

You can fill text with a color, but the feature for filling text with an image was removed in Microsoft Word 2013. However, with a little workaround, you can still do this in Word for Microsoft 365. Here’s how.
If you want to fill your text with an image in Word, you can’t simply type the text and fill it like you could in Word 2010, or even in the latest version of PowerPoint. But you can fill the text of a SmartArt graphic with an image.
RELATED: How to Get a Picture Behind Text in PowerPoint
First, open the Word application. In the “Illustrations” group of the “Insert” tab, click “SmartArt.”

The “Choose a SmartArt Graphic” window will appear. In the left-hand pane, choose an option that provides a type of SmartArt graphic that you can type text within. We’ll use “List” in this example.
Next, choose the SmartArt graphic that you’d like to use from the available options within the selected tab. We’ll use the “Basic Block List” SmartArt graphic. Once it’s been selected, click “OK.”
The SmartArt graphic will now appear in the Microsoft Word document. Now, delete all but one of the items within the graphic by clicking each item and pressing the Delete key.
Next, type the desired text in the remaining graphic.
To better see the image inserted in the text, format your text to be larger. You can do so in the “Font” group of the “Home” tab.
Here are the font specs we’ll use:
- Font type: Cooper Black
- Size: 82 pt.
- Format: Bold
This is what our text looks like now.
Next, highlight the text by clicking and dragging your cursor over the text.
In the “WordArt Styles” group of the “Format” tab that appears, click the “Text Fill” option.
Toward the bottom of the drop-down menu that appears, click “Picture.”
The “Insert Pictures” window will now appear. Here, choose where you’d like to locate an image:
- From a File: Choose an image from your computer.
- Stock Images: Choose an image from a stock image library.
- Online Pictures: Search for an online image.
- From Icons: Choose an icon from Word’s icon library.
We’ll use a stock image.
Select your image from the location that you chose, then click “Insert.”
The text will now be filled with the image.
Next, you’ll need to remove the background of the SmartArt graphic. Select the box and then, in the “Shape Styles” group of the “Format” tab, click “Shape Fill.”
In the drop-down menu that appears, click “No Fill.”
The SmartArt background will now be removed, leaving only the text behind.
Though not as convenient as it used to be, with this little trick, you can still insert an image inside your text.
READ NEXT
- › How to Add Blur or Transparency to an Image in Microsoft Word
- › 8 Microsoft Word Tips for Professional Looking Documents
- › Android’s Nearby Share Has (Unofficially) Arrived on Mac
- › How to Get a Refund on the PlayStation Store
- › Discord Direct Message Won’t Go Away? Here’s the Fix
- › Save Hundreds on Elegoo’s New PHECDA Laser Engraver Through Kickstarter
- › Windows 11 Has a New Photo Gallery in the File Explorer
- › The New Winamp Is Here, but It’s Not What You’d Expect
How-To Geek is where you turn when you want experts to explain technology. Since we launched in 2006, our articles have been read billions of times. Want to know more?


You can fill text with a color, but the feature of filling text with an image has been removed in Microsoft Word 2013. However, with a small workaround, you can still do it in Word for Microsoft 365. Here’s how to do it .
If you want to fill your text with a picture in Word, you can’t just type the text and fill it in like you would in Word 2010, or even the latest version of PowerPoint. But you can fill the text of a SmartArt graphic with an image.
First, open the Word application. In the “Illustrations” group of the “Insert” tab, click “SmartArt”.

The “Choose a SmartArt graphic” window appears. In the left pane, choose an option that provides a type of SmartArt graphic in which you can type text. We will use «List» in this example.

Then choose the SmartArt graphic you want to use from the options available in the selected tab. We will use the “Basic Block List” SmartArt graphic. Once selected, click “OK”.

The SmartArt graphic will now appear in the Microsoft Word document. Now delete all items except one in the chart by clicking on each item and pressing the delete key.
Then type the desired text in the remaining graphic.

To better see the image inserted into the text, format your text to be larger. You can do this in the «Font» group of the «Home» tab.
Here are the font specs we’ll be using:
- Font type: Black Cooper
- Size: 82 pt.
- Format: Fat
This is what our text looks like now.

Then highlight the text by clicking and dragging your cursor over the text.
In the «WordArt Styles» group of the «Format» tab that appears, click the «Text Fill» option.

Towards the bottom of the drop-down menu that appears, click «Image.»

The “Insert images” window then appears. Here, choose where you want to locate an image:
- From a file: Choose an image from your computer.
- Stock Images: Choose an image from an image library.
- Photos online: Search for an image online.
- From the icons: Choose an icon from Word’s icon library.
We will use a stock image.

Select your image from the location you chose, then click «Insert.»

The text will now be filled with the image.

Next, you will need to remove the background from the SmartArt graphic. Check the box then, in the “Shape styles” group of the “Format” tab, click “Shape fill”.

In the drop-down menu that appears, click «No fill».

The SmartArt background will now be removed, leaving only the text.

Although it’s not as convenient as it used to be, with this little trick you can still insert an image into your text.
★ ★ ★ ★ ★
Writing Tremplin Numérique, French web agency. Our authors provide you daily and free of charge with the latest tech and digital news, in France and around the world.
This tutorial is about How to Insert an Picture Inside of Text in Microsoft Word. Recently I updated this tutorial and will try my best so that you understand this guide. I hope you guys like this blog, How to Insert an Picture Inside of Text in Microsoft Word. If your answer is yes after reading the article, please share this article with your friends and family to support us.
Check How to Insert an Picture Inside of Text in Microsoft Word
Microsoft Word is a widely used commercial word processor developed by Microsoft. Microsoft Word is a component of the Microsoft Office productivity software suite, but can also be purchased as a stand-alone product. Microsoft Word was first introduced in 1983 and has been revised several times since then. It is available for Windows and Apple operating systems. Some features that have made MS Word useful include a WYSIWYG (what you see is what you get) display – this theme ensures that everything displayed on the screen appears the same, when printed or moved to another format or program. The ability for users to copy and paste content from MS Word to many other platforms without significant formatting loss is one of the reasons the software has remained so popular over the past two decades.
With the modernization of Microsoft Word over time, Microsoft’s operating systems have also modernized. Since the Microsoft Office suite is inherently tied to the Microsoft operating system, its use was frustrating for users at the end of life of Microsoft XP and the successive additions of Vista and Windows 7, 8 and 10.
How to insert an image inside a text in Microsoft Word
- First, open the Word app. In the “Illustrations” group of the “Insert” tab, click “SmartArt.”
- The “Choose a SmartArt Graphic” window will appear. In the left pane, choose an option that provides a type of SmartArt graphic that you can type text into. We will use “List” in this example.
- Next, choose the SmartArt graphic you’d like to use from the options available within the selected tab. We’ll use the “Basic Block List” SmartArt graphic. Once selected, click “OK”.
- The SmartArt graphic will now appear in the Microsoft Word document. Now delete all but one of the elements within the chart by clicking on each element and pressing the Delete key.
- Next, type the desired text on the remaining graphic.
- To better see the image embedded in the text, format your text to make it larger. You can do this in the “Font” group of the “Home” tab.
- These are the font specifications we will use:
- Font Type: Cooper Black
- Size: 82 points.
- Format: Bold
- This is what our text looks like now.
- Then highlight the text by clicking and dragging over the text.
- In the “WordArt Styles” group of the “Format” tab that appears, click the “Text Fill” option.
- Towards the bottom of the drop-down menu that appears, click “Image.”
- The “Insert Images” window will appear. Here, choose where you would like to place an image:
- From a file: Choose an image from your computer.
- Stock Images: Choose an image from a library of common images.
- Online Images – Search for an image online.
- From Icons: Choose an icon from the Word icon library.
- Select your image from the location you chose, then click “Insert.”
- The text will now be filled with the image.
- Next, you’ll need to remove the background from the SmartArt graphic. Select the checkbox, and then in the “Format” tab’s “Shape Styles” group, click “Shape Fill.”
- In the drop-down menu that appears, click “No Fill.”
I hope you understand this article, How to Insert an Picture Inside of Text in Microsoft Word. If your answer is no, you can ask anything via the contact forum section related to this article. And if your answer is yes, please share this article with your friends and family to give us your support.
James Hogan
James Hogan is a senior staff writer at Bollyinside, where he has been covering various topics, including laptops, gaming gear, keyboards, storage, and more. During that period, they evaluated hundreds of laptops and thousands of accessories and built a collection of entirely too many mechanical keyboards for their own use.
Download PC Repair Tool to quickly find & fix Windows errors automatically
What if you want to put a picture into a shape to create a collage or any other creation? Microsoft Word has tools that allow this to happen. Shapes in Microsoft Office are ready-made shapes offered by Office for users to use in their documents, such as circles, squares, and arrows. In this tutorial, we will explain how to:
- Inserting Pictures into shape.
- Crop the Picture inside the shape.
- Crop Picture into shape.
Open Microsoft Word
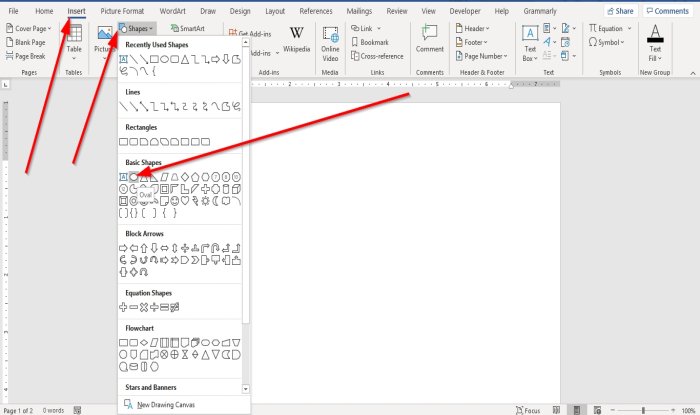
Go to the Insert tab in the Illustration group, select Shapes.
In the Shapes drop-down list, choose an oval or any other shape you desire.
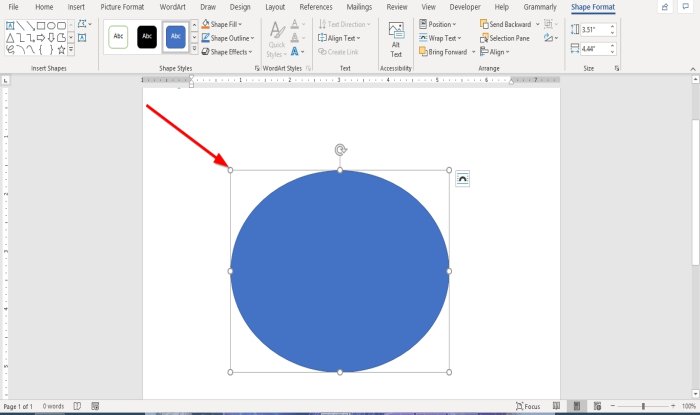
Now draw the shape into the document.
To make the shape bigger, drag the points on the end of the shape.

When a shape is drawn into the document, a Shape Format tab will appear.
Click the Shape Format tab.
On the Shape Format tab in the Shape Styles group, select the Shape Fill Tool.
In the Shape Fill, drop-down list, select Picture.
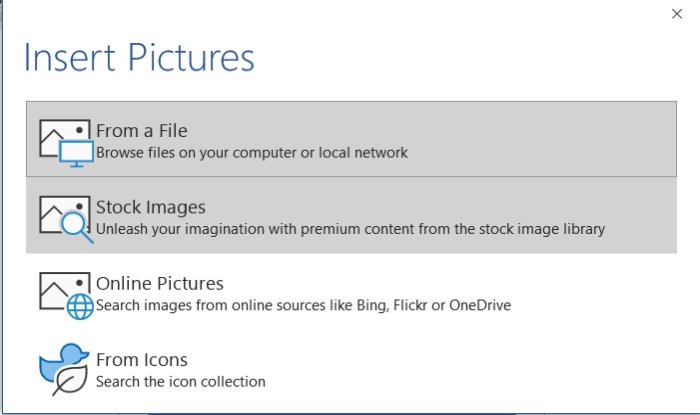
An Insert Picture dialog box will pop up.
Choose From a File.
When you select From a File, an Insert Picture window will appear, select your desired picture file and click Insert.
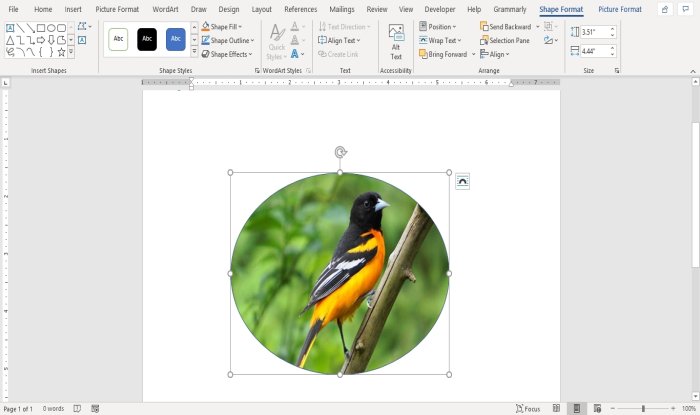
The picture is inserted into the shape.
Crop the Picture inside the shape
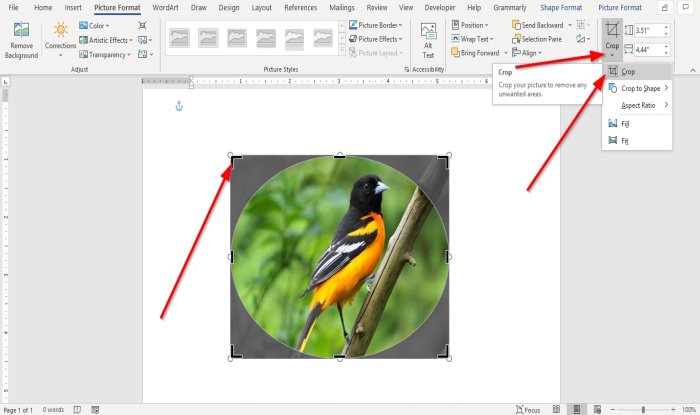
Click on the shape containing the picture.
Go to the Picture Format tab in the Size group and Click Crop.
In the Crop drop-down list, select Crop.
You will see pointers at the end of the image to crop the image.
Crop Picture into shape
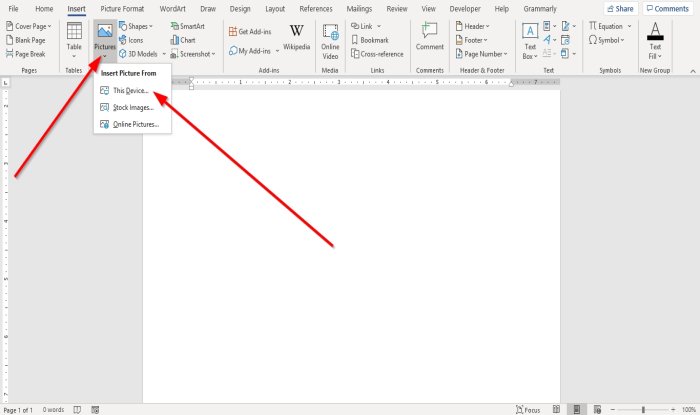
Go to the Insert tab and click Pictures in the Illustration group.
In the Picture drop-down list, click This Device.
An Insert Picture window will open, choose your picture file and click Insert.
The picture is in the Document.
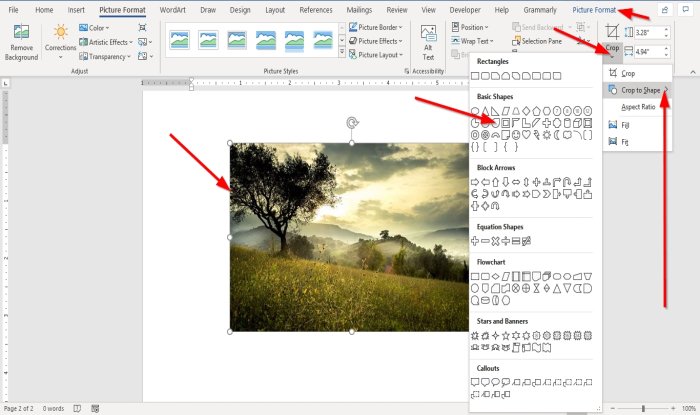
Click on the picture and go to The Picture Format tab.
On the Picture Format tab in the Size group, click Crop.
In the Crop drop-down list, click Crop to Shape.
In the Crop to Shape list, in the Basic Shapes group, select a teardrop.

You will see a teardrop shape with a picture inside it.
Now read: How to add Text Effects to WordArt in Office apps.

Shantel has studied Data Operations, Records Management, and Computer Information Systems. She is quite proficient in using Office software. Her goal is to become a Database Administrator or a System Administrator.
Making edits to pictures can be simpler with applications like Microsoft Paint or Photoshop.
But these tools can feel like an unnecessary added stop when you want to do something that seems like it should be easy.
One such edit involves placing text on a picture.
Our tutorial below will show you how to put a picture behind text in a Word document.
How to Put an Image Behind Text in a Word Document
- Open the document.
- Click the Page Layout tab.
- Select the Watermark button.
- Click Custom Watermark.
- Choose Picture watermark and click Select Picture.
- Click the Scale dropdown menu and choose a size.
- Select Apply, then OK.
Our guide continues below with more information on putting a picture behind text in Word, including pictures of these steps.
Are you trying to write in small capital letters? Our apply small caps effect in Word article can show you where to find that option.
Some of the more creative and less-rigidly formatted documents that you will create in Microsoft Word could involve the combination of various types of media and document objects.
For example, you may need to know how to put a picture behind text when your document image needs some editing and you don’t want to use something like Photoshop or Microsoft Paint.
You can customize most of the elements of your Microsoft Word 2010 documents, including the background of the document.
Many people assume that they can only add text and images to their document as the actual body of that document, but you can also configure the background of the document. For instance, you can put an image behind text in Microsoft Word 2010 to set it as the background for whatever you are writing.
You can configure some of the settings for the image that is behind your text, allowing you to make it more transparent so that the top-level text is still able to be read. Continue reading to learn more about putting an image behind text in Word 2010.
If you also use Google Apps, then you may want to check our guide on how to put a picture on Google so that you can use it in those apps as well.
How to Insert a Background Image in Word 2010 (Guide with Pictures)
Whatever your reasoning might be for wanting to put an image behind your document text in Word 2010, it can create an interesting effect for the document. Whether you are using this background image like a watermark or because you think it improves the visual appearance of the document, the process for putting the image behind your text can be followed below.
Step 1: Open the Word 2010 document in which you want to insert the image behind your text.
Step 2: Click the Page Layout tab at the top of the window.

Step 3: Click the Watermark drop-down menu in the Page Background section of the ribbon at the top of the window, then click the Custom Watermark option.

Step 4: Select the Picture Watermark option at the top of the window, then click the Select Picture button to choose the image that you want to put behind your text in Word 2010.
You will be able to select the image from your computer, so it’s easiest to already have the picture saved to a folder on your computer that you can find easily.

Step 5: Click the drop-down menu to the right of Scale, then choose the size that you want the background image to be.
Step 6: Check or uncheck the box to the left of Washout if you want to make the image more transparent, which will help to make your overlaying text easier to read.
Step 7: When you have finished configuring the options for the image behind your text in Word 2010, click the OK button at the bottom of the window. Note that you can click the Apply button at the bottom of the window at any time to see how your changes will look in the document.
Our guide continues below with more information on working with text and image layers in Microsoft Word, such as if you only want to include a picture behind text on one page in your document.
How Do I Adjust Text Wrapping on the Page Layout Tab in My Word Document?
Some non-traditional layout options in a document will involve learning how to wrap text. This option is found on the Layout tab, in the Arrange group of the ribbon. It is also one of the picture tools located on the Format Shape tab that appears when you select your picture.
When you select the picture, Word displays the Wrap Text button, allowing you to click it. The options you will find on the dropdown menu include:
- In line with text
- Square
- Tight
- Through
- Top and Bottom
- Behind Text
- In front of text
You can also click the More Layout Options button at the bottom of the menu, which is going to open a Layout dialog box. This provides additional text wrapping options.
More Information on How to Put a Picture Behind Text in Word 2010
One other way that you can accomplish this task is to add a picture to your document, then place a text box on top of the picture.
You will need to add the picture, then insert a text box from the Insert menu. You can then click on the border of the text box to select the entire object, then click the arrow to the right of Bring Forward and choose the Bring in Front of Text option. This will move the picture behind the text so that you can achieve the desired effect.
The background color of a text box in Microsoft Word is going to have a white background by default.
You can switch this to a different color, or remove it entirely, by clicking inside the text box, selecting the Shape Format tab at the top of the window, then clicking Shape Fill and choosing a color there.
The No Fill option will remove the background entirely so that you can see the picture through the text box.
In newer versions of Microsoft Word, the Watermark option is found on the Design tab, in the Page Background section of the ribbon.
Any watermark that you add to your document is going to appear on each page of your document. If you only want to place an image behind text on one of your pages then you should utilize the picture and text box configuration that we mentioned earlier in this section.

Matthew Burleigh has been writing tech tutorials since 2008. His writing has appeared on dozens of different websites and been read over 50 million times.
After receiving his Bachelor’s and Master’s degrees in Computer Science he spent several years working in IT management for small businesses. However, he now works full time writing content online and creating websites.
His main writing topics include iPhones, Microsoft Office, Google Apps, Android, and Photoshop, but he has also written about many other tech topics as well.
Read his full bio here.

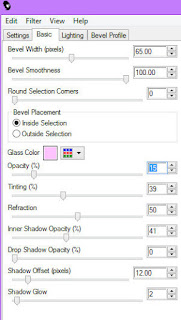
Supplies needed:
Tube(s) of choice
Filter — Eye Candy 5 Impact
~~~~~~~~~~~~~~~~~~~~~~~~~~~~~~~~~~~~~
This tutorial was written by Mizteeque on 18th February 2016
Written using psp9 but other versions should work just as well
Any similarity to other works is unintentional and purely coincidental
~~~~~~~~~~~~~~~~~~~~~~~~~~~~~~~~~~~~~~
One of my forum members asked me how I make names with images in them
so here is how I make them. There are probably a dozen different ways to do
this but this is just one way that i know and find easiest.
Open blank canvas 700 x 700
floodfill white
text tool
use a blocky font
I am using GramophoneNF
size 120, color black
create as vector
convert to raster

select all, float, defloat
choose two colors from your tube(s)
make a fore/back gradient
linear, angle 45, repeats 4
new raster layer
floodfill with your gradient
copy your tube(s)
paste as new layer(s)
resize & position to your liking
selections invert
hit delete on each tube layer

merge all tube layers together
change blend mode to lumincance
duplicate
adjust blur, gaussian blur 8
change blend mode to screen (or whatever you like)
selections expand by 2
new raster layer
floodfill with background colour
add noise, 100, uniform & monochrome checked
drag this layer below your gradient layer

selections contract by 2
new raster layer
drag this layer to the top of your layer palette
effects, eye candy 5 Impact, glass
make noise layer active
add dropshadow 2,5,50,8,black
add name and copyright information
delete white background layer
and black name layer
merge visible
crop and save as png
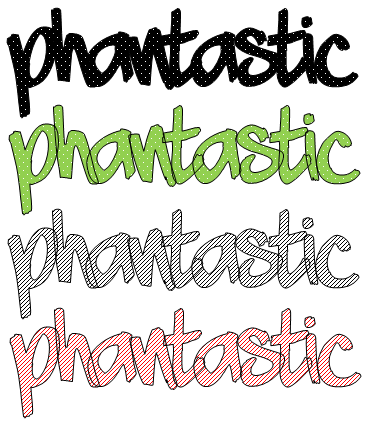
Tutorial
Click on thumbnailed images to enlarge
I’ll be using this image:

1. Open up Microsoft Word. (you will need the newer or latest version that contains ‘wordart.’)
2. Go to insert > WordArt > then select the very first example. (Actually, this will work with any of the wordart styles, but I prefer the first one, and the one below it with the dropshadow.)
3. Select whatever text you’d like, type your text, choose the size you want the text to be, then click OK. If you want the image/pattern to show pretty well in the text, you’ll need a bold or big text like Impact, Arial Black, etc. (I used Impact, but you can also use any other fonts.)
4. Right-click on the text > Click ‘format WordArt’
5. A window should pop up, then under ‘fill’, click ‘fill effects’
6. Click the tab that says ‘picture’ > select picture > choose the image/pattern you want > Click OK.
7. Then VOILA! You should have your image/pattern filled text!  You can drag the sides or corners/box to change the size of the text to your liking.
8. After you’re done with that, you’ll need to take a screenshot in order to save the picture. (press the button on your keyboard that says ‘prt scr’) Then open up the program Paint > paste the image > crop the image to your liking > then save! (I recommend saving it as a .png)
The finished product:

Here are some other things you can do!:
>>No border

Right-click on text > format WordArt > Under ‘line’ click the drop down list for color > No color.
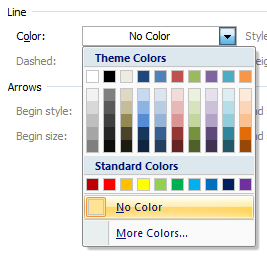
If you WANT a border, you can experiment with different colors and the border styles.
>>Patterns
Right-click on text > format WordArt > fill effects > pattern > then choose whatever pattern you like > click OK.
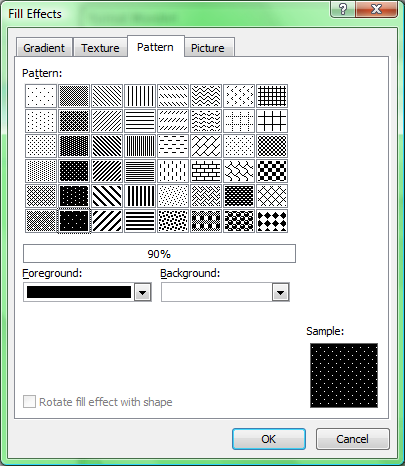
To change the color of the pattern, just click on the drop down list for color under ‘fill’
You can also change the transparency.
I didn’t include many pictures because I thought it was pretty self explanatory.  You can do many things, just experiment and see what you like best.
Tutorial Comments
Showing latest 6 of 6 comments
Picture and texture fills for WordArt are not available in Word 2010 
http://office.microsoft .com/en-us/word-help/add-or-de lete-a-fill-outline-or-effect- for-text-or-wordart-HA01035584 4.aspx
this tutorial helped so much, thanks(:
Awesomeeee thanks
Aw Damn i Have A Mac!
Haha, wicked cool.
By aliiicimo on Aug 11, 2009 10:07 am
Just using Microsoft Word??? Many people will be pleased with this. XD
Tutorial Details
Tutorial Tags
![]()
Download Article
Step-by-step guide to inserting pictures in Word
![]()
Download Article
- Windows
- Mac
- Web App
- Video
- Q&A
- Tips
|
|
|
|
|
Whether you’re working on a hefty research project or a friendly holiday greeting card, adding images to your Word document can really add value to your project. Whether you want to insert a picture from your computer or find one online, it’s easy to add photos in Word. This wikiHow teaches you how to insert an image into a Microsoft Word document using Windows, a Mac, and the free web version of Word.
Things You Should Know
- Use the Insert tab on Windows, Mac, and the web app to add a picture.
- Select Pictures > This Device to use an image on your computer.
- Click the image to resize and reformat it.
-

1
Click the place in your document where you want to insert the picture. Word’s insertion cursor, a vertical blinking bar, will appear at this point. When you insert the image, its bottom-left corner will be at this point.
- This method works for all modern versions of Word beginning with Word 2016. You can also use it as a guide for earlier versions of Windows, although there will be fewer tools and features.
- Changing the background is done through a different method, using the Design tab.
-
2
Click the Insert tab. It’s near the top of Word between «Home» and «Draw» (or «Home» and «Design» in some versions).
Advertisement
-
3
Click the Pictures tool. It’s in the «Illustrations» section of the toolbar running along the top of Word. Some location options will appear. If you’re using Word 2019 or later, a menu will expand. If you’re using Word 2016 or earlier, your file browser will appear.
-
4
Select the type of image you want to insert. You can choose an image on your computer, a stock image from Microsoft, or an image from the internet.
- Word 2019 or later:
- Click This Device if the picture is on your computer.
- Click Stock Images to select a free stock image from Microsoft’s collection.
- Click Online Pictures to use Bing’s image search to find photos on the web.
- If the photo is on your OneDrive, select Online Pictures and click OneDrive at the bottom-left corner.
- Word 2016:
- If the picture is on your computer, simply navigate to it in the file browser.
- If you want to search for a photo online or insert one from Facebook, Flickr, or your OneDrive, close the file browser and click the Online Pictures icon next to the «Pictures» in the toolbar. You can then select an image from Bing image search, Flickr, or Facebook.
- If the picture is on your OneDrive, click Online Pictures instead of Pictures and click Browse next to «OneDrive.»
- Word 2019 or later:
-
5
Select the image you want to insert. When you find the picture, click it once to select it.
- If you’re selecting from stock images or online images, you can click multiple pictures to add more than one.
- If you’re choosing files from your computer and want to add more than one picture, hold the Ctrl button down as you click each image.
-
6
Click Insert. It’ll be near the bottom-right corner of the window no matter where you’ve selected your image(s). You’re done! Continue to the next steps for formatting information, or print the document when you’re ready.
-
7
Resize the picture. If you want to change the picture’s size, click it once to select it, and then drag any of the corner circles in or out.[1]
- You can also specify the size if you want. Double-click the picture to open the Picture Format tab at the top, and then set your desired measurements next to «Height» and «Width.»
-
8
Use the curved arrow at the top of the picture to rotate it. It’s above the dot at the top-center part of the picture. To rotate, place the mouse cursor over the curved arrow, and then click and drag the cursor left or right until you’re satisfied.
-
9
Double-click the picture to access more editing tools. This opens the «Picture Format» (2019 and later) or «Format» (2016) tab at the top of Word. On this tab, you can:
- In the «Arrange» panel in the top-right area, click Wrap Text to choose how to situate the picture in blocks of text. You can also set alignment preferences here. Wrapping the text is a good way to get your document formatted exactly the way you want.
- To crop the picture, click the Crop tool in the «Size» panel at the top-right corner.
- The «Adjust» panel near the top-left corner has additional tools for background removal, color effects, and corrections.
- To add a border or effect around the picture, select one of the «Picture Styles» at the center of the Format bar, or choose any of the other options in the section to have more control over the style.


Advertisement
-
1
Click the place in your document where you’d like to insert a picture. This places the cursor at that location.
-
2
Click the Insert tab. It’s at the top of Word between the «Home» and «Design» or «Home» and «Draw» tabs.
-
3
Click the Pictures icon. It’s on the toolbar that runs along the top of Word. Look for an icon of a green mountain with a yellow sun between «Tables» and «Shapes.»
-
4
Click Photo Browser or Picture from File. If you want to browse images in your Mac’s Photos app, use Photo Browser. To select an image file using Finder, choose Picture from File.
-
5
Insert the picture into the document. If you’re using the Photo Browser option, simply drag the photo into your document. If you’re using Picture from File, select the image and click Insert.
-
6
Resize the picture. If you want to increase or reduce the picture’s size, click the image to select it, and then do one of the following:
- To maintain the picture’s proportions so it doesn’t stretch or warp, hold down the Shift key as you drag any of the sizing handles (the circles) inward or outward.[2]
- To keep the image’s center in place as you resize, hold down the Option key as you drag the handles.
- You can also specify a size. Double-click the Picture to open the Picture Format tab, then enter your desired measurements next to «Height» and «Width.»
- To maintain the picture’s proportions so it doesn’t stretch or warp, hold down the Shift key as you drag any of the sizing handles (the circles) inward or outward.[2]
-
7
Drag the curved arrow at the top of the picture to rotate it. It’s above the dot at the top-center edge of the picture. Just place the mouse cursor over the curved arrow, and then click and drag it left or right until it’s correct.
-
8
Double-click the picture to access more editing tools. This opens the «Picture Format» tab at the top of Word, which has a bunch of editing features, including the ability to remove the background and add styles.
- Click Corrections near the top-left corner to correct lighting and color problems.
- Click Artistic Effects to play around with filters, and Transparency to make the picture more see-through.
- To crop the picture, click the Crop tool next to the height and width controls.
- Click Wrap Text to choose how to situate the picture in blocks of text, and use Align and Position to ensure correct placement.
- Click Quick Styles to choose pre-styled borders, shadows, and other options.


Advertisement
-
1
Click the place in your document where you’d like to insert a picture. This places the cursor at that location.
- If it’s your first time using Office Online on the web, go to https://www.office.com, sign in with your Microsoft account, and select Word to get started.
-
2
Click Insert. This opens the Insert tab.
-
3
Click Pictures. This opens a drop down options menu.
-
4
Select a picture type. There are four options to choose from:
- This Device — choose a picture on your computer
- OneDrive — choose an image from your OneDrive
- Stock Images — insert a stock image or sticker
- Bing Pictures — search Bing for an image
-
5
Select an image. If you choose the This Device option, you’ll be prompted to select an image from your computer. Click it to select it.
-
6
Click Open. This is in the bottom right corner of the image selection window. This will confirm your selected image and insert it into the document.
-
7
Resize the picture. If you want to change the picture’s size, click it once to select it, and then drag any of the corner circles in or out.
- You can also specify the size if you want. Double-click the picture to open the Picture tab at the top, and then set your desired measurements next to «Height» and «Width.»
-
8
Use the curved arrow at the top of the picture to rotate it. It’s above the dot at the top-center part of the picture. To rotate, place the mouse cursor over the curved arrow, and then click and drag the cursor left or right until you’re satisfied.
-
9
Double-click the picture to access more editing tools. This opens the «Picture» tab at the top of the Word web app. On this tab, you can:
- In the «Arrange» panel in the top-right area, click Wrap Text to choose how to situate the picture in blocks of text. You can also set alignment preferences here.
- To crop the picture, click the Crop tool in the «Image Size» panel at the top-right corner.
- To add a border or effect around the picture, select one of the «Picture Styles» at the center of the bar, or choose any of the other options in the section to have more control over the style.


Advertisement
Add New Question
-
Question
How do I take screenshots?

On a Mac, shift command 3 to screenshot the whole screen. If you want to take a screenshot of a certain area on the screen, press shift command 4. On a Windows PC, press control and print screen at the same time, then you can paste the image into Paint or Microsoft Word.
-
Question
When I insert several photos on an age in a Word document, the photos often won’t stay in place. How do I stop the photos from bumping each other around?
You can right-click the image, hold the cursor over the «Wrap Text» menu option, and select an option from the list that is NOT «In Line with Text» (usually selected by default), such as «Tight» or «Behind/In Front of Text.» Then you should be able to move the image freely around the page.
-
Question
How do I format images in a Word document?
Try double-tapping the photo. A photo format menu should come up on the right side.
See more answers
Ask a Question
200 characters left
Include your email address to get a message when this question is answered.
Submit
Advertisement
Video
-
Adding photos to your Word document increases its size.
-
Other photo modification features available in newer versions of Microsoft Word include the ability to add borders, cutout styles, shadows, beveled edges, glows, and drop shadows.
-
When you crop a picture, the actual cropped part of the picture is hidden, not removed; unless you check the «Delete Cropped Areas of Pictures» box in the «Compression Settings» dialog box. Any compressed pictures with their cropped areas deleted cannot be restored to their original appearance.
Show More Tips
Thanks for submitting a tip for review!
Advertisement
About This Article
Article SummaryX
1. Click the place you want to insert the image.
2. Click the Insert tab.
3. Click Pictures.
4. Choose a location.
5. Select the image and click Insert.
6. Double-click the picture to open editing and format tools.
Did this summary help you?
Thanks to all authors for creating a page that has been read 650,440 times.
Is this article up to date?
- Remove From My Forums
-
Question
-
Hi,
I have a picture that I want to insert into text box or a rectangle by replacing a word like <Image> which written inside the shape with this picture
I have searched much and found this code that replace the all text in the document including the text in the text boxes and shapes:
public void FindandReplace(Word.Document doc, string Findtext, string ReplaceText)
{
	Word.Range myStoryRange = doc.Range();

	//First search the main document using the Selection
	Word.Find myFind = myStoryRange.Find;
	myFind.Text = Findtext;
	myFind.Replacement.Text = ReplaceText;
	myFind.Forward = true;
	myFind.Wrap = Word.WdFindWrap.wdFindContinue;
	myFind.Format = false;
	myFind.MatchCase = false;
	myFind.MatchWholeWord = false;
	myFind.MatchWildcards = false;
	myFind.MatchSoundsLike = false;
	myFind.MatchAllWordForms = false;
	myFind.Execute(Replace:Word.WdReplace.wdReplaceAll);

	//'Now search all other stories using Ranges
	foreach(Word.Range otherStoryRange in doc.StoryRanges)
	{
		if(otherStoryRange.StoryType != Word.WdStoryType.wdMainTextStory)
		{
			Word.Find myOtherFind = otherStoryRange.Find;
			myOtherFind.Text = Findtext;
			myOtherFind.Replacement.Text = ReplaceText;
			myOtherFind.Wrap = Word.WdFindWrap.wdFindContinue;
			myOtherFind.Execute(Replace:Word.WdReplace.wdReplaceAll);
		}

		// 'Now search all next stories of other stories (doc.storyRanges dont seem to cascades in sub story)
		Word.Range nextStoryRange = otherStoryRange.NextStoryRange;
		while(nextStoryRange != null)
		{
			Word.Find myNextStoryFind = nextStoryRange.Find;
			myNextStoryFind.Text = Findtext;
			myNextStoryFind.Replacement.Text = ReplaceText;
			myNextStoryFind.Wrap = Word.WdFindWrap.wdFindContinue;
			myNextStoryFind.Execute(Replace:Word.WdReplace.wdReplaceAll);

			nextStoryRange = nextStoryRange.NextStoryRange;
		}

	}
}
I want to modify this code to be able to replace the text I need to replace with a picture
Any suggestion?
Thank you in advance
-
Moved by
Thursday, October 23, 2014 6:27 AM
-
Moved by