
The menu bar in MS Word is also known as the tab bar. In a Menu bar, each menu (tab) has a group and each group has tools and commands, a combination of a command and tools is called a ribbon.
A ribbon locates under the menu bar. You can also hide it. The latest version has 10 menus (11 including help). These are File, Home, Insert, Draw Design, Layout, Mailings, Review and View.
But often we can use only 9 menus (excluding the file menu) for most word processing. But the File menu has a great uniqueness. It is also used for different needs.
Table of Contents
- What Does a Menu Bar in MS Word Contain?
- A List of Tabs to Commands and Tools in Word:
A Menu bar or tab bar contains a list of menus or tabs. Each menu/tab has a list of groups, a group has a list of commands and tools. By using these commands or tolls, we can work each and everything in a word document.
 1")
A List of Tabs to Commands and Tools in Word:
A menu/tab bar has different menus/tabs such as File, Home, Insert, Draw Design, Layout, Mailings, Review and View.
Each tab/menu has different groups. For example, the Home tab has Clipboard, Font, Paragraph, Styles and Editing.
Each group has commands and tools in the Clipboard group we have Cut, Copy, Paste, Paste Special, Paste Options, and Format Painter.
What is the menus list in Word?
These are File, Home, Insert, Draw Design, Layout, Mailings, Review and View.
What is the list of tabs?
A menu/tab bar has different menus/tabs such as File, Home, Insert, Draw Design, Layout, Mailings, Review and View.
What is the list of a group?
Each tab/menu has different groups. For example, the Home tab has Clipboard, Font, Paragraph, Styles and Editing.
What is the list of commands and tools?
Each group has commands and tools in the Clipboard group we have Cut, Copy, Paste, Paste Special, Paste Options, and Format Painter.
What is a tab bar?
A list of tabs which are located horizontally on a bar is called a tab bar or menu bar.
What is another name for the Menu bar?
The menu bar in MS Word is also known as the tab bar.
Symptoms
When you view a Microsoft Excel worksheet or a Microsoft Word document in full-screen mode, the menu bar may not be displayed. Or, the Minimize Window, Restore Window (or Maximize Window), and Close Window buttons may be missing.
Resolution
To resolve this issue, use one of the following methods, as appropriate to your specific symptoms.
Missing Menu Bar
If the menu bar is missing and the Minimize Window, Restore Window, and Close Window buttons are available, click Close Window in the Full Screen dialog box, or click Restore Window to return to a normal window view.
Missing Buttons
If the menu bar is available, but the Minimize Window, Restore Window, and Close Window buttons are missing, click View, and then click Full Screen.
Missing Menu Bar and Buttons
If both the menu bar and the buttons are missing, follow these steps:
-
Click Start, and then click Shut Down.
-
In the Shut Down Windows dialog box, click Restart, and then click OK.
-
When your computer restarts, repeatedly press (tap) the F5 key until the Microsoft Windows splash screen appears.
-
Select Open in Safe Mode, and then press ENTER.
NOTE: These steps start the computer in Safe mode, and therefore many of the normal safeguards that Windows provides are not functional.
-
Start Excel or Word (depending on which program the issue occurs in).
-
On the View menu, click Full Screen to turn off this feature.
-
On the File menu, click Open.
-
In the Open dialog box, locate the file in which the issue occurs.
NOTE: If the issue occurs in Word, skip to step 11.
-
On the View menu, point to Toolbars, and then click Customize.
-
In the Customize dialog box, verify that the Worksheet check box is selected.
-
On the File menu, click Save.
-
Quit the program, and then restart your computer.
If this issue occurs in Excel, and the Excel worksheet that you are working on contains shared toolbars or was created in a different version of Excel, it may be necessary to rename the file that contains the shared toolbar settings. To do this, follow these steps:
-
Start Excel.
-
On the File menu, click Open.
-
In the Open dialog box, click Toolbars in the Files of type list.
-
Determine whether there is an .xlb file in the following location:
C:Documents and Settingsuser nameApplication DataMicrosoftExcel
If there is, rename the file, and then click OK.
Need more help?
Table of Contents
- What is mini toolbar in MS Word?
- How do I add the Open command to the Quick Access toolbar in Word?
- How do I access tools in Word?
- What are the tools in Microsoft Word?
- What is Microsoft Word toolbar?
- What is the difference between menu bar and toolbar?
- How many menu bars are there in Microsoft Word?
- What are the different types of toolbar in MS Word?
- What is the function of the quick access toolbar in Microsoft Word?
- What are the different types of tool bar?
- What is title bar?
- What is title bar short answer?
- Is present on the title bar?
- What is the use of title bar?
- What is a title bar and how is it helpful?
- What is the top bar on a computer screen called?
- Where is the title bar in Windows 10?
- How do I change the color of the menu bar in Windows 10?
- How do I change the color of the top bar in Windows 10?
- Which is not a part of title bar?
- Where is status bar located?
- Which button is present at right corner of title bar?
- What do we call the bar that displays the program name and file name?
- What does blue title bar indicate?
- What is the program name?
- Which bar is present at the bottom of Word 2010 window?
A toolbar is a set of icons or buttons that are part of a software program’s interface or an open window. Microsoft Word has a toolbar with icons that allow you to open, save, and print documents, as well as change the font, text size, and style of the text. …
The mini toolbar appears whenever you right-click text in Word, Excel or PowerPoint. The mini toolbar provides a quick-access version of the Font group on the Home tab, plus a few extra buttons from other groups. Hover your mouse over each button to find out what it does.
Add commands to the Quick Access Toolbar
- Click Customize the Quick Access Toolbar, and then click More Commands.
- In the Choose commands from list, click File Tab.
- Choose the command, and then click Add.
- Remember to click OK.
So just going to the Tools drop down menu, you will view all familiar tools menu commands. Classic Menu for Office 2007 will bring Tools menu into Microsoft Word, Excel, PowerPoint, Outlook, and Access 2007.
- Indexes.
- Mail Merge.
- Microsoft Chart.
- Object Browser.
- Spelling and Grammar Checking.
- Thesaurus.
- Track Changes.
- Word Count.
The Menu bar is directly below the Title bar and it displays the menu. The menu begins with the word File and continues with Edit, View, Insert, Format, Tools, Table, Window, and Help. It demonstrates using the Microsoft Word menu.
The Toolbar contains buttons for frequently-used commands. The Menu bar displays the available menus and commands. For detailed information on the commands, see Linecalc Menus and Commands.
one menu bar
The Standard and Formatting toolbars are the two most common toolbars in Microsoft Office 2000. The Standard toolbar is located just below the menu bar. It contains icons representing universal commands such as New, Open, and Save. The Formatting toolbar is located just below the Standard toolbar.
Quick Access Toolbar lies next to the Microsoft Office Button. It is a customizable toolbar that comes with a set of independent commands. It gives you quick access to commonly used commands such as Save, Undo, Redo, etc. When you click the drop-down arrow next to toolbar it offers more commands.
Toolbars differ from menu bars; menu bars tend to group similar commands that you need to click to access while toolbar commands are always visible.
- Application Toolbar. An application toolbar (appbar) works like the Windows taskbar.
- Quick access toolbar.
- Search Toolbar.
- Thumbnail Toolbar.
What is title bar?
A title bar is a small strip that extends across the top of a window. It displays the title of the window and typically includes the close, minimize, and maximize buttons. In macOS, these buttons are on the left side of the title bar, while in Windows, they are on the right.
What is title bar short answer?
The title bar is a horizontal bar located at the top of a window in a GUI. It displays the title of the software, name of the current document, or other text identifying the contents of that window.
Is present on the title bar?
A horizontal bar which is present at the top of your window is known as Title Bar. This bar shows the title of the software along with the name of the currently opened document.
What is the use of title bar?
The title bar at the top of a window displays an application-defined icon and line of text. The text specifies the name of the application and indicates the purpose of the window. The title bar also makes it possible for the user to move the window using a mouse or other pointing device.
What is a title bar and how is it helpful?
Title bar is a graphical control element and part of the window decoration. The title bar is typically used to display the name of the application, or the name of the open document, and may provide title bar buttons for minimizing, maximizing, closing or rolling up of application windows.
What is the top bar on a computer screen called?
Menu bar. This toolbar contains various commands that often lead to dialog menus (covered later on this page). Windows computers have this bar at the top of windows; Macs have this bar at the top of the screen instead. The options contained in this toolbar vary greatly from program to program. Title bar.
Where is the title bar in Windows 10?
The title bar is at the top of every window in Windows 10. This includes three buttons at the top right corner of the window and a title for each open window.
How to change taskbar color, while keeping Start and Action Center dark
- Open Settings.
- Click on Personalization.
- Click on Colors.
- Pick an accent color, which will be the color you want to use in the taskbar.
- Turn on the Show color on Start, taskbar, and action center toggle switch.
How do I change the color of the top bar in Windows 10?
Change title bar color via Settings in Windows 10
- Step 1: Navigate to Settings > Personalization > Colors.
- Step 2: Select Title bars and window borders checkbox.
- Step 3: To change the color, on the same page, either click on of the color tiles or click the Custom option to create a color of your choice.
Which is not a part of title bar?
Answer. Answer: Tips is not a part of Title Bar.
Where is status bar located?
A status bar is located at the bottom of Internet browser windows and many application windows and displays the current state of the web page or application being displayed.
Which button is present at right corner of title bar?
Explanation: Located on the far right side of the Title Bar, this middle button expands the program to a full screen.
What do we call the bar that displays the program name and file name?
Title bar
What does blue title bar indicate?
BLUE TITLE BAR : The title bar contains the name of the file or application. In many graphical user interfaces, including the Macintosh and Microsoft Windows interfaces, you move (drag) a window by grabbing the title bar.
What is the program name?
The name or title of a program consists of the degree (e.g., BS) and the discipline or field of study (e.g., Business Administration). It is also called academic program, degree program, or curricular program. A subject is a collection of topics that forms a coherent whole, intended to be taught by a faculty member.
Which bar is present at the bottom of Word 2010 window?
status bar
When you open the World application, you see many features which include:
- Title bar
- Quick Access Toolbar
- Ribbon
- Tabs
- Groups
- Dialog Box Launcher
- Status bar
The title bar

On the very top of the Word window, the title bar is located which contains:
- Quick Access Toolbar (QAT)
- Current working document name
- Application name (Word)
- Office Online menu to manage your Microsoft account
Ribbon Display Optionsbutton for auto-hiding the ribbon, showing the tabs and commands
Quick Access Toolbar
To the left of the title bar, the Quick Access Toolbar (QAT) is located. QAT contains buttons to perform common tasks:
Savebutton for saving the current documentUndobutton for undoing your last actionRepeat(or Redo) button for repeating your last action- A small arrow at the end of Quick Acces Toolbar for customizing the QAT, as shown in the following figure:
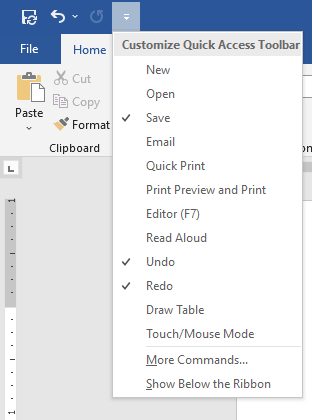
To add an item to the “Quick Access Toolbar” simply click the arrow key at the end of the toolbar and click on the name of the command that you want to add from the menu.
Ribbon
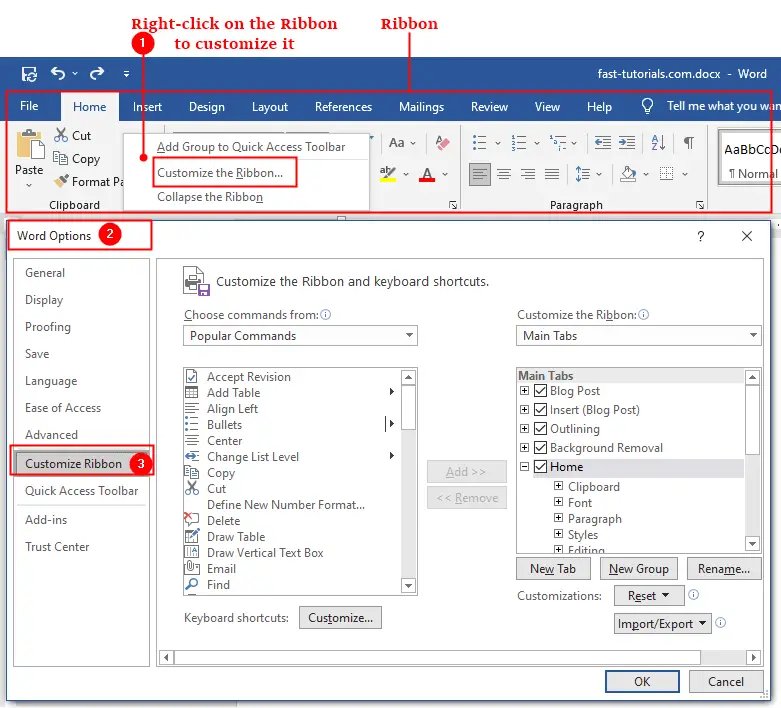
The ribbon contains Tabs and Commands. Each tab contains groups of related commands. The ribbon is customizable, you can add and remove groups and commands on it. You can also export your Ribbon Customizations and import them to another computer. To customize the Ribbon, click File tab and select Options or right-click on the Ribbon and select the “Customize the Ribbon” option, it will lead you to the Word’s Options dialog box with “Customize Ribbon“option selected:
How to Show and Hide Ribbon?
Right-click on the Ribbon and select Collapse the Ribbon. You can also customize the appearance of the Ribbon by clicking the Ribbon Display Options icon on the title bar, as shown in the following figure:
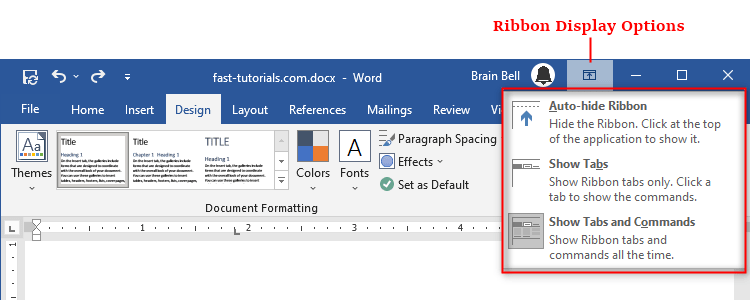
The Ribbon Display Options menu contains three options:
- Auto-hide Ribbon
Once you select this option, all the command and title bar will be hidden. - Show Tabs
Select this option to show only Tabs.
Note: Double-clicking on a tab will also hide the commands underneath it. Simply double-click on the tab to return the commands. - Show Tabs and Commands
Select this option to show both Tabs and Commands.
Tabs
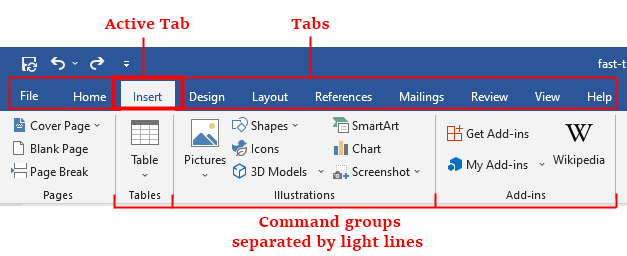
Tabs are located underneath the title bar. A tab is actually a menu bar that organizes Word features at the top of the application’s interface. When you click a tab, it shows commands contained in it. Double-clicking on a tab will collapse the commands, double-clicking again on a tab to return the commands.
Commands Groups
Each tab is arranged into sections known as groups to organize related commands. When you click a tab, you can see many command groups separated by light lines that define boxes around groups of icons. For example, the above figure showing the groups of Insert tab: Pages, Tables, Illustrations, and Add-ins.
Dialog Box Launcher
Dialog Box Launcher icon appears in the lower-right corner of many command groups on the Ribbon. Clicking this icon opens a dialog box or task pane that provides more options. For example, to access the Clipboard task pane, click on the group arrow, as shown:

Status bar
![]()
The status bar is located at the bottom of the Word. It Displays document information about the current document. The Status bar contains the number of the page on which you’re currently working, the total number of pages and total words in the document, the Proofing button, the View Shortcuts buttons, the Zoom Slider, and Zoom button.
Right-click on the status bar to display the shortcut menu, as shown:

To add or remove an item from the status bar, simply click on the desired option in the shortcut menu.
It often happens that, a daily program such as Word, is a perfect unknown for most users. It is true that, in all the years of his career, he has undergone many changes.
The latest versions incorporate many different types of options although, in essence, the functionalities are the same. The elements of the main word window are:

1-A Menu Bar
2-Standard toolbar
3-Bar selector of tool icons
4-Tools icons
5-scroll bars
6-Bar of Views of the document and state
7-Work Area
8-Help and search area
Each one is described below.
You may also be interested the excel elements .
Main elements of the word window
Menu bar
It is the access point to the options and tools of the program. It has a conventional form and is where we can locate all the material. They are arranged in a grouped and ordered way through drop-down menus.
Standard toolbar
It is a toolbar that stands out above the others. In it we can find the most used options such as: open file, save a file, cut, copy, paste, print.
We also find the help button, zoom or the icons that activate or deactivate the toolbars. We also have the sidebars or the multimedia gallery.
Tool icon selector bar
This bar is used to select the groups of tool icons that we want to show. Over the years, many of them have been incorporated.
In turn, the authors have been forced to put a selector so that the user can select the icon of the tool more conveniently. We can highlight: format, design, document elements, tables, graphics, revision.
Tools icons
In this bar all tool icons are shown depending on the selected group. All of them have a short legend that describes their function, which appears when we position ourselves in an icon and wait 2 seconds.
The most characteristic and we have all used at some time, are the format icons where we can select the source to use. In it we can enlarge it, color it, italicize, center the text, insert an image, etc.
Scrollbars
We have vertical and horizontal scroll bars, here we can navigate through the document from top to bottom and from left to right.
In addition, in this area we can paginate the document in a simple way and even access a selector. This is where we can move quickly or search and replace text in the document in different ways.
For example: p or modifications, by comments, by sections, by fields, by graphics, by tables, by titles, by notes, etc.
Bar of document views and status
Here we can change the layout of the document view in the lower left using different views: Draft, Outline, Design, Printing, Notepad and Full screen.
All of them useful at some point of our work with Word. Regarding the state, it will give us a quick overview of the number of pages of the document, words and the state of the spelling.
Work area
Here we can write our document, also, in it we will access a number of considerable options.
If we click on our right mouse button and select a block of text or a phrase with it, we will see the options.
Help and search area
In this Area we can enter any search pattern. The program will show us the result directly or using a side panel where the search results will be displayed.
References
- Area of Technology (2014). Elements of the Word 2017 window, from areatecnologia.com. Website: areatecnologia.com
- Verito (2014). Elements of the Word 2017 window, from slideshare.net. Website: slideshare.net
- Site Google (2014). Description of each of its parts of the Word 2017 window of Site Google. Website: sites.google
- WordPress (2013). Main elements of Microsoft Word 2017, from teescribodelcorazon. Website: teescribodelcorazon.wordpress
- Junta de Extremadura (2016). Basic elements of Microsoft Office Word 2016-2017, of the Ministry of Education and Employment. Website: emtic.educarex.es