
Resolution
What are Styles?
Built-in styles are combinations of formatting characteristics that you can apply to text to quickly change its appearance. For example, applying the Heading 1 style might make text bold, Arial, and 16 point, and applying the Heading 2 style makes text bold, italic, Arial, and 14 point. (Those are examples; exact formatting characteristics depend on Word’s default settings and those you might have chosen for yourself.)
Here are the top 5 reasons to use Word Styles:
1. Styles application means easy Table of Contents generation
The easiest way to create a table of contents is to use the built-in heading styles. You can also create a table of contents that is based on the custom styles that you have applied. Or you can assign the table of contents levels to individual text entries.
Mark entries by using built-in heading styles
-
Select the text that you want to appear in the table of contents.
-
On the Home tab, in the Styles group, click the style that you want.
For example, if you selected text that you want to style as a main heading, click the style called Heading 1 in the Quick Style gallery.
-
If you don’t see the style that you want, click the arrow to expand the Quick Style gallery.
-
If the style that you want does not appear in the Quick Style gallery, press CTRL+SHIFT+S to open the Apply Styles task pane. Under Style Name, click the style that you want.
2. Styles cascade and so when you make one change to a document you have made them all
Instead of using direct formatting, use styles to format your document so you can quickly and easily apply a set of formatting choices consistently throughout your document.
For more information see Style basics in Word
3. Styles allow you to use Outline View
When you enter your first top-level outline entry, Word automatically formats it with a built-in style, Heading 1. As you continue to build your outline by adding subordinate and body levels, Word in turn continues to apply the appropriate built-in style to each heading and body text entry. In this way, your outline levels (Level 1, Level 2, Body Text, and so on) are directly tied to built-in heading styles (Heading 1, Heading 2, Normal, and so on).
While you can manually change the formatting of text in your outline, veering away from the built-in styles that Word offers can result in some outline entries not being displayed correctly. So if you want to change formatting across your document, you might want to do so in another view, such as print layout view, once your outline is complete.
On the opposite end of the spectrum, if you find extra formatting distracting, you can display your entire outline as plain text by clicking Show Formatting on the Outlining toolbar.
4. Restrict formatting changes
5. Templates are much more efficient and kinder to others if they’re based on styles
A template is a Microsoft Office document that’s been designed with pre-existing themes, styles, and layouts, which has placeholder information instead of real content.
Templates are a great way to save time and create consistent Office 2010 documents. They are especially valuable for types of documents that you use frequently, such as weekly presentations, application forms, and expense reports. If possible, you want to use a file that already has the look and feel that you want, with placeholders that you can change to tailor it for your current needs. That’s what a template is—a file where the hard work has been done for you, saving you from having to start with a blank page.
In addition to the templates that come with the program, you have free access to all the templates on Office.com
Need more help?
Styles in Word — What a Way to Save Time!
(and produce work that is more professional and improve your chances of success)
Why use styles in Word?
Styles will make you more productive, your work will be more consistent, and your work will be more accurate.
Master styles and gain an advantage over your peers.
What is a style in Word?
A style in Word is a set of predefined formats. You can use them over and over again.
You probably are already using styles in Word because Microsoft provides a number of them. For example, if you click on Heading 1 in the Styles gallery in the Home tab, your text will be formatted according to that style (e.g. Calibri light font, 16 pt).
But what if the format you want is not one of the predefined styles (e.g. Times New Roman 12 pt, 1/2 in or 1.27 cm hanging indent, double line spaced)?
Then you create your own!
How to create Styles in Word
- Select the Home tab.
- Click on the arrow in the bottom right hand corner of the Styles group.
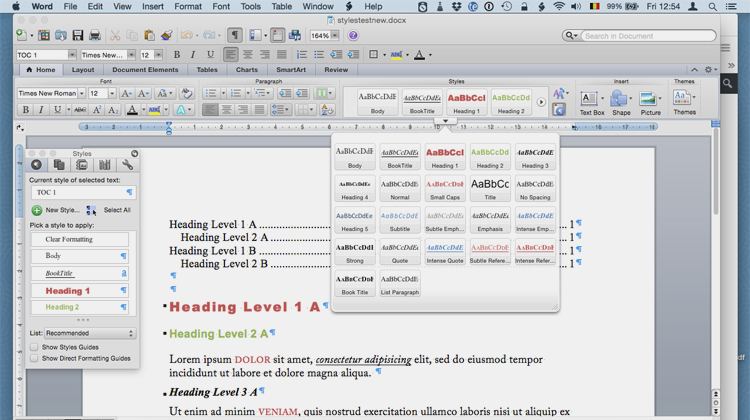
The Styles panel will appear (see Figure 1).
 Figure 1: In-built styles in Word
- Click on the A+ button at the bottom of the Styles Panel.
The Create New Style Window will appear (see Figure 2). - Complete the following in Properties:
- Name — enter what you would like to call the style sheet, for example, MyOwnStyle
- Style type — select one of the following from the drop down menu:
- Paragraph — the style applies to the whole paragraph, even if you select some text within the paragraph.
- Character — the style applies to the selected text only. You can only format text, such as font type, size and color.
- Linked — the style applies to selected text, or if no text selected, it applies to the paragraph.
- Style based on — select a style from the drop down list.
I prefer no style so that my style is not affected by another style. - Style for following paragraph — What style do you want for the following paragraph?
Is it the style you are creating here? Is it a different style?
For example, if you are creating a Heading style, you may want a paragraph style after that.
If you are creating a paragraph style (e.g. MyOwnStyle), you would have a paragraph style for the following paragraph. - Complete the following shortcuts in the Formatting part (if you don’t do it here, you can do it in a later step):
- Select the font type,for example, Times New Roman.
- Select the font size, for example, 12.
- Select Bold, Italic and/or Underline if you wish.
- Select Alignment — Left, Centered, Right or Justified.
- Select Spacing — Single, One and a Half, or Double line spacing.
- Increase or decrease space between paragraphs.
- Increase or decrease paragraph indents.
- Complete the following at the bottom:
- Add to the Styles Gallery (if not already checked).
- Select «Only in this document» if this new style is just for this document
OR
Select «New document based on this template» if this style is to be available for future documents as well — very useful if you are writing more documents with the same formatting. - Click on the Format button.
 Figure 2: Create a new style that suits your requirements
- Click on Font if you want to do more font formatting, or if you didn’t do the font formatting in the previous step (see Figure 3)
Figure 3: The Format submenu for the new style
- Complete the font properties that you haven’t yet entered in step 5 (see Figure 4).
Note — Font properties that you entered in step 5 will appear in this dialog box. You will not lose any information.
 Figure 4: Formatting the font in the new style
- Complete the paragraph properties that you want but didn’t enter in step 5 (see Figure 5).
Note -Paragraph properties that you entered in step 5 will appear in this dialog box. You will not lose any information. - You may want to add additional properties such as:
- Indents and Spacing
- Outline level — Levels 1, 2 and 3 (usually for heading levels so they can appear in the Table of Contents) and Body text (which is your normal paragraph level).
- Special — First line and Hanging indentation
- Line and Page Breaks
- Page break before
- Don’t hyphenate
- Complete the following in Indents and Spacing (see Figure 5):
- Alignment — Select Centered if not already selected.
- Outline level — Select Level 1 from the drop-down menu.
The level is used in the Outline View.
The level is used in creating a Table of Contents. - Select Double Line spacing
 Figure 5: Formatting the paragraph in the new style
- Complete the following in Line and Page Breaks (see Figure 6):
- Select Widow/Orphan control if not already selected.
- Select Page break before if you want Level 1 Headings to start on a new page.
- Select Don’t hyphenate.
- Click OK.
 Figure 6: Adding paragraph format to the new style.
- Click on OK to close the open windows.
How to use the styles in Word you have created
To type text in the format you defined in your style:
- Click on the style you created in the gallery (see Figure 7).
- Enter your text.
If you have already typed the text but not in the style you created:
- Place the cursor inside the text.
- Click on the style you created in the gallery.
If the style you created is not in the gallery (maybe you didn’t select Add to the Styles gallery):
- Click on the arrow in the bottom right hand corner of the Styles group.
- Click on the style that you created previously (see Figure 8).
 Figure 7: Select your style from the Style gallery
 Figure 8: Choosing your style from the Styles pane
Summary
Can you see how much time you can save by using styles in Word?
You can if you have several documents to create in Word using the same formatting rules — create your style (takes a little time, I know) but then apply it over and over again.
What if the formatting rules change? For example, your organization or institution decides to change the font type for paragraphs from Calibra to Times New Roman.
Do you go through and modify every paragraph?
No — not if you have made a style for it!
You just modify the style and all the paragraphs in all the documents will be updated when the document is opened.
Click here for help on modifying styles in Word.
Using styles in Word is a great productivity aid if you have several documents with formatting requirements not covered by the standard Microsoft Word styles.
-
Home
-
Styles in Word
or select the back button on your browser.
›
Like This Page? Please Share It.
Most writing software use what are called “Styles,” yet few people know about them or use them. Many who know about styles find them intimidating. They seem to be too complicated and a pain to learn and work with.
In most programs learning the basics of styles is actually quite easy and using them can save you a lot of time and hassle.
In this post I am going to show you the benefits of using styles. Given its market share I will take Word as an example (you can’t modify styles in Office 365).
What Is a Style?
A style is simply a set of formattings (font, size, spacing, alignment, etc.) saved under a name (the style name) that you can later apply to multiple parts of your document. Depending on the software, you can apply styles to characters, paragraphs, lists, tables, figures, etc.
Let’s take an example. I usually create a “body” paragraph style in my text documents. I select a font, a size, margins, an indentation, space before and after, a language, an alignment, etc. I save all those settings in a style called “body.” Now each time I apply the “body” style to a paragraph, it will take all these formattings automatically. If I edit the “body” style to change the font, for example, the changes will be applied to all the paragraphs formatted with the “body” style, whether the document has one page or a hundred pages. All these paragraphs will now use the new font I selected for the style “body.” This will be clear in the two videos that follow.
Getting the basics of styles is usually quite easy. In an hour or two you could dramatically change the way you work with your programs. I won’t go here into how to create and use styles. That will depend on the software your work with and there are plenty of teaching resources available online for most programs. The important thing is to get the concept of styles. The power and complexity of styles vary from one software to the other but the basic concept is the same. Once you get it, it is easy to apply it to other programs.
I can guarantee you that once you learn to take advantage of styles you will not go back to your “pre-style” days!
Why use styles?
- Time and consistency
- Easy TOC’s, lists, etc.
- Easy navigation
- Less formatting problems
- Time and consistency: You do not have to define fonts, size, spacing, etc. for each title, paragraph, character, and whatnot. You apply the style to a text for example and this will automatically apply all the formattings of the style to the selected text. On top of this, as you saw in the video, changes to a style are automatically applied to all items that use that style, whatever the length of your document.
- Easy compilation of tables of Contents, lists of figures and tables, etc.: Depending on which software you work with, using styles allows you to generate tables of contents, lists of figures, and so on almost instantly, however long your document is. These last three months I have been faced with several projects where people had created their table of contents manually, which is not only a huge waste of time but almost guarantees that your tables and lists won’t be up to date with your latest changes.
- Easy document navigation using Document Map or Outline in programs that have such a feature (ex. In Word, View > Sidebar > Document Map Pane). You need to use styled headlines to benefit from maps and outlines. These are hugely practical with long documents.
- Avoiding formatting problems: A lot of people hit the Enter key whenever they want more space under titles or between paragraphs. But each of these empty lines can come back to haunt you with formatting problems later on, especially in long documents (page jumps, unwanted spacing, etc.). To have more space after headlines, between paragraphs, after tables or quotations, increase the “space after” in the style definition. There are plenty of other examples of formatting problems that are solved using styles.
The Styles Available
Depending on your software, several types of styles are available, the most common being character and paragraph styles.
Here is an example using styles in Word 2011 again to format a bibliography.
Paragraph Styles
When people work with styles, this is the one they usually use. The name says it all. These are styles that are applied to paragraphs. This means that paragraph styles apply to titles too, not just paragraphs of texts. Usually, any formatting you can apply to a paragraph, you can also save in a paragraph style. This goes from basic choices such as font, size, alignment, to auto-numbering, space before and after, windows-orphans, etc.
Character Styles
Not many people seem to be aware that most programs also offer Character styles, meaning styles applied at the character level without changing the paragraph style. Let me give you an example on top of the examples in the two videos.
I still dabble with ancient Greek here and there. If I am working with a document that includes words in ancient Greek within paragraphs, I create a “GreekText” character style. I define the font I want to use for the Greek characters and save this as “GreekText” character style. Each time I need Greek text in a paragraph, I apply the “GreekText” style to these characters. Should I ever decide that I want to use another font for the Greek, I just change the font in my definition of the “GreekText” and all Greek texts in my document will now be in the new font. This also allows me to easily select a font for the text in English and a different font for the Greek text.
You can use several character styles within one paragraph, as I did on the second video in this article. Characters retain the properties of the paragraphs in which they appear, only the properties defined in the character style are modified. Using the “GreekText” example again, I can use it in a title, a paragraph, a quote, etc. I select the Greek text and apply the “GreekText” character style. The text will then be formatted with the font defined. None of the other formattings of the surrounding text in the paragraph change. If the title is in 18pt for example, the Greek text in the title will also be 18 pt because I only changed the font, not the size.
Other styles
Depending on your program, other styles often available are List styles, i.e. styles applied to lists; tables styles, images styles, figures styles, etc. The names speak for themselves. In some more powerful programs you can have imbedded styles, conditional styles, and other more intricate types of styles.
Two More Examples
Multilingual Documents
Another example could be a multilingual document. Let’s say you have a document with texts in English and French. If you software has this capability—a lot of them do—you could define a paragraph style as “FrenchText” with French as the working language, another one as “EnglishText” with English as the working language. You apply the styles to the appropriate paragraphs. When you do the spellcheck, your program will check the “FrenchText” paragraphs using the French spellchecker and dictionary, and the English tools for paragraphs using the “EnglishText” style.
Presentation Programs
A final example. In Keynote you can define styles for texts, titles, etc. Let’s say you just made a whole presentation and then decide that you’d rather have your main titles on each slide in a different color and font. You could, as I have seen people do, go back to each slide and change the titles. Alternatively, if you have used styles, you could just change the color and font in your style and all the titles will be immediately changed accordingly. Isn’t that nice?
Working with styles
Styles have been around forever in a lot of programs. Yet few people use them.
In most programs, learning the basics of styles is pretty straightforward.
Using styles saves you a huge amount of time and aggravation and helps you get a consistent look in your documents.
If you have never used styles, I would advise you to start with paragraph and character styles. They are the most useful on an everyday basis. Look into the help files of the program you work with or search online. In an hour or two you will get the gist of it and never look back.
Here are a couple of links with more information on styles for Word as an example.
- Microsoft support on styles in Word 2007 (but still useful), styles in Word 2011
Hope this was useful.
This is a longer video specifically on how to use styles in Word (2013).
If you haven’t been using Styles in Microsoft Word Listen carefully — start now! Quit wasting time with manual formatting! By using Styles, any document created in Word becomes exponentially easier to manage as the document grows to beyond say . . . 2 pages. Many view the use of Styles in a Word document as a nice “extra” feature, but the truth is if you’re not using Styles chances are you are wasting a lot of time and you haven’t tapped into the real power of Word. Word was built from the very beginning around styles and with the new and improved features in versions 2007 and 2010 there are even more reasons for using them today.
So What are Styles?
Styles are a handy feature of Microsoft Word which provides a quick standard way to control the formatting of a Word document. As you probably know, there are many poweful and rich looking ways to give a Word document the professional look you want. This involves so much more than just making changes to the typesetting (font). You can create bold and colorful headings, consistently spaced paragraphs, bulleted lists, highlights, etc. There are even special tools which allow you to create such things a table of contents, foot notes, and so much more. All of these formatting tools are used to give the document a “style” of its own.
Formally speaking, a Style in Microsoft Word is simply a collection of formatting rules and elements which are used consistently throughout the document to give it the look and feel you want. Once a style is in place, key portions of the document will be automatically formatted according to the rules of the style (e.g. paragraph headings, tables, numbered lists, etc.). Without Styles, a simple change to a font type in a document would have to be made multiple times.
Why Should You Use Them?
There are many reason why you should be using Styles in your Word documents. I’ll give you 4 of the best reasons:
- Consistent Look and Feel
- Ease of Format Management
- Making Intelligent Documents
- Format Portability
1. Consistent Look and Feel
Styles give your document a consistent theme which provides a more polished, professional look by providing a set of rules for formatting which are applied uniformly throughout the document. If you still format your document manually there’s a good chance you may inconsistency in the overall look and feel of the document as a whole.
Take fonts for example. There are 5 basic ways to format your document using fonts:
- Font Face (e.g. Arial, Times Roman, etc.)
- Font Size (e.g. 10pt, 14pt, 24pt, etc.)
- Font Color (e.g. Black, Blue, Orange, etc.)
- Font Style (Bold, Italics, Underline, etc.)
- Font Effect (Strikethough, Superscript, All Caps, etc.)
These are the very basics of font application which go a long way to determine the look and feel of the document. These basic font features are critical to the look and feel of your document (not to mention the many other advanced font features such as character spacing, shadowing, transparency, and so forth). If you apply font formatting manually there is a very good chance you’ll have, for example, subject headers with different styling as you make changes over time. This is especially true as your document grows beyond 1-3 pages to say over 10 pages. Even if you are particularly diligent about remembering what font style you used for what heading type (i.e. major heading, sub heading, sub-sub heading, etc.) you’re bound to miss a few. This effects the consistency of your document over time.
Why bother? Using styles takes all of this burden of remembering what formatting to use and where to use it. Simply decide what formatting you want to use and where you want to use it. Then, apply this formatting to a style and you’re done. Now your document will carry the same look and feel from the start to the finish.
2. Quick Format Management
Managing the Formatting of your document is much easily with the use of styles. You can easliy restyle your document in just seconds. Suppose you decide to use a new font color scheme in a large document which requires changes in the font colors of all headers and sub headers. In a 50 page documents this is a chore if you’re not using styling. With styles in place however, making the changes is a breeze! Suddenly 20 minutes turns into 20 seconds.
Simply head over to the styles menu and find the style you want to change. Right click and select Modify. Then make the change to the header and any other sub headers. These changes apply instantly to the entire document and you’re done in a matter of seconds. This process is so quick and painless that you can even apply sweeping changes to large documents just to see how it will look. If you like the changes you’re ready to move on. If not, just change them back or try something else.
You can also change multiple styles all at once in just a few seconds by applying a Style Set. Style Sets are preconfigured collections of styles which apply to a document all at once. They are useful for instantly changine the look and feel of your document and for overall document format management. You can chose from one of several built-in Styles Sets or create your own to quickly restyle your entire document from top to bottom based on a set of predetermined styles!
3. Making Intelligent Documents
Word 2012 gives you the ability to create amazingly intelligent documents. An intelligent document has the ability to do a great deal of work for you. This is because it has been configured to understand a few important things about the layout and content of your document. For example, keeping track of the page count and reflecting this in a header or footer. Intelligent documents can manage gootnotes and endnotes for you. They can even automatically track changes in your document structure and relect those changes in a dynamic index or table of contents. These are examples of the many powerful features built into Word to give your document the intelligence to save you a ton of work.
Intelligent documents don’t happen automatically. You have to add intelligence by applying the techniques available in Word to build up your document’s IQ. One of those techniques is the use of Styles. By defining your styles for headings for examples you enable Word to automatically format all of your major headings, sub headings, sub-sub headings, etc. Not only does Word know how to “style” those headings, but it knows a little something about the structure of your document. This allows it to provide you ease of movement thoughout the document by simply clicking on the heading you want to move to in the Navigation Pane.
Without styles in place to define which text represent Headings, sub headings, and so forth, the Navigation Pane would not be very useful because only text styled as “heading 1”, “heading 2”, “heading 3”, etc. will show up in the navigation list.
4. Take it With You
Another great thing about styles is their portability. In Word 2010, exporting your style to a template or another Word document is a snap. This is such a powerful feature in Word that you just have to take advantage of it. After you do the hard work of determining what formatting you want to use for your document Title, Sub-Title, Headings, sub-Headings, Quotes, Emphasis Text, etc. you’ll probably want to use this formatting somewhere else — No problem! If you have styled your document properly, you can push that style to another document or even a template in just a matter of seconds. Now you can take your style anywhere and everywhere.
As cool as all these capabilities are you can never take advantage of them if you aren’t actively using styles in your Word documents.
How do you Get Started?
Making the move to Styles is easy. Just follow these steps . . .
- First, decide on your document’s structure and formatting
- Next, format your Styles instead of your text
- Then, give your text a Style instead of manual formatting it
- Last, if you like what you’re created save your Style or create a custom Style List for future use
With the wealth of advantages to using styles and now the ease of applying them, it’s past time to quit manually formatting your documents! Quit reaching for that Font Properties setting and changing text one at a time. Move on to Styles and never look back!
Resources:
1. Style Basics in Word 2010
2. Microsoft Tutorial: Format your Document with Styles
3. The Essentials of Creating Styles in Word
Here at RedLine, we work with Word every day, so I figured it was high time for—drum roll, please—a Microsoft Word Styles Tutorial.
You might be wondering what Word Styles are and what purpose they serve. Well, you’re in the right spot.
Read on for our full Microsoft Word Styles tutorial or click below to skip right to a specific section.
I: Introduction
II: Applying Styles
III: Modifying Styles
IV: Creating Your Own Styles
V: Next Steps
Once you finish this tutorial, learn how to work with a table of contents in Word.
Microsoft Word Styles Tutorial
I: Introduction
Definition
Throughout this guide, I’ll be using Styles (uppercase) and styles (lowercase). So what’s the difference?
- Styles refers only to the Microsoft Word feature that deals with text formatting attributes.
- styles refers to formatting attributes, too, but in a general sense. For example, I might talk about good heading styles to use in your Word doc (or a Publisher or InDesign file, for that matter).
Benefits to Using Styles in MS Word
The Styles pane appears in the Home tab. This prominent position should give you a clue as to how important the folks at Microsoft think it is.
Here are four reasons why you should use Styles in Microsoft Word:
- You’ll save a lot of time, especially in long documents.
- You can automatically generate a table of contents based on your headings.
- Your formatting will be much more consistent than if you were to set text attributes manually.
- You can use them in Word templates for consistency across documents.
II: Applying Styles
Understanding Heading Hierarchy
No how-to article—especially a detailed Microsoft Word Styles tutorial—would be any good if it didn’t help you do something. So in this section you’ll learn how to apply styles in MS Word.
My example here is an outline for an article about household pets.
My article has different sections (see Figure 1), such as Section 1: Dogs and Cats and Section 2: Hamsters, Gerbils, and Guinea Pigs. These are my level-1 headings, which I’ll call H1 heads for short.

Figure 1. All headings are in a logical order but have not yet been formatted.
Within each section are more specific sections. In the section on dogs and cats, for example, I’ve got a subsection called Dogs and another subsection called Cats. These are my H2 heads, because they fit logically as “children” under the “parent” category above them.
Then, under each of those sections, I’ve listed even more specific subsections: Short-Haired Breeds and Long-Haired Breeds under Dogs, for example. These are my H3 heads.
Finally, under those sections, the content is more specific still: Beagle, Bloodhound, Irish Terrier, and so on. They fit logically under Short-Haired Breeds and are H4 heads.
I’m talking about my content (the words and ideas) here, not how it’s formatted (font, color, etc.). But it’s important to spend time on this concept because it will inform your formatting choices.
In fact, any self-respecting Microsoft Word Styles tutorial should have at least a bit of information on why you should use styles in the first place: it makes reading easier!
Using Word’s Built-In Styles
This hierarchy of headings displays content to your reader in a logical, sequential way. And the formatting that you’ll apply will reflect that, from broadest (biggest) to most specific (smallest).
MS Word comes prepackaged with a Styles pane in the Home tab. In it you’ll find little windows with labels such as “Title,” “Heading 1, “Heading 2,” “Normal,” etc. You’ll also see dummy text that shows what each Style looks like.
Let’s start applying Word Styles to our example text. (Mine may not look like yours—I’ve styled and restyled these elements several times.)
First, I’ll apply the “Heading 1” Style to the headings that are uppermost in the hierarchy.
Put your cursor anywhere within the line of text that you want to style and then click on “Heading 1.”
Use Word’s built-in styles to format your H1 heads.
Then, I’ll do the same for my H2, H3, and H4 heads using “Heading 2,” “Heading 3,” and “Heading 4,” respectively.
Again, put your cursor in the text to which you want to apply a style and click the style you want.
All headings, from H1 to H4, have been styled.
Pro tip: Use shortcut keys, not mouse clicks, to quickly apply styles in your Word doc.
III: Modifying Styles
What if you’re like me and you don’t like Word’s built-in styles? Then change them!
To modify a style, right-click it in the Styles pane and select “Modify”.
Right-click on the style you wish to change and select “Modify.”
MS Word lets you modify all attributes of a style, including typeface, font color and size, paragraph spacing, and tabs.
A “Modify Style” window will open. Here, you can change the global attributes for that style, including format, font, paragraph, tabs, and so on.
One of the most useful features in Styles is the ability to set a shortcut key. Instead of clicking multiple times with your mouse, you can set a key combination (Ctrl + 1, for example) for the H1 style.
Then, to format all of the H1 heads in your document, you only have to hit Ctrl + 1.
(In the reports that RedLine formats—some of which are over 100 pages—this is a big time saver, so we set up shortcut keys for the most common page elements.)
In my example, I’ve changed the color of the H1 style from blue to dark grey.
Modifying the color of any style changes all instances of that style in your document.
Pro tip: Any change that you make to a style will change all instances of that style throughout your document. (So if there’s any attribute of that style that you don’t want to apply elsewhere, then either create a new style or change the formatting manually.)
IV: Creating Your Own Styles
The next section in our Microsoft Word Styles tutorial has to do with creating your own styles. Moreover, you can base these new styles on existing styles.
Why Create a New Style?
For example, let’s say that you have a long document consisting of a main report and several annexes. For consistency, the headings in the document should be styled the same regardless of whether they appear in the main report or in an annex.
But you may not want your annex headings to populate the table of contents. What you can do is create two separate styles that look identical but that have different names.
How to Create a New Style in MS Word
I’ll use the same document as before. This time, though, it has ballooned from a feature article into a downloadable resource guide for would-be pet owners, so I’ll need a table of contents (TOC).
However, I don’t want every single heading within the annex to appear in the TOC. Solution? Create a new style.
In my example, I’m creating a new style specifically for headings in the annex. The first one is based on the Heading 2 style, so I put my cursor in the text that reads Dogs (it’s styled as an H2) and then click on the “Styles Pane” button (Figure 7). (In Office 2016 for Mac, this appears to the right of the Quick Styles pane.)

Figure 7. Open MS Word’s Styles Pane to create a new style.
Then, within Properties, I change the name of the style from “Heading 2” to “Heading 2 Annex” (Figure 8). Again, it looks like Heading 2—same typeface, same color, same spacing, etc. But now I can control whether it appears in the table of contents.
Figure 8. Give a descriptive name to your new style.
Pro tip: Click within your “template style” (the style on which your new style is based) before you create the new style. This will automatically base the new style on the highlighted style.
V. Next Steps
Well, you’ve reached the end of this little Microsoft Word Styles tutorial.
Download the dummy article I “wrote” for this post to see how the different headings are styled. Then try the following for yourself:
- Apply a style: Put your cursor in a heading and click a different style in the Styles pane to see what happens.
- Modify a style: Pick any style in the document and modify it. (For example, change the color of the H3 heads from red to blue.)
- Create a new style: Create a style called “Heading 3 Annex”. (It will look identical to Heading 3; it will just have a different name.)
This may not be the only Microsoft Word Styles tutorial you’ve read, but I hope it’s been helpful. (Feel free to ask me questions in the comments if you need help on a specific problem.)
If you need help styling your reports, let us know. The majority of our report formatting work is in MS Word. Thanks for reading!
If you’d like to read more content about Microsoft Word, see how to work with nonbreaking spaces.
by Dr Bob Rich
Word is the most commonly used word processor program, and yet many people have difficulties with its basic features. A very experienced writer in a group I belong to complained that he hates having to put a leading tab for each paragraph, and this is one of the reasons he hates Word.
When I am editing, I often need to rap my client gently on the knuckles for doing just that. It is asking for errors of omission. And actually, Word has a simple-to-use tool for having a first-line indent where you want one, and not where you don’t. This tool is its collection of Styles.
Rather than type up a mini-instruction manual in a group, I thought I’d make it more generally available through a post.
Every version of Word has a Format menu up the top. It has a ‘Font…’ entry. Study the changes it can make. They will apply to highlighted text, or the next thing you write beyond the location of the cursor.
Below this is ‘Paragraph…’ which applies to the current paragraph (regardless of where the cursor is in it), or to a selection containing multiple paragraphs. One of the items there is ‘Special’, which refers to first-line indent. There, you can specify how far in from the left edge this paragraph or set of paragraphs is indented.
Instead of doing things in bits and pieces like this, you can – no, no, no, you should, or even must – rely on a very elegant tool of Word and other modern word processors: the ‘Style’ feature.
Every paragraph is in a particular Style. For plain text this will be ‘Normal’ or ‘Body text’. A great thing is to have a Style specified for special uses like headings, subheadings and chapter titles. You can even make up your own Style.
So, click on ‘Style…’; you will get a dialog box with a list of style names on the left. The Style your current paragraph is using will be highlighted. The font, font size, paragraph alignment and other relevant facts of this Style are displayed in the main part.
Three important buttons are ‘New…’, ‘Modify…’ and ‘Organizer…’.
New
Clicking on this thingummy allows you to – surprise – create a new style. You can give it whatever name you want, and initially it will be a identical twin of the one you are starting from. Then you can modify it, so hold your breath and read on!
Modify
Guess what, this means changing the formatting of the Style. Directly from this box, you can alter:
- The font you are using.
- Font size.
- Whether you want everything written in this Style to be plain text, or bold, or italics, or both bold and italics.
- The next whatsit in my version of Word is mysterious: labelled ‘Automatic’. Clicking on it reveals the secret: you can specify a particular colour for your letters.
- The line below refers to paragraph formatting, allowing:
- positioning the paragraph left-aligned, centred, or justified (left-aligned with the right margin forced to be straight)
- definition of the spacing between lines; you can have single, 1.5 or double spacing
- definition of the amount of spacing between paragraphs
- choice of paragraph indentation: you can shove the entire paragraph farther from or closer to the left margin
Now comes the deep and hidden secret. A tab at the bottom is ‘Format…’. Clicking it allows changes to all these, and many more. Selecting Font or Paragraph allows all the manipulations you can now impose locally, but they will apply whenever you are writing in this Style.
Two other useful features you can access are Language and Shortcut Key. So, if you are using different versions of English from time to time, you can have one Style in English US, another otherwise identical Style English UK, etc. The shortcut key allows you to specify a quick way of changing Styles. For example, I have specified Control+Shift+d for a dot-point list.
Heading styles are particularly useful for, guess what, headings. You can use them to construct an automatic table of contents. In ‘Outline View’ (accessed at the bottom of the screen). You can count the number of words in a section/ chapter, move them around, and inspect features like the number of spaces before a heading.
So there you have it. No more leading tabs!
Finally, there is:
Organizer
(I do wish American English would stop its addiction to Z!)
This allows you to copy one or more Styles from one document to another. This can be useful if someone sends you a document that looks yuk. Copy the Styles from one of yours, and it will look the same.

About Dr Bob Rich
I am a professional grandfather. My main motivation is to transform society to create a sustainable world in which my grandchildren and their grandchildren in perpetuity can have a life, and a life worth living. This means reversing environmental idiocy that’s now threatening us with extinction, and replacing culture of greed and conflict with one of compassion and cooperation.
To use styles, I believe it’s helpful for one to understand their purpose,
which is to provide standardization of formatting through a document or a group
of documents. There are other benefits to using styles in Microsoft Word,
though, and you’ll learn about them here.
If you already understand styles and would like to visit our extreme
tutorial,
click
here.
What is a Style?
A style is nothing more than a specific set of formats that are saved «as a
set», which is called a «Style». For instance, when you read a paperback book,
virtually every chapter’s title looks the same. Perhaps it is Times New Roman,
Bold, 18-pt, and centered. When you read a textbook, each Tip may have the same
border around it, and each exercise may have the same red font used as its
heading. Styles help us do this. They’re so easy to use, but not quite as easy
to understand.
Gotchas
One of the biggest problems with using styles is that people create this
gorgeous template with styles, and then copy information from the web or other
external documents, and now there are 20 more styles in your document. It’s
difficult to restrict this from happening, particularly if you’re not the only
user of the template. See
this article
for more information.
Another problem is often caused because we use the default Heading 1 style
and alter it to suit us. Then someone else comes along who isn’t aware of
styles, and they decide to italicize it. Rather than changing the style, they
manually italicize each Heading 1. Someone who knows what they’re doing comes
along and doesn’t get the same result when they apply the Heading 1 style. Doh!
When and if you create styles in a template, do a final review to ensure
absolutely that all the styles have been properly created and/or changed.
Outline numbered styles can be tricky. See
this article for more information.
Styles have a setting to Automatically update. I wish they didn’t. See
this article
for more information.
What Styles to Use?
I prefer to use the built-in styles whenever possible. Using, for instance,
the Body Text style, I can alter it. This does not affect all documents, it only
affects the active document or-documents from this template. However, you can create your own
custom styles. See this article.
Typical Styles
When I develop a template for a manual, I generally include the following
styles:
- Headings 1, 2, and 3 (sometimes 4 and 5, but more than 5 is a bit
ridiculous and should be used only for the most technical of manuals) - Body Text
- List Bullet and List Bullet 2 (for 2 different levels of bullets)
- List Number and List Number 2 (for 2 different levels of numbering)
- Note (or Tip; I usually put a border on this)
- Graphic (provides great spacing)
- Caption
- Header and Footer styles and page number styles are auto-created when you
use headers and footers, and I don’t usually alter them. - TOC styles are auto-created when you insert a Table of Contents and I
often add spacing before the TOC1 style.
Components of a Style
There are two types of styles: Paragraph and Character.
Paragraph Styles
A paragraph style has
more format possibilities than a character style. For instance, a paragraph style could be bold and also
double-spaced.
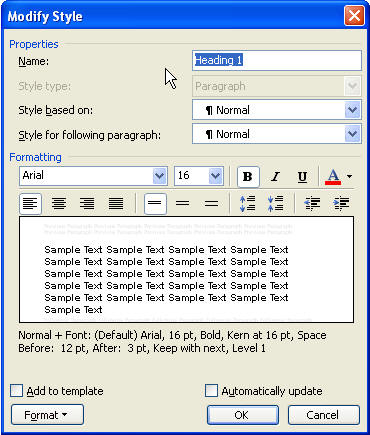
Above we show the dialog for modifying the Heading 1 style.
-
We have the Name, which I hope is self-explanatory. The
Style type in this case is Paragraph. -
Style based on tell us that Heading 1 is based on the
Normal style. Now, suppose we change the Normal Style to be red? Since you can
see that the Heading 1 style has no special font color designated, it would
indeed take on the red font we apply to the Normal style. I prefer to base my
styles on No Style, which is a choice in the drop-down. This way, each of my
styles is independent. While I may understand that styles are based on other
styles, other users of my templates may not (and it happens to be rare that I
personally use a template I have created). -
Style for the following paragraph denotes what style a
new paragraph defaults to when you hit Enter while you’re in a paragraph that
uses Heading 1. For Heading styles, I will generally make the Style for
following paragraph be Body Text. However, if you’re using outline numbered
styles, you might want it to default to Heading 2. Alternative, when I create
my Graphic style, I like the following paragraph to default to be the Caption
style because I always put Figure titles below my graphics.
For List Bullet and List Number, the likely following
paragraph would be another List Bullet or List Number, so I leave them to be
the same style.
-
I rarely use Add to template unless I am working on a
document that was created from a template, and realize I forgot to italicize
the font or something, but this does add the style to the template as well as
the document on which you are working. If your document is not based on a
template, you’ll want to avoid this setting. -
I rarely use Automatically update. The only styles I
use that have this checked are the Table of Contents (TOC) styles. If you
change a paragraph to which TOC1 is applied to become italicized, all
paragraphs with TOC1 applied to them will become italicized when this option
is checked.
Character Styles
A character style might be any text that is bolded. For
instance, suppose we always want our company name to appear in bold red font,
regardless of the formatting of the paragraph in which that text resides. We
can create a character style for it. I’ve called it MyCharStyle in the graphic
below.
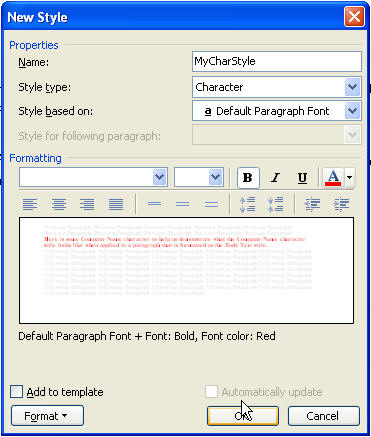
Unfortunately, when I apply the MyCharStyle style to some of the words in a
paragraph where the style is already bold, it unbolds it, as you can see below,
so be careful what font attributes you choose when creating your own character
style.
The following attributes cannot be built into Character styles: Tabs, paragraph
spacing, paragraph alignment, paragraph indents, bullets, numbering.