You can apply text formatting to field results in the same way you format any text in your document (for example, bold, underlined, and so on): select the field code or field result, and apply formatting.
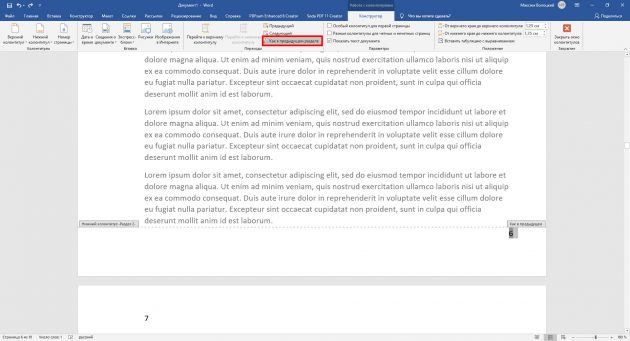
Note: If you update a field, any text formatting that you applied to the field results may be lost. To retain the formatting, include the * MERGEFORMAT switch in the field code. When you insert fields by using the Field dialog box, the * MERGEFORMAT switch is included by default.
In addition to text formatting, you can control the format of field results at the field level, with general switches that determine how data in the field is displayed. Depending on the field code, there are three types of general switches:
-
Format switch
-
Numeric format switch
-
Date-Time format switch
The Format field switch (*) defines how to display field results. The format instructions determine the following:
-
The use of uppercase and lowercase letters
-
Number formats — for example, whether 9 is displayed as ix (roman numerals) or ninth (ordinal text)
-
character formats
Format switches also retain a field result’s formatting when the field is updated.
The following is a list of switches and the items that they capitalize:
-
* Caps This switch capitalizes the first letter of each word. For example, { FILLIN «Type your name:» * Caps } displays Luis Alverca even if the name is typed in lowercase letters.
To select this option in the Field Options dialog box, click Title case.
-
* FirstCap This switch capitalizes the first letter of the first word. For example, { COMMENTS * FirstCap } displays Weekly report on sales.
To select this option in the Field Options dialog box, click First capital.
-
* Upper This switch capitalizes all letters. For example, { QUOTE «word» * Upper } displays WORD.
To select this option in the Field Options dialog box, click Uppercase.
-
* Lower This switch capitalizes none of the result; all letters are lowercase. For example, { FILENAME * Lower } displays weekly sales report.doc.
This switch has no effect if the entire field that contains the switch is formatted as small capital letters.
To select this option in the Field Options dialog box, click Lowercase.
The following is a list of number switches and their results:
-
*alphabetic This switch displays results as alphabetic characters. The result has the same case as the word «alphabetic» in the field code. For example, { SEQ appendix * ALPHABETIC } displays B (instead of 2), and { SEQ appendix * alphabetic } displays b.
To select this option in the Field Options dialog box, click a, b, c,.
-
*Arabic This switch displays results as Arabic cardinal numerals. For example, { PAGE * Arabic } displays 31.
Notes:
-
If the Number format setting in the Page Number Format dialog box is not Arabic, this switch overrides the Number format setting.
-
For page numbers only, there is also an ArabicDash format, which displays results as Arabic cardinal numbers surrounded by hyphen characters. For example, { PAGE * ArabicDash } displays — 31 —.
To select this option in the Field Options dialog box, click 1, 2, ,3, ….
-
-
*CardText This switch displays results as cardinal text. The result is formatted in lowercase letters unless you add a format switch to specify a different capitalization. For example, { = SUM(A1:B2) * CardText } displays seven hundred ninety, and { = SUM(A1:B2) * CardText * Caps } displays Seven Hundred Ninety.
To select this option in the Field Options dialog box, click One, Two, Three.
-
*DollarText This switch displays results as cardinal text. Word inserts and at the decimal place and displays the first two decimals (rounded) as Arabic numerators over 100. The result is formatted in lowercase letters unless you add a format switch to specify a different capitalization. For example, { = 9.20 + 5.35 * DollarText * Upper } displays FOURTEEN AND 55/100.
To select this option in the Field Options dialog box, click Dollar Text.
-
*Hex This switch displays results as hexadecimal numbers. For example, { QUOTE «458» * Hex } displays 1CA.
To select this option in the Field Options dialog box, click hex ….
-
*OrdText This switch displays results as ordinal text. The result is formatted in lowercase letters unless you add a format switch to specify a different capitalization. For example, { DATE @ «d» * OrdText } displays twenty-first, and { DATE @ «d» * OrdText * FirstCap } displays Twenty-first.
To select this option in the Field Options dialog box, click First, Second, Third, ….
-
*Ordinal This switch displays results as ordinal Arabic numerals. For example, { DATE @ «d» * Ordinal } displays 30th.
To select this option in the Field Options dialog box, click 1st, 2nd, 3rd.
-
*roman This switch displays results as Roman numerals. The result has the same case as the word «roman» in the field code. For example, { SEQ CHAPTER * roman } displays xi, and { SEQ CHAPTER * ROMAN } displays XI.
To select this option in the Field Options dialog box, click I, II, III,.
The following are character formatting switches and their results:
-
*Charformat This switch applies the formatting of the first letter of the field name to the entire result. The result of the following example has bold formatting because the R in REF is bold.
{ REF chapter2_title * Charformat } displays Whales of the Pacific in bold text.
To add this switch, type it in the field code or in the Field codes box in the Field dialog box.
-
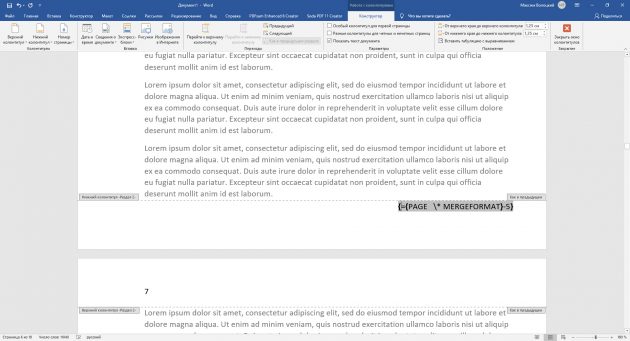
*MERGEFORMAT This switch applies the formatting of the previous result to the new result. For example, if you select the name displayed by the field { AUTHOR * MERGEFORMAT } and apply bold formatting, Word retains the bold formatting when the field is updated to display a new author name.
When you insert fields by using the Field dialog box , the *MERGEFORMAT switch is included by default. You can turn this option off by clearing the Preserve formatting during updates check box in the Field dialog box.
The Numeric format switch (#) specifies the display of a numeric result.
For example, the switch # $,0.00 in { = SUM(ABOVE) # $,0.00 } displays a result such as «$4,455.70.» If the result of a field is not a number, this switch has no effect.
Note: Quotation marks are not required around simple numeric formats that do not include spaces — for example, { MarchSales # $,0.00 }. For more complex numeric formats and those that include text or spaces, enclose the numeric format in quotation marks, as shown in the following examples. Word adds quotation marks to numeric format switches if you insert a field by using the Field dialog box or the Formula command in the Data group of the Layout tab (Table Tools contextual tab).
Combine the following format items to build a numeric format switch:
-
0 (zero) This format item specifies the requisite numeric places to display in the result. If the result does not include a digit in that place, Word displays a 0 (zero). For example, { = 4 + 5 # 00.00 } displays 09.00.
-
# This format item specifies the requisite numeric places to display in the result. If the result does not include a digit in that place, Word displays a space. For example, { = 9 + 6 # $### } displays $ 15.
-
x This format item drops digits to the left of the «x» placeholder. If the placeholder is to the right of the decimal point, Word rounds the result to that place. For example:
{ = 111053 + 111439 # x## } displays 492.
{ = 1/8 # 0.00x } displays 0.125.
{ = 3/4 # .x } displays .8. -
. (decimal point) This format item determines the decimal point position. For example, { = SUM(ABOVE) # $###.00 } displays $495.47.
Use the decimal symbol that is specified as part of the regional settings in Control Panel.
-
, (digit grouping symbol) This format item separates a series of three digits. For example, { = NetProfit # $#,###,### } displays $2,456,800.
Use the digit grouping symbol that is specified as part of the regional settings in Control Panel.
-
— (minus sign) This format item adds a minus sign to a negative result or adds a space if the result is positive or 0 (zero). For example, { = 10 — 90 # -## } displays -80.
-
+ (plus sign) This format item adds a plus sign to a positive result, a minus sign to a negative result, or a space if the result is 0 (zero). For example, { = 100 — 90 # +## } displays +10, and { = 90 — 100 # +## } displays -10.
-
%, $, *, and so on This format item includes the specified character in the result. For example, { = netprofit # «##%» } displays 33%.
-
«example formatting for positive; negative» This format item specifies different number formats for positive and negative results, separated by a semicolon. For example, if the bookmark Sales95 is a positive value, the field { Sales95 # «$#,##0.00;-$#,##0.00» } displays the value with regular formatting — for example, «$1,245.65». A negative value is displayed with bold formatting and a minus sign — for example, -$ 345.56.
-
«example formatting for positive; negative; zero» This format item specifies different number formats for a positive result, a negative result, and a 0 (zero) result, separated by semicolons. For example, depending on the value of the Sales95 bookmark, { Sales95 # «$#,##0.00;($#,##0.00);$0» } displays positive, negative, and 0 (zero) values as follows: $1,245.65, ($ 345.56), $0.
-
‘text’ This format item adds text to the result. Enclose the text in single quotation marks. For example, { = { Price } *8.1% # «$##0.00 ‘is sales tax’ » } displays $347.44 is sales tax.
-
`numbereditem` This format item displays the number of the preceding item that you numbered by using the Caption command (References tab, Captions group) or by inserting a SEQ field. Enclose the item identifier, such as «table» or «figure,» in grave accents (`). The sequential number is displayed in Arabic numerals. For example, { = SUM(A1:D4) # «##0.00 ‘is the total of Table’ `table`» } displays 456.34 is the total of Table 2.
The Date-Time format switch (@) specifies how to display the date or time.
For example, the switch @ «dddd, MMMM d, yyyy» in the field { DATE @ «dddd, MMMM d, yyyy» } displays «Friday, November 23, 2019.» Combine the following date and time instructions — day (d), month (M), and year (y); hours (h) and minutes (m) — to build a date-time format. You can also include text, punctuation, and spaces.
Month (M)
The letter M must be uppercase to distinguish months from minutes.
-
M This format item displays the month as a number without a leading 0 (zero) for single-digit months. For example, July is 7.
-
MM This format item displays the month as a number with a leading 0 (zero) for single-digit months. For example, July is 07.
-
MMM This format item displays the month as a three-letter abbreviation. For example, July is Jul.
-
MMMM This format item displays the month as its full name.
Day (d)
The letter d displays the day of the month or the day of the week. The letter d can be either uppercase or lowercase.
-
d This format item displays the day of the week or month as a number without a leading 0 (zero) for single-digit days. For example, the sixth day of the month is displayed as 6.
-
dd This format item displays the day of the week or month as a number with a leading 0 (zero) for single-digit days. For example, the sixth day of the month is displayed as 06.
-
ddd This format item displays the day of the week or month as a three-letter abbreviation. For example, Tuesday is displayed as Tue.
-
dddd This format item displays the day of the week as its full name.
Year (y)
The letter y displays the year as two or four digits. The letter y can be either uppercase or lowercase.
-
yy This format item displays the year as two digits with a leading 0 (zero) for years 01 through 09. For example, 1999 is displayed as 99, and 2006 is displayed as 06.
-
yyyy This format item displays the year as four digits.
Hours (h)
A lowercase h bases time on the 12-hour clock. An uppercase H bases time on the 24-hour, or military, clock; for example, 5 P.M. is displayed as 17.
-
h or H This format item displays the hour without a leading 0 (zero) for single-digit hours. For example, the hour of 9 A.M. is displayed as 9.
-
hh or HH This format item displays the hour with a leading 0 (zero) for single-digit hours. For example, the hour of 9 A.M. is displayed as 09.
Minutes (m)
The letter m must be lowercase to distinguish minutes from months.
-
m This format item displays minutes without a leading 0 (zero) for single-digit minutes. For example, { TIME @ «m» } displays 2.
-
mm This format item displays minutes with a leading 0 (zero) for single-digit minutes. For example, { TIME @ «mm» } displays 02.
Seconds (s)
-
s This format item displays seconds without a leading 0 (zero) for single-digit seconds. For example { TIME @ “s” displays 5.
-
ss This format item displays seconds with a leading 0 (zero) for single-digit seconds For example { TIME @ “ss” displays 05.
A.M. and P.M. (AM/PM)
This displays A.M. and P.M. To change the A.M. and P.M. symbols for Microsoft Windows, change the regional settings in Control Panel.
-
am/pm or AM/PM This format item displays A.M. and P.M. as uppercase. For example, { TIME @ «h AM/PM» } and { TIME @ «h am/pm» } display 9 AM or 5 PM.
-
‘text’ This format item displays any specified text in a date or time. Enclose the text in single quotation marks. For example, { TIME @ «HH:mm ‘Greenwich mean time’ » } displays 12:45 Greenwich mean time.
-
character This format item includes the specified character in a date or time, such as a : (colon), — (hyphen), * (asterisk), or space. For example, { DATE @ «HH:mm MMM-d, ‘yy» } displays 11:15 Nov-6, ’99.
-
`numbereditem` This format item includes in a date or time the number of the preceding item that you numbered by using the Caption command in the Captions group (References tab), or by inserting a SEQ field. Enclose the item identifier, such as table or figure, in grave accents (`). Word displays the sequential number in Arabic numerals. For example, { PRINTDATE @ «‘Table’ `table` ‘was printed on’ M/d/yy» } displays Table 2 was printed on 9/25/02.
Note: Quotation marks are not required around simple date-time formats that do not include spaces or text — for example, { DATE @ MM/yy }. For more complex date-time formats and those that include spaces or text, enclose the entire date-time format in quotation marks, for example, { DATE @ «dddd MMMM d, yyyy’, at’ h:mm» }. Word adds quotation marks to date-time format switches if you insert a field by using the Date and Time command in the Text group of the Insert tab or the Field dialog box.
Word inserts the MERGEFORMAT switch by default when you insert most fields. This switch keeps any manual formatting you apply to the field or part of the field. It is seldom what you want!
How do I format a date in mail merge?
Date Correction in Word Mail Merge
- Right mouse click the field (1) and choose Toggle Field Codes to see the field code (Meregefield) (2)
- Add the code @ “d/MM/yyyy” directly after the field name See diagram (3);
- Repeat for other date fields.
- Preview your Mail Merge.
How do I change the date format in a merge field?
Microsoft Word: Modify the format of your dates when using the Word Mail Merge feature
- Perform the first different steps of the Mail Merge as usual (Start Mail Merge, Select Recipients and insert Merge Field)
- Select the date field you wish to change and press Shift+F9.
- The code of your Merge field is now shown.
How do I format a merge field in Word?
To format a merge field:
- In the template document, while the merge field is selected, do the following to display the field code: Press Shift + F9 on Windows.
- Remove ” * MERGEFORMAT ” from the field code.
- Enter the switch in the field code. For example:
- Update the field: Press F9 on Windows.
How do I solve a Mergeformat page?
Step 1: Open the file to insert the faulty page number. Select Tools -> Options … Step 2: A dialog box appears, in the View tab, uncheck Field codes. Finally click OK to save the settings.
How do I get rid of Mergeformat?
If you want to see a page number, press Alt+F9. If you want to remove the page number, select the field and delete it.
How do you insert the current date in mail merge?
Insert today’s date
- On the Insert tab, in the Text group, click Date & Time.
- In the Date and time dialog box, select the format you want and click OK. The date is inserted as text.
How do I mail to 2 decimal places?
If you want to round to two decimal places, use #0.00 in your merge field. If you want the number to have a dollar sign before it (for anything that is money), use #$# in your merge field. If you want commas in your number, use ##,### in your merge field.
How do I get rid of Merge format?
Press Alt+F9.
What does merge format mean?
“Merge formatting” means that only formatting data will be pasted and not the actual text. For example, let’s say you have text that says, “Word1” and another that says “Word2.” “Word1” is in Arial font with no bold or underline.
How do I fix Mergeformat in Word?
3 Answers
- Insert a standard page number.
- Press Alt + F9 to show field codes.
- The page number field will show up as either { PAGE } or { PAGE * MERGEFORMAT } in a grey highlight.
- Replace this with { PAGE # 0# }
- Press Alt + F9 again to return to field values.
How to change the date format of a merge field?
Press Alt + F9 to display and edit the merge codes. For example, if using the Master Template you would change the current field { MERGEFIELD Merge_Date } which, by default, is formatted as MM/dd/yyyy and displayed as 01/01/2010 to { MERGEFIELD Merge_Date @ “dddd, MMMM d, yyyy” } the display would be Monday, January 1, 2010.
Can You Help Me to understand \ * mergeformat?
In theory the \*MERGEFORMAT switch is supposed to retain the format of the item being referenced and Microsoft in their wisdom insert it by default when you insert a field, though you can choose not to by unchecking the option ‘Preserve formatting during updates’.
How to change the format of a mail merge file?
To use a switch to change the format of a mail merge date field in Word, you will first need to display the field code and then type the switch starting with \@: In the main Word mail merge document, select the date field. Right-click the field and choose Toggle Field Codes from the drop-down menu to display the field code.
When to use the mergeformat switch in Excel?
In theory the *MERGEFORMAT switch is supposed to retain the format of the item being referenced and Microsoft in their wisdom insert it by default when you insert a field, though you can choose not to by unchecking the option ‘Preserve formatting during updates’. In practice it is probably best avoided.
Вы не вошли. Пожалуйста, войдите или зарегистрируйтесь.
Страницы 1
Чтобы отправить ответ, вы должны войти или зарегистрироваться
Сообщений [ 1 ]
1 25.02.2013 10:26:29

- Alex_Gur
- Модератор
- Неактивен
- Откуда: Москва
- Зарегистрирован: 28.07.2011
- Сообщений: 2,758
- Поблагодарили: 492
Тема: Что означает ключ *MERGEFORMAT ?
Что означает ключ *MERGEFORMAT ?
При формировании некоторых полей часто к ним добавляется ключ *MERGEFORMAT. Многие задаются вопросом — что означает этот ключ?
Я нашел следующее объяснение (внешняя ссылка):
*MERGEFORMAT
Формат введенного ранее элемента определяет формат значения поля. Например, если применить полужирное начертание к имени автора, отображаемого в поле { AUTHOR * MERGEFORMAT }, этот формат сохранится и после изменения имени автора.
Примечание. При вставке полей с помощью диалогового окна Поле (меню Вставка, команда Поле) ключ *MERGEFORMAT добавляется по умолчанию. Этот параметр можно отключить, сняв флажок Сохранить форматирование при обновлении в диалоговом окне Поле.
Еще один пример необходимости использования ключа *MERGEFORMAT — см. http://wordexpert.ru/forum/viewtopic.php?id=1707.
Post’s attachments
word-2007-quick-reference-sheet.pdf 6.92 Кб, 3 скачиваний с 2013-02-15
You don’t have the permssions to download the attachments of this post.
Удобной и приятной работы в Word!
Перевести спасибо на Яндекс кошелёк — 41001162202962; на WebMoney — R581830807057.
Сообщений [ 1 ]
Страницы 1
Чтобы отправить ответ, вы должны войти или зарегистрироваться
Что означает ключ *MERGEFORMAT ?
Компьютерные программы дают нам уникальные возможности выполнять быстро и качественно работу, на которую в противном случае пришлось бы потратить много времени и сил. На портале о Microsoft Office Word вы узнаете про: где в ворде 2010 узнать размер страницы.
Рекордсмен здесь редактор Ворд, который предполагает настолько гибкие настройки, что они способны обеспечить оптимальное выполнение практически любой задачи. Наш сайт о Microsoft Office Word даст ответ про: как изъять рисунок из ворда в.
Конечно, этим инструментом необходимо научиться правильно управлять. Своим опытом и путями решения различных задач делятся участники форума Ворд Эксперт. Наш сайт о Microsoft Office Word даст ответ про: как найти в ворд однокоренные слова.
Здесь можно найти шаблоны, макросы, советы по настройке горячих клавиш и панели управления, способы быстрого редактирования и переоформления больших, несогласованных кусков текста, готовые ответы на наиболее популярные вопросы и многое другое. Наш сайт о Microsoft Office Word даст ответ про: как писать сверху линии в ворде.
Table of Contents
- Where is merge formatting in Word?
- How do I insert phone number format in Word?
- How do I change the Mergeformat in Word?
- How do you insert a field that will automatically update in Word?
- How do you automatically update fields in Word?
- How do you automatically update table numbers in Word?
- How do I automatically update fields in Word 2016?
- How do you link field codes?
- How do I see all cross references in Word?
- How do I link text to a table in Word?
A “/*MERGEFORMAT” switch is automatically inserted if you check “preserve field format” and means leave formatted the same way the field is formatted. Generally, you do not want to check this box or add this switch. If you want one of these formatting switches, you probably want “/*CHARFORMAT” instead.
Where is merge formatting in Word?
Click on the “Merge Formatting” icon under the Paste Options section of the context menu. The pasted text will now align with the current style for that section of your document. Formatting will be retained for bold, italicized, underlined, listed and hyperlinked text.
How do I insert phone number format in Word?
Embedding Your Phone Number in a Document
- Choose Properties from the File menu.
- Make sure the Custom tab is selected.
- In the list of properties at the top of the dialog box (listed in the Name control), choose Telephone Number.
- In the Value box, enter the phone number you want associated with the document.
- Click on Add.
- Click on OK.
How do I change the Mergeformat in Word?
- Insert a standard page number.
- Press Alt + F9 to show field codes.
- The page number field will show up as either { PAGE } or { PAGE /* MERGEFORMAT } in a grey highlight.
- Replace this with { PAGE /# 0# }
- Press Alt + F9 again to return to field values.
How do you insert a field that will automatically update in Word?
On the Insert tab, in the Text group, click Date & Time. In the Date and time dialog box, select the format you want. Select the Update automatically check box. The date is inserted as a field and will update automatically.
How do you automatically update fields in Word?
Update all fields in a document Press F9. If your document has tables with fields or formulas, you might need to select each table separately and press F9. Tip: To make sure that you don’t forget to update your table of contents before you print the document, set Word to update fields automatically before printing.
How do you automatically update table numbers in Word?
Instead of searching and replacing all the figure numbers in the text, click “Edit” -> “Select All” (or, Ctrl + A), which select the entire document, then, press “F9”. This updates all the figure number automatically.
How do I automatically update fields in Word 2016?
Automatically Updating Fields and Links
- Choose Options from the Tools tab. Word displays the Options dialog box.
- Make sure the General tab is selected. (See Figure 1.)
- Click the Update Automatic Links at Open check box.
- Click on OK.
How do you link field codes?
Press ALT+F9 to see the field code. Delete the “Temp Link” text inside of the quotes….Put your cursor before the closing quote of your destination location.
- Go to Insert-> Quick Parts-> Field.
- Select MergeField from the Field Names menu.
- Add the Field Name to identify the MergeField.
- Click “OK” to exit the dialog.
How do I see all cross references in Word?
Press Alt+F9 to toggle the display back to field results. Press Ctrl+A, then F9 to update fields. You should see all your cross-references with the formatting you chose.
How do I link text to a table in Word?
On the References tab of the Ribbon, in the Captions group, click Cross-reference. In the Cross-reference dialog, select (in this instance) Table for “Reference type.” You can then choose to insert the entire caption, the label and number, or some other option.
More from The Question & Answer (Q&A)
Нумерация страниц в Word: несколько секретов от профессионалов
Использование нумерации в программе Word вызывает у многих пользователей ряд вопросов. При работе с инструментом первый номер присваивается титульному листу, не сохраняется информация в колонтитуле, возникают сложности при попытке сделать двойную нумерацию. Правильно поставить нумерацию в Ворде поможет вам эта статья.

Для чего используется эта функция?
С помощью присвоения символов последовательности всем листам, разделам и подразделам осуществляется навигация по документу. Этот номер запоминают, на него ссылаются и благодаря ему делаются важные пометки. Сочетая эту функцию с оглавлением, автор дает читателю или самому себе возможность ориентироваться в работе.
Последовательность может быть сквозной и двойной. Первый стиль оформления предполагает, что пронумеровать можно весь документ по порядку от первого до последнего листа. Второй используется при наличии объемных разделов. В таком случае первая цифра обозначает номер страницы всего текста, а вторая – номер листа раздела.
Как пользоваться функцией?
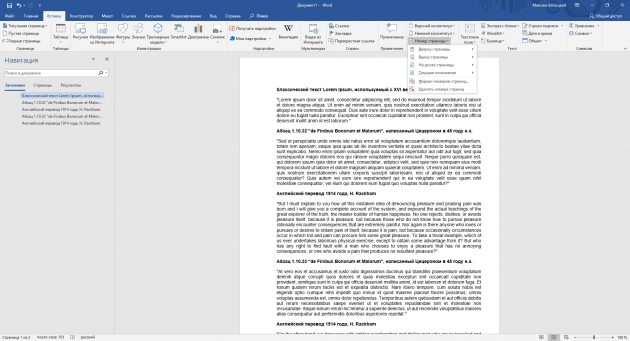
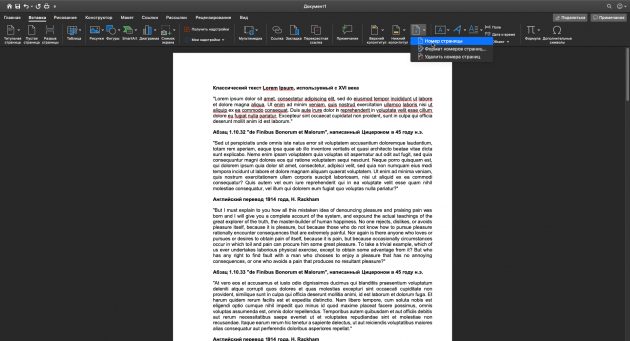
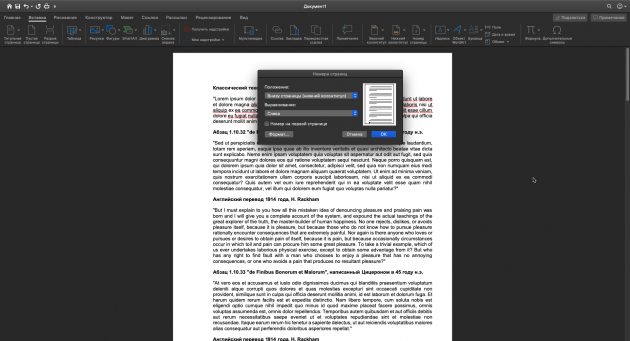
Чтобы пронумеровать текст в Ворде, откройте его и в верхнем меню во вкладке «Вставка» найдите кнопку «Номер страницы». Программа предлагает ряд вариантов расположения цифры на поле:
- вверху;
- внизу;
- на полях.
В каждом варианте есть дополнительные возможности по месту размещения символа. Они для наглядности представлены графически. Вам требуется выбрать подходящий вариант и установить конкретное число. Для простых текстов используется единица, при наличии оформления (например, титульного листа) это может быть другое число.
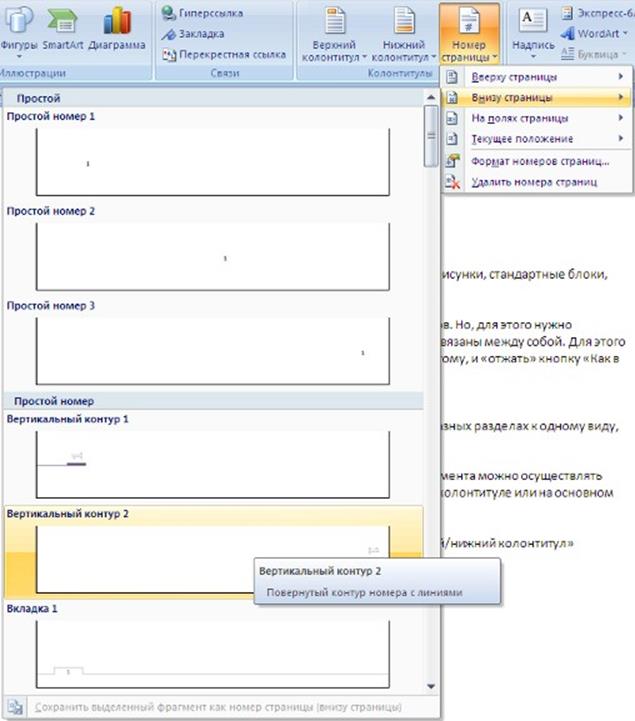
В каждом варианте есть дополнительные возможности по месту размещения символа
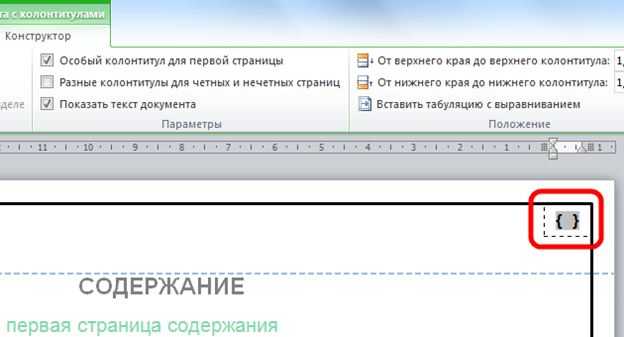
Что делать при наличии колонтитулов?
Знаки проставляются в колонтитулах, но если автор их использует для пометок, то возникает ошибка. Работа с колонтитулами в Word требует специфических знаний. Чтобы не нарушить структуру документа, воспользуйтесь этим алгоритмом:
- Зайдите во вкладку «Вставка» в верхнем меню.
- Выберите верхний или нижний инструмент.
- Перейдите к строчке «Изменить колонтитул».
- Нажмите Ctrl+F9.
- В появившихся скобках впишите код PAGE.
- Нажмите Alt+F9.
После этого нумерация в Ворде установлена и не замещает прописанный текст.
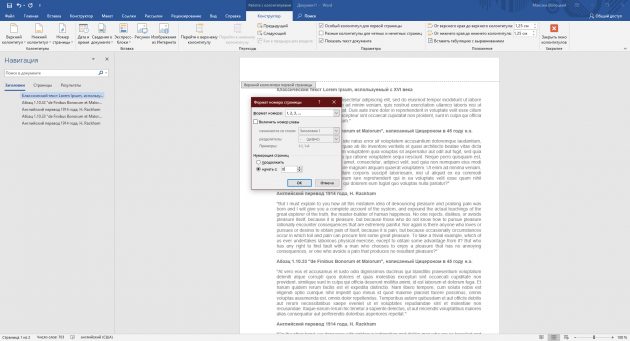
Двойная нумерация
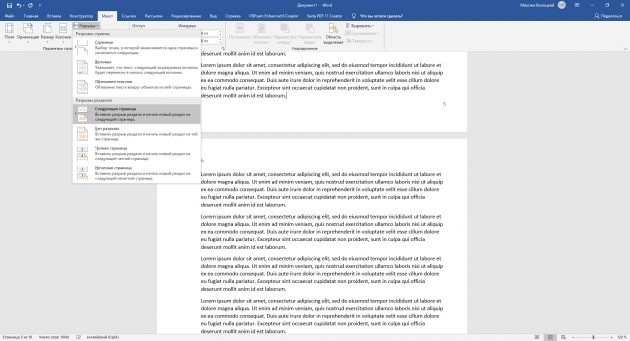
Чтобы сделать нумерацию в Ворде двойной, определитесь, какой колонтитул отводится для этого. Так, если в верхнем идет сквозной отсчет, то нижний относится к разделу. Теперь нужно отметить начало нового раздела следующим способом:
- Откройте первую страницу раздела.
- Перейдите в «Разметка страницы».
- Откройте Параметры.
- Выберите «Разрывы».
- Далее «Разрывы разделов».
- Установите текущую страницу.
Теперь Word понимает, что это начало нового раздела. Два раза кликните по колонтитулу, и в конструкторе откройте «Переходы». Снимите галочку с пункта «Как в предыдущем разделе». Нажатием Ctrl+F9 вызовите рабочую форму. В ней надо внести формулу:
Где N – это число предыдущих страниц. Например, раздел начинается со сквозного номера 15, значит N=14. Далее используете завершающее сочетание клавиш Alt+F9. Это действие нужно произвести для каждого раздела.
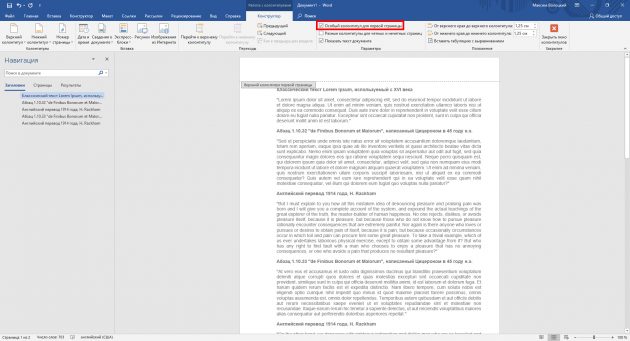
Как убрать нумерацию с титульного листа?
Программа начинает отсчет с первого фрагмента. Если по требованиям к оформлению документа титульный лист не должен иметь пометок, то нужно в поле редактирования поставить отметку в пункте «Особый колонтитул для первой страницы».
Что означает ключ *MERGEFORMAT ?
Чтобы отправить ответ, вы должны войти или зарегистрироваться
Сообщений [ 1 ]
1 Тема от Alex_Gur 25.02.2013 10:26:29

- Alex_Gur
- Модератор
- Неактивен

- Откуда: Москва
- Зарегистрирован: 28.07.2011
- Сообщений: 2,758
- Поблагодарили: 492
Тема: Что означает ключ *MERGEFORMAT ?
Что означает ключ *MERGEFORMAT ?
При формировании некоторых полей часто к ним добавляется ключ *MERGEFORMAT. Многие задаются вопросом — что означает этот ключ?
Я нашел следующее объяснение (внешняя ссылка):
Формат введенного ранее элемента определяет формат значения поля. Например, если применить полужирное начертание к имени автора, отображаемого в поле < AUTHOR * MERGEFORMAT >, этот формат сохранится и после изменения имени автора.
Примечание. При вставке полей с помощью диалогового окна Поле (меню Вставка, команда Поле) ключ *MERGEFORMAT добавляется по умолчанию. Этот параметр можно отключить, сняв флажок Сохранить форматирование при обновлении в диалоговом окне Поле.
Еще один пример необходимости использования ключа *MERGEFORMAT — см. http://wordexpert.ru/forum/viewtopic.php? >
word-2007-quick-reference-sheet.pdf 6.92 Кб, 3 скачиваний с 2013-02-15
You don’t have the permssions to download the attachments of this post.
Сообщений [ 1 ]
Чтобы отправить ответ, вы должны войти или зарегистрироваться
Вы можете помочь в развитии сайта, сделав пожертвование:
Или помочь сайту популярной криптовалютой:
BTC Адрес: 1Pi3a4c6sJPbfF2sSYR2noy61DMBkncSTQ
ETH Адрес: 0x7d046a6eaa1bd712f7a6937b042e9eee4998f634
LTC Адрес: LUyT9HtGjtDyLDyEbLJZ8WZWGYUr537qbZ
DOGE Адрес: DENN2ncxBc6CcgY8SbcHGpAF87siBVq4tU
BAT Адрес: 0x7d046a6eaa1bd712f7a6937b042e9eee4998f634
XRP Адрес: rEb8TK3gBgk5auZkwc6sHnwrGVJH8DuaLh Депозит Tag: 105314946
USDT (ERC-20) Адрес: 0x7d046a6eaa1bd712f7a6937b042e9eee4998f634
Яндекс Деньги: 410013576807538
Вебмани (R ещё работает): R140551758553 или Z216149053852
А тут весь список наших разных крипто адресов, может какой добрый человек пожертвует немного монет или токенов — получит плюсик в карму от нас 🙂 Благо Дарим, за любую помощь!
Похожие темы
Что означает ключ *MERGEFORMAT ?
Компьютерные программы дают нам уникальные возможности выполнять быстро и качественно работу, на которую в противном случае пришлось бы потратить много времени и сил. На портале о Microsoft Office Word вы узнаете про: где в ворде 2010 узнать размер страницы. Рекордсмен здесь редактор Ворд, который предполагает настолько гибкие настройки, что они способны обеспечить оптимальное выполнение практически любой задачи. Наш сайт о Microsoft Office Word даст ответ про: как изъять рисунок из ворда в.
Конечно, этим инструментом необходимо научиться правильно управлять. Своим опытом и путями решения различных задач делятся участники форума Ворд Эксперт. Наш сайт о Microsoft Office Word даст ответ про: как найти в ворд однокоренные слова.
Здесь можно найти шаблоны, макросы, советы по настройке горячих клавиш и панели управления, способы быстрого редактирования и переоформления больших, несогласованных кусков текста, готовые ответы на наиболее популярные вопросы и многое другое. Наш сайт о Microsoft Office Word даст ответ про: как писать сверху линии в ворде.
MERGEFORMAT Отображение при печати
26.07.2016, 13:08
При печати и при конвертации в pdf текст страниц съезжает
Добрый день! При работе с word документном все страницы отображаются хорошо, но при печати и при.
Ошибки при редактировании таблицыпри печати
Всем привет! Подскажите как решить проблемы: — При распечатке появляются 2 буквы. При просмотре.
Отображение рисунков при печати страницы
Здравствуйте! На странице фоновый рисунок состоит из маленьких частей. В основном это небольшие.
Отображение формы после печати или закрытия печати
Подскажите кто нибудь как дальше быть, нажимаю кнопку печать, выскакивает просмотр на печать, а вот.
26.07.2016, 13:44226.07.2016, 13:54 [ТС]326.07.2016, 14:04426.07.2016, 14:58 [ТС]5
Но проблема в том,что он половину значений прописывает правильно,а половину подставляет mergeformat
Добавлено через 29 минут
Не помогло(
26.07.2016, 20:02628.07.2016, 09:15 [ТС]7 Вложения
| ПТЭ_000503.docx (52.5 Кб, 7 просмотров) |
29.07.2016, 02:308
| Visual Basic |
| 29.07.2016, 02:30 |
| 29.07.2016, 02:30 |
|
Заказываю контрольные, курсовые, дипломные и любые другие студенческие работы здесь. Как при печати отчета программно установить параметры печати? Kyocera FS-1370DN не сохранятся профиль печати при печати из под общего доступа Как включить и отключить отображение ячеек в макете печати таблицы? Как пронумеровать страницы в WordЭта инструкция поможет вам добавить номера в Windows, macOS или веб-версии за несколько секунд. Как пронумеровать страницы в Word для WindowsКак добавить обычную нумерацию1. Нажмите «Вставка» → «Номер страницы» и выберите положение: вверху, внизу или на полях.
2. Если вы не хотите, чтобы номер отображался на первой странице, включите опцию «Особый колонтитул для первой страницы».
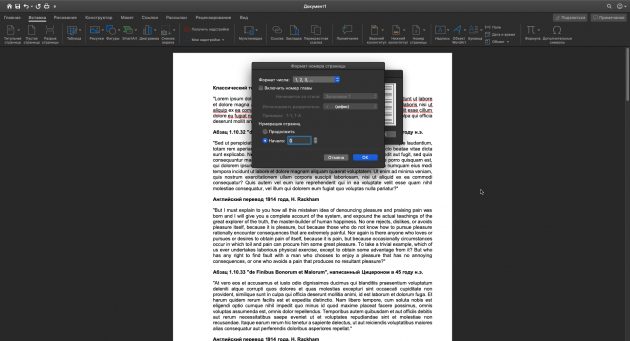
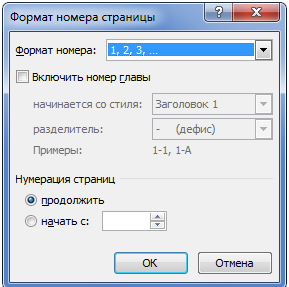
3. Если вам нужно, чтобы нумерация начиналась на второй странице не с двойки, а с единицы, кликните «Номер страницы» → «Формат номеров страницы» и в пункте «Нумерация страниц» выберите «начать с 0».
4. Чтобы закрыть окно колонтитулов, нажмите клавишу Esc или кликните дважды по странице. Как добавить двойную нумерациюДопустим, вам нужна сквозная нумерация для всего документа вверху и отдельная для каждого раздела внизу. Или наоборот. Обычным способом сделать это не получится, так как Word по умолчанию синхронизирует номера в верхней и нижней частях страницы. Чтобы обнулить нумерацию в каждом разделе, придётся использовать специальную формулу. 1. Проставьте обычную нумерацию в верхней и нижней частях страницы по вышеприведённой инструкции. 2. Разбейте документ на разделы. Для этого поставьте курсор в месте, где должен заканчиваться первый раздел, и кликните «Макет» → «Разрывы» → «Следующая страница». Это отделит первый раздел от остальной части документа. Затем отделите таким же образом другие разделы.
3. Разорвите связь в номерах страниц разных разделов. Для этого откройте первую страницу второго раздела и дважды кликните по нумерации, которую вам нужно начать заново (в нашем примере она внизу). В меню отключите опцию «Как в предыдущем разделе». Сквозную нумерацию на противоположной стороне страницы оставьте без изменений.
4. Вызовите формулу текущей нумерации: выделите номер и нажмите Shift + F9 и сразу Ctrl + F9. Если вы всё сделали правильно, вместо номера страницы отобразится формула <>. Если комбинация Shift + F9 не работает, попробуйте Alt + F9.
5. Теперь сбросьте нумерацию с помощью формулы. Для этого между левыми фигурными скобками вставьте символ равенства, а между правыми — минус и число, которое на 1 меньше текущего номера страницы. К примеру, если номер 6, у вас должно получиться <=-5>.
6. Преобразуйте формулу обратно в число: выделите её и нажмите F9. На месте номера страницы раздела отобразится 1, при этом сквозная нумерация останется нетронутой.
7. Повторите пункты 3–6 для всех последующих разделов документа. Сейчас читаютКак пронумеровать страницы в Word для macOS1. Кликните «Вставка» → «Номер страницы» → «Номер страницы».
2. Настройте положение и выравнивание номеров. Если не хотите, чтобы номер отображался на первой странице, снимите соответствующий флажок.
3. При необходимости сделайте так, чтобы нумерация на второй странице начиналась не с двойки, а с единицы. Для этого нажмите «Формат» и в пункте «Начало» выставьте «0».
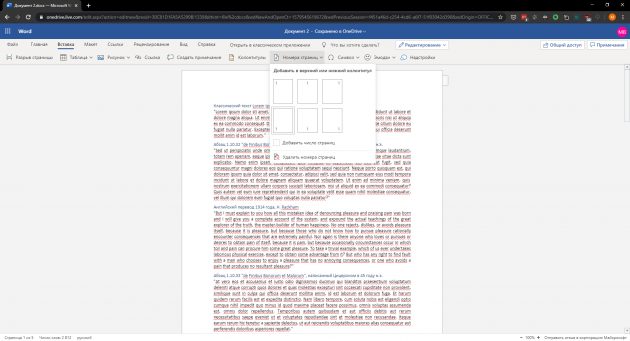
4. Кликните «ОК», чтобы сохранить изменения. Как пронумеровать страницы в Word Online1. Нажмите «Вставка» → «Номера страниц» и выберите подходящее расположение.
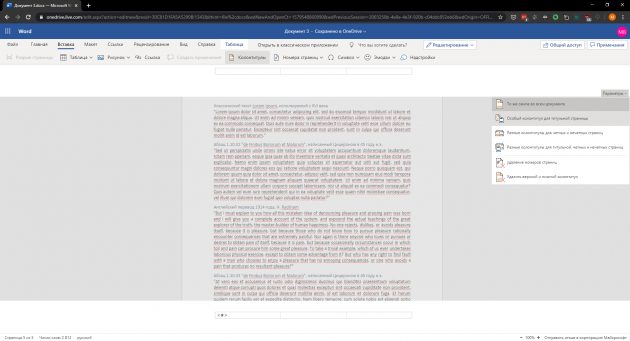
2. Если вы не желаете, чтобы номер отображался на первой странице, справа кликните «Параметры» и выберите «Особый колонтитул для титульной страницы».
3. Чтобы закрыть окно колонтитулов, нажмите клавишу Esc или кликните дважды по странице. Если хотите проверить отображение номеров, нажмите «Вид» → «Режим чтения». Оценка статьи:
Adblock |
 Обрезание текста и отключение границ при печати(ошибка во время печати)