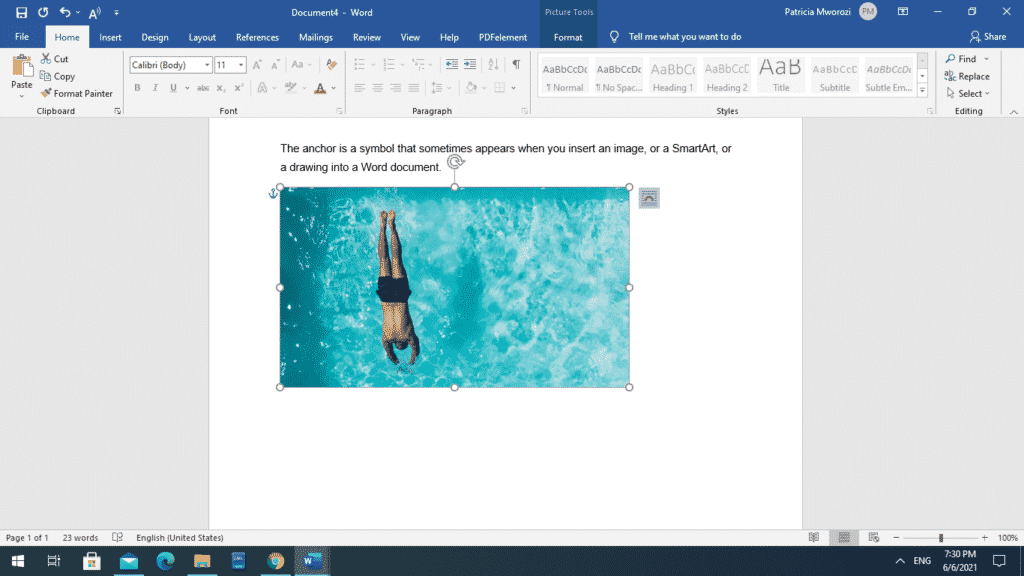
The anchor is a symbol that sometimes appears when you insert an image, or a SmartArt, or a drawing into a Word document.
By default, the anchor will only appear when you insert a picture, clipart, or SmartArt and then ‘Wrap text.’
In Word say 2013, you have the option of wrapping text in a specific way. When you wrap the text, an anchor will appear next to the image. Now, if you put the clicker on that anchor, a description will appear, letting you know that this picture is anchored to the text at this specific location or paragraph in the document. Now, if you were to try to move this paragraph, this picture would move with it.
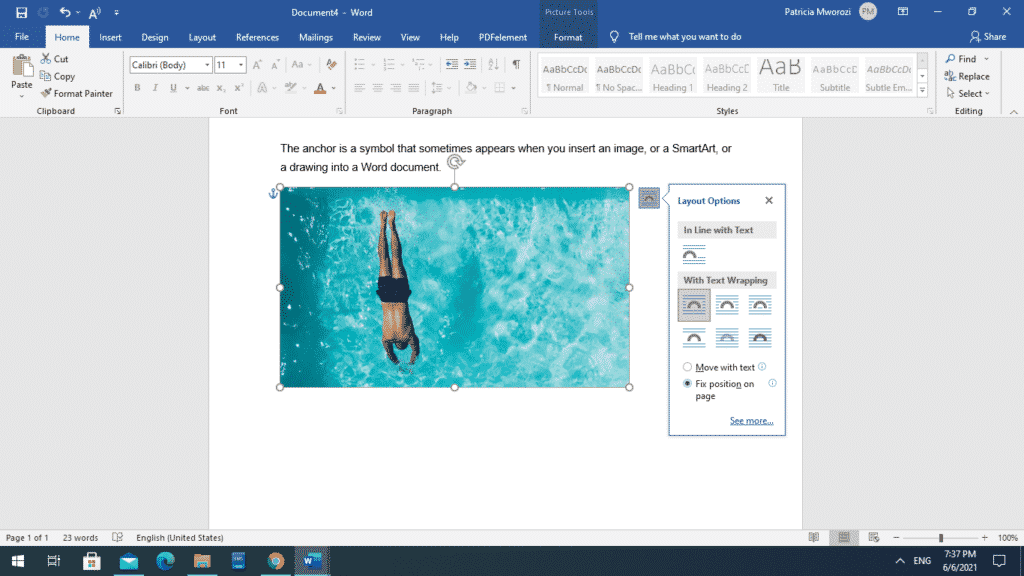
Suppose you want to keep the picture fixed to one location or position. You can click it, and wrapping options will appear. Here, you can pick ‘Fix position on page.’ If you were to try moving the paragraph (put the cursor at the beginning of the section and press enter), the picture would no longer move with the paragraph.
If you were to move the paragraph to another page, the picture would move too, but to the exact location on a new page.
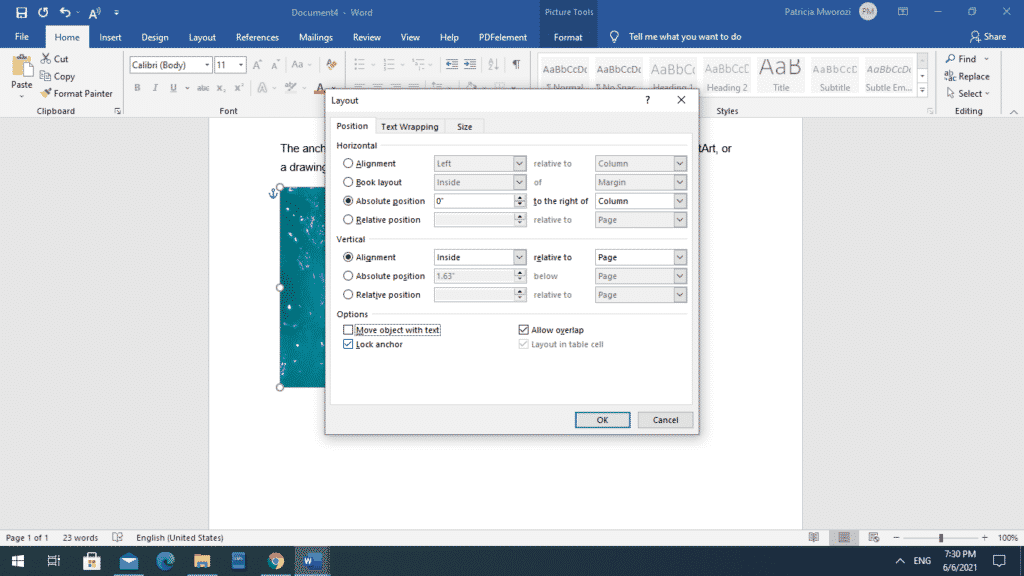
You also have the option of locking the anchor
Locking the anchor means that even if you keep changing the position of the image, it stays anchored to a specific paragraph. You will also notice that the anchor symbol will remain to the left of the start of the paragraph, regardless of the picture’s position.
When you unlock the anchor, the picture is no longer anchored to a specific location or paragraph and will remain next to the image.
Removing the anchor
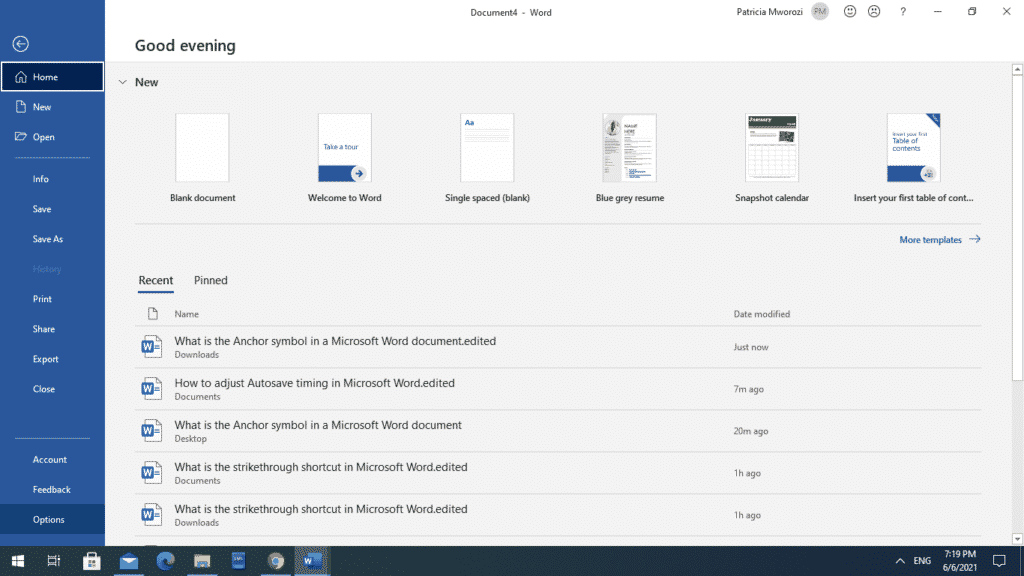
1. Open Word
In the top left corner, go to ‘File.’
2. Go to ‘Options’
When you go to ‘File,’ a list will appear. Go to options at the bottom.
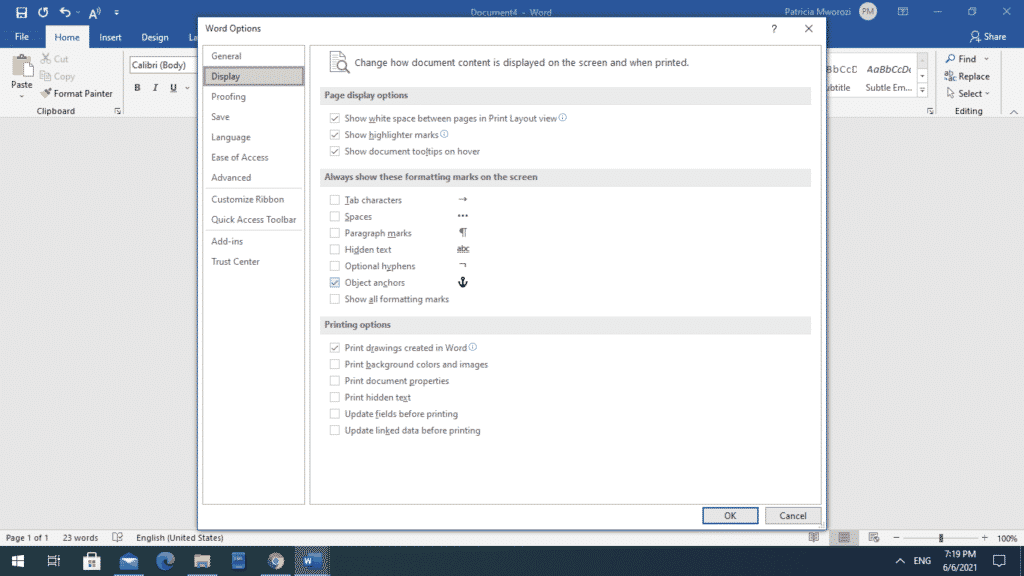
3. Go to ‘Display’
A pop-up window will appear. Go to ‘Display.’
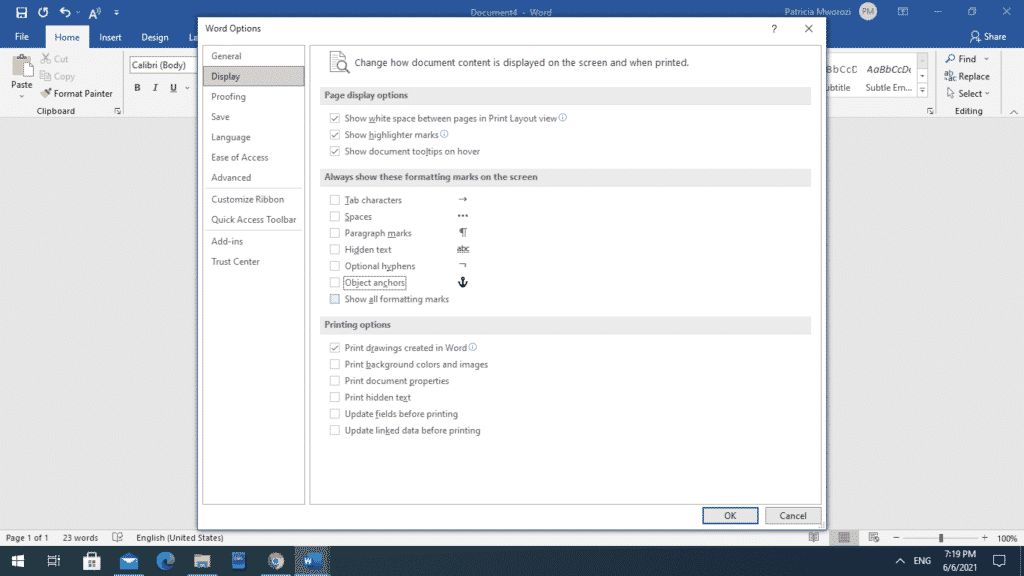
Under ‘Always show these formatting marks on the screen,’ uncheck or make sure the option ‘Object Anchors’ is unchecked.
Now, when you insert an image or object, the anchor will not appear.
Do you want to work faster on a piece or article by teaming up with a colleague but cannot find a collaborative tool?
Simul Docs is the answer for you. You will feel like you and your groupmates are seated next to each other, conversing and working on the same paper from the same laptop simultaneously.
The first step is downloading Simul Docs then you can get started.
After writing your first draft in Microsoft Word, upload it to Simul Docs. This will automatically make it the first version. Now, another colleague can open it and make their edits. This will create another version different from the first.
Sometimes, you might be in a rush and forget to turn on tracked changes so your modifications can be updated. You have nothing to worry about. Simul Docs automatically records these edits regardless of your online or offline status.
Since it is a collaboration, a bonus feature is the ability to add comments to the document. If you want a colleague to review the changes by a specific time, or any other instructions, you can let them know in the comment section. They have the option of either accepting or rejecting your suggested edits.
Additionally, you and your groupmates can work on the document at the same time. There’s no need to lazy around waiting for someone else to make edits.
Suppose another co-worker is supposed to include their input, but they do not have Simul Docs. Maybe they are not tech-savvy. All you have to do is download the document or forward it by email. Alternatively, you can upload it to any storage software like one drive, and once their changes have been made, they can forward it to you once again, and you can open it in Simul Docs.
Once all the necessary edits have been made, you can save the final version containing all the modifications with one click.
Also, Simul Docs keeps all versions of the edited document in case you want to go back to them. It does not mean that as a new version is created, an older one is deleted.
Simul is the most convenient collaborative tool yet. Centralising your written project avoids mishaps like losing your work or losing its original format.
Visit simuldocs.com and prepare your group projects without the usual hassle and bustle.
Introduction
Contents
- Introduction
- How do you edit an anchored object in Word?
- How to Remove an Anchor in Word?
- Conclusion
- Can you anchor in Word?
- Can you anchor a text box in Word?
- How do I create an anchor text?
- How do I fix the position of a text box in Word?
- How do I keep text from moving in Word?
- How do you make anchors?
- How do I type an anchor symbol?
- What are anchor text links?
- What does lock anchor in word mean?
- How do I move the anchor point in Word?
- How do I lock an anchor in Word?
- What is anchor text example?
- How do you add an anchor?
- What are anchor tags?
- How do you anchor text in HTML?
- What does this emoji mean?
- How do I find anchor text links?
- How do I increase anchor text?
- What is a descriptive anchor text?
- What is an object anchor in Microsoft Word?
Anchor In Text In Word: In Microsoft Word, an anchor is a connection point that links an object, such as a picture or a shape, to a specific location in the text. Anchors are important because they allow you to position objects precisely relative to the text, even if you later add or delete text in the document. Anchored objects can be moved around the page or even to a different page while remaining connected to their anchor point. However, there may be instances where you need to remove the anchor from an object, such as if you want to change its position or wrapping style. By understanding how to work with anchors in Word, you can create more professional-looking documents with greater precision and control over the placement of your content.
How do you edit an anchored object in Word?
To edit an anchored object in Word, follow these steps:
- Click on the anchored object to select it. The object will be surrounded by a border to indicate that it is selected.
- Right-click on the object and select “Format Object” from the context menu. Alternatively, you can go to the “Format” tab on the Ribbon and click on “Format Object” in the “Arrange” group.
- In the “Format Object” dialog box, you can make changes to the object’s properties such as position, size, wrapping, and text flow. You can also change the object’s appearance by selecting a new fill, outline, or effect.
- Click “OK” when you’re finished to apply the changes to the object.
Note that the options available in the “Format Object” dialog box may vary depending on the type of object you’re editing (e.g. picture, shape, chart).
How to Remove an Anchor in Word?
To remove an anchor in Word, follow these steps:
- Select the anchored object that you want to remove the anchor from.
- Right-click on the object and choose “Format Object” from the context menu.
- In the “Format Object” dialog box, click on the “Layout” tab.
- Under “Wrapping style”, select “In line with text”.
- Click “OK” to apply the changes. The anchor will be removed and the object will now be positioned inline with the text.
Note: If the object was originally inserted with the “Behind Text” or “In Front of Text” wrapping style, you will need to change the wrapping style to “In line with text” before the anchor can be removed.
Conclusion
Anchors are an important feature in Microsoft Word that allow you to link objects to specific locations in your document. Anchored objects can be moved around the page and remain connected to their anchor point, providing greater control over the placement of your content. However, there may be instances where you need to remove the anchor from an object, such as if you want to change its position or wrapping style. By understanding how to work with anchors in Word, you can create more professional-looking documents with precise placement of your content. By using this feature effectively, you can enhance the visual impact and readability of your documents.
To solve this problem, MS Word has a feature called Object anchors. You can use this feature to all the objects in your documents including images. … The image will not move unless the associated paragraph moves. Aside from this, you can also anchor an image to a specific area in your document.
Word does not allow you to anchor text boxes (or any other objects) to a particular page.
Can you anchor in Word?
Word does not allow you to anchor text boxes (or any other objects) to a particular page.
Can you anchor a text box in Word?
In Word, an anchor symbol in the left margin shows where a floating object (picture, text box, table) is attached to the text. If you really want to remove the anchor, you do it by selecting the object and deleting it from the document.
How do I create an anchor text?
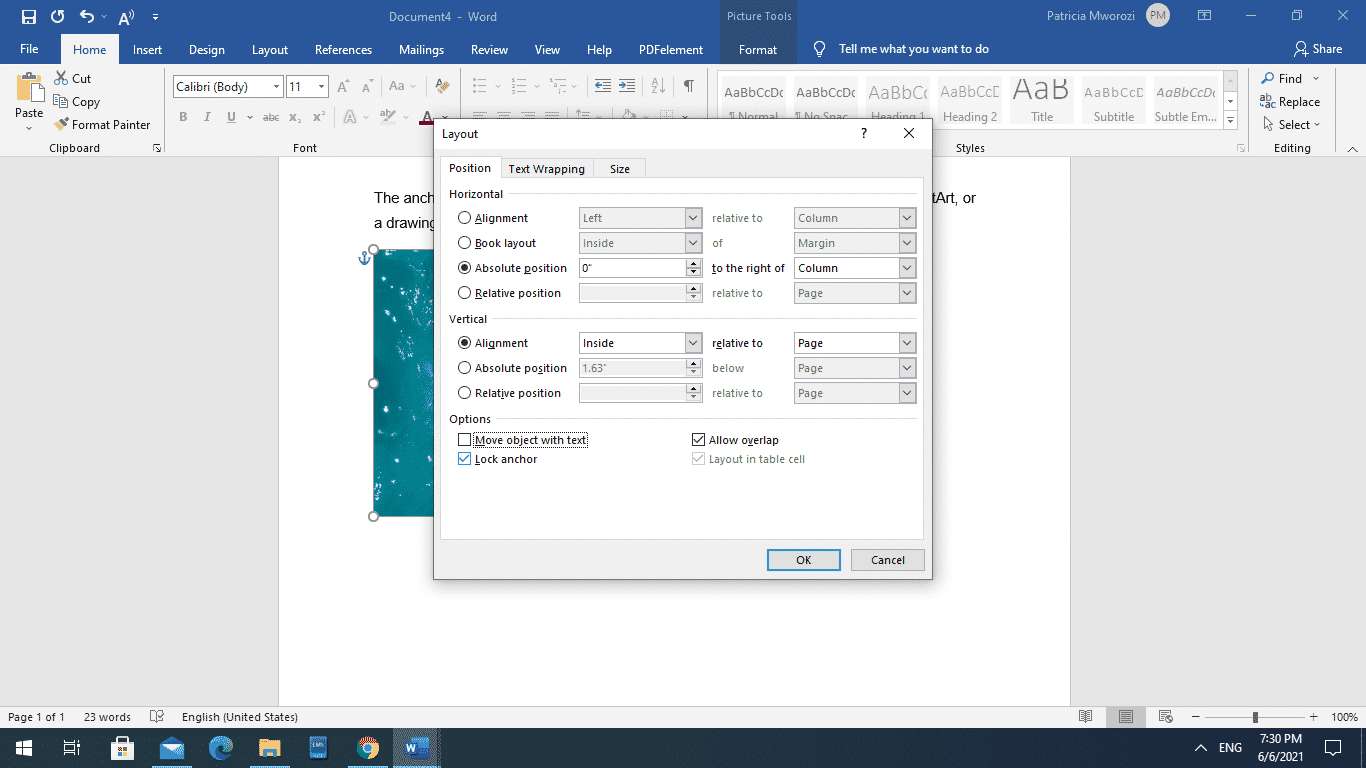
The Position tab of the Layout dialog box. Make sure the Move Object With Text check box is selected. Make sure the Lock Anchor check box is selected. Make sure the Allow Overlap check box is selected.
How do I fix the position of a text box in Word?
Anchor text is text on a page with a clickable hyperlink attached to it. You’ll want to use anchor text when linking to another source whether that be another URL, a PDF document, or any other online media.
How do I keep text from moving in Word?
When you turn on “Lock Anchor,” you can then move your image to any position on the same page as the anchor paragraph, and the object will stay in that position. However, if you move the anchor paragraph to another page, the object will also move to that page, but stay in the same relative position on the page.
How do you make anchors?
Click on the object anchor icon and drag it either up (towards the beginning of the document) or down (towards the end of the document). Release the mouse button when the mouse pointer is next to the paragraph where you want the object anchored.
How do I type an anchor symbol?
On the Ribbon’s Format tab, go to the Arrange group and choose Position→More Layout Options. Click the Position tab. (Optional) Set the position of an object precisely using controls in this dialog. Under Options, select the Lock Anchor check box.
What are anchor text links?
Anchor text that includes a variation of the keyword on the linked-to page. For example: ‘link building strategies’ linking to a page about link building. A brand name used as anchor text. For example: ‘Moz’ linking to an article on the Moz Blog.
What does lock anchor in word mean?
An anchor tag is a HTML element that creates a link to a target URL. When correctly implemented, the link can wrap around text, images, or as buttons, so that users can interact with it and visit the link’s destination.
How do I move the anchor point in Word?
The ‘anchor’ emoji is a special symbol that can be used on smartphones, tablets, and computers. The chart on this page shows how this emoji is displayed on Android, iOS, and other platforms. …
How do I lock an anchor in Word?
️ Meaning – Man in Suit Levitating Emoji
The image of a man in a suit, hovering above the ground with a shadow displayed beneath him, also known as Walt Jabsco, is the emoji symbol for “exclamation mark in the style of the rude boy logo found on records by The Specials”.
What is anchor text example?
Anchor text is the clickable text that visitors see in a hyperlink; text that’s usually uniquely coloured, underlined, or both. Best practice is to make this anchor text descriptive of what visitors are going to get when they click the link.
How do you add an anchor?
Object anchors are used to specify the paragraph with which an object is associated. Why is that important? Because it can affect the positioning of the object within the document. In order to see how this works, you need to display the settings that allow you to position the object.
What are anchor tags?
To edit the anchor, select the anchored text or object, click the Anchor button on the Properties palette, and change its name in the Change Anchor dialog. To delete the anchor, click the Anchor icon and click Remove in the Change Anchor dialog.
How do you anchor text in HTML?
An anchor text is the central text around which a lesson or unit is built. This may be, for example, a narrative piece, a data set, or an image. Students across disciplines engage with this anchor text throughout a lesson or unit, using it as base upon which to build skills and knowledge.
What does this emoji mean?
A hyperlink is the link itself. The anchor text is the text or name given to the link when the hyperlink is added. Anchor text can help your internal links to carry more weight and are taken into account with your on-page SEO.
How do I find anchor text links?
Anchor links, also called jump links or in-page links, are links that lead to another part of the page. If someone clicks on an anchor link, he doesn’t go to a new page but to another part of the same page.
How do I increase anchor text?
The HTML anchor tag defines a hyperlink that links one page to another page. It can create hyperlink to other web page as well as files, location, or any URL. The “href” attribute is the most important attribute of the HTML a tag. and which links to destination page or URL.
What is a descriptive anchor text?
The Anchor element. The HTML element (or anchor element), with its href attribute, creates a hyperlink to web pages, files, email addresses, locations in the same page, or anything else a URL can address. Content within each should indicate the link’s destination.
What is an object anchor in Microsoft Word?
⚓ Meaning – Anchor Emoji
⚓ This emoji is a navigational symbol for a marina, harbor, or shipyard. A stereotypical tattoo found on sailors – the cartoon character Popeye the Sailor Man had one on his upper arm. Anchor Emoji can be used to express that someone is dedicated or anchored in relation to something (Eg.

What is an anchor in Word?
The anchor is a symbol that sometimes appears when you insert an image, or a SmartArt, or a drawing into a Word document. By default, the anchor will only appear when you insert a picture, clipart, or SmartArt and then ‘Wrap text. … When you wrap the text, an anchor will appear next to the image.
How do I anchor an image in Word 2020?
Here are the steps to accomplish this.
- Step 1: Find and open the document that contains the image you will anchor. …
- Step 2: Enable the Object Anchors option. …
- Step 3: Change the layout of the selected image through text wrapping. …
- Step 4: Position the selected image to your desired area on the page.
How do I move an anchor in Word?
To move the object anchor to a different paragraph, follow these steps:
- Click once on the object whose anchor you want to move. …
- Click on the object anchor icon and drag it either up (towards the beginning of the document) or down (towards the end of the document).
How do I move the anchor point in Word?
Click on the object anchor icon and drag it either up (towards the beginning of the document) or down (towards the end of the document). Release the mouse button when the mouse pointer is next to the paragraph where you want the object anchored.
What is anchor text example?
Anchor text that includes a variation of the keyword on the linked-to page. For example: ‘link building strategies’ linking to a page about link building. A brand name used as anchor text. For example: ‘Moz’ linking to an article on the Moz Blog.
What is exact match anchor text?
Exact match anchor text is a signal of link building You’d inspect things such as the area where the link is placed, the text being used, whether or not it’s “do follow” or “no follow”, the relevancy of the site, etc.
How to make an anchor text link in a Word document?
1. Select the text that you want to make the anchor text by making it blue. 2. Right click on the blue selection and a menu will appear. 3. Choose hyperlink from the menu. 4. Your text you selected will automatically be inserted into the Text to display section at…
What is the feature of object anchor in word?
Because inline objects are anchored to the place within the text where they were inserted. In other words, they are treated like any other character in the text itself. If you want, you can modify whether Word displays object anchors or not. You can change this setting by following these steps: Display the Word Options dialog box.
How do you insert an anchor in Excel?
You can click a word or place your cursor immediately before it. Or, you can highlight text. The anchor will be placed immediately above this location. This displays the “Insert an anchor” window. After you assign a name to the anchor, click OK.
What does anchor text mean on a website?
Anchor text is the visible characters and words that hyperlinks display when linking to another document or location on the web. It usually appears as blue underlined text, but you change your website’s link colors and styles through your HTML or CSS.

When creating a document in Microsoft Word, it is common to insert a picture, table, or text box; However, when inserting these objects, an anchor icon may appear in the upper left corner; So, you are wondering what does this icon mean? and how do I remove it from my document?
In this article we will explain what does anchor mean in word? and how to remove the anchor that appears in Word?
It is very common for everyone to use Microsoft Office , and when using Microsoft Word to create a document, it is common to insert tables, images, and text boxes into text; This adds value to the document and makes bring out the information .
But when you insert a text box, table or picture into the text, a small anchor symbol may appear in the upper left corner; do so tells you that a floating object (text box, image or table) was tied to your text . This icon is also known as the anchor anchor.
This anchor symbol used by Word is used to link and lock objects with the current text or page ; this way you prevent the element you inserted from moving out of the square of the text. And it can be very useful even for create a creative timeline in Word and many other creations.
You should know that when an item is anchored to a paragraph, it will stay in that location; the only way it will move is to move the paragraph to another location.
If you want to move the paragraph but not the image, you must configure the image layout options to be anchored to a specific position on the page and not in the text. You should keep in mind that if you change the text on the page, the image will automatically move to that page and be located at the position you specified on the previous page.
For many Word users, this feature has proven to be useful. This makes the process easier when inserting something, as you can precisely manipulate said element without losing the shape of the text.
Although this is a very useful function, some users do not like to implement it, therefore Microsoft Word allows you to remove or disable this function. In addition, we can even take advantage of it during the create Word documents with Android .
How to remove the anchor that appears in Word?
Microsoft Word allows you to remove the anchor in two different ways, but both are very easy to manage.
-
Method 1: right click
- Open the Word document.
- Make a click right on the image including you want to remove the anchor.
- A floating menu will appear and you must select «Size and position» .
- Then a box called «Design» will appear on the screen; Click on the tab «Text Wrapping» at the top of the box.
- Select option «In line with the text» . This option does not allow images, tables or text boxes to have anchors.
- To save the changes, press the button «OK» .
The box called “Design” (step 4) allows you to configure the anchoring options, according to your preferences. If you adjust the anchor, you might not need to remove this feature that Word has made available to you.
-
Method 2: File menu
- Once in the Word document.
- Go to the top left corner of the screen and click «File» .
- Another window will open immediately, select «Options» .
- A box will appear where you need to check the option «Display» in the left menu.
- In the «Always display these format marks on screen» section; uncheck the box «Object delimiters» .
- And click on «OK» .
If you want to activate the image anchoring at another time, check the «Object delimiter» box and this option will be activated. And if you have succeeded in activate the function of registration automatic in Word , you will only have to wait for the changes you have made to be saved.
Make adjustments to a Word document is very simple, you don’t need to be a computer technician, you just need patience and follow the instructions to learn how to handle Word like a expert .

This article is written for users of the following Microsoft Word versions: 2007, 2010, 2013, 2016, 2019, and Word in Microsoft 365. If you are using an earlier version (Word 2003 or earlier), this tip may not work for you. For a version of this tip written specifically for earlier versions of Word, click here: Understanding Object Anchors.
Written by Allen Wyatt (last updated December 7, 2021)
This tip applies to Word 2007, 2010, 2013, 2016, 2019, and Word in Microsoft 365
Objects can be placed in your document in two ways: either inline or floating. Inline objects are those that reside on the same layer as your text and are positioned within the stream of text that surrounds the object. Floating objects are those that are placed on a layer over the text. The thing that indicates essentially where a floating object is located in relation to the text in your document is referred to as an object anchor.
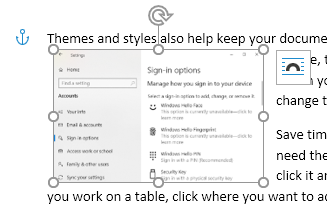
If you click an object so that it is selected, and if the object is truly a floating object, and if you are looking at the document in Print Layout view, then you can possibly see the object anchor on the screen. (That’s a lot of «ifs,» I know.) (See Figure 1.)
Figure 1. An object anchor shows up as a small boat anchor.
I say «possibly» because object anchors are not always visible. In other words, you can control the display of the anchors. (More on that in a moment.) If you select a graphic object in your document and you see a boat-anchor icon appear in the left margin of the document, then you know you have the display of object anchors enabled. If you select an inline object, then there is no object anchor to see. Why? Because inline objects are anchored to the place within the text where they were inserted. In other words, they are treated like any other character in the text itself.
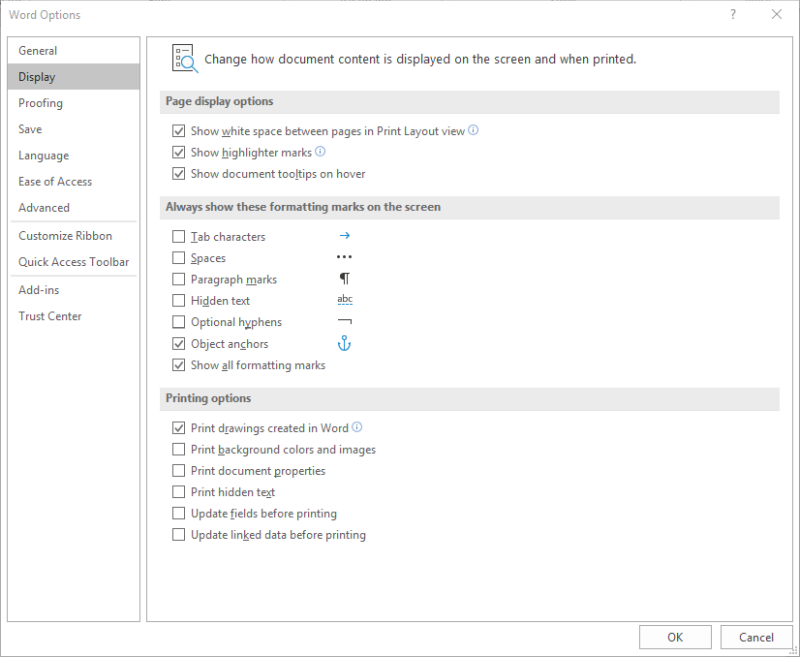
If you want, you can modify whether Word displays object anchors or not. You can change this setting by following these steps:
- Display the Word Options dialog box. (In Word 2007 click the Office button and then click Word Options. In Word 2010 or later versions, display the File tab of the ribbon and then click Options.)
- Click Display at the left side of the dialog box. (See Figure 2.)
- To view object anchors, make sure the Object Anchors check box is selected.
- Click on OK.
Figure 2. The Display options of the Word Options dialog box.
Object anchors are used to specify the paragraph with which an object is associated. Why is that important? Because it can affect the positioning of the object within the document. In order to see how this works, you need to display the settings that allow you to position the object. Follow these steps if you are using Word 2007 or Word 2010:
- Right-click a floating object. Word displays a Context menu for that object.
- Choose the Format Picture option. Word displays the Format Picture dialog box.
- Make sure the Layout tab is selected.
- Click the Advanced button. Word displays the Advanced Layout dialog box.
If you are using Word 2013 or a later version, then the steps are a bit different because Word uses different Context menus:
- Right-click a floating object. Word displays a Context menu for that object.
- Choose the Size and Position option. Word displays Layout dialog box.
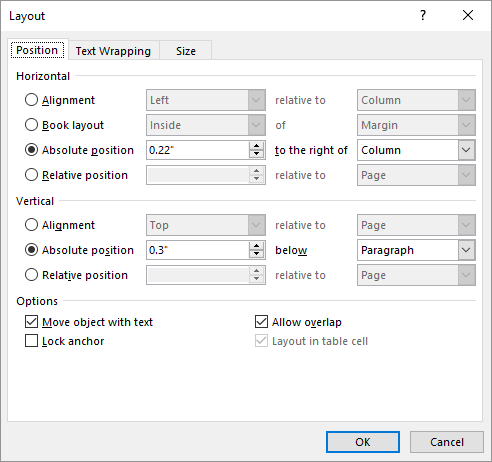
- Make sure the Position tab is selected. (See Figure 3.)
Figure 3. The Position tab of the Layout dialog box.
Note that these steps will only work if you are working with a floating object; again, inline objects don’t allow you to adjust their positioning relative to an object anchor. (Object anchors only exist for floating objects.)
Regardless of the version of Word you are using, the dialog box you see includes a plethora of controls that specify the positioning of the picture. One thing you can set is the vertical position of the picture in relation to the paragraph to which it is anchored. Thus, seeing the object anchor helps you to understand the positioning of the picture.
In addition, the Advanced Layout dialog box (Word 2007 and Word 2010) and the Layout dialog box (later versions of Word) allow you to select a check box named Lock Anchor. This option causes Word to paginate your document so that the object (the picture) is always on the same page as the object anchor. This is the best way to ensure that a floating picture is on the same page as the paragraph that describes what is in the picture.
WordTips is your source for cost-effective Microsoft Word training.
(Microsoft Word is the most popular word processing software in the world.)
This tip (8229) applies to Microsoft Word 2007, 2010, 2013, 2016, 2019, and Word in Microsoft 365. You can find a version of this tip for the older menu interface of Word here: Understanding Object Anchors.
Author Bio
With more than 50 non-fiction books and numerous magazine articles to his credit, Allen Wyatt is an internationally recognized author. He is president of Sharon Parq Associates, a computer and publishing services company. Learn more about Allen…
MORE FROM ALLEN
Changing the Size of a Graphic
Adding a graphic to a worksheet is easy. Getting that graphic to just the right size may take a little bit of trial and …
Discover More
Marking Gender-Specific Grammar
Some people feel that your writing can be better if you remove gender-specific language it may contain. Here’s how you …
Discover More
Keeping Word Open after Closing Documents
Usually when you are done working on a document, you want to close Word completely and move on to something else. There …
Discover More

