
Word for Microsoft 365 Word for Microsoft 365 for Mac Word for the web Word 2021 Word 2021 for Mac Word 2019 Word 2019 for Mac Word 2016 Word 2016 for Mac Word 2013 Word 2010 Word 2007 Word Starter 2010 More…Less
Use sections breaks to divide and format documents of all sizes. For example, you can break down sections into chapters, and add formatting such as columns, headers and footers, page borders, to each.
Add a section break
-
Select where you want a new section to begin.
-
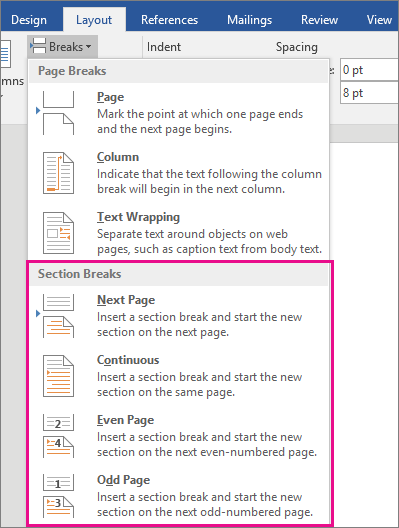
Go to Layout > Breaks.

-
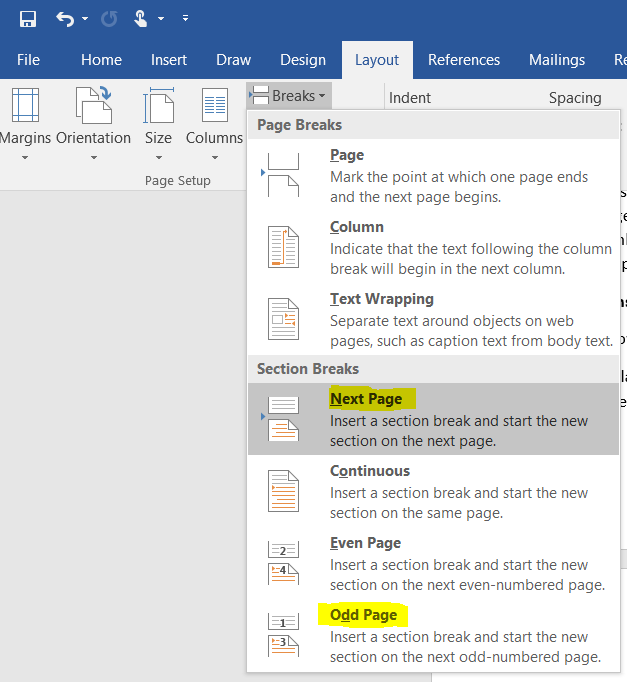
Choose the type of section break you want:
-
Next Page Section break starts the new section on the following page.
-
Continuous Section break starts the new section on the same page. This type of section break is often used to change the number of columns without starting a new page.
-
Even Page Section break starts a new section on the next even-numbered page.
-
Odd Page Section break starts a new section on the next odd-numbered page.
-


Important:
Office 2010 is no longer supported. Upgrade to Microsoft 365 to work anywhere from any device and continue to receive support.
Upgrade now
Insert a section break
-
Select where you want a new section to begin.
-
Go to Page Layout > Breaks.
-
Section break that you want to add:
-
A Next Page section break starts the new section on the next page
-
A Continuous section break starts the new section on the same page.
Tip: You can use Continuous section breaks to create pages with different number of columns.
-
An Even Page or an Odd Page section break starts the new section on the next even-numbered or odd-numbered page.
-
Insert a section break
-
Select where you want a new section to begin.
-
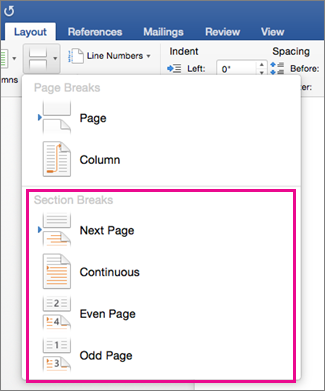
Go to Layout > Breaks, and then choose the type of section break you want.
-
Next Page Starts the new section on the following page.
-
Continuous Starts the new section on the same page. This section break is particularly useful for documents that have columns. You can use it to change the number of columns without starting a new page.
-
Even Page Starts the new section on the next even-numbered page. For example, if you insert an Even Page Break at the end of page 3, the next section will start on page 4.
-
Odd Page Starts the new section on the next odd-numbered page. For example, if you insert an Odd Page Section Break at the end of page 3, the next section will start on page 5.
-
You can add page breaks, but Word for the web can’t add section breaks yet.
If you have the Word desktop application, use the Open in Word command to open the document and add section breaks there. When you’re done and you save the document, it will continue to be stored where you opened it in Word for the web.
See also
Use section breaks to change the layout or formatting in a section of your document
Insert a page break
Need more help?
Word for Microsoft 365 Word 2021 Word 2019 Word 2016 Word 2013 Word 2010 Word 2007 More…Less
You can use section breaks to change the layout or formatting of pages in your document.
To change formatting in a document, insert a section break at the beginning of where you want the change. Set up the formatting change just past the new section break. If you want to change formatting again, put in another section break. If your changes are to be on the same page, choose the Continuous section break. Otherwise, choose Next Page, Odd Page, or Even Page section breaks.
If the formatting change occurs in the previous section, press Ctrl or Command + Z and move your cursor to after the section break and try it again.
Use section breaks to layout or format a document
When you insert a section break, choose the type of break that fits the changes you want to make. Here are the types with usage suggestions:
The Next Page command inserts a section break and starts the new section on the next page. This type of section break is useful to start new chapters in a document.
The Continuous command inserts a section break and starts the new section on the same page. A continuous section break is useful to create format changes such as a different number of columns on a page.

The Even Page or Odd Page command inserts a section break and starts the new section on the next even-numbered or odd-numbered page. To start document chapters always on an odd or even page, use the Odd page or Even page section break option.
Need more help?
Updated: 04/01/2018 by

In a word processor, such as Microsoft Word, a section break splits your document’s pages into sections with customizable formats or layouts. For example, you could create pages that have different headers and footers.
How to insert a section break
- In Word, click the Page Layout tab.
- In the Page Layout Page Setup section click Breaks.
- Select the type of section break you want to use.
How to delete a section break
- Scroll up or down the page until you locate the section break.
- Highlight the entire section break.
- Press Delete.
Tip
If you cannot see a section break, turn on formatting marks so the break is visible.
Tip
You may also place your cursor at the start or end of the page break and repeatedly use the backspace or delete key to remove it.
Types of section breaks
In Microsoft Word, there are several section layouts. Below is a brief description of each of the different types of section breaks.
Next page
Similar to a Page Break, Next Page creates a break in the document to go to the next page.
Continuous
Inserts a Continuous break, which starts a new section on the same page. A continuous break has the appearance of pressing Enter, however, if formatting marks are enabled, you can see «Section Break (Continuous)» were sections breaks are located.
Even page
Inserts a section break and starts the new section on the next even-numbered page.
Odd page
Inserts a section break and starts the new section on the next odd-numbered page.
Layout and formatting changes
When a new section is created, any of the below layout or formatting changes can be made in the new section.
- Columns.
- Footnotes and endnotes.
- Headers and footers.
- Line numbering.
- Margins.
- Page borders.
- Page numbering.
- Paper size or orientation.
- Paper source for a printer.
- Vertical alignment of text on a page.
Break, Page break, Section, Software terms, Word processor terms
What is a Section Break?
In Microsoft Word, section breaks are meant to divide your book into sections. In books, they are used between chapters and to divide the front-matter or back-matter pages. Section break should be placed after the title page, copyright page, dedication page, table of contents, chapter 1, chapter 2, and so on. These section breaks will create a page break between each of those sections.
But it is not just a page break. Section breaks also control the page numbers within the section, running heads, and whether the next section begins on the next page or next right hand (odd numbered) page. Let’s look at each of those.
Page Numbering
Section breaks allow you to control the numbering in each section. This lets you have page #1 be the first page of Chapter One. It also makes it possible to use lower case roman numerals for page numbers (i, ii, iii, iv, etc.) on the front-matter, and Arabic numerals (1, 2, 3, 4, etc.) on the chapter pages.
Running Heads
Each section has a first page, even page, and odd page header. You can place different running head text in each one (or not have any). In a book, the first-page header should be left blank as this would be the chapter title page, the even page header often has the book title, and the odd page header the current chapter title or author name. when you use section breaks, you can have different running heads in each section. This is useful for having the current chapter title for the running head of a section. You can also choose to link the current sections running head with the previous section if you want them to be the same.
Where to Start the Next Section
In a book, you often want to start the next section on the next right-side page (odd page). You would do this in Word by placing a Section Break: Odd Page before the chapter or section you want to start on the next odd numbered page, which will be a ride-side page. Word will then place a blank left-side page (if needed) before that next chapter to make certain that happens. Take note! Word will not display a blank left-side page in Normal view mode. This often confuses writers who don’t realize that that blank is there as they can’t see it. When you do a print preview, print, or create a PDF, Word will show the blank page. It is also reflected in the page numbering. You will notice that t seems that there is a missing page number. You might see a page 5, 6, 7, and then it goes to a new chapter which is shown as page 9. Where is page 8? It is a blank left-side page that Word is not showing you.
How to Insert a Section Break
Here is how you place a section break.
- Place your cursor where you want the section break to be placed. For example, after the last sentence of a chapter, before the next chapter starts.
- In the Word ribbon go to the Layout tab
- Click on Breaks
- From the drop down select either Next Page or Odd Page under Section Breaks.
You will then see a Section Break marker appear in your document (if you have show formatting marks turned on)

Start Chapter One on Page #1
Once your book is divided into sections, you can control the page numbering with in. For example, let’s say you want Chapter One to start on page #1. Make sure your chapters are divided into sections then place your cursor in Chapter One.
- First, add page numbers to your section.
- Place your cursor where you want the page numbers to appear in the section (such as the footer area)
- From the Word ribbon go to the Insert
- Click on the drop down for Page Number.
- Choose Current Position then Plain Number.
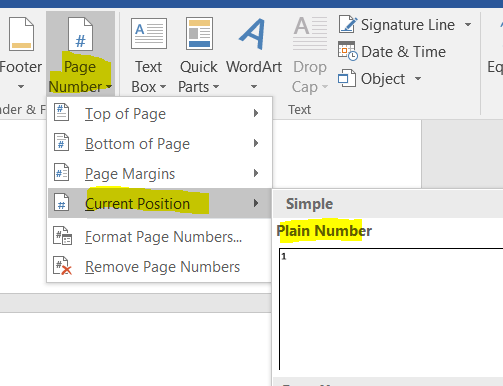
- Once your page number is where you want it, go back to that menu and select Format Page Numbers.
- Choose the Number format, then Start at: 1. Click OK.
A Different Running Head for Each Chapter
- Let’s say you want to place the current chapter title on the odd page running heads in your book. Here is how you would do that with the help of section breaks.
- First, make certain you have your document divided up by section breaks.
- Select all (press Ctrl + A)
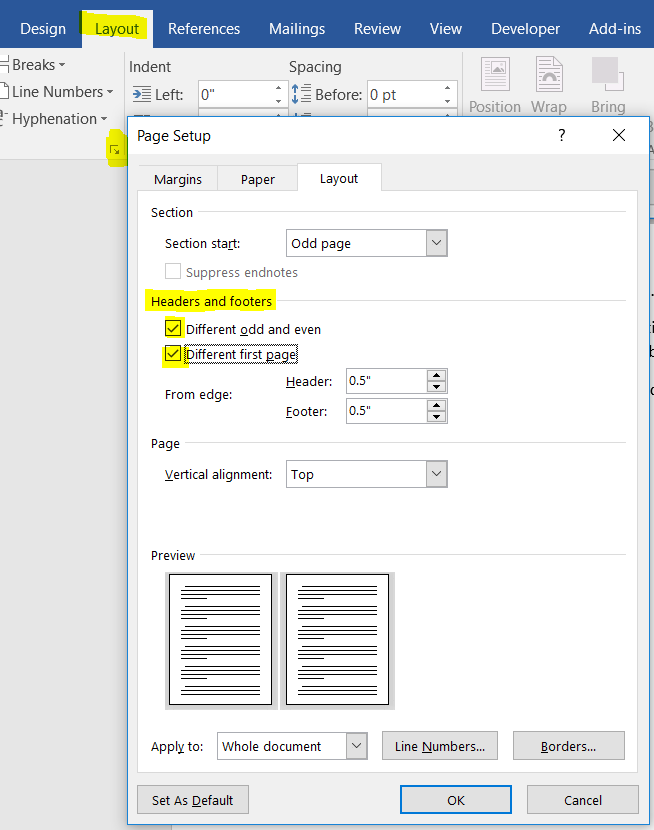
- Go into Layout from the Word menu.
- Open the Page Setup
- Under the Layout tab under Headers and footers check both Different odd and even and Different first page. Click OK.
- Next, go into the header area of your document for Chapter One. You can get there by double clicking in that ear of your Word document.
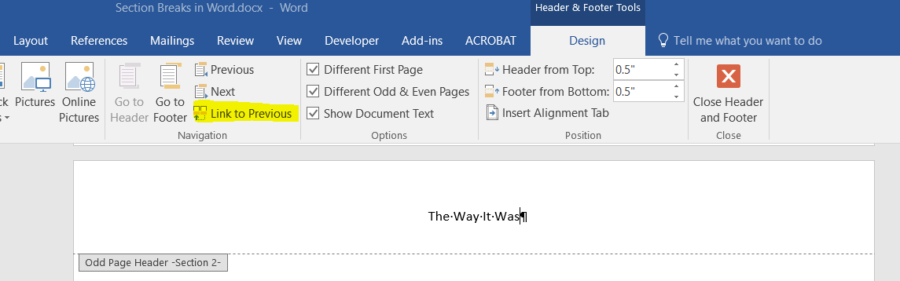
- Before you do anything else, make sure the Link to Previous toggle is NOT on. If it is on, it will link this running head with the running head in the previous section and they would both be the same. Click it if needed to turn it off.
- Type your chapter title for this section in the header area. Click the Close Header
- Repeat that process for each chapter in your book.
By the way, if you are hiring someone to do your book layout, don’t worry about having to do any of these things with section breaks. Your formatter will handle all of that for you and is likely using Adobe InDesign, not Microsoft Word to format your book.
Questions? Post them in the comment section below.
When you’re working on a long document, separating it into different parts makes it much easier to navigate. Microsoft Word eases your workflow by letting you insert document breaks, namely section and page breaks.


As you’ll see in this article by defining section and page breaks you can apply specific formatting elements in different parts of your document. You’ll also have better control over pagination.
Read on to learn how to use section and page breaks in Word to make your document more visually appealing and easier for readers to make their way around. Finally, we’ll show you some great sources for professionally designed Word templates.
How to Add Breaks in MS Word (Quick Start Video)
Are you ready to learn how how to insert breaks in MS Word? The short video below will give you a head start on inserting, viewing, and deleting MS Word section and page breaks:
To learn even more about breaks in Word (including the difference betwen section breaks and page breaks), study the written tutorial below.
Understanding Section and Page Breaks
Section and page breaks are types of breaks or partitions in a Word document. In this section, you’ll learn some basics:
1. Microsoft Word Section Break vs Page Break
A page break is a partition in the text of the document. At a page break, the succeeding text is automatically placed on top of a new page.


But, with a section break for Word the text is partitioned — along with the formatting associated with it:
- page numbers
- margins
- headers and footers
- paper size and/or orientation
Also, a Microsoft Word section break may or may not begin on a new page (more on that below).
2. Why Use Microsoft Section and Page Breaks?
Section and page breaks are useful for partitioning different parts of a document, especially a long one.
In a book, you’d use section breaks to divide it into chapters as well as delineate the front matter from the back matter. The title page, copyright page, table of contents, individual chapters, index, etc., would be separate sections.
For example, you usually want a new chapter of a book (or similar) document to begin on a new page. This is when a page break is most useful.
A section break for MS Word is useful for visually distinguishing parts of a document. An example of where you might use a section break is in a proposal where you want the summary to have a different layout. In this case, the summary section could have its own header, footer, and margins that are different from the rest of the document.
By using section breaks, each chapter can have a different running header, including the chapter title.


Microsoft Word Section breaks also let you use lower case numbers for page numbers on the introduction of the book and Arabic numerals on the rest of the pages.
Similarly, a section break in Microsoft Word lets you use a two-column format in the index section and a single column everywhere else.
You’ll also want to use section and page breaks when you want to control the pagination of your document. For example, the first page of your document may be a cover page. But you don’t want the cover page to be page 1 of your document. By inserting a section break after the cover page, you can make the next page be page 1.
You accomplish these results by inserting different types of section and page breaks in Word.
3. Types of Microsoft Word Section Breaks
There are four types of section breaks in MS Word:
- Next Page. This type of section break forces the text to the right of the cursor to a new section on the following page. All the formatting associated with the text is carried through to the new section as well.
- Continuous. A continuous section break creates a new section but keeps the text on the same page. This means two different sections can have their own formatting yet remain on the same page.
- Odd Page. This kind of section break moves the text to the right of the cursor to the top of the next odd-numbered page. If you’re on page 3, for example, and you insert an Odd Page Section Break, the next section will start on top of page 5 (page 4 will be blank). Book chapters usually begin on the next odd page of the book.
- Even Page. An Even Page section break moves the text to the right of the cursor to the top of the next even-numbered page. So, if you’re on page 6 and you insert an Even Page Section Break, the new section will begin on page 8 (leaving page 7 blank).
4. Types of Page Breaks
As for Microsoft Word page breaks, there are two kinds:


- Simple Page Breaks. A simple page break moves text to the right of the cursor to the top of the next page.
- Column Breaks. If your document is broken up into columns, a column break moves text to the right of the cursor to the top of the next column.
How to View Existing Breaks in an MS Word Doc
By default, section and page breaks are invisible in Word. You can only see their effects. You’ll see changes in formatting and pagination for each section. That’s because these breaks don’t appear when the document is printed.
As you’re editing and formatting your document, you may need to see page and section breaks. To view existing page and section breaks in Word, on the Home tab, then click on the Paragraph button.


How to Insert Section Breaks in Your Word Docs
To insert a page or section break, place the cursor where you want one section/page to end and the next section/page to begin.
Go to Insert > Break, then choose the specific type of page break or section break you want to insert.


Or, click on the Layout tab. Then click on the Breaks button on the ribbon and select the type of page or section break you wish to insert.


How to Remove/Delete Section and Page Breaks in Word
To remove a section or page break in Word, first display all the breaks.
Select the section or page break you want to remove by highlighting it. Click on either the Delete or Backspace key on your keyboard.


When you delete a section break, the text in the section adopts the formatting of the next section.
Tips for Using Section and Page Breaks in MS Word
Are you just getting comfortable with using Microsoft Word section and page breaks? Here are some extra tips to help you use them effectively:
1. Keep Your Section Breaks to a Minimum
Insert a section break in Word only when you have to (see above for when it’s a good idea to do so). Having more sections than necessary makes it more difficult to make global changes to your document, because you’d have to manually make those changes in each section.
2. Pay Attention to Which Section You’re In
If you’ve divided your document into sections, always be aware of what section you’re in when you make formatting changes. That’s because these changes will apply only to the section you’re currently in — that’s the section where your cursor is. If you want to make a formatting change to apply to the whole document, select the entire document first before making your changes.
3. Microsoft Word May Change a Continuous Section Break to the Other Section Break Types
You may be surprised that your continuous section break has been converted into a different type of section break. This happens when you’ve got a continuous section break. Then, in the next section, you try to apply a different header/footer, pagination, margins, or page size and orientation. Those formatting changes require a page break. And so, Word will automatically change the section break type to one that results in a page break.
Streamline Your Microsoft Word Workflow With Templates


There are other ways to streamline your MS Word workflow. One of them is using premium Word templates, like the ones you’ll find at Envato. Premium templates for Microsoft Word are created by professional designers to provide impressive layouts. These templates are customizable with your content, images, and branding. You can also adjust the design and layout as you please.
Envato Elements gives you unlimited downloads of Word templates as well as other inputs you need to complete your projects — fonts, graphics, stock photos, and more — all for one flat monthly subscription fee.


Or, go to GraphicRiver for Microsoft Word templates and other creative elements on a pay-per-use basis. It’s a terrific source for one-off projects.
Make Your Document Easier to Read and Navigate
Now you know how to use section and page breaks in Microsoft Word to better organize your document. Section breaks also let you have more granular control over the formatting of specific parts of your document. These make your document look better as well as easier to read and navigate through.
Use the steps you learned in this article to properly use section and page breaks. Also, use Word templates to make it much easier and faster to create impressive documents. Envato Elements provides unlimited downloads of templates for Word for one monthly subscription. For occasional projects, GraphicRiver is an excellent source of Word templates where you pay for each use.
Editorial Note: This tutorial has been updated to add a video by Andrew Childress.