
What is a Word add-in?
Word add-in is a user developed application that can be integrated with Microsoft word and can interact with the content of the document using the word javascript API.
What can we do using Microsoft word add-in?
- Adding different type of content to document
- bring external data in to office
- automate office documents
- Add breaks (line break, paragraph break etc)
- Text formatting (highlight, bold etc..)
- custom search options
- embed maps ,charts.
- Custom Ui design with fabric and many more things.
Why we use Word add-ins?
Some times our Requirements does not fulfil with pre-defined functions of the Microsoft word. At that time we can easily build functions as we needed and can integrate with those in to the Microsoft word. And office web add-ins are cross platform , So that we can run in office for windows, Mac, ios and office online.
How to start a project?
We can easily create word add-in using visual studio. In this tutorial I am using Microsoft visual studio 2015
Start new project and then select Templates -> visual c# -> office/sharepoint -> web add-ins -> word add-ins

if you do not see these templates, then you need to download office developer tools for visual studio 2015.
After creating your project, you will see lot of files. Office add-in consists with two main components.
Components of office add-in

Manifest
This is a xml file. This file consist of settings and configuration of the add-in. You can change the display name etc in that file
In the solution explorer we can see these files, under test-add-in part. You can see the manifest. open that file and see the xml contents.

 <DefaultSettings>
 <SourceLocation DefaultValue="~remoteAppUrl/Home.html" />
 </DefaultSettings>
Actually in a word add-in, a html file is loaded in to the task pane of the Microsoft word. You can see the configuration for that part in above code. In the <sourceLocation> tag we have set the Home.html file as the default html view.
Webpage
In the solution explorer we can see these files, under test add in web part. There are two main files under web app. Those are home.html and home.js.

In the home.html we write normal html that we all know to design the content of the task pane. In the Home.js, we write functions to handle the word web add in.we will se how to write our own function in a later post.
How to run the project ?
Click run arrow in visual studio to see the word web add-in. Then It will automatically generate self sign certificate and you will be asked to trust it.

Your html files are hosted in localhost. To load html file to Microsoft word, you need to trust the domain in your browser settings. You can see this is a self sign certificate because of issued-by and issued-to are from same person. Click yes, then you will not face certificate problems.
This certificate is only for testing purposes. We will see how to deploy project in a later post.
Then It will open Microsoft word automatically and you can see a task pane like this

OMG!. we have build our first web add-in successfully. This is the default template we will get into the task pane at we run the default project. we can change those things and add new contents as we like. According to this template we can display the selected word in the task pane. Try it your self.
In the next post, we will see how to customise and how to create our own design with the word add-in.
| title | description | ms.date | ms.prod | ms.localizationpriority |
|---|---|---|---|---|
|
Build your first Word task pane add-in |
Learn how to build a simple Word task pane add-in by using the Office JavaScript API. |
06/10/2022 |
word |
high |
Build your first Word task pane add-in
In this article, you’ll walk through the process of building a Word task pane add-in.
Create the add-in
[!includeChoose your editor]
Yeoman generator
Prerequisites
[!includeSet up requirements]
[!includeYeoman generator prerequisites]
Create the add-in project
[!includeYeoman generator create project guidance]
- Choose a project type:
Office Add-in Task Pane project - Choose a script type:
JavaScript - What do you want to name your add-in?
My Office Add-in - Which Office client application would you like to support?
Word

After you complete the wizard, the generator creates the project and installs supporting Node components.
[!includeYeoman generator next steps]
Explore the project
[!includeYeoman generator add-in project components]
Try it out
-
Navigate to the root folder of the project.
-
Complete the following steps to start the local web server and sideload your add-in.
[!INCLUDE alert use https]
[!TIP]
If you’re testing your add-in on Mac, run the following command before proceeding. When you run this command, the local web server starts.-
To test your add-in in Word, run the following command in the root directory of your project. This starts the local web server (if it’s not already running) and opens Word with your add-in loaded.
-
To test your add-in in Word on a browser, run the following command in the root directory of your project. When you run this command, the local web server starts. Replace «{url}» with the URL of a Word document on your OneDrive or a SharePoint library to which you have permissions.
[!INCLUDE npm start:web command syntax]
-
-
In Word, if the «My Office Add-in» task pane isn’t already open, open a new document, choose the Home tab, and then choose the Show Taskpane button in the ribbon to open the add-in task pane.

-
At the bottom of the task pane, choose the Run link to add the text «Hello World» to the document in blue font.


Next steps
Congratulations, you’ve successfully created a Word task pane add-in! Next, learn more about the capabilities of a Word add-in and build a more complex add-in by following along with the Word add-in tutorial.
[!div class=»nextstepaction»]
Word add-in tutorial
Visual Studio
Prerequisites
[!includeQuick Start prerequisites]
Create the add-in project
-
In Visual Studio, choose Create a new project.
-
Using the search box, enter add-in. Choose Word Web Add-in, then select Next.
-
Name your project and select Create.
-
Visual Studio creates a solution and its two projects appear in Solution Explorer. The Home.html file opens in Visual Studio.
Explore the Visual Studio solution
[!includeDescription of Visual Studio projects]
Update the code
-
Home.html specifies the HTML that will be rendered in the add-in’s task pane. In Home.html, replace the
<body>element with the following markup and save the file.<body> <div id="content-header"> <div class="padding"> <h1>Welcome</h1> </div> </div> <div id="content-main"> <div class="padding"> <p>Choose the buttons below to add boilerplate text to the document by using the Word JavaScript API.</p> <br /> <h3>Try it out</h3> <button id="emerson">Add quote from Ralph Waldo Emerson</button> <br /><br /> <button id="checkhov">Add quote from Anton Chekhov</button> <br /><br /> <button id="proverb">Add Chinese proverb</button> </div> </div> <br /> <div id="supportedVersion"/> </body>
-
Open the file Home.js in the root of the web application project. This file specifies the script for the add-in. Replace the entire contents with the following code and save the file.
[!includeInformation about the use of ES6 JavaScript]
'use strict';

(function () {

    Office.onReady(function() {
        // Office is ready.
        $(document).ready(function () {
            // The document is ready.
            // Use this to check whether the API is supported in the Word client.
            if (Office.context.requirements.isSetSupported('WordApi', '1.1')) {
                // Do something that is only available via the new APIs.
                $('#emerson').click(insertEmersonQuoteAtSelection);
                $('#checkhov').click(insertChekhovQuoteAtTheBeginning);
                $('#proverb').click(insertChineseProverbAtTheEnd);
                $('#supportedVersion').html('This code is using Word 2016 or later.');
            }
            else {
                // Just letting you know that this code will not work with your version of Word.
                $('#supportedVersion').html('This code requires Word 2016 or later.');
            }
        });
    });

    async function insertEmersonQuoteAtSelection() {
        await Word.run(async (context) => {

            // Create a proxy object for the document.
            const thisDocument = context.document;

            // Queue a command to get the current selection.
            // Create a proxy range object for the selection.
            const range = thisDocument.getSelection();

            // Queue a command to replace the selected text.
            range.insertText('"Hitch your wagon to a star."n', Word.InsertLocation.replace);

            // Synchronize the document state by executing the queued commands,
            // and return a promise to indicate task completion.
            await context.sync();
            console.log('Added a quote from Ralph Waldo Emerson.');
        })
        .catch(function (error) {
            console.log('Error: ' + JSON.stringify(error));
            if (error instanceof OfficeExtension.Error) {
                console.log('Debug info: ' + JSON.stringify(error.debugInfo));
            }
        });
    }

    async function insertChekhovQuoteAtTheBeginning() {
        await Word.run(async (context) => {

            // Create a proxy object for the document body.
            const body = context.document.body;

            // Queue a command to insert text at the start of the document body.
            body.insertText('"Knowledge is of no value unless you put it into practice."n', Word.InsertLocation.start);

            // Synchronize the document state by executing the queued commands,
            // and return a promise to indicate task completion.
            await context.sync();
            console.log('Added a quote from Anton Chekhov.');
        })
        .catch(function (error) {
            console.log('Error: ' + JSON.stringify(error));
            if (error instanceof OfficeExtension.Error) {
                console.log('Debug info: ' + JSON.stringify(error.debugInfo));
            }
        });
    }

    async function insertChineseProverbAtTheEnd() {
        await Word.run(async (context) => {

            // Create a proxy object for the document body.
            const body = context.document.body;

            // Queue a command to insert text at the end of the document body.
            body.insertText('"To know the road ahead, ask those coming back."n', Word.InsertLocation.end);

            // Synchronize the document state by executing the queued commands,
            // and return a promise to indicate task completion.
            await context.sync();
            console.log('Added a quote from a Chinese proverb.');
        })
        .catch(function (error) {
            console.log('Error: ' + JSON.stringify(error));
            if (error instanceof OfficeExtension.Error) {
                console.log('Debug info: ' + JSON.stringify(error.debugInfo));
            }
        });
    }
})();
-
Open the file Home.css in the root of the web application project. This file specifies the custom styles for the add-in. Replace the entire contents with the following code and save the file.
#content-header {
    background: #2a8dd4;
    color: #fff;
    position: absolute;
    top: 0;
    left: 0;
    width: 100%;
    height: 80px;
    overflow: hidden;
}

#content-main {
    background: #fff;
    position: fixed;
    top: 80px;
    left: 0;
    right: 0;
    bottom: 0;
    overflow: auto;
}

.padding {
    padding: 15px;
}
Update the manifest
-
Open the XML manifest file in the add-in project. This file defines the add-in’s settings and capabilities.
-
The
ProviderNameelement has a placeholder value. Replace it with your name. -
The
DefaultValueattribute of theDisplayNameelement has a placeholder. Replace it with My Office Add-in. -
The
DefaultValueattribute of theDescriptionelement has a placeholder. Replace it with A task pane add-in for Word. -
Save the file.
...
<ProviderName>John Doe</ProviderName>
<DefaultLocale>en-US</DefaultLocale>
<!-- The display name of your add-in. Used on the store and various places of the Office UI such as the add-ins dialog. -->
<DisplayName DefaultValue="My Office Add-in" />
<Description DefaultValue="A task pane add-in for Word"/>
...
Try it out
-
Using Visual Studio, test the newly created Word add-in by pressing F5 or choosing Debug > Start Debugging to launch Word with the Show Taskpane add-in button displayed in the ribbon. The add-in will be hosted locally on IIS.
-
In Word, choose the Home tab, and then choose the Show Taskpane button in the ribbon to open the add-in task pane. (If you’re using the volume-licensed perpetual version of Office, instead of the Microsoft 365 version or a retail perpetual version, then custom buttons are not supported. Instead, the task pane will open immediately.)
-
In the task pane, choose any of the buttons to add boilerplate text to the document.


[!includeConsole tool note]
Next steps
Congratulations, you’ve successfully created a Word task pane add-in! Next, to learn more about developing Office Add-ins with Visual Studio, continue to the following article.
[!div class=»nextstepaction»]
Develop Office Add-ins with Visual Studio
Code samples
- Word «Hello world» add-in: Learn how to build a simple Office Add-in with only a manifest, HTML web page, and a logo.
See also
- Office Add-ins platform overview
- Develop Office Add-ins
- Word add-ins overview
- Word add-in code samples
- Word JavaScript API reference
- Using Visual Studio Code to publish
The number of Microsoft Office users today, estimated to be over 1.2 billion, can easily form their own country. And it’s safe to say that Microsoft Word users are a big part of that productive population.
Microsoft Word (2019, 2016, or Microsoft 365) can help you design virtually every kind of professional document — from a simple office memo to a Kindle e-book. But sometimes you could use a bit of extra oomph in your Word documents. That’s where a roster of excellent and mostly free Microsoft Word add-ins can help.
Why are Microsoft Word add-ins so important?
Google Chrome has extensions. Microsoft Office has add-ins. Earlier, they were called Office Apps. These are little assistants which help you do a few things that Word cannot do on its own.
Want to send a document for an e-signature and track its status? Maybe you are a student who wants to add math equations quickly? Or do you just want to grab some beautiful stock photos for a document?
Add-ins can do all that and make Microsoft Word seem more powerful than it already is.
Today, we will look at how to install and manage these little tools and suggest a few of the best Microsoft Word add-ins you should install to improve your productivity.
Most of these add-ins will work with Microsoft Word 365, 2016, 2019, and Microsoft Word Online.
Get your free Word shortcuts cheatsheet!
Download the print-ready shortcut cheatsheet for Word.
Which add-ins should you install?
There are more than 2000 Microsoft Office add-ins. Microsoft Office organizes all add-ins in neat categories. You can also filter them by:
- Rating
- Name
Microsoft Office also automatically suggests a few add-ins to you. And there’s a category called Editor’s Picks, which displays a few highly-rated selections. Work through the choices and pick the ones that fit your workflow.
How to install and manage Microsoft Word add-ins
There are two simple routes to browse and download the add-ins you want.
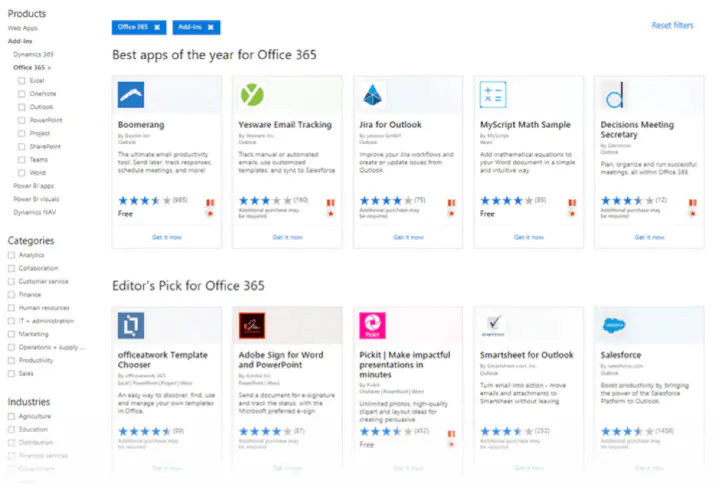
1. Microsoft Word has a dedicated Office Store (AppSource), which lists all add-ins available for all Office applications.
 2. You can also access the add-ins inside Word (and other Office apps), and Word for other platforms, like Word for iPad, Word for Mac, and Word Online.
How to download add-ins from the Office Store
The Office Store can be browsed like any other website. Filters on the left help you drill down to the add-ins you need.
Do read the reviews for each add-in and check the ratings. The better add-ins will be strong in both areas.
1. Click the blue Get It Now button.
2. Sign into AppSource with your Microsoft account.
3. Give Microsoft permission to install the add-in.
4. Continue the installation by selecting the application you want it for.
 5. The add-in will appear on the extreme right of the Ribbon. Click the add-in button and a sidebar appears on the side of your document.
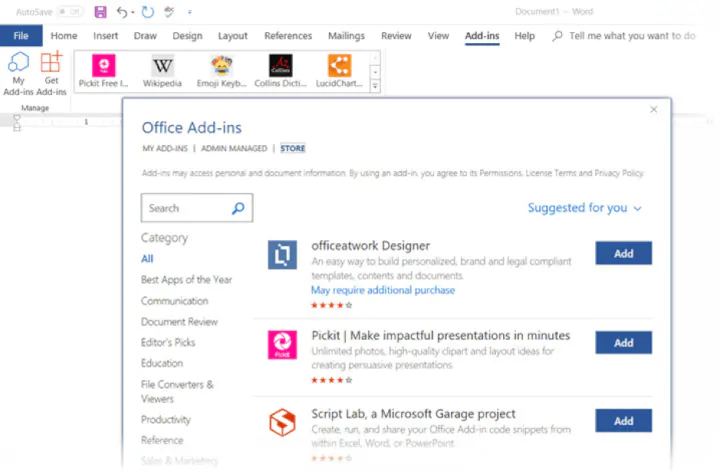
How to download add-ins from inside Microsoft Word
1. Go to Ribbon > Add-Ins > Get Add-Ins.
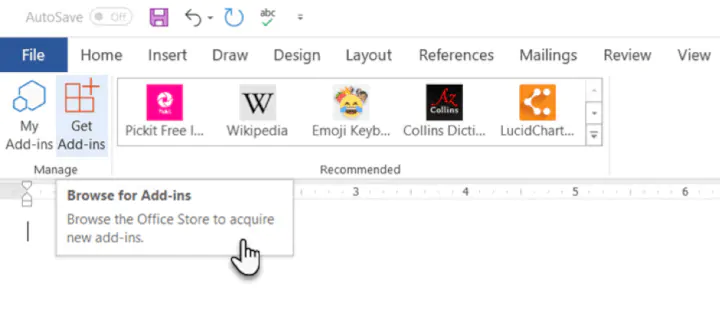 2. Use the Store pane to browse for add-ins and install them. All installed add-ins will be listed under My Add-Ins.
3. Give your permission to Microsoft and allow the installation to proceed.
As in the download from the website, the add-in appears as a button on the Ribbon. When you are done with an add-in, you can close it by clicking the “X” button in the sidebar.
All free and purchased add-ins are part of your Microsoft account. After you’ve added them, you’ll have quick access to them from the My Add-ins button on the menu. The Manage My Add-ins link on the window will also take you to a page where you can see more details.
For e.g. an option to hide an add-in if you don’t want to see it on your list.
If you don’t use an add-in, then you can always delete them to clean up your list.
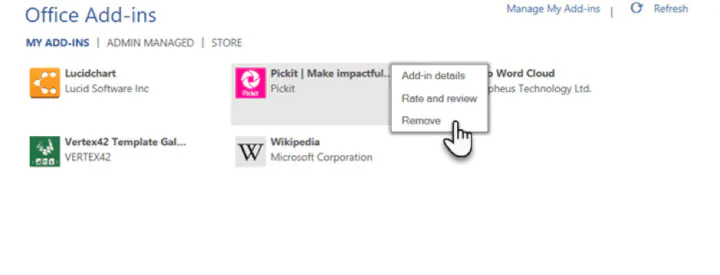
How to delete add-ins you don’t want
1. When you want to remove an add-in, go to Ribbon > Add-ins > My Add-ins. If you don’t see your add-in, then click on the Refresh link at the top of the window.
2. In the Office Add-ins window, click the menu option (three dots) for the specific add-in and click on Remove.
 With this basic process covered, let us move on to select a few choice add-ins that can set you up for productivity.
The best free Microsoft Word add-ins for everyday productivity
It’s a tough job selecting add-ins from a stock of 2000+. But let’s look at a few which can cut across all sections of users — from the layman to the white-collar worker.
Also, the focus of the list is on free add-ins. A few excellent add-ins with trial accounts have been thrown into the mix to demonstrate how you can extend Word when your needs demand it.
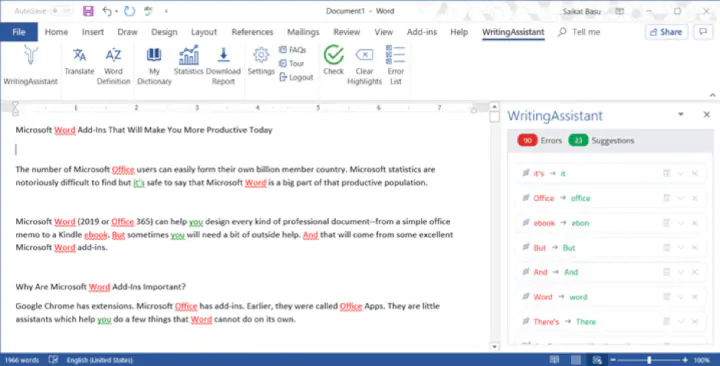
1. WritingAssistant
Cost: Free.
Key Benefit: Improve your English with AI.
When English isn’t your first language, then you should welcome some help. Writing Assistant is an artificial intelligence-powered text checker that flags errors in your grammar. It claims to adapt to your context and offer suggestions.
Use it alongside Word’s own Grammar and Spell Checker to improve your writing.
Also: Grammarly is popular, and it also has a powerful add-in for Word and Outlook.
2. MyScript Math Sample
Cost: Free.
Key Benefit: A math equation editor that works like a scratchpad.
In Word, go to Insert > Equation. You can use the gallery of equations in Word or manually type it out (or use Ink Equation). If this seems like hard work, try the MyScript Math Sample add-in now.
Use the side panel to write an equation with a finger, stylus, or the mouse. The add-in supports more than 200 symbols. Thanks to real-time handwriting recognition, your input is instantly converted to a clear typed equation. It just feels more intuitive, and you can combine it with Word’s own equation features.
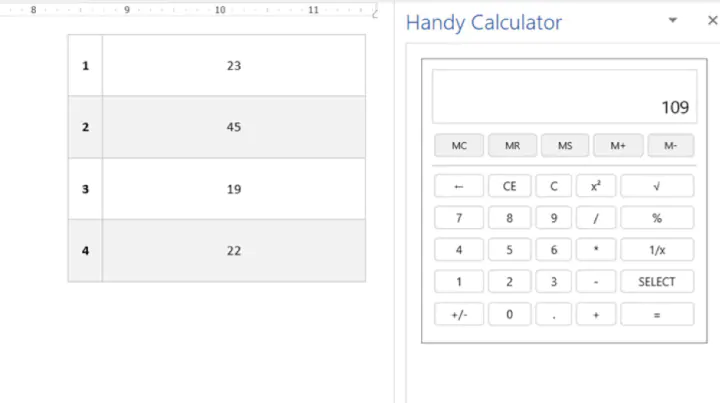
3. Handy Calculator
Cost: Free.
Key Benefit: Use it like a built-in calculator for Microsoft Word.
There could be a calculator sitting in your taskbar. But Handy Calculator saves you a few seconds as it works alongside your open Word document in a task pane. The calculator supports all common functions and the usual memory keys to recall any value stored in memory.
If you work a lot with Word and Excel, then use the Select button for quick cell calculations.
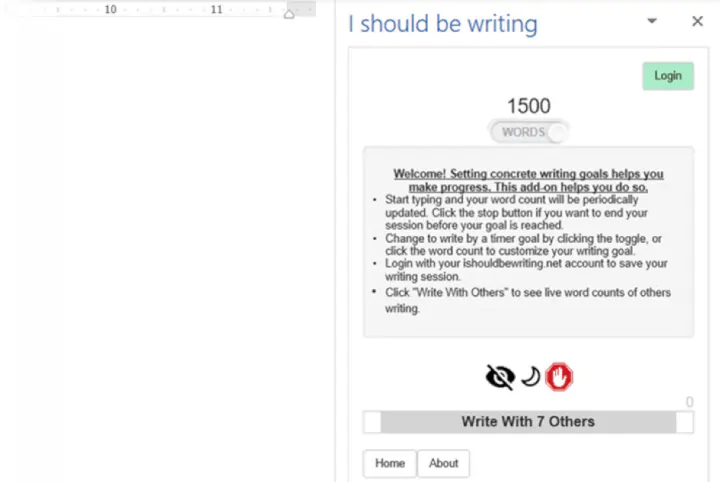
4. I Should Be Writing
Cost: Free.
Key Benefit: Keeps you motivated with a timer and a word count tracker.
Writing is a lonely job and sometimes you just have a word count to aim for. This simple add-in does this well by allowing you to set a countdown timer or a word count goal.
A Write with Others setting nudges your motivation with a live word count of other users or your team.
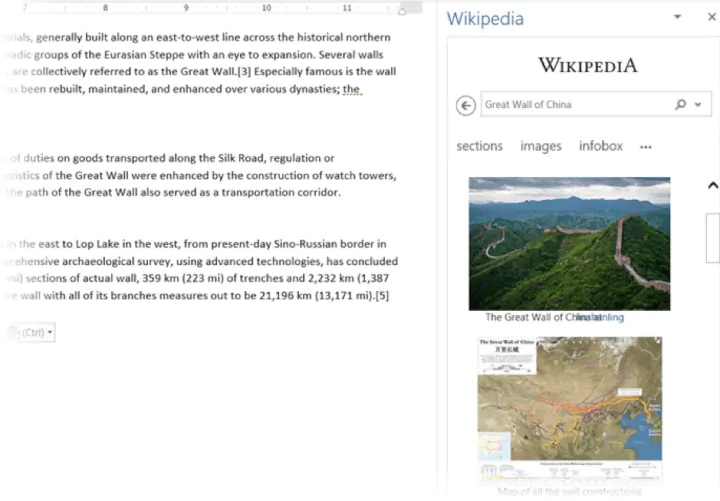
5. Wikipedia
Cost: Free.
Key Benefit: Simplify the search for facts.
It can be a college essay or a research paper. The world’s favorite encyclopedia is often the first source for facts. So, don’t jump between your Word document and the browser.
The Wikipedia add-in can work alongside Word’s Researcher function to help you crosscheck information and improve accuracy.
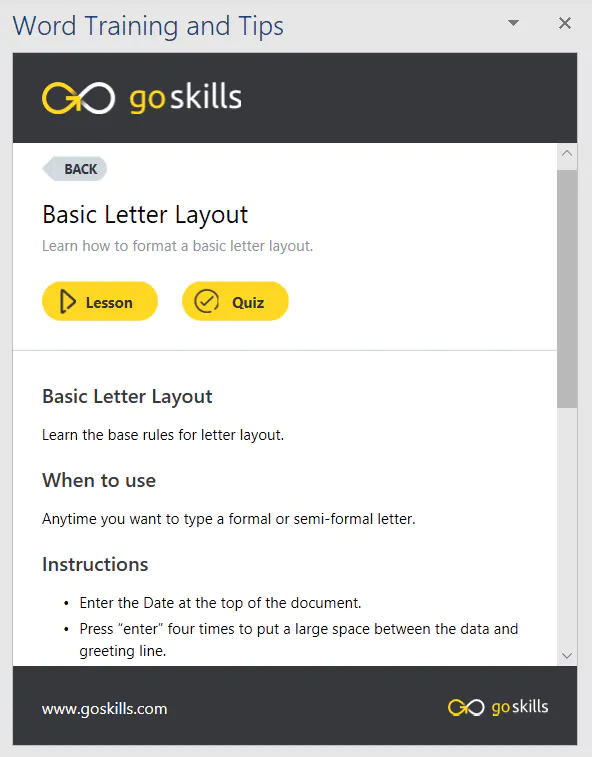
6. Word Training and Tips
Cost: Free.
Key Benefit: Become a better Microsoft Word user.
This add-in gives you access to GoSkills “how-to” cheat sheets from the popular Microsoft Word course. Get handy step-by-step instructions on formatting, styles, and more right within your Word document.
7. Symbol Search
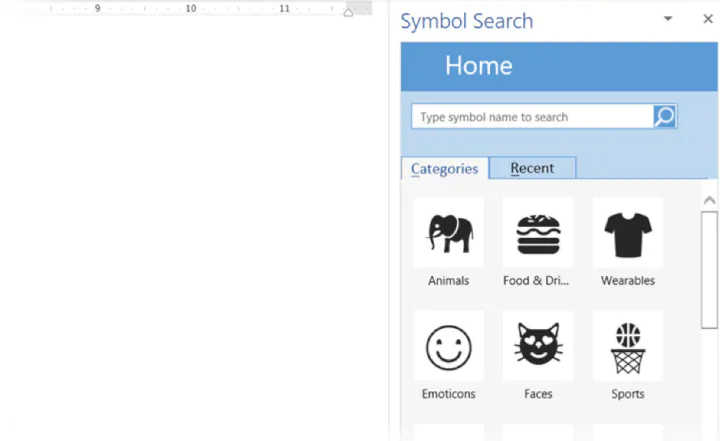
Cost: Free.
Key Benefit: Search and use high-quality symbols in your documents.
Microsoft Word has a nice Icons gallery on the Ribbon to help you communicate with symbols. But it’s always useful to have quick access to more. Symbol Search has a categorized lineup and a handy search box to find a unique symbol.
Click on More (three-dot menu option) and find the registered symbol, double asterisks, subscript numbers etc.
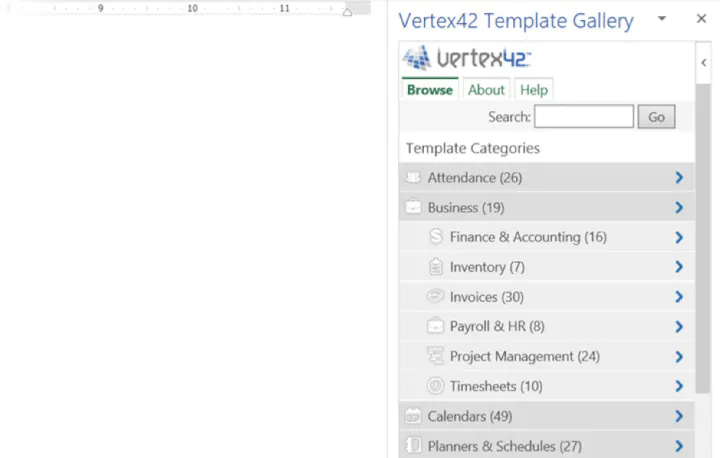
8. Vertex42 Template Gallery
Cost: Free.
Key Benefit: Select from 300+ professionally designed templates for Word and Excel.
There’s a sameness to the default templates in Microsoft Office. Vertex42 specializes in templates for Word and Excel and it shows in the variety they offer.
The collection of 431 documents is organized in neat categories that cover personal, educational, and professional templates.
Also: Look at Spreadsheet123 and its collection of 200 templates for Word and Excel.
Get your free Word shortcuts cheatsheet!
Download the print-ready shortcut cheatsheet for Word.
Get your free Word shortcuts cheatsheet!
Download the print-ready shortcut cheatsheet for Word.
9. Pro Word Cloud
Cost: Free.
Key Benefit: Visualize your text and get your point across.
Word clouds add a visual element to any document or presentation. If it’s text dense, then you can use a word cloud to check the frequency of your main keyword. It can also help summarize the core idea of any document for your readers.
You can customize the word clouds with different sizes, fonts, layouts, and color schemes.

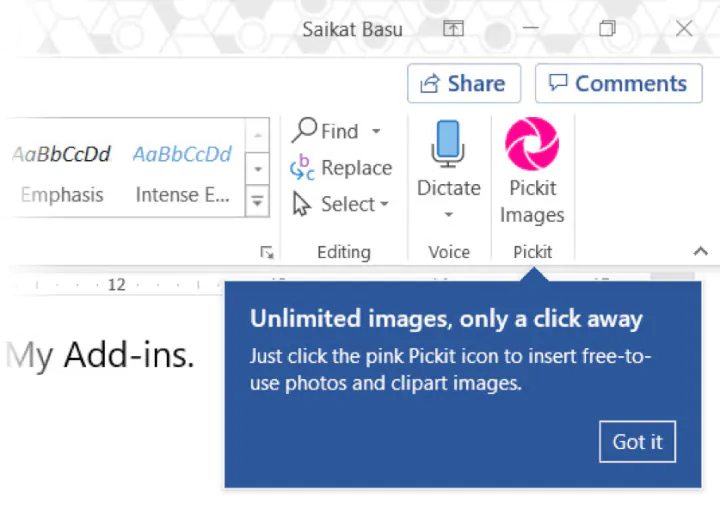
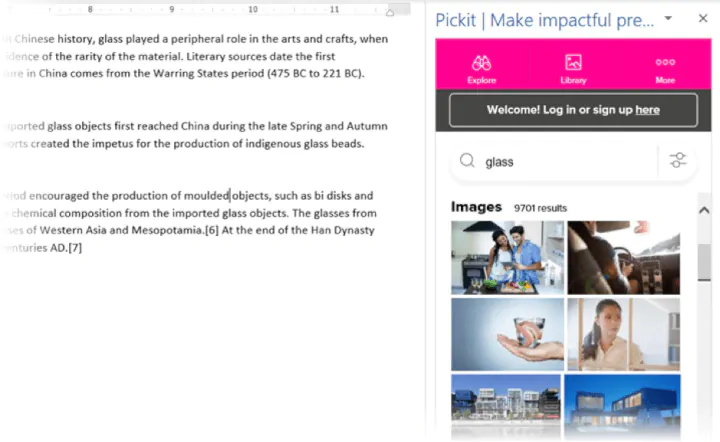
10. Pickit
Cost: Free for 7 days, $5.00/month after.
Key Benefit: Find the right photo or clipart to use from a vast image bank.
Pickit is a stock illustration site that can complement your documents with beautiful photos and clipart. PowerPoint designs aside, you can create impactful Word documents too by breaking up text with a photo that sends a visual message.
The add-in is free to download but you have to subscribe for premium features after seven days.
Also: Looking for a completely free alternative with Creative Commons licensed photos? Try the excellent Word add-in that sources images from Pexels.
11. PDFfiller
Cost: Free trial, $6.00/month after.
Key Benefit: Edit, sign, and share PDF files stored in OneDrive.
Word can open PDF files and even edit them. But it’s not perfect as lines and pages can break. PDFFiller opens a fillable, printable PDF in its own editor from OneDrive. Edit, sign, and share the files again from the same window within Word.
You can save a lot of time as you do not have to download or upload the files from the desktop.

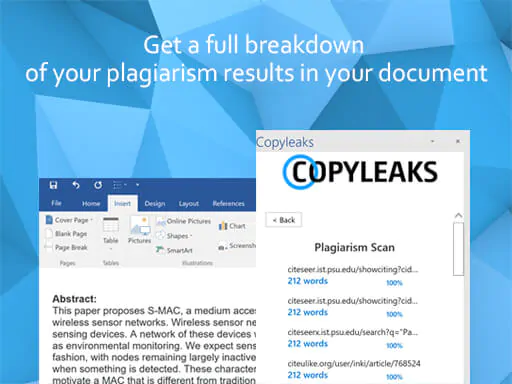
12. Copyleaks Plagiarism Checker
Cost: Free with a limited number of scans.
Key Benefit: Check if any document is original.
No one wants to be called a plagiarist. And Copyleaks has built its reputation as a search engine for avoiding that charge. The cloud-based app uses its algorithms to scan any document and ensure its integrity. Copyleaks also supports multiple languages.
The Word add-in allows you to scan 10 pages a month for free. If you are a heavy user, then go for an additional purchase.
13. Lucidchart Diagrams for Word
Cost: Free with a limited number of diagrams.
Key Benefit: Draw flowcharts, mockups, mind maps, and business process charts easily.
Sometimes, a flowchart or a business process diagram can make a complex concept simpler. Lucidchart is an industry-leading software that offers this add-in for Word users. Use the library of shapes and lines to quickly create your own diagrams. The learning curve is shallow.
Lucidchart also supports collaboration and version control. You can download the add-in for free and create a limited number of free documents. Additional upgrades need to be purchased.
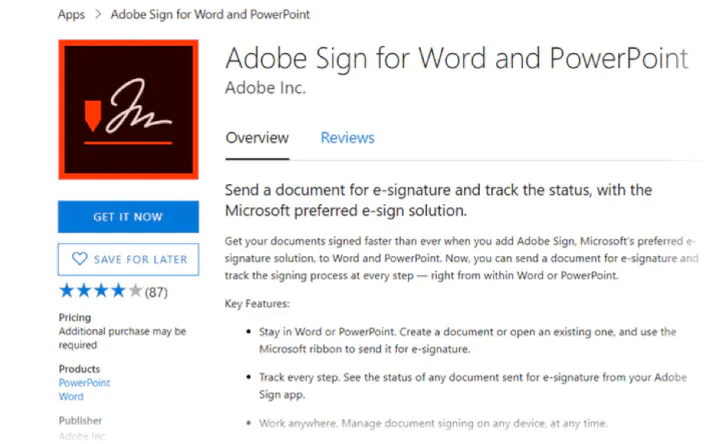
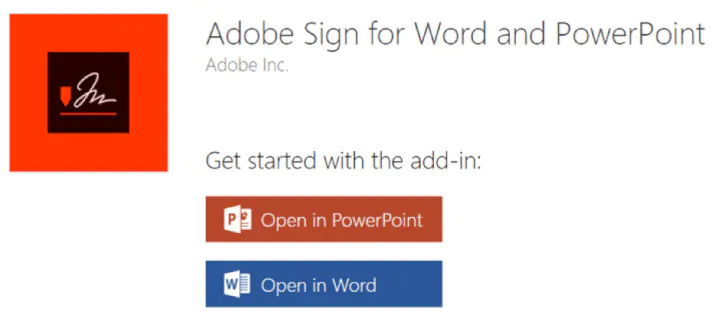
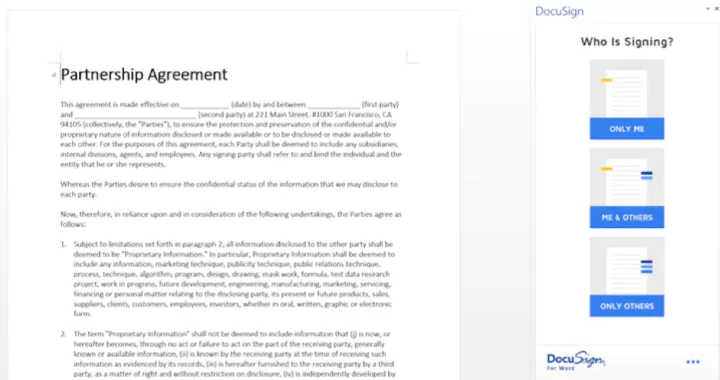
14. DocuSign for Word
Cost: Free to try. Additional purchases are required.
Key Benefit: Sign or request eSignatures for important documents without leaving Word.
Digital signatures have become foolproof and legally binding identification tools for critical documents. In many countries, they are the same as physical signatures on paper documents. Sign in with your Microsoft 365, Microsoft, or DocuSign account. Email a completed copy of the signed documents, and automatically save them in DocuSign or on a cloud platform for collaboration.
DocuSign offers a free trial (sign and send 5 documents with a Microsoft 365 account and 10 documents with a Microsoft account).
15. Qorus
Cost: Free to try. Additional purchases are required.
Key Benefit: Make business documents effortlessly.
Qorus is a business document builder. It works seamlessly across Outlook, Word, and PowerPoint to create personalized business documents like requests for proposals, pitches, and NDAs. Qorus includes tools that can quickly create fresh documents from templates, answer queries with a bank of reusable content, and even collaborate on documents with a team.
Qorus is a bid and proposal management solution on its own. The advantages can outweigh the costs if your enterprise needs it. Try it with a 14-day trial.
16. GetMpas
Cost: Free.
Key Benefit: Show locations on documents quickly.
Making an event flyer in Microsoft Word? Why not help your guests by displaying a small map that shows exactly where it will take place? There is Google Maps, but this little touch saves everyone a few seconds.
The add-in allows you to customize the appearance and size of the map.

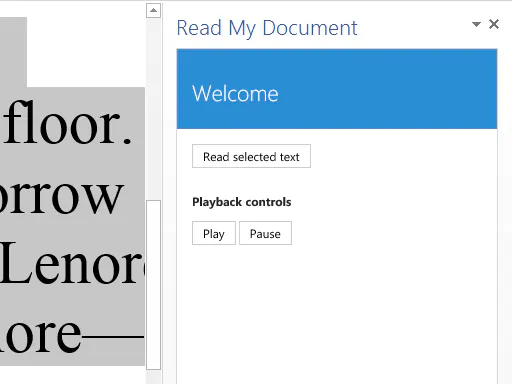
17. Read My Document
Cost: Free.
Key Benefit: Go easy on your eyes.
Read My Document is a text-to-speech converter that reads your Microsoft Office documents aloud. It can be an invaluable editing aid when you are proofreading a document. Pick a voice and the speech speed to begin.
Alternatively, you can multitask by letting it read a document while you do something else. But don’t use it for confidential documents as the engine can send data over the internet.
18. Woodpecker
Cost: Free.
Key Benefit: Reuse your most important legal documents.
Legal documents should always be standardized. It makes it not only easier to understand them but also saves a lot of time when you need to reuse them. Woodpecker is an easy-to-use add-in that removes the chore of re-creating legal docs every time you need to change a minor detail.
Woodpecker also promises secure document management and collaboration with your own account. Project managers can try this add-in to enhance the role of their Word templates.
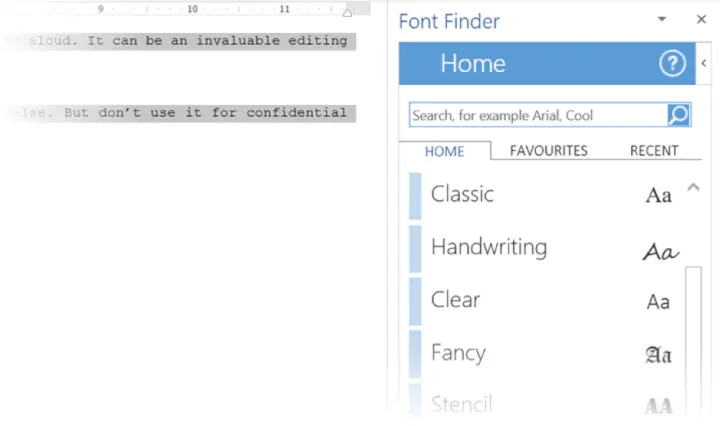
19. Font Finder
Cost: Free.
Key Benefit: Select and save your favorite fonts.
It is surprising that desktop publishing software like Microsoft Word still does not have an adept font management system. For instance, you cannot save your favorite fonts. You can create styles for them, but that is a roundabout way. Font Finder makes it easier.
Use the add-in tab screen to browse through the categorized fonts. Search for the font you want to use and set them as favorites with a click on the star. However, a small pitfall is that it seems to ignore fonts that do not come with Word.
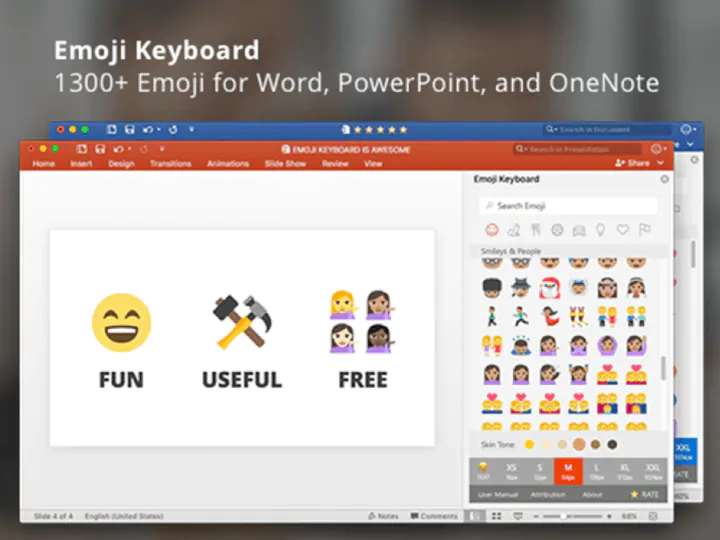
20. Emoji Keyboard
Cost: Free.
Key Benefit: Give your communication some color.
Microsoft Word add-ins shouldn’t be all sober and somber. Why not give it a bit of color with the Emoji Keyboard? After all, emojis are stuck to our digital tongues. And this keyboard gives you 1300 to choose from.
Get more work done today with these add-ins
We hope these useful and mostly free Microsoft Word add-ins help you plug a few productivity gaps, reduce a few steps and add up to a more efficient workflow at the end of your day!
If you are looking to sharpen your Microsoft Office skills, check out our Microsoft Word course to learn time-saving tips and tricks for formatting, margins, mail merges, and much more.
Ready to master Microsoft Office?
Start learning for free with GoSkills courses
Start free trial
Shows how to insert and style ranges, paragraphs, content controls, images, and HTML into documents, how to insert content into content controls, and how to format text.
Word Web Add-in project for use with the Word Getting Started tutorial
This repo contains the start and end states of a Word Web Add-in tutorial that shows developers how to insert text, images, tables, HTML, and content controls in to documents, specific paragraphs, and specific ranges. It also shows how to replace content in ranges, paragraphs, and content controls.
Table of Contents
- Change History
- Prerequisites
- To use the project
- Questions and comments
- Additional resources
Change History
- February 26th, 2018: Initial version.
Prerequisites
- An Office 365 account.
- Word 2016, version 1711 (Build 8730.1000 Click-to-Run) or later. You might need to be an Office Insider to get this version. For more information, see Be an Office Insider.
- Node and npm
- Git Bash (Or another git client.)
To use the project
This sample is meant to accompany the tutorials that begin at: Word Tutorial.
There are two versions of the sample, in the folders Start and Completed.
To use the Before version and manually add the code, follow the procedures in the article linked to above. Then go on to each subsequent stage of the tutorial. Each one links to its successor.
To work with the Completed version, follow all the steps in the Setup section of the first stage of the tutorial (but replace «Start» with «Completed» in the instructions), and then follow the steps in the Test the add-in section of each stage of the tutorials.
Questions and comments
We’d love to get your feedback about this sample. You can send your feedback to us in the Issues section of this repository.
Questions about Microsoft Office 365 development in general should be posted to Stack Overflow. If your question is about the Office JavaScript APIs, make sure that your questions are tagged with [office-js] and [API].
Additional resources
- Office add-in documentation
- Office Dev Center
- More Office Add-in samples at OfficeDev on Github
This project has adopted the Microsoft Open Source Code of Conduct. For more information see the Code of Conduct FAQ or contact opencode@microsoft.com with any additional questions or comments.
Copyright
Copyright (c) 2018 Microsoft Corporation. All rights reserved.
(Нажмите, чтобы увеличить изображение)
\

\
В октябре 2016 года я участвовал в 48-часовом хакатоне DevDays Asia 2016 по разработке приложений Office 365 в Пекине. Демонстрационная версия надстройки Word, разработанная мной — WordTemplateHelper, получила второе место. Мне посчастливилось познакомиться с г-ном Чен Сичжаном на площадке, и я получил большую пользу от обмена с г-ном Ченом. Узнав, что г-н Чен готовит серию решений для Office, я хотел бы кратко представить всем процесс разработки этой демонстрации, чтобы поддержать г-на Чена. Самоотверженная самоотдача, я также надеюсь, что больше разработчиков будут участвовать в разработке Office 365.
\
Для разработки, связанной с Office, перейдите по этому адресу: https://dev.office.com/getting-started
\
Эта статья в основном вводитРазработка надстройки Office.
\
нота: Оба URL в текстене поддерживаетсяНажмите, чтобы прыгать, нажмите в конце статьиПрочтите оригинал Чтобы лучше просмотреть соответствующий код.
\
1. Что такое надстройки Office
\
Что такое надстройки Office? В этих двух статьях Учителя Чена:
\
Обзор разработки Office 365 и введение в экологическую среду (1)
\
Обзор разработки Office 365 и введение в экологическую среду (2)
\
Вся история развития Office разобрана. Я лично понимаю, что разработчики могут делать определенные расширения Office для достижения различных функций на платформе, предоставляемой Office, например, ранее записанных макросов и написанных сценариев VBS. В некотором смысле все они могут рассматриваться как Надстройки для Office. Конечно, это только личное понимание, не обязательно точное. Текущие надстройки Office поддерживают только Office 2013 и более поздние версии, а метод разработки сильно отличается от предыдущей VBS.
\
Текущая структура надстроек Office выглядит следующим образом:
\
(Нажмите, чтобы увеличить изображение)
\

\
Надстройка Office на самом деле представляет собой веб-приложение, которое можно развернуть в любом месте и запустить в приложении Office. Существует файл манифеста manifest.xml, в котором можно указать способ представления веб-приложения, включая определение URL-адреса веб-приложения. Когда Office загружает эту надстройку, он фактически предоставляет среду браузера для запуска указанного веб-приложения. Другими словами, разработка надстройки Office почти такая же, как и разработка веб-программ, что очень просто для интерфейсных разработчиков, знакомых с html + JavaScript + css. Microsoft предоставляет богатый JavaScript API для работы с Office, чего можно достичь, зависит от воображения разработчика.
\
Пример надстройки Word:
\
(Нажмите, чтобы увеличить изображение)
\

\
Два, анализ спроса на помощник по шаблонам Word
\
Когда я узнал об этом событии, я не думал, что делать. Только когда я сел на скоростной поезд до Пекина, у меня постепенно появилась идея, которая пришла из моих обычных рабочих потребностей. В работе часто пишется множество документов, таких как различные спецификации требований к программному обеспечению, официальные письма, документы, руководства по эксплуатации и т.д., эти документы имеют установленный формат. Обычно я сохраняю некоторые уже написанные документы Word в папке в качестве шаблонов. В следующий раз, когда я напишу такой документ, я сделаю копию, удалю, удалю и изменю. Почему бы не написать программу самостоятельно и не использовать эти документы с фиксированным шаблоном в качестве шаблонов Word? Хотя Word также имеет свои собственные шаблоны, на самом деле он очень ограничен и не может полностью удовлетворить наши потребности. Если эту функцию превратить в магазин шаблонов, каждый сможет свободно загружать и делиться своими собственными шаблонами, что может быть намного удобнее.
\
Word поставляется с таким шаблоном:
\
(Нажмите, чтобы увеличить изображение)
\

\
Этих общих шаблонов недостаточно для более профессиональной работы. Эффект от Word Template Helper выглядит так:
\
(Нажмите, чтобы увеличить изображение)
\

\
Если есть идея, давайте посмотрим, как ее реализовать. Когда я участвовал в мероприятии, проект размещался в Code Cloud. Чтобы написать эту статью, я реорганизовал эту небольшую демонстрацию, построил проект на Github и попытался использовать последнюю версию .NET Core для реализации части фонового API. Давай сделаем это со мной дальше.
\
3. Структура проекта
\
Сначала проанализируйте структуру проекта. Данные шаблона документа, такие как заголовок шаблона, атрибуты и т. Д., Должны храниться в базе данных, а для предоставления данных требуется проект веб-API. Надстройка Office — это чисто интерфейсный проект, использующий платформу Angular2 и асинхронно вызывающий данные веб-API. Поиск, загрузка шаблонов и другие функции. Пользовательский интерфейс подключаемого модуля использует пользовательский интерфейс Fabric, предоставленный Microsoft. Стек технологий всего проекта выглядит следующим образом:
\
(Нажмите, чтобы увеличить изображение)
\

\
Что касается сущности документа — документа Word, он хранится в формате Word или непосредственно в базе данных? Если это формальный проект, то, конечно, лучше всего хранить его в облачном хранилище, но в случае с образцом его можно сохранить непосредственно в базе данных. Поскольку он участвует в марафоне развития, приходите как можно скорее. Фреймворк ORM также включен, просто чтобы быстро реализовать принятый метод, а не лучшую практику.
\
Конфигурация среды разработки в этом примере следующая:
\
Windows 10 x64,
\
VS 2017 (убедитесь, что установлены инструменты разработки Office)
\
VS Code
\
Node.js v7.10.0
\
NPM v4.2.0
\
ASP.NET Core 1.1
\
В-четвертых, разработка веб-API
\
VS2017 был официально выпущен, и я использую последнюю версию .NET Core для реализации уровня веб-API.
\
1. Новый проект
\
Создайте новое пустое решение, назовите его WordTemplateHelpe и добавьте к нему проект ASP.NET Core:
\
(Нажмите, чтобы увеличить изображение)
\

\
Выберите веб-API:
\
(Нажмите, чтобы увеличить изображение)
\

\
2. Установите EF Core.
\
Найдите и установите следующие пакеты Nuget в диспетчере Nuget:
\
Microsoft.EntityFrameworkCore.SqlServer:EF Core SQL Server
\
Microsoft.EntityFrameworkCore.Tools: инструменты командной строки EF
\
Microsoft.EntityFrameworkCore.Tools.DotNet: инструменты командной строки EF Core
\
(Нажмите, чтобы увеличить изображение)
\

\
3. Создание моделей
\
В настоящее время последняя версия EF рекомендует использовать режим Code First, то есть писать модель напрямую, и инфраструктура EF автоматически создаст необходимую базу данных. Если вы привыкли к DB First, есть также хорошая рекомендация по инструменту: EntityFramework-Reverse-POCO-Code-First-Generator: https://visualstudiogallery.msdn.microsoft.com/ee4fcff9-0c4c-4179-afd9-7a2fb90f5838
\
Его можно скачать прямо в расширении VS и обновить. Этот инструмент может легко сгенерировать необходимые классы сущностей на основе базы данных.
\
Сначала добавьте перечисление типов шаблонов:
\
(Нажмите, чтобы увеличить изображение)
\

\
Добавьте класс шаблона:
\
(Нажмите, чтобы увеличить изображение)
\

\
Поскольку также необходимы несколько таблиц, таких как шаблон организации и избранное пользователя, я не буду писать их здесь. Вы можете обратиться к примерам на Github.
\
4. Создайте контекст базы данных.
\
В модели вам нужно указать, какие сущности включены в модель данных. Добавьте папку Data и создайте в ней файл с именем WordTemplateContext.cs:
\
(Нажмите, чтобы увеличить изображение)
\

\
Таким образом, DbSet создается для каждой сущности, соответствующей таблице в базе данных, а сущность соответствует строке в таблице.
\
5. Используйте внедрение зависимостей для регистрации контекста.
\
ASP.NET Core по умолчанию реализует внедрение зависимостей. Чтобы зарегистрировать WordTemplateContext, только что созданный как службу, вам необходимо добавить следующий код в Startup.cs:
\
(Нажмите, чтобы увеличить изображение)
\

\
Обратите внимание на добавление с помощью Microsoft.EntityFrameworkCore, иначе метод UseSqlServer не будет найден.
\
Строка подключения к базе данных настраивается в appsettings.json:
\
(Нажмите, чтобы увеличить изображение)
\

\
LocalDb используется здесь для тестирования. Когда требуется формальное развертывание, здесь необходимо изменить адрес, имя пользователя и пароль официального сервера базы данных.
\
6. Инициализируйте базу данных.
\
Теперь используйте командную строку для инициализации базы данных. Создайте новый класс DbInitializer в каталоге данных и введите следующий метод:
\
(Нажмите, чтобы увеличить изображение)
\

\
Убедитесь, что данные созданы. Затем измените метод Configure в файле Startup.cs:
\
(Нажмите, чтобы увеличить изображение)
\

\
7. Создайте интерфейс API.
\
Теперь напишите Контроллер, чтобы увидеть. Добавьте контроллер в папку Controller:
\
(Нажмите, чтобы увеличить изображение)
\

\
Здесь вы можете использовать инъекцию зависимостей для внедрения контекста базы данных:
\
(Нажмите, чтобы увеличить изображение)
\

\
В качестве примера возьмем API шаблона поиска:
\
(Нажмите, чтобы увеличить изображение)
\

\
Перейдите в каталог проекта из командной строки и выполните следующую команду
\
dotnet run
\
Вы можете использовать интерфейсный инструмент отладки Postman для проверки:
\
(Нажмите, чтобы увеличить изображение)
\

\
Необходимо запомнить конкретный адрес операции проекта API, и он будет использован позже при выполнении надстройки. Пожалуйста, обратитесь к Github за конкретным кодом.
\
8. Разрешить междоменный доступ
\
Для поддержки надстройки для доступа к нашему интерфейсу через домены необходимо установить следующие библиотеки:
\
(Нажмите, чтобы увеличить изображение)
\

\
Затем добавьте следующий код в метод ConfigureServices файла Startup.cs:
\
(Нажмите, чтобы увеличить изображение)
\

\
Добавьте в WordTemplateController строку, которая должна быть междоменной:
\
[EnableCors("AllowCrossDomain ")]
\
Этот API может поддерживать междоменный доступ.
\
Пять, разработка надстройки Word
\
С помощью API вы можете разработать надстройку. Как упоминалось в начале, надстройка на самом деле представляет собой веб-приложение, которое управляет объектами документов Office с помощью JavaScript. В этом проекте он использует асинхронные js-файлы для запроса, загрузки и поиска файлов шаблонов, хранящихся на сервере, и динамического сравнения Текущий документ Word работает.
\
Microsoft открыла исходный код этого JavaScript API на Github: https://github.com/Microsoft/Office-js-docs_zh-cn, связанные документы: https://msdn.microsoft.com/zh-cn/library/office/fp142185 .aspx
\
Шаги разработки можно ссылаться на: https://github.com/OfficeDev/Office-js-docs_zh-cn/blob/staging/docs/get-started/create-and-debug-office-add-ins-in-visual-studio .md
\
Давайте разработаем надстройку.
\
1. Создайте новый проект надстройки.
\
Щелкните решение правой кнопкой мыши и добавьте надстройку Word Web:
\
(Нажмите, чтобы увеличить изображение)
\

\
После завершения добавления остается еще два предмета:
\
(Нажмите, чтобы увеличить изображение)
\

\
Один из них — это файл манифеста, а файл с суффиксом Web — это Web App.
\
2. Установите manifest.xml.
\
Файл манифеста — это очень важный файл, в котором описаны все настройки надстройки. Этот файл создается автоматически, но нам нужно изменить некоторые места вручную. К счастью, в файле есть комментарии, поэтому его легче изменить:
\
(Нажмите, чтобы увеличить изображение)
\

\
Самым важным является изменение узла SourceLocation. Этот адрес устанавливает расположение, в котором размещается веб-приложение. После разработки и развертывания на веб-стороне вы должны изменить этот узел на правильное расположение перед публикацией. Следующий узел также следует изменить.
\
(Нажмите, чтобы увеличить изображение)
\

\
3. Анализ веб-приложений.
\
Вы можете запустить этот шаблон, чтобы попробовать, напрямую F5:
\
(Нажмите, чтобы увеличить изображение)
\

\
Щелкните здесь, чтобы вызвать этот плагин:
\
(Нажмите, чтобы увеличить изображение)
\

\
Он автоматически откроет Word и загрузит этот плагин. Текст в документ вставляется плагином. Так где же работает код?
\
Откройте файл Home.js и найдите следующий код:
\
(Нажмите, чтобы увеличить изображение)
\

\
Word — это объект, предоставляемый JavaScript API, который может удобно работать с содержимым текущего документа. Такой способ мышления существует: вы можете использовать JavaScript для динамического вызова веб-API для получения результатов запроса и вставки запрошенного содержимого документа в текущий документ для достижения исходной цели. В то же время вы можете сохранить содержимое текущего документа в качестве шаблона и загрузить его на сервер для публикации.Полнофункциональный образец готов к выходу.
\
4. Используйте Angular
\
Мы используем последнюю версию Angular4 для разработки интерфейсных страниц. Конечно, вы можете использовать JQuery, но его сейчас немного, не так ли? Используя Angular, вы можете быстро разработать одностраничное веб-приложение с архитектурой MVVM, которая очень подходит для этой потребности.
\
Часть кода этой демонстрации относится к проекту с открытым исходным кодом Microsoft: https://github.com/OfficeDev/Office-Add-in-UX-Design-Patterns-Code
\
Кривая начала работы с Angular все еще немного крута.Официальный инструмент Angular CLI предназначен для быстрого создания приложения Angular. Сначала установите TypeScript:
\
npm install -g typescript
\
Затем установите Angular CLI: https://github.com/angular/angular-cli
\
npm install -g @angular/cli
\
Выполните следующую команду, чтобы создать проект Angular:
\
ng new WordTemplateHelperSource
\
(Нажмите, чтобы увеличить изображение)
\

\
Затем с помощью команды cd WordTemplateHelperSource перейдите в каталог проекта и выполните следующую команду:
\
npm install
\
Эта команда установит зависимости, необходимые для проекта ng. Если установка не удалась, рекомендуется переключиться на зеркало Taobao npm для установки.
\
Запустите проект ng с помощью следующей команды:
\
ng serve
\
Вы можете просмотреть http: // localhost: 4200 в браузере Chrome, чтобы увидеть эффект:
\
(Нажмите, чтобы увеличить изображение)
\

\
Обратите внимание, что если просмотр в IE является ненормальным, мы дадим решение этой проблемы в последнем разделе.
\
Почему бы не создать его прямо в WordTemplateHelperWeb? Поскольку приложения Angular должны быть упакованы, каталог dist будет создан в каталоге проекта, который является частью, которая официально запускается. Поэтому после завершения разработки скопируйте файлы из созданного каталога dist в WordTemplateHelperWeb.
\
В процессе разработки Angular рекомендуется использовать VS Code.Поддержка TypeScript и Angular очень хороша.
\
Поскольку эта статья не является учебным пособием по разработке на Angular, конкретные знания Angular здесь не будут подробно описаны.Если вам интересно, вы можете загрузить код Github и запустить его самостоятельно.
\
5. Добавьте сервис для работы с файлами Word.
\
Чтобы управлять файлами Word, нам нужно упаковать их в сервисы. Используйте следующую команду, чтобы добавить службу:
\
ng g service services\word-document\WordDocument
\
Это создаст службу с именем WordDocumentService по соответствующему пути в каталоге приложения. Аналогичным образом сгенерируйте несколько других сервисов. Основные методы следующие:
\
Метод поиска по запросу:
\
(Нажмите, чтобы увеличить изображение)
\

\
Таким образом можно получить шаблон документа, хранящийся на сервере, который на самом деле представляет собой строку, сохраненную в формате Ooxml.
\
В этом примере нет ничего слишком сложного в использовании Office JavaScript API. В основном используются два метода: getOoxml () и insertOoxml (). Первый может читать формат Ooxml текущего текстового документа, а второй может устанавливать текущий текстовый документ. Формат Ooxml. Ooxml — это формат, используемый версиями после Office2007, например docx.
\
Исходный API предоставляет функции обратного вызова. Для простоты использования я инкапсулировал их в Promises:
\
(Нажмите, чтобы увеличить изображение)
\

\
После поиска подходящего шаблона вы можете нажать кнопку, чтобы вызвать метод setOoxml (), чтобы вставить его в текущий документ Word:
\
applyTemplate(template: WordTemplateInfo) { this.wordDocument.setOoxml(template.TemplateContent); }
\
Это завершает функцию шаблона приложения.
\
Если вы хотите сохранить содержимое текущего документа в виде шаблона и загрузить его на сервер, вы можете вызвать метод getOoxml (), чтобы получить текст в формате Ooxml текущего документа и загрузить его на сервер для сохранения. Что касается других добавленных в избранное, добавленных в качестве институциональных шаблонов, установленных в качестве личных шаблонов и т. Д., Атрибуты установленных шаблонов были обновлены, и конкретный код не будет повторяться.
\
Еще одно замечание: при разработке адрес сервера здесь должен быть адресом ASP.NET Core, который мы только что разработали.
\
6. Используйте интерфейс Fabric.
\
Для надстройки Office простой и красивый пользовательский интерфейс, объединенный с Office, является обязательным. Microsoft рекомендует использовать Fabric UI для достижения унифицированного стиля интерфейса, см. Https://dev.office.com/fabric.
\
Существует множество ресурсов, таких как стили, значки, спецификации дизайна и даже компоненты версии React. Если вы используете React для разработки, вы можете использовать их напрямую. Эта демонстрация представляет собой файл стиля с прямой ссылкой, который настраивается в файле .angular-cli.json:
\
(Нажмите, чтобы увеличить изображение)
\

\
После нанесения получается так:
\
(Нажмите, чтобы увеличить изображение)
\

\
7. Надстройка пакета
\
Я только что разработал статическое веб-приложение в новом проекте, упаковал его и скопировал в проект WordTemplateHelperWeb. Используйте ng build -prod для упаковки приложений Angular. Упакованный файл будет выведен в каталог dist:
\
(Нажмите, чтобы увеличить изображение)
\

\
Обратите внимание, что есть еще одна вещь, на которую следует обратить внимание. Если он упакован только таким образом, браузер IE не поддерживается, но встроенный браузер надстройки Office на самом деле является ядром IE, поэтому нам нужно внести следующие изменения и найти каталог src В файле polyfills.ts раскомментируйте следующие части:
\
(Нажмите, чтобы увеличить изображение)
\

\
Согласно подсказкам, запустите команду npm install, чтобы установить несколько необходимых зависимостей. Только тогда он сможет нормально работать в браузерах серии IE. Снова запустите ng build –prod, чтобы упаковать. Значение параметра —prod состоит в том, чтобы построить в производственном режиме, чтобы сгенерированный код был меньше и работал быстрее.
\
Удалите все исходные файлы в проекте WordTemplateHelperWeb, кроме Web.config. Скопируйте файлы в каталог dist.
\
Хотя компьютер можно напрямую отлаживать и запускать во время разработки, для моделирования реального использования мы также официально выпустим это веб-приложение. Если у нас есть Azure или другие хосты, мы развернем его непосредственно на сервере.Теперь мы используем только собственный IIS для размещения этого веб-приложения:
\
(Нажмите, чтобы увеличить изображение)
\

\
Итак, адрес надстройки: http: // localhost / WordTemplateHelperWeb,
\
Запустим API, войдем в каталог WordTemplateHelperApi и запустим команду dotnet run:
\
(Нажмите, чтобы увеличить изображение)
\

\
Адрес проекта API: http: // localhost: 5000 / api /
\
Не путайте эти два адреса. Просто обратите внимание при упаковке WebApp. Адрес API в файле common app-global.ts должен быть изменен на тот же, что и фактический адрес API:
\
(Нажмите, чтобы увеличить изображение)
\

\
Теперь откройте файл манифеста WordTemplateHelperManifest и измените следующее расположение:
\
(Нажмите, чтобы увеличить изображение)
\

\
(Нажмите, чтобы увеличить изображение)
\

\
Вот адрес надстройки, не ошибитесь.
\
6. Запустите тест.
\
Теперь вы можете повторно запустить проект надстройки, установить для запускаемого проекта WordTemplateHelper и запустить:
\
(Нажмите, чтобы увеличить изображение)
\

\
Мы можем вставить шаблон и загрузить его на сервер:
\
(Нажмите, чтобы увеличить изображение)
\

\
Нажмите кнопку «Загрузить», чтобы загрузить текущий документ в качестве шаблона на сервер для совместного использования.
\
(Нажмите, чтобы увеличить изображение)
\

\
После поиска соответствующего шаблона нажмите кнопку «Применить», чтобы вставить содержимое шаблона в текущий документ.
\
Мы можем искать шаблоны, добавлять собственные шаблоны и применять содержимое шаблона к текущему документу. Организациями и отдельными лицами также можно управлять отдельно. Я считаю, что этот небольшой плагин можно превратить в платформу, например, в хранилище шаблонов, где пользователи могут свободно обмениваться шаблонами документов друг друга, а также собирать и добавлять в библиотеку шаблонов своей организации. Средний и так далее. Небольшое расширение может быть превращено в формальный продукт.
\
7. Загрузить анимацию загрузки.
\
При загрузке страницы можно добавить приглашение загрузки, чтобы сделать работу пользователя более удобной. Конкретный код может относиться к стилю css в index.html.
\
Шесть, резюме
\
Надстройка Office — это относительно новая область разработки, которая отличается от предыдущих методов разработки, но студенты, знакомые с интерфейсом, могут быстро войти в это поле, которое фактически является написанием веб-страниц. Этот пример представляет собой относительно полный проект от внутреннего интерфейса до клиентской реализации. Я надеюсь, что студенты, интересующиеся разработкой Office, смогут загрузить код для изучения и разработки более практичной надстройки. Поскольку этот проект фактически не был развернут, он не был загружен в магазин. Пользователи, скачивающие код, не должны использовать его в коммерческих целях. Настоящим объясните.
\
об авторе
\
Ян Сяоди, Самый ценный эксперт Microsoft, любит делиться. Знаком с ASP.NET, WPF, UWP, TypeScript и другими технологиями разработки, неоднократно участвовал в марафоне разработки, организованном Microsoft, и выигрывал награды.