
In this Article
- VBA PDF (Free Downloads)
- Word VBA Examples “CheatSheet”
- Select / Go To
- Bookmarks
- Document
- Columns
- Font
- Insert
- Loops
- Paragraph
- Word VBA Macro Tutorial
- Simple Word Macro Example
- Word Macro Basics
- Word Document Object
- Application
- Documents
- Document Methods
- Range, Selection, Paragraphs
- Range
- Selection
- Paragraphs
- Word VBA Tutorial Conclusion
- Word Macro Examples
- Word VBA FAQs
Welcome to our Word VBA / Macros Mega-Guide!
This page contains:
-
- Word VBA Tutorial PDF (Free Download)
- Word VBA “Cheat Sheet” containing a list of the most commonly used Word VBA code snippets
- Full Word VBA / Macro tutorial.
- Searchable list of all of our Word VBA Macro Tutorials
You might also be interested in our Interactive VBA Tutorial for Excel. While some of the examples / exercises are specific to Excel VBA, much of the content is generic to all VBA and you may find it useful to learn concepts like If Statements, Loops, MessageBoxes, and more.
VBA PDF (Free Downloads)
Download our free Microsoft Word VBA Tutorial! Or VBA Tutorials for other Office Programs!

Download
Word VBA Examples “CheatSheet”
Below you will find simple VBA code examples for working with Microsoft Word.
Select / Go To
Backspace
Selection.TypeBackspace
Select Entire Document
Selection.HomeKey Unit:=wdStory
Selection.Extend
Delete
Selection.Delete Unit:=wdCharacter, Count:=1
Insert After
Selection.InsertAfter “text”
Beginning of Line
Selection.HomeKey Unit:=wdLine
End of Line
Selection.EndKey Unit:=wdLine
Select All
Selection.WholeStory
Select Entire Line
Selection.EndKey Unit:=wdLine, Extend:=wdExtend
Move Up Paragraph
Selection.MoveUp Unit:=wdParagraph, Count:=1
Move Right One Character
Selection.MoveRight Unit:=wdCharacter, Count:=1
Move Right One Cell in Table
Selection.MoveRight Unit:=wdCell
Go To Start of Doc
Selection.HomeKey Unit:=wdStory
Go To End of Doc
Selection.EndKey Unit:=wdStory
Go To Page 1
Selection.GoTo What:=wdGoToPage, Which:=wdGoToNext, Name:=”1″
Go To Top of Page
Selection.GoTo What:=wdGoToBookmark, Name:=”Page”
Selection.MoveLeft Unit:=wdCharacter, Count:=1
Return to Top
Bookmarks
Add
With ActiveDocument.Bookmarks
.Add Range:=Selection.Range, Name:=”Name”
.DefaultSorting = wdSortByName
.ShowHidden = False
End With
Count
Dim n as Integer
n = ActiveDocument.Bookmarks.Count
Delete
ActiveDocument.Bookmarks(“BookmarkName”).Delete
Exists?
If ActiveDocument.Bookmarks.Exists(“BookmarkName”) = True then
‘Do something
End If
Go To
Selection.GoTo What:=wdGoToBookmark, Name:=”BookmarkName”
Select
ActiveDocument.Bookmarks(“BookmarkName”).Select
Replace Text
Selection.GoTo What:=wdGoToBookmark, Name:=”BookmarkName”
Selection.Delete Unit:=wdCharacter, Count:=1
Selection.InsertAfter “New Text”
ActiveDocument.Bookmarks.Add Range:=Selection.Range, _
Name:=”BookmarkName”
Return to Top
Document
Activate
Documents(“Example.doc”).Activate
Add to Variable
Dim doc As Document
Set doc = Documents.Add
Add (From Another Doc)
Documents.Add Template:=”C:FormsFormDoc.doc”, _
NewTemplate:=False
Close
Documents(“Example.doc”).Close
Close – Save Changes
Documents(“Example.doc”).Close SaveChanges:=wdSaveChanges
Close – Do Not Save
Documents(“Example.doc”).Close SaveChanges:=wdDoNotSaveChanges
Close – Prompt to Save
Documents(“Example.doc”).Close SaveChanges:=wdPromptToSaveChanges
Return to Top
Columns
Save As
Documents(“Example.doc”).SaveAs (“C:ExampleExample.doc”)
Save
Documents(“Example.doc”).Save
Protect
Documents(“Example.doc”).Protect Password:=”password”
Unprotect
Documents(“Example.doc”).UnProtect Password:=”password”
Number of Pages
Dim varNumberPages as Variant
varNumberPages = _
ActiveDocument.Content.Information(wdActiveEndAdjustedPageNumber)
Documents(“Example.doc”).Print
Return to Top
VBA Coding Made Easy
Stop searching for VBA code online. Learn more about AutoMacro — A VBA Code Builder that allows beginners to code procedures from scratch with minimal coding knowledge and with many time-saving features for all users!

Learn More
Font
Size
Selection.Font.Size = 12
Bold
Selection.Font.Bold = True
Italics
Selection.Font.Italic = True
Underline
Selection.Font.Underline = wdUnderlineSingle
All Caps
Selection.Font.AllCaps = True
Color
Selection.Font.TextColor = vbRed
Name
Selection.Font.Name = “Abadi”
Subscript
Selection.Font.Subscript = True
SuperScript
Selection.Font.Superscript = True
Highlight Color
Selection.Range.HighlightColorIndex = wdYellow
Style
Selection.Style = ActiveDocument.Styles(“Normal”)
Return to Top
Insert
Insert AutoText
Selection.TypeText Text:=”a3″
Selection.Range.InsertAutoText
Insert File
Selection.InsertFile (“C:DocsSomething.doc”)
Insert Page Break
Selection.InsertBreak Type:=wdPageBreak
Insert Paragraph Symbol
Selection.TypeText Text:=Chr$(182)
Insert Tab
Selection.TypeText Text:=vbTab
Insert Text
Selection.TypeText Text:=”Any Text”
Insert Type Paragraph
Selection.TypeParagraph
Insert Paragraph
Selection.InsertParagraph
Return to Top
Loops
Do Until End of Doc
Do Until ActiveDocument.Bookmarks(“Sel”) = ActiveDocument.Bookmarks(“EndOfDoc”)
‘Do Something
Sub
For Each Doc in Docs
Dim doc As Document
ForEach doc In Documents
‘Do Something
Next doc
Loop Through Paragraphs
Sub through Paragraphs
Dim i As Long, iParCount As Long
iParCount = ActiveDocument.Paragraphs.CountFori = 1 To iParCount
ActiveDocument.Paragraphs(i).Alignment = wdAlignParagraphLeft
Next i
Return to Top
VBA Programming | Code Generator does work for you!
Paragraph
KeepLinesTogether
Selection.ParagraphFormat.KeepTogether = True
KeepWithNext
Selection.ParagraphFormat.KeepWithNext = True
Space After
Selection.ParagraphFormat.SpaceAfter = 12
Space Before
Selection.ParagraphFormat.SpaceBefore = 0
Align Center
Selection.ParagraphFormat.Alignment = wdAlignParagraphCenter
Align Right
Selection.ParagraphFormat.Alignment = wdAlignParagraphRight
Align Left
Selection.ParagraphFormat.Alignment = wdAlignParagraphLeft
Left Indent
Selection.ParagraphFormat.LeftIndent = InchesToPoints(3.75)
Right Indent
Selection.ParagraphFormat.RightIndent = InchesToPoints(1)
Line Spacing
With Selection.ParagraphFormat
.LineSpacingRule = wdLineSpaceExactly
.LineSpacing = 12
End With
Loop Through All Paragraphs
Sub through Paragraphs
Dim i As Long, iParCount As Long
iParCount = ActiveDocument.Paragraphs.CountFori = 1 To iParCount
ActiveDocument.Paragraphs(i).Alignment = wdAlignParagraphLeft
Next i
Return to Top
Word VBA Macro Tutorial
This is a tutorial for using VBA with Microsoft Word. This tutorial will teach you how to write a simple Macro and interact with Documents, Ranges, Selections, and Paragraphs.
Note: If you’re brand new to Macros / VBA you might also find this article useful: How to write VBA Macros from Scratch.
VBA is the programming language used to automate Microsoft Office programs including Word, Excel, Outlook, PowerPoint, and Access.
Macros are blocks of VBA code that perform specific tasks.
When you Record a Macro, Word will write VBA code into a Macro, allowing you to repeat your actions. You can see a list of all available Macros from View > Macros.
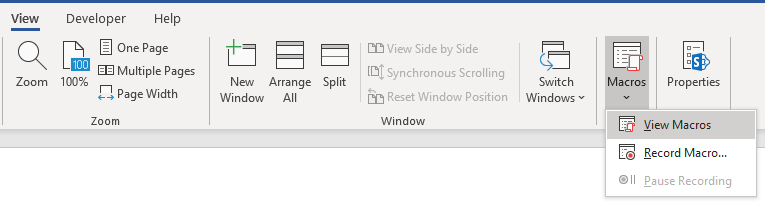
After recording a Macro, you will be able to edit the Macro from the Macro List:
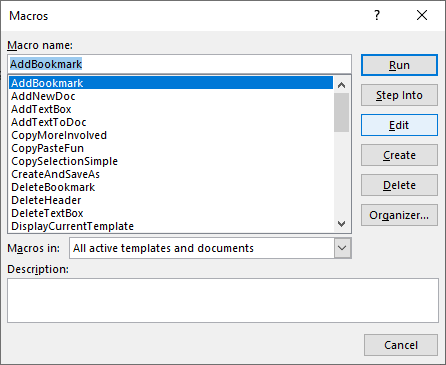
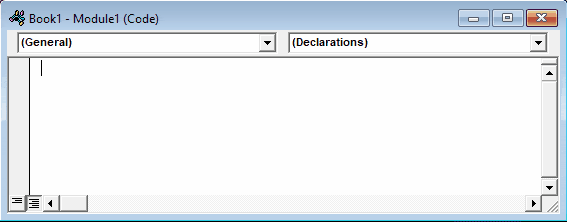
When you click Edit, you open the VBA Editor. Using the VBA Editor you can edit recorded Macros or write a Word Macro from scratch. To access the VBA Editor use the shortcut ALT + F11 or click Visual Basic from the Developer Ribbon.

Simple Word Macro Example
This is a simple example of a Word VBA Macro. It performs the following tasks:
- Opens a Word Document
- Writes to Document
- Closes and Saves the Word Document.
Sub WordMacroExample()

    'Open Doc & Assign to Variable
    Dim oDoc As Document
    Set oDoc = Documents.Open("c:UserssomeoneNewDocument.docx")

    'Write To Doc
    Selection.TypeText "www.automateexcel.com"
    Selection.TypeParagraph

    'Save and Close Doc
    oDoc.Save
    oDoc.Close

End Sub
Word Macro Basics
All VBA code must be stored within procedures like this. To create a procedure in VBA type “Sub WordMacroExample” (Where “WordMacroExample” is your desired Macro name) and press ENTER. VBA will automatically add the parenthesis and End Sub.
Word Document Object
When interacting with Microsoft Word in VBA, you will frequently reference Word “Objects”. The most common objects are:
Application Object – Microsoft Word itself
Document Object – A Word document
Range Object – A part of a Word document
Selection Object – A selected range or cursor location.
AutoMacro | Ultimate VBA Add-in | Click for Free Trial!
Application
Application is the “top-level” object. All other objects in Word can be reached through it.
In addition to accessing other Word objects, there are “application-level” settings that can be applied:
Application.Options.AllowDragAndDrop = TrueThis is an example of accessing the “Selection” of “Windows(1)” with in the Application:
Application.Windows(1).Selection.Characters.CountHowever, the most common Word objects can be accessed directly, without typing the full hierarchy. So instead, you can (and should) just type:
Selection.Characters.CountDocuments
ActiveDocument
Often, you will have two or more documents opened in Word and you will need specify which specific Word Document to interact with. One way to specify which document is to use ActiveDocument. For example:
ActiveDocument.PrintOut…would print the ActiveDocument. The ActiveDocument is the document in Word which “has focus”
To switch the ActiveDocument, use the Activate command:
Documents("Example.docx").ActivateThisDocument
Instead of using ActiveDocument to reference the active document, you can use ThisDocument to reference the document where the macro is stored. ThisDocument will never change.
ThisDocument.PrintOutDocument Variables
However, for more complicated macros, it can be hard to keep track of the Active Document. It can also be frustrating to switch back and forth between documents.
Instead, you can use Document variables.
This macro will assign the ActiveDocument to a variable and then print the document using the variable:
Sub VarExample()
    Dim oDoc As Document
    Set oDoc = ActiveDocument
    oDoc.PrintOut
End Sub
Document Methods
Open Document
To Open a Word Document:
Documents.Open "c:UsersSomeOneDesktopTest PM.docx"We recommend always assigning a Document to a variable upon opening it:
Dim oDoc as Document
Set oDoc = Documents.Open("c:UsersSomeOneDesktopTest PM.docx")
Create New Document
To create a new Word Document:
Documents.AddWe can instruct Word to create a new doc based on some template:
Documents.Add Template:="C:Program FilesMicrosoft OfficeTemplatesMyTemplate.dotx"As always, it is useful and huge problem saver to assign document to variable upon creating or opening:
Dim oDoc as Document
Set oDoc = Documents.Add (Template:="C:Program FilesMicrosoft OfficeTemplatesMyTemplate.dotx")
Save Document
To save a document:
ActiveDocument.Saveor SaveAs:
ActiveDocument.SaveAs FileName:= c:UsersSomeOneDesktoptest2.docx", FileFormat:=wdFormatDocumentClose Document
To close a Document and save changes:
ActiveDocument.Close wdSaveChangesor without saving changes:
ActiveDocument.Close wdDoNotSaveChangesPrint Document
This will print the active Document:
ActiveDocument.PrintOutRange, Selection, Paragraphs
Range and Selection are probably the most important objects in Word VBA, certainly the most used.
Range refers to some portion of document, usually, but not necessarily, text.
Selection refers to selected text (or other object like pictures) or, if nothing is selected, an insertion point.
Paragraphs represent paragraphs in document. Its less important than it sounds, because you can’t directly access paragraph text (you need to access particular paragraph range to make modifications).
AutoMacro | Ultimate VBA Add-in | Click for Free Trial!
Range
Range can be any part of document, including entire document:
Dim oRange As Range
Set oRange = ActiveDocument.Content
or it can be small as one character.
Another example, this range would refer to first word in document:
Dim oRange As Range
Set oRange = ActiveDocument.Range.Words(1)
Usually, you would want to get range which refers to specific part of document and then modify it.
In the following example we will make the first word of second paragraph bold:
Dim oRange As Range
Set oRange = ActiveDocument.Paragraphs(2).Range.Words(1)
oRange.Bold = True
Set Range Text
To set the text value of a Range:
Dim oRange As Range
Set oRange = ActiveDocument.Paragraphs(2).Range.Words(1)
oRange.Text = “Hello ”
(Tip: Note the space after “Hello”. Because word object includes space after word, with just “hello” we would get “Hellonext word”)
There are hundreds of things which you can do with ranges. Just a few examples (these assume you are already made object variable oRange referring to range of interest):
Change font
oRange.Font.Name = "Arial"Display in message box number of characters in particular range
MsgBox oRange.Characters.CountInsert some text before it
oRange.InsertBefore "this is inserted text "Add a footnote to range
ActiveDocument.Footnotes.Add Range:=oRange, _
Text:="Read more at automateexcel.com."
Copy it to clipboard
oRange.Copy
Often you need to change to what is particular range referring. So you can start it’s start and end
oRange.Start = 5
oRange.End = 50
After above code, oRange would refer to text starting with fifth and ending with 50th character in document.
Selection
Selection is even more widely used than Range, because it is easier to work with Selections than Ranges, IF your macro ONLY interacts with the ActiveDocument.
First select the desired part of your document. For example select the second paragraph in active document:
ActiveDocument.Paragraphs(2).Range.SelectThen you can use the Selection Object to type some text:
Selection.TypeText "Some text"We can type some paragraphs bellow “Some text”:
Selection.TypeText "Some text"
Selection.TypeParagraph
Often, it’s necessary to know if some text is selected or we have just a insertion point:
If Selection.Type <> wdSelectionIP Then
    Selection.Font.Bold = True
Else
    MsgBox "You need to select some text."
End If
When working with Selection object we want to place insertion point to particular place, and issue commands starting from this point.
Beginning of document:
Selection.HomeKey Unit:=wdStory, Extend:=wdMoveBeginning of current line:
Selection.HomeKey Unit:=wdLine, Extend:=wdMoveThe Extend parameter wdMove moves the insertion point. Instead, you could use wdExtend which will select all text between the current insertion point.
Selection.HomeKey Unit:=wdLine, Extend:=wdExtendMove Selection
The most useful method for changing position of insertion point is Move. To move Selection two characters forward:
Selection.Move Unit:=wdCharacter, Count:=2to move it backwards, use negative number for Count parameter:
Selection.Move Unit:=wdCharacter, Count:=-2Unit parameter can be wdCharacter, wdWord, wdLine, or more (use Word VBA help to see others).
To move words instead:
Selection.Move unit:=wdWord, Count:=2Selection is easier to work with (compared to ranges) because it is like a robot using Word, mimicking human user. Where Insertion point is – some action would take place. But, this means that you must take care where insertion point is! This is not easy after many steps in code. Otherwise, Word would change text in not desired place.
In the case you need some property or method not available in Selection object you can always easily obtain range associated with selection:
Set oRange = Selection.RangeTIP: Using Selection is often easier than using ranges, but also it’s way slower (important when you deal with big documents)
Paragraphs
You can’t directly use Paragraphs object to change text:
ActiveDocument.Paragraphs(1).Text = "No, it wouldn't work"Above wouldn’t work (actually it will throw an error). You need to first obtain range associated with particular paragraph:
ActiveDocument.Paragraphs(1).Range.Text = "It works now :)"But you can directly change its style:
ActiveDocument.Paragraphs(1).Style = "Normal"or change its paragraph level formatting:
ActiveDocument.Paragraphs(1).LeftIndent = 10or maybe you want to keep this paragraph on the same line with next paragraph:
ActiveDocument.Paragraphs(1).KeepWithNext = TrueMake paragraph centered:
ActiveDocument.Paragraphs(1).Alignment = wdAlignParagraphCenterIt is VERY useful to assign a particular paragraph to object variable. If we assign particular paragraph to variable we don’t have to worry if the first paragraph becomes the second because we inserted one paragraph before it:
dim oPara as Paragraph
Set oPara = Selection.Paragraphs(1) ‘here we assign first paragraph of current selection to variable
Here is an example where we insert a paragraph above the first paragraph, but we can still reference the old first paragraph because it was assigned to a variable:
Sub ParagraphExample()
    Dim oPara As Paragraph
    Set oPara = ActiveDocument.Paragraphs(1)
    MsgBox oPara.Range.Text
    oPara.Range.InsertParagraphBefore 'Insert Paragraph
    MsgBox oPara.Range.Text
End Sub
Paragraph object is very frequently used in loops:
Sub LoopThroughParagraphs()

    Dim oPara As Paragraph
    For Each oPara In ActiveDocument.Paragraphs
        'do something with it. We will just display
        'paragraph text if its style is "Heading 4"
        If oPara.Style = "Heading 4" Then
            MsgBox oPara.Range.Text
        End If
    Next oPara

End Sub
Word VBA Tutorial Conclusion
This tutorial covered the basics of Word VBA. If you’re new to VBA, you should also review our general VBA Tutorial to learn more about Variables, Loops, MessageBoxes, Settings, Conditional Logic and much more.
AutoMacro | Ultimate VBA Add-in | Click for Free Trial!
Word Macro Examples
Word VBA FAQs
What is a Word Macro?
A Macro is a general term that refers to a set of programming instructions that automates tasks. Word Macros automate tasks in Word using the VBA programming language.
Does word have VBA?
Yes, Microsoft Word has the VBA Editor. It can be accessed with by pressing ALT + F11 or by navigating to Developer > Visual Basic.
How do I use VBA in Word?
1. Open the VBA Editor (ALT + F11 or Developer > Visual Basic)
2. Go to Insert > Module to create a Code Module
3. Type ‘Sub HelloWorld’ and press Enter
4. In between the lines ‘Sub HelloWorld’ and ‘End Sub’, type ‘MsgBox “Hello World!’
5. You’ve created a Macro!
6. Now press ‘F5’ to run the Macro

Welcome to the Word VBA Tutorial. VBA is a great tool not only to be leveraged in MS Excel. Often it is worth to save some time doing repeatable tasks by adopting some VBA macros in Word or PowerPoint too. Today I wanted to focus a little bit on starting you off in Word VBA macro programming.
 When moving to macro programming in Word VBA you will stumble upon issues you would normally not expect in Excel. Lets take the example of moving around the Word file – in Excel you have spreadsheets which are easy to navigate around. In Word, however, you have a lot of different content e.g. text, objects like images and charts, tables etc. Navigating around Word file in VBA is the greatest challenge you will face. Today I would like to focus on that and other frequently used features in Word VBA. So let’s kick off this Word VBA Tutorial.
Starting your journey with programming in Visual Basic for Applications (VBA)? Start with my VBA Tutorial.
Word VBA is identical to Excel VBA – be sure to leverage the VBA Cheat Sheet
VBA Word Navigating
Let’s start with adding content to the most common places the start and end of a Word document in VBA. Know if you Google for this you will get tons of non-sense methods of navigating around Word files. I was truly amazed at how poorly it is documented.
Beginning and End of the Word Document
Go to the Beginning of a Word Document:
'Start - add text to the beginning of the Word Document
Dim startMark As Range
Set startMark = ActiveDocument.Range(0, 0)
startMark.Text = "This is the start of the document"
Go to the End of a Word Document:
'End - add text to the end of the Word Document
Dim endMark As Range
Set endMark = ActiveDocument.Range(Len(ActiveDocument.Range))
endMark.Text = "This is the end of the document"
Finding and replacing text in a Word Document with VBA
Finding and replacing text are basic functions that you will probably need to leverage every now and then.
'Find and print text in MsgBox
Dim selectText As Range
Set selectText = ActiveDocument.Content
selectText.Find.Execute "Hello"
If selectText.Find.Found Then
  MsgBox selectText.Text
End If
'Find and replace all instances of a specific text
Dim replaceText As Range
Set replaceText = ActiveDocument.Content
replaceText.Find.Execute FindText:="Hello", ReplaceWith:="Goodbye", Replace:=wdReplaceAll
VBA Word Text formatting
One of the first things you would want to do is probably text formatting in Word VBA.
Let’s start by adding some text to our document:
'Select the beginning of the document
ActiveDocument.Range(0).Select
'Type "Hello World!"
Selection.TypeText Text:="Hello World!"
Bold & Italic
To change the font weight to bold see below:
'Select the word "Hello"
ActiveDocument.Range(0, 5).Select

'Toggle the bold property
Selection.Font.Bold = wdToggle
To change the text decoration to italic see below:
'Select the word "World"
ActiveDocument.Range(0, 5).Select
'Toggle the bold property
Selection.Font.Bold = wdToggle
Below the final result of the code above:

Font size and name
Using the “Hello World!” example above we can similarly change the text font name and font size as shown below:
'Change font size
Selection.Font.Size = 20 'Size: 20
Selection.Font.Grow 'Size: 22
Selection.Font.Shrink 'Size: 20
'Change font name to "Aharoni"
Selection.Font.Name = "Aharoni"
VBA Word Tables
When editing Word files you might want to leverage tables as it is much easier to navigate around them in an automated way. My approach is to insert/modify tables in Word without and borders (invisible). This way you can guarantee a consistent and easy to navigate structure in Word. Let’s go through some of the basic functions around tables.
Add a table
Let’s add a table to the beginning of the Word document:
 Dim begin As Range
 Set startMark = ActiveDocument.Range(0, 0)
 'range as Range, NumRows as Long, NumColumns as Long
 Call ActiveDocument.Tables.Add(startMark, 3, 6) 'add to beginning of doc, 3 rows, 6 cols
Edit cell text
'Modify cell (1,3) to "Hello World!"
With ActiveDocument.Tables(1)
        .Cell(1, 3).Range.Text = "Hello World!"
End With
Working on rows and columns
With ActiveDocument.Tables(1)
        ' Modify height of row 1
        .Rows(1).Height = CentimetersToPoints(0.65)
        ' Modify width of column 1
        .Columns(1).Width = CentimetersToPoints(2.54)
        'Merge cell (1,3) with cell (1,4) - cells must be next to each other
        .Cell(1, 3).Merge .Cell(1, 4)
End With
Formatting borders
'Modify row 1 border, single, black and 100pt
 With ActiveDocument.Tables(1).Rows(3).Borders(wdBorderBottom)
        .LineStyle = wdLineStyleSingle
        .LineWidth = wdLineWidth100pt
        .Color = wdColorBlack
End With
In progress…
This post is the second in a series about controlling other applications from Excel using VBA. In the first part we looked at the basics of how to reference other applications using Early Binding or Late Binding. In this post, we will look at how we can automate Word from Excel even though we don’t know any VBA code for Word… yet. The process we will use for this is as follows:
- Enable the Word Developer menu
- Record a Word macro
- Add the code to Excel VBA and amend
- Record macros in Excel if necessary
- Repeat the previous steps until macro complete
I am not an Excel VBA expert (I’m more of an Excel VBA tinkerer), and I am certainly not a Word VBA expert. The process I am about to show you may not create the most efficient code, but I know this process works, because I have used it myself to automate lots tasks using Microsoft Word.
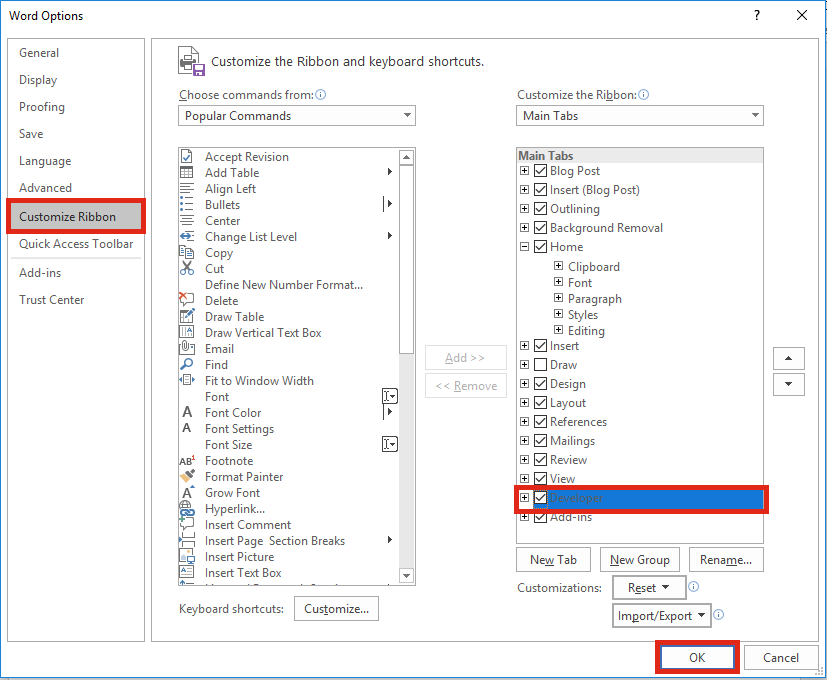
Enable the Word Developer menu
If you have enabled the Excel Developer menu it is the same process in Word.
In Word: File -> Options -> Customize Ribbon
Then tick the Developer Ribbon option, OK.
Record a Word Macro
The key to the success of this method is taking small sections of code and building up a complex macro bit by bit. Using the Word Macro Recorder is again, similar to the Excel Macro recorder.
Click on: Developer -> Record Macro

For the example in this post, we will create a macro which will open a new Word document, then copy a chart from Excel and paste it into that Word document. We will tackle this one stage at a time. Firstly, lets create the macro to open a new word document.
Click – Developer -> Record Macro. The Record Macro window will open.
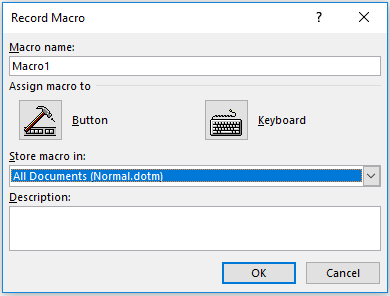
Make a note of the “Store macro in” option, as we will need to know where to find the recorded code later. Normal.dotm is fine for now. Click OK – the Macro Recorder is now running.
Open a new Word Document – File -> New -> Blank Document
Stop the Macro from recording – Developer -> Stop Recording

We can now view the code for opening a new Word Document in the Visual Basic Editor. Click: Developer -> Visual Basic.

Find the location of your recorded code in the Visual Basic Editor. In this example: Normal -> Modules -> NewMacros.
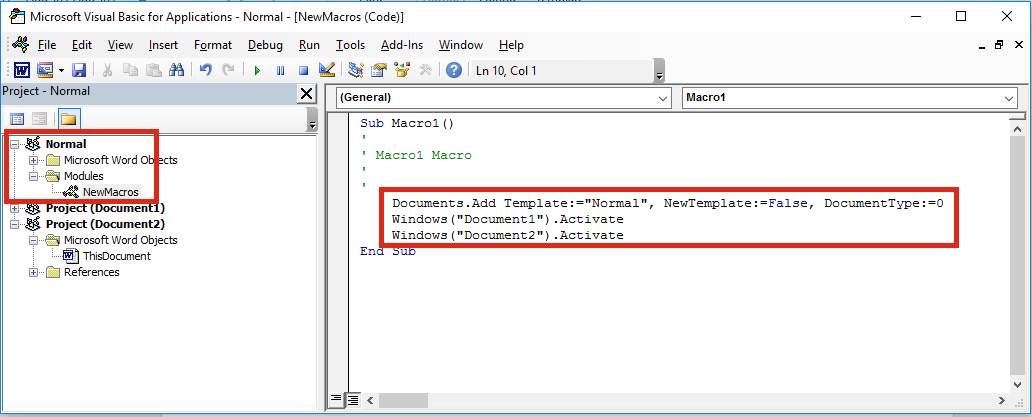
Your code should look like the following. It may be slightly different, but not significantly.
Sub Macro1()
'
' Macro1 Macro
'
'
    Documents.Add Template:="Normal", NewTemplate:=False, DocumentType:=0
    Windows("Document1").Activate
    Windows("Document2").Activate
End Sub
Add the code to Excel VBA and amend
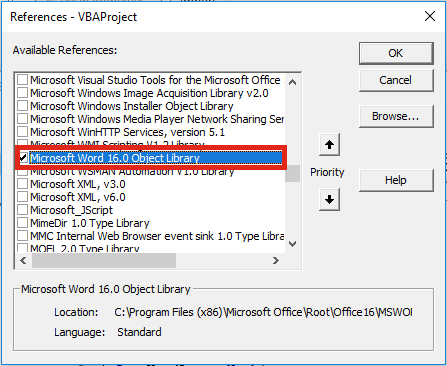
Let’s head back to the Excel VBA Editor and use the Early Binding method to control to Microsoft Word. In the Visual Basic Editor click Tools -> References select Microsoft Word x.xx Object Library. Then click OK.
As we are using Early Binding we need to declare the Application as a variable as follows:
Dim WordApp As Word.Application
Set WordApp = New Word.Application
Now copy and paste the code from the Word VBA Editor into the Excel VBA Editor.
The Word VBA code started with Documents.Add, all we have to do is add our application variable to the front of that line of code. Now becomes WordApp.Documents.Add . . .
Often, Selecting and Activating Objects is not required in VBA code, so I have not copied those statements into the code below.
Sub CreateWordDocument()

'Connect using Early Binding.
'Remember to set the reference to the Word Object Library
'In VBE Editor Tools -> References -> Microsoft Word x.xx Object Library
Dim WordApp As Word.Application
Set WordApp = New Word.Application

WordApp.Documents.Add Template:="Normal", NewTemplate:=False, DocumentType:=0
WordApp.Visible = True 'New Apps will be hidden by default, so make visible

Set WordApp = Nothing 'release the memory

End Sub
A point to note, when an application is opened with VBA, it is normally opened in the background. To make the Word document visible I have added the following code:
WordApp.Visible = True
Record macros in Excel (if necessary)
If we want to copy Excel content into a Word document, we will need to copy that content using Excel VBA. We can use the Macro Recorder in Excel to obtain the VBA code for copying, then we can use the Word Macro Recorder to obtain the VBA code for pasting.
Macro Recording from Excel – selecting a worksheet and copying chart
Sheets("Sheet1").Select
ActiveSheet.ChartObjects("Chart 1").Activate
ActiveChart.ChartArea.Copy
Macro Recording from Word – pasting a chart into a document
Selection.PasteSpecial Link:=False, DataType:=wdPasteEnhancedMetafile, _
        Placement:=wdInLine, DisplayAsIcon:=False
We can add both Macro recordings into our Excel macro. Remember to add WordApp. at the start of each statement of Word VBA code.
Sub CreateWordDocument()

'Connect using Early Binding.
'Remember to set the reference to the Word Object Library
'In VBE Editor Tools -> References -> Microsoft Word x.xx Object Library
Dim WordApp As Word.Application
Set WordApp = New Word.Application

WordApp.Documents.Add Template:="Normal", NewTemplate:=False, DocumentType:=0
WordApp.Visible = True 'New Apps will be hidden by default, so make visible

'code copied from Excel Macro recorder
Sheets("Sheet1").Select
Selection.ChartObjects("Chart 1").ChartArea.Copy

'code copied from Word Macro recorder with WordApp. added to the front.
WordApp.Selection.PasteSpecial Link:=False, DataType:=wdPasteEnhancedMetafile, _
        Placement:=wdInLine, DisplayAsIcon:=False

Set WordApp = Nothing 'release the memory

End Sub
This code is not particularly efficient; it contains a few unnecessary sections code. However… it works!
Repeat the previous steps until macro complete
By repeating the same steps above; recording short actions, then transferring the code into Excel, we can slowly build up much more complex Macros. The key is to keep the actions short, if you do too many actions with the Macro Recorder, code starts to look long and scary.
If you’ve you tried to use the Macro Recorder before you will know that this is not as easy as it seems. And this simple tutorial may make you think it is easy, when it’s not. Sometimes, it can be quite frustrating trying to find out where the issues and errors are. The key to success is recording very short actions, such as those below and copying them into the Visual Basic Editor.
'Pressing the Enter Key to move to a new line in Word
WordApp.Selection.TypeParagraph

'Turn on/off Bold Text
WordApp.Selection.Font.Bold = wdToggle

'Change Font Size
WordApp.Selection.Font.Size = 16

'Type some text
WordApp.Selection.TypeText Text:="Here is some text"
You will soon build up a standard library of code that you can use to control Word for most basic tasks.
In recorded VBA code from Word, the word “Selection” in the code often refers to the document itself. It is possible to make the code a little bit more efficient by declaring the document as a variable. If we were opening a specific document, we could include this at the start, just below the declaration of the application.
'Declare a specific document as a variable
Dim WordDocument As Object
Set WordDocument = WordApp.Documents.Open(sourceFileName)
Or, if we created a new document we could include the following below the declaration of the application variable.
'Delcare a new document as a variable
Dim WordDocument As Object
Set WordDocument = WordApp.Documents.Add Template:="Normal", _
NewTemplate:=False, DocumentType:=0
If we have created the document as a variable we can then reference the specific document. This code:
WordApp.Selection.TypeParagraph
Would become this code:
WordDocument.TypeParagraph
Or this code:
WordApp.Selection.TypeText Text:="Here is some text"
Would become this code:
WordDocument.TypeText Text:="Here is some text"
This method is much better, as it doesn’t rely on the Selection of the user being in the right place.
Conclusion
We have seen in this post that it is possible to create complex Macros to automate Word from Excel using VBA. By understanding how to declare variables for the application and documents we can create much more robust macros, even without knowing a lot of VBA code.
Related Posts:
- 5 quick ways to embed a Word document in Excel
- Controlling Powerpoint from Excel using VBA
- Edit links in Word using VBA
- How to link Excel to Word

About the author
Hey, I’m Mark, and I run Excel Off The Grid.
My parents tell me that at the age of 7 I declared I was going to become a qualified accountant. I was either psychic or had no imagination, as that is exactly what happened. However, it wasn’t until I was 35 that my journey really began.
In 2015, I started a new job, for which I was regularly working after 10pm. As a result, I rarely saw my children during the week. So, I started searching for the secrets to automating Excel. I discovered that by building a small number of simple tools, I could combine them together in different ways to automate nearly all my regular tasks. This meant I could work less hours (and I got pay raises!). Today, I teach these techniques to other professionals in our training program so they too can spend less time at work (and more time with their children and doing the things they love).
Do you need help adapting this post to your needs?
I’m guessing the examples in this post don’t exactly match your situation. We all use Excel differently, so it’s impossible to write a post that will meet everybody’s needs. By taking the time to understand the techniques and principles in this post (and elsewhere on this site), you should be able to adapt it to your needs.
But, if you’re still struggling you should:
- Read other blogs, or watch YouTube videos on the same topic. You will benefit much more by discovering your own solutions.
- Ask the ‘Excel Ninja’ in your office. It’s amazing what things other people know.
- Ask a question in a forum like Mr Excel, or the Microsoft Answers Community. Remember, the people on these forums are generally giving their time for free. So take care to craft your question, make sure it’s clear and concise. List all the things you’ve tried, and provide screenshots, code segments and example workbooks.
- Use Excel Rescue, who are my consultancy partner. They help by providing solutions to smaller Excel problems.
What next?
Don’t go yet, there is plenty more to learn on Excel Off The Grid. Check out the latest posts: