
In this article, let’s talk about the 7 useful ways to create a fillable field with underline in your Word document.
Once in a while, we would need to create some questionnaires. Therefore, it would be a needy demand to create a fillable field with underline. In the following content, there are 7 effectual methods which shall meet your requirements.
Method 1: Manually Draw a Line
- First off, put cursor at the place where the line goes and click “Insert” tab.
- Then click “Shapes” in “Illustration” group.
- Choose “Line” in “Lines” group.


Now there shall be a colored line. You can click on it and change the color to black by choosing a shape style under “Format” tab.
Method 2: Add Underline for Font
- To start with, enter a series of space and select them.
- Then click the expand button under “Home” tab to open the “Font” dialog box.
- Next choose an underline style and click “OK”.

- Now type on the selection and the text shall be underlined.


Method 3: Enter Underscore
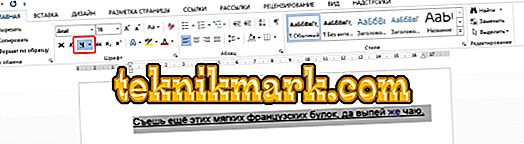
- Firstly, click “Underline” under “Home” tab and choose one line style.

- Then press “Shift+ Underscore” to get a line.
- Then place cursor above the line and type the content. As you type, you will find the line gets longer and longer. So you need to trim the length afterwards.

Method 4: Insert a Paragraph Border
- To begin with, click the border icon under “Home” tab in “Paragraph” group.
- Then choose “Bottom Border”.


Here is the effect:
Method 5: Use a Table Border
- Click “Insert” tab first.
- Then click “Table”.
- Next choose “Draw Table” on the list.

- Draw a table of one row and one column with approximate height and width.
- Then select the table.
- Click “Design” tab then “Borders” Icon.
- First choose “No Border” and then “Bottom Border”.


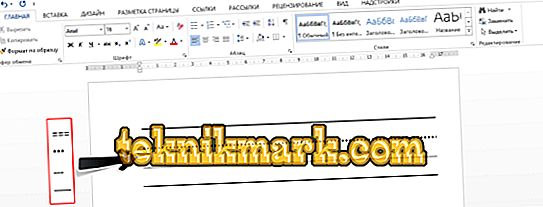
Method 6: Create a Horizontal Line
- Type dash three times.
- Then press “Enter”.
Method 7: Run a Macro
- First and foremost, press “Alt+ F11” to open Word VBA editor quickly.
- Then click “Normal” and then “Insert”.
- Next click “Insert”.
- Then choose “Module”.

- Double click on the new module to open the editing space.
- Paste these codes there:

Sub CreateAFillableField()
  Dim objParagraph As Paragraph
  Dim objTable As Table

  'Initialization
  Set objTable = ActiveDocument.Tables.Add(Range:=Selection.Range, NumRows:=1, NumColumns:= _
    1, DefaultTableBehavior:=wdWord9TableBehavior, AutoFitBehavior:= _
    wdAutoFitFixed)
  objTable.Cell(1, 1).SetWidth ColumnWidth:=InchesToPoints(1.1), RulerStyle:=wdAdjustNone

  'Set Table borders invisible.
  Selection.Borders.Enable = False

  'Apply bottom border only to table.
  With Selection.Borders(wdBorderBottom)
    .LineStyle = Options.DefaultBorderLineStyle
    .LineWidth = Options.DefaultBorderLineWidth
    .Color = Options.DefaultBorderColor
  End With

  'Remove table caption.
  For Each objParagraph In ActiveDocument.Paragraphs
    If objParagraph.Range.Style = "Caption" Then
      objParagraph.Range.Delete
    End If
  Next objParagraph
End Sub
- Click “Run” button.


For easy use in the future, you can assign a button for the macro. You can refer to this article: How to Remove the Formatting of Pasted Texts with Macro and VBA in Your Word
Comparison of 7 Methods
| Methods | Advantages | Disadvantages |
| Method 1: Manually Draw a Line | You can drag the line to adjust its location. | 1. You will have to change the color to black.
2. The line can’t get longer automatically even if there is no enough space for the text. |
| Method 2: Add Underline for Font | 1. There is no extra space left on the line.
2. The line can get longer automatically if there is no enough space for the text. |
1. You can’t see the line until you enter text over it.
2. You can’t move the line. |
| Method 3: Enter Underscore | You can view the line. | 1. You have to apply underline to the space before creating the line.
2. You will have to reduce the line length since it gets longer as you type. 3. You can’t move the line. |
| Method 4: Insert a Paragraph Border | You can view the line. | 1. You can’t change the line length.
2. You can’t move the line. |
| Method 5: Use a Table Border | 1. You can move the line.
2. You can alter the line length. |
1. You have to remove unnecessary borders.
2. You have to remove the table caption. |
| Method 6: Create a Horizontal Line | You can view the line. | 1. You can’t change the line length.
2. You can only have it on the next paragraph of existing text. 3. You can’t move the line. |
| Method 7: Run a Macro | 1. You can view the line.
2. You can move the line. 3. You can change the length. 4. No need to delete table caption. 5. The quickest way to get a fillable field with underline |
You will have to assign the macro to a button if you want to use it quickly in the future. |
Address File Corruption Predicament
In everyday use of digital devices, file loss or corruption due to all kinds of reasons happens all the time. However, these seeming broken files are highly recoverable, for there is a specialized damaged Word docx repair tool, the last-ditch effort you can make to save your data.
Author Introduction:
Vera Chen is a data recovery expert in DataNumen, Inc., which is the world leader in data recovery technologies, including xls data error recovery tool and pdf repair software products. For more information visit www.datanumen.com
In Word, you can underline labels, spaces, tabs. Different types of lines are available: wavy, straight, double. There are also page separators, tables. Red, green and blue «waves» the program highlights errors and incorrectly designed text. To use this toolkit, figure out how to add these lines, how to change their attributes, and how to remove an underline in Word if it cannot be selected.

There are several ways to underline text in Word. We will tell about them below.
Simple underscore
You can make a strip under the label like this:
- Select a fragment.
- On the main menu bar, find the letter “H” with a dash under it. Or press Ctrl + U. You can get rid of the line with the same key combination.
- To print with stripes already, click on the “» ”icon, write something, and click on Ч again.
The operation itself is quite simple. But so you can add only the usual feature. Here’s how to emphasize text in Word, if you want to use different types and colors of strips:
- Select a fragment.
- Click the little arrow next to the letter “H”.
- In the drop-down list, select the color and type: double line, dashed, thick, wavy.

To create a strip that will stay in place while text is printed over it, you need to do the following:
- Through the «Tables» section (or Insert — Tables, if you have Word 2007) add a grid.
- Write a few words in it.
- Click on the frame with the right mouse button.
- «Borders and shading.»
- The options will open. On the right there will be an area in which there are settings for the visibility of borders. Leave only the bottom line. It will remain in place even if you delete the text.
- In the same menu, select the type and thickness of the strip.
You can make it easier:
- After adding the grid, the “Working with Tables” section will appear at the top of the window. In it, go to the «Designer» tab.
- Click the arrow next to «Borders».
- Leave only the option «Lower Limit» active.
These strips are needed when working with HTML-documents. This technique is suitable for creating input fields and web forms.
If you want to add lines exclusively to the inscriptions, without touching the spaces, it is not necessary to customize the design of each preposition. Here’s how to underline a word in Word:
- Highlight text.
- Click on the black arrow next to the letter “H”.
- Item «Other».
- In the Underline field, select Word Only.
Underscore spaces
Sometimes you need the lines to be under the spaces. For example, if you are preparing to print a document in which there should be a place to enter a name, a surname or other data. For this fit the table (interaction with them is described above). But there are other ways. Here’s how to make an underline in Word without words:
- The easiest method is to press Shift + [-] (hyphen; without parentheses). A line will appear. This is not part of the design, but a symbol. All font settings apply to it.
- To change the color of the strip, find the button with the letter “A” in the menu bar. Click on the arrow next to it — a palette will open.
The underscore is not always suitable for the design. You can not print over it — it will move. It is difficult to align to the width of the paragraph. If your automatic replacement is activated, three lines in a row will automatically turn into a border.
In Word, you can add stripes to tabs. Their markup is easier to configure.
- Press the «TAB» key. It is located above the Caps Look button. Word cursor will move.
- It is better to activate the display of hidden characters in order to see tabs, and not just a set of words. To do this, click on the toolbar on the icon similar to the letter “P” (the button is called “Paragraph”). Or press Ctrl + Shift + * (asterisk). Tab in Word looks like an arrow pointing to the right.
- Select it.
- Press Ctrl + U.
Printing over such lines also will not work. But they are much wider than spaces — it will be easier to align the line with them.
Page borders
If you type three asterisks or three hyphens in a row in Word, they can become a horizontal line (sometimes you need to press Enter to do this). This autocorrect turns them into a page border. To create a certain kind of such a line, you need to do this:
- Enter three equal signs (=) to create a double bar.
- Three asterisks (*) — dotted.
- Three hyphens (-) — simple.
- The bottom three spaces (_) are bold.
These boundaries are similar to the usual underscore. They occupy the entire line. They cannot be selected or edited. But you can print over them.
Here’s how to remove a similar line:
- Place the Word cursor at the beginning of the bar line.
- Click Delete.
If this method does not help, it is better to do this:
- Section «Page Layout». It is in the menu bar at the top of the window.
- Button «Page Borders».
- In the «Type» field, set the parameter «No». The horizontal line will disappear.
Red, green and blue underscore — spell checker
Word has a spell checker. She marks wavy lines with spelling errors, punctuation, stylistics. With it, it is easier to notice a random typo, check the text, find any flaws. The following indicates what each bar means.
- Red The word is incorrectly written, or it is not in the Office database. Red color also denotes repetitions.
- Green Errors with grammar, stylistics, punctuation. Extra brackets. Inconsistent text.
- Blue Format mismatch.
Usually this feature is beneficial. But if you wrote everything correctly, the sudden wavy lines will annoy and interfere. How to remove underlining in Word, if it is set automatically when checking spelling:
- Right-click on the fragment under which a wavy line appeared.
- To get rid of it, select «Skip».
- To make Word remember the selected word and write it into your dictionary, click Add.
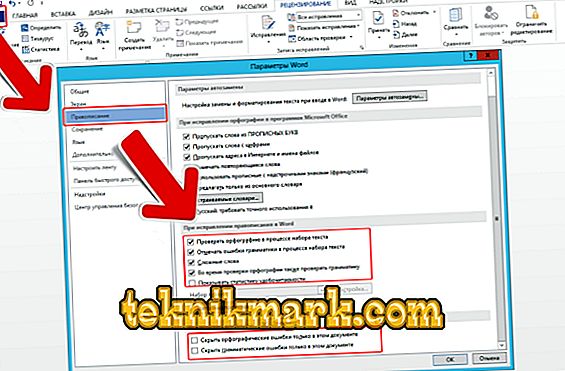
If you want to completely disable the scan, open the settings:
- Go to the Tools — Spelling menu (in Word 2007, for this you need to click on the Office logo in the upper left corner and select «Options» in the drop-down list).
- Uncheck the «Automatically check spelling» or check «Hide errors only in this document.» Autocheck will stop bothering you. But looking for typos will be more difficult.
In the Word toolkit, there are various types of lines to underline text or to draw a horizontal bar. Use these functions to process documents.
How can I underline a text that could be multiple lines of string?
I find some people suggest UIWebView, but it is obviously too heavy a class for just text rendering.
My thoughts was to figure out the start point and length of each string in each line.
And draw a line under it accordingly.
I meet problems at how to figure out the length and start point for the string.
I tried to use -[UILabel textRectForBounds:limitedToNumberOfLines:], this should be the drawing bounding rect for the text right?
Then I have to work on the alignment?
How can I get the start point of each line when it is center-justified and right justified?
![]()
Cœur
36.7k25 gold badges191 silver badges259 bronze badges
asked Apr 26, 2010 at 5:33
![]()
1
You may subclass from UILabel and override drawRect method:
- (void)drawRect:(CGRect)rect {
    CGContextRef ctx = UIGraphicsGetCurrentContext();
    CGContextSetRGBStrokeColor(ctx, 207.0f/255.0f, 91.0f/255.0f, 44.0f/255.0f, 1.0f); // RGBA
    CGContextSetLineWidth(ctx, 1.0f);

    CGContextMoveToPoint(ctx, 0, self.bounds.size.height - 1);
    CGContextAddLineToPoint(ctx, self.bounds.size.width, self.bounds.size.height - 1);

    CGContextStrokePath(ctx);

    [super drawRect:rect];
}
UPD:
As of iOS 6 Apple added NSAttributedString support for UILabel, so now it’s much easier and works for multiple lines:
NSDictionary *underlineAttribute = @{NSUnderlineStyleAttributeName: @(NSUnderlineStyleSingle)};
myLabel.attributedText = [[NSAttributedString alloc] initWithString:@"Test string"
                                                         attributes:underlineAttribute];
If you still wish to support iOS 4 and iOS 5, I’d recommend to use TTTAttributedLabel rather than underline label manually. However if you need to underline one-line UILabel and don’t want to use third-party components, code above would still do the trick.
![]()
jowie
8,0088 gold badges54 silver badges94 bronze badges
answered Apr 26, 2010 at 6:59
![]()
kovpaskovpas
9,5356 gold badges40 silver badges44 bronze badges
5
In Swift:
let underlineAttriString = NSAttributedString(string: "attriString",
                                          attributes: [NSAttributedString.Key.underlineStyle: NSUnderlineStyle.single.rawValue])
label.attributedText = underlineAttriString
![]()
beryllium
29.6k15 gold badges104 silver badges125 bronze badges
answered Nov 22, 2014 at 8:51
![]()
ytll21ytll21
8306 silver badges12 bronze badges
4
This is what i did. It works like butter.
1) Add CoreText.framework to your Frameworks.
2) import <CoreText/CoreText.h> in the class where you need underlined label.
3) Write the following code.
    NSMutableAttributedString *attString = [[NSMutableAttributedString alloc] initWithString:@"My Messages"];
    [attString addAttribute:(NSString*)kCTUnderlineStyleAttributeName
              value:[NSNumber numberWithInt:kCTUnderlineStyleSingle]
              range:(NSRange){0,[attString length]}];
    self.myMsgLBL.attributedText = attString;
    self.myMsgLBL.textColor = [UIColor whiteColor];
![]()
bret
7969 silver badges5 bronze badges
answered Oct 28, 2013 at 8:47
![]()
SanaSana
5574 silver badges9 bronze badges
1
Use an attribute string:
NSMutableAttributedString* attrString = [[NSMutableAttributedString alloc] initWithString:@"Your String"]
[attrString addAttribute:(NSString*)kCTUnderlineStyleAttributeName
                   value:[NSNumber numberWithInt:kCTUnderlineStyleSingle]
                   range:(NSRange){0,[attrString length]}];
And then override the label — (void)drawTextInRect:(CGRect)aRect and render the text in something like:
CGContextRef ctx = UIGraphicsGetCurrentContext();
CGContextSaveGState(ctx);
CTFramesetterRef framesetter = CTFramesetterCreateWithAttributedString((CFAttributedStringRef)attrString);
drawingRect = self.bounds;
CGMutablePathRef path = CGPathCreateMutable();
CGPathAddRect(path, NULL, drawingRect);
textFrame = CTFramesetterCreateFrame(framesetter,CFRangeMake(0,0), path, NULL);
CGPathRelease(path);
CFRelease(framesetter);
CTFrameDraw(textFrame, ctx);
CGContextRestoreGState(ctx);
Or better yet instead of overriding just use the OHAttributedLabel created by Olivier Halligon
answered Apr 11, 2012 at 12:08
![]()
2
I’ve combined some of provided answers, to create better (at least for my requirements) UILabel subclass, which supports:
- multiline text with various label bounds (text can be in the middle of label frame, or accurate size)
- underline
- strikeout
- underline/strikeout line offset
- text alignment
- different font sizes
https://github.com/GuntisTreulands/UnderLineLabel
answered Aug 6, 2012 at 10:56
![]()
Guntis TreulandsGuntis Treulands
4,7542 gold badges49 silver badges72 bronze badges
0
People, who do not want to subclass the view (UILabel/UIButton) etc…
‘forgetButton’ can be replace by any lable too.
-(void) drawUnderlinedLabel {
    NSString *string = [forgetButton titleForState:UIControlStateNormal];
    CGSize stringSize = [string sizeWithFont:forgetButton.titleLabel.font];
    CGRect buttonFrame = forgetButton.frame;
    CGRect labelFrame = CGRectMake(buttonFrame.origin.x + buttonFrame.size.width - stringSize.width,
            buttonFrame.origin.y + stringSize.height + 1 ,
            stringSize.width, 2);
    UILabel *lineLabel = [[UILabel alloc] initWithFrame:labelFrame];
    lineLabel.backgroundColor = [UIColor blackColor];
    //[forgetButton addSubview:lineLabel];
    [self.view addSubview:lineLabel];
}
answered Jan 11, 2011 at 15:36
![]()
karimkarim
15.3k7 gold badges58 silver badges94 bronze badges
2
NSString *tem =self.detailCustomerCRMCaseLabel.text;
if (tem != nil && ![tem isEqualToString:@""]) {
    NSMutableAttributedString *temString=[[NSMutableAttributedString alloc]initWithString:tem];
    [temString addAttribute:NSUnderlineStyleAttributeName
                      value:[NSNumber numberWithInt:1]
                      range:(NSRange){0,[temString length]}];
    self.detailCustomerCRMCaseLabel.attributedText = temString;
}
answered Feb 20, 2013 at 8:43
![]()
Jill WongJill Wong
811 silver badge1 bronze badge
0
Another solution could be (since iOS 7) given a negative value to NSBaselineOffsetAttributeName, for example your NSAttributedString could be:
NSAttributedString *attributedText = [[NSAttributedString alloc] initWithString:@"my text goes here'
                                                            attributes:@{NSFontAttributeName: [UIFont fontWithName:@"Helvetica-Regular" size:12],
                                                                         NSForegroundColorAttributeName: [UIColor blackColor],
                                                                         NSUnderlineStyleAttributeName: @(NSUnderlineStyleSingle), NSBaselineOffsetAttributeName: @(-3)}];
Hope this will help 
answered Apr 21, 2015 at 17:14
![]()
youssmanyoussman
1,5041 gold badge17 silver badges21 bronze badges
NSMutableAttributedString *text = [self.myUILabel.attributedText mutableCopy];
[text addAttribute:NSUnderlineStyleAttributeName value:@(NSUnderlineStyleSingle) range:NSMakeRange(0, text.length)];
self.myUILabel.attributedText = text;
answered Apr 11, 2016 at 13:38
![]()
You can create a custom label with name UnderlinedLabel and edit drawRect function.
#import "UnderlinedLabel.h"

@implementation UnderlinedLabel

- (void)drawRect:(CGRect)rect
{
   NSString *normalTex = self.text;
   NSDictionary *underlineAttribute = @{NSUnderlineStyleAttributeName: @(NSUnderlineStyleSingle)};
   self.attributedText = [[NSAttributedString alloc] initWithString:normalTex
                                                      attributes:underlineAttribute];

   [super drawRect:rect];
}
![]()
jcaron
17.2k6 gold badges32 silver badges45 bronze badges
answered Jan 11, 2016 at 9:48
![]()
nfinfunfinfu
711 silver badge3 bronze badges
0
Here is the easiest solution which works for me without writing additional codes.
// To underline text in UILable
NSMutableAttributedString *text = [[NSMutableAttributedString alloc] initWithString:@"Type your text here"];
[text addAttribute:NSUnderlineStyleAttributeName value:@(NSUnderlineStyleSingle) range:NSMakeRange(0, text.length)];
lblText.attributedText = text;
answered Oct 6, 2016 at 10:24
![]()
Sometimes we developer stuck in small designing part of any UI screen. One of the most irritating requirement is under line text. Don’t worry here is the solution.
Underlining a text in a UILabel using Objective C
UILabel *label=[[UILabel alloc]initWithFrame:CGRectMake(0, 0, 320, 480)];
label.backgroundColor=[UIColor lightGrayColor];
NSMutableAttributedString *attributedString;
attributedString = [[NSMutableAttributedString alloc] initWithString:@"Apply Underlining"];
[attributedString addAttribute:NSUnderlineStyleAttributeName value:@1 range:NSMakeRange(0,
[attributedString length])];
[label setAttributedText:attributedString];
Underlining a text in UILabel using Swift
 label.backgroundColor = .lightGray
 let attributedString = NSMutableAttributedString.init(string: "Apply UnderLining")
 attributedString.addAttribute(NSUnderlineStyleAttributeName, value: 1, range:
NSRange.init(location: 0, length: attributedString.length))
 label.attributedText = attributedString
answered Sep 23, 2019 at 10:14
![]()
Mr.Javed MultaniMr.Javed Multani
12.2k4 gold badges53 silver badges51 bronze badges
An enhanced version of the code of Kovpas (color and line size)
@implementation UILabelUnderlined

- (void)drawRect:(CGRect)rect {

    CGContextRef ctx = UIGraphicsGetCurrentContext();
    const CGFloat* colors = CGColorGetComponents(self.textColor.CGColor);

    CGContextSetRGBStrokeColor(ctx, colors[0], colors[1], colors[2], 1.0); // RGBA

    CGContextSetLineWidth(ctx, 1.0f);

    CGSize tmpSize = [self.text sizeWithFont:self.font constrainedToSize:CGSizeMake(200, 9999)];

    CGContextMoveToPoint(ctx, 0, self.bounds.size.height - 1);
    CGContextAddLineToPoint(ctx, tmpSize.width, self.bounds.size.height - 1);

    CGContextStrokePath(ctx);

    [super drawRect:rect];
}

@end
answered May 19, 2011 at 13:04
![]()
Damien PracaDamien Praca
3,11621 silver badges14 bronze badges
0
I have Created for multiline uilabel with underline :
For Font size 8 to 13 set int lineHeight = self.font.pointSize+3;
For font size 14 to 20 set int lineHeight = self.font.pointSize+4;
- (void)drawRect:(CGRect)rect

{

CGContextRef ctx = UIGraphicsGetCurrentContext();

const CGFloat* colors = CGColorGetComponents(self.textColor.CGColor);

CGContextSetRGBStrokeColor(ctx, colors[0], colors[1], colors[2], 1.0); // RGBA

CGContextSetLineWidth(ctx, 1.0f);
CGSize tmpSize = [self.text sizeWithFont:self.font constrainedToSize:CGSizeMake(self.frame.size.width, 9999)];

int height = tmpSize.height;

int lineHeight = self.font.pointSize+4;

int maxCount = height/lineHeight;

float totalWidth = [self.text sizeWithFont:self.font constrainedToSize:CGSizeMake(1000, 9999)].width;

for(int i=1;i<=maxCount;i++)

{

    float width=0.0;
    if((i*self.frame.size.width-totalWidth)<=0)
        width = self.frame.size.width;
    else
        width = self.frame.size.width - (i* self.frame.size.width - totalWidth);
    CGContextMoveToPoint(ctx, 0, lineHeight*i-1);
    CGContextAddLineToPoint(ctx, width, lineHeight*i-1);
}

CGContextStrokePath(ctx);

[super drawRect:rect];
}
![]()
DShah
9,71811 gold badges70 silver badges127 bronze badges
answered Aug 25, 2011 at 7:32
![]()
Swift 4.1 ver:
 let underlineAttriString = NSAttributedString(string:"attriString", attributes:
    [NSAttributedStringKey.underlineStyle: NSUnderlineStyle.styleSingle.rawValue])

label.attributedText = underlineAttriString
answered Sep 12, 2018 at 10:45
![]()
AbdoelrhmanAbdoelrhman
9058 silver badges17 bronze badges
As kovpas has shown you can use the bounding box in most cases, although it is not always guaranteed that the bounding box will fit neatly around the text. A box with a height of 50 and font size of 12 may not give the results you want depending on the UILabel configuration.
Query the UIString within the UILabel to determine its exact metrics and use these to better place your underline regardless of the enclosing bounding box or frame using the drawing code already provided by kovpas.
You should also look at UIFont’s «leading» property that gives the distance between baselines based on a particular font. The baseline is where you would want your underline to be drawn.
Look up the UIKit additions to NSString:
(CGSize)sizeWithFont:(UIFont *)font
//Returns the size of the string if it were to be rendered with the specified font on a single line.

(CGSize)sizeWithFont:(UIFont *)font constrainedToSize:(CGSize)size
// Returns the size of the string if it were rendered and constrained to the specified size.

(CGSize)sizeWithFont:(UIFont *)font constrainedToSize:(CGSize)size lineBreakMode:(UILineBreakMode)lineBreakMode
//Returns the size of the string if it were rendered with the specified constraints.
answered Apr 26, 2010 at 7:34
![]()
gnashergnasher
1,51312 silver badges17 bronze badges
2
I use an open source line view and just added it to the button subviews:
 UILabel *label = termsButton.titleLabel;
 CGRect frame = label.frame;
 frame.origin.y += frame.size.height - 1;
 frame.size.height = 1;
 SSLineView *line = [[SSLineView alloc] initWithFrame:frame];
 line.lineColor = [UIColor lightGrayColor];
 [termsButton addSubview:line];
This was inspired by Karim above.
answered Oct 7, 2011 at 18:40
![]()
David HDavid H
40.7k12 gold badges90 silver badges136 bronze badges
1
Based on Kovpas & Damien Praca’s Answers, here is an implementation of UILabelUnderligned which also support textAlignemnt.
#import <UIKit/UIKit.h>

@interface UILabelUnderlined : UILabel

@end
and the implementation:
#import "UILabelUnderlined.h"

@implementation DKUILabel

- (id)initWithFrame:(CGRect)frame
{
    self = [super initWithFrame:frame];
    if (self) {
        // Initialization code
    }
    return self;
}

- (void)drawRect:(CGRect)rect {

    CGContextRef ctx = UIGraphicsGetCurrentContext();
    const CGFloat* colors = CGColorGetComponents(self.textColor.CGColor);

    CGContextSetRGBStrokeColor(ctx, colors[0], colors[1], colors[2], 1.0); // RGBA

    CGContextSetLineWidth(ctx, 1.0f);

    CGSize textSize = [self.text sizeWithFont:self.font constrainedToSize:CGSizeMake(200, 9999)];

    // handle textAlignement

    int alignementXOffset = 0;

    switch (self.textAlignment) {
        case UITextAlignmentLeft:
            break;
        case UITextAlignmentCenter:
            alignementXOffset = (self.frame.size.width - textSize.width)/2;
            break;
        case UITextAlignmentRight:
            alignementXOffset = self.frame.size.width - textSize.width;
            break;
    }

    CGContextMoveToPoint(ctx, alignementXOffset, self.bounds.size.height - 1);
    CGContextAddLineToPoint(ctx, alignementXOffset+textSize.width, self.bounds.size.height - 1);

    CGContextStrokePath(ctx);

    [super drawRect:rect];
}


@end
answered Jul 19, 2012 at 12:56
![]()
PascalPascal
14.6k2 gold badges50 silver badges65 bronze badges
1
Here’s another, simpler solution (underline’s width is not most accurate but it was good enough for me)
I have a UIView (_view_underline) that has White background, height of 1 pixel and I update its width everytime I update the text
// It's a shame you have to do custom stuff to underline text
- (void) underline  {
    float width = [[_txt_title text] length] * 10.0f;
    CGRect prev_frame = [_view_underline frame];
    prev_frame.size.width = width;
    [_view_underline setFrame:prev_frame];
}
answered Nov 14, 2012 at 9:29
![]()
Ege AkpinarEge Akpinar
3,2561 gold badge22 silver badges29 bronze badges
NSUnderlineStyleAttributeName which takes an NSNumber (where 0 is no underline) can be added to an attribute dictionary.
I don’t know if this is any easier. But, it was easier for my purposes.
    NSDictionary *attributes;
    attributes = @{NSFontAttributeName:font,   NSParagraphStyleAttributeName: style, NSUnderlineStyleAttributeName:[NSNumber numberWithInteger:1]};

    [text drawInRect:CGRectMake(self.contentRect.origin.x, currentY, maximumSize.width, textRect.size.height) withAttributes:attributes];
answered Jul 18, 2017 at 23:39
![]()
epausepaus
1114 bronze badges
You can use this my custom label!
You can also use interface builder to set
import UIKit


class  YHYAttributedLabel : UILabel{


    @IBInspectable
    var underlineText : String = ""{

        didSet{

            self.attributedText = NSAttributedString(string: underlineText,
            attributes: [NSAttributedString.Key.underlineStyle: NSUnderlineStyle.single.rawValue])
        }


    }

}
answered Aug 13, 2020 at 23:45
![]()
UcdemirUcdemir
2,7852 gold badges25 silver badges43 bronze badges
|
|


In this tutorial, you will learn how to underline text on UILabel in Swift programmatically.
To make the text on UILabel underlined we will need to use the NSMutableAttributedString together with NSUnderlineStyleAttributeName. The Swift code snippet below demonstrates how to create a new UILabel programmatically and then use the NSMutableAttributedString to underline the text on the label.
Create a UILabel Programmatically
The first Swift code snippet will be to create a new UILabel, so we can set an attributed text on it. You could also create UILabel using interface builder.
let label = UILabel()
label.frame = CGRect(x: 20, y: 20, width: 200, height: 20)
The below code snippet in Swift will create a new attributed string and will use the NSUnderlineStyleAttributeName to make the text on UILabel underlined.
// Create a new Attributed String
let attributedString = NSMutableAttributedString.init(string: "Text on label")

// Add Underline Style Attribute.
attributedString.addAttribute(NSAttributedString.Key.underlineStyle, value: 1, range:
    NSRange.init(location: 0, length: attributedString.length));
label.attributedText = attributedString
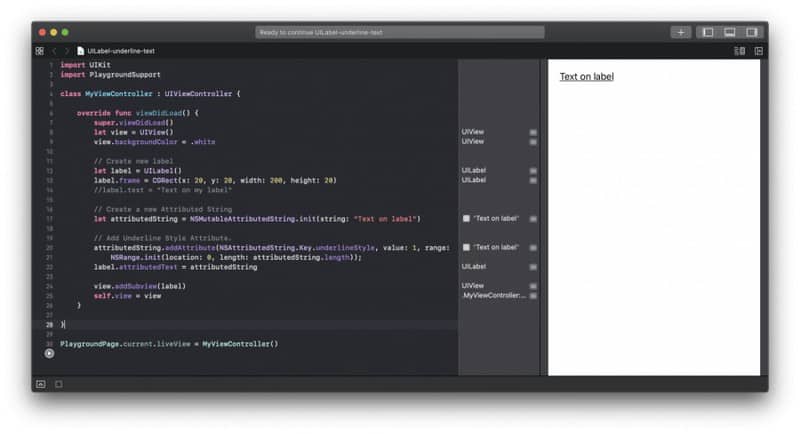
Complete Code Example
Here here is a complete code example created in Xcode Playground.
import UIKit
import PlaygroundSupport

class MyViewController : UIViewController {

    override func viewDidLoad() {
        super.viewDidLoad()
        let view = UIView()
        view.backgroundColor = .white

        // Create new label
        let label = UILabel()
        label.frame = CGRect(x: 20, y: 20, width: 200, height: 20)
        //label.text = "Text on my label"

        // Create a new Attributed String
        let attributedString = NSMutableAttributedString.init(string: "Text on label")

        // Add Underline Style Attribute.
        attributedString.addAttribute(NSAttributedString.Key.underlineStyle, value: 1, range:
            NSRange.init(location: 0, length: attributedString.length));
        label.attributedText = attributedString

        view.addSubview(label)
        self.view = view
    }

}

PlaygroundPage.current.liveView = MyViewController()
If you run this code snippet in Xcode Playground it will look and work like on the image below:
I hope this short Swift code tutorial was of some help to you. This blog contains many other useful Swift code snippets and tutorials if you look around or search for a Swift keyword. Many of those tutorials contain video lessons as well.
Happy learning 🙋🏻♂️