
Word для Microsoft 365 Word 2021 Word 2019 Word 2016 Word 2013 Word 2010 Еще…Меньше
Нажав клавишу INSERT, вы можете начать вводить новый текст на месте старого. Вы можете настроить функцию в Word Параметры.
Включение режима замены
При редактировании текста в режиме overtype введите текст справа от точки вставки.
-
В Word откройте меню Файл и выберите пункт Параметры.
-
В диалоговом окне Параметры Word выберите пункт Дополнительно.
-
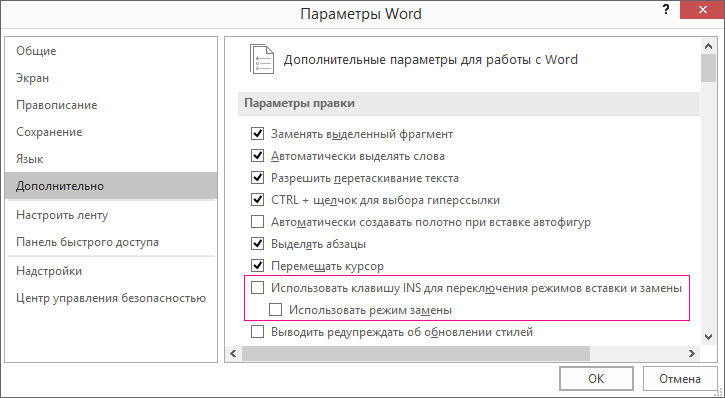
В разделе Параметры правки выполните требуемое действие.
-
Чтобы использовать клавишу INSERT для управления режимом замены, установите флажок Использовать клавишу INS для переключения режимов вставки и замены.
-
Чтобы включить режим замены на постоянной основе, установите флажок Использовать режим замены.

-
Нужна дополнительная помощь?
Замена текста при вводе в Word для Windows
Нажав клавишу INSERT, вы можете начать вводить новый текст на месте старого. Вы можете настроить функцию в Word Параметры.
Включение режима замены
При редактировании текста в режиме overtype введите текст справа от точки вставки.
В Word откройте меню Файл и выберите пункт Параметры.
В диалоговом окне Параметры Word выберите пункт Дополнительно.
В разделе Параметры правки выполните требуемое действие.
Чтобы использовать клавишу INSERT для управления режимом замены, установите флажок Использовать клавишу INS для переключения режимов вставки и замены.
Чтобы включить режим замены на постоянной основе, установите флажок Использовать режим замены.
Как в ворде печатать с заменой?
В диалоговом окне Параметры Word выберите пункт Дополнительно. В разделе Параметры правки выполните требуемое действие. Чтобы использовать клавишу INSERT для управления режимом замены, установите флажок Использовать клавишу INS для переключения режимов вставки и замены.
Как настроить кнопку Insert?
Как активировать кнопку insert на ноутбуке
- В верхнем левом углу окна программы щелкните по кнопке
- В меню типичных команд щелкните по кнопке «Параметры
- В окне «Параметры Word» перейдите к вкладке «Дополни тельно» и группе «Вырезание, копирование и вставка» вклю чите пункт «Использовать клавишу Ins для вставки».
- Закройте окно кнопкой «ОК».
Как перейти в режим замены?
Для перехода в режим замены используется клавиша . Точнее, две клавиши: одна ( ) на блоке клавиш справа от основной клавиатуры, а вторая ( ) — на вспомогательной цифровой клавиатуре, где она работает только при отключенном режиме Num Lock.
Как в Word повторить текст в другом месте?
Ввод часто повторяющихся фрагментов текста
- Поставьте пробел в том месте документа, где вы будете вводить основной текст, затем выделите этот пробел и вставьте закладку.
- В другом месте документа, где вы планируете иметь обновляемый текст, поставьте курсор ввода и нажмите сочетание клавиш «Ctrl»+«F9».
Как в ворде заменить символ на другой?
Поиск и замена текста
- Перейдите на главная >Заменить или нажмите CTRL+H.
- В поле Найти введите искомое слово или фразу.
- В поле Заменить введите новый текст.
- Нажимайте кнопку Найти далее, пока не перейдете к слову, которое нужно изменить.
- Нажмите кнопку Заменить. Чтобы обновить все вхождения одновременно, нажмите кнопку Заменить все.
Как нажать кнопку Insert на ноутбуке?
Ответ Клавиша 0 в нижней части цифровой клавиатуры в верхнем правом углу клавиатуры будет работать как клавиша Insert, когда Num Lock выключен. Вот почему он помечен как 0, так и Ins на самой клавише.
Как выйти из режима замены?
Этот режим часто включается совершенно случайно: вы нажали клавишу Insert на клавиатуре. Чтобы отключить этот режим, достаточно еще раз нажать клавишу Insert. Когда режим включен, в строке состояния отображается индикатор ЗАМ (OVR).
Как отключить функцию Insert?
В Microsoft Word 2010 можно отключить клавишу «Insert» для переключения между режимами вставки и замены. Для этого зайдите в Файл –Параметры – Дополнительно и снимите галочку с параметра «Использовать клавишу INS для переключения режимов вставки и замены».
Какие символы называются специальными можно ли их увидеть в тексте документа?
Символ конца абзаца и ряд других символов (пробелы, условные переносы, символы табуляции, крытый текст) называются специальными или непечатаемыми символами. Их можно увидеть на экране, если нажать на Стандартной панели кнопку Непечатаемые знаки. Ввод текста может осуществляться в двух режимах: вставки и замены.
Для чего нужна клавиша Home?
Клавиша Home обычно находится над клавишей End в блоке клавиш управления курсором. На фото справа показано как может выглядеть эта клавиша на клавиатуре. Она выполняет функцию возврата к началу строки, абзаца, экрана или документа, в зависимости от используемой программы.
Как в ворде сделать автоматическое заполнение?
Настройка и использование элемента автозамены
Перейдите в раздел> Параметры> Правописаниеи нажмите кнопку Параметры автозамены. На вкладке Автозамена установите флажок Заменять при вводе , если он еще не установлен. В разделе заменитьвведите знаки, которые нужно инициировать для автоматического ввода текста.
Как создать элемент автотекста?
Вставка элемента списка автотекста
- Установите курсор в то место текста, куда следует вставить элемент списка автотекста.
- Выберите команду Автотекст в меню Вставка (Insert, AutoText). …
- Выберите имя нужного элемента списка автотекста.
- Нажмите кнопку Вставить (Insert).
Где находится автотекст?
Автотекст — это распространенный тип building block, который хранит текст и рисунки. Для поиска или изменения нужного блока можно использовать организатор. Чтобы открыть коллекцию экспресс-боков, на вкладке Вставка в группе Текст нажмите кнопку Экспресс-блоки.
Как включить режим замены в ворде?
В разделе Параметры правки выполните требуемое действие.
- Чтобы использовать клавишу INSERT для управления режимом замены, установите флажок Использовать клавишу INS для переключения режимов вставки и замены.
- Чтобы включить режим замены на постоянной основе, установите флажок Использовать режим замены.
Какие существуют способы для замены неправильного символов в тексте?
Нажимам комбинацию клавиш Ctrl+H. Откроется окно «Найти и заменить». Перейдите на вкладку «Заменить». В поле «Найти» вводим неправильную фамилию, в поле «Заменить» – правильную.
…
Что такое автозамена?
- Самостоятельно обнаруживает и исправляет ошибки. …
- Меняет символы. …
- Быстро вставляет фразы.
Как изменить цифры в ворде?
Изменение форматирования нумерации и маркировки
- Щелкните маркер или номер в списке, который вы хотите изменить. …
- На вкладке Главная в области Абзацщелкните стрелку рядом с кнопкой Маркеры или Номер.
- Выберите нужный формат в библиотеке маркеров или библиотеке номеров.
Замена слов по всему тексту в Ворде
Никто не застрахован от грамматических и пунктуационных ошибок при создании любого вида текстового документа. Замена в Ворде позволит не тратить много времени на исправление и вычитывание текста. Заменить слово одно на другое, сменить символ пробела на нижнее подчёркивание и еще многое другое можно сделать с помощью функции «Заменить». Рассмотрим подробнее, где она находится и как правильно её использовать.
Открытие окна «Заменить»
Перед тем, как научится правильно заменять слова в тексте по всему документу, нужно знать, каким образом осуществлять вызов функции «Замена». Существует три метода:
Метод 1: Сочетание клавиш
Нажмите комбинацию клавиш «Ctrl+H». Перед вами откроется окно «Найти и заменить».
Метод 2: Панель навигации
Вызвать панель «Навигация» можно сочетанием клавиш «Ctrl+F», если в документе данное окно скрыто. Далее нажать на треугольник и выбрать «Заменить». Откроется диалоговое окно «Найти и заменить».

Метод 3: Вкладка «Главная»
Открыть вкладку «Главная» нажать по кнопке «Заменить» в разделе «Редактирование».

Возможности окна «Замены»
Многим пользователям функция замены известна тем, что с её помощью можно быстро сделать замену символа по документу или отдельному фрагменту. Но на этом возможности команды «Заменить» не заканчиваются. Рассмотрим все по порядку.
Замена слов и фраз в Ворде
Когда набирается текст очень быстрым темпом и еще всеми десятью пальцами, невозможно не промазать по нужной клавише. А бывают и такие ситуации, когда в реферате или курсовой много повторений одного и того же слова, такие моменты можно исправить. Открыв окно «Найти и заменить» следует выполнить действия:
- Для начала надо расширить функционал данной панели, нажав по кнопке «Больше»;
- Перед фразой «Найти» напишите слово или знак, который необходимо найти и заменить. Например, нужно заменить слово «Знак» на синоним.


Напротив «Заменить на» напечатайте слово в нужном падеже или словоформе, на которое будет заменено предыдущее. Ниже в параметрах поиска установите галочку напротив «Только слово целиком».

В нашем случае, под команду поиск и замену не будут попадать словообразования, такие как «Знаковые» или «Знаки». И нажмите «Заменить все». Закройте окно замены слов, нажав по кнопке «Закрыть».
Теперь вы знаете, каким образом можно заменить слова в Ворде, если много повторений. Можно более точно настроить замену, используйте кнопку «Специальный».
Форматирование документа
Когда перед пользователем огромный текст в несколько десятков страниц, то постоянное проматывание и внесение корректировки ужасно выматывает. Посредством функции «Заменить» вносить форматирование по тексту будет в разы быстрее.
- Откройте окно «Найти и заменить»;
- В строке «Заменить на» укажите слово или пункт, к которому нужно применить форматирование;
- Кликните по «Формат» и выберите нужный пункт форматирования;
- Откроется новое соответствующее окно, в котором сможете задать необходимые параметры;
- Нажмите на «Ок». И кликните по «Заменить все» и «Закрыть»;
- В результате по всему документу ранее указанное слово «символ» изменится в соответствии с заданным шрифтом, размером и начертанием.


By default, Microsoft Word replaces the selected text when you start typing. However, if you do not want to do that and instead, you want to block Word from removing selected text when typing, here is how you can do that. It is possible to enable or disable this setting using Word Options, Local Group Policy Editor, and Registry Editor.
Let’s say that you have selected a text and want to replace it with new words. For that, you do not need to press the Backspace or Delete button after selecting the text in order to remove it. Instead, you can start typing, and the selected text will be replaced automatically. However, if you do not want to do that due to some reason, this guide will be handy for you.
You can make Microsoft Word stop deleting selected text by changing the ‘Typing replaces selected text‘ setting. To allow or block Word from removing selected text when typing, follow these steps:
- Open Microsoft Word on your computer.
- Click on the Options menu.
- Switch to the Advanced tab.
- Tick the Typing replaces selected text checkbox to allow.
- Remove the tick to block.
- Click the OK button.
To learn more about these steps, continue reading.
To get started, you need to open Microsoft Word first and click on the Options menu visible in the bottom-left corner.
After opening the Word Options panel, you need to switch to the Advanced tab. Here you can find a setting called Typing replaces selected text.

If you want to allow removing the selected text, tick this checkbox. However, if you do not want to remove the selected text, remove the tick from the corresponding checkbox.
Finally, click the OK button to save the change.
How to enable or disable removing selected text when typing in Word
To enable or disable removing selected text when typing in Word, follow these steps:
- Press Win+R to open the Run prompt.
- Type gpedit.msc and press the OK button.
- Navigate to Advanced in User Configuration.
- Double-click on the Typing replaces selected text setting.
- Choose the Enabled option to allow.
- Choose the Disabled option to block.
- Click the OK button.
Let’s check out these steps in detail.
First, you need to open the Local Group Policy Editor. To do that, press Win+R > type gpedit.msc > press the OK button. Then, navigate to this path:
User Configuration > Administrative Templates > Microsoft Word 2016 > Word Options > Advanced
Here you can see a setting called Typing replaces selected text. You need to double-click on it and select the Enabled option to allow and the Disabled option to block removing the selected text while typing in Word.
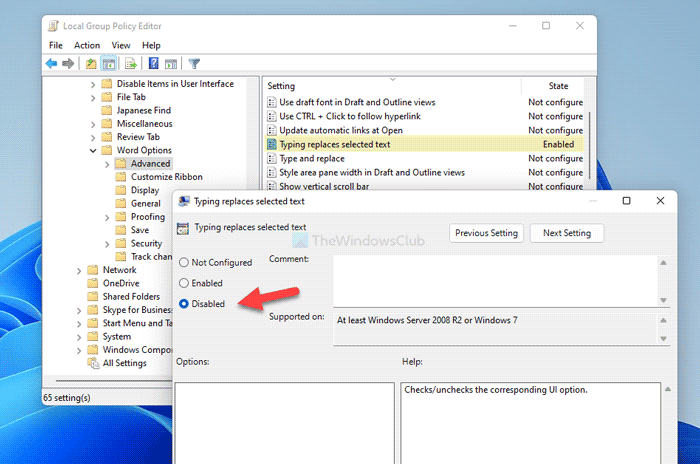
Finally, click the OK button to save the change.
How to enable or disable removing selected text when typing in Word using Registry
To enable or disable removing selected text when typing in Word using Registry, follow these steps:
- Search for regedit and click the search result.
- Click the Yes button.
- Navigate to Microsoftoffice16.0 in HKCU.
- Right-click on 0 > New > Key and name it as word.
- Right-click on word > New > Key and name it as options.
- Right-click on options > New > DWORD (32-bit) Value.
- Name it as autotextdelete.
- Double-click on it to set the Value data.
- Set it as 1 to allow and 0 to block.
- Click the OK button and restart PC.
Let’s delve into these steps in detail.
For getting started, search for regedit in the Taskbar search box, click on the individual search result, and click the Yes button in the UAC prompt to open the Registry Editor on your computer.
Then, go to this path:
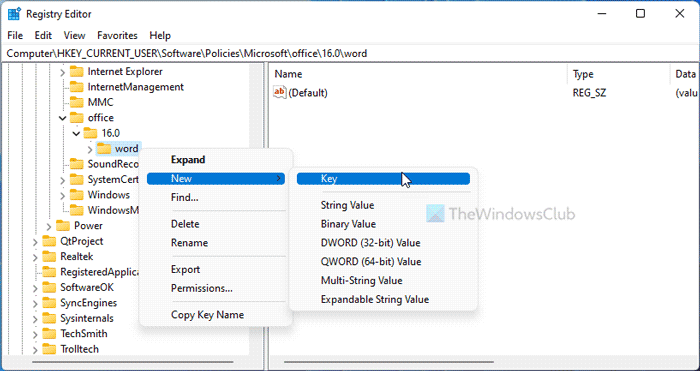
HKEY_CURRENT_USERSoftwarePoliciesMicrosoftoffice16.0
Right-click on 16.0 > New > Key and set the name as word. Then, right-click on the word key, select New > Key, and name it as options.
Following that, right-click on the options key, select New > DWORD (32-bit) Value and name it as autotextdelete.
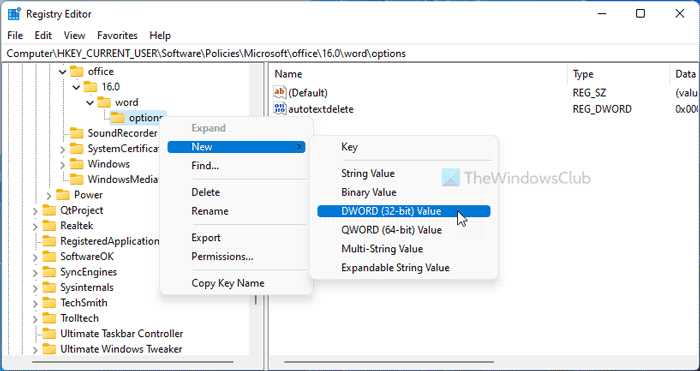
By default, it comes with a Value data of 0. If you want to block this setting, keep that Value data. However, if you want to allow Word to remove the selected text, double-click on it and set the Value data as 1.
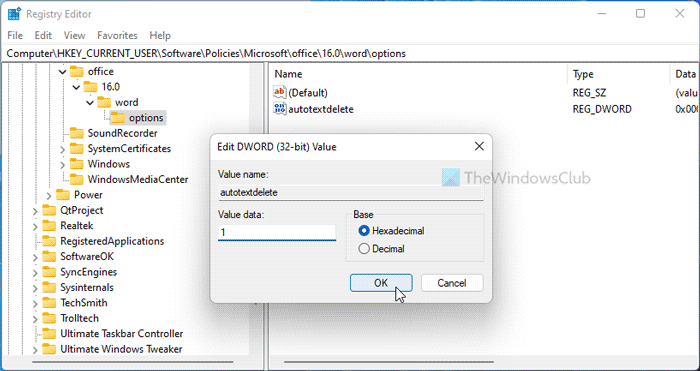
Finally, click the OK button and restart your computer to get the change.
Read: How to disable Text Drag and Drop feature in Word and PowerPoint
How do you stop text from overwriting when typing?
To stop Word from overwriting when typing, you need to enable the Overtype mode. For that, open the Word Options and go to the Advanced tab. Then, find the Use overtype mode setting and tick the corresponding checkbox.
Why is my text deleted when I type?
If Word is deleting text when you type, you need to disable the overtype mode. As said earlier, you can find this setting in the Word Options panel. To turn it on or off, open the Word Options and go to the Advanced tab. Then, uncheck the Use overtype mode option and click the OK button.
That’s all! Hope this guide helped.
Read: How to stop Word from selecting everything.
It can be pretty frustrating when an application that you use all the time starts behaving differently or is causing a weird problem that is difficult to describe or troubleshoot.
One such problem involves an issue in Microsoft Word where it will delete existing text from a document as you type, instead of adding your typing to the document and leaving the original text in place.
If you’re experiencing an issue in Microsoft Word where typing a letter replaces an existing letter, then you aren’t alone. This is caused by something called “overtype.”
Use these steps to stop deleting letters when you type in Word.
How to Stop Word from Deleting Letters When You Type
- Open your document in Microsoft Word.
- Press the Ins or Insert key on your keyboard.
- Type as normal to confirm that overtype is turned off.
This is behavior that is not exclusive to Microsoft Word. This will also happen in other programs with document editors like Microsoft Excel or Powerpoint.
Related Topic: There are some useful keyboard shortcuts that make it easier to add certain symbols. Our square root symbol on keyboard guide talks about one of them.
This is especially problematic on keyboards where it’s easy to accidentally press the Insert key. In many cases, it is located right next to the Backspace key, which is one of the more commonly used keys on the keyboard.
You can use a lot of the tools in the Word application to format your content or add symbols that aren’t on your keyboard, but when you need to change something about the way the application behaves then you often need to go into the Word Options menu.
Do you need to add a lot of mathematical characters when you type? Check out our guide on how to add exponents in Word and learn about a few different options.
How to Disable Overtype Mode in Microsoft Word (Guide with Pictures)
Microsoft Word also has a setting in its Options menu that lets you disable Overtype mode entirely. You can use these steps to prevent accidentally enabling Overtype in the future.
These steps will show you how to turn off the option that causes Microsoft Word to delete letters when you type.
Step 1: Open Microsoft Word.
Launch the Word application.
Step 2: Open the File menu.

Click the File tab at the upper left corner of the window.
Step 3: Open the Word Options menu.
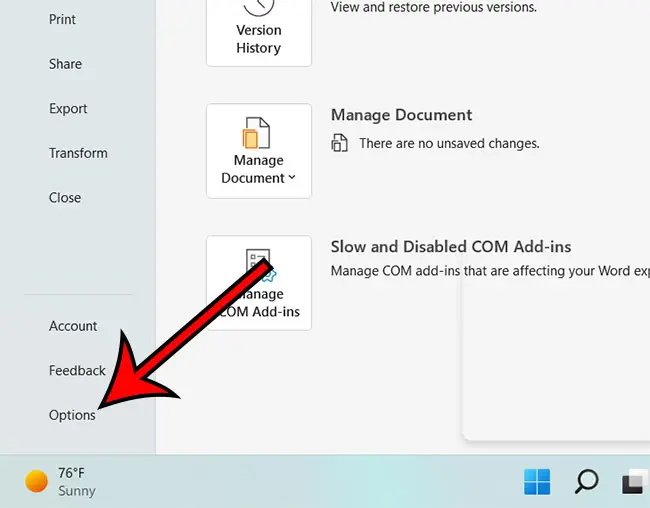
Select the Options button at the bottom of the left column.
Step 4: Select the Advanced option.
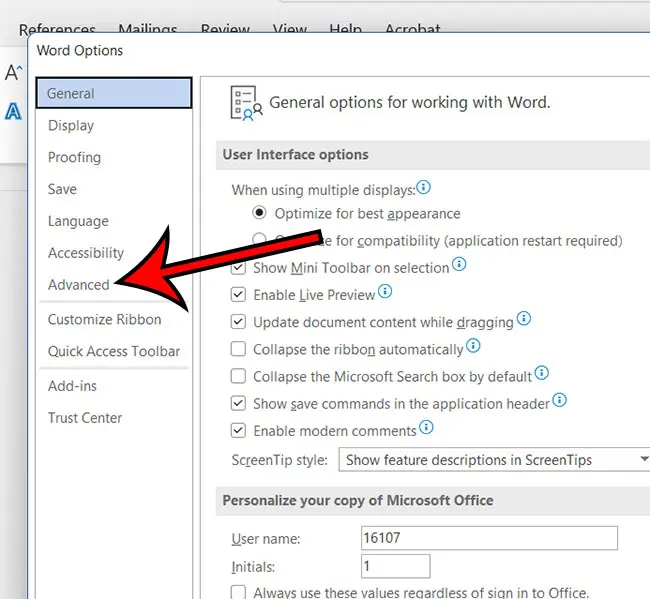
Click the Advanced tab at the left side of the Word Options dialog box.
Step 5: Disable the Overtype mode option.
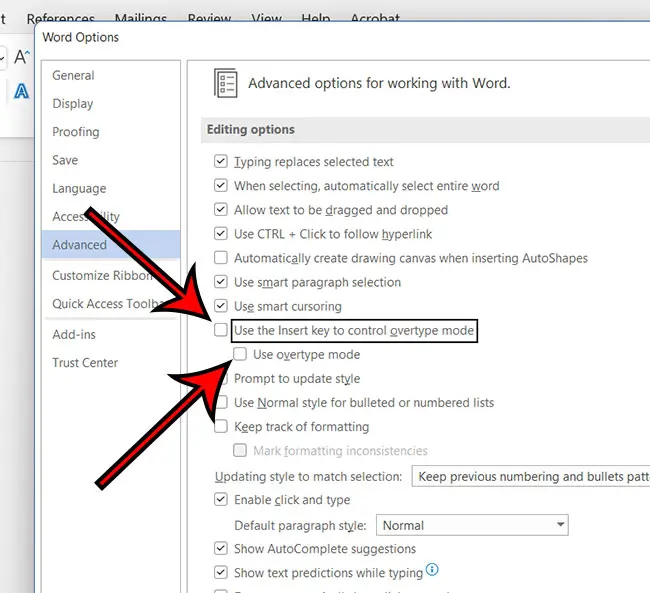
Click the boxes to the left of Use the insert key to control overtype mode and Use overtype mode to remove the check marks.
Step 6: Save your changes.
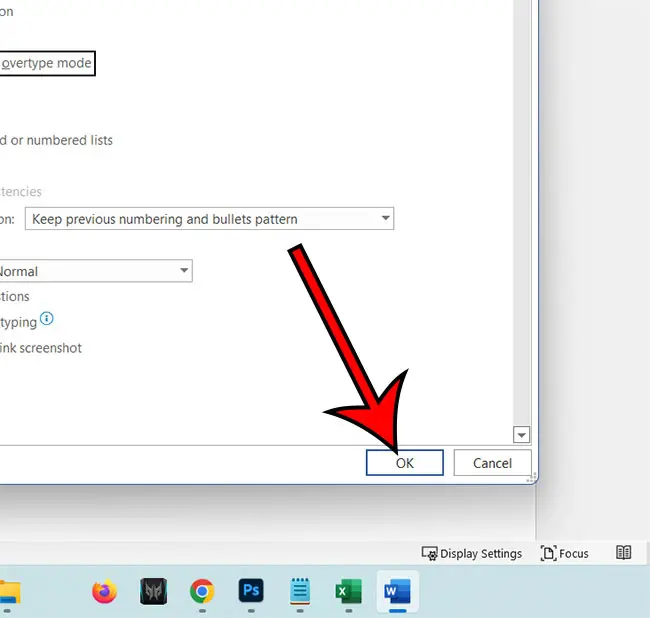
Click the OK button to confirm your changes.
Now that you know how to stop Word from deleting letters when you type you will be able to fix this problem again should it occur on a different computer that you use.
Or, if you run into a situation where you want that behavior to occur, you will know how to find the setting that controls it.
Frequently Asked Questions About Why Word is Deleting Letters When You Type
What are the two different typing modes in Microsoft Word?
Microsoft Word has two modes of typing that provide alternate editing options as you are working with your document.
The first and most common mode that you are probably familiar with is the default mode, or insert mode, where you can type inside of your document and add your text to any existing text in the document.
The other mode is Overtype mode, where you put your text cursor at a place if your document and Word will start displacing existing text as you type.
If you would like to permanently switch settings in Word so that the application doesn’t enter Overtype mode then you can go to File > Options > Advanced > and turn off the Use the insert key to control overtype mode and Use overtype mode options by clearing the check box to the left of either of those settings.
Why does Word delete letters when I type?
Microsoft Word replaces text in your document with the text that you are typing when you are in Overtype mode.
You can press the Ins key on your keyboard to toggle this mode off, or you can go to the Advanced tab on the Word Options menu and disable the setting that allows you to switch between modes by pressing the Insert key.

Matthew Burleigh has been writing tech tutorials since 2008. His writing has appeared on dozens of different websites and been read over 50 million times.
After receiving his Bachelor’s and Master’s degrees in Computer Science he spent several years working in IT management for small businesses. However, he now works full time writing content online and creating websites.
His main writing topics include iPhones, Microsoft Office, Google Apps, Android, and Photoshop, but he has also written about many other tech topics as well.
Read his full bio here.
При редактировании больших объемов текста возникает необходимость найти и заменить текст в Word. Для таких случаев можно воспользоваться кнопкой «Заменить»:

! Горячие клавиши для вызова формы «Найти и заменить» в Word: Ctrl+H.
После всплывает форма:

В форме в первую ячейку вписывается заменяемое слово, во вторую ячейку вносится слово, на которое нужно заменить (новое). После этого необходимо нажать на кнопку «Заменить», по нажатию этой кнопки будет по одному находиться слово и заменяться. Если нажать на кнопку «Заменить все», то произойдет замена в Ворде всех слов по всему тексту (такой вариант наиболее быстрый и часто использующийся).

Это самый простой и быстрый способ замены слов.
! Для того, чтобы только удалить во всем документе нужное слово, то вторую ячейку «Заменить на» оставьте пустой.
Расширенный функционал
Word предоставляет расширенный функционал. Для перехода к большему количеству настроек необходимо нажать в форме «Найти и заменить» кнопку «Больше»:

После нажатия кнопки открывается расширенный функционал замены в Word:

Самые полезные фишки этого функционала:
Замена с учетом регистра букв
В расширенной форме можно провести замену слов в Ворде по всему документу с учетом регистра символов. Это значит, что если Вам нужно найти все слова, начинающие с большой буквы, то нужно отметить галочку «Учитывать регистр». Поиск найдет и заменит все слова с большой буквы, и пропустит, которые с маленькой:
Из трех слов word выбрал только одно слово и заменил. Остальные 2 не подходили по критерию (в первом слове было 2 большие буквы, во втором все слово было с маленькой буквы.
Замена без учета знаков препинания
Ворд имеет возможность находить словосочетания, без учетов знаков препинания. Для этого нужно нажать галочку «Не учитывать знаки препинания»:
В результате произойдет поиск замена в Ворде словосочетания «полуострова, в», несмотря на то, что там есть запятая.
Замена без учета пробелов
Для поиска и замены слов в Ворде без учета пробелов нужно нажать на галочку «Не учитывать пробелы». Word найдет любой текст, и не возьмет во внимание пробелы:
Замена текста определенного формата
Супер важная функция в Ворде поиска и замены текста определенного формата. Для этого необходимо нажать на кнопку формат, и выбрать что именно нужно будет искать. Например, нужно будет найти все слова, выделенные курсивом и размером шрифта 10:
- Открываем Формат => шрифт:

- В открывшемся окне выбираем курсив и 10 размер:

- Далее нажимаем Ок. В основном окне должно выйти такие выбранные параметры:

- В результате все тексты, написанные курсивом и 10 размером заменены на слово ProWord

! Для того, что бы в следующий раз не выполнялся поиск по определенному формату, нужно нажать на кнопку «Снять форматирование», которая находится правее от кнопки «Формат».
 Please Note:
This article is written for users of the following Microsoft Word versions: 2007, 2010, 2013, 2016, 2019, and Word in Microsoft 365. If you are using an earlier version (Word 2003 or earlier), this tip may not work for you. For a version of this tip written specifically for earlier versions of Word, click here: Replacing Text Selections.
![]()
Written by Allen Wyatt (last updated June 20, 2020)
This tip applies to Word 2007, 2010, 2013, 2016, 2019, and Word in Microsoft 365
By default, if you have selected some text and then press any key except a cursor control key, the selected text is replaced with what you type. This can be annoying, especially if this behavior does not match what you are familiar with in another word processor. To disable this aspect of Word, follow these steps:
- Display the Word Options dialog box. (In Word 2007 click the Office button and then click Word Options. In Word 2010 or a later version, display the File tab of the ribbon and then click Options.)
- Click Advanced at the left side of the dialog box. (See Figure 1.)
- Click on Typing Replaces Selected Text. (This should be the first option in the dialog box.) If the check box is selected, then what you type replaces what you have selected; if it is not selected then what you type is inserted before what you have selected.
- Click on OK.
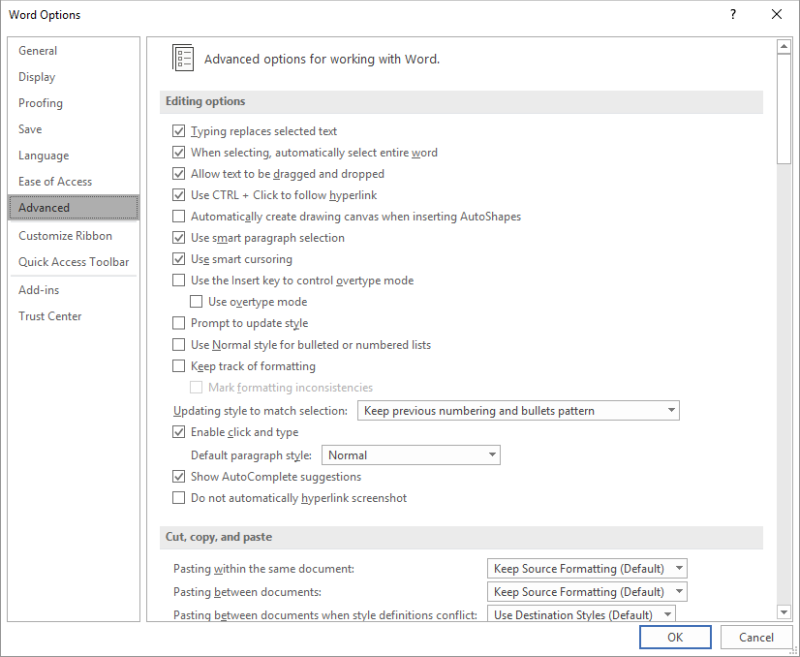
Figure 1. The Advanced options in the Word Options dialog box.
WordTips is your source for cost-effective Microsoft Word training.
(Microsoft Word is the most popular word processing software in the world.)
This tip (8959) applies to Microsoft Word 2007, 2010, 2013, 2016, 2019, and Word in Microsoft 365. You can find a version of this tip for the older menu interface of Word here: Replacing Text Selections.
Author Bio
With more than 50 non-fiction books and numerous magazine articles to his credit, Allen Wyatt is an internationally recognized author. He is president of Sharon Parq Associates, a computer and publishing services company. Learn more about Allen…
MORE FROM ALLEN
Selecting Lots of Graphics
Need to select a lot of graphics in the document? Here’s an easy way to do it using tools available on the Drawing toolbar.
Discover More
Printing Documents without Markup
If you have a document with Track Changes turned on, you can accumulate quite a bit of «markup» in it. Here’s how you can …
Discover More
Splitting Sentences to Cells
If you have a lot of text in your workbook, at some point you might want to split out sentences into individual cells. …
Discover More
More WordTips (ribbon)
Adding a Break to Your Document
Want to modify the way your text flows between pages in a document? Word allows you to insert several types of breaks …
Discover More
Inserting a Dynamic Line Count
Word provides fields that allow you to insert a variety of informational items about your document into the document …
Discover More
Capitalizing the Word «I»
The first-person, singular pronoun «I» should always be capitalized, unless you are exercising poetic license. Word may …
Discover More

Have you ever finishing typing a letter, report or presentation only to discover that you misspelled a person’s name or had the wrong company listed multiple times throughout your document? No worries—it’s an easy fix. Using Word’s Find and Replace feature, you can quickly locate and replace text. Let’s see how it works.
Switch over to the “Home” tab on Word’s Ribbon and then click the “Replace” button.

This opens Word’s Find and Replace window. In the “Find What” box, type the word or phrase you want to locate. If you only want to find text in your document, you can go ahead and click the “Find Next” button to have Word jump to the next occurrence of that word. Keep clicking it to browse through all the results.
If you want to replace the text you find with something else, type the replacement text into the “Replace With” box. You can enter up to 255 characters in the both the “Find What” and “Replace With” boxes, by the way.
In this example, let’s say we want to replace the name “Williams” with the name “Billingsly”, so we’ve typed that text into the respective boxes. Next, we’d click the “Find Next” button to have Word locate the first instance of the text in the “Find What” box.
Word jumps the document to that point and highlights the result in gray, still keeping the Find and Replace window on top for you. Click the “Replace” button to replace the currently selected result with whatever text is in the “Replace With” box.
To replace all instances at once without stopping and reviewing each one, you can click the “Replace All” button.
Be careful when using “Replace All” because it will automatically replace all instances, including those you might not want to replace. In the example below, there are three more instances of “Williams,” but we only want to replace the next two. In this case, we would only click “Replace” for the second and third instance.
If there is a particular instance where you don’t want to replace the text, click “Find Next” as many times as needed until you come to an example where you need to replace text.
To exit from Find and Replace, click the “Cancel” button.
Of course, since it is Word we’re talking about here, there are also lots of other things you can do to make your searches more sophisticated:
- Use wildcards in your searches to narrow them down to more specific results.
- Search directly within Word’s Navigation pane to have Word show you which headings have your search terms included under them.
- Replace double spaces between sentences with single spaces.
- Search for specific formatting or special characters.
The basic of searching and replacing text in Word are pretty straightforward, but there’s a lot you can do with it once you start digging.
READ NEXT
- › How to Replace Any Character with Newlines in Notepad++
- › How to Search in Google Docs
- › How to Use Find and Replace in Google Docs
- › What Your Function Keys Do in Microsoft Word
- › How to Search for Text in Word
- › How to Find and Replace Formatting in Microsoft Word
- › How to Delete a Page in Microsoft Word
- › Spotify Is Shutting Down Its Free Online Game
How-To Geek is where you turn when you want experts to explain technology. Since we launched in 2006, our articles have been read billions of times. Want to know more?