
Lesson 14: Breaks
/en/word/printing-documents/content/
Introduction
When you’re working on a multi-page document, there may be times when you want to have more control over how exactly the text flows. Breaks can be helpful in these cases. There are many types of breaks to choose from depending on what you need, including page breaks, section breaks, and column breaks.
Optional: Download our practice document.
Watch the video below to learn more about using breaks in Word.
To insert a page break:
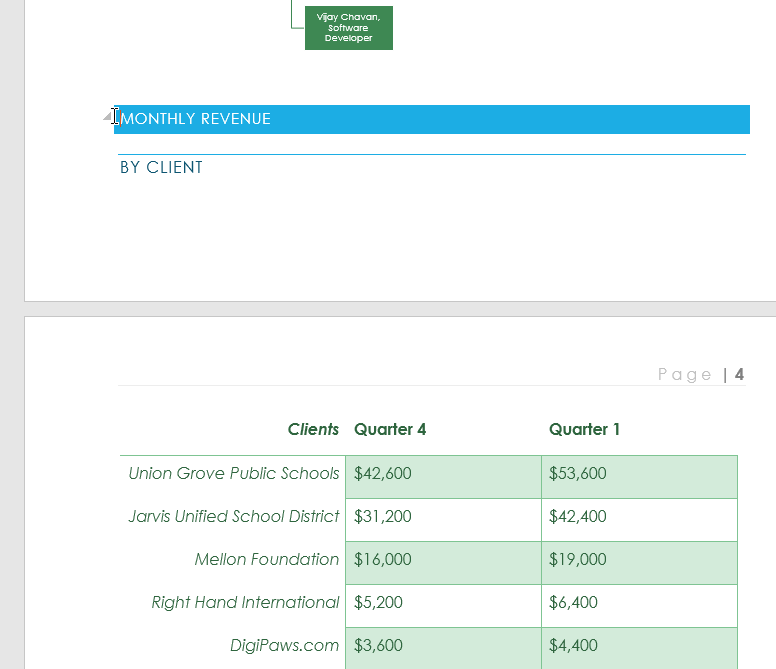
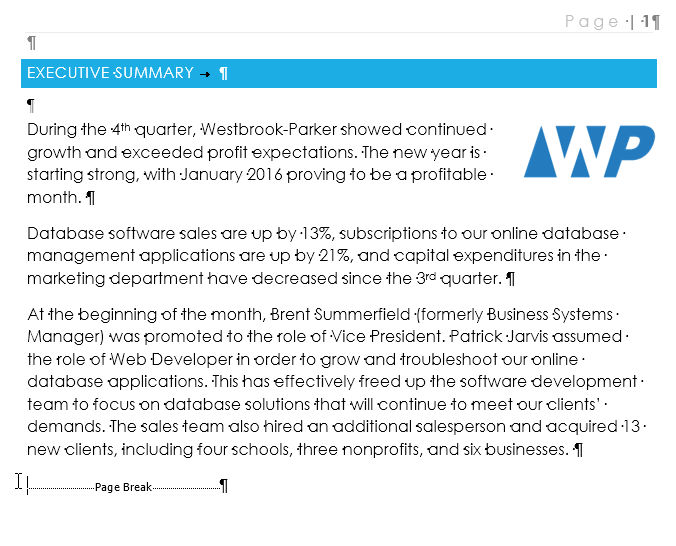
In our example, the section headers on page three (Monthly Revenue and By Client) are separated from the table on the page below. And while we could just press Enter until that text reaches the top of page four, it could easily be shifted around if we added or deleted something in another part of the document. Instead, we’ll insert a page break.
- Place the insertion point where you want to create the page break. In our example, we’ll place it at the beginning of our headings.

- On the Insert tab, click the Page Break command. You can also press Ctrl+Enter on your keyboard.
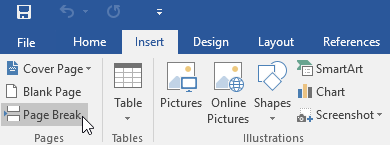
- The page break will be inserted into the document, and the text will move to the next page.
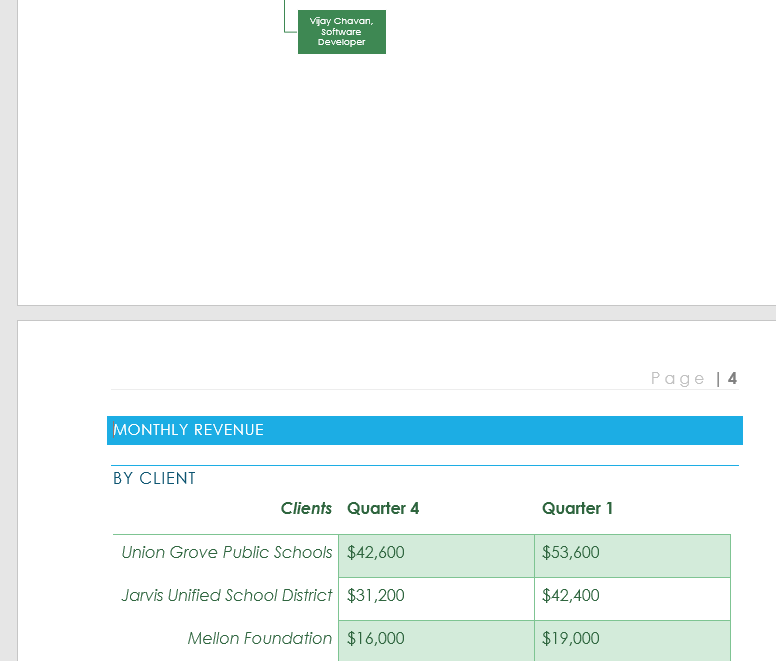
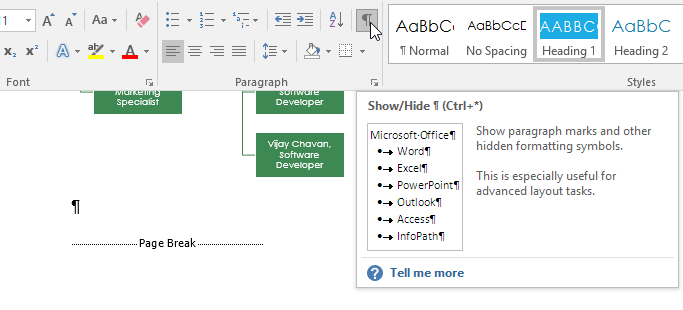
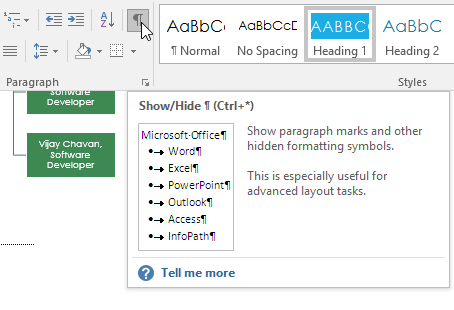
By default, breaks are invisible. If you want to see the breaks in your document, click the Show/Hide command on the Home tab.
Section breaks
Section breaks create a barrier between different parts of a document, allowing you to format each section independently. For example, you may want one section to have two columns without adding columns to the entire document. Word offers several types of section breaks.
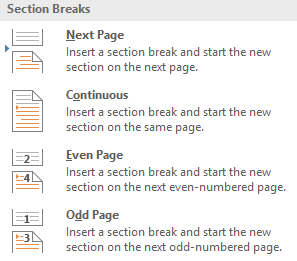
- Next Page: This option inserts a section break and moves text after the break to the next page of the document.
- Continuous: This option inserts a section break and allows you to continue working on the same page.
- Even Page and Odd Page: These options add a section break and move the text after the break to the next even or odd page. These options may be useful when you need to begin a new section on an even or odd page (like with a new chapter of a book).
To insert a section break:
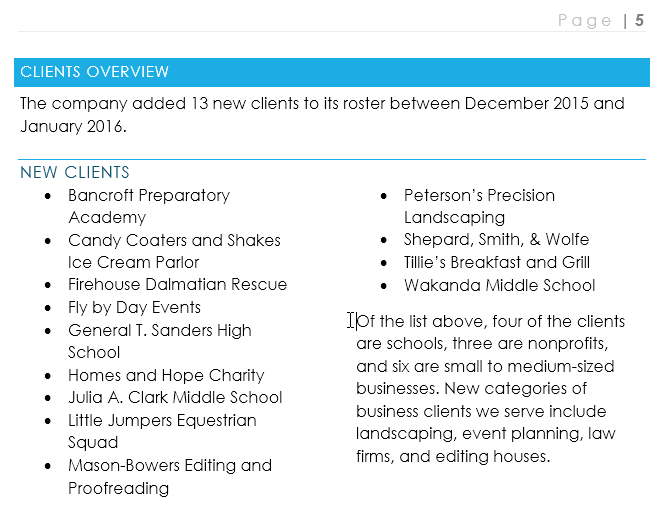
In our example, we’ll add a section break to separate a paragraph from a two-column list.
- Place the insertion point where you want to create the break. In our example, we’ll place it at the beginning of the paragraph we want to separate from two-column formatting.
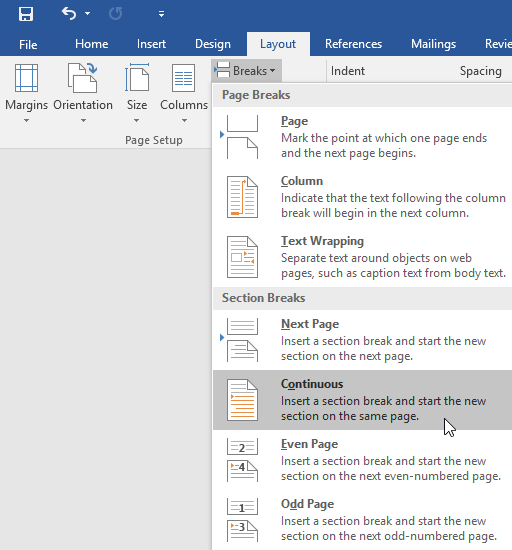
- On the Page Layout tab, click the Breaks command, then select the desired section break from the drop-down menu. In our example, we’ll select Continuous so our paragraph remains on the same page as the columns.
- A section break will appear in the document.
- The text before and after the section break can now be formatted separately. In our example, we’ll apply one-column formatting to the paragraph.
- The formatting will be applied to the current section of the document. In our example, the text above the section break uses two-column formatting, while the paragraph below the break uses one-column formatting.


Other types of breaks
When you want to format the appearance of columns or modify text wrapping around an image, Word offers additional break options that can help:
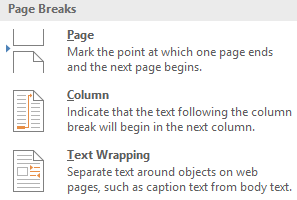
- Column: When creating multiple columns, you can apply a column break to balance the appearance of the columns. Any text following the column break will begin in the next column. To learn more about how to create columns in your document, review our lesson on Columns.
- Text wrapping: When text has been wrapped around an image or object, you can use a text-wrapping break to end the wrapping and begin typing on the line below the image. Review our lesson on Pictures and Text Wrapping to learn more.
To delete a break:
By default, breaks are hidden. If you want to delete a break, you’ll first need to show the breaks in your document.
- On the Home tab, click the Show/Hide command.
- Locate the break you want to delete, then place the insertion point at the beginning of the break.
- Press the Delete key. The break will be deleted from the document.

Challenge!
- Open our practice document.
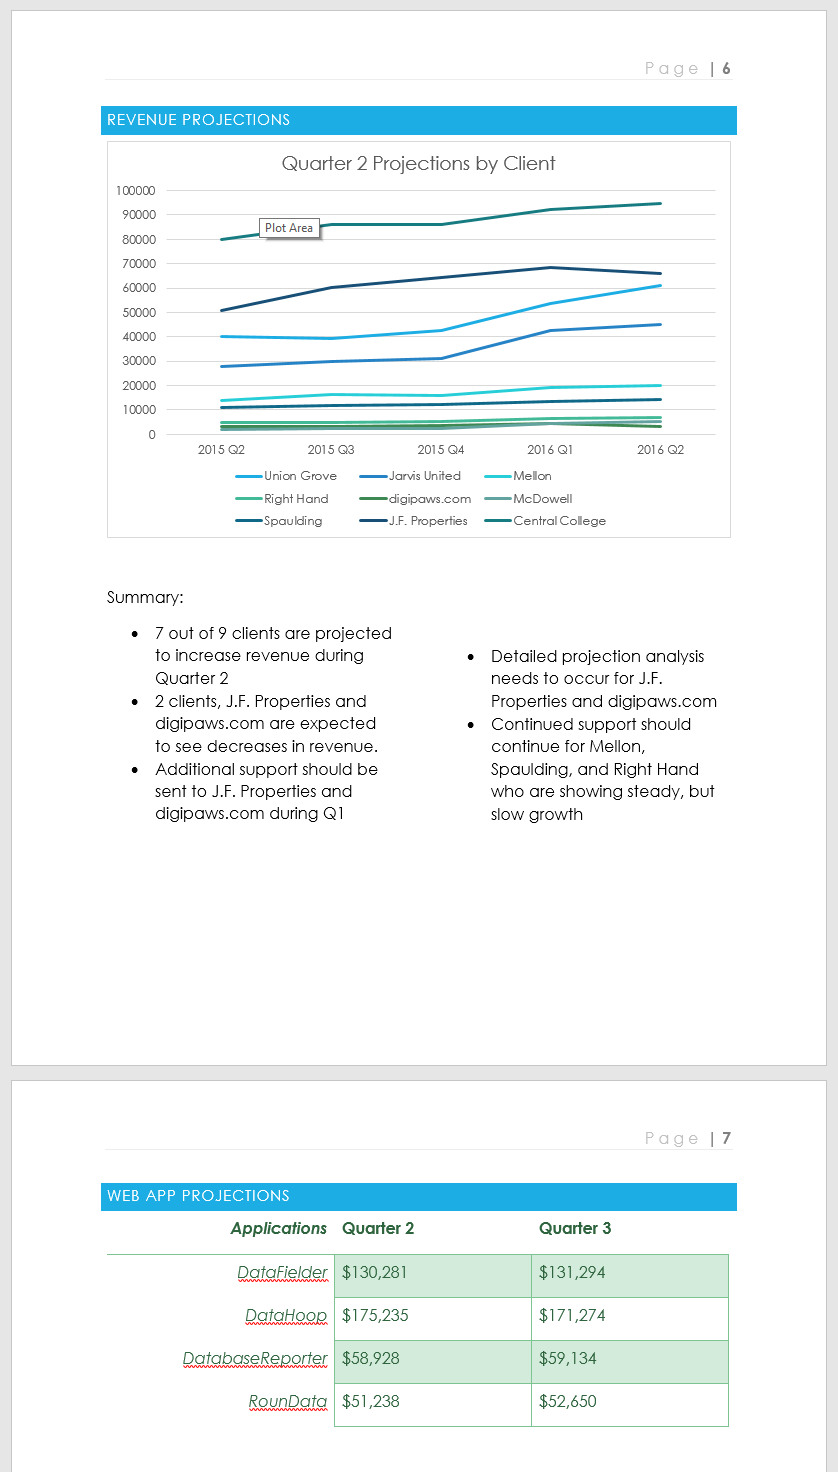
- Scroll to the Revenue Projections section near the end of the document.
- Remove the page break after the Quarter 2 Projections by Client chart.
- Place your cursor at the beginning of the header Web App Projections.
- Insert a Next Page section break.
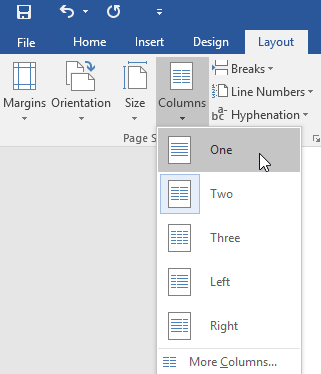
- In the Page Setup group on the Layout tab, click the Columns drop-down menu and choose One. This formats the page back to one column and should allow the Web App Projections header and the table below it to span across the page. You will learn more about columns in our next lesson.
- When you’re finished, the last two pages should look something like this:

/en/word/columns/content/
When you’re working on a long document, separating it into different parts makes it much easier to navigate. Microsoft Word eases your workflow by letting you insert document breaks, namely section and page breaks.


As you’ll see in this article by defining section and page breaks you can apply specific formatting elements in different parts of your document. You’ll also have better control over pagination.
Read on to learn how to use section and page breaks in Word to make your document more visually appealing and easier for readers to make their way around. Finally, we’ll show you some great sources for professionally designed Word templates.
How to Add Breaks in MS Word (Quick Start Video)
Are you ready to learn how how to insert breaks in MS Word? The short video below will give you a head start on inserting, viewing, and deleting MS Word section and page breaks:
To learn even more about breaks in Word (including the difference betwen section breaks and page breaks), study the written tutorial below.
Understanding Section and Page Breaks
Section and page breaks are types of breaks or partitions in a Word document. In this section, you’ll learn some basics:
1. Microsoft Word Section Break vs Page Break
A page break is a partition in the text of the document. At a page break, the succeeding text is automatically placed on top of a new page.


But, with a section break for Word the text is partitioned — along with the formatting associated with it:
- page numbers
- margins
- headers and footers
- paper size and/or orientation
Also, a Microsoft Word section break may or may not begin on a new page (more on that below).
2. Why Use Microsoft Section and Page Breaks?
Section and page breaks are useful for partitioning different parts of a document, especially a long one.
In a book, you’d use section breaks to divide it into chapters as well as delineate the front matter from the back matter. The title page, copyright page, table of contents, individual chapters, index, etc., would be separate sections.
For example, you usually want a new chapter of a book (or similar) document to begin on a new page. This is when a page break is most useful.
A section break for MS Word is useful for visually distinguishing parts of a document. An example of where you might use a section break is in a proposal where you want the summary to have a different layout. In this case, the summary section could have its own header, footer, and margins that are different from the rest of the document.
By using section breaks, each chapter can have a different running header, including the chapter title.


Microsoft Word Section breaks also let you use lower case numbers for page numbers on the introduction of the book and Arabic numerals on the rest of the pages.
Similarly, a section break in Microsoft Word lets you use a two-column format in the index section and a single column everywhere else.
You’ll also want to use section and page breaks when you want to control the pagination of your document. For example, the first page of your document may be a cover page. But you don’t want the cover page to be page 1 of your document. By inserting a section break after the cover page, you can make the next page be page 1.
You accomplish these results by inserting different types of section and page breaks in Word.
3. Types of Microsoft Word Section Breaks
There are four types of section breaks in MS Word:
- Next Page. This type of section break forces the text to the right of the cursor to a new section on the following page. All the formatting associated with the text is carried through to the new section as well.
- Continuous. A continuous section break creates a new section but keeps the text on the same page. This means two different sections can have their own formatting yet remain on the same page.
- Odd Page. This kind of section break moves the text to the right of the cursor to the top of the next odd-numbered page. If you’re on page 3, for example, and you insert an Odd Page Section Break, the next section will start on top of page 5 (page 4 will be blank). Book chapters usually begin on the next odd page of the book.
- Even Page. An Even Page section break moves the text to the right of the cursor to the top of the next even-numbered page. So, if you’re on page 6 and you insert an Even Page Section Break, the new section will begin on page 8 (leaving page 7 blank).
4. Types of Page Breaks
As for Microsoft Word page breaks, there are two kinds:


- Simple Page Breaks. A simple page break moves text to the right of the cursor to the top of the next page.
- Column Breaks. If your document is broken up into columns, a column break moves text to the right of the cursor to the top of the next column.
How to View Existing Breaks in an MS Word Doc
By default, section and page breaks are invisible in Word. You can only see their effects. You’ll see changes in formatting and pagination for each section. That’s because these breaks don’t appear when the document is printed.
As you’re editing and formatting your document, you may need to see page and section breaks. To view existing page and section breaks in Word, on the Home tab, then click on the Paragraph button.


How to Insert Section Breaks in Your Word Docs
To insert a page or section break, place the cursor where you want one section/page to end and the next section/page to begin.
Go to Insert > Break, then choose the specific type of page break or section break you want to insert.


Or, click on the Layout tab. Then click on the Breaks button on the ribbon and select the type of page or section break you wish to insert.


How to Remove/Delete Section and Page Breaks in Word
To remove a section or page break in Word, first display all the breaks.
Select the section or page break you want to remove by highlighting it. Click on either the Delete or Backspace key on your keyboard.


When you delete a section break, the text in the section adopts the formatting of the next section.
Tips for Using Section and Page Breaks in MS Word
Are you just getting comfortable with using Microsoft Word section and page breaks? Here are some extra tips to help you use them effectively:
1. Keep Your Section Breaks to a Minimum
Insert a section break in Word only when you have to (see above for when it’s a good idea to do so). Having more sections than necessary makes it more difficult to make global changes to your document, because you’d have to manually make those changes in each section.
2. Pay Attention to Which Section You’re In
If you’ve divided your document into sections, always be aware of what section you’re in when you make formatting changes. That’s because these changes will apply only to the section you’re currently in — that’s the section where your cursor is. If you want to make a formatting change to apply to the whole document, select the entire document first before making your changes.
3. Microsoft Word May Change a Continuous Section Break to the Other Section Break Types
You may be surprised that your continuous section break has been converted into a different type of section break. This happens when you’ve got a continuous section break. Then, in the next section, you try to apply a different header/footer, pagination, margins, or page size and orientation. Those formatting changes require a page break. And so, Word will automatically change the section break type to one that results in a page break.
Streamline Your Microsoft Word Workflow With Templates


There are other ways to streamline your MS Word workflow. One of them is using premium Word templates, like the ones you’ll find at Envato. Premium templates for Microsoft Word are created by professional designers to provide impressive layouts. These templates are customizable with your content, images, and branding. You can also adjust the design and layout as you please.
Envato Elements gives you unlimited downloads of Word templates as well as other inputs you need to complete your projects — fonts, graphics, stock photos, and more — all for one flat monthly subscription fee.


Or, go to GraphicRiver for Microsoft Word templates and other creative elements on a pay-per-use basis. It’s a terrific source for one-off projects.
Make Your Document Easier to Read and Navigate
Now you know how to use section and page breaks in Microsoft Word to better organize your document. Section breaks also let you have more granular control over the formatting of specific parts of your document. These make your document look better as well as easier to read and navigate through.
Use the steps you learned in this article to properly use section and page breaks. Also, use Word templates to make it much easier and faster to create impressive documents. Envato Elements provides unlimited downloads of templates for Word for one monthly subscription. For occasional projects, GraphicRiver is an excellent source of Word templates where you pay for each use.
Editorial Note: This tutorial has been updated to add a video by Andrew Childress.
 Please Note:
This article is written for users of the following Microsoft Word versions: 97, 2000, 2002, and 2003. If you are using a later version (Word 2007 or later), this tip may not work for you. For a version of this tip written specifically for later versions of Word, click here: Adding a Break to Your Document.
![]()
Written by Allen Wyatt (last updated June 29, 2022)
This tip applies to Word 97, 2000, 2002, and 2003
As you are typing in Word, you will notice the program automatically keeps track of where you are. When your document no longer fits on a single page, Word automatically inserts a page break (indicated by a thin dashed line when viewing your document in Normal view) and wraps your text to the next page.
There may be times, however, when you want to insert a break in your text automatically. Word supports the following types of breaks:
- Page breaks. Causes the following text to begin at the top of the next page.
- Column breaks. Causes the following text to begin at the top of the next column. (If there is only one column in your page layout, the column break functions the same as a page break.)
- Section breaks. Causes the following text to begin a new section of your document. Where the actual break occurs depends on the type of section break you use. There are four different types of section breaks that can be inserted in your document.
- Text-wrapping breaks. These breaks, which are not available in Word 97, are closely akin to line breaks (Shift+Enter). A text-wrapping break breaks a line of text and moves the text to the next line. This type of break is intended for use with text that wraps around graphics.
To insert a break in your document, follow these steps if you are using Word 2007:
- Position the insertion point at the position where you want to insert the break.
- Display the Page Layout tab of the ribbon.
- Click the Breaks tool, in the Page Setup group. Word displays a list of breaks you can insert.
- Click the type of break you want to insert.
If you are using a version of Word prior to Word 2007, follow these steps instead:
- Position the insertion point at the position where you want to insert the break.
- Select the Break option from the Insert menu. Word displays the Break dialog box. (See Figure 1.)
- Select the type of break you want to insert.
- Click on OK.
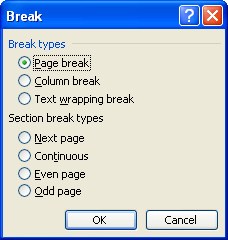
Figure 1. The Break dialog box.
WordTips is your source for cost-effective Microsoft Word training.
(Microsoft Word is the most popular word processing software in the world.)
This tip (183) applies to Microsoft Word 97, 2000, 2002, and 2003. You can find a version of this tip for the ribbon interface of Word (Word 2007 and later) here: Adding a Break to Your Document.
Author Bio
With more than 50 non-fiction books and numerous magazine articles to his credit, Allen Wyatt is an internationally recognized author. He is president of Sharon Parq Associates, a computer and publishing services company. Learn more about Allen…
MORE FROM ALLEN
Store Common Addresses in AutoText Entries
Do you write letters to lots of different people? One good place to keep those addresses is in AutoText entries. They are …
Discover More
Making AutoCorrect Automatically Recognize the Replace Word
When you select some text in your document and then display the AutoCorrect dialog box, it can seem a bit odd that …
Discover More
Limiting How Many Times a Worksheet Can Be Calculated
Excel, by default, recalculates your worksheets as you make changes in those worksheets. If you want to limit the number …
Discover More
More WordTips (menu)
Determining a Column Width
When laying out your document, you may wonder what width you should use for your text. An old typographers trick may help …
Discover More
Removing Breaks
Word allows you to add several types of «breaks» into your document. If you later want to remove any of them, you can use …
Discover More
Determining Page Layout
Getting your document onto paper is the whole purpose of word processing. Here are some concepts that are important when …
Discover More
Hi Will
As I’m not intimately familiar with your code, I didn’t know what kind of Range would be appropriate. It could be anything at all — I used Range in the very general sense of «take any Range object», Sections(1) will be a property of it, no matter what the
origin of the Range.
There will always be a character after a break; at the very least, it will be a lone paragraph mark at the end of the document. The paragraph mark — that occurs for every paragraph in the document — is ANSI character 13 (in C# «r»).
To find out what type of section each para is, building on your code snippet, you’d use:
para.Range.Sections[1].PageSetup.SectionStart;
A Range could contain more than one section; the above gives you the first section in that Range. If you’re concerned that there could be more than one section within a paragraph, you could precede this with para.Range.Sections.Count. If it returns >
1 there is more than one section in the paragraph. In that case, you could loop through the Range.SEctions collection to determine what types of section breaks there are (any that are IN the paragraph will be continuous, by definition).
As you «walk» the paragraphs you can determine whether a section has changed using:
int secIndex = para.Range.Sections[1].Index;
Index will be the number of the section counted from the beginning of the document.
Note: If you need all the properties I’ve outlined above, then it would be worthwhile using a Range object (Word.Range rngPara = para.Range;), rather than always referring to para.Range.
Going back to moving one character and checking whether the section type changed: If you have rngPara you can collapse it to its end-point, then move it one character:
object collapseEnd = Word.WdCollapseDirection.wdCollapseEnd;
object count1 = 1;
object unitChar = Word.WdUnit.wdCharacter;
rngPara.Collapse(ref collapseEnd);
rng.MoveStart(ref unitChar, ref count1);
Now rng.Text should be the character following what was previously in rngPara.
Cindy Meister, VSTO/Word MVP
-
Предложено в качестве ответа
30 июля 2012 г. 1:36
-
Помечено в качестве ответа
Leo_Gao
1 августа 2012 г. 1:21
Try the Word Course for Free!

How to Set Page Breaks in Word: Overview
In this tutorial, you will learn how to set page breaks in Word. When you create a document, you set a paper size such as 8.5” by 11.” When you reach the end of the specified page size in Word, an automatic page break is inserted. Sometimes these automatic page breaks occur in places where you would rather not have them occur. For example, an automatic page break may leave one sentence on a second page, orphaned from the rest of the paragraph. You cannot delete automatic page breaks in Word. Instead, you must insert a manual page break at a point in the page prior to the occurrence of the automatic page break.
It is easy to set page breaks in Word. Just click into the document at the place where you want the page break to occur. This should, of course, be before the automatic page break. Then press “Ctrl” + “Enter” on your keyboard. Alternatively, click the “Breaks” button in the “Page Setup” group on the “Layout” tab of the Ribbon. Then choose the “Page” option from the drop-down menu.
You can set page breaks in Word to apply the most commonly used type of document break. However, it is by no means the only type of document break available. When you click the “Breaks” button in the “Page Setup” group on the “Layout” tab of the Ribbon, you will see many of the other types of document breaks that are available for use in Microsoft Word. You can also select these types of breaks for your document, if the need arises. We will now examine the other types of document breaks that you can insert into your Word documents and their uses within the program.
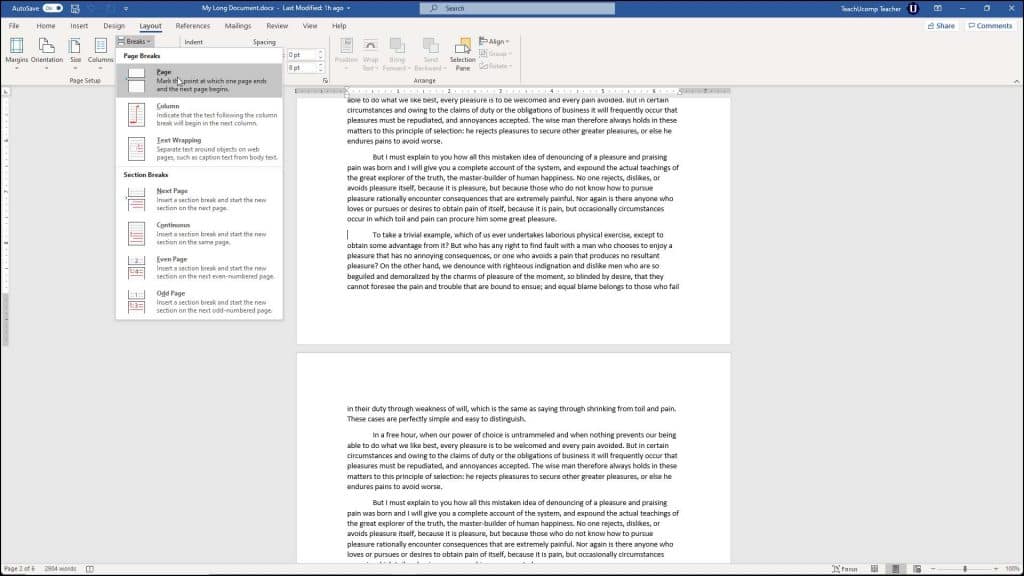
Set Page Breaks in Word- Tutorial and Instructions: A picture of the different types of breaks available in Word.
A “Section Break” is much like a page break, but it breaks the sections of your document. When you insert a section break, you can then set the page layout independently for each section. For example, using a “Next Page” section break, each section could change the page layouts, like switching from a “Portrait” page orientation to a “Landscape” page orientation within a single document.
There are four different types of section breaks that you can insert. They are “Next Page,” “Continuous,” “Odd Page,” and “Even Page.” A “Next Page” section break inserts a page break, but also creates two separate sections of the document so that each section can have its own unique page layout. A “Continuous” section break inserts a break, but continues the next section on the same page. The “Odd Page” or “Even Page” section break will place a break, and then continue the next section on the next odd or even numbered page. This is helpful for inserting section breaks into documents that are intended for double-sided, bound printing.
If you select to view the non-printing characters in a document after you set page breaks in Word, you will see that a manual page break is identifiable by the words “Page Break” in the center of a dashed line within the document. You can easily delete these breaks just as you would any other character. You simply click into the line containing the “Page Break” character, and then press the “Delete” key on your keyboard.
How to Set Page Breaks in Word: Step-By-Step Instructions
- To insert a manual page break, click into the document at the place you want the page break to occur, before an automatic break.
- Press the “Ctrl” + “Enter” keys on your keyboard.
- Alternatively, click the “Layout” tab in the Ribbon and click the “Breaks” drop-down button.
- Then choose the “Page” option from the drop-down menu.
- To insert a section break that creates a new section in your document, click the “Layout” tab of the Ribbon.
- Then click the “Breaks” drop-down button in the “Page Setup” button group.
- Then choose one of the following options from the “Section Breaks” section.
- “Next Page,” will insert a page break and create two separate sections of the document.
- “Continuous,” will inset a break but continue the next section on the same page.
- “Odd Page” or “Even Page” will place a section break and then continue the next section on the next odd or even numbered page.
- To delete page breaks you have added to your document, ensure that you can view non-printing characters.
- Click into the dotted line containing the term “Page Break” and press the “Delete” key on your keyboard.
How to Set Page Breaks in Word: Video Lesson
The following video lesson, titled “Setting Page and Section Breaks,” shows how to set page breaks in Word. This video is from our complete Word tutorial, titled “Mastering Word Made Easy v.2019 and 365.”
Tagged under:
add, automatic page breaks, continuous, course, delete, document, document breaks, documents, even page, help, how-to, insert, insert page breaks, instructions, layout, learn, lesson, Microsoft Office 365, microsoft word, next page, odd page, office 365, overview, page break, page breaks, page setup, remove, section break, section breaks, sections, self study, set page breaks, teach, training, tutorial, video, Word 2013, Word 2016, Word 2019, Word document, Word documents, Word for Microsoft 365, word for Office 365

От автора: в наши дни очень важно сделать сайт адаптивным, чтобы он правильно отображался на всех устройствах. К сожалению, несмотря на все усилия, вы все равно можете получить неработающие макеты. Иногда макеты нарушаются из-за того, что некоторые слова слишком длинные, чтобы уместиться в контейнере.
Переполнение контента может произойти, когда вы имеете дело с пользовательским контентом, который вы не можете контролировать. Типичный пример — раздел комментариев в блоге. Следовательно, вам необходимо применить соответствующий стиль, чтобы содержимое не переполняло свой контейнер.
Вы можете использовать свойства CSS word-wrap, overflow-wrap или word-break для обертывания или переноса слов, которые в противном случае переполнили бы их контейнер. Эта статья представляет собой подробное руководство по свойствам CSS word-wrap, overflow-wrap и word-break, а также о том, как вы можете использовать их, чтобы не допустить, чтобы переполнение содержимого разрушало ваш красиво оформленный макет.
Прежде чем мы начнем, давайте разберемся, как браузеры переносят контент в следующую секцию.
Как происходит перенос контента в браузерах?
Браузеры выполняют перенос содержимого в разрешенные брейкпоинты, называемый «мягкой оберткой». Браузер будет обертывать контент с использованием мягкой обертки, если таковая возможна, чтобы минимизировать переполнение контента.
В английской и большинстве подобных ей системах письма возможности мягкой обертки по умолчанию появляются на границах слов при отсутствии переносов. Поскольку слова ограничены пробелами и знаками препинания, именно здесь используются мягкие обертки.
Хотя в английских текстах для символов пробела используются мягкие обертки, для неанглийских систем письма ситуация может быть иной. Некоторые языки не используют пробелов для разделения слов. Следовательно, упаковка содержимого зависит от языка или системы письма. Значение атрибута lang, которое вы указываете в элементе html, в основном используется для определения того, какая языковая система используется. В этой статье основное внимание будет уделено системе письма на английском языке.
Переноса по умолчанию при использовании мягкой обертки может быть недостаточно, если вы имеете дело с длинным непрерывным текстом, например URL-адресами или пользовательским контентом, который у вас недостаточно или совсем не контролируется.
Прежде чем мы перейдем к подробному объяснению этих свойств CSS, давайте посмотрим на различия между мягким переносом и принудительным переносом строки в разделе ниже.
В чем разница между мягким и принудительным переносом строки?
Любой перенос текста, который происходит при использовании мягкого переноса, называется разрывом мягкого переноса. Чтобы перенос происходил при использовании мягкого обертывания, необходимо убедиться, что обертывание включено. Например, установка значения nowrap для свойства white-space отключит перенос.
С другой стороны, принудительные разрывы строк возникают из-за явного управления разрывом строк или указания конца или начала блоков текста.
CSS свойства word-wrap и overflow-wrap
Название word-wrap — это устаревшее имя свойства overflow-wrap. Word-wrap изначально было расширением Microsoft. Оно не было частью стандарта CSS, хотя большинство браузеров реализовали его под названием word-wrap. Согласно проекту спецификации CSS3, браузеры должны рассматривать word-wrap как устаревший псевдоним для свойства overflow-wrap.
В последних версиях популярных веб-браузеров реализовано свойство overflow-wrap. В проекте спецификации CSS3 указано следующее определение overflow-wrap: Это свойство указывает, может ли браузер разбивать строку на недопустимые точки переноса, чтобы предотвратить переполнение, когда неразрывная строка слишком длинна, чтобы поместиться в границах контейнера.
Если у вас есть свойство white-space для элемента, вам необходимо установить для него значение allow, чтобы разрешить эффект переноса для overflow-wrap. Ниже приведены значения свойства overflow-wrap. Вы также можете использовать глобальные значения inherit, initial, revert и unset для overflow-wrap, но здесь мы не будем их рассматривать.
|
overflow-wrap: normal; overflow-wrap: anywhere; overflow-wrap: break-word; |
Ниже мы рассмотрим значения свойства CSS overflow-wrap, чтобы понять его поведение.
Normal
Применение значения normal заставит браузер использовать поведение разрыва строки по умолчанию в системе. Поэтому для английского языка и других подобных системах письма разрывы строк будут происходить через пробелы и дефисы:
|
.my-element{ overflow-wrap: normal; } |
На изображении ниже в тексте есть слово, длина которого превышает длину контейнера. Поскольку нет возможности мягкого переноса, а значение свойства overflow-wrap равно normal, слово переполняет свой контейнер. Это является поведением системы при переносе строк по умолчанию.

Anywhere
Использование значения в аnywhere приведет к разрыву неразрывной строки в произвольных точках между двумя символами. Аnywhere не будет добавлять символ дефиса, даже если вы примените свойство hyphens к этому элементу.
Браузер разорвет слово только в том случае, если отображение слова приведет к переполнению. Если слово вызывает переполнение, оно будет разорвано в точке, где это переполнение произошло.
Когда вы используете аnywhere, браузер будет учитывать возможности мягкого переноса, предоставляемые разрывом слова, при вычислении внутренних размеров min-content:
|
.my-element{ overflow-wrap: anywhere; } |
В отличие от предыдущего примера, где мы использовали overflow-wrap: normal, на изображении ниже мы используем overflow-wrap :where. Слово-переполнение, которое невозможно разбить, разбивается на фрагменты текста с помощью overflow-wrap: anywhere, чтобы оно поместилось в своем контейнере.

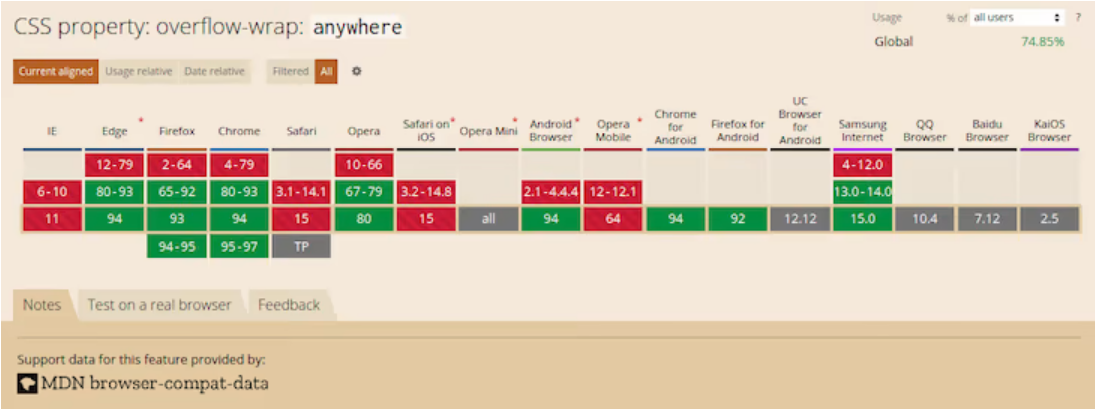
Значение anywhere не поддерживается некоторыми браузерами. На изображении ниже показана поддержка браузерами по данным caniuse.com. Поэтому не рекомендуется использовать overflow-wrap: anywhere, если вы хотите иметь более высокую поддержку браузера.
Break-word
Значение break-word похоже на любое другое с точки зрения функциональности. Если браузер может перенести слово без переполнения, то он это сделает. Однако, если слово все еще переполняет контейнер, даже когда оно находится в новой строке, браузер разделит его в точке, где снова произошло бы переполнение:
|
.my-element{ overflow-wrap: break-word; } |
На изображении ниже показано, как браузер прерывает переполненный текст в предыдущем разделе, когда вы применяете overflow-wrap: break-word. Вы заметите, что изображение ниже выглядит так же, как изображение в последнем примере. Разница между overflow-wrap: anywhere и overflow-wrap: break-word заключается в вычислении внутренних размеров min-content.

Разница между anywhere и break-word очевидна при вычислении внутренних размеров min-content. С break-word браузер не учитывает возможности мягкого переноса, предоставляемые разрывом слова, при вычислении внутренних размеров min-content, но он учитывает возможности мягкого переноса при использовании anywhere.
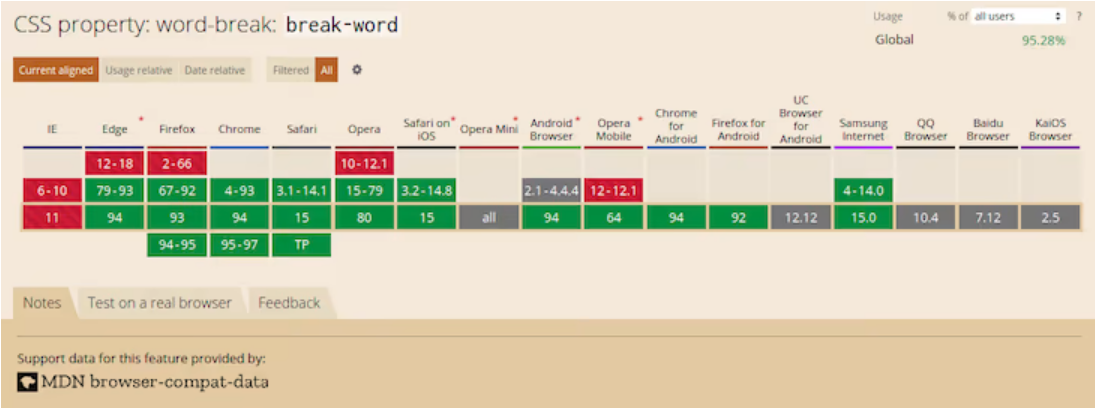
Значение break-word имеет достойный охват среди последних версий десктопных браузеров. К сожалению, этого нельзя сказать об их мобильном аналоге. Поэтому безопаснее использовать унаследованный word-wrap: break-word вместо более нового overflow-wrap: break-word.
На изображении ниже показана поддержка браузеров overflow-wrap: break-word согласно caniuse.com. Вы заметите, что последние версии десктопных браузеров имеют поддержку, в то время как поддержка некоторых мобильных браузеров неизвестна.

Свойство Word-break
Word-break — еще одно свойство CSS, которое вы можете использовать для указания возможности мягкого переноса между символами. Вы можете использовать это свойство, чтобы разбить слово в том месте, где могло произойти переполнение, и перенести его на следующую строку.
Ниже приводится то, что говорится о свойстве CSS word-break в спецификации CSS3:
Это свойство определяет возможности мягкого переноса между буквами, то есть там, где это «нормально» и допустимо для разрывов строк текста. Word-break контролирует, какие типы букв браузер может объединять в неразрывные «слова», заставляя символы CJK вести себя как текст, не относящийся к CJK, или наоборот.
Ниже приведены возможные значения CSS-свойства word-break. Как и для overflow-wrap, вы также можете использовать глобальные значения inherit, initial, revert и unset, но мы не будем рассматривать их здесь:
|
word-break: normal; word-break: break-all; word-break: keep-all; |
Break-word также является значением для CSS-свойства word-break, хотя оно устарело. Однако, браузеры по-прежнему поддерживают его. Указание этого свойства имеет тот же эффект, что и word-break: normal и overflow-wrap :where.
Теперь, когда мы знакомы с CSS-свойством break-word и соответствующими ему значениями, давайте подробно рассмотрим их.
Normal
Установка для свойства word-break значение normal будет применять правила разбиения по словам по умолчанию:
|
.my-element{ word-break: normal; } |
На изображении ниже показано, что происходит, когда вы применяете стиль word-break: normal к блоку текста, который содержит слово длиннее, чем его контейнер. Вы видите, что в браузере действуют обычные правила разбиения на слова.

Break-all
Значение break-all вставит разрыв строки именно в том месте, где текст переполнился бы для некитайских, неяпонских и некорейских систем письма. Слово не будет помещено в отдельную строку, даже если это предотвратит необходимость вставки разрыва строки:
|
.my-element{ word-break: break-all; } |
На изображении ниже я применил стиль word-break:break-all к элементу p шириной 240 пикселей, содержащему переполненный текст. Браузер вставил разрыв строки в точке, где могло произойти переполнение, и перенес оставшийся текст в следующую строку.

Использование break-all приведет к разрыву слова между двумя символами именно в том месте, где произойдет переполнение в английском и других родственных языковых системах. Однако это не применимо к текстам на китайском, японском и корейском языках (CJK).
Он не применяет то же поведение к текстам CJK, потому что системы письма CJK имеют свои собственные правила для применения брейкпоинтов. Создание разрыва строки между двумя символами произвольно во избежание переполнения может значительно изменить общий смысл текста. Для систем CJK браузер будет применять разрывы строк в том месте, где такие разрывы разрешены.
На изображении ниже показана поддержка браузером word-break: break-word согласно caniuse.com. Хотя последние версии современных веб-браузеров поддерживают это значение, поддержка среди некоторых мобильных браузеров неизвестна.
Keep-all
Если вы используете значение keep-all, браузер не будет применять разрывы слов к текстам CJK, даже если происходит переполнение содержимого. Эффект от применения значения keep-all такой же, как и у normal для систем письма, отличных от CJK:
|
.my-element{ word-break: keep-all; } |
На изображении ниже применение word-break: keep-all имеет тот же эффект, что и word-break: normal, потому что я использую систему письма, отличную от CJK (английский язык).

На изображении ниже показана поддержка браузером word-break: keep-all согласно caniuse.com. Это значение поддерживается в большинстве популярных десктопных браузеров. К сожалению, это не относится к мобильным браузерам.

Теперь, когда мы рассмотрели свойства CSS overflow-wrap и word-break, в чем разница между ними?
В чем разница между overflow-wrap и разр word-break?
Вы можете использовать CSS свойства overflow-wrap и word-break для управления переполнением содержимого. Однако существуют различия в способах обработки этих двух свойств.
Использование overflow-wrap приведет к переносу всего переполненного слова в новую строку, если оно может поместиться в одну строку, не переполняя свой контейнер. Браузер разорвет слово только в том случае, если он не сможет разместить слово в новой строке без переполнения. В большинстве случаев свойство overflow-wrap или его устаревшее название word-wrap может быть достаточным для управления переполнением содержимого.
Свойство overflow-wrap относительно новое, поэтому его поддержка браузером ограничена. Вместо этого вы можете использовать устаревшее название word-wrap, если вам нужна более высокая поддержка браузером.
С другой стороны, word-break безжалостно разорвет слово, которое выходит за границы, между двумя символами, даже если размещение его в новой строке устранит необходимость в разрыве слова. Кроме того, некоторые системы письма, такие как системы письма CJK, имеют строгие правила разбиения по словам, которые браузер принимает во внимание при создании разрывов строк с помощью word-break.
Заключение
Как указывалось в предыдущих разделах, overflow-wrap и word-break во многом схожи. Вы можете использовать оба из них для управления разрывом строки.
Название overflow-wrap является псевдонимом устаревшего свойства word-wrap. Следовательно, вы можете использовать их как взаимозаменяемые. Однако стоит отметить, что поддержка браузером нового свойства overflow-wrap по-прежнему невысока. Вам лучше использовать word-wrap вместо overflow-wrap, если вы хотите почти универсальную поддержку браузера. Согласно проекту спецификации CSS3, браузеры должны продолжать поддерживать word-wrap.
Если вы хотите управлять переполнением содержимого, вам достаточно использовать overflow-wrap или его устаревшее название word-wrap.
Вы также можете использовать word-break, чтобы разбить слово между двумя символами, если слово выходит за пределы своего контейнера. Как и при overflow-wrap, при использовании word-break нужно действовать осторожно из-за ограничений в поддержке браузера.
Теперь, когда вы знаете поведение, связанное с этими двумя свойствами, вы можете решить, где и когда их использовать.
Автор: Joseph Mawa
Источник: blog.logrocket.com
Редакция: Команда webformyself.
Читайте нас в Telegram, VK, Яндекс.Дзен
As you type in Word, text forms sentences that expand into paragraphs that fill up the page.
As Word always starts with a predefined page, once it fills up, Word moves over to a new page.
Similarly, when you delete text in one page, Word fills up the gap by moving in text from subsequent pages.
Therefore, depending on some parameters like font size, and line spacing you have chosen, Word decides the amount of text in a page, and automatically inserts a page break to separate two pages.
However, everything is not automatic, and Word also allows you to insert different types of breaks to control the flow of text in your Word document.
Word offers three types of breaks—
- Simple Page breaks
- Page breaks
- Section breaks
subtypes of them, as in the table below:
| Breaks | Simple Page Break | Page Breaks | Section Breaks |
| Function | Separates the content between pages keeping the flow. | Separate the content between pages breaking the flow. | Split the document into sections. |
| Utility | Starts a new page. Following paragraph starts at page top. | Start a new page. Following paragraph starts after a blank line at page top. | Start a new section. Each section can have its own header/footer and formatting |
| Insertion | Keyboard/Menu | Menu | Menu |
| Types | None | Page, Column, Text wrapping. | Next page, Continuous, Even page, Odd page. |
Inserting breaks in a document allows you to print it in the desired manner. It also helps to retain the format while you change the fonts, or the page orientation.
Word uses hidden characters to depict breaks, and normally they remain invisible. However, for understanding the difference between different breaks, it is easier if the breaks were visible.
The easiest way to do this is to open the Word document, click on the Home tab on the top menu bar, and click on the Show/Hide button within the Paragraph section.

So, how do you choose what break to insert and where? Let us find out.
Simple Page Break
When you have a document where the text flow is continuous, and you want a break to allow the next paragraph to begin on the next page, you insert a Simple Page break. You can do this in two ways—using the menus or the keyboard.
To insert a Simple Page break using menus, click on the Insert tab on the top menu bar to change the ribbon.
Place the cursor at the beginning of the paragraph where you want to insert the break.
Click on Page Break in the Pages section, and Word will insert a page break on a new line after the cursor.
Word will also move the next paragraph to the beginning of the next page.

You can achieve the same effect by pressing Ctrl+Enter simultaneously on your keyboard, after you have placed the cursor at the beginning of the paragraph where you want the break to appear.
What happens if your text flow is continuous, but columnar?
Inserting a Simple Page break moves the next paragraph to a new column on a new page.

Notice that you are not adding a heading in between the paragraphs. What if you had to?
To add a heading in between the two paragraphs, separate them with a Page break.
Page Break
When you want the separated paragraph to also have a new line for adding a heading, use the Page break.
Click on the Layout tab on the top menu bar to change the ribbon.
Within the Page Setup section, click on the tiny triangle on the right side of Breaks to open the Page Breaks and Section Breaks menu.

If you click on Page, Word will shift the paragraph following the cursor to the beginning of the next page, and will also add a new line in front, allowing you to add a heading there.

What happens if your text is columnar? You must use the Column break.
Column Break
Next in the Page Breaks menu is the Column break. When your document contains columnar text, you can break up the columns with a Column break.
Word moves the next paragraph following the cursor to the beginning of the next column and adds a new line to allow adding a heading.

What happens if you have an image along with the text in your document? For such a case, you must use the Text Wrapping break.
Text Wrapping Break
The next type of Page break in the menu is the Text Wrapping break.
This type of break is for keeping the image and its caption within a paragraph—allowing the paragraph containing the image to wrap around it, while separating it from the text in the next paragraph.
Place the cursor at the end of the paragraph containing the image, and click on Text Wrapping in the Page Break menu.
Word shifts the next paragraph down until it no longer wraps around the image.

Now, let us see how Section Breaks work.
Section Breaks
As we saw earlier, Word offers four types of Section Breaks. We will check them out one by one.

Next Page Section Break
When a part of your Word document has content that requires a different formatting from the rest, you can isolate it with a Next Page section break and apply the special formatting on it.
For instance, most of your document is continuous and the pages are in portrait mode, but you need to insert a wide table in between, and the table looks good only in landscape mode.
You can insert a Next Page section break after the last paragraph, add the table in landscape mode, add another Next Page section break after the table, and continue the text in portrait mode.
You have basically isolated the page containing the table with two Next Page section breaks.

What happens if you do not want a separate page for changing the format?
When you want the change of format to be applicable, say on a paragraph within the page, you need to apply the Continuous section break.
Continuous Section Break
This is the second type of section break in the menu. This break maintains a continuity in the text flow, but allows you to change the formatting to a section in the same page.
For instance, by isolating a certain section of the text, say, one or more paragraphs, with a Continuous section break at either end, you can change them to columnar text.

The last two types of Section Breaks, Even Page and Odd Page, pertain more to printing than to the visible aspects of a document.
Let us consider the Even Page Section break first.
Even Page Section Break
When you insert an Even Page section break, Word creates the break at the cursor and pushes the rest of the text to the next page, and numbers it with an even number.
If you were already on an even-numbered page when you inserted the break, the next page will be the next even number, and Word will skip the odd numbers in between.

What happens if you want the new page to have an odd number rather than an even one? You use the next type of break, the Odd Page Section Break.
Odd Page Section Break
This is the last type of break Word offers. This is identical to the Even Page section break, only it numbers the new page with an odd number rather than an even number.
To illustrate, if you have pages running serially in your document as:
[Page #1] [Page #2] [Page #3] [Page #4] [Page #5] [Page #6],
When you insert an Even Page Section Break between Page #3 and #4, the sequence will change as below:

When you insert an Even Page Section break between Page #2 and #3, the sequence changes as below:

When you insert an Odd Page Section Break between Page #3 and #4, the sequence changes as below:

When you insert an Odd Page Section break between Page #2 and #3, the sequence change as below:

Conclusion
Use the different page breaks and section breaks judiciously, and you can make your document not only aesthetically pleasing, but also suitable for printing it the way you want. Our discussion above should help you understand the difference between different types of page breaks and section breaks.
Let’s talk about the various ways we can control how text wraps (or doesn’t wrap) on a web page. CSS gives us a lot of tools to make sure our text flows the way we want it to, but we’ll also cover some tricks using HTML and special characters.

Protecting Layout
Normally, text flows to the next line at “soft wrap opportunities”, which is a fancy name for spots you’d expect text to break naturally, like between words or after a hyphen. But sometimes you may find yourself with long spans of text that don’t have soft wrap opportunities, such as really long words or URLs. This can cause all sorts of layout issues. For example, the text may overflow its container, or it might force the container to become too wide and push things out of place.
It’s good defensive coding to anticipate issues from text not breaking. Fortunately, CSS gives us some tools for this.
Getting Overflowing Text to Wrap
Putting overflow-wrap: break-word on an element will allow text to break mid-word if needed. It’ll first try to keep a word unbroken by moving it to the next line, but will then break the word if there’s still not enough room.
See the Pen overflow-wrap: break-word by Will Boyd (@lonekorean) on CodePen.
There’s also overflow-wrap: anywhere, which breaks words in the same manner. The difference is in how it affects the min-content size calculation of the element it’s on. It’s pretty easy to see when width is set to min-content.
.top {
  width: min-content;
  overflow-wrap: break-word;
}.bottom {
  width: min-content;
  overflow-wrap: anywhere;
}
See the Pen overflow-wrap + min-content by Will Boyd (@lonekorean) on CodePen.
The top element with overflow-wrap: break-word calculates min-content as if no words are broken, so its width becomes the width of the longest word. The bottom element with overflow-wrap: anywhere calculates min-content with all the breaks it can create. Since a break can happen, well, anywhere, min-content ends up being the width of a single character.
Remember, this behavior only comes into play when min-content is involved. If we had set width to some rigid value, we’d see the same word-breaking result for both.
Breaking Words without Mercy
Another option for breaking words is word-break: break-all. This one won’t even try to keep words whole — it’ll just break them immediately. Take a look.
See the Pen word-break: break-all by Will Boyd (@lonekorean) on CodePen.
Notice how the long word isn’t moved to the next line, like it would have been when using overflow. Also notice how “words” is broken, even though it would have fit just fine on the next line.
word-break: break-all has no problem breaking words, but it’s still cautious around punctuation. For example, it’ll avoid starting a line with the period from the end of a sentence. If you want truly merciless breaking, even with punctuation, use line-break: anywhere.
See the Pen word-break: break-all vs line-break: anywhere by Will Boyd (@lonekorean) on CodePen.
See how word-break: break-all moves the “k” down to avoid starting the second line with “.”? Meanwhile, line-break: anywhere doesn’t care.
Excessive Punctuation
Let’s see how the CSS properties we’ve covered so far handle excessively long spans of punctuation.
See the Pen Excessive Punctuation by Will Boyd (@lonekorean) on CodePen.
overflow-wrap: break-word and line-break: anywhere are able to keep things contained, but then there’s word-break: break-all being weird with punctuation again — this time resulting in overflowing text.
It’s something to keep in mind. If you absolutely do not want text to overflow, be aware that word-break: break-all won’t stop runaway punctuation.
Specifying Where Words Can Break
For more control, you can manually insert word break opportunities into your text with <wbr>. You can also use a “zero-width space”, provided by the ​ HTML entity (yes, it must be capitalized just as you see it!).
Let’s see these in action by wrapping a long URL that normally wouldn’t wrap, but only between segments.
<!-- normal -->
<p>https://subdomain.somewhere.co.uk</p> <!-- <wbr> -->
<p>https://subdomain<wbr>.somewhere<wbr>.co<wbr>.uk</p>
<!-- ​ -->
<p>https://subdomain​.somewhere​.co​.uk</p>
See the Pen Manual Word Break Opportunities by Will Boyd (@lonekorean) on CodePen.
Automatic Hyphenation
You can tell the browser to break and hyphenate words where appropriate by using hyphens: auto. Hyphenation rules are determined by language, so you’ll need to tell the browser what language to use. This is done by specifying the lang attribute in HTML, possibly on the relevant element directly, or on <html>.
<p lang="en">This is just a bit of arbitrary text to show hyphenation in action.</p> p {
-webkit-hyphens: auto; /* for Safari */
hyphens: auto;
}See the Pen hyphens: auto by Will Boyd (@lonekorean) on CodePen.
Manual Hyphenation
You can also take matters into your own hands and insert a “soft hyphen” manually with the ­ HTML entity. It won’t be visible unless the browser decides to wrap there, in which case a hyphen will appear. Notice in the following demo how we’re using ­ twice, but we only see it once where the text wraps.
<p lang="en">Magic? Abraca­dabra? Abraca­dabra!</p>See the Pen Soft Hyphen by Will Boyd (@lonekorean) on CodePen.
hyphens must be set to either auto or manual for ­ to display properly. Conveniently, the default is hyphens: manual, so you should be good without any additional CSS (unless something has declared hyphens: none for some reason).
Preventing Text from Wrapping
Let’s switch things up. There may be times when you don’t want text to wrap freely, so that you have better control over how your content is presented. There are a couple of tools to help you with this.
First up is white-space: nowrap. Put it on an element to prevent its text from wrapping naturally.
See the Pen white-space: nowrap by Will Boyd (@lonekorean) on CodePen.
Preformatting Text
There’s also white-space: pre, which will wrap text just as you have it typed in your HTML. Be careful though, as it will also preserve spaces from your HTML, so be mindful of your formatting. You can also use a <pre> tag to get the same results (it has white-space: pre on it by default).
<!-- the formatting of this HTML results in extra whitespace! -->
<p>
What's worse, ignorance or apathy?
I don't know and I don't care.
</p><!-- tighter formatting that "hugs" the text -->
<p>What's worse, ignorance or apathy?
I don't know and I don't care.</p>
<!-- same as above, but using <pre> -->
<pre>What's worse, ignorance or apathy?
I don't know and I don't care.</pre>
p {
  white-space: pre;
}pre {
  /* <pre> sets font-family: monospace, but we can undo that */
  font-family: inherit;
}
See the Pen Preformatted Text by Will Boyd (@lonekorean) on CodePen.
A Break, Where Words Can’t Break?
For line breaks, you can use <br> inside of an element with white-space: nowrap or white-space: pre just fine. The text will wrap.
But what happens if you use <wbr> in such an element? Kind of a trick question… because browsers don’t agree. Chrome/Edge will recognize the <wbr> and potentially wrap, while Firefox/Safari won’t.
When it comes to the zero-width space (​) though, browsers are consistent. None will wrap it with white-space: nowrap or white-space: pre.
<p>Darth Vader: Nooooooooooooo<br>oooo!</p><p>Darth Vader: Nooooooooooooo<wbr>oooo!</p>
<p>Darth Vader: Nooooooooooooo​oooo!</p>
See the Pen white-space: nowrap + breaking lines by Will Boyd (@lonekorean) on CodePen.
Non-Breaking Spaces
Sometimes you may want text to wrap freely, except in very specific places. Good news! There are a few specialized HTML entities that let you do exactly this.
A “non-breaking space” ( ) is often used to keep space between words, but disallow a line break between them.
<p>Something I've noticed is designers don't seem to like orphans.</p><p>Something I've noticed is designers don't seem to like orphans.</p>
See the Pen Non-Breaking Space by Will Boyd (@lonekorean) on CodePen.
Word Joiners and Non-Breaking Hyphens
It’s possible for text to naturally wrap even without spaces, such as after a hyphen. To prevent wrapping without adding a space, you can use ⁠ (case-sensitive!) to get a “word joiner”. For hyphens specifically, you can get a “non-breaking hyphen” with ‑ (it doesn’t have a nice HTML entity name).
<p>Turn right here to get on I-85.</p> <p>Turn right here to get on I-⁠85.</p>
<p>Turn right here to get on I‑85.</p>
See the Pen Word Joiners and Non-Breaking Hyphens by Will Boyd (@lonekorean) on CodePen.
CJK Text and Breaking Words
CJK (Chinese/Japanese/Korean) text behaves differently than non-CJK text in some ways. Certain CSS properties and values can be used for additional control over the wrapping of CJK text specifically.
Default browser behavior allows words to be broken in CJK text. This means that word-break: normal (the default) and word-break: break-all will give you the same results. However, you can use word-break: keep-all to prevent CJK text from wrapping within words (non-CJK text will be unaffected).
Here’s an example in Korean. Note how the word “자랑스럽게” does or doesn’t break.
See the Pen CJK Text + word-break by Will Boyd (@lonekorean) on CodePen.
Be careful though, Chinese and Japanese don’t use spaces between words like Korean does, so word-break: keep-all can easily cause long overflowing text if not otherwise handled.
CJK Text and Line Break Rules
We talked about line-break: anywhere earlier with non-CJK text and how it has no problem breaking at punctuation. The same is true with CJK text.
Here’s an example in Japanese. Note how “。” is or isn’t allowed to start a line.
See the Pen CJK Text + line-break by Will Boyd (@lonekorean) on CodePen.
There are other values for line-break that affect how CJK text wraps: loose, normal, and strict. These values instruct the browser on which rules to use when deciding where to insert line breaks. The W3C describes several rules and it’s possible for browsers to add their own rules as well.
Worth Mentioning: Element Overflow
The overflow CSS property isn’t specific to text, but is often used to ensure text doesn’t render outside of an element that has its width or height constrained.
.top {
  white-space: nowrap;
  overflow: auto;
}.bottom {
  white-space: nowrap;
  overflow: hidden;
}
See the Pen Element Overflow by Will Boyd (@lonekorean) on CodePen.
As you can see, a value of auto allows the content to be scrolled (auto only shows scrollbars when needed, scroll shows them always). A value of hidden simply cuts off the content and leaves it at that.
overflow is actually shorthand to set both overflow-x and overflow-y, for horizontal and vertical overflow respectively. Feel free to use what suits you best.
We can build upon overflow: hidden by adding text-overflow: ellipsis. Text will still be cut off, but we’ll get some nice ellipsis as an indication.
p {
  white-space: nowrap;
  overflow: hidden;
  text-overflow: ellipsis;
}
See the Pen text-overflow: ellipsis by Will Boyd (@lonekorean) on CodePen.
Bonus Trick: Pseudo-Element Line Break
You can force a line break before and/or after an inline element, while keeping it as an inline element, with a little bit of pseudo-element trickery.
First, set the content of a ::before or ::after pseudo-element to 'A', which will give you the new line character. Then set white-space: pre to ensure the new line character is respected.
<p>Things that go <span>bump</span> in the night.</p>span {
background-color: #000;
}span::before, span::after {
content: 'A';
white-space: pre;
}
See the Pen Pseudo-Element Line Breaks by Will Boyd (@lonekorean) on CodePen.
We could have just put display: block on the <span> to get the same breaks, but then it would no longer be inline. The background-color makes it easy to see that with this method, we still have an inline element.
Bonus Notes
- There’s an older CSS property named
word-wrap. It’s non-standard and browsers now treat it as an alias foroverflow-wrap. - The
white-spaceCSS property has some other values we didn’t cover:pre-wrap,pre-line, andbreak-spaces. Unlike the ones we did cover, these don’t prevent text wrapping. - The CSS Text Module Level 4 spec describes a
text-wrapCSS property that looks interesting, but at the time of writing, no browser implements it.
Time to “Wrap” Things Up
There’s so much that goes into flowing text on a web page. Most of the time you don’t really need to think about it, since browsers handle it for you. For the times when you do need more control, it’s nice to know that you have a lot of options.
Writing this was definitely a rabbit hole for me as I kept finding more and more things to talk about. I hope I’ve shown you enough to get your text to break and flow just the way you want it.
Thanks for reading!