
I am writing a report in a 2 column page format. Now I want to insert a rather large picture that requires to use full width of the page and cut the columns horizontally. How can I achiveve this? Please see the images below for what I mean :


asked Feb 26, 2013 at 12:40
![]()
3
If you’re looking to have your text read left to right columns above the image, and begin left to right again after the image (rather than left top to bottom, right top to bottom), all you need to do is add two breaks.
- Insert your image,
Insert > Picture, thenFormat > Wrap Text > Top & Bottomwill insert your image and apply the basic, proper formatting. - Insert a Column Break in the left column where you want your image (this forces the text to the next column).
- Insert a Continous Section Break in the right column immediately above the image’s location (this pushes the text back to the left column, but below your image).
In the sample image, there is a column break after paragraph 2 (before image) and a section break (continuous) after paragraph 4 (before image).

![]()
Ivo Flipse
24.6k31 gold badges102 silver badges147 bronze badges
answered Feb 26, 2013 at 13:23
![]()
davdav
9,8365 gold badges29 silver badges50 bronze badges
1
Select picture -> Wrap Text -> Top and Bottom
answered Feb 26, 2013 at 13:22
![]()
Ben WelmanBen Welman
5794 silver badges2 bronze badges
1
There is one more step for Ivo Flipse’s answer:
After inserting the image, drag it to the position you want and make it as big as wish, then apply step 2 and 3, break column, and continuous.
you might find the break column and continuous tools in page layout ribbon.
answered Jul 24, 2015 at 7:27
![]()
1
Just create a text box and put the image in there, and text will wrap around and you can move it to wherever you want.
answered Sep 5, 2019 at 12:53
![]()
4 Answers
- Insert your image, Insert > Picture , then Format > Wrap Text > Top & Bottom will insert your image and apply the basic, proper formatting.
- Insert a Column Break in the left column where you want your image (this forces the text to the next column).
How do I place pictures side by side in Word?
Click and drag the first image to where you want it on the page. Release the mouse button. Click and drag the second image next to the first, where you want it to align. As the sides come close to each other, Word will automatically snap the second image into place next to the first.
How do I make a 2×2 picture in Word?
The Format menu can be activated by double-clicking the photo in your document. After clicking Crop, select Aspect Ratio and then 1:1. This ensures that the edited photo will always have a square shape. You have now activated the cropping feature.
How do I make two columns in Word without a table?
Right click and choose “AutoFit”. Then choose “Fixed Column Width” on the extend menu. If you want no border for the table, just select it and click “Borders” under “Design” tab. Then choose “No Border”.
How do I split text in Word?
How to Split Text to Columns
- Open the document.
- Select the Page Layout tab.
- In Page Setup group click the Columns command.
- It displays a list of options to split text into columns.
- Select the desired option.
How do I insert a picture into a table in Word?
Click inside the cell where you want to position the picture file (first cell in the first row for this example). Click the Insert tab. Click Pictures in the Illustrations group. Use the Insert Pictures dialog to find and insert the picture.
How do you wrap text in Word?
Go to Picture Format or Shape Format and select Arrange > Wrap Text. If the window is wide enough, Word displays Wrap Text directly on the Picture Format tab. Choose the wrapping options that you want to apply. For example, In Line with Text, Top and Bottom, and Behind Text.
How do you remove background in Word?
On the toolbar, select Picture Format > Remove Background, or Format > Remove Background.
How can I put my signature on a Word document?
Insert a signature line
- Click where you want the line.
- Click Insert > Signature Line.
- Click Microsoft Office Signature Line.
- In the Signature Setup box, you can type a name in the Suggested signerbox. You can also add a title in the Suggested signer’s title box.
- Click OK. The signature line appears in your document.
How can I remove a page break in word?
Remove a page break from a Word document
- On the Home tab, in the Paragraph group, click Show/Hide to show all formatting marks including page breaks.
- Double-click the page break to select it, then press Delete.
- Click Show/Hide again to hide the remaining formatting marks in the document.
How do I split text in word?
How to Split Text to Columns
- Open the document.
- Select the Page Layout tab.
- In Page Setup group click the Columns command.
- It displays a list of options to split text into columns.
- Select the desired option.
How do you change the theme color in Word?
On the Page Layout tab in Excel or the Design tab in Word, click Colors, and then click Customize Colors. Click the button next to the theme color you want to change (for example, Accent 1 or Hyperlink), and then pick a color under Theme Colors.
How do I insert watermark in Word?
On the Design tab, select Watermark. In the Insert Watermark dialog, select Text and either type your own watermark text or select one, like DRAFT, from the list. Then, customize the watermark by setting the font, layout, size, colors, and orientation. If you don’t see the watermark, click View > Print Layout.
How do I make a picture document?
Upload your image from your computer, phone or a cloud service like GDrive or Dropbox. Then, choose the document format you need from the dropdown menu. Afterwards, you can use the optional settings, if you wish. If not, click on “Convert” and download the document you chose.
How do I mail merge in Word?
To do this, follow these steps:
- Click Edit individual letters.
- In the Merge to New Document dialog box, select the records that you want to merge.
- Click OK. …
- Scroll to the information that you want to edit, and then make your changes.
- Print or save the document just as you would any regular document.
How do you Format a picture in Word?
Select the image you want to crop, then click the Format tab. Click the Crop drop-down arrow. Hover over Crop to Shape, then select the desired shape from the drop-down menu. The image will be cropped to the chosen shape.
How do I write over an image in Word?
On the Insert tab, in the Text group, click WordArt, click the style of text you want, and then type your text. Click the outside edge of the WordArt to select it, drag the text over your photo and then, if you want, rotate the text to the angle that works best for your photo.
How do I fill an image in Word?
Method 1: Fit a Picture by Dragging and Resizing
- Step 1: Open an MS Word document. First, you have to open up a Word document. …
- Step 2: Insert the image. …
- Step 3: Select the Text Wrap Style. …
- Step 4: Drag and resize the image.
How do I make an image transparent?
Double-click the picture, and when Picture Tools appears, click Picture Tools Format > Color. Click Set Transparent Color, and when the pointer changes, click the color you want to make transparent.
How do you remove signatures from PDF?
The steps are:
- Open the PDF file using Adobe Reader.
- Go to ‘Tools’ and select ‘content’
- Select Objects.
- Then, click on the signature field.
- Choose the delete button
How can I copy a signature from a photo?
Here are the steps to scan signature from image
- Find your signature from an image. From your recent photos or on your phone gallery, choose an image that contains your signature. …
- Choose a scanner app. …
- Scan the image. …
- Crop the scanned image. …
- Use the scanned signature.
How to have both paragraph and two columns in a single document in Microsoft Word
![]()
Download Article
A user-friendly guide to create two separate text columns on Microsoft Word
![]()
Download Article
- Using a Computer
- Using the Mobile App
- Q&A
- Tips
|
|
|
Do you want to split text into multiple columns in Microsoft Word? With the «Columns» feature, you can easily do so in a few simple steps. With the desktop version of Word, you’ll be able to create columns with selected text. On mobile, you’ll need to change the whole document layout. This wikiHow will show you how to make two or more columns in your Microsoft Word document using your Windows, Mac, iPhone, or Android device.
Things You Should Know
- On desktop, highlight the text you want to split. Click «Layout» → «Columns» → «Two.»
- On mobile, tap ••• → «Home» → «Layout» → «Columns» → «Two».
- You can only split selected text on desktop. Creating columns on mobile will change the entire document layout.
-

1
Open the Microsoft Word document you want to edit. Find the Word document you want to edit on your computer, and double-click on its icon to open it.[1]
- If you don’t have Microsoft Word on your Windows or Mac computer, you can download it or use the free web version at https://www.office.com.
- You can also add images to your document if you’re planning to create a «news column» type document.
-
2
Select all the text you want to split into columns. Click the beginning of the text you want to edit, and drag your mouse until the end of it. Selected parts will be highlighted.
- If you want to select the whole document, you can use a keyboard shortcut.
- On Mac, press Command + A.
- On Windows, press CTRL + A.
Advertisement
- If you want to select the whole document, you can use a keyboard shortcut.
-
3
Click the Layout tab at the top. This button is located above the toolbar at the top of your document.
- Depending on your version of Word, this button may also be labeled Page Layout.
-
4
Click the Columns button on the Layout toolbar. This looks like a rectangle with horizontal lines divided in two sets.
- A drop-down menu will open.
-
5
Select Two on the drop-down menu. This will split the selected text into two columns.
- Alternatively, you can select another option here, and create even more columns. You can select: One (default), Two, Three, Left, Right, or More Columns.
-
6
Change the size of your columns (optional). You can click and drag the edges of the ruler at the top of your document to change the size of your columns.
- If you don’t see the ruler, click the View tab, then click the box next to Ruler in the Show section.
- Make sure you still have your column text selected when you adjust the size.
- This is an optional adjustment. If you prefer not to change the column sizes, your columns will be equal in size by default.
- Be sure to save your Word document when you’re finished.


Advertisement
-
1
Open a document in the Microsoft Word app. This looks like a blue notebook next to a W. Microsoft Word is available for iOS in the App Store and for Android in the Google Play Store.
- Tap Blank document to open a new document or tap a file to open an existing document.
- You can’t put specific text into two columns on the mobile app. This method will adjust the entire document’s layout without needing to select text.
-
2
Tap ••• . This can be found above the keyboard, to the right.
- If you don’t see your keyboard, tap the document to bring it up.
- A new menu will open.
-
3
Tap Home. This will be to the left of the formatting window.
- A drop-down menu will open.
-
4
Tap Layout. You’ll see a list of options you can make to your page layout.
-
5
Tap Columns. This will be next to the icon of horizontal lines divided in two sets.
-
6
Tap Two. This will split the selected text into two columns.
- Alternatively, you can select another option here, and split your text into more columns. You can select: One (default), Two, Three, Left, or Right.
- Your page layout will now have two columns. When you enter text, it will fill the left column first, then continue onto the right column.


Advertisement
Add New Question
-
Question
My layout key does not have the option for columns. How do I add that?

You are probably using the web version. It doesn’t have a lot of special options. The best solution is just to get the Word app and try again.
-
Question
How to create a two columns with separate texts?
This is very simple. When typing in each column, type different things. If it tries to connect them, just start a new paragraph.
-
Question
I want to change back to a full document after the columns. Then change back to columns and so forth (Recipe title and serving size, then columns for actual recipe; then another recipe on same page.)
At the bottom of the advanced column settings, there is a dropdown box labeled «Apply to:». Set the column number and click this to select the section you want to update. The easiest option is to highlight a section and select the «selected text» option.
See more answers
Ask a Question
200 characters left
Include your email address to get a message when this question is answered.
Submit
Advertisement
Thanks for submitting a tip for review!
Advertisement
About This Article
Thanks to all authors for creating a page that has been read 384,324 times.
Is this article up to date?
Insert your image, Insert > Picture , then Format > Wrap Text > Top & Bottom will insert your image and apply the basic, proper formatting. Insert a Column Break in the left column where you want your image (this forces the text to the next column).
How do I change the orientation of one page in Word Mac 2020?
To start a new page, from the Insert tab, select Page Break. In the Page Layout tab, from the Margins drop-down menu, select Custom Margins…. In the Page Setup window, click the Margins tab. Under “Orientation”, change the page orientation to the desired setting (Portrait or Landscape).
How do you make an outline thicker?
3 Answers. Yes, you can make the outlined path thicker. Simplest way is to just apply a stroke on the outlines. This will then be added to your stroke (so remember it needs to be 1/2 the additional weight you need).
How do I change the thickness of my computer line?
Word
- Click the line that you want to change, and then click the Format tab.
- Under Shape Styles, click the arrow next to Line. , point to Weights, and then click the width that you want.
How do you increase line thickness in SolidWorks?
To assign line thickness or style:
- Click Options (Standard toolbar) and select the Document Properties tab.
- Set style and thickness for the following: All dimension leaders. All annotation leaders. Frames for geometric tolerances, balloons, and datums. Style. Thickness.
How will you change the thickness of selected tool?
How to Change Drawing Tool Line Thickness
- Open Drawing tool menu. Click the artist’s palette icon.
- Add drawing to chart. Select desired drawing tool.
- Click on the drawing tool on the chart.
- Choose Edit.
- Set line thickness.
- Set as Default line thickness (Optional)
- Repeat for any drawing tools you want to change.
How do I change the thickness of a line in Solidworks 2019?
To set line thickness:
- Click File > Print.
- In the dialog box, under Document Options, click Line Thickness.
- In Line thickness print settings, type a value for the line weights (Thin, Normal, Thick, and five additional line thickness settings).
- Click OK.
- Click OK to close the Print dialog box and print the document.
How do I change dimension thickness in Solidworks?
To set line thickness and style:
- Click Options , and then select the Document Properties tab.
- Select the type of annotation or dimension for which you intend to customize the frame or leader line thickness.
- Select a thickness from the list, or select Custom Size and enter a value for the custom thickness.
How do I make lines darker in Solidworks?
Hi: You can select a edge , right click and change the color and thickness. This only applicable in drawing mode. Tools/Options/Color or look for line quality and thickness.
Can you change color of sketch lines in SolidWorks?
To change the color of the sketch in your display, go to the FeatureManager design tree, right click Sketch > Sketch Color. This will take you to the Sketch/Curve Color property manager (see image below). Inside the property manager, you can set any desired color for the sketch.
How do I change the line format in SolidWorks?
To change the format of an existing edge or sketch entity:
- Select the edge or sketch entity you want to change. To select more than one entity at a time, hold Ctrl as you select.
- Click a tool on the Line Format toolbar and select a format from the menu. The new format is applied to the selected entities.
How do I change the color of a leader in SolidWorks?
You can change the layer of the note to one of the appropriate colour which will also change the leader, or use the “Line Format” tool bar “Line colour” tool which will change both the note and leader to the selected colour.
Why are dimensions GREY in Solidworks?
One other significant reason that dimensions are gray is due to the layer properties. If you place dimensions on a separate layer so you can easily hide them, you may also affect the color.
What do blue dimensions mean in Solidworks?
are to be created on this layer using the layer settings for items. In the system colors all dims, annotations, text, etc. are set to this blue color. Dangling dimensions are set to red.
How do you color something in Solidworks?
On the Document Properties tab, click Model Display. Under Model / feature colors, select Shading. Click Edit and select a color from the Color palette or click Define Custom Colors and define a color of a new shade or hue.
Работа с колонками текста в Word
Из этой инструкции вы узнаете как использовать колонки в текстовых документах, как выравнивать текст в колонках и менять расстояние между ними, как добавлять разрывы между колонками.
Зачем использовать колонки
Чаще всего элемент колонок используют в газетах, журналах, брошюрах и флаерах. В частности, для печатного издания формат с колонками выглядит более привлекательно и профессионально.
Вы можете создать одну, две или три колонки одинакового размера. Затем при наборе текста вы автоматически перейдете к следующей колонке, когда закончится предыдущая, если только вручную не используете вставку окончания колонки. Вы можете задавать ширину колонок и использовать привычное форматирование, которое используется и в обычных текстовых документах.
Онлайн-курс «Word от простого к сложному» Онлайн-курс «Word от простого к сложному» Освойте работу в главном текстовом редакторе на высоком уровне. Неважно новичок вы или уже работаете с Word, с нашим курсом вы станете настоящим гуру документов! Подробнее
Добавление колонок
- Выделите текст, который вы хотите преобразовать в колонки.
- В ленточном меню выберите вкладку «Макет», секцию «Параметры страницы».
- Нажмите на кнопку «Колонки».
- Из выпадающего списка выберите желаемое количество колонок (например, три).
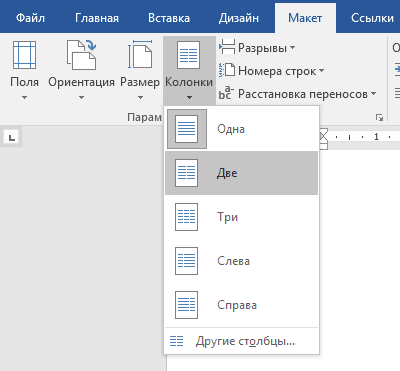
Обратите внимание, что если предварительно не выделять конкретную область текста, который вы хотите обратить в колонки, то весь текст, следующий за курсором, преобразуется в колонки.
Форматирование колонок
При создании колонок по умолчанию они имеют выравнивание, аналогичное тому, что было в тексте. И часто это выравнивание по левому краю. Для колонок это не лучший вариант, поэтому лучше отформатировать по ширине.
- Выделяем наши колонки.
- В ленточном меню выбираем вкладку «Главная», секция «Абзац».
- Нажимаем на значок «Выровнять по ширине» (аналогичного действия можно добиться нажатием сочетания клавиш Ctrl + J).
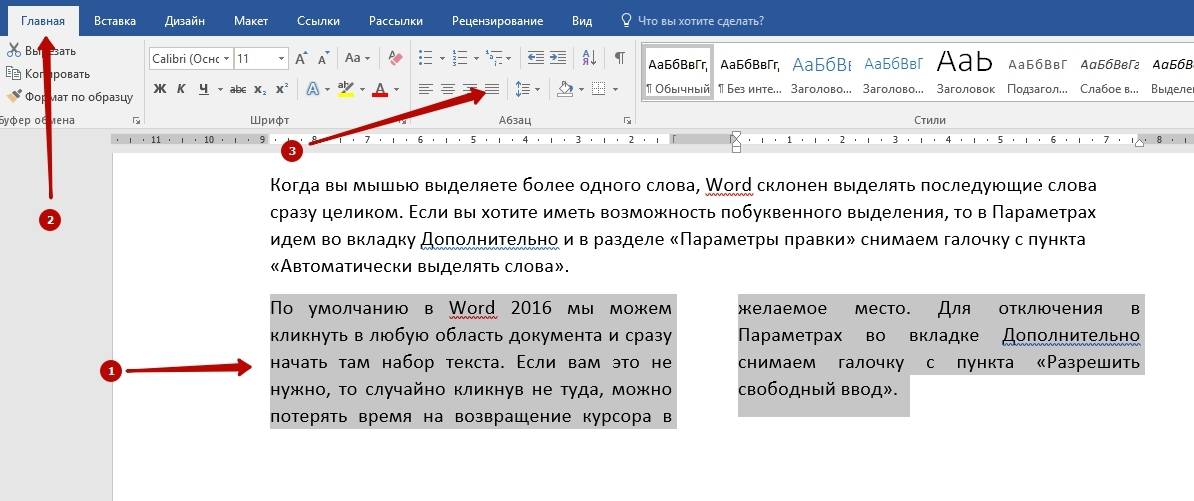
Текст расположился равномерно внутри колонок. И более наглядны стали расстояния между колонками. Эти значения можно поменять.
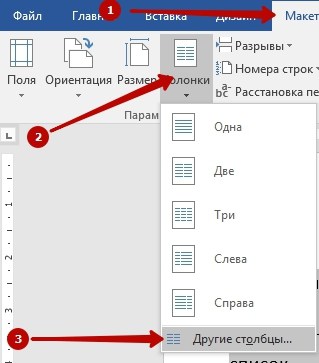
- Поставьте курсор в любую область внутри колонок, которые вы хотите отформатировать.
- Из ленточного меню выберите вкладку «Макет», область «Параметры страницы».
- Кликните на кнопку «Колонки» и затем выберите пункт «Другие столбцы». Откроется диалоговое окно «Колонны».
- Введите значения для ширины колонок и промежутка между ними. Например, в качестве промежутка укажите 0.2, чтобы расстояния стали меньше.
- Нажмите Ок и оцените изменения. При необходимости проделайте путь заново и измените значения.
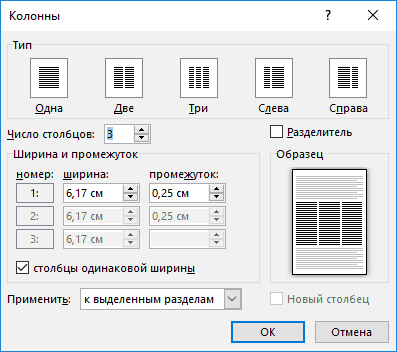
Если вы хотите задать колонки различной ширины, то это делается в том же диалоговом окне «Колонны». Чтобы задать каждой колонке индивидуальную ширину, предварительно нужно снять галочку с чекбокса «Столбцы одинаковой ширины». После этого для редактирования станут доступны значения ширины и промежутка для каждой из колонок.
Если же вам в принципе нужны только две колонки – одна толстая, другая тоньше, то при создании колонок через кнопку «Колонки» просто выберите значение «Слева» или «Справа», в зависимости от того, где должна расположиться колонка меньшего размера.
Работа с картинками в Word
Возможности Microsoft Word не ограничиваются созданием и редактированием текстовых документов. Программа имеет неплохой набор инструментов для работы с графикой – можно не только добавлять рисунки и фото в текст, но и изменять их.
Как в Word вставить картинку
Некоторые графические элементы – таблицы, диаграммы, фигуры, надписи – легко создать непосредственно в Word или импортировать из других программ.
В документ можно вставить изображение любого формата, включая bmp, gif, jpeg, tiff, qtif, emf, wmf. Это легко и просто осуществить несколькими способами.
Способ 1
- Открыть папку, в которой расположен рисунок.
- Выделить его, кликнув левой кнопкой мышки.
- Нажать на клавиатуре комбинацию клавиш Ctrl+C.
- Перейти в документ. Установить курсор в той части страницы, куда будет добавлено изображение.
- Нажать сочетание клавиш Ctrl+V.


Способ 2
- Открыть рисунок в графическом редакторе (Microsoft Office, встроенное средство Windows или любом другом) и скопировать его. Либо найти нужное изображение в интернете, открыть его в новой вкладке. Клацнуть по нему правой кнопкой мышки и выбрать опцию «Копировать картинку».
- В документе установить курсор, щелкнуть правой кнопкой мышки и выбрать параметр вставки. Но проще всего использовать комбинацию Ctrl+V.


Способ 3
- Установить курсор в том месте, куда будет добавлено изображение.
- Перейти на вкладку «Вставка» и выбрать «Рисунок
- В открывшемся окне указать путь расположения графического объекта.
- Выделить его и нажать кнопку «Вставить» или дважды щелкнуть по нему левой кнопкой мышки.
Способ 4
Можно добавить изображение из коллекции Microsoft, которая очень обширна:
- Поставить курсор в нужном месте документа.
- Во вкладке «Вставка» выбрать инструмент «Картинка».
- Справа отобразится панель поиска. Отметить галочкой пункт «Включить контент сайта Office».
- В поисковую строку ввести название, нажать «Enter» или кнопку «Начать».
- Выбрать изображение и кликнуть по нему.
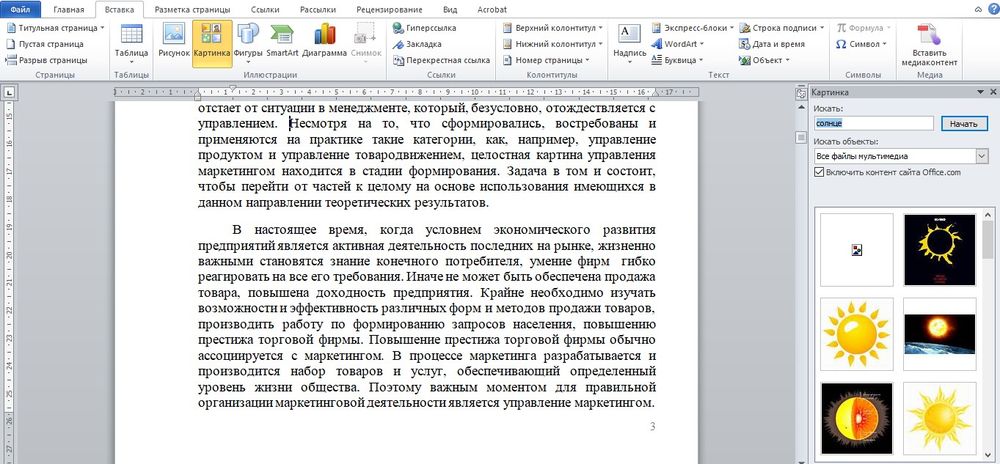
Таким же образом добавляется любая фигура, диаграмма, снимок, SmartArt.
Редактирование
После вставки картинки (но только если она выделена) на верхней панели появляется вкладка «Формат» – работа с рисунками.
Здесь можно задать яркость, контрастность, установить цвет, наложить тени, отражение или свечение, выбрать положение объекта на странице и многое другое.
Набор инструментов для работы с графикой во всех версиях Microsoft Word отличаются незначительно.
Как в Word повернуть картинку
Для поворота объекта следует выполнить следующие шаги:
- Выделить изображение, перейти во вкладку «Формат».
- В разделе «Упорядочить» найти опцию «Повернуть».
- Кликнуть по ней левой кнопкой мышки для вызова меню.
- Выбрать вариант поворота или отражения объекта.
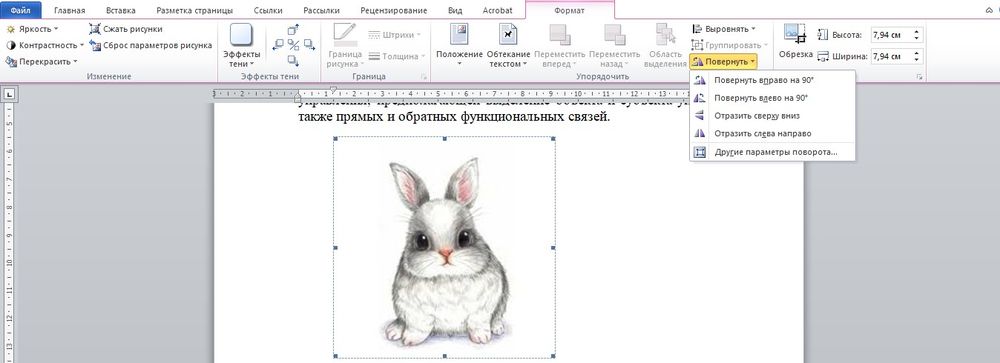
При редактировании обычно не приходится задействовать другие параметры поворота.
Как в Word обрезать картинку
Делается это в несколько кликов:
- Выделить рисунок.
- В разделе «Размер» вкладки «Формат» найти опцию «Обрезка».
- Кликнуть по ней левой кнопкой мышки. Возле курсора появится инструмент обрезки.
- Навести его на любую из точек выделения, нажать левую кнопку и потянуть в нужную сторону.
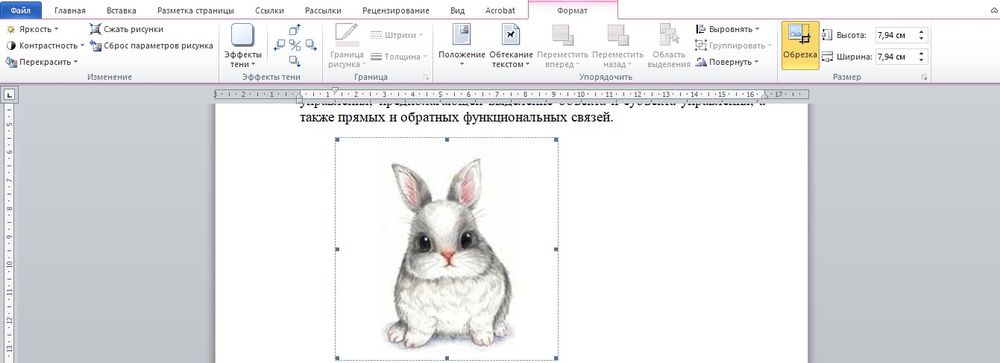
Для более точной обрезки необходимо:
- Открыть параметры раздела «Размер», клацнув по значку со стрелкой в правом нижнем углу.
- В диалоговом окне перейти на вкладку «Рисунок».
- Указать значения для обрезки изображения со всех сторон.
- Нажать «Ок».

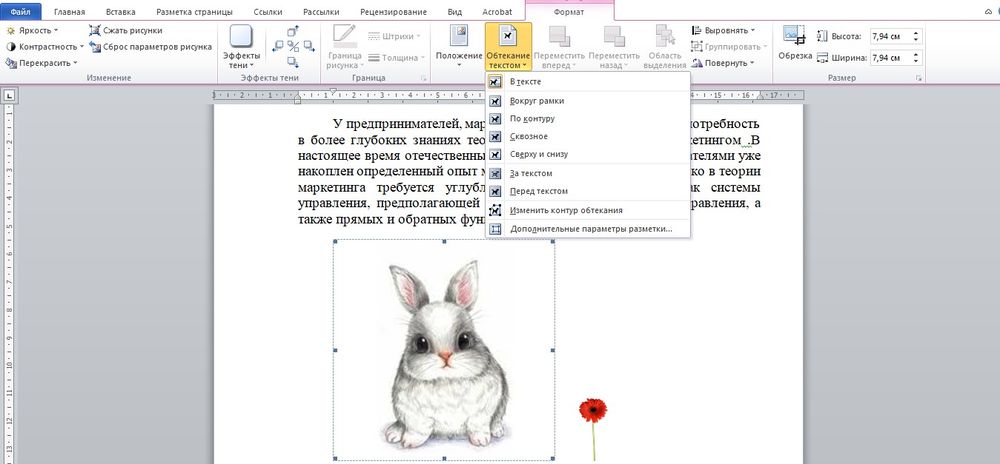
Как в Word наложить картинку на картинку
При вставке изображений стандартным способом они располагаются только один над другим или рядом. Наложить несколько объектов друг на друга возможно несколькими способами.
Чтобы два рисунка гармонично выглядели, один из них должен быть на прозрачном фоне, то есть в формате png.
С помощью «Обтекания текстом»
- Вставить изображения по очереди удобным способом.
- Выделить то, которое будет фоном, клацнув по нему левой кнопкой.
- Во вкладке «Формат» выбрать инструмент «Обтекание…» — «За текстом».
- Повторить действия со вторым рисунком, только выбрать вариант «Перед текстом».
- Перетащить левой кнопкой второй объект на фон.

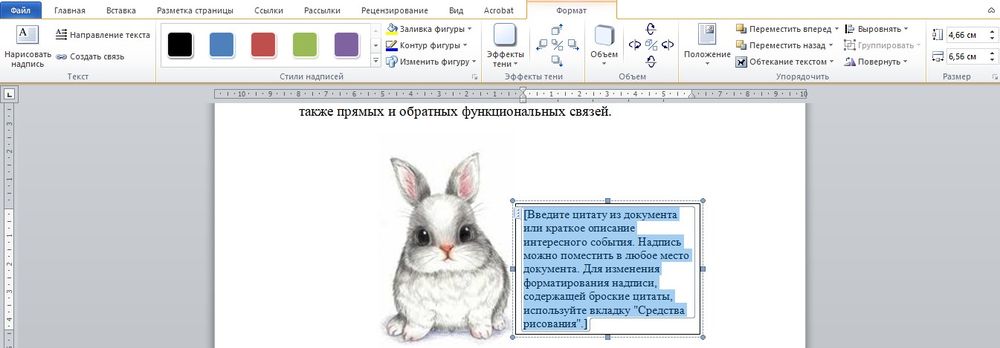
С помощью «Надписи»
- Во вкладке «Вставка» найти раздел «Текст».
- Выбрать инструмент «Надпись» — подойдет простая, или можно нарисовать ее.
- В месте, где установлен курсор, появится рамка с текстом, которая перемещается по странице левой кнопкой мышки.
- Выделить и удалить текст кнопкой «Del» или «Backspace».
- Вставить внутрь пустой рамки картинку, используя опцию «Вставка» — «Рисунок» или комбинацию клавиш Ctrl+C и Ctrl+V.
- Второе изображение можно наложить на фон.
- Для скрытия рамки и белых полей нужно выделить объект и перейти во вкладку «Формат». В контуре и заливке фигуры установить вариант «Нет».
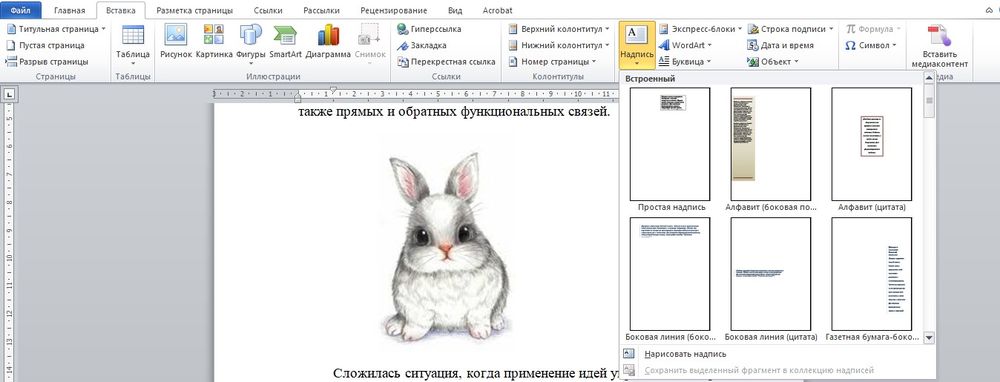

Как в Word вставить текст на картинку
Иногда требуется сделать так, чтобы текст располагался не под или над рисунком, а прямо на нем. Эта опция обычно актуальна для объяснения определенных фрагментов изображения или просто красивой надписи. Написание текста на графическом элементе осуществляется двумя способами.
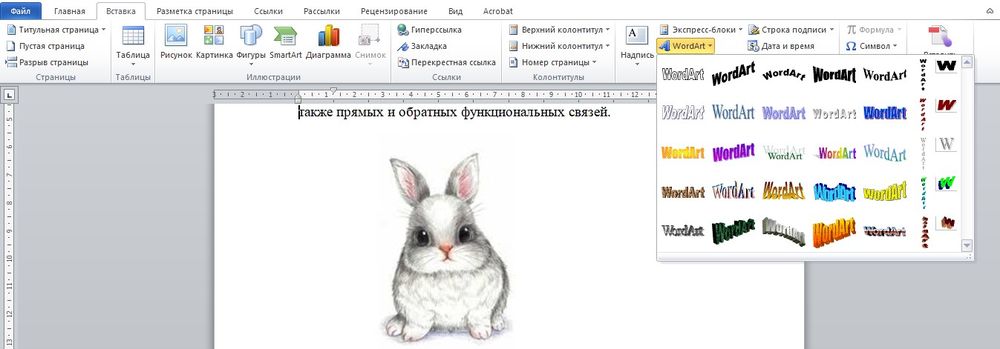
С помощью «WordArt»
- После добавления рисунка в документ перейти во вкладку «Вставка», в разделе «Текст» выбрать инструмент «WordArt».
- В списке найти подходящий стиль и кликнуть по нему.
- На экране появится диалоговое окно. Нужно удалить пример, написать желаемую фразу, выбрать шрифт и размер, установить курсивное или жирное начертание.
- Нажать «Ок».
- Во вкладке «Формат» настраивается оформление надписи: заливка, контур, тени и т.д. Здесь также можно изменить текст.
- Задать для надписи формат обтекания – «Перед текстом».
- Передвинуть готовую надпись на рисунок.


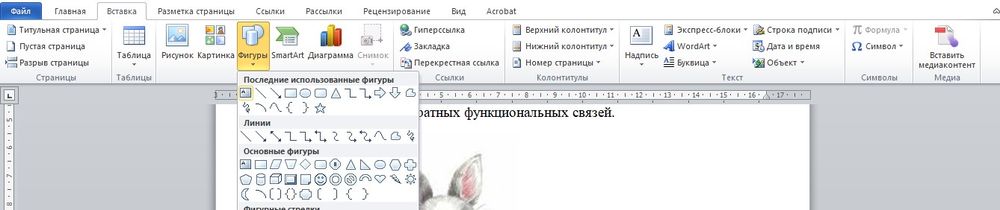
С помощью «Фигуры»
- Во вкладке «Вставка» раскрыть список с фигурами.
- Найти вариант «Надпись» и клацнуть по нему.
- На экране вместо курсора появится знак в виде «+».
- Левой кнопкой мышки кликнуть по любому месту на рисунке и протянуть прямоугольник до нужного размера.
- Вписать текст, выбрать шрифт, размер, цвет, заливку.
- При желании оформить надпись, используя инструменты во вкладке «Формат».
- Для изменения белого фона прямоугольника и удаления границ в «Заливке фигуры» и «Контуре фигуры» установить вариант «Нет».
- Щелкнуть в любом месте документа для применения изменений.

Не знаете, как в ворде сделать 2 независимые колонки? Если Вам хочется украсить свой документ и разбить материал на 2, 3 или даже 4 колонки, то милости просим к чтению. Помимо обычной разбивки на 2 независимые колонки как научиться писать параллельный текст в Word.
Плюсом Вы научитесь переходить ко второй колонке, сможете объединять 2 колонки в одну. Да и чуть не забыли, Вы также сможете контролировать длину колонок, то есть делать их не на всю страницу.
Как в ворде сделать 2 независимые колонки
Начнем пожалуй с самого сложного. Чтобы писать текст в двух независимых колонка просто следуйте пошаговой инструкции.

После того как Вы открыли вордовский документ, в котором нужно сделать 2 независимые колонки, найдите на главной панели вкладку «Макет»

Перейдя на вкладку «Макет» найдите кнопку «Колонки». Щелкните на неё.
В диалоговом окне выберите «Другие колонки». Несмотря на то, что Вы хотите создать 2 колонки на странице, выбирайте только «Другие колонки». Я понимаю, что там есть вкладка «Два», но это буду зависимые колонки. Для того чтобы создать независимые необходимо перейти во вкладку «Другие».

На рисунке выше можно увидеть большое меню, ничего страшного и сложного там нет. Итак, Вы хотели создать две независимые колонны, правильно? В разделе тип выбираем «Два». В разделе «Ширина и промежуток» Вы можете изменить ширину колонок и определить размер промежутка между ними.
В графе образец можно узреть, как будут примерно выглядеть Ваши колоночки. Теперь поговорим про кнопку «Разделитель», если поставите галочку, то у Вас появится черная линия между колонками. А вот галочка в графе «колонки одинаковой ширины» обеспечивает Вам одинаковый размер колонн. Итак, когда все отредактировано нажимаем «ОК».

Как видно на рисунке сверху у нас уже получилось сделать 2 колонки. Почему включены «невидимые символы» и что это за «разрыв раздела» спросите Вы, наверное. Невидимые символы включены чтобы показать «разрыв раздела», а он поставлен для того, чтобы наш заголовок не делился на две колонки. Как это сделать Вы можете прочитать чуть ниже.
Как перейти на 2 колонку в ворде?
У нас уже готовы с Вами 2 независимые колонки осталось разобраться как перейти с первой на вторую. Чтобы это провернуть нам как раз и понадобиться «разрыв раздела». Где его найти? Ответ внизу.

Ставим курсор на самой нижней строчки первой колонки. Поднимаем глаза на главную панель и находим вкладку «Макет» под макетами находим «Разрывы» и в выпадающем списке выбираем тип разрыва «Колонка». Этот тип разрыва будет перебрасывать на из одной колонки во вторую.
Как после независимых 2 колонок печатать текст?

Теперь чтобы обратно вернуться к первой колонке, необходимо вставить «Разрыв раздела». Он находится там же Макет > Разрывы > Без разрыва.

Теперь когда курсор вернулся в первую колонку нужно перейти в «Макет» > Колонки > Одна

И теперь можно начинать писать, а точнее продолжать писать в одной колонке снова.

Обязательно проверьте разрыв, который должен пропасть после того, как Вы переключили режим на 1 колонку снова. Таким образом Вы можете сделать две колонки в ворде не на всю страницу.
Рубрика FAQ
Это можно сделать двумя способами. Первый мы рассмотрели, он реализуется через «Макет» > «Колонки» > «Другие колонки».
А второй немного проще. Выделите текст, который хотите разделить на два текста, и пройдите в «Макет» > «Колонки» > «Две колонки». Ваш текст автоматически поделится на две половины.
На самом деле нет никакой разницы в каком из вордов Вы будете это делать.
Выше был дан ответ на вопрос «как в ворде сделать 2 независимые колонки», он полностью пошагово отвечает на Ваш.
Интересно, что же Вы собрались излагать там, ну да ладно.
6 колонок к счастью делаются также как и 2. Переходите в «Макет» > «Колонки» > «Другие колонки»
В графе «Число колонок» указывайте 6 и не забудьте настроить их ширину.
In this article, we will demonstrate you 3 effective ways to create a two-column Word document where the first column text is independent of the second one.
Naturally, when we create a document in columns, the text of the first column is always linked to that of the next one on the same page. Yet, in some cases, we may need to connect it to the first column text on next page. For example, to compile a translation work in bilateral languages will need to set the source contents and targeted translation in parallel columns on one page. Besides, some people could just prefer to make notes on the column next to the body text.
Luckily, the following 3 methods will enable you to achieve that goal.
Method 1: Insert a Table
- First and foremost, click “Insert” tab.
- Then click “Table”.
- On the drop-down menu, choose a table in size of one row and two columns.

- Next, click the plus sign on the upper-left corner to select the table.
- Right click and choose “Table Properties”.

- Now click “Row” tab first.
- And ensure the “Specify height” box is cleared and the “Allow row to break across pages” box is checked.
- Then click “OK”.

- You can click and drag the line between 2 columns to adjust the column width.

- Then select the table again.
- Right click and choose “AutoFit”.
- Then choose “Fixed Column Width” on the extend menu.

- If you want no border for the table, just select it and click “Borders” under “Design” tab. Then choose “No Border”.


Method 2: Insert Linked Text Boxes
- First off, open a new document.
- Then click “Insert” and click “Blank Page” to insert a new page.

- Now go back to the first page and click “Text Box” under “Insert” tab.
- Choose “Draw Text Box”.

- Next draw 2 text boxes on the first page, with one on the left and another on the right. Here we just name them A1 and B1.
- Repeat step 2 to insert another new page that is page 3. This is to guarantee that you can always to insert a new page on a blank page without cut the link between text boxes.
- On page 2, draw 2 text boxes. Here we name them A2 and B2.
- Make sure all text boxes are empty. Now click on text box A1 and then click “Create Link” under “Format” tab.

- You shall observe that the cursor changes to a shape like teapot. Go to click on the text box you want to link. In this case, it’s text box A2. And then use the same way to link text boxes on the other side, such as B1 and B2. When the first text box is full, contents will automatically flow to the linked one.
- To remove box lines, you can right click on text box line and choose “Format Shape”. Then choose “No line” under “Line Color” and close the “Format Shape” dialog box.


Method 3: Use Text Box in a Two-column Document
For those documents which have the final contents settled, you can take method 3.
- At first, click “Page Setup” tab and then click “Columns”.
- Next choose “Two” to set the document in 2 columns.

- Now put cursor at the end of the first column on the first page and click “Insert” tab.
- Then click “Page Break”. You shall see the second column text on first page just jump to the left on the second page, leaving the right side of the first page in blank.

- Apply the same way to move the second column on second page to the left side on the third page, and so on. The aim is to keep the right side of all pages in empty.
- Then you can insert text box on the right side of each page and link them by taking steps in method 2.


Manage Long Word Documents
Due to all reasons, processing long documents is inevitable in office work. Since we know Word is susceptible to corruption, long files just increase its risk of being compromised. Thus, to back up files on a regular routine seems never more important. It allows you to turn to the latest version of data in case Word damage happens.
Author Introduction:
Vera Chen is a data recovery expert in DataNumen, Inc., which is the world leader in data recovery technologies, including corrupt Excel xls fix and pdf repair software products. For more information visit www.datanumen.com
How do I make my resume two columns in Word?
- Posted on 28/06/2021
How do I make my resume two columns in Word?
3:18Suggested clip 116 secondsMultiple Columns in your Word Resume – YouTubeYouTubeStart of suggested clipEnd of suggested clip
How do I make two columns in one section in Word?
3:44Suggested clip 96 secondsWord 2010- Apply Columns To A Portion Of A Document – YouTubeYouTubeStart of suggested clipEnd of suggested clip
How do you make a picture two columns in Word?
Insert your image, Insert > Picture , then Format > Wrap Text > Top & Bottom will insert your image and apply the basic, proper formatting. Insert a Column Break in the left column where you want your image (this forces the text to the next column).
How do I write in the second column of a Word document?
Say you’re typing in the first column of your document and you want to end that column there and start typing in the second column. To do that, you have to insert a column break. You can insert a column break in one of two ways: Press CTRL-SHIFT-ENTER simultaneously; or.
How do I jump to another column in Word?
To add a column break:Place the insertion point at the beginning of the text you want to move.Select the Layout tab, then click the Breaks command. A drop-down menu will appear.Select Column from the menu.The text will move to the beginning of the column. In our example, it moved to the beginning of the next column.
How do I make two columns in Word 2010?
To add columns to a document:Select the text you want to format.Click the Page Layout tab.Click the Columns command. A drop-down menu will appear. Adding columns.Select the number of columns you want to insert. The text will then format into columns.
How do I create columns in a Word document?
Traditional columnsHighlight the text you want to format; if you do not highlight any text, Word will format the entire document.Click the Page Layout tab, and then select Columns….Choose the format of your columns. Click OK.
How do I fix columns in Word?
On the Page Layout or Layout tab, click Columns. At the bottom of the list, choose More Columns. In the Columns dialog box, adjust the settings under Width and spacing to choose your column width and the spacing between columns. If you want columns of varying widths, deselect the checkbox next to Equal column width.
How many columns can you insert in a Word document in maximum?
A Word table can contain as many as 63 columns but the number of rows is unlimited.
What is the highest font size in MS Word?
Word supports font sizes from 1 point to 1638 points, which means you can use fonts that are 1/72 of an inch all the way up to 22-3/4 inches. Don’t these sizes deceive you, however. You might expect that if you set a font size to 144 points, you will end up with letters two inches high. You won’t.
What is the extension of Word files?
Common file name extensions in WindowsExtensionFormatdocMicrosoft Word document before Word 2007docmMicrosoft Word macro-enabled documentdocxMicrosoft Word documentdotMicrosoft Word template before Word 200791
How many ways you can save a document?
You can save the document in Microsoft word in three ways: 1. You can save by clicking File on top left corner and then click save as. After that browse the location where exactly you want to save in your computer.
What are the two ways to save a document?
You can save the document in microsoft word in three ways:You can save by clicking File on top left corner and then click save as. You can also save by just pressing ctrl + S and then browse the location where you want to save .Just press F12 and then browse the location where you want to save.
How do I open and save a Word document?
Save a Word document in OpenDocument Text formatClick the File tab.Click Save As.Click Browse, and then select the location where you want to save your file.In the Save as type list, click OpenDocument Text.Give your file a name, and then save it.
How do you type and save a document on a computer?
Click FILE > Save, pick or browse to a folder, type a name for your document in the File name box, and click Save. Save your work as you go – hit Ctrl+S often. To print, click the FILE tab, and then click Print.
Why is my Word document not saving?
Microsoft Word 2016 won’t save documents – This issue can occur due to your add-ins. To fix the problem, be sure to start Word in Safe Mode and disable all add-ins. Not able to save Word document to Desktop – Sometimes you might encounter permission problems while saving Word documents.
How do you save a document on a laptop?
1:47Suggested clip 93 secondsHow to Save a Document in a Computer : Basic Computer …YouTubeStart of suggested clipEnd of suggested clip
How do I write a document on my laptop?
Below are the steps on how to create a document with AbiWord.Open AbiWord.Click File and New or press the shortcut Ctrl+N to create a new document.Type the document you want to create.Save the document by clicking File > Save or pressing the shortcut key Ctrl+S.
What are the steps to create a document in MS Word?
Open Word. Or, if Word is already open, select File > New. Select Blank document….Try it!Open Word. In the Search for online templates box, enter a search word like letter, resume, or invoice. Click a template to see a preview. Select Create.
How do I create a document in Windows 10?
2:33Suggested clip 97 secondsWindows 10 Tutorial Starting WordPad and Creating a New …YouTubeStart of suggested clipEnd of suggested clip