
Track changes in Word
Note: If a document has been shared with you for review, you may not be able to turn off Track Changes. If you want to edit the document without tracking changes, you’ll need to either save a copy or ask the person who sent it to you to share it again with review mode turned off.

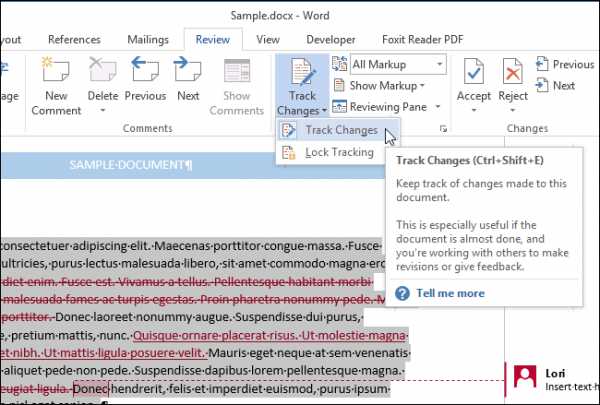
Turn Track Changes on and off
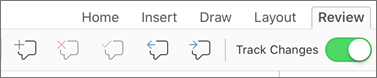
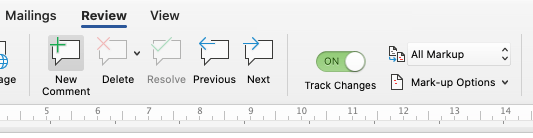
On the Review tab, select Track Changes.
-
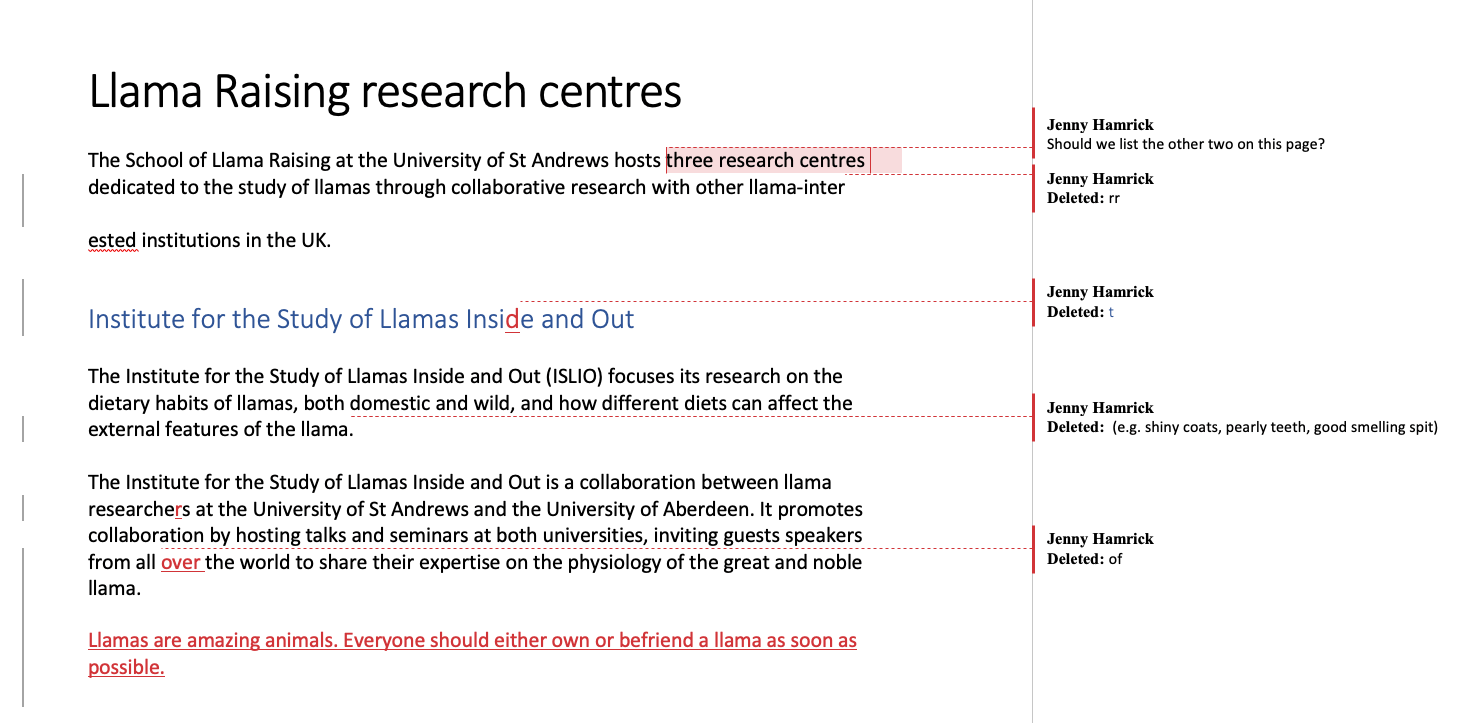
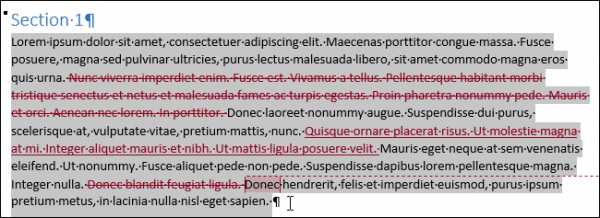
When Track Changes is on, the section is highlighted. Deletions are marked with a strikethrough, and additions are marked with an underline. Different authors’ changes are indicated with different colors.
-
When Track Changes is off, the section is not highlighted. Word stops marking changes, but the colored underlines and strikethroughs are still in the document.
Tip: You also can add a Track Changes indicator to the status bar. Right-click the status bar and select Track Changes.
View tracked changes
Note: When a document is in Editing or Reviewing mode, you can select a tracked change to view a collaborator’s full, suggested change in a card that displays. Hover over the Accept or Reject button to see a preview of what that action would do to your final document.
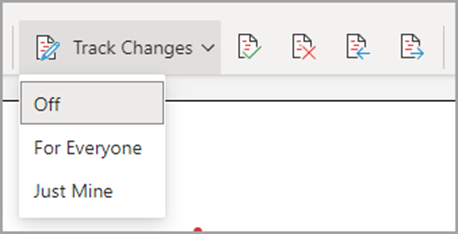
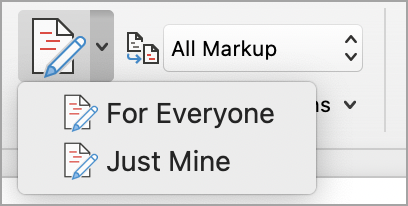
Choose whose changes to track
You can choose to track only your own changes or everyone’s changes.
-
To track only your own changes — On the Review tab, select Track Changes > Just Mine.
-
To track everyone’s changes — On the Review tab, select Track Changes > For Everyone.
Tip: to use a password to keep others from turning off Track Changes — On the Review tab, select Track Changes > Lock Tracking.
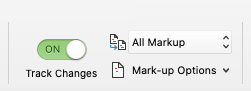
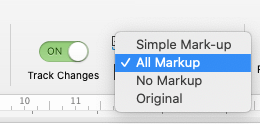
Choose how you would like to see the changes in the document
You can choose the type of markup you want to see.
-
On the Review tab, select Tracking.
-
Select All Markup for the drop-down list to display.
-
Select one of the following options.
-
Simple Markup displays tracked changes with a red line in the margin.
-
All Markup displays tracked changes with different colors of text and lines for each reviewer
-
No Markup hides the markup to show the document with changes incorporated
-
Original displays the original document without tracked changes and comments showing. However, any tracked changes or comments in the document that have not been accepted, rejected, or deleted remain in the document.
Choose the way track changes display
You can choose the types of revisions that display and the way they display. If you choose to show revisions as balloons, they display in the margins of the document. If you choose to display them directly within the document in line. In line revisions display all deletions with strikethroughs instead of inside balloons.
-
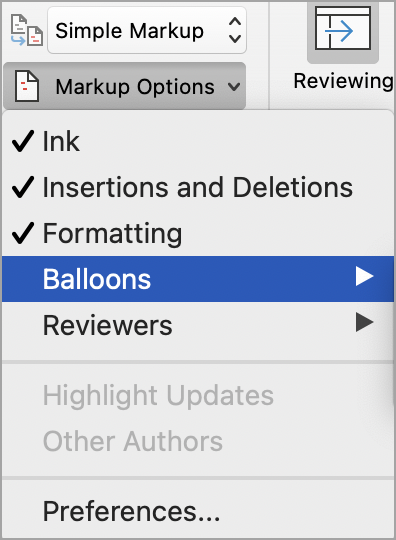
On the Review tab, select Track > Show Markup.
-
Select Balloons and then select the type of display you want.
-
Show Revisions in Balloons
-
Show All Revisions Inline
-
Show Only Formatting in Balloons
Note: If you want to see tracked changes in balloons, you must be in Print Layout view or Web Layout view.
Display changes by type of edit
-
On the Review tab, select Track Changes > Show Markup.
-
Select the type of edit.
-
Insertions and Deletions
-
Formatting
The check mark next to the item indicates that it’s selected.
Note: Even if you hide a type of markup by clearing it on the Show Markup menu, the markup automatically displays each time the document is opened by you or a reviewer.
Display changes by reviewer(s)
-
In Review > Tracking, select Show Markup.
-
Select Specific People.
-
Select to clear all check boxes except the ones next to the names of the reviewers whose changes you want to show.
Note: To select or clear all check boxes for all reviewers in the list, select All Reviewers.
Navigate tracked changes in Changes menu section
You can navigate from one tracked change to another.
-
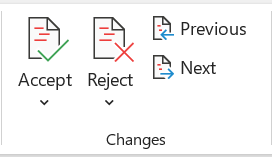
In Review > Changes, select Next to view the next tracked change.
-
In Review > Changes, select Previous to view the previous tracked change.
Accept or Reject tracked changes
There are multiple ways to address tracked changes. The most proficient method is to identify the commentor and respond to the tracked change is through the card display when you click the marked change. The card displays the commentor name and the option to accept or reject the suggestion.

Accept or reject tracked changes in sequence using the main menu
You can resolve teach tracked change from the beginning of the document to the end of the document in sequence.
-
Select Review > Changes > Next.
-
Select Accept or Reject. The next sequential tracked change is highlighted for your review and action.
Note: You can also accept or reject individual tracked changes using the main menus’ drop-down menus. This method is often used as a methodical approach to reviewing tracked changes.
Accept changes using the main menu
-
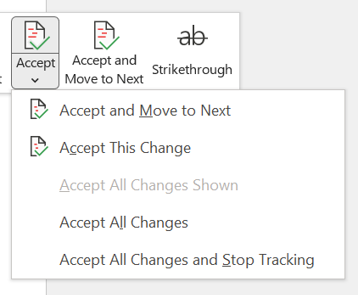
In Review > Changes, select Accept.
-
Select one of the options.
-
Accept and Move to Next
-
Accept This Change
-
Accept All Changes
-
Accept All Changes and Stop Tracking
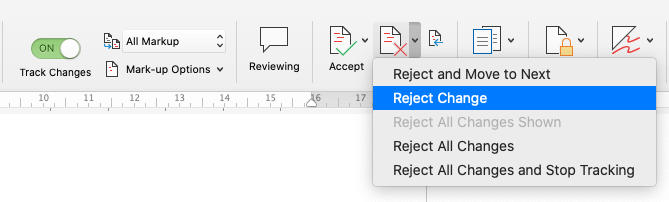
Reject changes using the main menu
-
In Review > Changes, select > Reject.
-
Select one of the options.
-
Reject and Move to Next
-
Reject This Change
-
Reject All Changes
-
Reject All Changes and Stop Tracking
Accept or reject changes within a document with a right click
Working within a document, you can right-click on a tracked change to accept or reject the change. Using the right-click method displays a banner menu option and a drop-down menu option.
Accept changes in-line with the right-click banner option
-
Right-click a tracked change in the document to review a single suggestion.
-
On the banner, select one of the following.
-
Accept > Accept and Move to Next
-
Accept > Accept This Change
-
Accept > Accept All Changes
-
Accept > Accept All Changes and Stop Tracking
-
Accept and Move to Next
Accept changes in-line with the right-click drop-down menu option
-
Right-click a tracked change in the document to review a single suggestion.
-
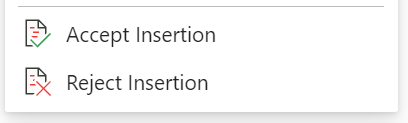
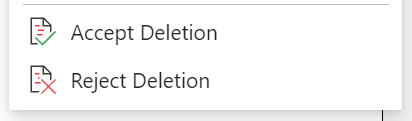
In the drop-down menu, select one of the following.
-
Accept Insertion (or Accept Deletion)
-
Reject Insertion (or Reject Deletion)
Accept or reject all tracked changes at once on the main menu
Accept all tracked changes
-
In Review > Changes, select Accept.
-
Select one of the options.
-
Accept All Changes Shown
-
Accept All Changes
-
Accept All Changes and Stop Tracking
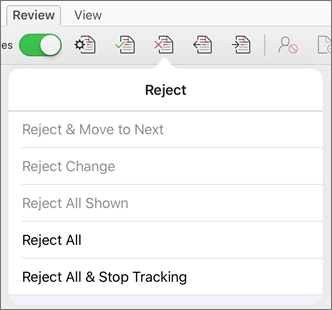
Reject all tracked changes
-
In Review > Changes, select Reject.
-
Select one of the options.
-
Reject All Changes Shown
-
Reject All Changes
-
Reject All Changes and Stop Tracking
Note: When Review>Tracking>Show Markup>Specific People>All Reviewers is selected, the Accept All Changes Shown and Reject All Changes Shown options do not display.
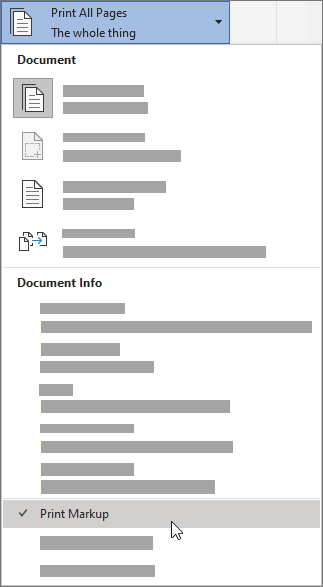
Hide tracked changes and comments when printing
Hiding changes doesn’t remove them from the document. You must use the Accept and Reject commands in the Changes group to remove markup from your document.
-
Go to File > Print > Settings > Print All Pages.
-
Under Document Info, select Print Markup to clear the check mark.

View all your changes in a summary list on the Reviewing Pane
-
In Review > Tracking, select Reviewing Pane.
-
Choose if you want to see the Reviewing Pane next to or below your document.
-
Select Reviewing Pane Vertical to see a list of all changes next to your document.
-
Select Reviewing Pane Horizontal to see a list of all changes below your document.
You can use the Reviewing Pane as a handy tool for to check that all tracked changes have been removed from your document so that they show up to others who might view your document. The summary section at the top of the Reviewing Pane displays the exact number of visible tracked changes and comments that remain in your document.
The Reviewing Pane also allows you to review long comments that don’t fit within a comment bubble.
Note: The Reviewing Pane, unlike the document or the comment balloons, is not the best tool for making changes to your document. Instead of deleting text or comments or making other changes in the Reviewing Pane, make all editorial changes in the document. The changes will then be visible in the Reviewing Pane.
Important: Comments are no longer part of the Track Changes function.
Turn on Track Changes
You can set Word for the Web to track changes for all users who are collaborating on the document or to track only your changes.
-
On the Review tab, select Track Changes.
-
In the Track Changes drop-down list, select one of the following:
-
To track only the changes that you make to the document, select Just Mine.
-
To track changes to the document made by all users, select For Everyone.
-
Turn off Track Changes
-
On the Review tab, select Track Changes.
-
In the Track Changes drop-down list, select Off.
Select the Markup view
-
On the Review tab, select Markup view.
-
Select one of the markup options.
-
Markup in margin (Simple Markup) — See suggestions in the margin
-
Markup on page (All Markup) — See suggestions on the page
Review, accept, or reject changes
Accept or reject tracked changes in sequence
You can review each tracked change in sequence and decide whether to accept or reject the change.
-
Click or tap at the beginning of the document.
-
On the Review tab, select Track Changes.
-
Select Accept or Reject. As you accept or reject changes, Word will move to the next change.
Tip: To move through changes in the document without accepting or rejecting them, select Next or Previous.
-
Repeat until you’ve reviewed all of the changes in your document.
Accept or reject a single change
Rather than move through changes in sequence, you can accept or reject a single change. When you accept or reject the change, Word will not move to the next change in the document.
-
Click the change.
-
Select the option to accept or reject it.
When tracked changes are turned on, Word marks any changes made by any authors of the document. This is useful when you’re collaborating with other authors because you can see which authors made a particular change.
Turn Track Changes on
-
On the Review tab, select Track Changes.
-
Select to track only your own changes or everyone’s change.
-
To track only your own changes — On the Review tab, select Track Changes > Just Mine.
-
To track everyone’s changes — On the Review tab, select Track Changes > For Everyone.
Note: To turn Track Changes off, select Track Changes again.
Accept or reject all tracked changes at once on the main menu
Accept all tracked changes
-
Select Reviewing > Accept.
-
Select one of the options.
-
Accept All Changes Shown
-
Accept All Changes
-
Accept All Changes and Stop Tracking
Reject all tracked changes
-
Select Reviewing > Reject.
-
Select one of the options.
-
Reject All Changes Shown
-
Reject All Changes
-
Reject All Changes and Stop Tracking
Word shows changes in the document by displaying a line in the margin. If you switch to All Markup view, you’ll see changes inline and in balloons.
Anytime someone adds a comment, it’ll show up in a balloon.
Review changes inline
To see changes inline instead of in balloons, do the following:
-
On the Review Tab, select Markup Options
-
Point to Balloons and select Show All Revisions Inline.
Keep Track Changes on
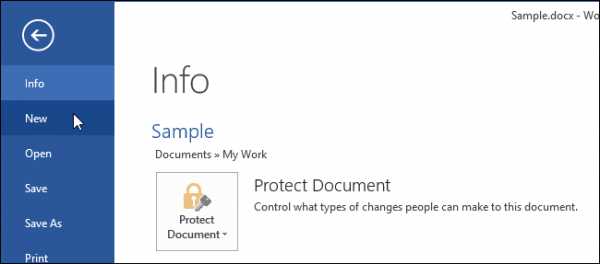
To prevent others from turning off Track Changes, lock Track Changes on with a password.
Important: Be sure to remember the password so you can turn Track Changes off when you’re ready to accept or reject the changes.
Lock Track Changes with a password
-
On the Review tab, select Protect > Protect Document.
-
In the Password box, enter a password.
-
Re-enter your password and select OK.
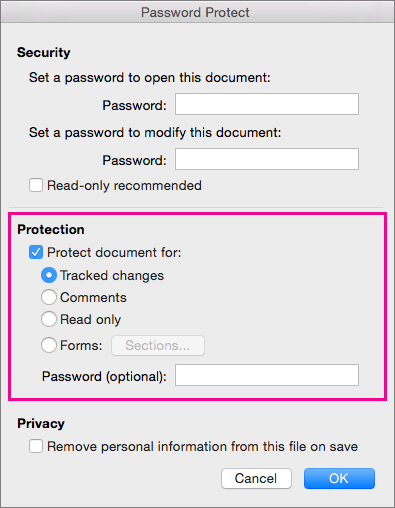
While tracked changes are locked, you can’t turn off change tracking, and you can’t accept or reject changes.
Unlock Track Changes
-
On the Review tab, select Protect > Protect Document.
-
Under Protection, uncheck Protect document for.
-
Enter your password and select OK.
For more info, see
remove the tracked changes and comments.
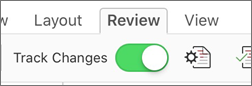
Turn Track Changes on or off (Word for iPad)
-
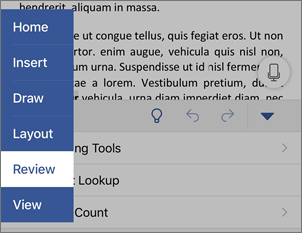
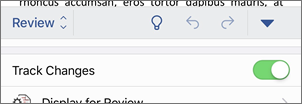
Tap the Review tab.
-
Tap the control next to Track Changes to turn Track Changes on or off.
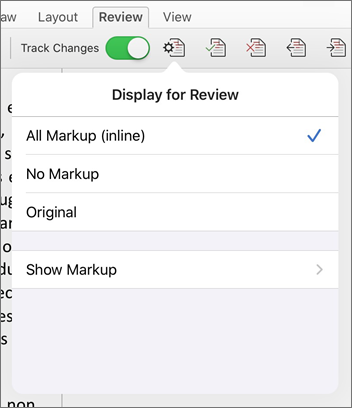
Show or hide markup (Word for iPad)
-
On the Review tab, tap the Display for Review icon.
-
In the Display for Review list, tap the option you want:
-
All Markup (inline) shows the final document with tracked changes visible inline
-
No markup shows the final document without tracked changed
-
Original shows the original document with no tracked changes
-
Show tracked changes by type (Word for iPad)
-
On the Review tab, tap the Display for Review icon.
-
In the Display for Review list, tap Show Markup.
-
In the Show Markup list, tap the option you want:
-
Ink shows or hides any marks made by digital inking in the document.
-
Insertions & Deletions shows or hides inserted or deleted text.
-
Formatting shows or hides formatting changes.
-
Show Revisions in Balloons shows changes in balloons in the right margin.
-
Show Only Formatting in Balloons shows only formatting changes in balloons and keeps the other changes as inline tracking.
-
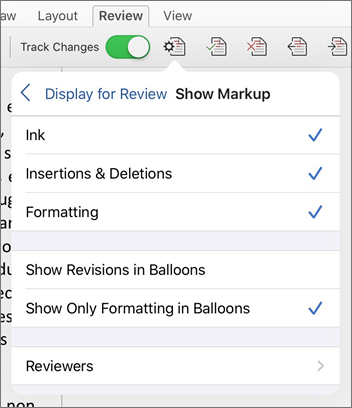
Show tracked changes by reviewer (Word for iPad)
If there are multiple reviewers for the document, Word will show all changes by default. However, you can choose to show only changes made by specific viewers.
-
On the Review tab, tap the Display for Review icon.
-
In the Display for Review list, tap Show Markup.
-
In the Show Markup list, tap Reviewers.
-
In the Other Authors list, tap the names of the reviewers whose changes you want to see or tap All Reviewers.
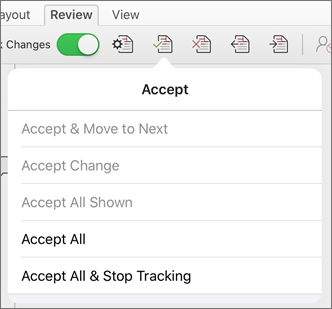
Accept changes (Word for iPad)
-
Tap twice on a change in the document to select it.
-
On the Review tab, tap the Accept icon.
-
Do one of the following:
-
Tap Accept & Move to Next to accept the change and move to the next change in the document.
-
Tap Accept Deletion, Accept Insertion, or Accept Change to accept the selected change, identified contextually by type, and not move to the next change in the document.
-
Tap Accept All Shown to accept all changes that are visible, but not changes that are hidden. For example, if you’re viewing only changes made by a specific reviewer, tapping Accept All Shown accepts only the changes made by that reviewer.
-
Tap Accept All to accept all changes in the document.
-
Tap Accept All & Stop Tracking to accept all changes in the document and turn off Track Changes.
-
-
To move to another change without accepting or rejecting it, tap the Previous or Next icon.
Reject changes (Word for iPad)
-
Tap twice on a change in the document to select it.
-
On the Review tab, tap the Reject icon.
-
Do one of the following:
-
Tap Reject & Move to Next to reject the change and move to the next change in the document.
-
Tap Reject Deletion, Reject Insertion, or Reject Change to reject the selected change, identified contextually by type, and not move to the next change in the document.
-
Tap Reject All Shown to reject all changes that are visible, but not changes that are hidden. For example, if you’re viewing only changes made by a specific reviewer, tapping Reject All Shown rejects only the changes made by that reviewer.
-
Tap Reject All to reject all changes in the document.
-
Tap Rejects All & Stop Tracking to reject all changes in the document and turn off Track Changes.
-
-
To move to another change without accepting or rejecting it, tap the Previous or Next icon.
Delete comments (Word for iPad)
-
Tap twice on a comment in the document to select it.
-
Tap the Review tab.
-
Tap the Delete icon to delete the comment or press and hold the Delete icon until the Delete list appears, and then do one of the following:
-
Tap Delete to delete only the selected comment.
-
Tap Delete All to delete all comments in the document.
-
-
To move to another comment without deleting it, tap the Previous or Next icon.
Turn Track Changes on or off (Word for iPhone)
-
Tap the pen icon at the top to open the ribbon.
-
Tap the Review tab.
-
Tap the control next to Track Changes to turn Track Changes on or off.
Show or hide markup (Word for iPhone)
-
On the Review tab, tap Display for Review.
-
Tap the option you want:
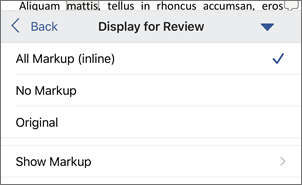
-
All Markup (inline) shows the final document with tracked changes visible inline
-
No markup shows the final document without tracked changed
-
Original shows the original document with no tracked changes
-
Show tracked changes by type (Word for iPhone)
-
On the Review tab, tap Display for Review.
-
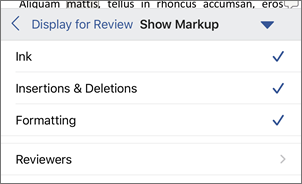
Tap Show Markup.
-
In the Show Markup list, tap the option you want:
-
Ink shows or hides any marks made by digital inking in the document.
-
Insertions & Deletions shows or hides inserted or deleted text.
-
Formatting shows or hides formatting changes.
-
Show tracked changes by reviewer (Word for iPhone)
If there are multiple reviewers for the document, Word will show all changes by default. However, you can choose to show only changes made by specific viewers.
-
On the Review tab, tap Display for Review.
-
Tap Show Markup.
-
Tap Reviewers.
-
In the Other Authors list, tap the names of the reviewers whose changes you want to see or tap All Reviewers.
Accept changes (Word for iPhone)
-
Tap twice on a change in the document to select it.
-
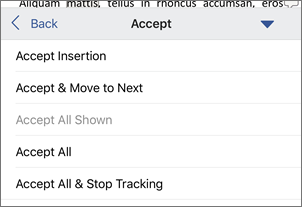
On the Review tab, tap Accept.
-
Do one of the following:
-
Tap Accept & Move to Next to accept the change and move to the next change in the document.
-
Tap Accept Deletion, Accept Insertion, or Accept Change to accept the selected change, identified contextually by type, and not move to the next change in the document.
-
Tap Accept All Shown to accept all changes that are visible, but not changes that are hidden. For example, if you’re viewing only changes made by a specific reviewer, tapping Accept All Shown accepts only the changes made by that reviewer.
-
Tap Accept All to accept all changes in the document.
-
Tap Accept All & Stop Tracking to accept all changes in the document and turn off Track Changes.
-
Reject changes (Word for iPhone)
-
Tap twice on a change in the document to select it.
-
On the Review tab, tap Reject.
-
Do one of the following:
-
Tap Reject & Move to Next to reject the change and move to the next change in the document.
-
Tap Reject Deletion, Reject Insertion, or Reject Change to reject the selected change, identified contextually by type, and not move to the next change in the document.
-
Tap Reject All Shown to reject all changes that are visible, but not changes that are hidden. For example, if you’re viewing only changes made by a specific reviewer, tapping Reject All Shown rejects only the changes made by that reviewer.
-
Tap Reject All to reject all changes in the document.
-
Tap Reject All & Stop Tracking to reject all changes in the document and turn off Track Changes.
-

Delete comments (Word for iPhone)
-
Tap twice on a comment in the document to select it.
-
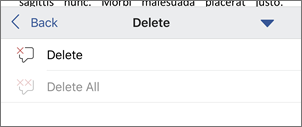
One the Review tab, tap Delete, and then do one of the following:
-
Tap Delete to delete only the selected comment.
-
Tap Delete All to delete all comments in the document.
-
-
To move to another comment without deleting it, tap the Previous or Next icon
Need more help?
Want more options?
Explore subscription benefits, browse training courses, learn how to secure your device, and more.
Communities help you ask and answer questions, give feedback, and hear from experts with rich knowledge.
Find solutions to common problems or get help from a support agent.
Содержание
- 0.1 Часть 1 Как включить функцию «Исправления»
- 0.2 Часть 2 Как отредактировать документ
- 1 Советы
- 2 Предупреждения
Часть 1 Как включить функцию «Исправления»
- Откройте документ, который нужно отредактировать.
Для этого дважды щелкните по документу Microsoft Word или откройте программу Microsoft Word, а затем выберите документ на странице «Последние документы».
- Прежде чем вносить изменения в документ, сделайте его копию и редактируйте ее, а не исходный документ (на случай, если что-то пойдет не так).
-
Перейдите на вкладку Рецензирование. Она находится на синей ленте в верхней части документа. Откроется панель инструментов, которые помогут отредактировать документ.
-
Нажмите Исправления. Эта опция находится посередине верхней панели инструментов. Так вы включите функцию «Исправления» в Microsoft Word.
- Откройте выпадающий список рядом с Исправления.
В списке находятся следующие опции:
- Исправления: добавленный или удаленный текст будет обозначен красными линиями на полях; другие изменения не отображаются.
- Все исправления: все изменения, внесенные в документ, будут обозначены красным шрифтом и комментариями на полях.
- Без исправлений: обозначения исправлений будут скрыты, а документ отобразится в финальном виде (после внесения всех изменений).
- Оригинал: отобразится исходный документ без изменений.
-
Нажмите Все изменения. Будут обозначены все изменения (красным шрифтом), которые были внесены в исходный текст (черный шрифт).
Часть 2 Как отредактировать документ
- Удалите текст.
Если удалить один символ или целый абзац, они исчезнут из документа. На полях справа появится красное поле с примечанием « Удалено: ».
- Если вы измените формат всего документа (например, поменяете шрифт), это также будет обозначено на полях справа.
- Введите новый текст.
Любой текст, который вы добавите в документ, будет отображаться красным шрифтом.
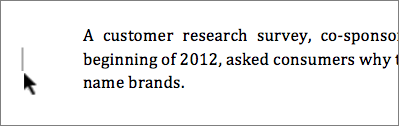
- Если вы перейдете на новую строку (для этого нажмите ↵ Enter или ⏎ Return), на полях слева появится серая вертикальная черта, обозначающая новую строку.
- Нажмите Создать примечание, чтобы добавить примечание к выделенному тексту.
Значок этой опции выглядит как текстовое облачко со знаком «плюс» и находится в верхней части окна. На полях справа откроется поле, в которое можно ввести примечание.
- Щелкните по любой точке документа вне поля для примечания, чтобы сохранить примечание.
- Примите или отклоните исправления.
Для этого нажмите «Принять» или «Отклонить», чтобы согласиться или не согласиться с обозначенными исправлениями; также можно нажать «▼» под опцией «Принять» или «Отклонить», а затем нажать «Все исправления», чтобы согласиться или не согласиться со всеми изменениями, внесенными в документ. При этом будут удалены все обозначения исправлений, такие как красный шрифт и поля с примечаниями.
- Также документ можно сохранить с обозначениями исправлений; в этом случае пропустите этот шаг.
-
Сохраните документ. Для этого зажмите Ctrl (или ⌘ Command в Mac OS X), а затем нажмите S. Документ будет сохранен с внесенными изменениями.
Советы
- В некоторых почтовых клиентах удаленный текст отображается черным шрифтом с перечеркивающей красной линией.
Предупреждения
- Если перед редактированием документа вы не сделаете его копию, это может привести к потере содержимого исходного документа.
Информация о статье
Эту страницу просматривали 13 979 раза.
Была ли эта статья полезной?
Текстовый редактор Microsoft Word — это не только отличный инструмент для набора и форматирования текста, но и удобнейшее средство его дальнейшего исправления и правки. Об этой истинно «редакторской» функции знают немногие, поэтому мы решили раскрыть вам этот секрет.
Проще всего править текст на бумаге — возразят мне многие читатели. Действительно, взяв красную ручку всегда можно зачеркнуть несуразную фразу, а сверху написать что-то получше. Можно оставить злорадные комментарии, показав автору текста его неправоту. А самое главное: при такой правке исходный текст не меняется, и автору самому решать, принимать исправления или нет. Но такие исправления не отправишь по электронной почте, и существуют они в единственном виде.
Воспользовавшись инструментами рецензирования текстового редактора Word, вы сможете точно так же вставлять комментарии практически красной ручкой на полях и исправлять то, что написал автор, зачеркивая исходный текст. Но при этом документ со всеми исправлениями и пометками будет существовать в электронном виде, а значит, будет доступен для пересылки по электронной почте. А автор документа, изучив исправления, буквально одним нажатием кнопки может их принять, а не исправлять каждую пометку вручную, или же, наоборот, отклонить, оставшись при своем мнении.
Инструменты для вставки пометок и исправлений размещены на панели инструментов «Рецензирование». Отобразить ее можно, выбрав «Вид (View) -> Панели инструментов (Toolbars) -> Рецензирование (Reviewing)».
Если вдруг, читая текст, у вас возникло желание прокомментировать особо понравившийся или наоборот, неудачный момент, вы можете воспользоваться инструментом «Примечание». Для этого выделите нужный фрагмент текста и нажмите кнопку «Добавить примечание» (Insert Comment) на панели инструментов. В поле справа от основного текста появится окно для ввода примечания. После того, как вы набрали текст, нажмите мышкой в стороне от окна для ввода примечания.
Поле для ввода примечания отобразиться справа от текста документа.
После сохранения и повторного открытия текста, на экране фрагмент, у которого есть примечание, будет выделен другим цветом. А если навести на него мышку, можно увидеть текст примечания, его автора и время его добавления. Перемещаться между добавленными примечаниями удобно с помощью специальных кнопок, размещенных на панели инструментов «Рецензирование».
Просмотр текста примечания
Следующим инструментом, доступным для редактирования, является режим исправления.
При включении этого режима записываются все изменения, вносимые в документ. Причем, как изменения, касающиеся его содержимого (будет записано удаление и добавление текста), так и изменения формата документа (изменение шрифтов, параметров страниц и т. д.). Перейти в режим записи исправлений очень просто — достаточно дважды щелкнуть мышкой по кнопке с надписью «ИСПР», которая размещена в строке состояния текстового редактора. Второй способ: нажать на кнопку «Исправления» (Track Changes) на панели инструментов «Рецензирование».
В зависимости от настроек Word, исправления будут либо отображаться другим цветом, либо не отображаться вовсе, но обязательно рядом с каждым исправлением будет размещено примечание, в котором и будет указано, какие именно изменения были внесены в документ.
Все исправления и примечания наглядно отображаются на правом поле документа
Для просмотра всех исправлений следует отобразить на экране окно просмотра изменений. Для этого необходимо нажать кнопку «Окно просмотра» на панели инструментов «Рецензирование». В нижней части экрана отобразятся все внесенные в документ исправления и примечания. Используя это окно можно по очереди выделять в тексте документа добавленные примечания и исправления. Для этого надо дважды щелкнуть мышкой на линии, отделяющей одно примечание от другого.
Следующим шагом после просмотра внесенных изменений будет принятие решения относительно их сохранения. Для этого предназначены списки «Принять выделенное исправление» и «Отклонить выделенное исправление». Нажав соответствующую кнопку можно раскрыть список и выбрать нужный пункт, с помощью которого можно принять или отклонить это конкретное исправление. А выбрав пункт «Отклонить все изменения» или «Применить все изменения» можно принять решение относительно правки всего документа.

Инструмент «Исправления» в Word нужен для отслеживания изменений, сделанных в документе. Он особенно полезен при совместной работе над документом с другими пользователями. Иногда необходимо скопировать текст в другой документ, сохранив историю исправлений. Эта задача кажется простой, но на деле она сложнее, чем просто скопировать и вставить текст.
Сперва выделите текст с изменениями.

Первый секрет копирования исправлений вместе с текстом: нужно обязательно отключить опцию Track Changes (Исправления). Для этого откройте вкладку Review (Рецензирование). Если в разделе Tracking (Запись исправлений) кнопка Track Changes (Исправления) подсвечена синим, это значит, что опция включена. Нажмите нижнюю часть этой кнопки и выберите из выпадающего меню пункт Track Changes (Исправления). Теперь, когда опция отключена, у кнопки нет подсветки.
Примечание: Если не отключить функцию Track Changes (Исправления), Word решит, что Вы хотите скопировать текст в таком виде, как если бы все изменения были приняты, и исправления применятся.

Нажмите Ctrl+C, чтобы скопировать текст. Создайте новый документ, в него мы вставим скопированный текст.
Примечание: Текст можно вставить в любой существующий документ Word.
Откройте вкладку File (Файл).

В левой части окна нажмите New (Создать).

В разделе New (Создать) кликните по Blank document (Новый документ).

Второй секрет успешного сохранения исправлений в скопированном тексте: отключите опцию Track Changes (Исправления) в том документе, куда собираетесь вставить скопированный текст. Затем нажмите Ctrl+V, и скопированный текст вставится вместе с исправлениями.

Для копирования текста можно воспользоваться инструментом «Копилка», что особенно удобно, если Вы копируете несколько несмежных блоков текста и/или изображения.
Урок подготовлен для Вас командой сайта office-guru.ru
Источник: /> Перевела: Ольга Гелих
Правила перепечаткиЕще больше уроков по Microsoft Word
Оцените качество статьи. Нам важно ваше мнение:
![]()
Загрузить PDF
![]()
Загрузить PDF
Из данной статьи вы узнаете, как использовать функцию «Исправления» в Microsoft Word, чтобы следить за любыми изменениями, которые вносятся в документ.
-
1
Откройте документ, который нужно отредактировать. Для этого дважды щелкните по документу Microsoft Word или откройте программу Microsoft Word, а затем выберите документ на странице «Последние документы».
- Прежде чем вносить изменения в документ, сделайте его копию и редактируйте ее, а не исходный документ (на случай, если что-то пойдет не так).
-
2
Перейдите на вкладку Рецензирование. Она находится на синей ленте в верхней части документа. Откроется панель инструментов, которые помогут отредактировать документ.
-
3
Нажмите Исправления. Эта опция находится посередине верхней панели инструментов. Так вы включите функцию «Исправления» в Microsoft Word.
-
4
Откройте выпадающий список рядом с Исправления. В списке находятся следующие опции:
- Исправления: добавленный или удаленный текст будет обозначен красными линиями на полях; другие изменения не отображаются.
- Все исправления: все изменения, внесенные в документ, будут обозначены красным шрифтом и комментариями на полях.
- Без исправлений: обозначения исправлений будут скрыты, а документ отобразится в финальном виде (после внесения всех изменений).
- Оригинал: отобразится исходный документ без изменений.
-
5
Нажмите Все изменения. Будут обозначены все изменения (красным шрифтом), которые были внесены в исходный текст (черный шрифт).
Реклама


-
1
Удалите текст. Если удалить часть текста, будь то один символ или целый абзац, она исчезнет из документа. На полях справа появится красное поле с примечанием «[имя пользователя] Удалено: [удаленный текст]».
- Если вы измените формат всего документа (например, поменяете шрифт), это также будет обозначено на полях справа.
-
2
Введите новый текст. Любой текст, который вы добавите в документ, будет отображаться красным шрифтом.
- Если вы перейдете на новую строку (для этого нажмите ↵ Enter или ⏎ Return), на полях слева появится серая вертикальная черта, обозначающая новую строку.
-
3
Нажмите Создать примечание, чтобы добавить примечание к выделенному тексту. Значок этой опции выглядит как текстовое облачко со знаком «плюс» и находится в верхней части окна. На полях справа откроется поле, в которое можно ввести примечание.
- Чтобы сохранить примечание, щелкните по любой точке документа вне поля для примечания.
-
4
Примите или отклоните исправления. Для этого нажмите «Принять» или «Отклонить», чтобы согласиться или не согласиться с отмеченными исправлениями; также можно нажать «▼» под опцией «Принять» или «Отклонить», а затем нажать «Все исправления», чтобы согласиться или не согласиться со всеми изменениями, внесенными в документ. При этом будут удалены все обозначения исправлений, такие как красный шрифт и поля с примечаниями.
- Также документ можно сохранить с обозначениями исправлений; в этом случае пропустите этот шаг.
-
5
Сохраните документ. Для этого зажмите Ctrl (или ⌘ Command в Mac OS X), а затем нажмите S. Документ будет сохранен с внесенными изменениями.
Реклама


Советы
- В некоторых почтовых клиентах удаленный текст отображается черным шрифтом с перечеркивающей красной линией.
Реклама
Предупреждения
- Если перед редактированием документа вы не сделаете его копию, это может привести к потере содержимого исходного документа.
Реклама
Была ли эта статья полезной?

Track Changes is a tool in Microsoft Word which allows you to show any markups, changes or comments made to a document.
In this post, I’ll teach you how to use Track Changes to edit Word documents, and how to accept or reject those changes as a reviewer.
Why use Track Changes?
It is particularly useful when you are sharing documents with other colleagues, because it allows you to see exactly what changes were made, and by whom. In addition, it gives more power to the owner of the document who can accept or reject any changes made to the document.
Digital communications often shares Word documents containing website content with colleagues across the University, and asks them to use Track Changes to make edits or queries. This allows us to clearly see what edits have been made and greatly speeds up the amount of time we spend editing web pages.
How to use Track Changes
If you do not know how to use Track Changes, Microsoft has a very useful online guide to using Track Changes.
You can also follow these steps if you are using the desktop Microsoft Word app:
Turn on Track Changes
- Open Microsoft Word.
- Choose the Review tab at the top of the document.

- Either click the Track Changes button (PC) or toggle the Track Changes switch (Mac).

- Make sure that you change ‘Simple Markup’ to ‘All Markup’ from the drop down bar next to Track Changes.


Edit
Once Track Changes is turned on, you can start editing the document. Any changes you make to the text will be marked by a grey bar on the left side of the changed text.
When you add text, the added text will be in a different colour to the normal text – making it easy to spot for reviewers.

When you delete text, the deleted text will be noted in a comment in the right margin of the document.

When you reformat text, the type of reformat will be noted in a comment in the right margin of the document.


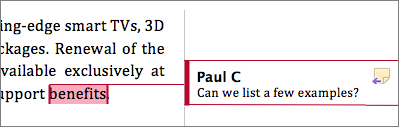
You can also comment on pieces of text by selecting New Comment from the Review tab. The comment will appear in the right margin of the document.

Review
If you are reviewing a document, you can either accept or reject changes made by another person. To do this, simply click on the changed text (or the note in the margin) and then select either Accept or Reject from the Review tab.
You can also choose to accept or reject all changes at once from the drop down menus beside each option.
Turn off Track Changes
To turn off Track Changes, simply click on the Track Changes button or toggle again.
Как сделать track changes в word?
- Откройте документ, который нужно отредактировать.
Для этого дважды щелкните по документу Microsoft Word или откройте программу Microsoft Word, а затем выберите документ на странице «Последние документы».
- Прежде чем вносить изменения в документ, сделайте его копию и редактируйте ее, а не исходный документ (на случай, если что-то пойдет не так).
-
Перейдите на вкладку Рецензирование. Она находится на синей ленте в верхней части документа. Откроется панель инструментов, которые помогут отредактировать документ.
-
Нажмите Исправления. Эта опция находится посередине верхней панели инструментов. Так вы включите функцию «Исправления» в Microsoft Word.
-
Откройте выпадающий список рядом с Исправления.
В списке находятся следующие опции:
- Исправления: добавленный или удаленный текст будет обозначен красными линиями на полях; другие изменения не отображаются.
- Все исправления: все изменения, внесенные в документ, будут обозначены красным шрифтом и комментариями на полях.
- Без исправлений: обозначения исправлений будут скрыты, а документ отобразится в финальном виде (после внесения всех изменений).
- Оригинал: отобразится исходный документ без изменений.
-
Нажмите Все изменения. Будут обозначены все изменения (красным шрифтом), которые были внесены в исходный текст (черный шрифт).
- Удалите текст.
Если удалить один символ или целый абзац, они исчезнут из документа. На полях справа появится красное поле с примечанием « Удалено: ».
- Если вы измените формат всего документа (например, поменяете шрифт), это также будет обозначено на полях справа.
- Введите новый текст.
Любой текст, который вы добавите в документ, будет отображаться красным шрифтом.
- Если вы перейдете на новую строку (для этого нажмите ↵ Enter или ⏎ Return), на полях слева появится серая вертикальная черта, обозначающая новую строку.
- Нажмите Создать примечание, чтобы добавить примечание к выделенному тексту.
Значок этой опции выглядит как текстовое облачко со знаком «плюс» и находится в верхней части окна. На полях справа откроется поле, в которое можно ввести примечание.
- Щелкните по любой точке документа вне поля для примечания, чтобы сохранить примечание.
- Примите или отклоните исправления.
Для этого нажмите «Принять» или «Отклонить», чтобы согласиться или не согласиться с обозначенными исправлениями; также можно нажать «▼» под опцией «Принять» или «Отклонить», а затем нажать «Все исправления», чтобы согласиться или не согласиться со всеми изменениями, внесенными в документ. При этом будут удалены все обозначения исправлений, такие как красный шрифт и поля с примечаниями.
- Также документ можно сохранить с обозначениями исправлений; в этом случае пропустите этот шаг.
-
Сохраните документ. Для этого зажмите Ctrl (или ⌘ Command в Mac OS X), а затем нажмите S. Документ будет сохранен с внесенными изменениями.
- В некоторых почтовых клиентах удаленный текст отображается черным шрифтом с перечеркивающей красной линией.
- Если перед редактированием документа вы не сделаете его копию, это может привести к потере содержимого исходного документа.
Информация о статье
Эту страницу просматривали 13 979 раза.
Была ли эта статья полезной?
Текстовый редактор Microsoft Word — это не только отличный инструмент для набора и форматирования текста, но и удобнейшее средство его дальнейшего исправления и правки. Об этой истинно «редакторской» функции знают немногие, поэтому мы решили раскрыть вам этот секрет.
Проще всего править текст на бумаге — возразят мне многие читатели. Действительно, взяв красную ручку всегда можно зачеркнуть несуразную фразу, а сверху написать что-то получше. Можно оставить злорадные комментарии, показав автору текста его неправоту. А самое главное: при такой правке исходный текст не меняется, и автору самому решать, принимать исправления или нет. Но такие исправления не отправишь по электронной почте, и существуют они в единственном виде.
Воспользовавшись инструментами рецензирования текстового редактора Word, вы сможете точно так же вставлять комментарии практически красной ручкой на полях и исправлять то, что написал автор, зачеркивая исходный текст. Но при этом документ со всеми исправлениями и пометками будет существовать в электронном виде, а значит, будет доступен для пересылки по электронной почте. А автор документа, изучив исправления, буквально одним нажатием кнопки может их принять, а не исправлять каждую пометку вручную, или же, наоборот, отклонить, оставшись при своем мнении.
Инструменты для вставки пометок и исправлений размещены на панели инструментов «Рецензирование». Отобразить ее можно, выбрав «Вид (View) -> Панели инструментов (Toolbars) -> Рецензирование (Reviewing)».
Если вдруг, читая текст, у вас возникло желание прокомментировать особо понравившийся или наоборот, неудачный момент, вы можете воспользоваться инструментом «Примечание». Для этого выделите нужный фрагмент текста и нажмите кнопку «Добавить примечание» (Insert Comment) на панели инструментов. В поле справа от основного текста появится окно для ввода примечания. После того, как вы набрали текст, нажмите мышкой в стороне от окна для ввода примечания.
Поле для ввода примечания отобразиться справа от текста документа.
После сохранения и повторного открытия текста, на экране фрагмент, у которого есть примечание, будет выделен другим цветом. А если навести на него мышку, можно увидеть текст примечания, его автора и время его добавления. Перемещаться между добавленными примечаниями удобно с помощью специальных кнопок, размещенных на панели инструментов «Рецензирование».
Просмотр текста примечания
Следующим инструментом, доступным для редактирования, является режим исправления.
При включении этого режима записываются все изменения, вносимые в документ. Причем, как изменения, касающиеся его содержимого (будет записано удаление и добавление текста), так и изменения формата документа (изменение шрифтов, параметров страниц и т. д.). Перейти в режим записи исправлений очень просто — достаточно дважды щелкнуть мышкой по кнопке с надписью «ИСПР», которая размещена в строке состояния текстового редактора. Второй способ: нажать на кнопку «Исправления» (Track Changes) на панели инструментов «Рецензирование».
В зависимости от настроек Word, исправления будут либо отображаться другим цветом, либо не отображаться вовсе, но обязательно рядом с каждым исправлением будет размещено примечание, в котором и будет указано, какие именно изменения были внесены в документ.
Все исправления и примечания наглядно отображаются на правом поле документа
Для просмотра всех исправлений следует отобразить на экране окно просмотра изменений. Для этого необходимо нажать кнопку «Окно просмотра» на панели инструментов «Рецензирование». В нижней части экрана отобразятся все внесенные в документ исправления и примечания. Используя это окно можно по очереди выделять в тексте документа добавленные примечания и исправления. Для этого надо дважды щелкнуть мышкой на линии, отделяющей одно примечание от другого.
Следующим шагом после просмотра внесенных изменений будет принятие решения относительно их сохранения. Для этого предназначены списки «Принять выделенное исправление» и «Отклонить выделенное исправление». Нажав соответствующую кнопку можно раскрыть список и выбрать нужный пункт, с помощью которого можно принять или отклонить это конкретное исправление. А выбрав пункт «Отклонить все изменения» или «Применить все изменения» можно принять решение относительно правки всего документа.

Инструмент «Исправления» в Word нужен для отслеживания изменений, сделанных в документе. Он особенно полезен при совместной работе над документом с другими пользователями. Иногда необходимо скопировать текст в другой документ, сохранив историю исправлений. Эта задача кажется простой, но на деле она сложнее, чем просто скопировать и вставить текст.
Сперва выделите текст с изменениями.
Первый секрет копирования исправлений вместе с текстом: нужно обязательно отключить опцию Track Changes (Исправления). Для этого откройте вкладку Review (Рецензирование). Если в разделе Tracking (Запись исправлений) кнопка Track Changes (Исправления) подсвечена синим, это значит, что опция включена. Нажмите нижнюю часть этой кнопки и выберите из выпадающего меню пункт Track Changes (Исправления). Теперь, когда опция отключена, у кнопки нет подсветки.
Примечание: Если не отключить функцию Track Changes (Исправления), Word решит, что Вы хотите скопировать текст в таком виде, как если бы все изменения были приняты, и исправления применятся.
Нажмите Ctrl+C, чтобы скопировать текст. Создайте новый документ, в него мы вставим скопированный текст.
Примечание: Текст можно вставить в любой существующий документ Word.
Откройте вкладку File (Файл).

В левой части окна нажмите New (Создать).
В разделе New (Создать) кликните по Blank document (Новый документ).

Второй секрет успешного сохранения исправлений в скопированном тексте: отключите опцию Track Changes (Исправления) в том документе, куда собираетесь вставить скопированный текст. Затем нажмите Ctrl+V, и скопированный текст вставится вместе с исправлениями.

Для копирования текста можно воспользоваться инструментом «Копилка», что особенно удобно, если Вы копируете несколько несмежных блоков текста и/или изображения.
Урок подготовлен для Вас командой сайта office-guru.ru Источник: /> Перевела: Ольга Гелих
Правила перепечаткиЕще больше уроков по Microsoft Word
Оцените качество статьи. Нам важно ваше мнение:
Track changes in Word
Word for Office 365 Word 2019 Word 2016 Word 2013 Word 2010 Word 2007 More… Less
Turning on Track Changes gives you and your coworkers a way to make changes that are easy to spot. The changes are like suggestions that you can review, and then remove them or make them permanent.
Turn Track Changes on and off by going to Review > Track Changes.
-
When it’s turned on, deletions are marked with a strikethrough, and additions are marked with an underline. Different authors’ changes are indicated with different colors.
-
When it’s turned off, Word stops marking changes, but the colored underlines and strikethrough are still in the document.
To review the changes in your document, go to Review > Tracking > Display for Review.
-
To review the changes, indicated by a red line in the margin, choose Simple Markup.
-
For a detailed view of the changes, choose All Markup.
-
For a preview of how the document will look if you make all the suggested changes permanent, choose No Markup.
-
To view the original document as if all the suggested changes were removed, choose Original.
-
On the Review tab, in the Tracking group, choose Track Changes.
The Track Changes is highlighted, as shown in the following image.
Note: If the Track Changes feature is unavailable, you might have to turn off document protection. On the Review tab, in the Protect group, click Restrict Editing, and then click Stop Protection at the bottom of the Protect Document task pane. (You might need to know the document password.)
You also can add a track changes indicator to the status bar.
-
Right-click the status bar and choose Track Changes.
Note: You now can use the Track Changes indicator on the status bar to turn on or turn off Track Changes.
When you turn off Track Changes, you can revise the document without marking what has changed. Turning off the feature, however, doesn’t remove any changes that have already been tracked.
-
On the Review tab, in the Tracking group, choose Track Changes button.
The Track Changes button no longer is highlighted as shown in the following image.
Important: To remove tracked changes, use the Accept and Reject commands on the Review tab in the Changes group.
What would you like to do?
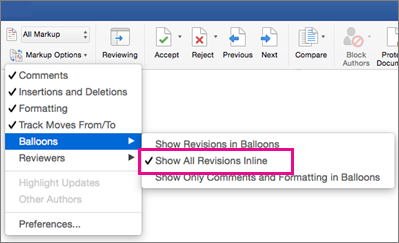
Display all changes inline
The default in Word is to display deletions and comments in balloons in the margins of the document. However, you can change the display to show comments inline and all deletions with strikethroughs instead of inside balloons.
-
On the Review tab, in the Tracking group, click Show Markup.
-
Point to Balloons, and then click Show All Revisions Inline to show deletions with strikethroughs and comments inline.
Display comments in ScreenTips instead of balloons
The default in Word is to display deletions and comments in balloons in the margins of the document. However, you can change the display to show comments inline. Inline comments can be viewed when you rest your pointer on the comment indicator.
-
On the Review tab, in the Tracking group, click Show Markup.
-
Point to Balloons, and then click Show All Revisions Inline to show deletions with strikethroughs and comments inline.
-
Rest the pointer on a comment in the document. The comment appears in a ScreenTip.
Display changes by type of edit or by reviewer
-
On the Review tab, in the Tracking group, click Show Markup.
-
Do one of the following:
-
Click to select the type of change that you want to display. For example, click Comments or Insertions and Deletions. The check mark next to the item indicates that the item is selected.
-
Important: Even if you hide a type of markup by clearing it on the Show Markup menu, the markup automatically appears each time the document is opened by you or a reviewer.
Point to Reviewers, and then click to clear all check boxes except the ones next to the names of the reviewers whose changes and comments you want to show.
Note: To select or clear all check boxes for all reviewers in the list, click All Reviewers.
Display changes and comments for specific reviewers
An editor or reviewer usually wants to view a document as it will appear after their changes are incorporated. This procedure gives an editor or reviewer the opportunity to see how the document will look with the changes.
-
On the Review tab, in the Tracking group, click the arrow in the Display for Review box, and then choose the option that you want.
-
Final Showing Markup This view displays the final document with all tracked changes and comments showing. This is the default view for all documents opened in Word.
-
Final This view displays the document with all changes incorporated into the text and without tracked changes showing. However, any tracked changes or comments that have not been accepted, rejected, or deleted remain in the document.
-
Original Showing Markup This view displays the original text with tracked changes and comments.
-
Original This view displays the original document without tracked changes and comments showing. However, any tracked changes or comments in the document that have not been accepted, rejected, or deleted remain in the document.
-
Note: If you want to see comments and tracked changes in balloons, you must be in Print Layout view or Web Layout view.
Hide tracked changes and comments when printing
Hiding changes does not remove changes from the document. You must use the Accept and Reject commands in the Changes group to remove markup from your document.
-
Click the File tab.
-
Click Print.
-
Under Settings, click the arrow next to Print All Pages.
-
Click Print Markup to clear the check mark.
What would you like to do?
Review a summary of tracked changes
The Reviewing Pane is a handy tool for making sure that all tracked changes have been removed from your document and won’t show up to others who might view your document. The summary section at the top of the Reviewing Pane displays the exact number of visible tracked changes and comments that remain in your document.
The Reviewing Pane also allows you to read long comments that don’t fit within a comment bubble.
Note: The Reviewing Pane, unlike the document or the comment bubbles, is not the best tool for making changes to your document. Instead of deleting text or comments or making other changes in the Reviewing Pane, make all editorial changes in the document. The changes will then be visible in the Reviewing Pane.
-
On the Review tab, in the Tracking group, choose one of the following:
-
To view the summary at the side of your screen, choose Reviewing Pane.
-
To view the summary across the bottom of your screen, in the Reviewing Pane list, choose Reviewing Pane Horizontal.
-
-
Choose Show Detailed Summary to view the number of each type of change.
Review each tracked change and comment in sequence
-
On the Review tab, in the Changes group, click Next or Previous.
-
Do one of the following:
-
In the Changes group, choose Accept.
-
In the Changes group, choose Reject.
-
In the Comments group, choose Delete.
-
-
Accept or reject changes and delete comments until there are no more tracked changes or comments in your document, and then confirm all tracked changes are accepted or rejected and that all comments are deleted.
-
On the Review tab, in the Tracking group, choose Reviewing Pane.
Note: The summary section at the top of the Reviewing Pane displays the exact number of tracked changes and comments that remain in your document.
Review changes by type of edit or by a specific reviewer
-
On the Review tab, in the Tracking group, do one of the following:
-
In the Show Markup list, clear all check boxes except for those next to the types of changes that you want to review.
-
In the Show Markup list, choose Reviewers, and then clear all check boxes except those next to the names of the reviewers whose changes you want to see.
-
In the Show Markup list, choose All Reviewers to select or clear the check boxes for all reviewers in the list
-
-
On the Review tab, in the Changes group, choose Next or Previous.
-
Do one of the following:
-
In the Changes group, choose Accept.
-
In the Changes group, choose Reject.
-
Accept all changes at the same time
-
On the Review tab, in the Changes group, choose Next or Previous.
-
In the Accept list, choose Accept All Changes in Document.
Reject all changes at the same time
-
On the Review tab, in the Changes group, choose Next or Previous.
-
In the Reject list, choose Reject All Changes in Document.
Delete comments
-
Click the comment.
-
On the Review tab, in the Comments group, click Delete.
To delete all comments at once, click the arrow below Delete, and then click Delete All Comments in Document.
What would you like to do?
You can easily make and view tracked changes and comments while you work in a document. By default, Microsoft Office Word 2007 uses balloons to display deletions, comments, formatting changes, and content that has moved. If you want to see all your changes inline, you can change settings so that tracked changes and comments display the way you want.
Balloons (1) show formatting changes, comments, and deletions.
Note: To prevent you from inadvertently distributing documents that contain tracked changes and comments, Word displays tracked changes and comments by default. Final Showing Markup is the default option in the Display for Review box.
-
Open the document that you want to revise.
-
On the Review tab, in the Tracking group, click the Track Changes button. The Track changes button becomes highlighted, as shown in the following figure.
-
Optional. Add a track changes indicator to the status bar. Right-click the status bar, and click Track Changes. Click the Track Changes indicator on the status bar to turn on or turn off track changes.
-
Make the changes that you want by inserting, deleting, moving, or formatting text or graphics. You can also add comments.
Note: If you use change tracking and then save your document as a Web page (.htm or .html), tracked changes will appear on your Web page.
To turn Track changes off:
-
On the Review tab, in the Tracking group, click the Track Changes button.
The Track Changes button is no longer highlighted, as shown in the following image.
If you customized the status bar to include a track changes indicator, clicking Track Changes in the Tracking group will also turn off the indicator in the status bar.
Note: Turning off change tracking does not eliminate the tracked changes in your document. To ensure that there are no more tracked changes in your document, be sure that all changes are showing, and then use the Accept or Reject commands for each change in the document.
Be aware that there are various ways to hide tracked changes or comments, but all the changes that were made while the Track Changes feature was turned on and all the comments that were inserted remain part of the document until they are accepted or rejected (or, in the case of comments, deleted).
Hiding tracked changes—for example, under Show Markup, clearing the check mark for Insertions and Deletions—doesn’t delete existing tracked changes or comments from the document. Instead, hiding tracked changes enables you to view the document without having to wade through crossed-out text, underlining, and balloons.
There are several ways to hide tracked changes and comments, which may lead you to think that they are not in the document. For example:
-
Display for Review box On the Review tab, in the Tracking group, the Display for Review box shows you what viewing mode you are in. It also provides additional options for viewing your document. If you click Final or Original, tracked changes and comments are hidden. To display them, select Final Showing Markup or Original Showing Markup.
-
Show Markup On the Review tab, in the Tracking group, you can use the Show Markup list to hide comments and tracked changes. Items that are marked with a check mark under Show Markup are displayed; items without a check mark are hidden. To display an item, such as Insertions and Deletions, click it on the Show Markup menu.
The default in Word is to display deletions and comments in balloons in the margins of the document. However, you can change the display to show comments inline and all deletions as crossed out instead of inside balloons.
-
On the Review tab, in the Tracking group, click Balloons.
-
Click Show All Revisions Inline to show deletions as crossed out and comments inline.
There are several options available for changing how tracked changes (markup) is displayed.
-
You can change the color and other formatting that Word uses to mark changed text and graphics by clicking the arrow next to Track Changes and then clicking Change Tracking Options.
Note: While you can’t assign specific colors for changes made by different reviewers, each reviewer’s changes appear as a different color in the document so that you can track multiple reviewers.
-
You can view all changes, including deletions, inline instead of inside balloons that appear in the margins of your document. To show changes inline, in the Tracking group, click Balloons, and then click Show all revisions inline.
When you click Show all revisions inline, all the revisions and comments in the document appear inline.
-
To highlight the margin area where all balloons appear, under Show Markup, click Markup Area Highlight.
-
On the Review tab, in the Tracking group, click the arrow next to Show Markup.
-
Do one of the following:
-
Select the type of change that you want to display.
Note: Even if you hide a type of markup by clearing it on the Show Markup menu, the markup automatically appears each time the document is opened by you or a reviewer.
-
Point to Reviewers, and then click to clear all check boxes except the ones next to the names of the reviewers whose changes and comments you want to show.
Note: To select or clear all check boxes for all reviewers in the list, click All Reviewers.
-
You can use the Display for Review list, in the Tracking group, to view a document at various stages of the edit process. Each of the four options in the list provides a different view of the document. Final Showing Markup is the default when you open any document.
-
Final Showing Markup This view displays the final document with all tracked changes and comments showing. This is the default view for all documents opened in Word.
-
Final This view displays the document with all changes incorporated into the text and without tracked changes showing. However, any tracked changes or comments that have not been accepted, rejected, or deleted remain in the document.
-
Original Showing Markup This view displays the original text with tracked changes and comments.
-
Original This view displays the original document without tracked changes and comments showing. However, any tracked changes or comments in the document that have not been accepted, rejected, or deleted remain in the document.
The default in Word is to display deletions and comments in balloons in the margins of the document. However, you can change the display to show comments inline. Inline comments can be viewed when you rest your pointer on the comment indicator.
-
On the Review tab, in the Tracking group, click Balloons.
-
Click Show All Revisions Inline to show deletions as crossed out and comments inline.
-
Rest the pointer on a comment in the document. The comment appears in a ScreenTip.
To learn more about comments, see Insert and delete comments.
-
On the Review tab, in the Changes group, click Next or Previous.
-
Do one of the following:
-
In the Changes group, choose Accept.
-
In the Changes group, choose Reject.
-
In the Comments group, choose Delete.
-
-
Accept or reject changes and delete comments until there are no more tracked changes or comments in your document, and then confirm all tracked changes are accepted or rejected and that all comments are deleted.
-
On the Review tab, in the Tracking group, choose Reviewing Pane.
Note: The summary section at the top of the Reviewing Pane displays the exact number of tracked changes and comments that remain in your document.
-
On the Review tab, in the Changes group, choose Next or Previous.
-
Do one of the following:
In the Accept list, choose Accept All Changes in Document.
In the Reject list, choose Reject All Changes in Document.
Office Word 2007 provides a feature called Document Inspector that allows you to check any document for tracked changes, comments, hidden text, and other personal information. To check a document:
-
Open the document you want to inspect for tracked changes and comments.
-
Click the Microsoft Office Button , point to Prepare, and then click Inspect Document.
-
In the Document Inspector dialog box, click Inspect.
-
Review the inspection results. If Document Inspector finds comments and tracked changes, you are prompted to click Remove All next to Comments, Revisions, Versions, and Annotations.
-
Click Reinspect or Close.
Before you print the document, switch to Print Layout view and display the tracked changes and comments the way that you want them to appear in the printed document. You have several options.
-
Print showing all markup On the Review tab, in the Tracking group, click Show Markup.
Note: Clicking Show Markup displays or hides all markup in the document for selected reviewers. When you display all markup, all types of markup are selected on the Show Markup menu.
-
Print showing changes and comments by type or reviewer On the Review tab, in the Tracking group, click Show Markup, and then select the type of change that you want to display.
-
Print changes and comments for an editor or other reviewer On the Review tab, in the Tracking group, in the Display for Review box, click Final Showing Markup.
When the markup appears the way that you want it to, you are ready to print the document.
-
Click the Microsoft Office Button , and then click Print.
-
In the Print dialog box, in the Print what box, click Document showing markup, and then click OK.
Notes:
-
By default, Microsoft Word chooses the zoom level and page orientation to best display the tracked changes in your printed document.
-
If balloons are turned on, the document will shrink to fit the balloons on the printed page. To make your printed page readable, you can turn off balloons by clicking Balloons in the Tracking group and then clicking Show all revisions inline. You can also set the page layout to landscape to print the balloons and the text in a more readable format. On the Page Layout tab, under Page Setup, click Orientation, and then click Landscape.
-
Change the layout for printing tracked changes
-
On the Review tab, in the Tracking group, click the arrow next to Track Changes, and then click Change Tracking Options.
-
Under Balloons, in the Paper orientation in printing list, click one of the following:
-
Auto When you select this option, Word decides the orientation that will provide the best layout for your document.
-
Preserve When you select this option, Word prints the document with the orientation that is specified in the Page Setup dialog box.
-
Force Landscape When you select this option, the orientation is landscape and the most room is allowed for balloons.
-
Print a list of changes made to a document
-
Click the Microsoft Office Button , and then click Print.
-
In the Print what box, click List of markup.
Hiding changes does not remove changes from the document. You must use the Accept and Reject commands in the Changes group to remove markup from your document.
-
Click the Microsoft Office Button , and then click Print.
-
In the Print what box, click Document (instead of Document showing markup).
Insert or delete a comment
Expand your Office skills Explore training
Track changes in Word
Word for Office 365 Word 2019 Word 2016 Word 2013 Word 2010 Word 2007 More… Less
Turning on Track Changes gives you and your coworkers a way to make changes that are easy to spot. The changes are like suggestions that you can review, and then remove them or make them permanent.
Turn Track Changes on and off by going to Review > Track Changes.
-
When it’s turned on, deletions are marked with a strikethrough, and additions are marked with an underline. Different authors’ changes are indicated with different colors.
-
When it’s turned off, Word stops marking changes, but the colored underlines and strikethrough are still in the document.
To review the changes in your document, go to Review > Tracking > Display for Review.
-
To review the changes, indicated by a red line in the margin, choose Simple Markup.
-
For a detailed view of the changes, choose All Markup.
-
For a preview of how the document will look if you make all the suggested changes permanent, choose No Markup.
-
To view the original document as if all the suggested changes were removed, choose Original.
-
On the Review tab, in the Tracking group, choose Track Changes.
The Track Changes is highlighted, as shown in the following image.
Note: If the Track Changes feature is unavailable, you might have to turn off document protection. On the Review tab, in the Protect group, click Restrict Editing, and then click Stop Protection at the bottom of the Protect Document task pane. (You might need to know the document password.)
You also can add a track changes indicator to the status bar.
-
Right-click the status bar and choose Track Changes.
Note: You now can use the Track Changes indicator on the status bar to turn on or turn off Track Changes.
When you turn off Track Changes, you can revise the document without marking what has changed. Turning off the feature, however, doesn’t remove any changes that have already been tracked.
-
On the Review tab, in the Tracking group, choose Track Changes button.
The Track Changes button no longer is highlighted as shown in the following image.
Important: To remove tracked changes, use the Accept and Reject commands on the Review tab in the Changes group.
What would you like to do?
Display all changes inline
The default in Word is to display deletions and comments in balloons in the margins of the document. However, you can change the display to show comments inline and all deletions with strikethroughs instead of inside balloons.
-
On the Review tab, in the Tracking group, click Show Markup.
-
Point to Balloons, and then click Show All Revisions Inline to show deletions with strikethroughs and comments inline.
Display comments in ScreenTips instead of balloons
The default in Word is to display deletions and comments in balloons in the margins of the document. However, you can change the display to show comments inline. Inline comments can be viewed when you rest your pointer on the comment indicator.
-
On the Review tab, in the Tracking group, click Show Markup.
-
Point to Balloons, and then click Show All Revisions Inline to show deletions with strikethroughs and comments inline.
-
Rest the pointer on a comment in the document. The comment appears in a ScreenTip.
Display changes by type of edit or by reviewer
-
On the Review tab, in the Tracking group, click Show Markup.
-
Do one of the following:
-
Click to select the type of change that you want to display. For example, click Comments or Insertions and Deletions. The check mark next to the item indicates that the item is selected.
-
Important: Even if you hide a type of markup by clearing it on the Show Markup menu, the markup automatically appears each time the document is opened by you or a reviewer.
Point to Reviewers, and then click to clear all check boxes except the ones next to the names of the reviewers whose changes and comments you want to show.
Note: To select or clear all check boxes for all reviewers in the list, click All Reviewers.
Display changes and comments for specific reviewers
An editor or reviewer usually wants to view a document as it will appear after their changes are incorporated. This procedure gives an editor or reviewer the opportunity to see how the document will look with the changes.
-
On the Review tab, in the Tracking group, click the arrow in the Display for Review box, and then choose the option that you want.
-
Final Showing Markup This view displays the final document with all tracked changes and comments showing. This is the default view for all documents opened in Word.
-
Final This view displays the document with all changes incorporated into the text and without tracked changes showing. However, any tracked changes or comments that have not been accepted, rejected, or deleted remain in the document.
-
Original Showing Markup This view displays the original text with tracked changes and comments.
-
Original This view displays the original document without tracked changes and comments showing. However, any tracked changes or comments in the document that have not been accepted, rejected, or deleted remain in the document.
-
Note: If you want to see comments and tracked changes in balloons, you must be in Print Layout view or Web Layout view.
Hide tracked changes and comments when printing
Hiding changes does not remove changes from the document. You must use the Accept and Reject commands in the Changes group to remove markup from your document.
-
Click the File tab.
-
Click Print.
-
Under Settings, click the arrow next to Print All Pages.
-
Click Print Markup to clear the check mark.
What would you like to do?
Review a summary of tracked changes
The Reviewing Pane is a handy tool for making sure that all tracked changes have been removed from your document and won’t show up to others who might view your document. The summary section at the top of the Reviewing Pane displays the exact number of visible tracked changes and comments that remain in your document.
The Reviewing Pane also allows you to read long comments that don’t fit within a comment bubble.
Note: The Reviewing Pane, unlike the document or the comment bubbles, is not the best tool for making changes to your document. Instead of deleting text or comments or making other changes in the Reviewing Pane, make all editorial changes in the document. The changes will then be visible in the Reviewing Pane.
-
On the Review tab, in the Tracking group, choose one of the following:
-
To view the summary at the side of your screen, choose Reviewing Pane.
-
To view the summary across the bottom of your screen, in the Reviewing Pane list, choose Reviewing Pane Horizontal.
-
-
Choose Show Detailed Summary to view the number of each type of change.
Review each tracked change and comment in sequence
-
On the Review tab, in the Changes group, click Next or Previous.
-
Do one of the following:
-
In the Changes group, choose Accept.
-
In the Changes group, choose Reject.
-
In the Comments group, choose Delete.
-
-
Accept or reject changes and delete comments until there are no more tracked changes or comments in your document, and then confirm all tracked changes are accepted or rejected and that all comments are deleted.
-
On the Review tab, in the Tracking group, choose Reviewing Pane.
Note: The summary section at the top of the Reviewing Pane displays the exact number of tracked changes and comments that remain in your document.
Review changes by type of edit or by a specific reviewer
-
On the Review tab, in the Tracking group, do one of the following:
-
In the Show Markup list, clear all check boxes except for those next to the types of changes that you want to review.
-
In the Show Markup list, choose Reviewers, and then clear all check boxes except those next to the names of the reviewers whose changes you want to see.
-
In the Show Markup list, choose All Reviewers to select or clear the check boxes for all reviewers in the list
-
-
On the Review tab, in the Changes group, choose Next or Previous.
-
Do one of the following:
-
In the Changes group, choose Accept.
-
In the Changes group, choose Reject.
-
Accept all changes at the same time
-
On the Review tab, in the Changes group, choose Next or Previous.
-
In the Accept list, choose Accept All Changes in Document.
Reject all changes at the same time
-
On the Review tab, in the Changes group, choose Next or Previous.
-
In the Reject list, choose Reject All Changes in Document.
Delete comments
-
Click the comment.
-
On the Review tab, in the Comments group, click Delete.
To delete all comments at once, click the arrow below Delete, and then click Delete All Comments in Document.
What would you like to do?
You can easily make and view tracked changes and comments while you work in a document. By default, Microsoft Office Word 2007 uses balloons to display deletions, comments, formatting changes, and content that has moved. If you want to see all your changes inline, you can change settings so that tracked changes and comments display the way you want.
Balloons (1) show formatting changes, comments, and deletions.
Note: To prevent you from inadvertently distributing documents that contain tracked changes and comments, Word displays tracked changes and comments by default. Final Showing Markup is the default option in the Display for Review box.
-
Open the document that you want to revise.
-
On the Review tab, in the Tracking group, click the Track Changes button. The Track changes button becomes highlighted, as shown in the following figure.
-
Optional. Add a track changes indicator to the status bar. Right-click the status bar, and click Track Changes. Click the Track Changes indicator on the status bar to turn on or turn off track changes.
-
Make the changes that you want by inserting, deleting, moving, or formatting text or graphics. You can also add comments.
Note: If you use change tracking and then save your document as a Web page (.htm or .html), tracked changes will appear on your Web page.
To turn Track changes off:
-
On the Review tab, in the Tracking group, click the Track Changes button.
The Track Changes button is no longer highlighted, as shown in the following image.
If you customized the status bar to include a track changes indicator, clicking Track Changes in the Tracking group will also turn off the indicator in the status bar.
Note: Turning off change tracking does not eliminate the tracked changes in your document. To ensure that there are no more tracked changes in your document, be sure that all changes are showing, and then use the Accept or Reject commands for each change in the document.
Be aware that there are various ways to hide tracked changes or comments, but all the changes that were made while the Track Changes feature was turned on and all the comments that were inserted remain part of the document until they are accepted or rejected (or, in the case of comments, deleted).
Hiding tracked changes—for example, under Show Markup, clearing the check mark for Insertions and Deletions—doesn’t delete existing tracked changes or comments from the document. Instead, hiding tracked changes enables you to view the document without having to wade through crossed-out text, underlining, and balloons.
There are several ways to hide tracked changes and comments, which may lead you to think that they are not in the document. For example:
-
Display for Review box On the Review tab, in the Tracking group, the Display for Review box shows you what viewing mode you are in. It also provides additional options for viewing your document. If you click Final or Original, tracked changes and comments are hidden. To display them, select Final Showing Markup or Original Showing Markup.
-
Show Markup On the Review tab, in the Tracking group, you can use the Show Markup list to hide comments and tracked changes. Items that are marked with a check mark under Show Markup are displayed; items without a check mark are hidden. To display an item, such as Insertions and Deletions, click it on the Show Markup menu.
The default in Word is to display deletions and comments in balloons in the margins of the document. However, you can change the display to show comments inline and all deletions as crossed out instead of inside balloons.
-
On the Review tab, in the Tracking group, click Balloons.
-
Click Show All Revisions Inline to show deletions as crossed out and comments inline.
There are several options available for changing how tracked changes (markup) is displayed.
-
You can change the color and other formatting that Word uses to mark changed text and graphics by clicking the arrow next to Track Changes and then clicking Change Tracking Options.
Note: While you can’t assign specific colors for changes made by different reviewers, each reviewer’s changes appear as a different color in the document so that you can track multiple reviewers.
-
You can view all changes, including deletions, inline instead of inside balloons that appear in the margins of your document. To show changes inline, in the Tracking group, click Balloons, and then click Show all revisions inline.
When you click Show all revisions inline, all the revisions and comments in the document appear inline.
-
To highlight the margin area where all balloons appear, under Show Markup, click Markup Area Highlight.
-
On the Review tab, in the Tracking group, click the arrow next to Show Markup.
-
Do one of the following:
-
Select the type of change that you want to display.
Note: Even if you hide a type of markup by clearing it on the Show Markup menu, the markup automatically appears each time the document is opened by you or a reviewer.
-
Point to Reviewers, and then click to clear all check boxes except the ones next to the names of the reviewers whose changes and comments you want to show.
Note: To select or clear all check boxes for all reviewers in the list, click All Reviewers.
-
You can use the Display for Review list, in the Tracking group, to view a document at various stages of the edit process. Each of the four options in the list provides a different view of the document. Final Showing Markup is the default when you open any document.
-
Final Showing Markup This view displays the final document with all tracked changes and comments showing. This is the default view for all documents opened in Word.
-
Final This view displays the document with all changes incorporated into the text and without tracked changes showing. However, any tracked changes or comments that have not been accepted, rejected, or deleted remain in the document.
-
Original Showing Markup This view displays the original text with tracked changes and comments.
-
Original This view displays the original document without tracked changes and comments showing. However, any tracked changes or comments in the document that have not been accepted, rejected, or deleted remain in the document.
The default in Word is to display deletions and comments in balloons in the margins of the document. However, you can change the display to show comments inline. Inline comments can be viewed when you rest your pointer on the comment indicator.
-
On the Review tab, in the Tracking group, click Balloons.
-
Click Show All Revisions Inline to show deletions as crossed out and comments inline.
-
Rest the pointer on a comment in the document. The comment appears in a ScreenTip.
To learn more about comments, see Insert and delete comments.
-
On the Review tab, in the Changes group, click Next or Previous.
-
Do one of the following:
-
In the Changes group, choose Accept.
-
In the Changes group, choose Reject.
-
In the Comments group, choose Delete.
-
-
Accept or reject changes and delete comments until there are no more tracked changes or comments in your document, and then confirm all tracked changes are accepted or rejected and that all comments are deleted.
-
On the Review tab, in the Tracking group, choose Reviewing Pane.
Note: The summary section at the top of the Reviewing Pane displays the exact number of tracked changes and comments that remain in your document.
-
On the Review tab, in the Changes group, choose Next or Previous.
-
Do one of the following:
In the Accept list, choose Accept All Changes in Document.
In the Reject list, choose Reject All Changes in Document.
Office Word 2007 provides a feature called Document Inspector that allows you to check any document for tracked changes, comments, hidden text, and other personal information. To check a document:
-
Open the document you want to inspect for tracked changes and comments.
-
Click the Microsoft Office Button , point to Prepare, and then click Inspect Document.
-
In the Document Inspector dialog box, click Inspect.
-
Review the inspection results. If Document Inspector finds comments and tracked changes, you are prompted to click Remove All next to Comments, Revisions, Versions, and Annotations.
-
Click Reinspect or Close.
Before you print the document, switch to Print Layout view and display the tracked changes and comments the way that you want them to appear in the printed document. You have several options.
-
Print showing all markup On the Review tab, in the Tracking group, click Show Markup.
Note: Clicking Show Markup displays or hides all markup in the document for selected reviewers. When you display all markup, all types of markup are selected on the Show Markup menu.
-
Print showing changes and comments by type or reviewer On the Review tab, in the Tracking group, click Show Markup, and then select the type of change that you want to display.
-
Print changes and comments for an editor or other reviewer On the Review tab, in the Tracking group, in the Display for Review box, click Final Showing Markup.
When the markup appears the way that you want it to, you are ready to print the document.
-
Click the Microsoft Office Button , and then click Print.
-
In the Print dialog box, in the Print what box, click Document showing markup, and then click OK.
Notes:
-
By default, Microsoft Word chooses the zoom level and page orientation to best display the tracked changes in your printed document.
-
If balloons are turned on, the document will shrink to fit the balloons on the printed page. To make your printed page readable, you can turn off balloons by clicking Balloons in the Tracking group and then clicking Show all revisions inline. You can also set the page layout to landscape to print the balloons and the text in a more readable format. On the Page Layout tab, under Page Setup, click Orientation, and then click Landscape.
-
Change the layout for printing tracked changes
-
On the Review tab, in the Tracking group, click the arrow next to Track Changes, and then click Change Tracking Options.
-
Under Balloons, in the Paper orientation in printing list, click one of the following:
-
Auto When you select this option, Word decides the orientation that will provide the best layout for your document.
-
Preserve When you select this option, Word prints the document with the orientation that is specified in the Page Setup dialog box.
-
Force Landscape When you select this option, the orientation is landscape and the most room is allowed for balloons.
-
Print a list of changes made to a document
-
Click the Microsoft Office Button , and then click Print.
-
In the Print what box, click List of markup.
Hiding changes does not remove changes from the document. You must use the Accept and Reject commands in the Changes group to remove markup from your document.
-
Click the Microsoft Office Button , and then click Print.
-
In the Print what box, click Document (instead of Document showing markup).
Insert or delete a comment
Как в Word 2013 копировать и вставлять текст с исправлениями — Microsoft Excel для начинающих
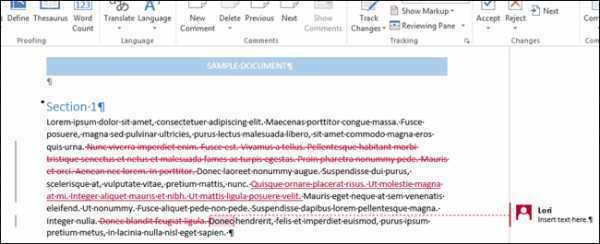
Инструмент «Исправления» в Word нужен для отслеживания изменений, сделанных в документе. Он особенно полезен при совместной работе над документом с другими пользователями. Иногда необходимо скопировать текст в другой документ, сохранив историю исправлений. Эта задача кажется простой, но на деле она сложнее, чем просто скопировать и вставить текст.
Сперва выделите текст с изменениями.

Первый секрет копирования исправлений вместе с текстом: нужно обязательно отключить опцию Track Changes (Исправления). Для этого откройте вкладку Review (Рецензирование). Если в разделе Tracking (Запись исправлений) кнопка Track Changes (Исправления) подсвечена синим, это значит, что опция включена. Нажмите нижнюю часть этой кнопки и выберите из выпадающего меню пункт Track Changes (Исправления). Теперь, когда опция отключена, у кнопки нет подсветки.
Примечание: Если не отключить функцию Track Changes (Исправления), Word решит, что Вы хотите скопировать текст в таком виде, как если бы все изменения были приняты, и исправления применятся.

Нажмите Ctrl+C, чтобы скопировать текст. Создайте новый документ, в него мы вставим скопированный текст.
Примечание: Текст можно вставить в любой существующий документ Word.
Откройте вкладку File (Файл).
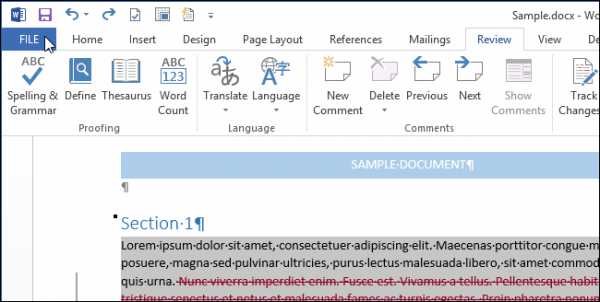
В левой части окна нажмите New (Создать).

В разделе New (Создать) кликните по Blank document (Новый документ).
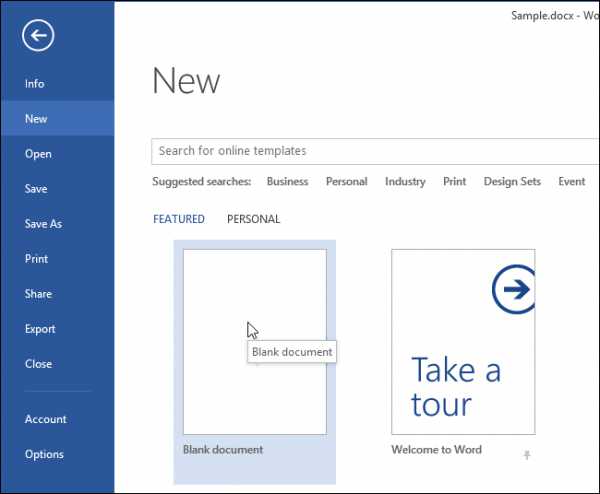
Второй секрет успешного сохранения исправлений в скопированном тексте: отключите опцию Track Changes (Исправления) в том документе, куда собираетесь вставить скопированный текст. Затем нажмите Ctrl+V, и скопированный текст вставится вместе с исправлениями.
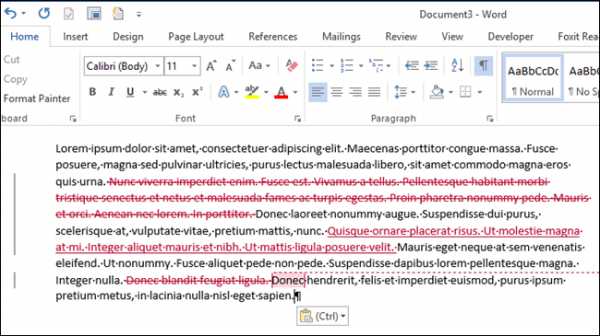
Для копирования текста можно воспользоваться инструментом «Копилка», что особенно удобно, если Вы копируете несколько несмежных блоков текста и/или изображения.
Оцените качество статьи. Нам важно ваше мнение: