
Приветствую вас, дорогой человек! Как импортировать документы .docx из MS Word в WordPress? Легко. Пост для тех кто пишет статьи не в редакторе WP, а например, в Microsoft Word или у вас есть давнишние/старинные записи в формате .docx которые пылятся на жестком диске. А может вам присылают статьи в формате Word .docx для публикации на вашем веб-ресурсе.
Копировать и вставлять их в ручную не удобно, долго, да и в тексте часто используют изображение которое не скопируешь из документа в редактор ВордПресс. Как автоматически перенести материал/статьи/контент из MS Word в WordPress сохранив форматирование? Импорт содержимого ворд файла в ВордПресс. Сегодняшний пост посвящается.

Как импортировать документы .docx в WordPress
Импорт всего содержимого из документов .DOCX в WordPress осуществляется по «щучьему велению, моему хотению», то есть, при помощи специального плагина.
Таких модулей будет сегодня представлено — парочка. Первый самый простой, работает хорошо, сам использовал. И так, быстрый импорт файлов Microsoft Word (.docx / doc) в WordPress.
Плагин Mammoth .docx converter
Хотите импортировать документы .docx в WordPress вместо копирования/вставки, что обычно нарушает форматирование? Тогда вперёд, друзья.

Плагин Mammoth .docx converter это — самый простой и легкий способ импорта документов Word (.docx) в WordPress. Модуль поддерживает такие функции:
- Заголовки преобразуются в теги h1, h2 и т. д.;
- Списки;
- Сноски;
- Таблицы. Форматирование самой таблицы, например границ, в настоящее время игнорируется, но форматирование текста обрабатывается так же, как и в остальной части документа.
- Простое форматирование HTML: жирность, курсив, надстрочный и подстрочный текст;
- Изображения, вставленные в документ, импортируются в WordPress
- Ссылки;
- Текстовые блоки конвертируются в простые абзацы.
Установить данный плагинчик можно стандартным способом, через вашу админку — Плагины — Добавить новый. В поисковую строку вводите его название, устанавливаете, а после активации у вас на экране редактирования/создание записи под редактором сообщений вы увидите поле Mammoth .docx converter:

А дальше, выбираете файл .docx на компьютере и загружаете. Как только вы загрузите файл .docx, мамонт покажет вам 3 вида документа. Вкладка Visual — вы увидите, как будет документ отображаться в WordPress:

Вы ещё можете просматривать HTML, созданный конвертером, нажав на кнопку Raw HTML. Вы можете нажать на кнопку сообщений и проверить, есть ли какие-то предупреждения или ошибки во время конвертации. Если вам всё нравится, как выглядит документ во вкладке Visual, то смело нажимайте на волшебную кнопку Insert into editor. Плагин вставит конвертированный HTML в ваш редактор записей WordPress. Далее, вы можете продолжать работать над сообщением. Просто супер — пупер! Идём дальше — к плагину посложней, вернее, у него больше функций, то есть, возможностей.
Плагин WordPress Seraphinite Post .DOCX Source
Если вы используете MS Word для написание статей для сайта на ВордПресс. То вам понадобится автоматический перенос материалов из MS Word в WordPress с помощью специального плагина. Экономьте свое время, автоматически конвертируя из .DOCX в контент со всеми атрибутами сообщений WordPress.

Seraphinite Post .DOCX Source — плагин автоматизирует перенос контента из документа MS Word в редактор сообщений WordPress. Данный плагин я не пробовал, узнал о нём только сегодня. Есть пост о нём на habrahabr от разработчика — https://habrahabr.ru/post/311420/. Функций больше чем у Mammoth, например может импортировать из документа .DOCX гиперссылки, теги, название и описание SEO и другое. Блочный редактор Гутенберг тоже поддерживается.
После установки и активации plagina также появится мета-окно .DOCX Source под редактором сообщений, где нужно отмечать нужное для импорта:

Вот пример форматирования текста, который использует разработчик данного чуда. Выделены ключевые слова, используются комментарии, присутствуют ссылки на будущие неопубликованные материалы. Известно, что ссылки на другие связанные статьи способствуют как SEO продвижению, так и удобству навигации конечным читателем:

Seraphinite Post .DOCX Source также легко устанавливается через вашу админку.
Хотите импортировать документы .docx в WordPress, сохранив форматирование, вместо того, чтобы постоянно копировать и вставлять куски текста? Тогда эти инструменты для вас, дамы и господа. С ними легко автоматически публиковать статьи из документа Word в CMS WordPress. Жизнь блогера станет намного легче.
А здесь, читайте — Публикация записей из Microsoft Word в WordPress.
На этом моё субботнее повествование завершается. Надеюсь, друзья, вам было полезно. До встречи! И главное, удачи всем вам без исключения.
As the project champion for my community college’s Open Learning Lab, I help literally hundreds of students, faculty, and other academics get started with their own WordPress sites.
I often encounter people who prefer to write in Microsoft Word rather than the default WordPress post editor.
They’re comfortable with Word. They know Word.
They assume they need to write first in Word and then copy-and-paste into WordPress.
I used to think the same thing but I just discovered there’s an easier way to move Word into WordPress.
MS Word offers a way to write and post directly to a WordPress blog/site without using copy-and-paste.
While the method has been around for a long time apparently–it’s possible in Word 10, Word 13, and Word 16.
I’ve only just discovered it. It’s easy and it works well.
In many ways, it’s easier than copy-and-pasting content. In my explanation here, I’ll use Word 16 as an example. The others are similar but might appear slightly different.
Steps to Blog From Word to WordPress
Create the Document
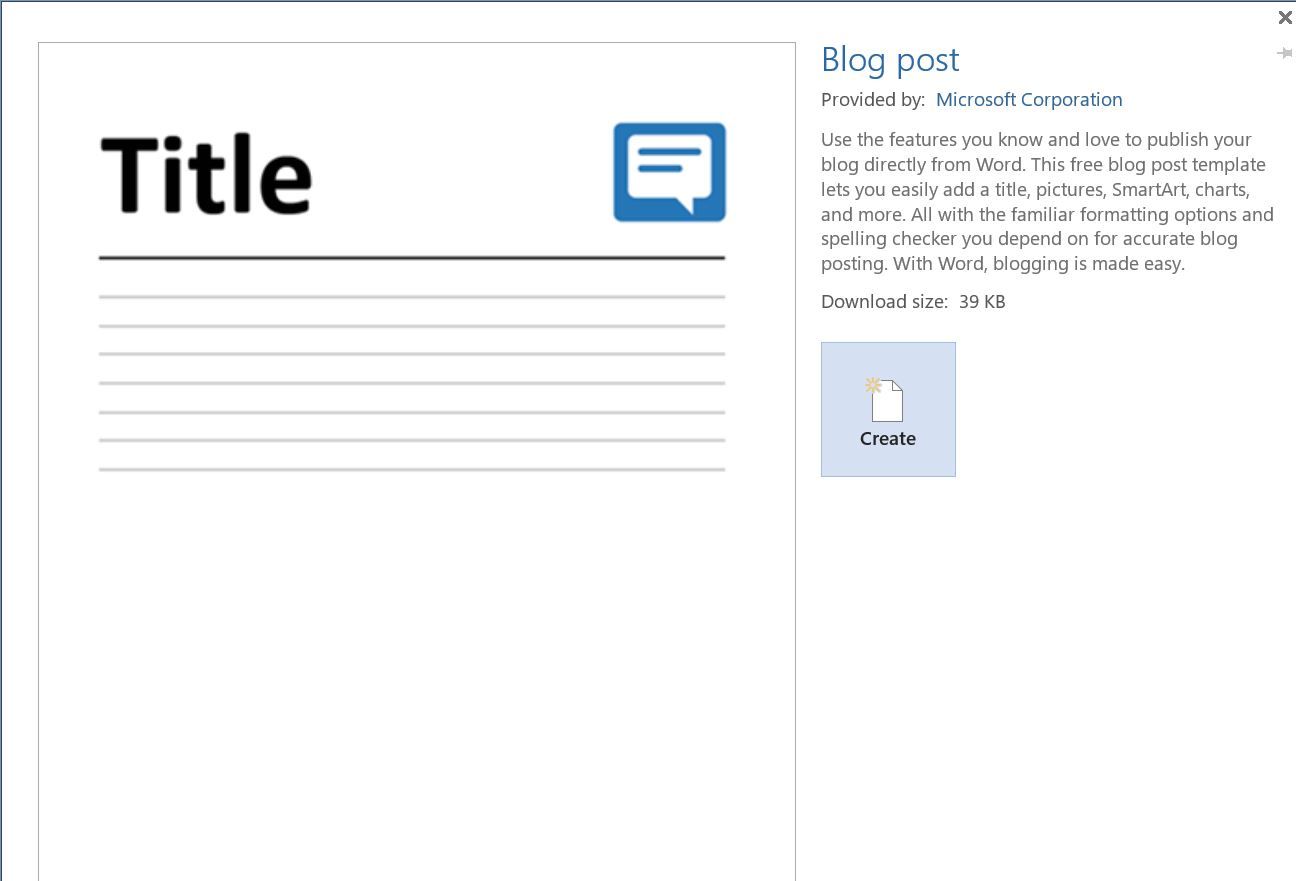
The first step is to create a new Word document by using the “Blog Post” template.
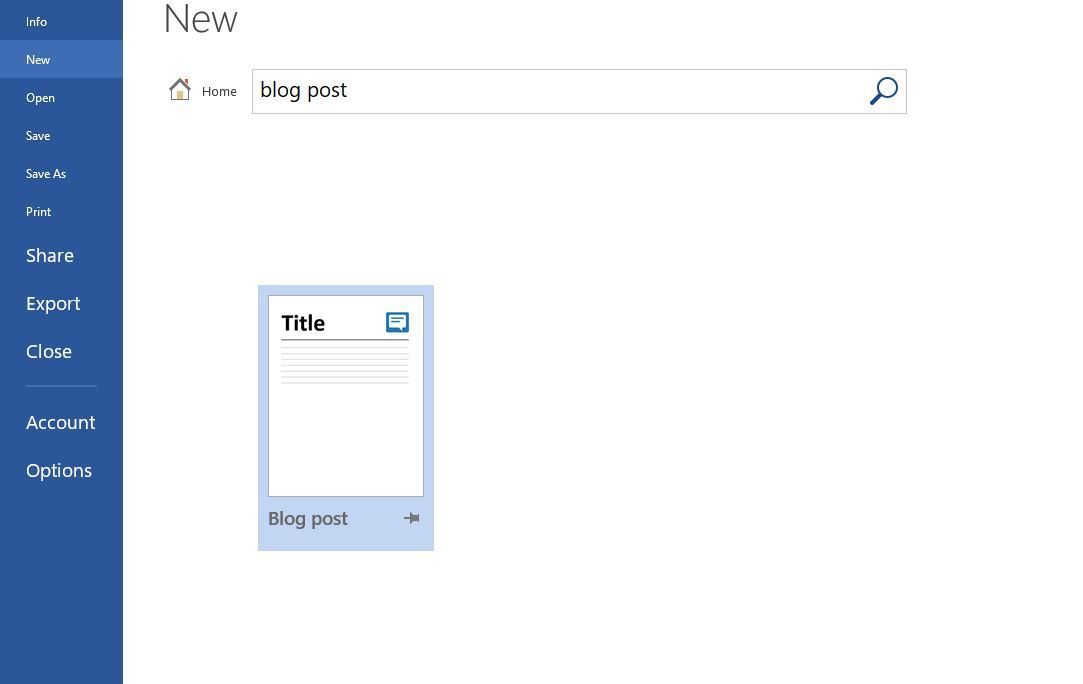
From the Word File menu > New, you’ll be prompted to select either a blank document or a template.
You want to use “Blog Post” template. If you don’t see it displayed right away, try searching for it.
When the template opens with you’ll see that the normal Word menus and the “ribbon” have changed.
Basically the menus and buttons have been slimmed down to only what’s relevant to creating a post for your blog.
Here’s a partial screen shot of the slimmed down interface.

Writing Your Post
There are only three menus listed on the tool bar: File, Blog Post, and Insert.
The file menu is the standard Word file menu you can use to save a local copy, save as, print, etc.
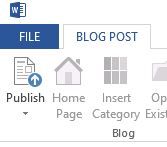
The second menu/ribbon is labeled Blog Post and is shown in the screen shot above.
Except for the first five buttons on the left, the buttons available here correspond very closely to what you can do in the WordPress editor.
You can bold, italicize, change alignment, indent/outdent, change text color, change font size, and select paragraph/headings 1-6, etc.
I’ll get to those first five buttons in a moment when we want to actually publish.
To write your post, start typing. The first line has a horizontal rule below it and says “[Enter Post Title Here].”
Replace that text field with your title for your post. This corresponds exactly to the WordPress title box.
Immediately below the horizontal rule is a line that identifies the blog account you have connected to Word.
If you haven’t connected it yet, it will only say “Account.” We’ll connect to your blog when we publish.
On the next line, you start typing and writing your post. Style it using the buttons just as would in the WordPress visual editor.
Adding Media
In WordPress we’re accustomed to using the “Add Media” button to insert graphics and other media.
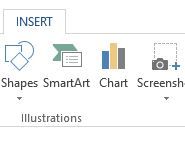
The Word equivalent is the Insert menu. You also use the Insert menu to insert hyperlinks.
In many ways, the Word Insert menu offers capabilities beyond the normal WordPress Media Library since you can take advantage of Word’s regular insert features to not only insert pictures, but also shapes, SmartArt, screenshots, WordArt, symbols, and even Wikipedia quotes.
Connecting and Publishing Your Post
Once you’re finished and you think your post is ready to publish, you will need to connect Word to your WordPress site.
This need only be done the first time and you can have Word remember your connection.
Now we’re ready for those first five buttons on the left in the Blog Post menu, as shown here.

To connect Word to your site, you’ll need to select the Manage Accounts button. A dialog box opens listing all the sites you’ve connected to Word.
Of course since this is the first one, the list is blank. Select New, and another dialog box opens as shown below.

In this last dialog box, there’s a drop down menu to select your blog provider. Select WordPress. This is true for both WordPress.com and self-hosted WordPress sites.
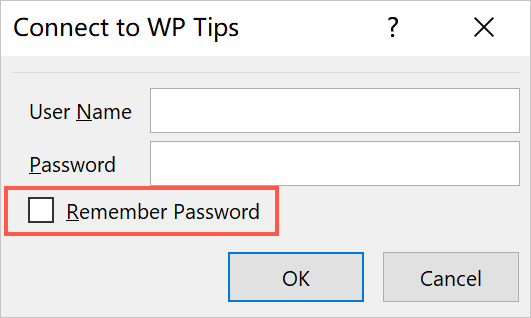
On this next dialog box, the New WordPress Account box, you need to enter three things:
- Blog post URL
- Your user name for your WordPress site
- Your WordPress password
You have the option to have Word remember your settings so you can skip this step in future posts. You also have some options for how pictures get handled.
The default is to upload pictures to your WordPress Media library. If you have an alternative server for images, you can configure Word to upload your images to that server and insert image-from-URL into WordPress.
Tip: The blog post URL is the address for your WordPress Site xmlrpc interface. It is typically of the form:
http(s):// <your blog URL> /xmlrpc.phpThis entry is very picky, especially regarding whether you are using http or https. (you are using https, right?)

Select OK. Select Close. And you’re ready to publish.
Once you have your site(s) entered and connected to Word, you can publish any post simply by selecting the Publish button.
If you have multiple sites connected, the Publish button becomes a drop-down menu listing your sites.
When you select Publish, the entire post gets uploaded including the graphics and media in just one step.
Pros & Cons of Using Word to Post to WordPress
Using Word has several advantages over using the default WordPress editor.
First, you can work offline. It also becomes easier to collaborate on a post or document with others in the draft phase–simply keep the Word draft copy in a sharable or cloud location and share the document with others.
This way you can collaborate with others without having to add them as a user in your WordPress site. You can also get all those great additional graphics insertions such as WordArt, symbols, etc.
The downside of using Word is that while it is easy and the resulting post will look the same in WordPress as it did Word, there might be some additional messiness in the HTML.
Word, of course, is notorious for creating very poor HTML code from Word documents. This method isn’t as bad as saving to HTML from Word, but it’s not as clean as the native WordPress editor might create.
If it’s critical for your posts to have very clean, neat HTML code, you probably should use the WordPress editor.
The other potential downside is that it depends on the xmlrpc interface in WordPress. Xmlrpc has been around a long time and has its own share of criticism.
The WordPress API is beginning to displace much of what xmlrpc did before and some developers are calling for xmlrpc to be removed.
If that happens, then this trick won’t work. We’ll need someone to write an API interface.
By the way, xmlrpc doesn’t work with Google Docs. If you want to connect Google Docs to your WordPress blog and publish directly, you’ll have to use the WordPress Jetpack plugin.
Give it a shot and tell us what you think.
If you’re into the blogging or publishing world, you’ve certainly come to a moment when you want to have a copy of the information in your Microsoft word document transferred into your WordPress posts or pages.
Yes, this can be achieved by simply copy-pasting into your WordPress post or page, but something weird will happen. You’ll lose all your document formatting and styles such as headings, and hyperlinks among others. And in most cases, longer pages from your Word document will take you time to format again in your newly created page or post in WordPress.
Advertisements
Now, there are several ways to have your Ms word document imported in any WordPress post or page with no hustle and keep all the formatting you had done in the word processing.
In some of these methods, I will share with you in this post, when you import your Ms word document into WordPress, all your images and other attachments within the Ms Word will be imported into the WordPress post or page with no hustle and yet maintain the same image quality and dimensions. This saves alot of your time.
Here is a video version of this blog
If you don’t like the video, continue reading…
Requirements
WordPress Site
To be able to execute fully all that I will mention in this post, you should either own or operate an existing WordPress site. With this, you can create pages and posts.
Advertisements
Plugins (Installed And Activated)
I will list the plugins that you need to download from the WordPress repository. When installed, you’ll kindly follow the steps I have shared in the article.
Ms Word Document
The needed document to import into WordPress should be already created and saved anywhere on your local machine / pc or cloud.
And finally, here is how to import a word document into a WordPress page or post.
1. Using the Google Drive Embed Plugin (Closed)

Advertisements
This plugin grants you an easier way to access your Google Drive in a popup box, where you can select documents to embed directly into their post or page. Just as easily as picking a photo from the WordPress media gallery.
Documents can be embedded in-line, using Google’s read-only interactive viewer for your audience to read them. Documents can also be placed in your site as links to open up editable files (either in the same or a new browser tab), or downloaded straight to the computer.
You will need to set document-sharing settings to ensure your website viewers have access to view your documents (e.g. at least ‘anyone with the link can view’ to be visible to all visitors).
Displays many file types such as PDF, Word DOC, ZIP, Videos, Images etc plus native Google docs (Spreadsheet, Drawing, Forms, etc). Step through a list of your Drive files or search to find the one you’re looking for.
Advertisements
Choose from:
- Viewer file link – full-page Google viewer and editor
- Download file link – directly download file to your computer (disabled for native Google doc formats)
- Embed document – display most file types inline in your posts or pages (non-Google file types need sharing settings at least ‘anyone with the link can view’)
Useful for public websites or private intranets (all visitors should be able to view files as long as sharing settings are ‘anyone with the link can view’ or higher in Google Drive).
Works on all WordPress installations including multisite networks.
Requirements:
Google Drive document embedding and one-click login will work for the following domains and user accounts:
- G Suite Basic (Google Apps for Work)
- G Suite Business (Google Apps Unlimited for Work)
- G Suite for Education (Google Apps for Education)
- G Suite for Non-profits (Google Apps for Non-profits)
- G Suite for Government (Google Apps for Government)
- Personal gmail.com and googlemail.com emails
Google Apps Login plugin setup requires you to have admin access to any G Suite domain (formerly Google Apps), or a regular Gmail account, to register and obtain two simple codes from Google.
Advertisements
2. Using the Mammoth .docx Converter WordPress Plugin

This tool is designed to help you convert .docx documents, such as those created by Microsoft Word, and convert them to HTML. Mammoth aims to produce simple and clean HTML by using semantic information in the document and ignoring other details. For instance, Mammoth converts any paragraph with the style Heading1 to h1 elements, rather than attempting to exactly copy the styling (font, text size, colour, etc.) of the heading. This allows you to paste from Word documents without the usual mess.
Mammoth works best if you only use styles to semantically mark up your document.
The following features are currently supported:
- Headings.
- Lists.
- Tables. The formatting of the table itself, such as borders, is currently ignored, but the formatting of the text is treated the same as in the rest of the document.
- Footnotes and endnotes.
- Images.
- Bold, italics, superscript and subscript.
- Links.
- Text boxes. The contents of the text box are treated as a separate paragraph that appears after the paragraph containing the text box.
3. Using Embed Any Document Plugin

Embed Any Document WordPress plugin lets you upload and embed your documents easily in your WordPress website without any additional browser plugins like Flash or Acrobat reader. The plugin lets you choose between Google Docs Viewer and Microsoft Office Online to display your documents.
Supported file types
- Microsoft Word (docx, docm, dotm, dotx)
- Microsoft Excel (xlsx, xlsb, xls, xlsm)
- Microsoft PowerPoint (pptx, ppsx, ppt, pps, pptm, potm, ppam, potx, ppsm)
- Adobe Portable Document Format (pdf)
- Text files (txt)
- TIFF Images (tif, tiff)
- Adobe Illustrator (ai)
- Scalable Vector Graphics (svg)
Advertisements
With Embed Any Document plugin, you’re able to
Easy to Upload and Embed: Embed Any Document is integrated seamlessly into the post editor. With a click of ‘Add Document’ button it lets you upload documents directly into media library and embed them.
No 3rd party plugin needed: The plugin uses Google Docs Viewer and Microsoft Office Online’s services to display the documents on your website. You will not require any additional browser plugins to view the documents and you can expect maximum compatibility for your documents.
Option to choose the viewer: You can choose between Google Docs Viewer and Microsoft Office Online to display your document. If one service is down, you can switch to another easily.
Cross-browser compatibility: The viewers are mobile-ready and cross-browser-compatible.
Clean and Minimal UI: Embed Any Document comes with a clean and clutter-free UI.
This plugin will seamlessly embed and display PDF, Microsoft Word, Excel and PowerPoint documents on your WordPress website.
4. Using the Aspose DOC Importer WordPress Plugin

Aspose Doc Importer Plugin for WordPress allows developers to get/read contents of Microsoft Word (doc/docx) document without requiring Microsoft Office. This module demonstrates very powerful Import feature provided by Aspose.Words .
It adds a simple button above Editor in WordPress and asks for the Doc file to be imported into the editor. Once the Doc or Docx file is provided, users get the document contents displayed on the editor immediately.
Advertisements
With Aspose, you’re able to
Read text from the doc file: You can click on the “Aspose Doc Importer” button, it will popup a box, which will display two tabs “Select Local Files” & “Select Aspose Cloud Storage File”.
You can click on “Select Doc file” button and select a doc file from your local machine, after successful upload, you need to click on the “Insert DOC to editor” button. It will put the text from the selected doc file to the editor.
Read text from cloud: Functionality of reading text from the doc file located at Aspose Cloud Storage.
Note: This Plugin works only with PHP version 5.3 and above.
Also Read: Elementor Landing Page – A Step by Step Guide
In Conclusion
There are several other ways you’ll come across in your search like paste as text option in WordPress itself, copy-pasting your word document into your blogger site page or page and then copying text code into WordPress page or post dashboard.
Both those options won’t enable you to have any of the attachments, a number of formatting come along with your document.
The other downside of using the fore mentioned tricks is that, they take time since you need to reformat the document over and over again which is time-consuming.
However, using one of the plugins I mentioned in this blog to import an MS word document into a WordPress post or page will not only save you time, but will keep your original document formatting, and attachments and above all, easy and fast.
Advertisements
If you as a publisher or digital creative designer and you have come across any other way of importing a word document into WordPress without losing the original document settings and formatting, kindly share will me in the comment section.
I find the methods I mentioned here very helpful to me as a digital creative, designing websites, and uploading and publishing content every other day.
Share your views in the comment box below.
Do you use Microsoft Word to write WordPress posts? Here’s a simple way to blog directly from the application.

Using your WordPress blogging editor for the first time can be rather hectic. Having to learn the controls and figure out your way around is not easy. Luckily, you could use Microsoft Word instead of struggling with your blogging site editor.
Here are some instructions to guide you in setting up Microsoft Word to create and edit posts for your WordPress blog.
Set Your WordPress Blog Account to Accept Posts
Before trying to link your blog to your WordPress account, you need to ensure that it will accept any posts from Microsoft Word. Although most new versions of WordPress accept outside posts by default, it is best to confirm the status of your site before proceeding manually.
- Go to the Admin settings in your WordPress blog account.
- Click on Settings > Writing > Remote Publishing.
- Check the XML-RPC.
- Click Save Changes.
Method 1: Draft Your Blog Post Account From Microsoft Word
One of the simplest ways to use Microsoft Word for your blog post is to draft it on Word before copying it to your blog’s editor. This method gives you the freedom to format your blog fully before publishing it.
The only downside with this method is that it may not convert some formatting to HTML. However, you can solve this by pasting your text in another editor, such as Google Docs, before copying it into your blog editor.
You could also use HTML cleaning tools to get rid of extra formatting that the blogging editor may not feature.
Method 2: Link Your Microsoft Word to Your Blog Account
A better way would be to link your blog account to your Microsoft Word. The process is pretty simple and may save you the trouble of copy-pasting every now and then.
You can either link your Word to a new or existing blog post.
Registering New Blog
- Open your Microsoft Word and click on File, then New, and select Blog post. Some versions may require you to click on Create.

- You can also find it by performing a search using the search bar as shown below.

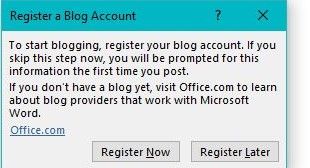
- A dialog box will appear asking you to Register a Blog Account.
- Click on Register Now. Feed-in all the necessary information as prompted.

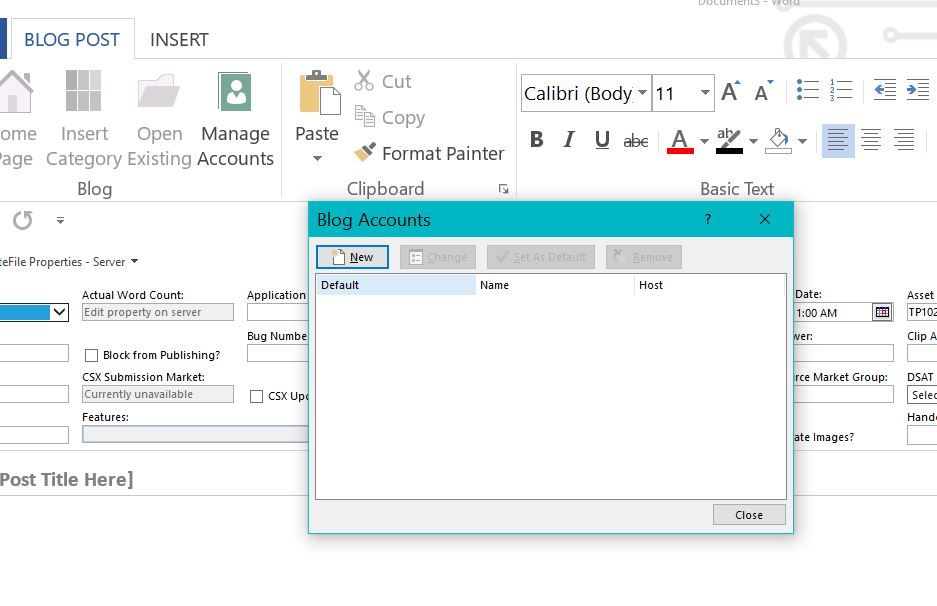
- Alternatively, click on the Blog Post tab, select the blog group and Click on Manage Accounts, then New.

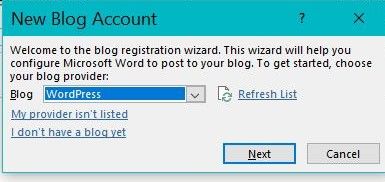
- A New Blog Account will appear. Here, click on the Blog drop-down arrow and select WordPress. Click Next.
- Feed-in the required information such as your username, password, and your blog URL.
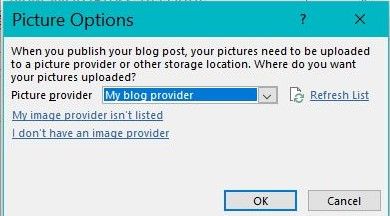
- Change your Picture Options to determine whether you will directly upload the pictures from Word or through your WordPress blog editor.

- Select OK to sign in to your account. Only do this when you are sure of all the details you have provided.
- If this does not work, try linking Microsoft Word to your blog by using your account settings. Check out the Dashboard or Admin in your blog. Check out for Remote Publishing.
Link an Existing Blog
- Open the New Blog Account dialog box in your Microsoft Word and click on your blog provider. For providers that are not listed here, click on Other.

- Click on Next.
- Fill in your account information as prompted. Your data should be accurate. Ensure to use your blog’s username and password.

- Activate the pictures feature by clicking on Picture Options and indicating how you want to upload your images.
- Click OK.
Write, Publish, Draft or Edit Your Blog Posts on Microsoft Word
After linking your blog post to your Microsoft Word, you are now ready to draft your content. You can do this by typing your text into the Blog post template you have created. You can also perform other tasks such as editing through these processes below.
Adding Content to Your Blog Post
- Select your Blog Post Template.
- If you want to apply styles, use the clipboard, enter basic text into your blog post, and click on Blog Post.

- On the other hand, if you intend to add media such as hyperlinks, select the Insert tab.

- Create the title for your blog post.
- Place the cursor beneath the title and start typing in your content. You can format it as you wish.

- Add a category to your post by clicking Insert Category.
- When done with your post, click Publish.
- You could choose to Publish as Draft. This option allows you to preview your blog post and see what it would look like if it went live.
Adding Images to a Post
- Set your cursor to the intended picture location.
- Select the Insert tab and click on Picture.
- Browse the Insert Picture dialog box for the image you want to upload.
- Select the image, then Insert.
- Use the Picture tools to edit the pictures and change how they appear.


Adding Hyperlinks to Your Blog Post
- Select your intended link text.
- Click on the Insert tab.
- Select Hyperlink.
- Type the URL into the Address box.
- Click OK.
Edit an Existing Blog Post
If you are working on a lengthy blog post or have to change something from an existing post, it is quite simple.
- To edit an existing blog post using Word, go to File, select Open Existing, and choose your existing blog post.
- Select the blog post you want to edit and click OK.
- You can now edit your blog post as you desire.
Please note that these may vary across various versions of Word. However, you can easily find the necessary controls once you get the basic concept.
Adding Your Feature Image
Adding a featured image to your WordPress blog is one of the few things you cannot do directly from Microsoft Word.
To add a featured image to your blog post, you may have to directly insert it from your WordPress blog account.
Why Use Word to Post to WordPress
Using Word to post your WordPress blogs has a number of advantages. It allows you to work offline before adding your content to the blog account.
This option also allows you to share your blog post with other contributors without giving them access to your WordPress editor. Word also allows you access to special features and graphics such as Word Art.
Use Microsoft Word For Your Blogging Today
Setting up your blog and keeping it running has never been easy. You have to come up with plenty of relevant content and keep your readers hooked. You do not want to spend more time figuring your way around a complicated blog editor.
Using Microsoft Word will help you save plenty of time while maintaining a lovely and relevant blog for your readers.
WordPress is the popular content management system for blogging. However, it is not a good idea to sit in front of your WordPress editor and prepare content online. Many bloggers prefer to prepare content using text editors like Microsoft Word. It will be an easy task to copy and paste the content from Word to WordPress editor and upload images. If you follow this workflow, do you ever wonder directly publishing blog posts from Microsoft Word to WordPress without opening the admin panel? Yes, it is super easy and we will explain how to do that in this article.
What You Need?
You need the followings, in order to share blog post from Word to WordPress.
- WordPress admin username and password. You can use both WordPress.com and WordPress.org blog for sharing posts from Word.
- XMLRPC link, it should be like https://www.yoursite.com/xmlrpc.php. If you have installed WordPress on subdirectory then change the URL accordingly. Remember, many security plugins block XMLRPC from public access. Make sure you are not blocking the access.
- Microsoft Word on Windows laptop or PC. We do not see the blog post sharing option is available in Word for Mac.
Document Sharing in Microsoft Word
You can either prepare a new document or share the one already you have on the computer to your WordPress blog. Open the document and go to “File > Share” menu.
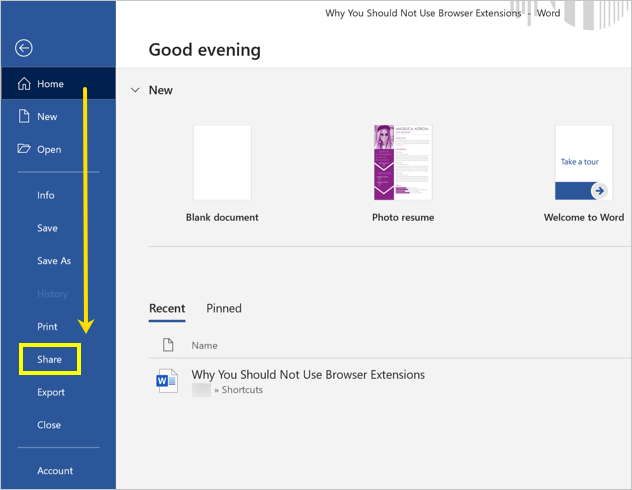
Select “Post to Blog” option to see the list of available options. Word offers direct blog post sharing for SharePoint Blog, WordPress, Telligent Community and TypePad platforms. At this point, you do not need to select the platform and click on “Post to Blog” button to proceed further.

Word will prompt you to register your blog account. Click “Register Later” button to connect with your WordPress account after preparing the content.

Preparing Content in Word
Word will open your document with different publisher view. You can ass blog post title and edit or create your content similar to creating normal Word documents.
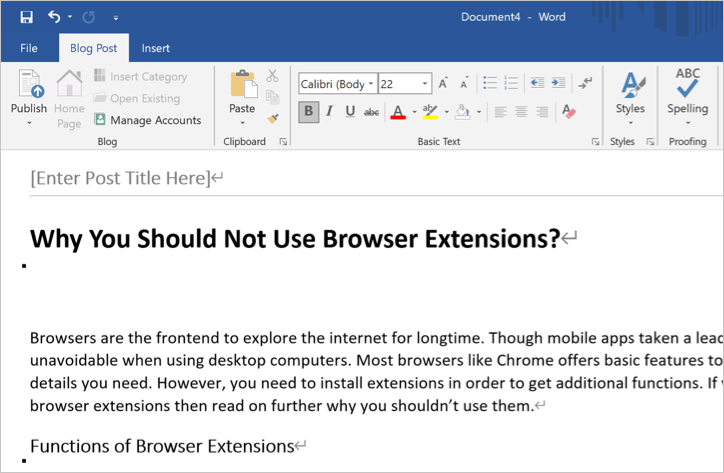
At this point, you can’t assign category to your post since you did not connect your WordPress account.
Publishing Blog Post
After your content is ready, click on the “Publish” button. You can either publish the content as a live post or add in your blog in draft status.

Connecting to WordPress Account
Now, Word will ask you to register the blog account to post the content and click on the “Register an Account” button.

Click on the blog provider dropdown and choose “WordPress” option and click “Next” button.

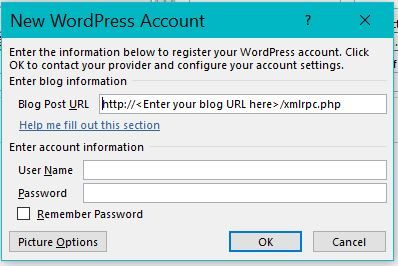
On the next “New WordPress Account” dialog box, you have to provide the XMLRPC and admin details.

It may be confusing to see the “Blog Post URL” will be showing as “http://<Enter your blog URL here>/xmlrpc.php”. You should not enter the blog post URL here, Word will automatically consider the title as the post URL slug in WordPress. In this text box, you need to simply enter the XMLRPC link like “https://www.yoursite.com/xmlrpc.php”. under “Enter account information section, provide you WordPress admin username and password that you use to login to your dashboard.

If you want to change the image uploading option, click on the “Picture Options” button. Here you can choose the provider for your images. In normal case, you should leave this as it is as “My blog provider”.

Click on “OK” buttons to connect Word to your WordPress account. After successful connection, you should see a message like below:

In case of errors, you will see a message like below. Click on “More Information” button to get additional details of the error. Most probably, you should check and provide correct username and password.

When the account is connected, you will see a post published message on top of the document. You can login to your WordPress admin panel and check the post is added with published or draft status as you have selected in Word.
Editing Existing Blog Posts
In addition to posting new blog posts, it is also possible to edit any of your existing post on the connected WordPress site. click on the “Open Existing” menu under “Blog Post” tab. This will show you the list of all available blog posts on your site. select the post you want to edit and click on “OK” button.

You can edit the content and assigned category. It is also possible to add additional categories by clicking on “Insert Category” button and choose from the dropdown list. After finishing editing, click on “Publish” button to update it on your live blog.

Managing Blog Accounts
Word allows you to connect multiple accounts from WordPress and other available blogging platforms. You can click on “Manage Accounts” to see all available accounts. If you do not want to use the sharing, simply select the account and click on “Remove” button to delete the connection.

If you like the sharing of blog posts from Word to WordPress directly, then check the box that shows “Remember Password”. This will help to avoid providing username and password every time when publishing content.
Some Glitches in Sharing
This process is very simple and useful for those wanted to share content frequently from Word to WordPress. However, it has some minor glitches.
- Word does not offer tags which is widely used in WordPress blogs.
- Though Word uploads all inserted images, all of them will have the same name as title suffixed with incremental number. Unfortunately, Word ignores caption and alt text if added to the images in documents when posting in WordPress. This does not make sense when you have meaningful images and need to change all images Alt text one by one.
- You can share a blog post only with .docx file extension. In case, if you have old .doc documents, first convert them into .docx before sharing.
- Blog post sharing is available all Word version for Windows. However, this option is not available in Word for Mac version.
Final Words
In our opinion, sharing blog posts from Word to WordPress is a useful function especially when you have plenty of text to publish. You can quickly, write down your thoughts in Word with proper formatting and alignment to share to your blog in few clicks. We recommend you to share as a draft so that you can preview from WordPress admin panel and adjust before publishing live. Make sure to add proper caption and alt text to your images and assign tags and multiple categories if needed.
Время на прочтение
3 мин
Количество просмотров 9.5K
Сегодня для продвижения сайта через SEO (Search Engine Optimization – настройка ресурса под выдачу в поисковиках) нужно делать материалы высокого уровня. Контент должен быть уникальным, полезным и оптимизированным под запросы поисковых систем.
- Уникальность помогает быть увиденными поисковиками.
- Качество (грамотность, структура, дизайн) и полезность материалов оценивается и читателями и поисковиками (время, проведенное пользователем на вашей странице, интерпретируется поисковыми системами как интересность контента для публики).
- Оптимизация нужна, т.к. все вышеперечисленное не будет работать, если вы не будете попадать в топ-10 выдачи хотя бы по некоторым поисковым запросам.
Верным способом соответствовать всем этим критериям является создание авторского материала именно для вашего сайта (можно писать самому, можно заказать у агентств). Я пошел по пути собственноручного написания статей и в процессе написания разработал для себя удобную инструментальную схему, о которой хочу рассказать.
WordPress

Мой сайт на WordPress, т.к. его популярность все возрастает и он уже является стандартом CMS. Сначала я писал тексты прямо там. Со временем ощутил, как неудобно набивать тексты в вебе:
- притормаживает сам редактор, случается, что браузер вылетает и я теряю данные, иногда тупит хостинг;
- в процессе SEO нужно следить за количеством слов, проверять орфографию, проверять вхождения ключевых слов (не более 2% на слово), а это все требует дополнительных плагинов, которые влияют на скорость работы WordPress;
- также мне нужно было вести историю изменений, т.к. кропотливо созданный контент нужно беречь и версионировать, и это тоже нагружает CMS.
MS Word

На ум сразу пришла мысль об использовании MS Word как инструмента написания материалов. Тут и проверка орфографии, и языка, и независимость от сети и удобно отдавать материалы на коррекцию при необходимости. Удобно делать цветовую разметку ключевых слов, чтобы видеть текущую SEO оптимизацию текстов, которая не должна отображаться в публикуемом материале. MS Word файл это вообще стандарт документо-оборота – для него гораздо легче найти любые мощные инструменты в зависимости от потребностей.
Плюсами использования Word для меня стали:
- Снижение нагрузки на CMS (отключаем версионирование и минимальный набор плагинов для WordPress).
- Увеличение надежности хранения материалов за счет использования бэкапов, облаков и т.п. средств.
- Богатый инструментарий, особенно мне пригодились:
- проверка орфографии;
- подсчет количества всех и ключевых слов;
- комментарии;
- ревью материалов;
- просмотр отличий от предыдущих версий;
- написание удобных макросов для автокоррекции текста.
- Более высокая доступность наших материалов: локальное хранение, сохранение в любом типе облака и возможность работать с матариалом при отсутствии интернета.
Автоматический перенос материалов из MS Word в WordPress
Сначала через Copy/Paste переносил материалы статей – WordPress специально поддерживает такой вид переноса из MS Word, о чем они говорят официально. Далее отдельно вставлял заголовок, убирал линки на еще ненаписанные статьи, вставлял картинки, добавлял категории, ключевые слова, SEO атрибутику. Иногда при копировании терялись слова (баги, куда ж без них) и приходилось еще раз внимательно проверять весь текст.
После нескольких таких итерации надоело, попробовал сделать публикацию из самого Word, он тоже заточен на подобные действия. В интернете, кстати, полно материала как это делается. Но в этом случае он сохраняет все цветовые разметки и остаются все те же проблемы что и выше. Начал искать плагины для WordPress, которые удобно бы импортировали docx документы. Перепробовал несколько – но они по сути лишь делают аналоги ручного CopyPaste.
В итоге сделал свой плагин для WordPress, который автоматизирует все вышеперечисленные действия – и с картинками удобно работать, и разметки делать.
Вот пример форматирования текста, который я использую:
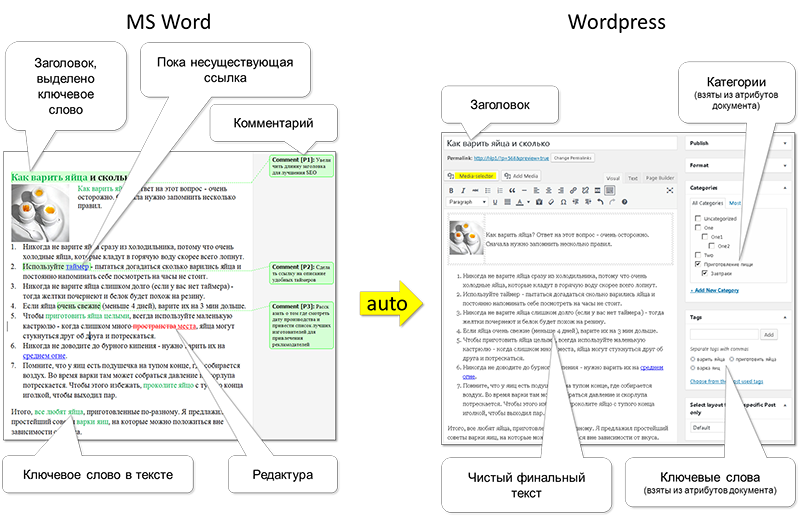
Увеличить
Выделены ключевые слова, используются комментарии, присутствуют ссылки на будущие неопубликованные материалы. Известно, что ссылки на другие связанные статьи способствуют как SEO продвижению, так и удобству навигации конечным читателем.
Все материалы для сайта храню в структурном виде в Dropbox. Картинки делаю линками вместо встроенных, чтобы MS Word не искажал качество исходника при изменении размера.
Сейчас уже становится лень копировать в WordPress каждую статью отдельно – хочется публиковать пачками. Т.е. поработал, изменил несколько статей и сделал общую выгрузку на сайт (commit to CMS). Буду думать над созданием инструментария.
Заключение
По сути, получился целый подход по управлению материалами сайта. Храню исходники где удобно, модифицирую стандартным и очень распространенным инструментарием и по готовности автоматически публикую в CMS.
Буду признателен за любые комментарии и советы – может я чего-то не нашел или упустил.
Many people will use Microsoft Word to create content before publishing it live on WordPress. Perhaps you use guest authors to help develop content and don’t want to give anyone access to the backend of WordPress. Regardless of your reasoning, you don’t have to resort to copying and pasting text from Word to the WordPress editor. Importing the file is not only much easier, but it also helps keep all of the formatting in the .DOCX file such as headers and lists.
Why Go Beyond Copy and Paste?
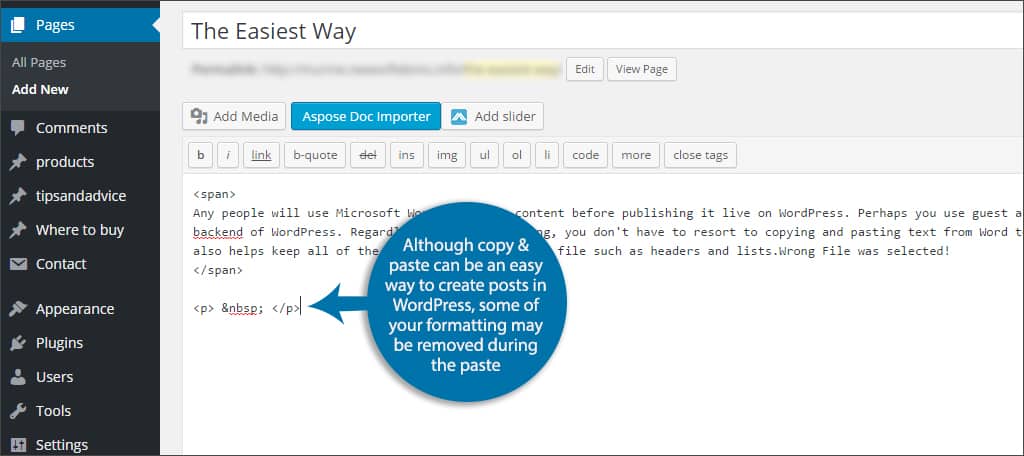
Although copy and paste can be an easy way to create posts in WordPress, not everything may be copied as you’d like to see it. For example, some of your formatting may be removed during the paste. This means you’ll have to go through the document again and fix those missing elements.
What if you prefer using Word as opposed to the editor in WordPress? Importing your content can be nothing more than a seamless transition from one format to another within the WordPress editor. You don’t have to worry about fixing elements such as indents, headlines, tables, embedded imagery or list items. It can all be done by easily to WordPress from Word documents thanks to the versatility of your website.
How to Easily Import Documents into WordPress
The easiest method to import the documents you need, whether they are .DOCX or other file format, is through plugins. These little additions to your site can give you more control over what you can do and can be easily installed from the “Plugins” section of the WordPress dashboard. Here are a few of the best titles for importing .DOCX files into WordPress.
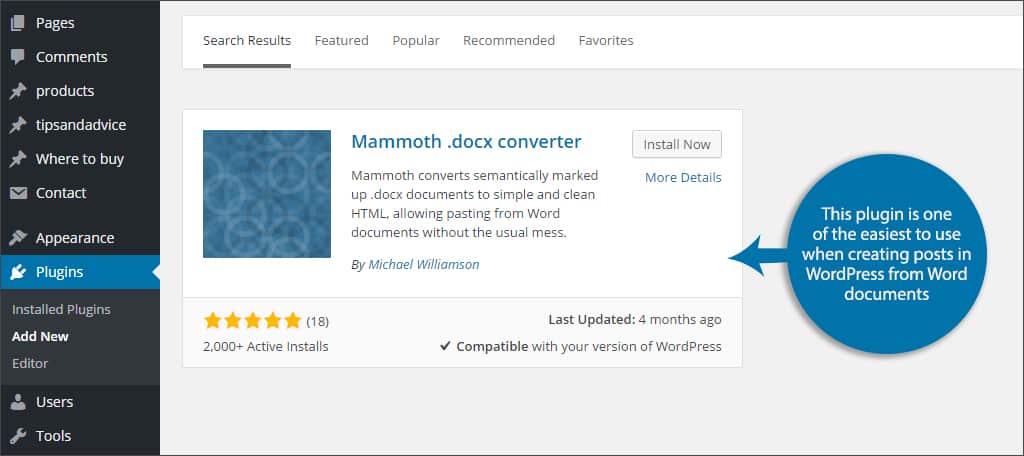
Mammoth .docx converter
The Mammoth .docx converter plugin is one of the easiest to use when creating posts in WordPress from Word documents. It supports a wide range of transitions such as font, color, text size and footnotes. The plugin adds a new control within the editor under the text field. Once you “Choose File,” you can browse for your Word document. This will show what your document will look like once imported. Just like the TinyMCE editor, you have an option to see what the document will look like visually or in HTML coding. When you’re ready, click the “Insert into editor” button along the top and Mammoth will do the rest for you.
Aspose DOC Importer
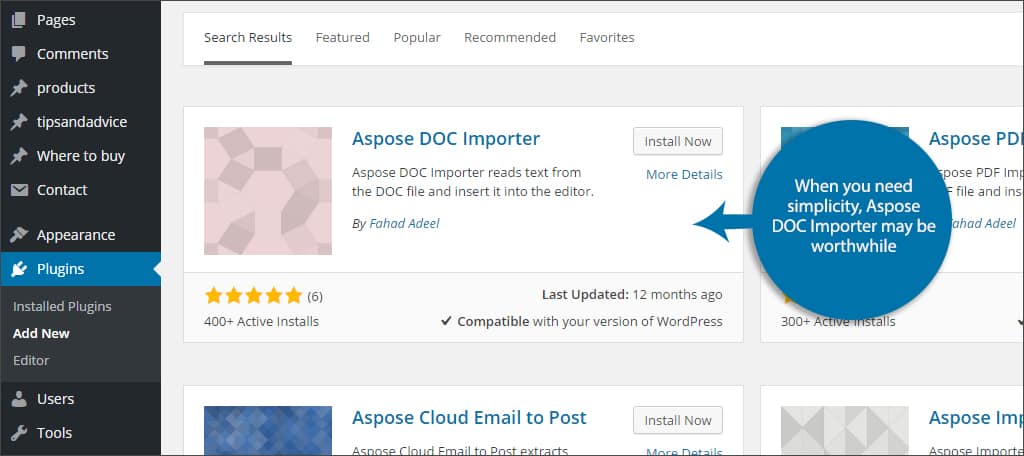
When you need simplicity, Aspose DOC Importer may be worthwhile. However, you need to sign up for an account with Aspose Cloud in order to use the plugin. This free account will then give you an App SID and App key that is needed to work the plugin. Aspose will install a new button directly above the text editor in WordPress labeled, “Aspose Doc Importer.” Once the button is clicked, you’re able to import .DOC and .DOCX directly into your post.
What About Embedding?
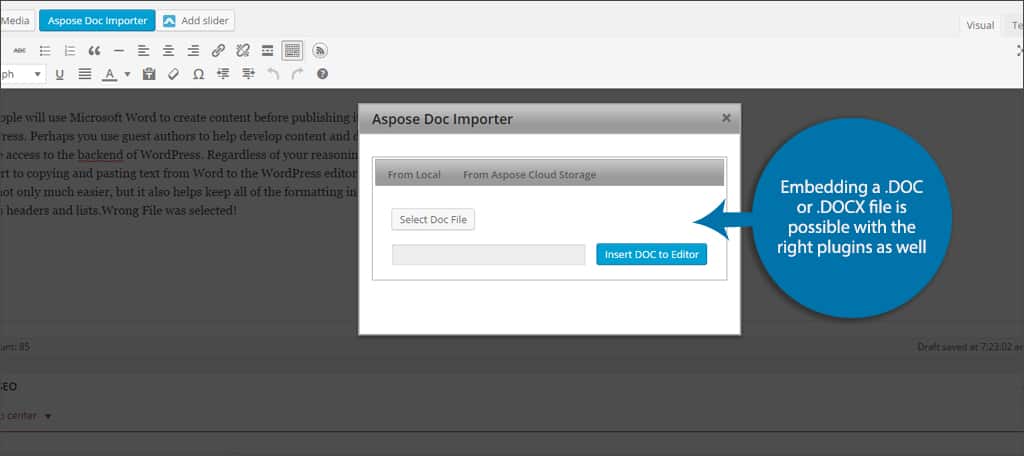
Embedding a .DOC or .DOCX file is possible with the right plugins as well. In many instances, this may be easier while making sure that all of your formatting in the document remains intact. The downside to this is that WordPress will have to make an additional request to the database to pull the file type. However, it does eliminate the browser’s need to render HTML and PHP for posts you create. This has potential to make the page load faster in the long run because many files can also be cached.
Pulling From Cloud
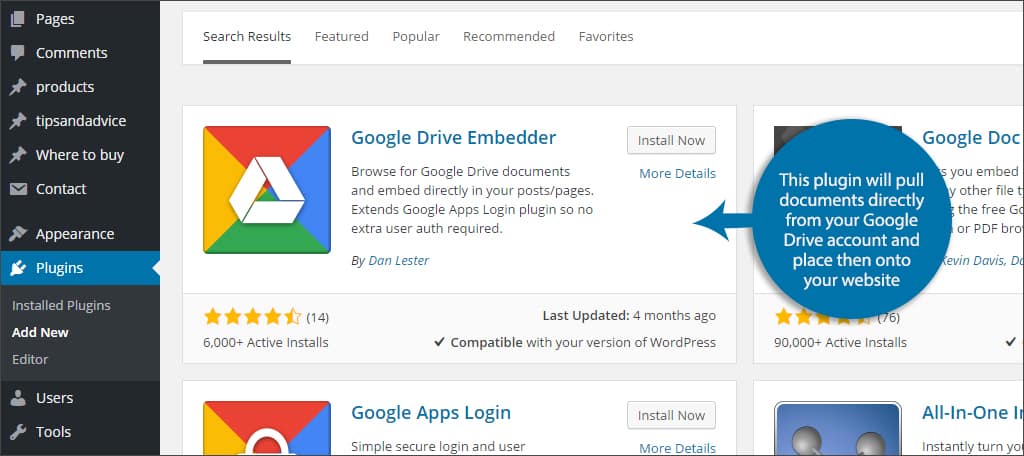
Another advantage embedding a .DOCX file has over conversion is that many plugins are capable of pulling data directly from Cloud sources. For example, the plugin Google Drive Embedder will pull documents directly from your Google Drive account and place then onto your website.
More Difficult to Edit
One of the biggest downsides to embedding documents into WordPress from Word files is that you’ll need to edit the original if changes are needed. This means you will have to find the original document and alter it instead of going into the WordPress TinyMCE editor. This can be more time consuming depending on where the original files are stored.
Whether you’re uploading an older document as a new post or would rather create rough drafts in Word, being able to import into WordPress can save you time. If you’re unable to copy and paste directly from your content, take a look at what a plugin can offer. Your time is precious, and you don’t want to spend it making sure all of the formatting is just right for your post.
Which editing system do you prefer, WordPress TinyMCE or Microsoft Word? What kinds of documents do you import into WordPress?
- Details
- Reviews
- Installation
- Development
Save your time by automatically converting from .DOCX to content with all WordPress post attributes. See more how to use it.
TO USE FREE ADDITIONAL FEATURES PLEASE INSTALL THE FREE EXTENDED PLUGIN VERSION BY FOLLOWING ONSCREEN PLUGIN’S INSTRUCTIONS.
Try it online!
Features
- Google Docs support
Load documents directly from your Google Drive or by shared URLs. - No external services
No embedding and dependencies on external services that slow down your site. - Flexible conversion mode
Convert all as in the original document (default mode) or just only document structure by turning all styles off. - Document to HTML conversion
Converts all types of elements listed next. Numbered and bullet lists with inside content with or without numbering style. Text decoration like bold, italic, underline, hidden, superscript, subscript, strikethrough, small caps, all caps, background and foreground color, and font size. Paragraphs with or without styles. Tables with absolute or relative width and header. Links to URLs and relative to other DOCX files with HTML target attribute. Initial letter (drop cap), footnotes and endnotes, blockquotes, page breaks, formulas. Raw HTML tags and attributes are also supported. Uploads images (linked and embedded) into the library or standalone file with sizing, cropping, filename, alignment, floating, title and alt text, caption with final URL checking. Uses images thumbnails. - All attributes conversion
Converts title, tags, categories, excerpt, slug, SEO title and description, featured image, date, language, WooCommerce gallery images, and custom fields. Uses document additional contents marked by special style for other text blocks. - Editor mode
It appears as the special meta-box in the content editor (in-place). All changes will be put in particular editor places. - Direct mode
Automatically create content if needed. No need to open content for editing. - Gutenberg editor support
Gutenberg blocks are fully supported. - Remembering applicable content types
Particular content types can be chosen to be applicable. - Basic content corrections
Corrects image URLs according to the upload image directory. Checks internal links for existence and marks or deletes them. Converts links to another .DOCX documents to site links. Uses original and specified media filenames. Warns about non-existent media URLs. - Document to post binding
Documents can be bound to the posts to get the ability to update it later from the same source. - Rich document markup using
Works with reviewing documents and always uses final markup content. Comment document parts to prevent them from publishing.
Free additional features
- Batch mode (limited)
Just converts a set of documents with one click. Add files to list from many sources at one time.
Premium features
- Batch mode
Just converts a set of documents with one click. Add files to list from many sources at one time. - Remembering conversion settings
Conversion options can be preset by each post type to use the right settings each time. - Advanced content corrections
Downlevels subheaders if more than one ‘Header 1’ on the page. Cleans unneeded elements like page breaks, image original title, alternative text, and link attributes, URL site prefix. Generates title and alternative text attributes if they are empty. - No promotions
No promotions of other related plugins. - Support
Personal prioritized support.
More details.
Requirements
- WordPress 4.5 or higher.
- PHP 5.4 or higher.
- Browser (Google Chrome, Firefox, IE).
Compatibility
- All in One SEO Pack 2.0.9 or higher.
- Yoast SEO 6.0 or higher.
- Rank Math SEO 1.0 or higher.
- SEO Press 3.7 or higher.
- WooCommerce 3.0 or higher.
- WPML 4.0 or higher.
- PolyLang 1.8 or higher.
- Custom Upload Dir 3.4 or higher.
- Custom Post Type UI 1.5 or higher.
- Meta Box 4.0 or higher.
- Choose the plugin from the WordPress repository, or choose the plugin’s archive file in ‘Upload Plugin’ section in WordPress ‘PluginsAdd New’, or upload and extract the plugin archive to the ‘/wp-content/plugins’ directory manually.
- Activate the plugin through the ‘Plugins’ screen in WordPress.
- It will appear in the admin UI as shown in the screenshots.

I installed it a few months ago to replace another plugin that quit working after WordPress 6. This one worked fine. The people who post new articles haven’t had any problems.

I enjoy writing in MS Word and need an accurate conversion to WordPress. I first used Docxpresso, which works well as an embedded technique. The problem I encountered was in-page links did not work on mobile devices, tablets, and shrunken browser windows. Unable to solve that problem, I tried Mammoth which does not do a complete job in converting MS Word formatting.
Seraphinite did a much better job on formatting and solved the in-page links. It’s easy to use and gives more control of options than Mammoth. I just just glad I found a good solution.

Отличный плагин, единственный в своем роде. Перерыл весь inet, это единственное качественное решение, которое удалось найти. Если нужна быстрая конвертация из docx в html — этот вариант лучший (имхо).

Seraphinite seems to be the real deal! I can create a great blog post in Microsoft Word and upload it directly to Improvementals.com (my WordPress Blog site). This plugin is convenient, free, and easy to use!

Куча рекламы Не удаляется!!!!!

<p>Всё работает.!!!!!!!!!!! Спасибо!!!!!!!!!!!!! Теперь намного легче переносить документы .docx на сайт</p>
Read all 40 reviews
“Seraphinite Post .DOCX Source” is open source software. The following people have contributed to this plugin.
Contributors
-

Seraphinite Solutions
2.16.4
Improvements:
- Decreasing CPU using while asynchronous tasks execution.
- Direct link to a new plugin version in plugins list.
- Limiting log files to 2 MB size and maximum 50 count.
Fixes:
- ‘Upgrade to base plugin version is not supported’ error on some hostings.
- Decrypting is not working after changing salts.
- Numbering of deeper levels is not reset.
- Possible warning while theme customization about ‘cannot modify header information’.
2.16.3
Fixes:
- Localization is unavailable when Translate Press plugin is used.
2.16.2
Improvements:
- Auto-renaming (while activation or upgrading from Base version) plugin’s directory to appended by ‘-ext’ to avoid external wrong overwriting by Base version.
- Plugin’s custom directory name support.
- Settings restoring confirmation.
- Support for Google Docs attributes’ separator via ‘Title’ style.
Fixes:
- Can’t update plugin from file if its directory is renamed.
- Plugin’s scripts and styles are loaded incorrectly if WP plugins directory is not under WP root directory.
- Sometimes Ext, Full versions are updated to Base version.
- Sometimes error appears about call to undefined function ‘get_plugins’.
- Tags are not set in post’s editor.
2.16.1
Improvements:
- Changing text ‘Already done’ to ‘Dismiss’ in review notification.
- On all notifications that requires confirming the close ‘X’ button was removed.
Fixes:
- Deactivation link doesn’t work.
2.16
Improvements:
- Direct link to download full version in upgrade message.
- If EULA is not accepted then showing minimal UI.
- Support for converting ‘Code’ style to ‘code’ tag.
- Updating post after applying all attributes to be compatible with cache plugins.
Fixes:
- Ajax requests could be blocked by another plugins.
- Decrypting is not working after changing salts.
- In batch mode result post’s link uses current language instead of post’s one.
- Localization is not reloaded on ‘change_locale’ event.
- Media directory without first slash on some sites.
- Sometimes Ext, Full versions are updated to Base version.
- Sometimes error in log: Cannot read properties of undefined (reading ‘w:type’).
- Table cells in Google Docs are treated as headers.
- The activation panel is not visible if the server is unavailable.
- URL existence checking can fail for some sites.
2.15.1
Improvements:
- The support button now opens the site page instead of the email client.
2.15
New features:
- Taking ‘SEO Description’ from N-th line.
- Taking ‘SEO Title’ from filename.
- Taking ‘Title’ from file name.
Improvements:
- Import/export of settings.
- Input-output security improvements.
- Minimum WordPress version is 4.5.
- Options: Multisite support.
- Post binding ID from file name.
- Premium update.
- Upgrading from free version to full.
Fixes:
- Admin scripts.
- Mismatched version is always shown as new.
- Sometimes Ext, Full versions are updated to Base version.
- Unable to upgrade Extended and Premium version.
- Update terminates due to timeout on some hosting.
- Updating to full version is not always working.
2.14.1
Improvements:
- Link existence checking timeout increased from 15 to 30 seconds.
- Russian localization correction.
- Upgrading to preview version trough downloading.
2.14
Improvements:
- Backup previous settings structure.
- Security: sanitizing input parameters.
Fixes:
- ‘Key’ buttons might have background on some themes.
- Document by direct Google Docs URL might not work on some sites.
- License block is invisible just after installation if remote configuration is unavailable.
- Output on some sites might be broken.
- Sequential images in one paragraph are with line breaks.
- The language of post’s parent is wrong.
2.13.1
Fixes:
- PHP 8: Fatal error on plugin initialization (call_user_func).
2.13
New features:
- Picture’s border support.
Improvements:
- ‘Status’ separate attribute support.
- Line break with ‘clear all’ support.
- Making backups when change .htaccess.
- Not meeting minimum requirements notifications.
- Reset settings.
Fixes:
- Anchor in table freezes converting.
- BMP resizing doesn’t work on php7.3 and higher.
- Image floating is not correct in list.
- Image offset support.
- Paragraphs with floating images are not broken.
2.12.2
Fixes:
- PHP Compatibility Checker by WPEngine detects issues with PHP 7.3.
2.12.1
New features:
- Post’s parent and order support.
Fixes:
- Batch: Comments are always open of the new posts.
- PHP Compatibility Checker by WPEngine detects issues with PHP 7.3.
- Paragraphs with floating images are not broken.
2.12
Improvements:
- Image caption as figcaption tag.
Fixes:
- Frontend plugin queries are not valid for some sites.
- Settings: ‘Save changes’ button is always in English.
- Updating tags shows error when applies to pages.
- Wrong settings panel for default non ‘post’ type.
- imagecreatefromstring is not supported on some systems.
2.11
New features:
- Polylang plugin support.
- Templates for alternate text and title for images.
Improvements:
- Binding translations of the same post slug to featured images.
- Editor images wrapping attribute support.
Fixes:
- Choosing the same media folder doesn’t refresh files.
- Compatibility issues with Polylang plugin.
- Featured image is not readed when it is in separate attr paragraph.
- Getting not shared Google Document by URL gives data corruption message.
- Image left wrapping sometimes is not correct.
2.10.2
Improvements:
- List items operations animation.
- Storing settings in JSON format to ensure import/export of data.
Fixes:
- Batch update: Choosing same files don’t add them to files list.
- Multiple appearing of Change Version warning.
- Separator line is invisible under WordPress 5.2 or higher.
2.10.1
Improvements:
- Option added to completely disable formula styles.
Fixes:
- Borderless tables are inserted with borders.
- Font size sometimes is not applied.
- Formulas font size sometimes applied incorrectly.
- Last paragraph line break is not applied.
- Line breaks are sometimes not applied.
2.10
New features:
- Batch: Multiple sources support.
- Google Documents: File chooser dialog.
Fixes:
- ‘General error’ if document was changed after choosing.
- Empty document’s body and title is not applied to the post.
- Link “about:blank” is always marked as unexisted.
2.9.3
Fixes:
- Hidden numbering is shown.
- On some environment TinyMCE is hang to set result text.
- Sometimes image size is not correct.
2.9.2
Fixes:
- Block’s help button is shifted to right.
- Empty tags convert with error.
- Google Docs import always shows “Access denied”.
- Incorrect localization of the term “tags”.
2.9.1
Fixes:
- Call to undefined function: wpml_element_type_filter.
2.9
New features:
- Don’t touch body’s data option when importing line with date and title.
2.8.2
Improvements:
- Merge table cells with various types of elements inside.
- Nth line count from non empty text.
Fixes:
- Empty paragraphs detecting.
- On some systems, script loading fails, resulting in a site loading error.
- Raw attributes are not applied to some links.
2.8.1
Fixes:
- Link existence is checking only 5 seconds.
- The size setting is not available in ‘Image Details’ in the editor.
2.8
New features:
- Basic PDF support (as paged images).
Fixes:
- Post binding ID can be copied.
2.7.1
Behavior changes:
- Featured image from body choosing is moved to premium version.
- Properties from n-th line of document choosing is moved to premium version.
Fixes:
- Date’s time zone is shown incorrectly in the settings.
2.7
New features:
- Featured image from 1st body’s image.
- Published date.
- Title from N-th line.
Improvements:
- Document binding: Always assign GUID to post to bind document later.
- Items naming corrected in style’s combo.
- Log window max vertical size increased.
- Separate attributes’ localization.
Fixes:
- Featured image isn’t assigned if filename contains spaces.
- Link existence is checking only 5 seconds.
- Raw attributes stick together.
- Single formula is left aligned.
2.6.1
New features:
- Connection with translations with the same slugs.
Improvements:
- Behavior changes notification warning.
- Columns’ break support.
- Error catching improved.
- Separated styles properties.
Fixes:
- Gutenberg: Some blocks show warning if use all document’s formatting.
- List sub-item’s indent.
- Lists are not applied if style is “Header”.
- Lists that broken with additional paragraphs are converted incorrectly.
- Page break inside other tags.
- Raw attributes: ‘style’ and ‘class’ merging.
2.6
Behavior changes:
- Font sizes are now imported by default (can be changed in the settings).
- Improved footnotes formatting.
- Tables now import vertical cell alignment.
Improvements:
- Behavior changes notification warning.
- Columns’ break support.
- Font sizes support.
- Old format numbering lists by are supported.
- Tab’s indent support.
- Table: Cell vertical alignment support.
Fixes:
- Footnotes’ backlinks are on newline.
- JS error when process too large documents.
- JS scripts failed to load on some environment.
- Lists that broken with additional paragraphs are converted incorrectly.
- Theme’s custom bullets conflict with DOCX custom bullets.
2.5.1
Fixes:
- In the admin panel, the warning ‘Undefined index’ is shown, if DEBUG mode is enabled.
- JS code error at indents treatment.
- Paragraph is missed if contains page-break as last element.
2.5
New features:
- Clean anchors.
Improvements:
- Dependency of ‘Link to original’ image from thumbnail size was removed.
- List bullets’ styles.
- Paragraphs’ indentions.
- Premium settings are inactive in the extended version.
- Skipping media files with 0x0 size.
- Text justification alignment support.
Fixes:
- Drop cap container attributes aren’t applied.
- Inline comboboxes too short in WP 5.3 or higher.
- List item’s style is applied to children.
- Paragraph justification alignment.
- Paragraph’s text properties are applied to formula.
- Paragraphs not marked all as bullets produce an error.
- Spaces and non ASCII symbols in media file names prevent images to show.
- Standalone spaces conversion.
- Tabbed centered string alignment.
2.4
New features:
- Convert image file names to slug.
- Link to thumbnail’s original image.
Improvements:
- ‘SEOPress’ plugin support.
- Batch mode: Post status.
- Checkboxes inner select links are now in Combo style.
- Upload images inserted by external URLs.
- Using original embedded files names if possible.
Fixes:
- Alt text of pictures (stored as images) is not imported.
- Disabled post types in settings are still visible in the batch mode.
- Images placed as URLs are imported incorrectly.
- Last paragraph’s ‘page break’ is included.
- Taxonomies language is not gotten.
2.3.6
Fixes:
- Some additional post types are not displayed.
2.3.5
Fixes:
- Default style sometimes is not applied.
- Line height smaller than should be.
2.3.4
Improvements:
- Activation in Base plugin’s mode.
- Clean page breaks option.
- In-place Edit: Help for post option settings.
2.3.3
New features:
- RankMath SEO support in in-place editor.
Improvements:
- Colored rects support.
- Document styles’ attributes support.
Fixes:
- ‘Yoast SEO’ title and description setting doesn’t work in editor in later versions.
- If Gutenberg and Classic editors are activated at the same time, the plugin and Yoast SEO do not work together.
- Paragraph alignment isn’t applied to raw HTML.
2.3.2
Improvements:
- Global document ID binding support.
- Log items now contain help links.
- Log: List of all found separated attributes.
- Unexisted links now is just checked by default.
Fixes:
- In-place edit: Custom post type: Unable to find tags block.
- In-place edit: EWWW Image Optimizer shows warnings about dummy.jpg.
2.3.1
Improvements:
- Image crop and resize settings.
Fixes:
- Formulas: Integral wrong limits location.
- Incorrect unproportional image resize.
2.3
New features:
- Math formulas support.
Improvements:
- Batch mode: Total status after processing.
Fixes:
- Script localization is missed.
2.2
New features:
- Image crop and resize support.
Improvements:
- Auto convert BMP to PNG.
Fixes:
- Unable to upgrade Extended and Premium version.
2.1.1
Fixes:
- Batch mode: Empty content.
2.1
New features:
- In-place edit: Google Documents support.
Improvements:
- Log: Mark operation items as gray icons.
Fixes:
- Google Docs: Text background on some colors.
2.0.2
New features:
- Initial letter (drop cap) support.
- Text colors support.
Improvements:
- In-place edit: Temporary remove “Preview mode” due to not good user experience.
Fixes:
- Log: Inaccurate link forming of relative DOCX files.
2.0.1
Fixes:
- In rare cases admin UI is blocked.
2.0
Behavior changes:
- Additional attributes should be marked with a special style instead of %E2%80%98Header 1′.
New features:
- Blockquotes support.
- Category import case insensitive.
- Direct mode: Link to edit post in the log.
- Downlevel subheaders if more that one ‘Header 1’ on page.
- Embedded body’s images.
- Image caption support.
- Images are uploaded in posts’ drafts by default.
- In-place edit: Preview Mode.
- Page break support.
- Tags import case insensitive, check existence.
Improvements:
- Download Preview and Full bundles by current version.
- In-place edit: Advanced settings block is hidden by default.
- Log links checking and media processing.
Fixes:
- “Key” link after “Order” button is invalid.
- Categories are not set in Gutenberg editor.
- Footnotes links check fail.
- List item wrong subcontent.
1.10.1
New features:
- RankMath SEO support in batch mode.
Fixes:
- Empty default links target frame produces “a.firstByAttrVal(…).getElementsByTagName is not a function”.
- PHP 5.4 incompatibility while uploading images.
- Rarely some URLs are detected as “not found”.
1.10
New features:
- Compound custom fields.
- WooCommerce product gallery images support.
Improvements:
- Acting as importer.
Fixes:
- Incorrect final image extensions when image optimization plugins are used.
- Settings layout is too wide on some themes.
- Unneeded warnings about unrecognized elements.
1.9
Improvements:
- Option: Images’ title and alternative text attributes autogeneration.
- Option: Remove images alt, title and link while importing.
Fixes:
- Bold style covers all sub list items instead of only list item.
1.8.2
Fixes:
- PHP 5.4 ’empty’ operator compatibility.
1.8.1
Fixes:
- In the new post there is some broken UI element.
1.8
Improvements:
- Erase some attributes’ value.
- Language attribute support.
- Localization – Russian.
- Pretty log area.
- Show the result post link in the log.
Fixes:
- Bold style is missing on not first items.
- Default page ‘open link mode’ is not used.
- Double ‘strong’ tag.
- Error: Can’t upload image: Can’t create “” temp file.
- Excerpt is converted to plain text.
- Hyperlink target is used sometimes as anchor.
- Non-inform warnings about unrecognised elements.
- PHP internal error shows in AJAX requests.
- Save settings result message is blocked by security plugins.
- Script sometimes stops if upload image error occurs.
- Warning about not founded “” text block.
- When Linked external media folder is chosen then first element path is shown.
1.7.4
Improvements:
- Option – image thumbnail size choosing to insert into body.
- Prepend post slug to image filenames.
Fixes:
- DOCX invalid complex fields are processed.
- Empty tag attributes appear.
- WordPress 5.x Gutenberg mode is unavailable.
1.7.3
Improvements:
- Media URL base is used when uploading images.
- Option: Add site path to begin of the URLs.
Fixes:
- Check URL fails if SSL certificate is broken.
- Deactivate text link is corrupted if it’s not in english.
- Empty table cells are cut.
- Script and style loading error when using blocking admin messages plugins.
1.7.2
Improvements:
- Add post title for featured image.
Fixes:
- False featuredImage_not_set warning.
- Images always are overwritten and placed in the library.
1.7.1
Fixes:
- Custom attributes are filled with Gutenberg paragraphs.
- Upload image too long URI error.
1.7
Improvements:
- DOCX extension checking.
- Documentation: How to.
- Don’t use media library when uploading.
- External linked media upload via folder choosing.
- Guttenberg editor full support.
- Image (media) file name from raw html props and from image description (alt).
- Image size choosing.
- Inline upgrade progress.
- Load scripts and styles only on screens with active plugin UI.
- Media filenames choosing.
- Overwrite medias when uploading.
- Questionarie on deactivation.
- Separate UI boxes in batch mode.
Fixes:
- Disabled ‘Featured image’ still uploads image.
- Gutenberg: tags block is missing when title is selected and right sidebar switched to block.
- Image’s hyperlink isn’t processed.
- Link to draft post interpret as existent while links checking.
- Tags aren’t imported in direct mode.
- URL checking uses browser cache.
1.6
Improvements:
- Cancel conversion support.
- Integrate the last mamooth library.
- RAW HTML code and attributes support via particular styles.
- Tables’ header support.
- UI expandable boxes.
Fixes:
- Alone numbered sub paragpaph changes placement to the last numbering item.
- Doesn’t convert correctly compound links.
- Doesn’t convert correctly compound links.
- Picture under numbered block is not after text.
- Settings display inaccurate.
- Single top level paragraph with attributes is removed.
- Table under numbering list isn’t included.
- Text doesn’t wrap correctly around left of right image.
1.5.1
Improvements:
- Bundle minimization.
- Custom attributes saving in a batch mode.
- Table width is supported.
Fixes:
- Aligment of not paragraph blocks isn’t applied.
- Custom attributes sometimes are filled with paragraphs.
- Error when ‘In-place attributes’ block isn’t found.
- Hyperlinks blocks aren’t read correctly with long names.
- Hyperlinks on images aren’t converted.
- Hyperlinks target isn’t applied.
- Slashes ‘’ are erased in batch mode.
- Tag ‘tbody’ in tables is not added.
1.5
Improvements:
- File dialog filter for DOCX.
- Remember settings for document types.
- Support information.
- Work speed incrase.
Fixes:
- ‘Media URL base’ is not applied after manual change.
- Related documents links don’t depend on permalinks last slash.
- Title form ‘title’ always override from body.
1.4.3
Improvements:
- Content load perfomance incrase.
Fixes:
- Fail if no title.
- Fail if there are apostrophs in content.
1.4.2
Fixes:
- Save license info.
1.4.1
Improvements:
- Load images speed incrased.
Fixes:
- Load error – syntax error, unexpected ‘[‘ – low version PHP incompatibility.
- Post AJAX request errors on some sites.
1.4
Improvements:
- Settings: Content types.
Fixes:
- After activation there are error messages.
- Internal error in log: Can’t get id property of ‘undefined’.
- License activation might fail.
- Plugin license activation might fail.
- Unable to set YoastSEO data if it’s not active.
- Unable to switch to another plugin version.
1.3
Improvements:
- ‘SEO Yoast’ support.
- Check existance of not only site URLs.
- Check not only internal links.
- Flexible properties sources.
- Full excerpt support.
- Incrase perfomance.
- Multisite binding.
Fixes:
- ‘Featured image’ option is always active.
- Categories and slug aren’t processed first to apply post’s depended path.
- Links checking is not only on body section.
- No warning if Featured image declared by URL is not found.
- Synchronous link checking and slug processing.
1.2.9
Improvements:
- Embeded featured image.
- Featured image in inline editor.
- Set categories by id.
Fixes:
- Additional text blocks are not imported.
- Slug is not based on site’s logic.
1.2.8
Improvements:
- Description.
- Rate Us.
Fixes:
- Old browsers JavaScript don’t support ‘includes’.
- Paragraph with manual CRLF is converted to divided by double
one. - Tags isn’t processed.
1.2.7
Fixes:
- Help icons don’t use styles.
- Help icons.
1.2.6
Improvements:
- Documentation.
- Inplace documentation links.
- Print OK in log if success.
Fixes:
- ‘Media URL base’ depends on featured image.
- Options for categories and tags didn’t work when extended attributes are used.
1.2.5
Improvements:
- Categorieas as slugs.
- Document’s name as post’s slug.
Fixes:
- Scripts ans styles don’t work after plugin update.
1.2.4
Improvements:
- The first small documentation.
Fixes:
- Categories parse error.
- Links with % symbols are double encoded.
1.2.3
Fixes:
- External links to DOCX is processed as internal.
- If categories aren’t set the warning for not found empty category will be shown.
- Process ‘mailto:’ as nonexistent links.
1.2.2
Improvements:
- Batch mode conversion.
- Contents marked by header for text blocks can be used for SEO title, SEO description, tags, categories and featured image.
- Paragraphs in list items.
Fixes:
- Batch mode: pages were stored as posts.
- Comments are not available after converting.
- Plugin initialize error at lower versions of PHP.
1.1.4
Improvements:
- Category/subcat selection.
- Featured image capability – upload featured image to wordpress direct, grab that URL and put that into the sample-submission.docx file so it auto grabs and displays.
Fixes:
- Associated images with external URL aren’t left as is.
- Doesn’t use image floating attributes.
- Doesn’t work with WooCommerce products.
- Inner single content in list item looses line break.
- Not first Header1 is used.
- Paragraphs in list items are not always included.
- Progress ends before whole process finishes.
- Some type of hyperlinks are not processed correctly.
- Support subcategories.
- Unneeded space is included after text is inserted.
1.1.2
Fixes:
- Sub categories are supported.
1.1.1
Improvements:
- Support categories.
Fixes:
- Paragraphs in list items are not always included.
1.1.0
Improvements:
- Support categories.
- Support document additional contents marked by header for other text blocks.
- Support product post types.
Fixes:
- Check final URLs always ‘on’.
- Paragraphs in list items are not always included.
- Unneeded space is included after text is inserted.
1.0.2
Improvements:
- Check local hashtags.
- Check media final URLs.
- JS size minimized.
- One log event for one not existing hyperlink.
- Scroll to meta-box back after update.
Fixes:
- Inner single content in list item looses line break.
- Progress ends before whole process finishes.
1.0.1
Improvements:
- Dynamic standard progress indicator.
- Embeded document media upload supported.
- New post upload media warning.
- Post image path is generated from featured image or from upload directory.
Fixes:
- DOCX hyperlink path.
- Media URL base.
1.0
New features:
- Post attributes conversion.
- Post body conversion.
 When LearnWP holds its WordPress workshops, I am often asked about transposing a post from Word to WordPress. Although many workshop participants are becoming increasingly comfortable with writing directly into the visual editor or text editor, it’s still helpful to know the process for moving from Word to WordPress. Here are the easy steps:
Step 1: Create your Blog Post in Word
Begin by creating your post in a Word document. Make sure that you include all the styling/formatting you want in your piece. By this I mean, you can include all your H1, H2, H3 headings; your italics and even your hyperlinks. WordPress allows you to transpose all of it with a click of a button. Your document might look something like this:
Step 2: Log in to the back-end of WordPress
From the dashboard, go to Posts and select Add new. You’ll have to type in your H1 title, but otherwise you can paste your entire post and maintain your beautiful formatting. Now all you have to do is Command v (for Mac users) or control v for Window users. Voila – your content is pasted into the WordPress Visual Editor.
Step 3: Click on Preview Changes
You’ll see “Preview Changes” on the top right-hand corner of publishing panel. By clicking on that, WordPress will open a new tab in your browser and you can view the post from the front-end before updating. You can continue to format your Word document once you look at the preview.
Step 4: Do One Last Format Review
While I said that Word transposes into WordPress — it isn’t 100% perfect. Sometimes you’ll see additional non-breaking spaces or your bullets will be a problem. Solve your formatting issues this way
- For extra lines: Go to the line following the extra space and click delete on your Mac or back space on your PC.
- For bullets or numbered lists: I will take these out of Word before I do a copy and paste into WordPress. Then I will re-add them in the visual editor.
Step 5: Publish, Save or Preview Your Post
At this point, you can save your post as a draft, you can preview it or you can publish. Most of the time, I will preview before I publish just to make sure that the post is going to look good.
So there you have it. An easy way to transpose your Word docs to WordPress posts in less than 10 minutes.
Do you have tricks for easily moving from an application that you’ve used to record your thoughts to WordPress? Leave me a comment and let me know.
Recently I started to write all my WordPress blog posts in Microsoft Word, publishing directly to WordPress with a click of a button.
I love the fact that Word gives me clean HTML mark-up of the same quality I would expect from writing directly in WordPress.
If like me, you too are a Microsoft Word fan, then this post is for you!
Headsup: I don’t recommend you publish this way if your site is not SSL. Non-SSL websites allow usernames and passwords to be sent in clear text form which leaves you vulnerable to a man in the middle attack. If you don’t have SSL, here is my guide to getting SSL for free.
Here are some great reasons:
- You don’t need internet access to write posts
- You won’t lose your work
- Images upload along with content
- Clean HTML mark-up
- You get to use Word’s spell check, grammar check, and synonyms
- Works with Grammarly
And not so great:
- Does not play nicely with offline media plugins, images always upload to wp-content/uploads folder instead of an offline server
- Does not work fully with WordPress 5 Gutenberg, all content exports to a single classic editor block
How do I post to my WordPress blog using Microsoft Word?
- Start Microsoft Word
- Open a new document
- Select the Blog Post template
Notice there is an extra tab in the top left of the screen called Blog Post.
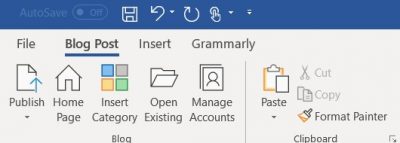
Before you can begin publishing, we need to set up a connection with your WordPress blog.
- Click the Manage Accounts button
- Select WordPress

- Click the Next button
- In the next window, enter your domain URL followed by /xmlrpc.php.
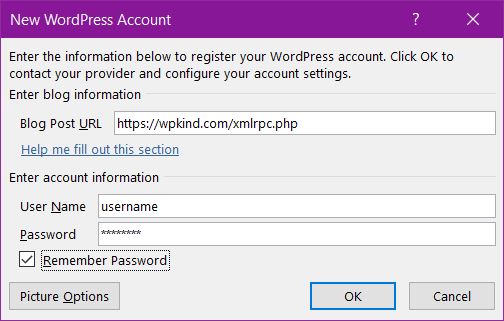
If your site domain is https://mydomain.com, for example, the Blog Post URL would be https://mydomain.com/xmlrpc.php.
- Enter your username and password for WordPress
- Click Remember Password so you don’t need to type it again
The Picture Options allow you to specify whether pictures upload along with the blog post.
I have found that the upload function does not work for a WordPress setup where images are stored on another server such as Amazon S3. If you have this kind of arrangement on your WordPress blog, it is best to switch off picture upload and do it manually instead.
I have also found that Word changes the image names (that I had previously carefully chosen for better SEO), which is another reason to choose the manual upload method.
How to write blog posts using Microsoft Word
- Enter the title of the post at the top
- Underneath the title, the category drop-down allows you to select from a list of categories defined on your blog.
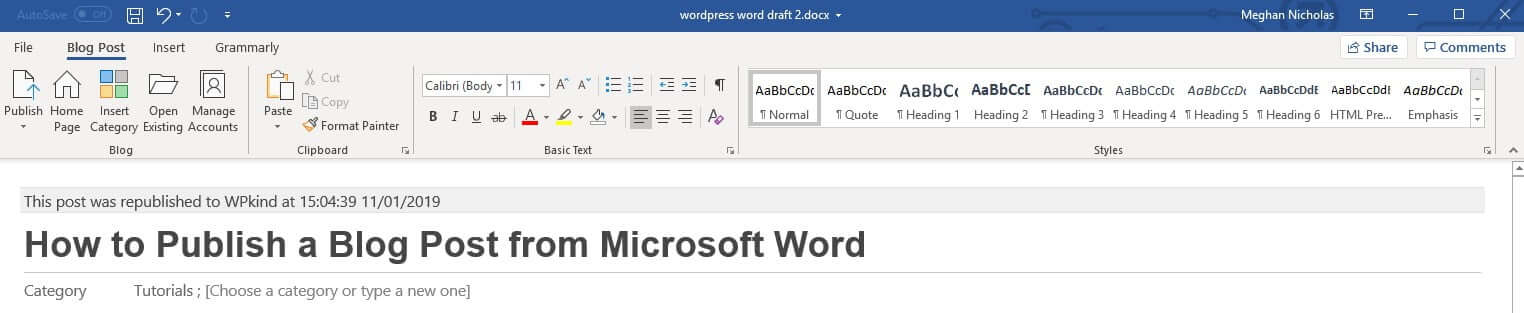
- Type your blog post
- Use the top right-hand styles selector to choose heading types. Bold, underline, and italic styles will all translate directly to WordPress HTML, as will links.
- Add pictures using the Insert tab.
How to publish a blog post from Microsoft Word
When you’re ready to publish the post, click the top left Publish button.
You can also publish as a draft which I prefer to do first, that way I can make changes to the post in WordPress before it goes live, such as edit the post URL, set the tags and do some tweaks for SEO.
In WordPress 5+, the new post exports to a classic editor block rather than individual blocks.
You can convert a classic block to individual blocks easily by selecting the block options and then Convert To Blocks.
Using the Open Existing button, you can open a post on your blog, make amendments and then re-publish.
Wrapping up
In this post, I have taken you through connecting Microsoft Word to your WordPress blog, writing your post and then publishing it.
If you are familiar with Word, you will feel right at home making posts this way.
Images can be an issue. Be aware that the nice name you gave it will be overwritten with something unfriendly, so it is best to avoid putting images in the post until it gets into WordPress.
This post was proofread by Grammarly