
I think this question came up in a conversation with a friend…we were discussing how serving lunch could be made more efficient.
They could _____ the lunch line by doing this or that.
The only word we could think of was «efficienize», but I doubt that’s an actual word. Any ideas?
![]()
RegDwigнt
96.4k39 gold badges305 silver badges399 bronze badges
asked Sep 30, 2011 at 19:29
![]()
6
I think that the word you’re looking for here is optimize:
From Merriam-Webster: to make as perfect, effective, or functional as possible
![]()
Daniel
57.1k75 gold badges256 silver badges377 bronze badges
answered Sep 30, 2011 at 19:33
![]()
8
Streamline
- (transitive) To design and construct the contours of a vehicle etc. so as to offer the least resistance to its flow through a fluid.
- (transitive, by extension) To simplify or organize a process in order to increase its efficiency.
- (transitive) To modernise.
answered Sep 30, 2011 at 19:53
![]()
oosterwaloosterwal
7,3316 gold badges33 silver badges48 bronze badges
2
Why not just use the word ‘improve’?
Seems to fit in quite nicely in the sentence:
«They could improve the lunch line by doing this or that.»
I think that optimize doesn’t quite capture the original intent (and it doesn’t sound as good to me):
«They could optimize the lunch line by doing this or that.»
answered Oct 1, 2011 at 10:47
![]()
TomMTomM
1794 bronze badges
2
A great word for this is kaizen, a word originating in Japanese production improvement systems. It is not all that common in general English, but in operations and production systems it has become quite a common term.
FYI, it originally was a noun and sometimes an adjective, however, it has transformed in English to be usable as a verb too. «Could you guys kaizen the production line?»
answered Sep 30, 2011 at 22:07
![]()
Fraser OrrFraser Orr
16.3k3 gold badges46 silver badges59 bronze badges
3
I would argue that «optimize» is close but not exactly the same. To say that a company «optimized its procedures» is not the same as saying that a «company rendered its procedures more efficient», because the latter implies results whereas the former only implies changes made which will hopefully yield results. In the example given by the OP, «optimize» works just fine. But in other scenarios, «render more efficient» or «increase the efficiency of» would give a more accurate meaning.
answered Nov 29, 2011 at 14:42
![]()
Shorten the lunch line.
Speed up the lunch line.
You are talking about making the lunch-serving process more efficient, and your example says you are measuring that by how long (presumably) the queue is. So. Improving the serving process means reducing the number of people in the line, or the waiting time on it.
«I’m hungry, dammit. Send in the operations managers!»
Operations management is the discipline of business administration concerned with making processes more efficient. You could read up on it to find out what has been done lately in the area of meal-serving.
answered Mar 15, 2016 at 0:19
![]()
Tom HundtTom Hundt
5973 silver badges5 bronze badges
0
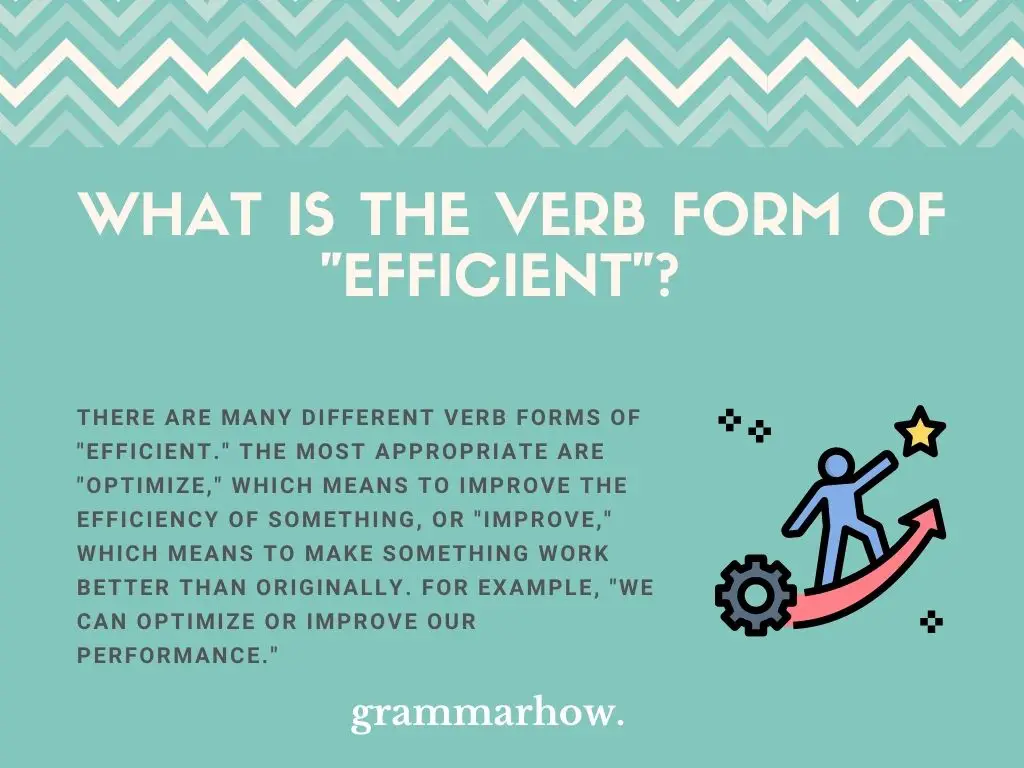
Sometimes, we want to use a word to convey meaning in a sentence, but it might be tricky if that word doesn’t have an apparent verb form. “Efficient” is a good example of this, where we want to use a quick word to make something more efficient, so let’s look at examples.
What Is The Verb Form Of “Efficient”?
There are many different verb forms of “efficient.” The most appropriate are “optimize,” which means to improve the efficiency of something, or “improve,” which means to make something work better than originally. For example, “we can optimize or improve our performance.”
Let’s look at a couple of examples using The Cambridge Dictionary.
We’ll start with the meaning of “optimize” in The Cambridge Dictionary, which means “to make something as good as possible.” This shows how we’re working to achieve more efficiency with something.
We can also look at the simpler word “improve” in The Cambridge Dictionary, which means “to (cause something to) get better.” The idea is the same between both of these words.
Of course, the line isn’t drawn there. There are plenty of other examples we could go through with you. We’ll elaborate more as the article develops, but we’ll look mostly at the following:
- Optimize
- Improve
- Streamline
- Shorten
- Enhance
- Hone
Optimize
The first verb we want to share is the most likely candidate to use as a verb to mean “make something more efficient.” We use optimize frequently, and it works perfectly to convey the meaning we’re after.
Optimize means that we work towards making something the best possible version of itself. This means the same as making something as efficient as possible because we’re working towards an attainable goal of efficiency.
It’s a great verb to use in this sense, but you might not be all that familiar with it. Let’s look at some examples of it in a sentence so you can see when it might be used.
- We need to optimize our performance to win.
- We need to optimize the workload to finish early.
- I want to optimize my output on this task.
- You should optimize your completion rates.
- He will optimize whatever you ask him to. He’s good at that.
As you can see, we’re using the verb as a way to make something more efficient than it previously was. It’s the closest verb form in this article to the original idea of “to make something more efficient.”
Improve
Next, we’ll look at “improve” as a verb. We often find ourselves using this one when we’re talking about generally making things better than they were before. It doesn’t always have to relate to efficiency, but it works well in this case.
Improve means that we work towards making something better than it was previously. We might not make it perfect, but we’re at least improving on the original parts.
It’s one thing us telling you what the verb means, but it’s another actually showing it to you in action. We thought we’d include some examples to give you an idea of what to expect when you see it.
- You must improve your performance to keep your job here.
- You need to improve your attitude.
- We should improve on the deadlines to impress the boss.
- Can I improve the efficiency of this line?
- He must improve this, or there will be consequences.
As you can see, efficiency isn’t always the primary goal of using the verb “improve.” Still, it works well when we want to use it in this manner.
Streamline
Streamline is the next word we want to show you that works well.
Streamline means “to shape something so that it can move as effectively and quickly as possible,” according to The Cambridge Dictionary. It doesn’t always have to refer to a physical shape, either. Sometimes you can streamline a concept or idea.
As we mentioned above, while streamlining is mostly reserved for shape and mechanics, we can use it when we’re talking about concepts and ideas as well.
- You can streamline your performance to finish faster.
- We streamlined this vehicle to improve its fuel efficiency.
- I need to streamline my article before sending it off.
- We have streamlined the design for purposes of efficiency.
- She streamlined her ideas to narrow down her decision.
As you can see, you don’t always have to refer to a shape of something when you use the verb “streamline.” It works well to improve efficiency in general.
Shorten
Next up, we have the verb “shorten,” which works in a few contexts. However, it works well when we want to shorten the output time of something and thus make it more efficient.
According to The Cambridge Dictionary, shorten means “to make something shorter in time.” That works with making something more efficient because the quicker we do something, the quicker we’ll finish (and the more efficient we’ll be with time management).
Again, shorten isn’t strictly related to efficiency in all cases, but when we write it in the correct context, it works really well. Let’s look at some examples:
- We need to shorten the time it takes us to finish.
- I should shorten the deadline to keep efficiency high.
- You shortened the length to save on time, didn’t you?
- Shortening this for us will save plenty of time and money.
- They always look to shorten the task to save them the time.
As you can see, it’s not always related to efficiency, but it’s always related to “time” when we write it in this manner. When we save time, we often make something more efficient. Sometimes, we’re talking about cutting corners to save time, but that’s not encourageable if you want to truly make a task as efficient as possible.
Enhance
Next, we have “enhance,” which works in a similar vein to “optimize.” It’s a verb that encourages us to improve something, and we can apply it to various situations when written.
Enhance means “to improve the quality, amount, or strength of something,” according to The Cambridge Dictionary. Generally, we enhance something when we want to improve the performance or quality.
If we enhance a workload, we’re making it more efficient. If we enhance the time it takes to do something, we’re making it quicker (and more efficient). As you can see, it’s a good word to replace the original “to make something more efficient.”
Here are a few examples of it in action:
- We can enhance our task performance and be done in no time.
- They enhanced their input and finished the task promptly.
- I enhanced the process and finished ahead of time.
- You enhanced all the things I asked of you, and I thank you for that.
- He enhanced our relationship, and I didn’t even ask him to.
As you can see, “enhance” is another great word to show that something is made slightly more efficient. It is more common to relate to the efficiency of something as well, rather than using more open-ended words like “shorten” or “improve.”
“Enhance” is most closely synonymous with “optimize” if that helps you with your decision of which verb works best.
Hone
The last verb we want to introduce you to is “hone.” It’s not the most common verb in usage anymore, but it’s still a great one in this context. It originates from sharpening an object or tool but has transitioned to be used to talk about improving general efficiency in things.
According to The Cambridge Dictionary, “hone” means “to make something better or completely suitable for its purpose.” It’s most common for someone to “hone their skills” in a situation to make themselves the best they possibly can be at that skill.
Now let’s look through some examples of “hone” used in a sentence. We mostly talk about it with “skills,” but it can work in a few other contexts.
- We need to hone your ability before you take them on again.
- You should hone your skills before handing in a task like this.
- Can we hone in on this project to get it completed?
- I honed in on the task at hand and finished it.
- They honed into what was asked of them and impressed everyone.
As you can see, “hone” works really well as another verb here to show that something is made more efficient. We’d encourage you to use this one as well because it’s more old-fashioned, many people have forgotten all about it – which makes it all the more impressive if you can use it correctly.
Is “Efficientize” A Word?
Finally, we wanted to touch on potentially turning “efficient” into its own verb. Many people think that “efficientize” might be a correct word, as adding “-ize” to the end of some other words turns them into a verb form.
“Efficientize” is not a word and is not the correct verb form of “efficient.” You should instead you one of the verbs we introduced above if you ever need to use it in a sentence.
Sometimes, we can’t make words fit, and that’s okay. You just need to find a suitable replacement to get it sorted.

Martin holds a Master’s degree in Finance and International Business. He has six years of experience in professional communication with clients, executives, and colleagues. Furthermore, he has teaching experience from Aarhus University. Martin has been featured as an expert in communication and teaching on Forbes and Shopify. Read more about Martin here.
Word is a part of Microsoft Office package and is one of the most popular word processing tools. Millions of businesses and individual users depend on the capabilities of this powerful tool. People create starting from proposals, reports and almost every other document on a daily basis. Word has numerous features that make preparing and formatting any text file or documents faster and easier. However, despite its popularity and the fact that the majority of computer users are proficient in using Word, only a few people know how to use this powerful program to its full capability. Below are some tips to help you save time and improve your productivity when using Microsoft Word. Also, learn productivity tips for Microsoft Excel and Microsoft PowerPoint apps.
Word for Windows and Mac versions have similar interface when you type. However, they are two different apps in the backend development perspective. Though most of the below listed tips work on Windows and Mac versions, the article is primarily focus on using Word in Windows.
1. Auto Recovery and AutoSave Documents
One
of the biggest frustrations for Word users is losing all their work in case of
an unexpected system or program crash. For this reason, it is important to keep
saving your document after you make a few changes. However, you can use some
Word features to avoid a situation where you may have to repeat what you had
already done.
- Use the keyboard shortcut keys “Ctrl + S” to save a document for the first time or changes in the documents.
- You can also set “AutoSave” to enable automatic saving of the document after a few minutes. Go to “File” and select “Options” at the bottom of the list on the left pane.
- From the resulting pop-up, click “Save” on the left side and on the right side go to “Save documents” section.
- Check both the “Save AutoRecover…” and “Keep the last…” boxes and then specify the after how long Word should automatically save the documents (between 1 and 10 minutes) by clicking the up or down arrow. Click “Ok” at the bottom of the window.

2. Recover Unsaved Documents
- You can also recover unsaved documents by navigating through “File > Info” menu.
- Under “Manage versions”, click “Recover Unsaved…”.

- This opens a list of unsaved files. Double click a file to open.

- Click “Save As” to open and save a copy of the file.

3. Customize Paste Option
Copy
and Paste combination is very helpful when you are working on a Word document
but at times, it can get tricky especially when you are pasting a pre-set
format. You can avoid the frustration by:
- Press “Ctrl + Alt + V” and choose the “Unformatted Text” to merge the added text with your document’s format automatically, then click “Ok”.

- You may also configure the paste options. To do so, go to “File” choose “Options” and click “Advanced”.
- Scroll down to the “Cut, copy & paste” section, customize the paste options to your preference and click “OK”.

4. Using the Word Clipboard
If you are copying various blocks of text or images, you can increase your productivity by storing the copies in the clipboard.
- To add text or an object to the clipboard, select the item and press “Ctrl + C” twice.
- Expand clipboard on the “Home” tab to see the copied items.
- Click the arrow on an item and click “Paste”. The “Delete” option removes the item from the clipboard.

5. Maintain Format Consistency with Text Styles
Use
the Word in-built text styles to structure your and create a consistent
document. Select the theme and set layout for your document, so that the
readability is consistent throughout the document.
When you want to style particular portion of your document then highlight the text and select one of the text styles on the “Styles” ribbon under “Home” menu. By applying proper formatting to your documents, you can easily convert Word documents to beautiful PDF eBooks.

6. Applying Styles Quickly
You
probably know applying formatting of one segment to another segment by using “Format
Painter”.

However,
you don’t need to click the “Format Painter” every time for applying the
selected style to multiple parts on your document.
- Select a text portion and double
click on the “Format Painter” option under “Home” menu. - Now select different text portions
on different places on your document to apply the style. - Press escape to exit the format
painter.
7. Use Table of Contents
Create document with appropriate headings. The headings facilitate ease navigation (Outline view) and help when generating an automatic table of contents on “References” tab.

When you have lots of headings, simply go to “References” tab and insert table of content to your document. This helps your reader to understand the summary quickly.
8. Navigation Pane to Move Content Blocks
Creating
a very big document is a hassle. Especially when you want to re-structure the
document, you don’t need to cut and paste through the documents. The navigation
pane helps you to easily drag and drop the content blocks. You can enable the
navigation pane under “View” menu. On Mac, you can enable the pane under “View
> Sidebar > Document Map Pane”.

You
can change the pane settings to view the document in page by page thumbnail
view or as a document map view.
9. Insert Screenshots Quickly
Screenshots help to show with a single picture exactly what you explain in hundreds of words. In order to insert screenshot in Word, go to “Insert > Screenshot” menu. You can either insert the full screen capture of any of the open app or only capture the required portion of the window using “Screen Clipping” option.
After inserting pictures, use “Picture Tools” to add borders as choose different layouts for your screenshot.
10. Adding Divider
Do you know type three dots and pressing
enter key will create a full width divider line in Word document?
Try with different keys like dot and asterisk to create different types of dividers. Learn more on how to add and remove dividers quickly in Word documents.
11. Insert Pull Quotes
Having thousands of words without any
picture or table in a document makes people bored. Don’t worry!!! You have an
option to insert colourful quotes to keep the reader on your documents. Go to
“Insert” tab and select “Text Box” option. You can either choose a pre-defined
quote style from the text box drop-down or create a default text box and format
to different style.

12. Master Keyboard Shortcuts
Keyboard shortcuts can really save your time when working on a Word document. Here are some of the underutilized shortcuts that save your time and energy.
- “Shift + F5” – To move to the sections where you were working on the document last.
- “Ctrl” and then press anywhere within a sentence – Quickly select an entire sentence.
- “Shift + F3” – To switch the capitalization case of the selection.
- “Ctrl + Space” – To remove formatting on selected text.
- “Ctrl + F” – To find a word or a phrase within a document.
- You can use “Find and Replace” together to replace a word(s) in your document.

Conclusion
Microsoft Word is a standard gold tool for creating any type of document. It has a host of features, which makes it easy to edit and format text, images and other illustrations to suit our requirements. However, with the right knowledge, you can use the various Word features to become more efficient and consistent in your daily tasks. The above are just some of the tips of enhancing your productivity with MS Word but there is so much more you can do to save time and get the right results.
Microsoft Word is the nearly universal tool businesses use to write documents, draft letters, edit articles, and save files.

You may have been using Word for so long that you think you know all the ins and outs – but what if we told you it could be even easier? As Word has evolved it’s grown to include even more useful and exciting tools to make our work more efficient and effective. Try out these tips and tricks next time you’re working on word.
Select The Text You Need Quickly
If you want to select an entire paragraph you can triple-click anywhere within it, or to select a sentence just click on it and press the CTRL key. Holding down the ALT key and dragging your mouse will allow you to select a rectangular area of text.
Move Faster Through Lengthy Documents
If you find yourself working with a lot of long, wordy documents, this will helpful for you. You can press Shift+F5 to filter through the spots that you recently edited in any document. When you open an existing document inside Word that same shortcut will take you to the location that you were last working on before the document was closed.
Use Your Document as a Whiteboard
Need a new tool to jot down your messy brainstorming ideas? Your documents don’t have to be so neatly formatted. By double-clicking anywhere on the page you can type text in any spot you choose. Go ahead and use Word as a whiteboard!
Convert Copied Text
When you take snippets from websites and copy them into a Word document, the formatting, font and style is all left intact. There’s a quick way to deal with that – select the text and press Ctrl+Space Bar and the text will convert to typical formatting.
Do a Little Math
Did you know Word came with a built-in calculator? Most people don’t, but it can be a helpful tool. The word calculator can handle all common arithmetic problems. Go to Word Options, Quick Access Toolbar, switch to All Commands and add the Calculate Command to your Quick Access Toolbar. Now you can write math equations in your document, highlight them and press the Calculator button. The result will appear in your status bar.
For more IT tips and tricks get in contact with ✅ IT Services By Colorado Computer Support at blake@coloradosupport.com or by phone at (719) 355-2440.
Microsoft Word is filled with little-known tips and tricks that allow for more efficient work.

It’s easy to take Microsoft Word for granted, despite its reputation as an easy-to-use word processor.
However, even everyday Word users might not realize how powerful the app is, or how many features it has beyond the simple editing commands we all know.
Microsoft Word tips and tricks
Taking time to explore Word’s more obscure corners can make the program even more useful for you. If you start using these tricks often, you might start to wonder how you ever went without them.
Here are 15 of our favorite Microsoft Word tips and tricks, all of which can save you time and energy while you work.
Double-click to write anywhere in a Word document If you want to write text on a specific part of the page, you don’t need to mash Enter and Spacebar to reach it. Just double-click any part of a blank page to move your cursor there and start writing. This is a great way to jot down quick notes in a whiteboard or Post-It-like fashion.
FOLLOW BUSINESS INSIDER AFRICA
Our newsletter gives you access to a curated selection of the most important stories daily.
Thanks for signing up for our daily insight on the African economy. We bring you daily editor picks from the best Business Insider news content so you can stay updated on the latest topics and conversations on the African market, leaders, careers and lifestyle. Also join us across all of our other channels — we love to be connected!
Unblock notifications in browser settings.
Microsoft Word is the nearly universal tool businesses use to write documents, draft letters, edit articles, and save files.
You may have been using Word for so long that you think you know all the ins and outs – but what if we told you it could be even easier? As Word has evolved it’s grown to include even more useful and exciting tools to make our work more efficient and effective. Try out these tips and tricks next time you’re working on word.
Select The Text You Need Quickly
If you want to select an entire paragraph you can triple-click anywhere within it, or to select a sentence just click on it and press the CTRL key. Holding down the ALT key and dragging your mouse will allow you to select a rectangular area of text.
Move Faster Through Lengthy Documents
If you find yourself working with a lot of long, wordy documents, this will helpful for you. You can press Shift+F5 to filter through the spots that you recently edited in any document. When you open an existing document inside Word that same shortcut will take you to the location that you were last working on before the document was closed.
Use Your Document as a Whiteboard
Need a new tool to jot down your messy brainstorming ideas? Your documents don’t have to be so neatly formatted. By double-clicking anywhere on the page you can type text in any spot you choose. Go ahead and use Word as a whiteboard!
Convert Copied Text
When you take snippets from websites and copy them into a Word document, the formatting, font and style is all left intact. There’s a quick way to deal with that – select the text and press Ctrl+Space Bar and the text will convert to typical formatting.
Do a Little Math
Did you know Word came with a built-in calculator? Most people don’t, but it can be a helpful tool. The word calculator can handle all common arithmetic problems. Go to Word Options, Quick Access Toolbar, switch to All Commands and add the Calculate Command to your Quick Access Toolbar. Now you can write math equations in your document, highlight them and press the Calculator button. The result will appear in your status bar.
For more IT tips and tricks get in contact with LAN Infotech at sales@laninfotech.com or by phone at (954) 717-1990.

LAN Infotech is a Microsoft Cloud Services Provider, IT Managed Support company and a leader in helping law firms, nonprofits and medical organizations deploy cloud solutions, manage computer networks, keep data protected and top technology management company. Businesses like yours need technology support to run highly-effective organizations.
Want to work smarter and faster in Microsoft Word? Word is a powerful tool with tons of features, but it also has tricks and shortcuts that will help you be more efficient with the tasks you do every day. Here are nine easy-to-use, time-saving Microsoft Word hacks that you can start using right away!
Word Hack #1 – Start Typing Anywhere
When you’re staring at a blank Word document, you often start typing at the top. But if it’s a cover page, you may want to start further down the page. Rather than pressing Enter a bunch of times, just double-click on the line where you want to start. Word will automatically add in the extra spaces.
Word Hack #2 – Quickly Bold, Italicize and Underline
Among the most frequently used formatting tools in Word are bold, italic, and underline. While Word makes these buttons easy to find on your Home tab, you’ll still save an enormous amount of time by learning the keyboard shortcuts. Press the shortcut keys once to turn on the effect, and a second time to go back to normal text.
Bold: Ctrl + B
Italics: Ctrl + I
Underline: Ctrl + U
Word Hack #3 – Change Paragraph Alignment and Spacing
Along the same lines, you can use the buttons in your ribbon to change paragraph alignment and spacing, but if you know the shortcuts, you won’t have to interrupt your typing.
Paragraph Alignment Shortcuts
Left align: Ctrl + L
Center: Ctrl + E
Right align: Ctrl + R
Paragraph Spacing Shortcuts
Single Space: Ctrl + 1
Double Space: Ctrl + 2
1.5x Spacing: Ctrl + 5
You can also add a line break (rather than a full paragraph break) by pressing Shift + Enter.
Word Hack #4 – Remove Extra Spaces and Paragraphs
Back when “word processing” meant typewriters, people often put two spaces after periods and two returns after every paragraph to improve readability. While modern computers and word processors have made this practice obsolete, the old habit hasn’t died yet.
If you want to remove those pesky extra spaces, bring up the Find/Replace tool by pressing Ctrl + H. In the Find box, type a period (.) followed by two spaces, and next to Replace, type a period (.) followed by one space. Then click Replace All.
To eliminate double paragraphs, use the Find/Replace tool to find ^p^p (these are the symbols for a paragraph break), and replace it with ^p.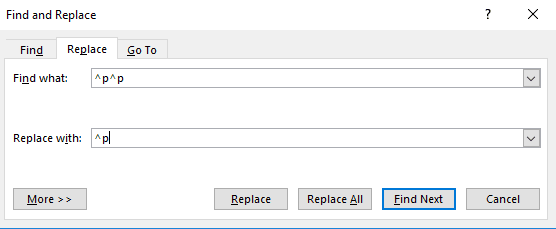
Word Hack #5 – Quickly Create a Bulleted List
Need a quick bulleted list, but don’t want to interrupt your train of thought? Save time and hassle by using a simple keyboard shortcut instead of the button in the ribbon.
Just type an asterisk (*) and then the space bar. Your first bullet will automatically appear so you can begin your list. You can continue adding bullets by pressing Enter. When you want to stop your list, just press the Enter key twice to return to standard formatting. If you prefer dashes as bullets, the same trick works with the dash (-) button.
Alternatively, you can press Ctrl + Shift + L, which will also start a bulleted list.
Word Hack #6 – Change Case Instantly
Have you ever seen a document in ALL CAPS that felt like it was shouting at you the whole time? Rather than retyping everything, just highlight the text you want to change and press Shift + F3. Each time you press Shift + F3, your text will toggle through UPPERCASE, lowercase and Title Case options.
Word Hack #7 – Clear Formatting

Controlling formatting when you copy and paste text from a website or other document can be one of the most frustrating tasks in Word.
When you paste, a handy Paste Options button will appear that will allow you to keep the formatting of the text that you’re copying, merge it with the destination document, or discard all formatting and just keep the text.
But what if you’ve already copied multiple things into your document, and you forgot to change the formatting? Simply highlight the text you want to change and press CTRL + Space bar. This restores the default font and style settings for that section to match the rest of your document.
Before
After
Word Hack #8 – Modify Styles in Microsoft Word
Microsoft Word’s built-in styles make it easy to format your document with a single click. But did you know that you can make changes to the built-in styles or even create your own?
Here’s how:
Change Built-In Styles
Select the style you want to change and then right-click on the style to get the context menu. Choose Modify from the menu.
You’ll get a screen like the one below where you can change just about any aspect of the style including the font, color, spacing, number formatting, and more. If you want your changes to carry over across documents, select radio button to apply to New documents based on this template.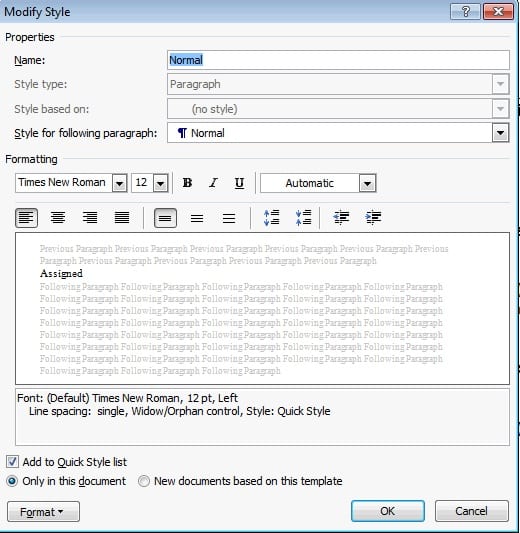
Alternatively, if you have text in your document that already looks just the way you want it, you can update your styles to match. Just highlight the text, right-click on the style you want to modify and click Update <Style> to Match Selection.
Create Your Own Styles
If you’re constantly changing Word’s default styles, consider creating your own custom style.
To do this, simply select the text from which you’d like to base the new style, right-click the selected text and choose Styles –> Create a Style from the formatting menu. Give your new style a name and click OK. The new style will appear in the list of other quick styles in your Home tab.
Word Hack #9 – Expand Your Cut & Paste Options with the Spike
Everyone knows that the cut and paste feature is useful for moving text from one place to another. But one of Word’s lesser known functions is the Spike – a storage place for multiple text snippets that can be pasted just once or multiple times throughout your document. This is useful for moving separate blocks of text in rapid succession.
Here’s how it works. Instead of cutting and pasting the text you want to move, highlight the text and press Ctrl + F3. This cuts the selected text and saves it in the Spike. You can repeat this action multiple times until you have captured all the text you want to move. Each time you press Ctrl + F3, a new entry will be added to the Spike.
Now it’s time to ’empty’ the Spike onto the page. To do that, move your cursor where you want the saved text to appear. Then press Ctrl + Shift + F3. All of the individual text snippets you just saved will be pasted into the document. This method only works once.
If you want to use the contents of the Spike multiple times, instead of pressing Ctrl + Shift + F3 to paste, type the word spike and then press F3. The contents of the Spike will appear, and you can do this as many times as you want throughout the document. Newer versions of Word will even detect when you write the word spike and automatically insert your copied text if you press Enter.
If you’d like to see the contents of the Spike, go to the Insert tab and click the Quick Parts button. Then choose Building Blocks Organizer. Finally choose the Spike from the left side to display its contents on the right. You can also click the Insert button to insert the contents of the Spike into your document right from this screen.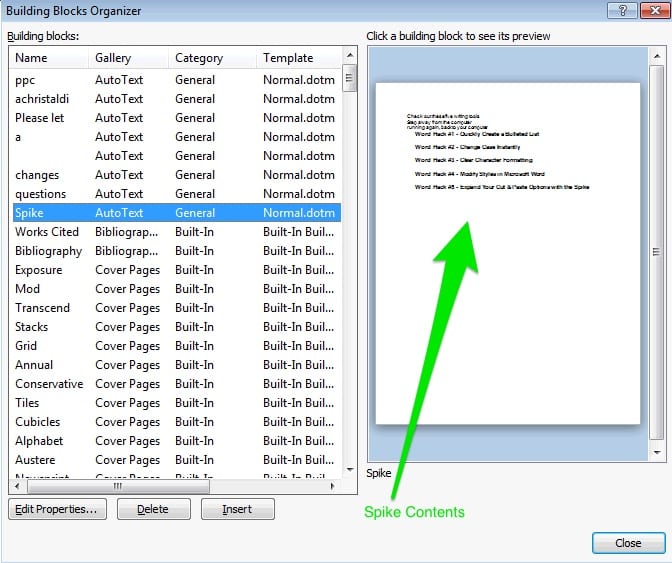
So there you have it! Hopefully these useful tips will help you work more efficiently in Microsoft Word.
Looking for other Microsoft Office hacks? Check out our other posts:
8 Time-Saving Hacks for Microsoft Outlook
9 Time-Saving Microsoft Excel Hacks
13 Time-Saving Hacks for Better (and Prettier) PowerPoints
I understand the small and big problems you face in your daily work when using Microsoft Word. Here I am presenting solutions for these day-to-day MS Word problems in simple and illustrated fashion. If you don’t find solution to your problem in the articles listed below, please feel free to ask me a question in the comment section. These Microsoft Word tips and tricks are important as they increase your productivity in office. Also, in my experience, these tips save you time to easily grab a cup of coffee! 
Quick Tips
- To select an entire paragraph make three rapid clicks anywhere in the paragraph
- Ctrl + click selects sentence. Click anywhere in a sentence while holding Ctrl key down will select the sentence
- To create a horizontal line type 3 hyphens and then press Enter
- Ctrl+ makes a word subscript and Ctrl Shift + makes a word superscript
- Pressing backspace while holding Ctrl key down deletes the preceding word
- USe Format Painter feature to quickly apply a particular format to a new area.
- Typing =rand(8,10) and then pressing Enter will automatically generate random text you can use for testing the page formatting, fonts, etc.
- To move cursor to the location where it was when you last save the document press Shift + F5
- Select some text -now if you will press Ctrl + Shift + > the font size of the selected text will increase. To decrease the font size use Ctrl + Shift + < combination
- To quickly create a table type a plus sign (+) then press Tab key; again type a plus and again press Tab key; do this as many times as the number of cells you want in your table. Then press Enter. And table shall appear!
These tips on Microsoft Word make your life easier and increase your productivity at work.
Learn how to save images from MS Word document. If document has a lot of image inserted in it and you need them as separate files, you can easily save them all with this method.
Learn how to find and replace images in an MS-Word document. With this method you can select and replace all the images in a document in one go.
Registered trademark symbol (®) is distinct from trademark sign ™ and service mark ℠. There are several methods to type it in computer.
Legal use of various Trademark Symbols, differences among trademark, registered trademark and copyright symbols. Also know how to type trademark sign in MS Word.
Copyright symbol © can be easily typed and inserted in MS Word, MS Excel, Windows Notepad, Apple Mac, HTML, JavaScript and plain text etc. Learn how to type it this symbol of legal importance to protect your intellectual property. Press Alt key and then type 0169 on NumPad of your computer. Alt + 0169 is the shortcut for typing © symbol.
Learn how to type degree symbol in MS Word, Excel, HTML and Unicode. Inserting degree sign in documents is often required while typing temperatures, angles, coordinates etc. The easiest method of typing degree symbol in MS Word is to use the key combination of [email protected] and then press space bar.
Learn to create strikethrough shortcut key for MS Word, MS Excel, MS Outlook etc. Microsoft doesn’t provide any built-in key combination for the strike through command.
It is easy to change default font style, size, color etc. in all the MS Word documents. You can edit normal.dot template file with the click of a button.
“When you open a new document, its style is based on a template called normal.dot. Whatever styles and formatting are set in normal.dot template —the same gets applied on all the new documents. Earlier, it was possible to open normal.dot template and make changes. But now, even better, you can edit this template without even opening it.”
An MS Word document can be split so as to display two copies with independent scroll bars. It is useful in tasks like editing and tallying in large documents.
“Remember, once the document is split, some of your actions will apply to the copy which is active at that moment. To activate a copy, just click anywhere inside it. However, any editing or formatting will affect both the copies. For example, if you make some text bold in the upper copy –the same text will become bold in the lower copy as well”
An MS-Word document split into two copies.
Now you can type anywhere in an MS Word document. No need to keep pressing space bar to position typing cursor. This feature is available in Office XP and above.
“With this feature, Microsoft intended to imitate a paper sheet in MS-Word. You can write on a paper sheet wherever you want. Now you can do the same in your computer as well. Say good bye to position text with the help of spaces!”
Learn how to remove red / green underlines showing spelling and grammar mistakes in an MS Word document. These zigzag lines show errors. You can remove all the error indicating lines in one go for a particular document.
“This method is useful because it hides spelling / grammar errors only in a particular document. It does not completely switch off the spell checker. Spell checker will duly show errors in all other existing and new documents that you’ll create.”
Filling dummy sample text as placeholder in an MS-Word document is a very common requirement. Learn how to use rand & lorem functions to insert text easily.
“As soon as you’ll type this and hit space or enter –three paragraphs of sample text (with four lines in each para) will appear in place of this command. You can even control the number of paragraphs to be inserted and number of lines in each paragraph.”
For many people it is useful if open the most recently used document automatically opens when they launch MS-Word. It’s easy enough to do, let’s see how.
“A box will pop-up and it will ask you to browse or type the location of the file to be opened. In this case we want to open winword.exe (this is the file that launches MS-Word). Click on Browse button and go to the location where this file is located. Once you find it, select this file and click OK button. Usually this file is located in C:Program FilesMicrosoft Office folder.”
Learn how to quickly move to the most recent (last) location in an MS-Word document where you were editing. SHIFT+F5 key combination can help you.
“for example, lets say, at present you are on page number 14 in your document and need to paste a paragraph here. The paragraph to be copied is present in the same document on page number 347. You will move to page 347 and copy the paragraph. But is there is a way for returning back to the page where you were working (i.e. page 14)? Yes, there is a way!.”
MS-Word has a feature that enables you to hold more than one data pieces in clipboard and then paste all of them in one go. This is cut paste extended!
“Regular clipboard can hold only one piece of text or image at any given time. When you copy another piece of data –it overwrites the data that was already there in clipboard. This is where Spike comes into the picture. It is an extended clipboard which can hold multiple pieces of data. Therefore, in case of Spike, incoming data pieces do not overwrite the existing data.”
Learn how to type, insert or add the Indian Rupee (indicated as INR or Rs) symbol in HTML, MS Word, Excel or text document using Unicode. You can add Indian currency Unicode symbol on computers with Indic language support.
“Indian government launched new symbol for the Indian currency on 15 July 2010. Earlier, a more general Rs. Symbol was used to indicate Indian Rupee (INR). From the word processing point of view it was much easier to type it because both the constituent characters (i.e. R and s) were available on English keyboard.”
Learn to select free form rectangular arbitrary block in MS Word. You can select a vertical area and also begin selection in the middle of a line.
“Selection of text is one of the most basic task in MS-Word. You can issue a lot of commands that work only on a selected piece of text. Such commands range from simple copy or cut to doing calculations among a number of other things.”
Selecting arbitrary rectangular block in MS-Word
Setting a password on a file is a good way to keep the content safe from unauthorized access. Learn how to protect your MS-Word files with password
“Placing a password on MS-Word document provides a simple way to keep secret data secret. When a user will try to open a secured file –password will be asked for. It is as simple as that. This is so easy that one does not need to be a power user to set password and open secured files.”
Insertion of more rows and columns is an action often taken while working on a document. Learn how to do it easily and quickly.
“Tables are among the most often used features of Microsoft Word. MS-Word offers a great deal of options to design and manage the tables in a document. In order to create a new table, you need to go to the Insert tab and use Table button. Then you can drag your mouse over a grid presented in the resulting menu to select the number of rows and columns you need for your table.”
This method can save you time as you can quickly fill the entire column of an MS-Word table with serial numbers or serial alphabets. It works in similar fashion to Fill Handle feature of MS-Excel.
“There is a way to fill a column with sequential numbers in MS-Excel –but there is no similar way available for MS-Word tables. So, I lazily began to enter serial numbers one by one manually but then I thought there must be a way to do this tiny task in a more efficient manner. And I found one. And it turned out to be extremely simple and intuitive too! Here is how you can do this on click of a mouse and save yourself time for a coffee break!”
Learn how to format a date field while doing Mail Merge. You can easily have the date formatted as you wish using field codes and switches.
“When you do Mail Merge and if you are using a date field, sometimes MS-Word picks date field from source and prints it in a unwanted format. But, thankfully, we can change the format of date to suit your purpose.”
MS-Word: Field Codes button
Learn an easy trick to reverse the order of content of a list in MS-Word. This trick does not use any script or code. It is plain and neat solution that could save you a lot of time.
“The other day, a friend of mine asked me an interesting question. He had a Microsoft Word document which contained a long numbered list of about 200 items. And he wanted the same list in reversed order. That is, the last item in the list should become the first, second-last should become second and so and so forth.”
Select text > Click on Insert tab > Table > Convert Text to Table
Learn how to change order (sequence) of a set of words by swapping them around in Microsoft Word. This is done using regular expressions (wildcards).
“Sometimes, we need to swap the order of two (or more) words and change their sequence. Depending upon the size of the document, this task could turn out to be nightmarish. But with proper use of regular expressions, you can perform it in a jiffy!”
Learn how to find and replace numbers, digits, numerals in a given MS Word document. You can find certain numbers or range of numbers and replace them with nothing or anything.
“At times we find ourselves in a situation wherein we need to find and replace only numbers (numerical digits) in a given document. It is quite easy to accomplish using Find and Replace facility given in MS-Word. Here is how we can accomplish this.”
Learn how to insert a column break in MS-Word to make columns of different sizes. With this, you can make a column shorter than the other.
“As per the normal behavior of columns in MS-Word, you have to fill the first column with content before moving onto the next column. MS-Word users sometimes, however, want to only partially fill the first column and move onto the next one. Let’s learn how we can accomplish this.”
Insert Column Break in MS-Word
Learn how to insert two column or multiple columns in MS Word document. This layout gives your pages a more professional look like that of a magazine.
“Often times, we want to write text in two (or more columns) just the way they publish text in newspapers, magazines and books. Two column text is easier to read because readers’ eyes don’t have to move across the full width of the page.”
Learn how to find certain type of formatting and replace it with another format in MS Word document. For example, you can find all the bold words and make them italic in one shot.
“People are used to with find and replace facility in MS-Word know how to find text and replace it with some other text. But it is indeed possible to find formatting and replace it with other formatting!”
Basic steps for recording, writing and running a macro in MS Word. The same steps apply for other applications in MS-Office package.
“In order to write a Visual Basic program to run in MS-Office packages (like Word, Excel, PowerPoint, Access etc) you need an editor. Microsoft has provided you with one. To bring this editor to the fore take the following steps.”
Learn how to write a macro to do multiple find and replace operations in MS Word in one go. You can change multiple words with this VBA macro.
“Nowadays, I am working with a lot of Unicode text in MS-Word. All the pieces of the text invariably need editing. There are some commonly occurring mistakes which I have to keep correcting in various documents. So, I thought it would be great if I could run several find and replace commands in one go.”
Give your document a professional look by using Roman numerals for Table of Content (TOC) and introduction etc. The rest of the documents will have separate page numbering.
“To get around this problem, you need to given TOC a section of its own. Insert a section break at the beginning of the document and then insert TOC in that section. The main document will remain in second section. Now you can give different page numbers to both the sections.”
Learn how to convert just a few pages to landscape orientation in MS Word document using section break. Rest of the pages will remain in portrait layout.
“Big tables, graphs and images sometimes don’t fit into the portrait layout –but when we try to change the layout to landscape, MS-Word applies changes to the the entire document. Here is the solution to this problem”
MS-Word can easily create table of content. This is very useful feature especially you are working on large amount of text, like a book. Learn how to insert a table of content in MS Word document.
“Such a table is often used by the readers to get an overall idea about the content of the document as well as a navigation means. In MS-Word, it is quite easy to create Table of Content (TOC). Many people who do not know about this feature try to manually create TOC –but you can imagine how tough such manual process would be.”
Step-by-step guide on how to remove or replace paragraph breaks. There is no need to do it manually. MS Word can do it for you!
“the paragraph break or line break is represented by invisible character (¶) which looks like a flipped P. You can toggle the visibility of this character by clicking a button given on the Home tab in M Word. The button bears the same symbol.”
Smart curly quotes provided by MS Word look pretty but can be a real nuisance sometimes. Learn how to replace them with simple straight quotes.
“When caught in such a situation, for the life of you, you just somehow want to get back to straight quotes (it happened with me a week ago –and that it why this post!). MS Word does not provide a simple way to toggle between smart and plain quotes.”
Learn these MS Word shortcuts. You can work faster with the help of keys like CTRL+C (copy), CTRL+V (paste), CTRL+A (Select all) etc. Be a keyboard warrior!
shortcut keys work faster than doing the same thing with mouse. When you are typing in MS Word, pressing shortcuts is easier because you don’t have to leave your keyboard and get hold of mouse.
A simple method to remove unnecessary spaces before and after lines in an MS-Word document.
“More often than not I get MS-Word files in which a lot of lines either begin with unnecessary spaces or they have lots of trailing spaces –and if it is a really bad case –lines will have both leading and trailing spaces. Not-so-tech-savvy people use leading spaces to align lines.”
Sometimes we need to transpose (invert or reverse) a table in MS Word. Learn how to change columns into rows and rows into columns of Microsoft Word table. It can be done with the help of MS Excel.
Transpose function of a table in Excel.
Learn how to delete a document or file from your computer. The steps are same for deleting any kind of file including Microsoft Word document. Process is almost same for both PCs (Windows) and Mac.
Delete a document from your computer.
Get rid of horizontal line that automatically appears when you type dashes (hyphens) and press enter key. Learn to remove it and permanently deactivate it.
The first thing that you need to understand about this line is that it is NOT a line. It is actually a border. This is why you can not select it with a mouse click and because it is unselectable —you can not press delete button to remove it.
This is how you can remove automatic horizontal line in MS-Word.
Learn how to insert code snippets with syntax highlights in an MS Word document. This method will preserve the color coding and inserted code blocks will be much easier to maintain.
go to Insert tab and then click on the Object option. A new box will appear with a list of objects that you can insert in your MS Word document. Select OpenDocument Text from the list and click OK to insert the object…
I hope these MS Word tips and trick helped you save some good time in office. Should you have any questions, please feel free to ask. I will try my best to assist you. Also, please send me more useful MS Word tips, if you have any. Thank you for using TechWelkin!