
Convert a Word Doc to html
To install, run:
This will give you a command-line script, which you can run:
$ word2html /path/to/MyGloriousDoc.docx
This will give you a new file, /path/to/MyGloriousDoc.html, that’s (hopefully)
decent-looking html.
Note on tests & versions
- This project has NO TESTS! (feel free to add some of you think it should).
- This was last used with python 3.9 and the dependency versions listed in requirements.txt
Note on Licenses
While this code is MIT-licensed, it uses boty pypandoc and pytidylib, both of
which depend on other software that may not be MIT-licensed and must be installed
for this to work.
- pytidylib is available under the
MIT license, and Tidy is available
under an MIT-like license - pypandoc is available under the MIT
license, while Pandoc is released under the GPL.
You can try with Microsoft.Office.Interop.Word;
   using Word = Microsoft.Office.Interop.Word;

    public static void ConvertDocToHtml(object Sourcepath, object TargetPath)
    {

        Word._Application newApp = new Word.Application();
        Word.Documents d = newApp.Documents;
        object Unknown = Type.Missing;
        Word.Document od = d.Open(ref Sourcepath, ref Unknown,
                                 ref Unknown, ref Unknown, ref Unknown,
                                 ref Unknown, ref Unknown, ref Unknown,
                                 ref Unknown, ref Unknown, ref Unknown,
                                 ref Unknown, ref Unknown, ref Unknown, ref Unknown);
        object format = Word.WdSaveFormat.wdFormatHTML;


        newApp.ActiveDocument.SaveAs(ref TargetPath, ref format,
                    ref Unknown, ref Unknown, ref Unknown,
                    ref Unknown, ref Unknown, ref Unknown,
                    ref Unknown, ref Unknown, ref Unknown,
                    ref Unknown, ref Unknown, ref Unknown,
                    ref Unknown, ref Unknown);

        newApp.Documents.Close(Word.WdSaveOptions.wdDoNotSaveChanges);


    }
Use this free online tool to convert Microsoft Word documents to HTML code. It extracts all text content from a word doc into downloadable and clean HTML.
By default, it produces very tidy HTML code from a word doc. This clean HTML option is probably the best format option for most people. It produces classless elements in a clear, readable format.
However, there are a few things to note. The HTML code will have empty image src tags so you’ll have to reference your online images for those to work, and it’s generally not good with HTML lists.
Other than that, it works pretty well and is super handy if you’re looking to quickly convert content from a word doc into a usable HTML format.
Note: here’s the old version of Word to HTML if you need to use it.
Convert Word to HTML File Revisions
This free tool has been recently revised to use word document uploads instead of using a manual process like the old Word to HTML version of this converter.
With a click of a button, you can now automatically save the document conversion results as a downloadable HTML page. This tool makes it easy to instantly convert Word to HTML without having to paste the document.
The old version of this Word to HTML converter relied on copying and pasting the content from an open Word doc which was a clunkier process. This new version allows direct Word document uploads and outputs HTML files or copyable clean code making for a far better process.
I hope you enjoy this newly revised word to HTML tool. It really is much better now at converting Word documents.
Most Popular Text Tools
Alphabetical Tools
Random Generators
Line Break Tools
Fun Text Tools
Text Changing Tools
SEO and Word Tools
Content Conversion Tools
HTML Code Generators
HTML Compression
HTML Encoding Tools
- Download MSOfficeInterop.zip — 1 MB
Table of Contents
- Introduction.
- Microsoft office Interop library
- Adding the reference of Microsoft Interop libraries.
- Using the code
- Access the Converter functionality
- Summary
- Disclaimer
Introduction
This article is about using Microsoft Office Interop APIs to convert Word documents and Excel sheets and document templates to an HTML file and render on a client browser.
Sometimes developer find it difficult to convert the excel sheets and document to equivalent html, then office interop api are good solutions comes as very handy.
Microsoft Office Interop library
Before using Microsoft office interop APIs, you have to install the Microsoft Office on your system. without ms office we can not run Microsoft Office interop APIs.
If you have not msoffice install please first install the ms office.
Download Microsoft office
Adding the reference of Microsoft Interop libraries
If you have installed the ms office then add the references of required Microsoft office interop libraries.
- Microsoft Office Excel library.
- Microsoft Office Word library
- Microsoft Office object library
In this article i will show the functionality to covert the word document files and excel files to html file, so we only need to add the reference of these above 3 libraries.
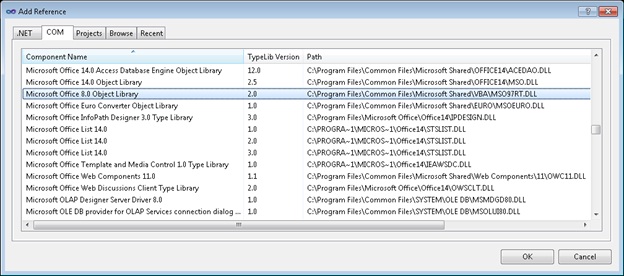
Steps to add library references
- Right click on Reference folder in your solution
- Click Add reference
- Click on COM tab
- Select Microsoft Office 8.0 or 14.0 object library, press the control key and select the Microsoft Office Excel library and Microsoft Office Word library
- Click on OK button.
Note: Assembly can be different, it is based on the Office version installed in your machine.
Using the code
Before actually building the code you must have MS office installed in your office, you also need to configure the ckEditor. Because I am using ckEditor to display the HTML Content that is generated from document or excel sheet. Add the following config to you page setting in web.config file.
<controls>
    <add tagPrefix="CKEditor" assembly="CKEditor.NET" namespace="CKEditor.NET"/>
</controls>
DocToHtml class
Word document to HTML conversion has been implemented in class below is the snipped of the actual code which convert the doc file to HTML string.
public StringBuilder Convert()
{
    Application objWord = new Application();

    if (File.Exists(FileToSave))
    {
        File.Delete(FileToSave);
    }
    try
    {
        objWord.Documents.Open(FileName: FullFilePath);
        objWord.Visible = false;
        if (objWord.Documents.Count > 0)
        {
            Microsoft.Office.Interop.Word.Document oDoc = objWord.ActiveDocument;
            oDoc.SaveAs(FileName: FileToSave, FileFormat: 10);
            oDoc.Close(SaveChanges: false);
        }
    }
    finally
    {
        objWord.Application.Quit(SaveChanges: false);
    }
    return base.ReadConvertedFile();
}
XlsToHtml class
Excel sheet to HTML conversion has been implemented in class below is the snipped of the actual code which convert the Excel file to HTML string.
public StringBuilder Convert()
{
    Application excel = new Application();

    if (File.Exists(FileToSave))
    {
        File.Delete(FileToSave);
    }
    try
    {
        excel.Workbooks.Open(Filename: FullFilePath);
        excel.Visible = false;
        if (excel.Workbooks.Count > 0)
        {
            IEnumerator wsEnumerator = excel.ActiveWorkbook.Worksheets.GetEnumerator();
            object format = Microsoft.Office.Interop.Excel.XlFileFormat.xlHtml;
            int i = 1;
            while (wsEnumerator.MoveNext())
            {
                Microsoft.Office.Interop.Excel.Worksheet wsCurrent = (Microsoft.Office.Interop.Excel.Worksheet)wsEnumerator.Current;
                String outputFile = "excelFile" + "." + i.ToString() + ".html";
                wsCurrent.SaveAs(Filename: FileToSave, FileFormat: format);
                ++i;
                break;
            }
            excel.Workbooks.Close();
        }
    }
    finally
    {
        excel.Application.Quit();
    }
    return base.ReadConvertedFile();
}
ConverterLocator class
To call the actual converter based on the extension of the file, we need some converter locator which can return
the actual converter service.
Like if i upload the xls file, the ConverterLocator must return the instance of XlsToHtml class else if the upload
files is document then ConverterLocator return the instance of DocToHtml class.
Both XlsToHtml and DocToHtml class implements the IConverter interface,
which declare the Convert method.
public static IConverter Converter(string fullFilePath, string fileToSave)
{
    IConverter converter = null;
    string ext = fullFilePath.Split('.').Last().ToLower();
    switch (ext)
    {
        case "doc": converter = new DocToHtml { FileToSave = fileToSave, FullFilePath = fullFilePath };
            break;
        case "docx": converter = new DocToHtml { FileToSave = fileToSave, FullFilePath = fullFilePath };
            break;
        case "dot": converter = new DocToHtml { FileToSave = fileToSave, FullFilePath = fullFilePath };
            break;
        case "dotx": converter = new DocToHtml { FileToSave = fileToSave, FullFilePath = fullFilePath };
            break;
        case "rtf": converter = new DocToHtml { FileToSave = fileToSave, FullFilePath = fullFilePath };
            break;
        case "xls": converter = new XlsToHtml { FileToSave = fileToSave, FullFilePath = fullFilePath };
            break;
        case "xlsx": converter = new XlsToHtml { FileToSave = fileToSave, FullFilePath = fullFilePath };
            break;
    }
    return converter;
}
Access the Converter functionality
We are ready with every thing, now we need to call the functionality to covert the document and excel to html and render the result
on the browser screen.
Below is the snippt of code to call the IConverter service.
private void ConvertAndLoadDocumentInEditor()
{

    string randamName = DateTime.Now.ToFileTime().ToString();

    string relativePath = Server.MapPath("~") + "/_Temp/";


    string FilePath = relativePath + randamName + flDocument.FileName;

    string GeneratedName = randamName +
      flDocument.FileName.Split('.')[flDocument.FileName.Split('.').Count() - 2] + ".html";

    flDocument.SaveAs(FilePath);


    string FileToSave =
      HttpContext.Current.Server.MapPath("~") + "_Temp\" + GeneratedName;


    IConverter doc = ConverterLocator.Converter(FilePath, FileToSave);


    editor.Text = doc.Convert().ToString().Replace("�", "");
}
For demo purpose I created a word document and converted it to html file using Microsoft Word Interop.
Here is the word document file, that I created for demo.
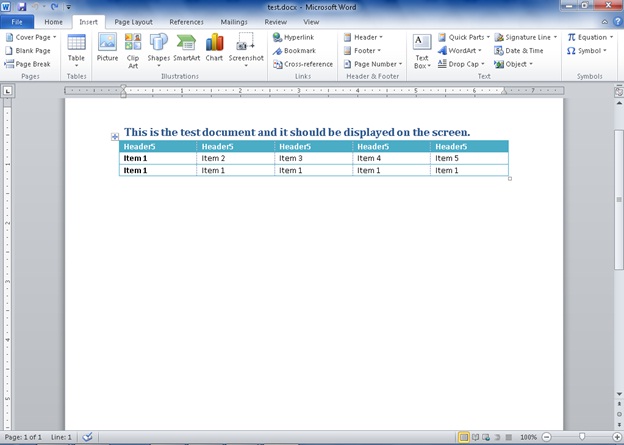
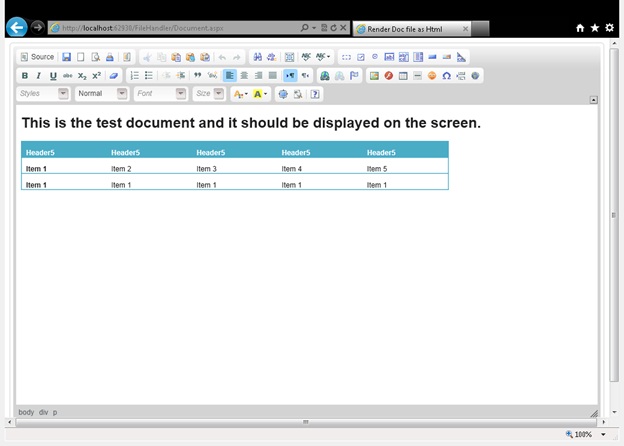
and here is the converted HTML and I am displaying the converted HTML in FCKeditor.
Summary
So you have been walk through how to convert the Microsoft word document into HTML document and displaying the result in Browser. By using Interop API you can perform several type of works like generating document, Excel sheets on the fly using code. This demo just give the introduction of Microsoft interop API, you can perform much more complex thing.
Disclaimer
The project is solely based on my self study, knowledge and research, not based on any other project. I have used Microsoft Office Interop Api to write this article. I would like to tell you that this is not the best approach to run Microsoft office on web server, because it is not recommended by Microsoft. Instead they recommended Open XML to perform Microsoft Office related functionality on web server. With OpenXML you can do near about everything that you do with MS Word or MS Excel.
I am vijay tanwar and i am a software engineer with passion of programming. I love to programming in c#, I love to warp up more and more things in few lines of code. my favirote languages are c# and javascript and both are fully object oriended. I always like to become the .net Architect.

Word to HTML
phpdocx Advanced and Premium licenses include the functionality of transforming DOCX files to HTML with native PHP classes.
There are currently two ways to transform Word to HTML with phpdocx:
- With the conversion plugin
- With the TransformDocAdvHTML native PHP class
The conversion plugin executes LibreOffice or OpenOffice to perform the conversion. This method has a disadvantage: it is not native PHP and requires calling external programs, besides, it doesn’t allow to customize the output but with PHP DOM modifications after the conversion.
Native PHP classes included in Advanced and Premium licenses allow to transform DOCX to HTML with PHP exclusively. The main features of this functionality are the following:
- Conversion of contents, styles and properties
- Native PHP classes
- Easily customizable
- Transform DOCX created from scratch and templates
The transformation can be done using just three lines of code:
where document.docx can be a DOCX created with phpdocx or from other source (MS Word, LibreOffice, etc). Premium licenses can also transform in-memory documents.
Supported OOXML tags and attributes
phpdocx parses contents, styles, properties and other XML contents.
The list of currently parsed contents and styles include (OOXML content/style and HTML/CSS transformation):
-
document (w:body) : <body>
- background color (w:background) => w:color (background-color)
- background image (v:background) => id (background-image)
- border (w:pgBorders) => w:top (border-top), w:bottom (border-bottom), w:left (border-left), w:right (border-right): w:color (border-color: #HEX), w:sz (border-width), w:val (border-style: nil, none, dashed, dotted, double, solid), w:space (padding)
-
sections (w:sectPr) : <section>
- size (w:pgSz) => w:w (max-width)
- margin (w:pgMar) => w:top (margin-top), w:bottom (margin-bottom), w:left (margin-left), w:right (margin-right)
- columns (w:cols) => w:num (columns)
-
title and metas (cp:coreProperties) : <title>, <meta>
- title (dc:title) => <title>
- author (dc:creator) => <meta> (author)
- description (dc:description) => <meta> (description)
- keywords (cp:keywords) => <meta> (keywords)
-
text strings (w:t) and text styles (w:rPr) : <span>
- text (w:t) => <span>
- bold (w:b) => w:val (font-weight: bold)
- color (w:color) => w:val (color: #HEX)
- double line through (w:dstrike) => w:val (text-decoration-style: double)
- font family (w:rFonts) => w:ascii (font-family), w:cs (font-family)
- font size (w:sz) => w:val (font-size)
- highlight (w:highlight) => w:val (background-color)
- italic (w:i) => w:val (font-style: italic)
- line through (w:strike) => w:on (text-decoration: line-through)
- lower case (w:smallCaps) => w:val (text-transform: uppercase; font-size: small)
- text decoration (w:u) => w:val (text-decoration: none or underline; text-decoration-style: dashed, dotted, double, solid, wavy, none)
- upper case (w:caps) => w:val (text-transform: uppercase)
- vanish (w:vanish) => w:val (visibility: hidden; visibility: visibility)
- vertical align (w:vertAlign) => w:val (vertical-align: sub; vertical-align: super)
-
paragraphs (w:pPr) : <p>
- background color (w:shd) => w:shd (background-color)
- bold (w:b) => w:val (font-weight: bold)
- border (w:pBdr) => w:top (border-top), w:bottom (border-bottom), w:left (border-left), w:right (border-right), w:color (border-color: #HEX), w:sz (border-width), w:val (border-style: nil, none, dashed, dotted, double, solid), w:space (padding)
- color (w:color) => w:val (color: #HEX)
- double line-through (w:dstrike) => w:val (text-decoration-style: double)
- font family (w:rFonts) => w:ascii (font-family)
- font size (w:sz) => w:val (font-size)
- heading (w:outlineLvl) => w:val (h1, h2, h3, h4, h5, h6)
- highlight (w:highlight) => w:val (background-color)
- italic (w:i) => w:val (font-style: italic)
- line height (w:spacing) => w:line (line-height)
- line through (w:strike) => w:on (text-decoration: line-through)
- lower case (w:smallCaps) => w:val (text-transform: lowercase)
- margin (w:ind, w:spacing) => w:left (margin-left), w:start (margin-left), w:right (margin-right), w:end (margin-right), w:after (margin-bottom), w:before (margin-top)
- padding (w:hanging) => w:hanging (padding-left, text-indent)
- page break (w:pageBreakBefore) => w:val (page-break-before: always)
- text align (w:jc) => w:val (text-align: left, justify, center, right)
- text decoration (w:u) => w:val (text-decoration: none or underline; text-decoration-style: dashed, dotted, double, solid, wavy, none)
- text indent (w:firstLine) => w:firstLine (text-indent)
- text direction (w:textDirection) => w:val tbRl (direction: rtl; text-align: right;)
- upper case (w:caps) => w:val (text-transform: uppercase)
- vertical-align (w:vertAlign) => w:val (vertical-align: sub; vertical-align: super)
- word wrap (w:wordWrap) => w:val (word-wrap: break-word)
-
lists (w:numPr) : <ul>, <ol>, <li>
- type (w:numId) => w:val and w:ilvl (list-style-type: circle, disc, decimal, lower-alpha, lower-roman, upper-alpha, upper-roman)
- view paragraphs elements for other styles
- some styles such as color or font sizes can be inherited to the li content from the li symbol. In this case, the content must have its own style
-
links : <a>
- bookmark (w:bookmarkStart, w:bookmarkEnd) => w:name (<a>)
- cross-reference (w:instrText) => PAGEREF (<a>)
- link (w:instrText) => HYPERLINK (<a>)
-
form elements
- checkbox (w:instrText) => (<input> checkbox)
- date (w:date) => (<input> date)
- input (w:instrText) => (<input> text)
- select (w:instrText, w:comboBox) => (<select>)
-
styles (view elements on this same page for supported styles)
- character/run (w:rPr)
- paragraph (w:pPr)
- list (w:pPr, w:numId, w:ilvl)
- table (w:style, w:pPr, w:rPr)
- styles file (w:styles) => character/run (w:rStyle), paragraph and list (w:pStyle), table
- numbering file => list (w:abstractNum)
- default styles (w:docDefaults, w:style w:default=»1″) => w:pPr, w:rPr
-
tables (w:tbl) : <table>
- align (w:jc) => w:val (margin-left, margin-right)
- border (w:tblBorders) => w:top, w:right, w:bottom, w:left (border-: width style [dashed, dotted, double, none, solid] color)
- layout (w:tblLayout) => w:type fixed (table-layout)
- margin (w:tblInd, w:tblpPr) => w:w (margin-left), w:bottomFromText (margin-bottom), w:topFromText (margin-top)
- width (w:tblW) => w:type pct, dxa w:w (width)
- first col style (w:tblStylePr) => w:type (w:rPr styles)
- first row style (w:tblStylePr) => w:type (w:rPr and w:pPr styles)
- last col style (w:tblStylePr) => w:type (w:rPr styles)
- last row style (w:tblStylePr) => w:type (w:rPr and w:pPr styles)
- band1Horz style (w:tblStylePr) => w:type (w:rPr and w:pPr styles)
- band2Horz style (w:tblStylePr) => w:type (w:rPr and w:pPr styles)
- row height (w:trPr) => w:trHeight (height)
- rowspan (w:vMerge) => w:val restart, continue (rowspan)
- cell background color (w:shd) => w:fill (background-color)
- cell border (w:tcPr) => w:top, w:right, w:bottom, w:left (border-: width style [dashed, dotted, double, none, solid] color)
- cell padding (w:tblCellMar) => w:top (padding-top), w:right (padding-right), w:bottom (padding-bottom), w:left (padding-left)
- cell vertical align (w:vAlign) => top, bottom, center, both and default w:val (vertical-align)
- cell width (w:tcW) => w:w (width)
- colspan (w:gridSpan) => w:val (colspan)
- text direction (w:textDirection) => w:val btLr, tbLrV, tbRl and tbRlV (writing-mode, transform, white-space)
-
images (w:drawing) : <img>
- Supported image formats: png, jpg and other formats supported by web browsers. Wmf is supported if ImageImagick is installed
- border (a:ln, a:noFill) => w (width), a:prstDash (style: dashed, dotted, solid), a:srgbClr (color)
- float (wp:positionH, wp:align) => right (float: right), left (float: left), center (display:block; margin-left: auto; margin-right: auto)
- height (wp:extent) => cy (height)
- link (a:hlinkClick) => r:id (href)
- margin (wp:effectExtent, wp:positionH, wp:positionV) => t (margin-top), r (margin-right), b (margin-bottom), l (margin-left), wp:positionH wp:posOffset (margin-left), wp:positionV wp:posOffset (margin-top)
- text wrapping (wp:inline, wp:anchor) => wp:inline (display: inline), wp:wrapSquare (float: left), wp:wrapNone behindDoc (position: absolute; z-index: -1)
- width (wp:extent) => cx (width)
- src (r:embed, r:link) => embedded and linked images
- saved as files or as base64 (only for embedded images)
-
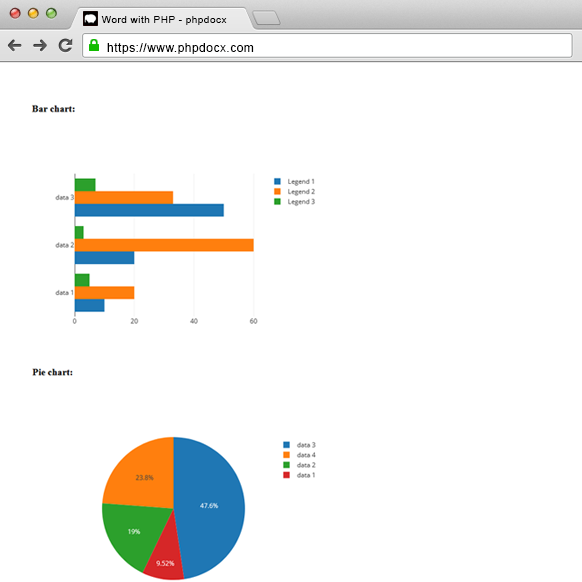
charts (w:drawing) : <div>
- Supported charts: bar (group, stack and percent), column (group, stack and percent), pie, doughnut and line charts
- Plotly JS library (MIT license) [https://plotly.com/javascript/] is used as default chart library
- height (cy)
- labels (c:cat)
- legends (c:tx)
- orientation (h, v)
- values (c:val)
- width (cx)
- Plotly default colors are used
-
other elements
- break (w:br) => (<br>)
- comment (w:commentReference, w:comment) => added to the bottom of the page (<span>)
- date (w:instrText) => TIME (<span>)
- endnote (w:endnoteReference, w:endnote) => added to the bottom of the page (<span>)
- external file (w:altChunk) => r:id (<a>)
- footer (w:footerReference, w:ftr) => (<footer>) added to the bottom of its section
- header (w:headerReference, w:hdr) => (<header>) added to the top of its section
- footnote (w:footnoteReference) => added to the bottom of the page (<span>)
- math equations => Office MathML
- simple fields (w:fldSimple) => AUTHOR, COMMENTS, LASTSAVEDBY, TITLE
- tabs (w:tab) => (<span>) margin-left default
- textbox (v:textbox) => (<div>), style (min-height, float, width), fillcolor (background-color), margin-top (margin-top), strokecolor (border-color, border-style), strokeweight (border-width)
- tracked contents (w:ins, w:del) => (<ins>, <del>)
- The fact that a tag is not parsed does not mean its content disappears from the HTML output. It only implies that their associated OOXML properties are not taken directly into account. Their children and text content will be parsed and rendered with their corresponding styles into the HTML output.
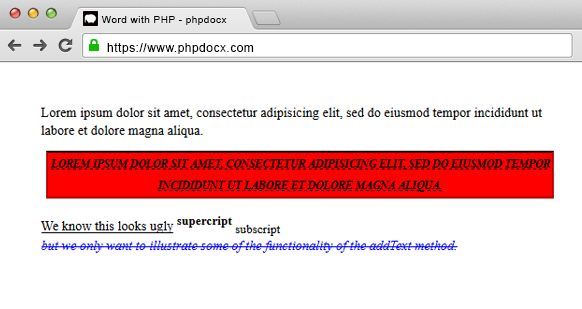
WARNING:
The transforming features included in phpdocx allow to transform complex DOCX documents generated from scratch or using templates. Let’s take a look at some samples and their HTML output.
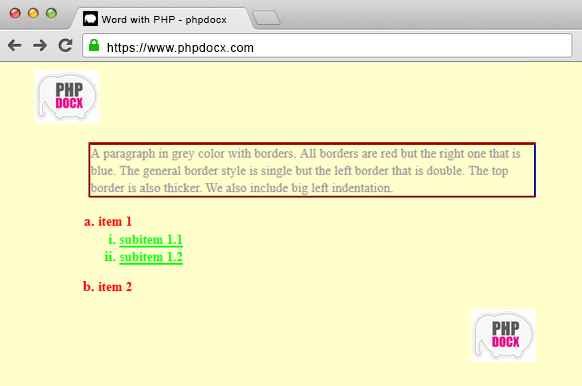
DOCX with an A4 section and paragraphs:
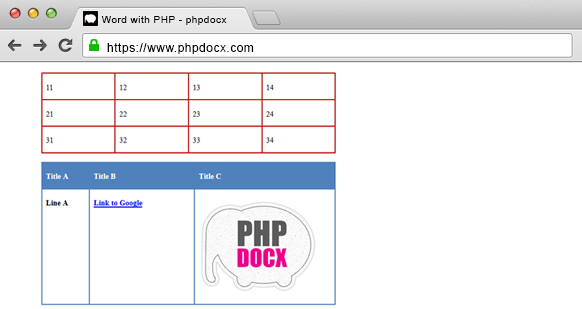
DOCX with tables:
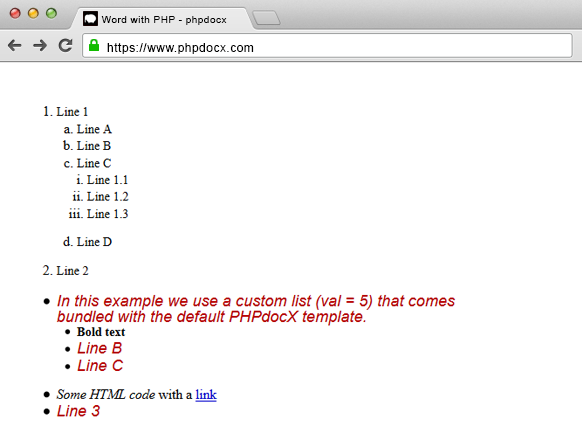
DOCX with lists and text styles:
DOCX with headers and footers:
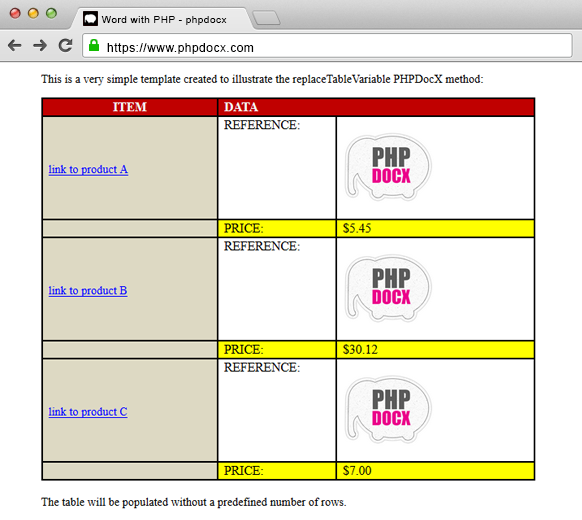
DOCX from a template:
DOCX with charts:
How to customize transformations
Nearly all the functionalities available for performing DOCX to HTML transformations can be customized.
The two main classes for transformations are: TransformDocAdvHTML and TransformDocAdvHTMLPlugin.
TransformDocAdvHTML is the class for parsing DOCX structures and performs the transformation to HTML. Its constructor receives an object of the TransformDocAdvHTMLPlugin type that sets the export options. This class can be extended to customize the transformation of each element, e.g., transformW_BOOKMARKSTART for bookmarks or transformW_SECTPR for sections.
TransformDocAdvHTMLPlugin allows to generate transformation plugins according to the project requirements. E.g.: inserting images as base64, ignoring sections, customizing conversion factors, setting the method to set export sizes and set CSS, JavaScript and custom HTML. phpdocx includes the TransformDocAdvHTMLDefaultPlugin, the default plugin to perform transformations.
All the available options are thoroughly explained in the API documentation page of the transformDocAdvHTML method.