
A question we often get asked is, “how do I import my script from another word processing program?” This is a good question because if done improperly, it can create significant issues within your script.
Simply copying and pasting text from a word processing application introduces foreign code into Final Draft that can then alter, and ultimately corrupt, the code of the script file. Think back to the scientists in Jurassic Park – they filled the missing links of dinosaur DNA with frog DNA, which caused the genetic mutations that led to the dinosaurs being able to breed and wreak havoc on the park. In this case, your script is precious dino-DNA and any text from another word processor is highly corruptible frog DNA. Once foreign code is introduced into Final Draft, it can cause the script file to deteriorate until it is completely corrupted and un-openable.
To that end, here is the right way to import text from another word processor into Final Draft –
- First, open the script in the program in which it was created. Once it’s open, go to File > Save As (or, depending on the program, File > Export).
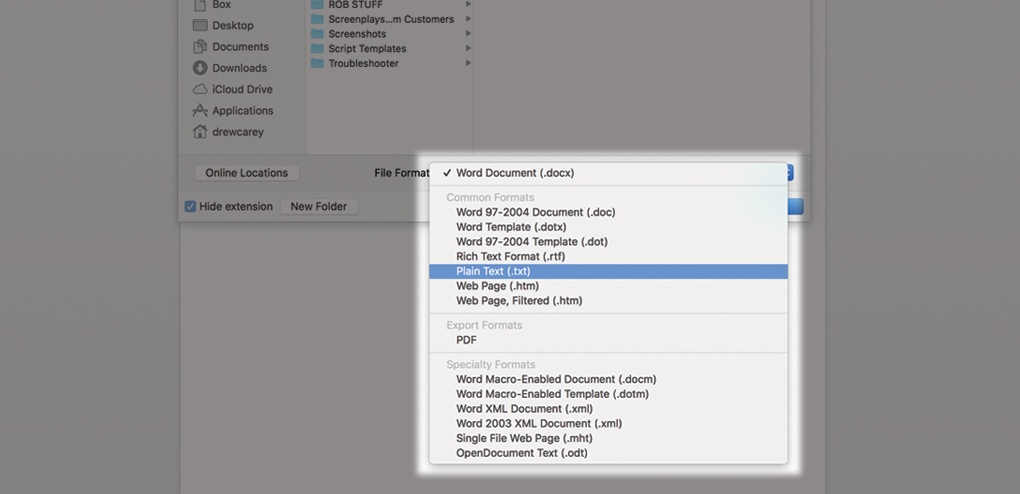
- Next, choose the Desktop as the location and from the Save as Type or dropdown menu at the bottom of the window, choose Plain Text, Text Only or ASCII Text file (they’re all the same). Recent versions of Microsoft Word will offer Save As Other; choose Plain Text from this submenu.

- Then, in Final Draft, go to File > Open; navigate this dialogue box to look on the Desktop (on Windows, change the Files of Type to Text Documents); and double-click on your script file.
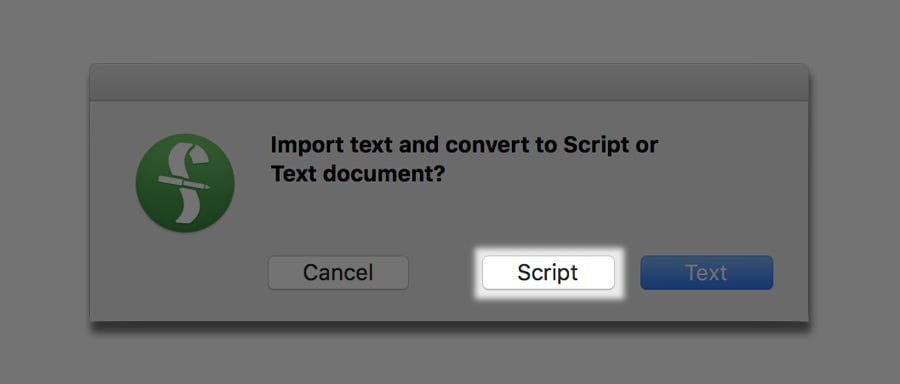
- Final Draft will then prompt you to open the file as either a Script or Text; choose script.
- Final Draft will import the text and render it as a feature screenplay.

Once your converted file is in Final Draft, you may find that your script has a small amount of errant formatting, e.g., scene headings might be formatted as action, or character names are formatted as dialogue. Fixing this is easy, and there are two ways of doing this –
- If the script has only a few examples of erroneous formatting, simply put the blinking cursor the paragraph that needs to be reformatted and choose the correct element from the Elements drop-down menu. On Mac, this is at the bottom left of the screen and on Windows it’s at the top center.
- If there is lots of reformatting to do, go to Tools > Reformat and a new toolbar will pop up. The Reformat tool will highlight a block of text and allow you, by choosing the right element, to correct the format of that block of text.
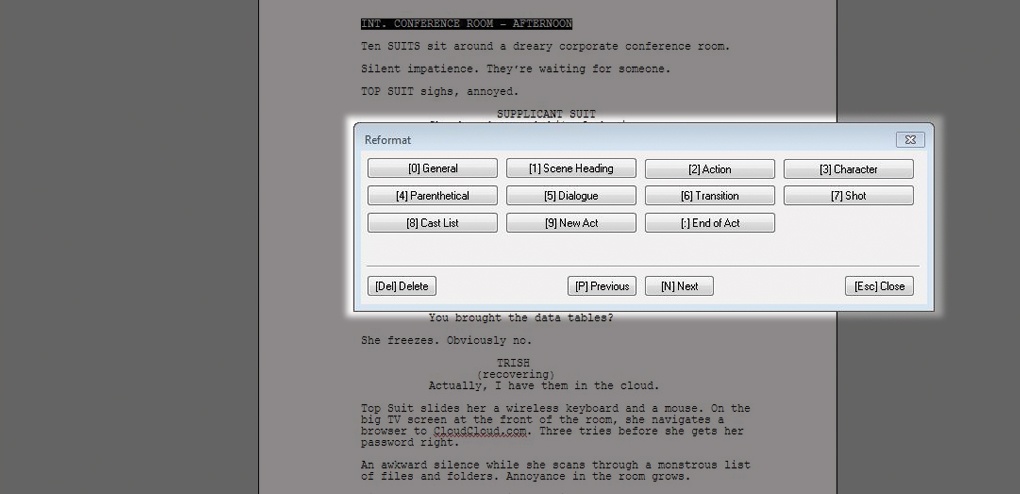
Please note: the Reformat tool can’t break up blocks of text, so if you have scene headings, action, character names and/or dialogue clumped in one paragraph, you will first need to separate these sections of text before using the Reformat tool.
So, the next time you need to import from another word processing program, remember not to copy and paste into Final Draft! Follow these steps and you’ll be one step closer to writing your masterpiece!
- Главная
- Обучение
- Особенности импорта Word-файлов
Обучение
Есть вопросы по освоению программы?
Напишите в службу поддержки, и вам ответят в течение нескольких часов.
info@filmtoolz.ru
Импорт файлов из программ КИТ сценарист, Final draft и Fade in не требует от пользователей каких либо действий, т.к. эти программы передают информацию об объектах, персонажах, номерах сцен изначально в необходимом формате. Однако, при импорте файлов Word или PDF необходимо выполнить ряд требований к форматированию сценария и заполнению шапки сцен, чтобы FilmToolz смог корректно распознать импортируемые данные.
Шапка сцены состоит из номера сцены, типа и названия объекта, режима и номера сценарного дня, персонажей и планового хронометража.
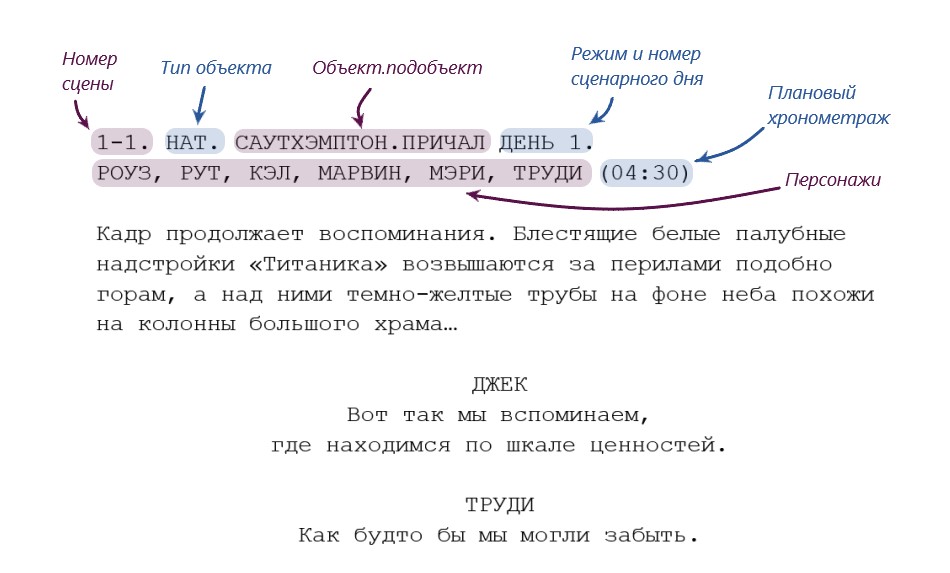
Номер сцены состоит из номера серии и порядкового номера сцены внутри этой серии. Разделите номер серии и номер сцены с помощью тире, затем поставьте точку и пробел, чтобы система определяла, где заканчивается номер сцены, а где начинается указание типа объекта.

Если вы загружаете сценарий для полнометражного фильма, то достаточно указывать только номер сцены, без номера серии. Либо, если вам так привычней, указывать номер, как для первой серии в формате 1-1., 1-2.
Для обозначения типа объекта в системе используются 4 аббревиатуры: «ИНТ.» для интерьера, «НАТ.» для натуры, «НАТ/ИНТ.» — для смешанного типа, и «ПАВ.» для павильона. Не забудьте поставить точку и пробел после указания типа объекта.

Название объекта может быть простым или состоящим из двух частей, разделенных точкой — название объекта и название подобъекта, к примеру «Школа.Кабинет директора» или «Школа.Спортзал».

Обращаем ваше внимание, что при написании названия объекта важны используемые регистр и язык. Например, объекты «дом», начинающийся со строчной буквы и «Дом», начинающийся с прописной буквы, будут распознаны системой как два разных объекта.
После названия объекта поставьте пробел и укажите режим съемочного дня. В системе присутствуют 4 доступных режима: утро, день, вечер, ночь. Далее через пробел укажите номер сценарного дня, если это необходимо, и поставьте точку.
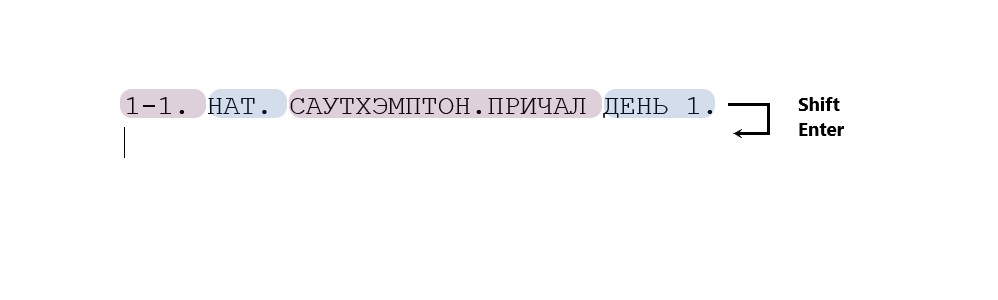
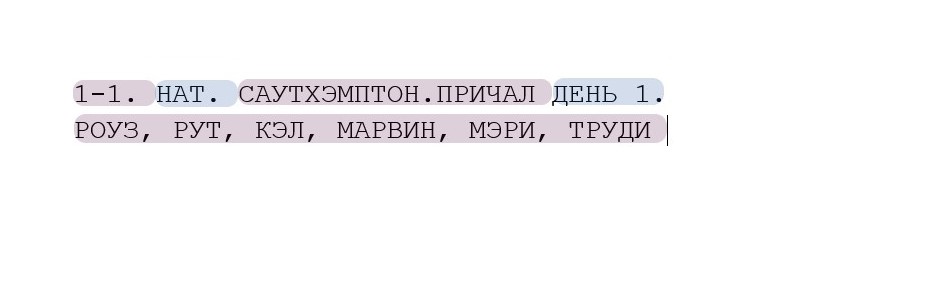
Указание всех персонажей сцены является необязательным условием, т.к. персонажи по умолчанию импортируются из диалогов. Указывать список персонажей в заголовке сцены вручную рекомендуется, когда в сцене присутствуют персонажи без реплик. Чтобы перечислить всех персонажей, перейдите на следующую строку с помощью сочетания клавиш SHIFT+ENTER. Если для перехода на следующую строку вы по ошибке используйте просто Enter (вместо Shift+Enter), то весь последующий текст будет распознан системой как текст сценария и персонажи будут распознаны согласно тексту.
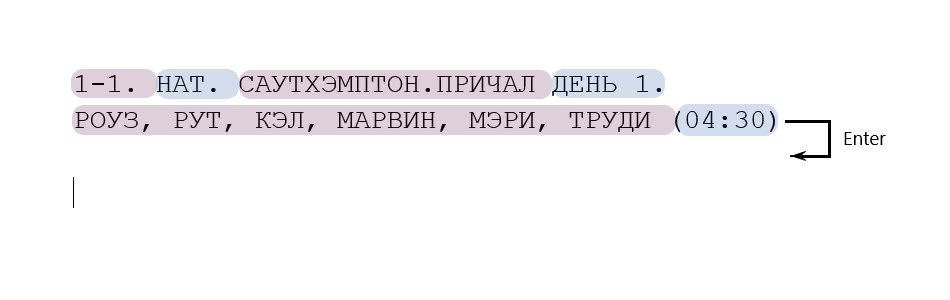
После перечисления персонажей вы можете указать плановый хронометраж сцены — для этого отступите от названия последнего персонажа, нажав на пробел, и введите время в формате мм:cc. Возьмите хронометраж в скобки. Если у вас нет точного планового хронометража, то можете ничего не указывать, а при импорте сценария выбрать опцию автоматического расчета хронометража.
После того, как шапка сцены будет заполнена, нажмите на Enter, чтобы перейти к вводу текста сценария сцены.
Чтобы система могла корректно распознать диалоги и прочие элементы сценария, форматируйте их в соответствии с общепринятым стандартом, а именно:
— Перед «Действием» должна быть пустая строка
— «Персонаж» должен быть написан заглавными буквами, перед ним должна быть пустая строка
— «Диалог» или «Ремарка» размещены сразу на следующей строке после «Персонажа» т.е. после имени персонажа не должно быть пустой строки.
— «Ремарка» должна быть заключена в скобки и размещена перед речью, к которой относится.
Если у вас возникли проблемы с импортом сценария, напишите нам на info@filmtoolz.ru, мы обязательно поможем!

What’s the best way to convert a word docx to final draft?
I saw something on here a few days back but now I can’t find it!
I’ve been sent a script in Word docx format! I’ve tried importing it into FD but it comes out as all action! I remember having to do it this with, I think, FD v7 and it made a good attempt at putting everything in the right place, the newer version seems to have dropped that feature?
Thanks
LeftAligned
Write in Word. Deliver in Final Draft.
LeftAligned is a Java GUI app that converts «stage play» formatted screenplays written in Word 2007 (.docx) to Final Draft 8 XML (.fdx).
Write:
FADE IN:

INT. ALICE'S APARTMENT - DAY

Some boilerplate scene description a better screen
writer would have done without.

ANGLE ON

Alice.  In the kitchen; stirring a pot on the stove.
She has her mobile phone jammed to her ear --

ALICE: (to phone) Mom!  Listen.  The garlic has only
been in a minute.  Mom!

INSERT

the frying pan.  The garlic is starting to burn...
and get:
                                            FADE IN: <Transition>

INT. ALICE'S APARTMENT - DAY <Scene Heading>

Some boilerplate scene description a better screen
writer would have done without. <Action>

ANGLE ON <Shot>

Alice.  In the kitchen; stirring a pot on the stove.
She has her mobile phone jammed to her ear --

                  ALICE <Character>
                (to phone) <Parenthetical>
          Mom!  Listen.  The garlic has
          only been in a minute.  Mom! <Dialogue>

INSERT <Shot>

the frying pan.  The garlic is starting to burn... <Action>
Features
- Write screenplays in Word or other text editor with .docx (Word 2007) export.
- Keep text left-aligned and simply follow some simple formatting rules
- Automatically breaks dialogue paragraphs into their component parts: character name, parentheticals, and dialogue
- Recognition of scene headings, shots, and transitions
- Retains the following styles supported by Final Draft: Italic, Bold, Underline
- Simple GUI interface or can be adapted to CLI or integrated within your own application
- One-way conversion at the moment
Installation
From source only at the moment.
Documentation
Basic usage
Simply launch the app and select a source file. Optionally provide an alternative name/save-to location.
Press «Convert».
Formatting in Word
While LeftAligned avoids the need for complicated style sheets, it does require that you adhere to a few rules:
Scene Headings must be ALL CAPS and use either a INT. or EXT. prefix or - DAY, - NIGHT, - CONTINUOUS or - NEXT suffix.
Dialogue paragraphs must start with an ALL CAPS character name followed by colon: CHARACTER NAME:. Any text following the first : that is contained within () will be treated as a parethetical. The rest as literal dialogue. For his reason, it is important to use alternatives such as [] or {} for bracketing. Any text within () preceding the first colon is treated as part of the name itself, following what Final Draft XML does.
Transitions must be ALL CAPS and have either FADE or TO: within them.
Shot is the default for any ALL CAPS paragraph that is not determined to be a Scene Heading or Transition. Scene Headings that are missing a required component will likely be typed Shots.
Action is the default for what’s left after the above patterns have been tested for. I.e., normal prose. Camera direction or other ALL CAPS strings within an Action paragraph will be treated as part of that paragraph. Keep ANGLE ON, CLOSE UP, etc. in separate paragraphs if you want them to be type Shots.
Instead of
CLOSE UP

as Bob reaches for the gun.
use
CLOSE UP
as Bob reaches for the gun.
Note: Final Draft also has a General element. While the ScriptDocument API (see below) supports this element, nothing converted by LeftAlign will be set to General as any unidentifiable patterns will default to Action.
CLI usage/integration with other software
The class LeftAligned can serve as an entry point for your application. It does not implement a main() method of it’s own. However, you can easily wrap it in one for CLI use.
LeftAligned la = new LeftAligned();
la.makeFDX("myScreenPlay.docx");
la.writeFDX("myScreenPlay.fdx");
You can also pass a java.io.File object to both .makeFDX(File fo) and .writeFDX(File fo) methods.
Libraries of note
Apache POI’s XWPFDocument API (org.apache.poi.xwpf) is used to read the .docx source file.
The GUI is JavaFX.
The ScriptDocument class
LeftAligned does not convert directly from the source document to Final Draft XML. A custom collection of objects are used to encapsulate the document as a whole as well as contain its component parts. This simplifies future bi-directionality as well as enables support for other file formats besides .docx and .fdx.
The hierarchy of ScriptDocument is:
ScriptDocument -> SceneGroup -> ElementGroup -> ScriptElement -> Text
ScriptDocument
This is the top-level. Equivalent to XWPFDocument. Its members property contains an ArrayList of SceneGroups
SceneGroup
LeftAligned follows the Final Draft convention of treating each Scene Heading as the start of a new scene. Therefore, documents created with LeftAligned will feature one SceneGroup per SceneHeading. (The first SceneGroup may not have a Scene Heading, however.) However, the ScriptDocument itself does not depend on this being the case. Its members property can contain any assortment of ElementGroup objects.
See my «Note on Scene Groups» below on a better way a screen writing application could organize scenes.
ElementGroup
Final Draft itself only has elements. So Parenthetical and Dialogue elements can be used without an associated Character element, even though dialogue without an associated character name isn’t likely to be useful. Therefore, it seemed prudent to group logically bound elements together. With the current implementation, the only ElementGroup that can contain more than one ScriptElement type is DialogueGroup. In future, Scene Headings may be broken into several sub-element types, although Final Draft XML draft treats Scene Headings as a single element.
ScriptElement
These objects correspond directly to the element types Final Draft XML uses. The field type contains a string with the exact spelling for the type used by the Final Draft Paragraph element’s Type attribute.
Text
Basically the equivalent of a ‘run’ in MS Office documents, and corresponding to Final Draft’s Text XML element. Each Text object contains a textContent field was well as a style field. style holds a whitespace-delimited string of all styles that apply. For simplicity, style strings match spelling used by Final Draft Text element’s Style attribute. Invalid style names are simply ignored (possibly erased?) by Final Draft.
Metadata support
In the limited testing I’ve done so far, it appears Final Draft generates metadata, such as location lists and character lists, automatically when you first open the LeftAligned rendered file. If further testing indicates this is not the case, there is a SceneProperties class—currently unused—that can contain this metadata.
Note about Unicode
The limited range of fonts supported by Final Draft (TrueType only I believe) can be problematic for writers using languages other than English. For its part, LeftAligned will faithfully pass non-ASCIIs through. What Final Draft does with them is another story. Final Draft can be used for free in «Reader Mode». I would suggest inspecting the converted file to ensure any Unicode rendered as expected. If not, transliteration may be required unfortunately.
Also, be aware that «smart type» characters generated by Word and other word processors may not be interpreted correctly by Final Draft. At the moment, dashes/hypens are normalized to keyboard defaults in Scene Headings only—this is to aid in proper Scene Heading recognition. I would recommend disabling «smart type» functionality while writing for your screenplays to avoid surprises.
Note on Scene Groups
Final Draft naively treats a Scene Heading as the start of the new scene. Often this isn’t what you want. What if a character moves from inside to outside? This will require a new Scene Heading, but is arguably part of the same logical scene.
If I had my way, I would make «Start of Scene» (SOS) a hidden element that can be placed arbitrarily. One hack I’ve seen is to only use a Scene Heading when a scene starts and Shot elements for the rest of your sluglines. Unfortunately, you lose typeahead when you do this. For now, LeftAligned simply follows Final Draft in the way it defines a «scene».
convert
Quick Import from Microsoft Word
Video time control bar
0:00
▶️
⏸️
🔊
Audio volume control bar
0:00 / 0:00
Quality:
↔️
↕️
Sharing buttons:
![]()
![]()
![]()
![]()
![]()
![]()
Generate Transcript
Monday, October 24, 2011
Word to Final Draft
Currently pasting all my scripts (pre-Masters Program) into Final Draft from Word. AMAZING how I did a two year screenwriting program on Word but, ANNOYING, the process it takes to input it into Final Draft. But, pretty soon I’ll have a professional body of work to send out…we’re still allowed to draw cartoons on the cover pages right? ;-P
Posted by
Gus
at
12:28 PM
![]()
No comments:
Post a Comment
Newer Post
Older Post
Home
Subscribe to:
Post Comments (Atom)
If you have Microsoft Word, even the basic one, this article will show you how to format it so you can write your screenplays.
A side note: If you’re writing screenplays and making a living from them, I highly recommend Final Draft (Amazon, B&H).![]() The program gets out of the way and allows you to focus completely on your craft. Also, it’s the industry standard.
The program gets out of the way and allows you to focus completely on your craft. Also, it’s the industry standard.
For a free software that works great, take a look at Fade In. You will have to pay to remove the watermark and publish your pages, but at least you can get your script written.
Exclusive Bonus: Download your FREE Blueprint: How to make a movie. A complete visual representation of the filmmaking process from beginning to end.
I have used MS Word for six years without any problems.
The only two ‘must-haves’ for a serious screenplay writer are a great keyboard and a great chair. If you’re writing on a tablet, get a bluetooth keyboard and pound away.
I’m assuming you know what the correct format is. If not, please start by reading this article:
How is A4 different from US Letter for screenplays?
You might be wondering if there are any practical ramifications of using A4 over the standard US Letter format. If you’re sending a web PDF document, then consider where it will be printed. If it is going to the US, then it will be printed on US Letter.
The screenplay format is designed for US letter, and not for A4. I’ve been using it for A4, since that’s the only kind of paper I can buy in India.
Courier 12-point should give you 4.23mm (0.166″) per line. For A4 paper, this means 55-64 lines , and for US Letter paper, this means a maximum of 51-60 lines. How many characters does that make?
- A4 – Between 3,135 to 3,648 per page.
- Letter – Between 3,060 to 3,600 per page.
That’s an approximate difference of 2% between the two. If one page equals one minute (60 seconds) in US Letter, it would mean 61 seconds on A4. For a 100 page script, it would approximate 100 minutes in US Letter, and 102 minutes in A4. There is no difference. Also, don’t forget to take note that you are allowed to use double or even triple spaces between lines, or break up your page breaks for better readability. This by itself is a 10% difference per page!
To recap, don’t worry about the paper size. Stick to the margins, and keep your font fixed at Courier 12-point 10-pitch.
The font for a screenplay
The font is Courier 12-point 10-pitch.
Where do you find Courier 12 pt 10-pitch?
The easiest way is to download a demo version of Final Draft. Then copy the font to your font directory before the trial version expires. Then you’ll have it available for Microsoft Word or another word processing application.
Before you use fonts for any commercial activity, make sure there are no licensing fees involved. Some fonts are not usable for any purpose, commercial or personal. When in doubt, use the default Courier font on your word processor. Nothing bad will happen.
How to format MS Word for the page layout
I’m going to be using Microsoft Word, but you can do the same with any word processor.
Open a new blank document. Go to Layout and choose the paper size – stick to US Letter or A4.
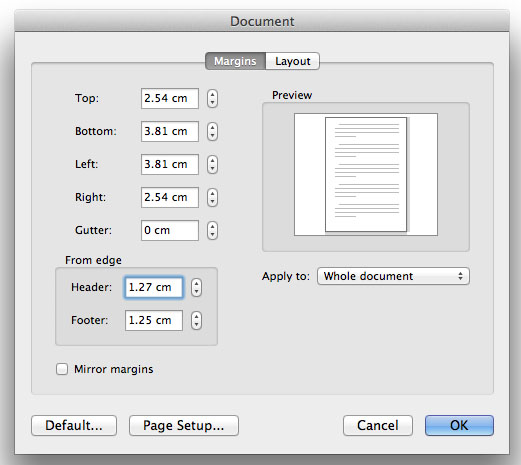
Go to Margins and select Custom Margins…:
Click OK. Go to Insert > Page Numbers and select Top and Right. Page numbers should be displayed from the first page. Note: Some people shift the page numbers a bit to the right but it doesn’t matter. Start the numbering from 2 (1 is reserved for the title page).
Finally, select the Courier 12pt font.
That’s it, your main document is ready. Save it on your hard drive before proceeding. We’ll come back to it after the next section.
How to create the title page for your screenplay
Create your title page only after you’ve finished writing your script. Otherwise you might spend months with just the name of your movie!
Open a new Word document and select the same paper size as your preferred screenplay format. Choose your font.
The title is centered somewhere just above the middle (doesn’t matter). On the next line (or you could leave a couple of lines) you write ‘by’. On the next line write your full name (only first letter is capitalized).
No jazzy stuff, bold fonts or styles or colors. The page number shouldn’t be visible on the title page.
On the bottom right (align to the right), write down your address, phone number and/or email address (Many competitions forbid you to include this information). Nobody’s going to study your title page and gush at your layout skills. It shouldn’t draw attention to itself. If your script is good, then the reader will want to meet you.
Save this as a title template and you’re done.
Next let’s look at the elements that form a screenplay, and how you can ensure the smoothest writing experience with Microsoft Word.
Now let’s create the elements of a screenplay.
How to get elements into Microsoft Word
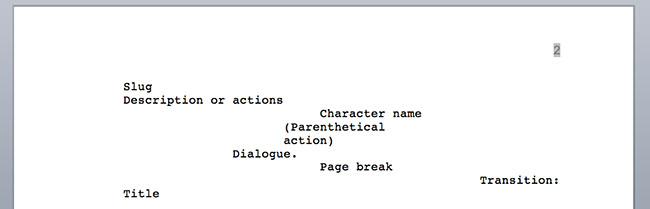
Word has a crazy system of adding spacing to the margin, so you need to get rid of that first. Type these to the script template:
Slug
Description or actions
Character name
Parenthetical action
Dialogue
Transition
Page break
Title
Select them and right click. Select Paragraph…. Make sure the Alignment is ‘Left’ and Indentation is ‘0 cm or inches’. Hit OK.
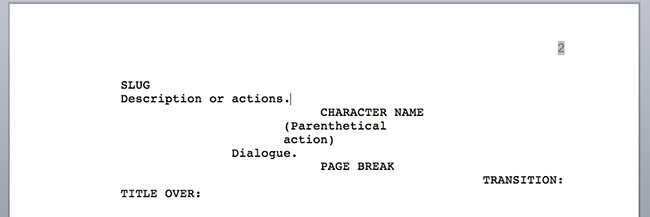
Character name
Place the curser at the beginning of ‘Character name’. Right click and select Paragraph…. You have two choices:
- Change the left indentation to 6.86 cm (2.7″). Use this if you’re using the 4.2″ formatting.
- Change the alignment to ‘Centered’. Use this if you’re just centering the character name.
Parenthetical action
Place the cursor on Parenthetical action. Repeat the steps above to get to the Paragraph popup. Because the paranthetical action position is related to the character name, you have two choices:
- If you have opted for the 4.2″ system, set the left indentation at 5.59 cm (2.2″).
- If you have opted for the centered system, set the alignment to ‘Centered’. Then set the left indentation at -1.27 cm (0.5″).
Dialogue
Place the cursor on Dialogue. Repeat the steps above to get to the Paragraph popup. Because the position of the dialogue is relative to the character name, you have two choices:
- If you have opted for the 4.2″ system, set the left indentation at 3.84 cm (1.5″). Set the right indentation at 2.54 cm (1″).
- If you have opted for the centered system, set the alignment to ‘Centered’. Then set the left indentation at -3.81 cm (1.5″). Set the right indentation at -4.44 cm (1.75″). This will center the text and give you a width of 3″.
Centered looks better for online reading but the 4.2″ system is better for MS Word formatting. The ‘centering system’ is harder to implement in Word, don’t worry.
Transition
Same steps. Align to the Right.
Page break
Same as Character name.
For Slug, Title and Description, don’t make any changes yet. If you’ve done everything okay, this is what your template should look like:
Changing the fonts and line spacing
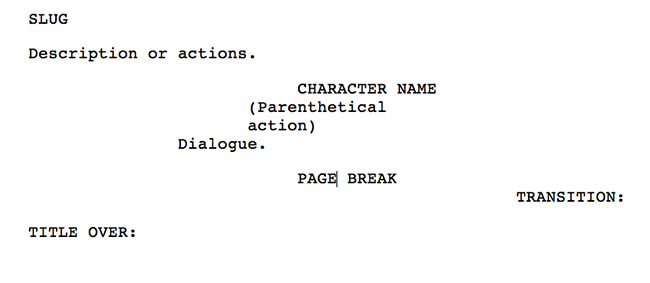
The next step is to make sure the fonts that are always in upper case be assigned that style.
Fonts
Choose Slug, Character name, Page break, Transitions and Title one by one, right click and select Font…. Check ‘All caps’. This is what it will look like:
Finally, we manipulate the line spacing so each element behaves the way it is supposed to.
Line Spacing
This part could have been done alongside indentation and alignment, but this way it is more foolproof for first timers. First, let’s understand how line spacing works in a screenplay:
Double spacing follows these elements, always:
- Slug
- Each paragraph of a description or action.
- Diagloue.
- Transition.
Why not add them in automatically? We can do that.
Select each of these elements one by one, right click and select Paragraph…. Change the Spacing, After to 12 pt. This is what it will look like:
There shouldn’t be a double spacing before the Page break. However, this only applies rarely to a screenplay, so you can just hit backspace when you need it. There are some writers who like to have two spaces prior to every slug. You can use the same method to change things up.
With this system, you don’t have to worry about line spaces before any element because it will follow automatically after another element.
Add Actions to your template
What are actions? Simply put, there are some rules that always hold true in a screenplay format:
- A slug or scene heading is always followed by action/description.
- The end of a transition is always a slug or scene heading.
- Dialogue is assumed after each character’s name, unless a parenthetical action is necessary. After every parenthetical there is always a dialogue.
- More likely than not a dialogue will be followed by another character’s name.
Software like Final Draft makes it easy to write because as soon as you finish one line of the above and hit ENTER the next line assumes the next logical step – saving you many keystrokes. To get the same benefits in Microsoft Word, you must try to create actions (term borrowed from Photoshop) that make it as easy as possible.
Let’s go in this order:
Description or action
Select/Highlight Description or actions in your template. Go to Format > Style > New…:
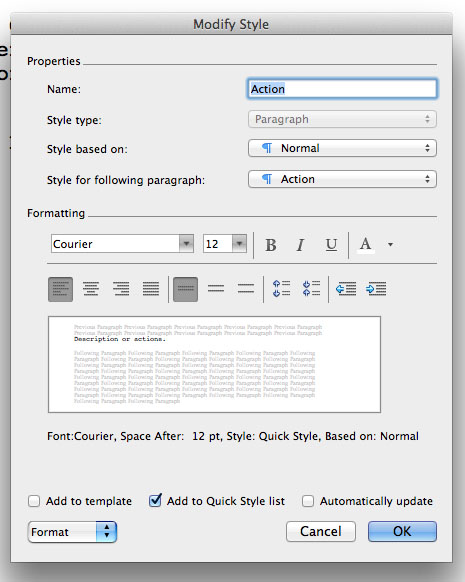
Name the style as ‘Action’. Click OK. Word will automatically assign the ‘Style for following paragraph’ to ‘Action’. To create a shortcut, click on the ‘Format’ drop down on the lower left:
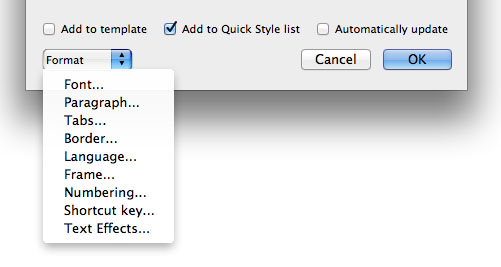
Select Shortcut key…. You’ll get this box:
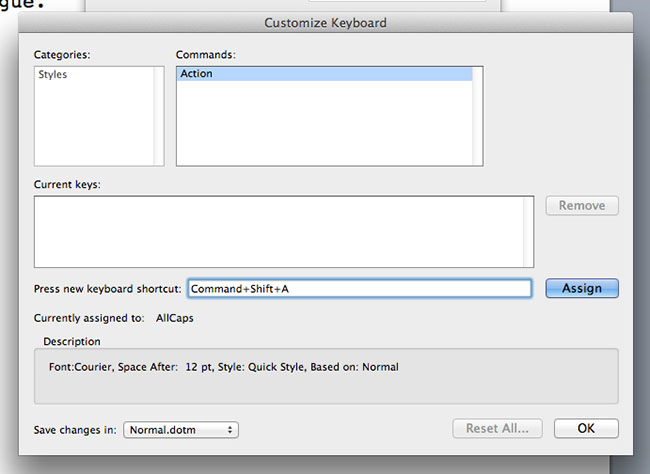
Alt is assigned to the menu and Shift is assigned to upper case letters. I recommend using CTRL+SHIFT+Number. E.g., for Action you could have CTRL+SHIFT+2. Click on Assign and then OK.
Slug
Highlight ‘Slug’ and repeat the above steps. In the New Style popup, name it ‘Slug’ and assign the ‘Style for following paragraph’ to ‘Action’. Click OK.
Set the shortcut as CTRL+SHIFT+1.
Transition
Same as above. In the New Style popup, name it ‘Transition’ and assign the ‘Style for following paragraph’ to ‘Slug’. Click OK.
Set the shortcut as CTRL+SHIFT+6.
Character name
Same as above. In the New Style popup, name it ‘CharacterName’. Click OK.
Set the shortcut as CTRL+SHIFT+3.
Dialogue
Same as above. In the New Style popup, name it ‘Dialogue’ and assign the ‘Style for following paragraph’ to ‘CharacterName’. Click OK.
Go back to the CharacterName style and assign the ‘Style for following paragraph’ to ‘Dialogue’. Click OK.
Set the shortcut as CTRL+SHIFT+5.
Parenthetical action
Same as above. In the New Style popup, name it ‘Paranthetical’ and assign the ‘Style for following paragraph’ to ‘Dialogue’. Click OK.
Set the shortcut as CTRL+SHIFT+4.
Title
Same as above. In the New Style popup, name it ‘TitleOver’ and assign the ‘Style for following paragraph’ to ‘Dialogue’. Click OK.
Set the shortcut as CTRL+SHIFT+7.
Now we have our styles. Page break has the exact same style as CharacterName so you can use that instead. Try playing around with the styles. It works!
Don’t forget to save your template!
If you’re having trouble with my shortcuts, feel free to choose your own. Keep it simple and repeatable so you only have to learn one set of movements and you’ll be doing it fast in no time.
Microsoft Word tells you whether your preferred shortcut is already in use for an important function or not. You can also save your shortcuts and styles to apply to all documents created in Word (but that isn’t a good idea if you’re using Word for other stuff as well).
There you have it, how to set up Microsoft Word to write a screenplay. Happy writing!