Download PC Repair Tool to quickly find & fix Windows errors automatically
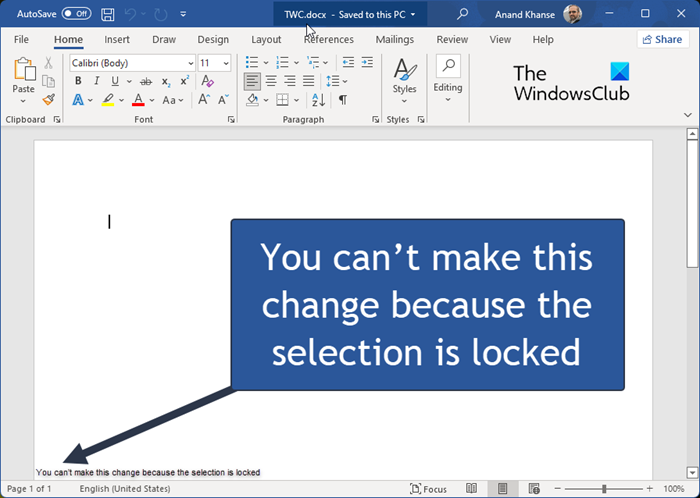
Microsoft Word may display an error when trying to access, edit or save your documents, which can be very frustrating for users. One of them is You can’t make this change because the selection is locked. This means that you are denied editing access to certain parts of the document.
Follow the solutions below to fix the Office error ‘You can’t make this change because the selection is locked.
- Disable Mark as Final
- Disable Restrict editing
- Modify the properties of the document
- Activate your Office
1] Disable Mark as final
If the author marks the document as final, it will restrict you from making changes. Follow the steps to disable Mark as final below:
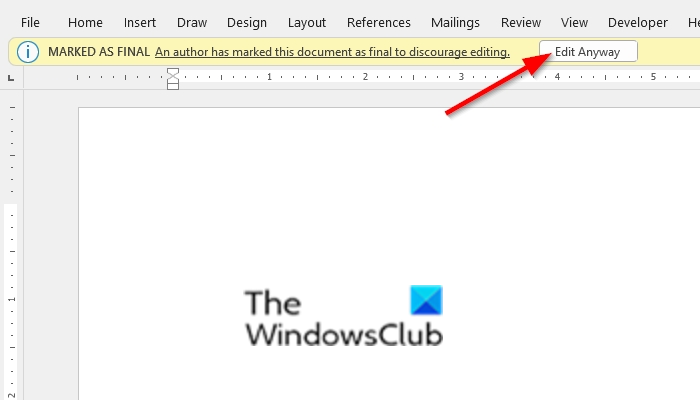
When you open a Mark as Final document, you will see a notification under the toolbar. Click Edit anyway to disable Mark as Final temporarily and do this procedure every time you open the document.
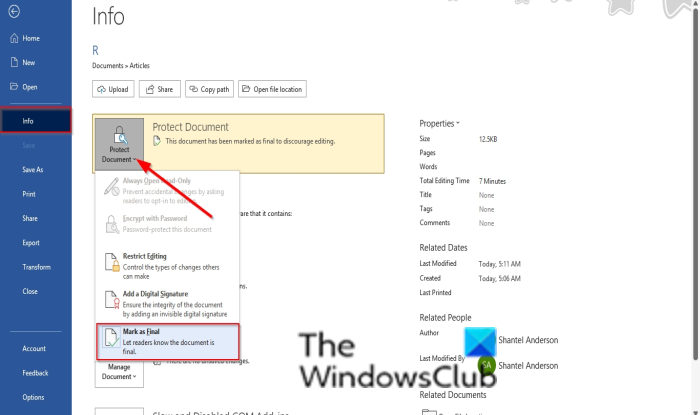
To disable Mark as Final completely; click File, then click Info on the backstage view.
Click Protected view on the right (The Protected View is highlighted) and select Mark as Final from the drop-down menu.
Marked as Final is disabled.
2] Disable Restrict Editing
You can fix this error by enabling the Developer tab and disabling Restrict Editing.
Click File, then click Options on the backstage view.
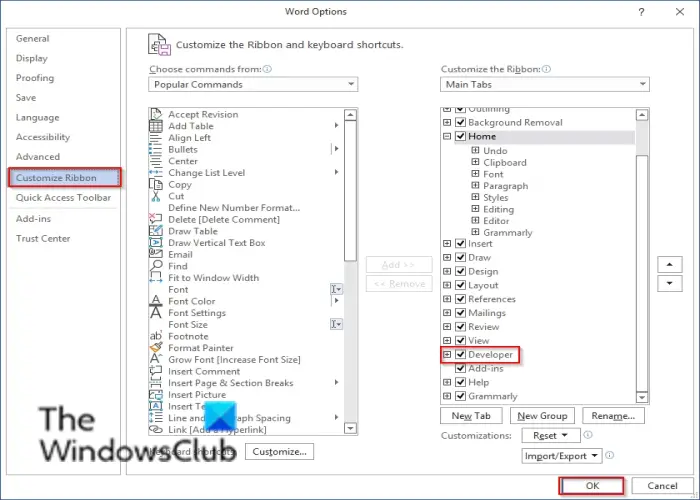
A Word Options dialog box will appear; click the Customize Ribbon in the left pane.
On the right, under the Customize Ribbon column, check the checkbox for the Developer tab.
Then click OK.
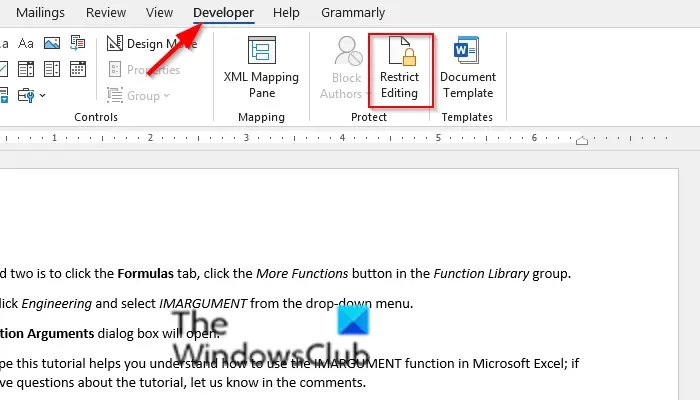
Go back to the document, click the Developer tab and click Restrict Editing in the Protect group to disable it.
Related: Word cannot complete the save due to a file permission error
3] Modify the Properties of the document
The problem can arise due to issues with the metadata within the document. In this situation, you can modify the properties of the windows.
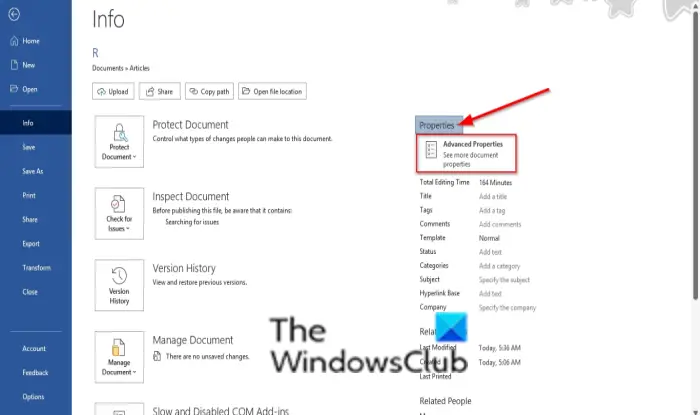
Click File, then click Info on the left pane.
On the right, click Properties drop-down arrow and select Advanced Properties.
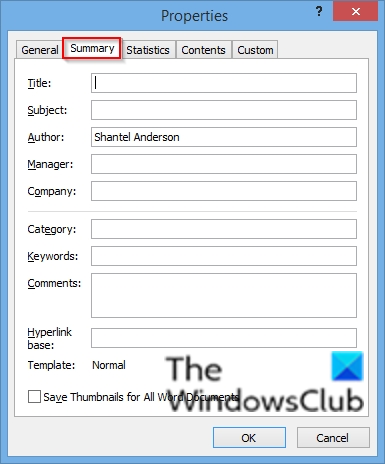
In the Advanced Properties interface, go to the Summary tab and modify the Title, Subject, and other metadata you want to include.
Then click OK.
4] Activate your Office
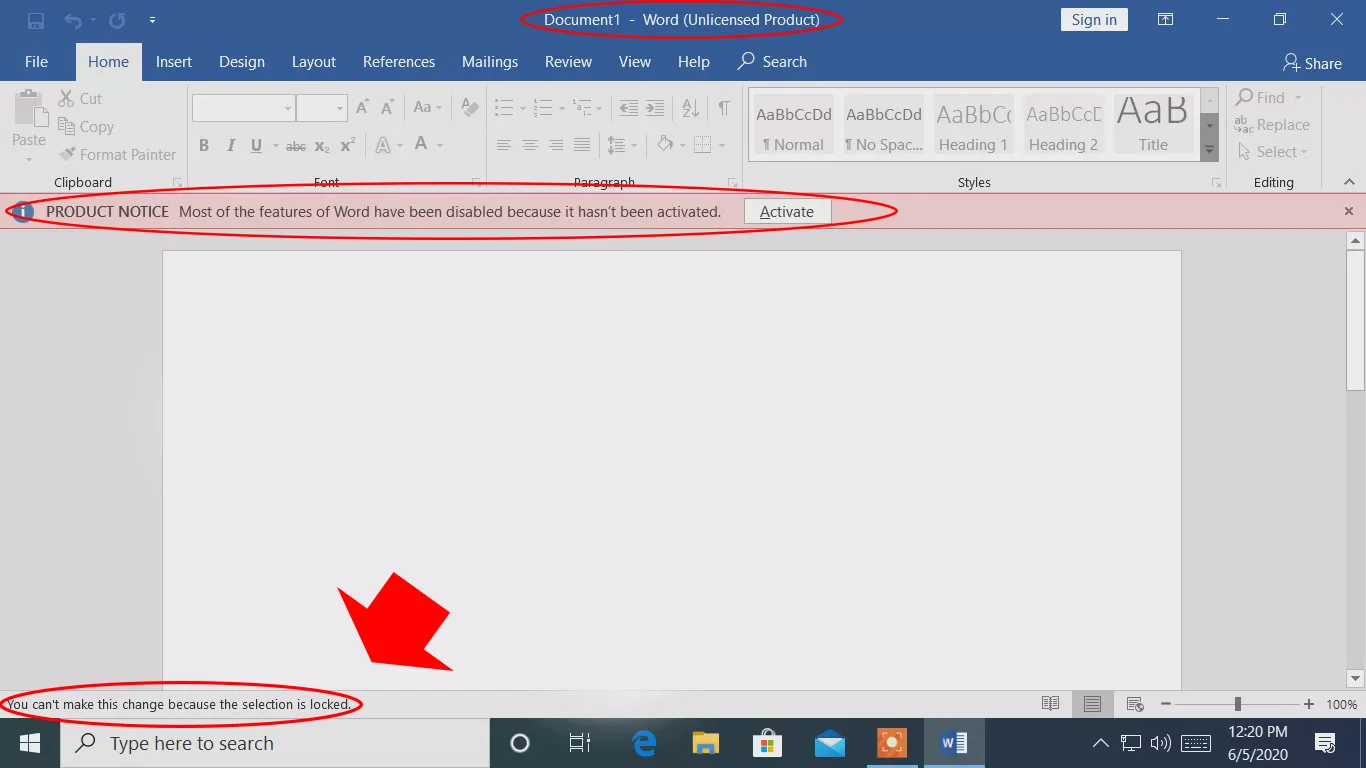
The issue can occur due to the expiration of the Office trial; in this case, you need to activate Office.
Why does my Microsoft Word say the selection is locked?
The most common cause of the ‘Selection is locked error’ is due to an unactivated version of Office, and the document is protected or restricted from editing in some ways.
Related: Word cannot complete the save due to a file permission error
Why can’t I make changes to my Word document?
If you open or receive a document and cannot make changes, it may be open for viewing in Protected View. In Microsoft Office, a Protected view is a read-only mode where most editing functions are disabled.
We hope this tutorial helps you understand Office Error: You can’t make this change because the selection is locked; if you have questions about the tutorial, let us know in the comments.
Shantel has studied Data Operations, Records Management, and Computer Information Systems. She is quite proficient in using Office software. Her goal is to become a Database Administrator or a System Administrator.
Unable to modify your Word Document content and frequently getting “you can’t make this change because the selection is locked” error?
Well many users like you find complaining about this because they can’t apply changes in their Word documents.
If you don’t have any clue what to do when Microsoft word selection is locked then go through this post to get easy idea of this.
Go through this complete tutorial to know how to unlock selection in Word.
After unlocking the selection in document, you must be able to make modification in your Word file.
What’s This Word Selection Is Locked Means?
Selection is locked issue is quiet commonly encountered by Office document users. Although some of the users find complaining about the following error messages that occur meanwhile the locked selection issue.
- This modification is not allowed because the selection is locked.
- You can’t make this change because the selection is locked.
Why The Selection Is Locked In Word?
You can’t make this change because the selection is locked error is not specific to any Word version.
This error is not accused by single issue but it arises due to so many reasons. Let’s take a quick glance over why Word selection is locked.
- Trial MS Office version–
MS Office application trial versions has limited features for selecting and modification of data.
- Problem In The Document’s Metadata–
If your word document has some visible metadata, then you will get the particular error message each time when you try to modify its text.
To fix issue, you need to make modification directly in the meta data.
- Enabled ‘Content control can’t be deleted’ option–
Content control can’t be deleted is a developer-exclusive feature which prevents certain document from getting deleted.
- MS Office is not activated–
Such type of error also occurred when you are using an inactive MS Office version.
- Synergy Is Hindering Office Applications To Work–
Usage of Synergy application is also highly responsible for restricting selection of content in MS Word applications.
- Windows bug–
Microsoft word selection is locked issue also occurs because of the Windows 7 bug which comes when certain Office updates is being installed.
Depending upon the causes, you can try the following fixes to resolve Word selection locked issue differently.
- Method 1. Remove Protection From The Restrict Editing Menu
- Method 2. Use The “Edit Anyway” Option To Unlock Word Selection
- Method 3. Activate MS Word Using The Product Key
- Method 4: Restart MS Word Application (Temporary Fix)
- Method 5: Update Or Disable Synergy
- Method 6: Modifying Word Document’s Properties
- Method 7: Repair Corrupt/Damaged Word File
Method 1. Remove Protection From The Restrict Editing Menu
If any Word file is restricted then it’s clear that you can’t do any task on it without taking the owner’s permission.
Mostly this Restrict editing option is applied to the Word document having the crucial stuffs which shouldn’t be altered by any random person.
To remove this editing restriction you need to assign the right password.
Follow down the steps to remove protection from the restricts editing menu:
- Open your Word document in which you are facing this selection is locked issue.
- Now on the Review tab search for the “Restrict Editing”.
- This will open the restrict editing pane. Now tap to the Stop Protection button.
- After this on your PC’s screen the dialog box of “Unprotect Document” will gets open. In which you have to assign the password and then hit enter button.
- The “Unprotect Document” dialog will appear. Enter the password and you’ll be able to edit your Word file again. Doing this will unlock selection in Word.
- If in case, you don’t know the password then best option is to unlock the Word document using the some reliable password unlocker software.
After this your document is unlocked for being modified. For testing you can either add a new line or delete any existing paragraph from Word document.
Method 2. Use The “Edit Anyway” Option To Unlock Word Selection
Sometimes, by mistake the word document is marked as final. After enabling this feature you are not allowed to do any modifications in your Word document.
Follow down steps mentioned below to disable this marked as final option.
- Open the selection locked MS Word document and then try to make modification in it.
- You will notice that at your document’s top a message of marked as final is appearing. Hit the “edit anyway” button present across this message.
- After doing this you will be able to edit your word document even if it is marked as final.
After making all the changes in your content you can mark your document as final.
Method 3. Activate MS Word Using The Product Key
If you are using the MS Word trial version and its evaluation time period is over now. In that case you need to buy the Product key for unlocking the selection and editing of the documents.
Suppose that you have activated MS Office suit on the PC. But if still the software is requesting you to enter product key then it means you are not allowed to access it.
Either you have to buy the product key from Microsoft or you need to activate MS Office’s copy on the PC.
Once you successfully activate the MS Office on your PC after that you can perform any action on your word document without any issue.
Method 4: Restart MS Word Application (Temporary Fix)
If the issue is happened due to some minor issues then restarting the MS Office application may resolve the selection is locked in word issue.
This method is not a permanent fix but still you have the option to use it as a temporary fix. Utilize the time frame in between the re-launched word file and the error message occurrence to copy complete content.
This trick will definitely avoid the issue. But if the problem persists, then move on to the next solution.
Method 5: Update Or Disable Synergy
Most of the time it is also seen that Synergy is also responsible for such type of word selection is locked error.
Mainly this happens due to Synergy bug which restricts the select-drag option in all types of MS Office applications.
After the release of v1.8.2-stable version, developers of Synergy have also released the patch for its bug. Thus if anyone of you getting this selection is locked in word error message after the installation of the Synergy. In that case, you need to start updating Synergy to its latest available version.
If option of updating Synergy to its latest version is not possible in your case then you can try pressing the Windows key just before making selection in your Word file.
Another option that you can try is disabling software each time when you need to work in the MS word application. If you don’t need the Synergy software then it’s better to uninstall it.
Method 6: Modify Word Document’s Properties
If any element of your Word file is un-editable then probably the issue is raised from the file’s metadata.
Well this issue can be resolved by making modification in the title of document’s properties.
Here is how it is to be done:
- Open your word document in which you are getting this error.
- Hit on the File>info option from the menu.
- On the right side of the screen there is a Properties option when you make a click over it Drop-down menu appear. From this drop-down menu select the Advanced Properties Menu.
- On the opened window of Advanced Properties hit the Summary Now change the metadeta, Title or Subject.
- To apply all the done changes hit the OK option.
Method 7: Repair Corrupt/damaged Word File
Sometime corruption of the Word file also restricts the editing of your Word document. So in that case repairing the corrupt word file gets too important. For that purpose we recommend you to use Word File Repair Tool.
This outstanding software will help you to fix and get back your data from even “the file cannot be opened because there are problems with the contents” error. It is one of the best tools that helps you in repairing corrupt or inaccessible (.doc) and (.docx) files with ease.
It is specially designed to repair & recover corrupt or inaccessible .doc files. It recovers document text along with its important stuff like indentation, formatting, charts, hyperlinks, images, tables, etc.

This tool executes high-end scanning algorithms to ensure complete restoring of your data from the inaccessible Word file. It comes with a user-friendly interface and hence it is easy to use and understand.
Steps To Repair Microsoft Word Selection Issue
Step 1: User needs to just select a single file by clicking on a ‘Select File’ option or simply on a folder that contains all word files. They need to click on the ‘Select Folder’ or need to find the file clicking on the ‘Find File’ option.
Step 2: As a list of the selected files is displayed, the user needs to thus make the selection of the Word file by using a checkbox that they want to repair. They need to select all files by marking the ‘Select All’ checkbox. After that, they need to click on the ‘Scan’ button.
Step 3: He/she could easily saw the preview of the scanned file just by clicking on the file in both ‘Full document, and ‘Filtered text’ formats by clicking the tab given on the middle pane of the Window.
Step 4: If the scanned word file sis a*.doc file, then there will an available preview in the “Raw text” format along with the ‘Filtered Text’ formats and ‘Full Document’ and ‘Filtered Text’ formats.
Step 5: For repairing, the user needs to simply click on the click on the ‘Start Repair’ option. Then they need to make the selection of the option for saving their file from the ‘Save Document’ dialog box and thus click the ‘Ok’ button.
Final Verdict:
Hopefully the above guide will help you to fix MS word selection is locked issue.
So now you can make modifications in your Word document content. Apart from this if you are getting any other issue in your word document then you can ask it on our social media Facebook and Twitter pages.
Steven Telfer is a senior writer at filerepairtool.net. He is a technology expert having over 4 years of experience and loves to write in different subjects like Video Repair, Microsoft Excel, QuickBooks, Word & others. He has a Master’s degree in Computer Application and has solve many technical problems. In free time, he loves to read books and do research work to grow in his field.
Microsoft Word is one of the best document processing tools available today that allows you to create many types of documents for personal or professional usage. It also offers rigid security features so that your documents can’t be modified by unauthorized users.
However, you may want to modify Word but got touble with «You can’t make this change because the selection is locked». How to modify the documents by yourself when the selection is locked, you can follow the below guide that shows how to unlock selection in Microsoft Word 2016. Once you have unlocked selection in a document, you should be able to modify the contents of it.
- Method 1. Unlock MS Word Selection Is Locked by Stop Protection from Restrict Editing Menu
- Method 2. Use the Edit Anyway Feature to Unlock Word Selection Is Locked
- Method 3. Use A Product Key to Activate Microsoft Word 2016
- More Tips: How to Unlock Open Password in Microsoft Word 2016
Method 1. Unlock MS Word Selection Is Locked by Stop Protection from Restrict Editing Menu
There’s an effortless way to unlock selection locked in Word 2016 document and it doesn’t even require you to install any app on your computer. The following is a guide for it.
Open the document where the selection is locked in the Microsoft Word 2016 application on your computer. When the document opens, go to the Review tab and find and click on the option that says Restrict Editing. You will now see the restrict editing pane on your screen. Find and click on the button that says Stop Protection to unlock selection in Word.
The document should now be unlocked for it to be modified and you can test it for yourself by adding a new line or removing an existing line from the document. Hopefully, the selection is locked in Microsoft Word 2016 issue should now be resolved for you.
Method 2. Use the Edit Anyway Feature to Unlock Word Selection Is Locked
Sometimes, an author may mark the document as final meaning the document does not require any further modifications. If this is the case with your document, you will need to do the below steps to be able to modify it.
Launch the locked document in MS Word 2016 and try to modify the content of the document. A notice will appear at the top of the document saying the document has been marked as final. Click on the button that says Edit Anyway and it will let you edit the document even though it’s been marked as final.
This will give you a chance to modify the content and then you can mark the document as final again. Cheers, you now know how to unlock selection in Word issue.
Method 3. Use A Product Key to Activate Microsoft Word 2016
If you have been using the trial version of Microsoft Word 2016 on your computer and the evaluation period is now over, you will need to buy a product key to unlock selection and edit your documents.
You can purchase a product key directly from Microsoft and it will activate your copy of MS Office on your computer. Once MS Office is activated, you should again be able to edit documents just like you could before.
If you had already activated the Office suite on your computer but the software is asking again for the product key and you do not have access to it, you can use an application that helps users to retrieve product keys for Office 2016.
Tips: PassFab Product Key Recovery can also help you retrieve the product key for Microsoft Office 2016 on your computer. Download and get the tool running on your Windows system. Then, click on «Get Key» and you will find all the product keys on your screen. You can learn how to use it in this guide. There you go.
More Tips: How to Unlock Open Password in Microsoft Word 2016
By the way, if you forgot or lost open password in Word 2016, then PassFab for Word is no doubt to be your best option. It is a powerful Word password recovery tool that is designed to unlock password in Microsoft Word and even supports all Word versions. It provides three modes to help you with password recovery, which are Dictionary Attack, Brute-force Attack and Brute-force with Mask Attack.
All you need to do is to import your Word document, choose a recovery mode and then click on Start button. Finally your password will be displayed in a pop up window.
You can also watch this video tutorial about how to use it:
Summary
We hope the above guide helps you unlock selection in Microsoft Word 2016 so you can modify the contents of your documents. And, with the program like the above license key finder from PassFab, you can now retrieve your lost product keys to unlock selection as well. Last but not least, if you need to unlock forgotten Word 2016 password, you may interested in this post about Office 2016 password recovery.
Microsoft Word in the Office suite is the most downloaded document-processing software you can use on any computer. It has many users because of its ease of use, accessibility, and, most importantly, its ability to outperform competing applications at the advanced level.
There are a few flaws, though. For instance, when you open a new Word document, it denies you access when you try to modify it saying, “You can’t make changes because the selection is locked.” That’s horrible when you can’t modify the file in Word.
This article is about resolving that selection error for Word documents. Read till the end to solve the Microsoft Word selection is locked problem.
Let’s begin.
Check out our separate post on how to insert word page numbers in MS Word.
Why is my Selection Locked in Microsoft Word?
Using an unactivated version of Microsoft Office is the main reason behind the word selection is locked error. Also, opening a protected document and windows bugs can trigger the issue. However, if the content controlled can’t be deleted option is enabled, you might face this error.
Moreover, issues in the document’s metadata significantly impact access to editing permission.
Microsoft Word doesn’t allow any changes if the document is configured as restricted editing. Then you’ll get an error message You can’t make this change because the selection is locked, or This modification isn’t allowed because this section is opened for viewing only.
That irritating message won’t move out from your screen unless you change something on your computer. You might ask what can be adjusted to get rid of that issue.
Read the following chapter and act accordingly to find out the solutions.
Here’s a complete guide on how to set background image on MS Word.
Unlocking a locked Word document is comparatively simple. You just need to open the document in Microsoft Word updated version. Press Ctrl + Shift + F11 simultaneously; after that, you can edit the file. Also, press Ctrl + Shift + Fn + F11 if you’re using a laptop.
The described method is a generalized way to unlock Word documents.
In case that method didn’t go well for you, following the subsequent techniques will. After reading this section, opening a locked document for editing won’t be difficult.
When a document is marked as final, a message will appear on the top in a yellow bar. It is often used with Word documents that carry vital data to prevent being tampered with by unauthorized persons.
If it was locked with a password when marking the document as final, then you can just enter the password and you’ll be able to edit when you ask for editing permission, given that you have the password. If you don’t know the password and someone else who has the password can tell you, you can still access the file.
Without the password, you won’t be able to modify the file when trying to access it.
Otherwise, simply click on Edit anyway whenever the error message appears. After that, move forward to the solutions.
Here are the methods to unlock Selection in MS Word:
1. Disable Restrict Editing
If the document you’re trying to make changes to appears restricted, you can disable the restriction mode from the Word client.
Follow the steps here to disable Restrict Editing in Word:
Note: If the original owner of the file makes it password protected, make sure you retrieve the password to disable the restriction.
Also, check out our separate post on how to make only one page landscape in Word.
2. Update Microsoft Application
One of the possible reasons behind this locked selection problem in Word is using an outdated Microsoft application. Update the application from time to time to unlock a selection in Word.
Here are the steps to update Microsoft Word:
- Launch Word from your desktop.
- Move to the File tab and click on Account.
- Click on Office Updates drop-down menu.
- Select update now from the menu.
Microsoft will check whether you need an update or not. After downloading the update, Microsoft will install it automatically.
Check out the easiest way to enable equation editor in Microsoft Word.
3. Activate Office
Using the trial version of MS office sometimes leads you to this issue. Activating the Office application can retrieve you from this misery.
Here’s the procedure to activate Microsoft Word:
- Open Microsoft Word from your device.
- Navigate to File > Options from your dashboard.
- Select Activate on that window.
- Log in with your Microsoft account and provide valid product keys.
That will activate Microsoft Word. Check if you are still unable to edit the Word document. Try out the following solutions in case these methods couldn’t resolve your issue.
Check out the Microsoft Refund policy to get absolutely full refunds to your products.
4. Modify the Document’s Properties
As explained earlier, when the document’s meta properties isn’t set well, you are likely to face the locked mode in MS Word. Modify the document’s properties to resolve the issue.
Here’s the procedure to modify document metadata:
Click Ok after editing that information. Once you’re done, relaunch Word and check whether you can carry on with editing without any problem.
Quickly check out our epic guide on how to enable word wrap in notepad.
5. Repair Office Application
In case the aforementioned solutions couldn’t resolve your issue, there are chances that your office application is broken somehow. Repairing the application might solve the case.
Here’s the procedure to quickly repair your Office application:
You will be able to unlock the selection and apply changes in Word once you complete these tweaks. These are the solutions that I personally implement whenever I find the selection is locked errors in Word.
Have any queries regarding this matter? Continue reading the following section to get answers to your questions.
Quickly check out our epic guide on why can’t I copy paste in Microsoft Word.
Frequently Asked Questions
How do I unlock a locked selection in Word?
Go to the review tab in MS Word > Click on Unprotect document > save the file.
Can’t type on Word because the selection is locked?
When a document is locked in Word, open the problematic Word document > Click on edit anyway in the marked as final section > edit the document.
How do I enable editing in Word?
If a document has been marked as final, navigate to File > Info > Protect Document > Enable Editing.
How to Unlock a Selection in Microsoft Word?
Press Ctrl + Shift + F11 on the desktop word client. In terms of laptops, press Ctrl + Shift + Fn +F11 synchronously.
Microsoft Word isn’t free from hassling issues even though the application is widely acceptable. Maybe a file was locked to protect sensitive information from being modified by unauthorized users.
So, whenever you encounter you can’t edit Word because the selection is locked in a Word file, don’t hesitate to read this article once again and follow my instructions as well if you need to unlock a doc file.
In case you can’t make any changes to your file even after that, just write down the specific problem in the comment box. My team will reach out to help you with the precise solution. Till then, peace!
You are here: Home / How To / [FIXED] You Can’t Make this Change because the Selection is Locked
Microsoft Office is one of the most successful softwares ever launched by Microsoft. Word, Excel and Powerpoint have become a part of the day’s life for those who use Windows. Office is one of the cleanest and most reliable softwares ever. But, many users have recently reported an error that reads:- ‘ you can’t make this change because the selection is locked ‘. In this article we are going to learn about this error, what causes it and how can we fix it. So, read along to find out.
When do we see this message?
When we open a blank document on Microsoft Word 13, Word 16 or Office 365, we are restricted from making any changes to the document. This error is particular to the above mentioned versions of the MiceMicroOffice. When we make an attempt to make changes in the document , “this modificationis not allowed because the selection is locked” or “this modification/change is not allowed because the document is opened for viewing only” might appear at the bottom-left corner of the window.
Why do we see this message?
A new way of viewing documents was added in Word 2013 restricts you from editing the document. Which was intended as a sort of e-reader type view. This problem is caused by Word opening the document in “reading view”. This is a read only sort of environment which is meant to keep the document in its untouched and original state.
Seriously speaking, this is not much of an issue. We can solve it easily by just following the below mentioned steps:
Simply switching to the normal “print layout” view will help you edit the document.
- Click on the View tab at the top.
- Now select Edit Document from the drop down list.
- This can also be done by clicking on the “print layout” view button at the bottom-right corner of the window, next to the “zoom” control.
Now by default Word might try opening documents in view only or rear only mode. Even that is not much of a problem. To stop Word from always opening documents in reading view perform the following steps:
- Click on the File menu .
- Select Options from the drop down list.
- Under the heading Start up options, un-check the box labeled “Open e-mail attachments and other uneditable files in reading view”.
- Click OK
The following methods can also be tried.
Method 1. Disable Restrict Editing
To disable ‘restrict editing’ feature of MS Office perform the following steps.
- Click anywhere on the protected area
- The “Restrict Editing” pane will display on the right side.
- Simply select “Step Protection” button to unlock protected part of the document.
Method 2. Disable Mark as Final
In case the Word document is marked as final and you can’t edit it. You just need to click the “Edit Anyway” button that highlight in the head of the page. It is only one-time operation, so you have to perform this step everytime.
Method 3. Activate Office
II case you are using a trial version of Office 2016 that is usually pre-installed on a new computer which has expired, then in order to unlock selection in Word, you have to purchase a retail copy . But if you have licensed copy, perhaps the problem is just that you have not yet activated it. To activate your account you just need to follow the below steps:
- Select the “File” tab in the document
- Click “Account” option.
- Type your 25-character product key to activate Office Word 2016.
Method 4.Create New Document
Probably the easeeet method to deal siwi this issie would be simply importing the document with locked table into a new, blank document. This method should copy all of the content without any document protection included by pasting it to another new document. You can then easily edit the contents of this new document.
And you are done. These were the top methods to solve the ‘You can’t make this change because the selection is locked’ problem . You must have successfully fixed the issue.
Final Take!
I hope that you were able to fix ‘You can’t make this change because the selection is locked’ successfully. In case if you face any difficulty, please feel free to comment and let us know. We will get back to you as soon as possible. I hope you found the article informative and enjoyed reading it. This is all for the day. Thanks for reading!
You are trying to edit a document, but you cannot start editing. MS Word displays an error message “you can’t make this change because the selection is locked.”
There may be many reasons for the above message. Fortunately, it is quite easy to get rid of the problem so you can start editing the document.
We will show you six reasons why the message is displayed, and how to fix each:
- Activate your Office Suite
- Edit document from Print Layout
- Disable Mark as Final
- Disable Restrict Editing
- Modify properties of the document
- Create a New Document
We will use simple, step-by-step instructions.
Let’s start.
Method #1: Activate Your Office Suite
Microsoft is displaying the message because you are using a trial version of MS Office, and the trial period has expired.
Step #1: Open Word
Open the MS Word program.
The File menu will open.
Note: If you have already opened a document in Word, click on the File tab in the top menu bar to launch the File menu.
Step #2: Activate Office
In the left pane, click on Account at the bottom of the menu.

In the right pane, type your 25-character product key to activate Office.

You will now be able to edit the document.
Method #2: Edit Document from Print Layout
Word is displaying the message because it is opening the document in Read Only Mode.
Step #1: Open document
Open the Word document you want to edit.
Word opens the document in Read Only Mode.
Step #2: Change the view settings
Click on the View tab in the top menu bar.

This will open a menu.
Click on Edit Document to change over to Print Layout.

You will now be able to edit the document.
Method #3: Disable Mark as Final
Word is displaying the message because the author of the document has marked it as final.
Step #1: Open document
Open the Word document you want to edit.
Word opens the document in Read Mode.
In place of the ribbon, Word displays a message:

Step #2: Edit the document
Click on the Edit Anyway tab in the message.

You will now be able to edit the document.
Method #4: Disable Restrict Editing
Word is displaying the message because the author has restricted editing of the document only to those who know the password.
Step #1: Open document
Open the Word document you want to edit.
Word opens the document in Read Mode.
Try to edit the document.
A Restrict Editing pane appears on the right.

Step #2: Enter the password
Click on the Stop Protection tab at the bottom of the Restrict Editing pane.

A dialog box opens.
Type the password to unprotect the document.
Click on the OK button to close the dialog box.

You will now be able to edit the document.
Method #5: Modify Properties of the Document
Word is displaying the message because there is some problem with the metadata of the document. It does not allow editing some parts of the document, like its title.
Step #1: Open document
Open the Word document you want to edit.
Step #2: Open the file menu
Click on the File tab in the top menu bar.

This opens the File menu.
Step #3: Open advanced properties
In the left pane, click on the Info tab.

Click on Properties in the right pane.

In the menu that opens, click on Advanced Properties.

Step #4: Modify the properties of the document
The Properties dialog box will open.
Click on the Summary tab.
Modify the required properties of the document.

Click on the OK button at the bottom to close the dialog box.
Method #6: Create a New Document
This method is useful because it is simple and quick.
Step #1: Open document
Open the Word document you want to edit.
You cannot edit the document because it is protected.
Step #2: Copy the part you want to edit
Select the part you want to edit.

Right-click to open a menu.
Click on Copy.
The clipboard now holds a copy of the selection.

Step #3: Open a blank document
Click on the File tab in the top menu bar.

This opens the File menu.
In the left pane, click on New.
In the right pane, click on the Blank Document icon.

A new blank document will open.
Step #4: Paste the clipboard contents
Right-click within the document.
In the menu that opens, click on the first icon under Paste Options:.

This will preserve the original formatting of the document in the copy.

You will now be able to edit your new document.
Conclusion
We have shown you six ways of fixing the error message that does not allow document editing in Word. Use any one of these methods to solve your problem.
If you are facing this issue on your computer, you might have been using any version of MS Word. It could be Word 16, 13, or 365 versions. But, this error (you can’t make this change because the selection is locked) could be caused by numerous reasons. However, most of the time, it is caused by the underlying protection issues with the file you want to open. So, when you try to open or modify a document that is protected by its creator, this error may come up. You can see various other errors on your computer screen.
The error comes at the bottom left corner of your computer screen most of the time. So, if you have an important document to see or edit on your computer but if you are not able to do the same, this article will definitely help you with the same.
Whether you are having any sort of computer with any operating system, you can easily use the below-given methods and get everything solved. Also, you can implement these tactics to solve the issue either on a personal or enterprise computer.
Make sure to have an activated account of word processing in your computer before you put together all these steps we are going to discuss below. This will surely help you to make things corrected effectively. This issue mostly happens in Windows computers where you have any MS Word version installed in your system.
In this article, we are going to help you with everything you can try to get this thing solved effectively on your computer.
So, without any further delay, let’s get started.
What is the reason of selection is locked error?
As we discussed earlier, the issue is most probably lying in your file. Else, it could be there in your software itself. So, most of the time, this problem occurs when your software opens the file in the reading mode instead of editing mode.
In other words, your software needs to open your file with its editing interface. Otherwise, you are surely going to see this error on your computer.
Another reason could be a protected document. If you have a pdf or Word file which is protected by any sort of method, you would definitely see this error.
If the creator of the file has created it to be only in the reading mode, you are surely going to see this error.
When do we see this error message?
This error will only be seen when you try to edit your document or enter any input through your keyboard. So, if your system is not allowing you to do that, you will probably see an error “this change is not allowed because the selection is locked” or “this modification is not allowed because the document is opened for viewing only”.
With the latest versions of MS Word, you get an option named “Enable Editing” on the top of main windows which can easily be enabled, and then you can start editing your desired files.
In simple words, you can effectively force your software to edit your files and then make your desired modifications. But, whenever your software does not allow you to do the same, it could become impossible for you.
How to fix this error ‘you can’t make this change because the selection is locked’?
For most of the people, it is not an issue itself. You can easily enable your MS Word to edit your documents without any hassle. However, for some people, it may become tough to initiate the process and edit their files in the way they want.
You can either choose the print layout to edit your document or follow this procedure to get it done properly. After opening your document in MS word, just do the things we are going to discuss.
- Click on the View option on top of the window
- Now, click on Edit document from the list
- Also, you can choose the Print Layout option at the bottom.
Once you did these settings, you can freely start editing your documents because the Word will allow you to do the same. So, for the next time, whenever you stuck in this situation, you just have to follow this procedure and see if the error gets solved.
But, for the next time, if you want to always enable the editing mode whenever you open a new file, these are the steps you have to follow.
- Click on the File tab
- Click on the Select option from the drop-down
- Now, under the Start-up options, make sure to uncheck this option “Open e-mail attachments and other uneditable files in reading view”
- Then click on OK and you are done with the same.
Method 1: Disabling Restrict Editing
Most of the time, MS Word will be set on the settings where it will restrict the editing settings for any of your files. This is the main thing that can frustrate anyone because for some people it is tough to determine the issue and get it corrected.
This feature is enabled by the developers to let the users read and review their important documents without editing any of the words inside it.
When you disable restrict editing, your new files will be opened in the editing mode so that you do not have to see this error “you can’t make this change because the selection is locked”.
So, to perform the whole procedure thoroughly, follow the given steps.
- Click anywhere on your protected document
- You will now see the Restrict editing error pane on the screen
- Now, click on the Step Protection button to disable the editing restriction if it is there.
Method 2: Disable Mark as Final feature in MS Word
You can’t set your MS Word to disable the Mark as the final feature permanently. This is the setting you will have to perform every time you open a new document. Mark as Final is the attribute used to specify a document as the final output of our work.
So, once you set this attribute for your Word document and you try to open it again, it will not open in the edit mode. This is the setting that will never apply permanently to the software in any way.
Whenever you open a new file and the error is coming up, you will have to check whether this is the thing that is causing the problem. Here is how you can solve this problem on any version of MS Word.
- Open your document in MS Word.
- Click on the option “Edit Anyway” or “Enable Editing” on the top
Once you did this one-time action on your software, you are good to edit your document in the way you want. It is pretty easy to do this step but most people are not able to do it.
So, we hope this step will be enough to guide you with this process.
Method 3: Activate MS Office
You will surely see an error along with the startup notification to activate your MS office if it has been expired. So, if your PC hasn’t come along with a pre-installed MS office setup, it might be possible that the trial period or the total subscription plan is expired.
In that case, too, you will only be able to see your documents but the software will never allow you to edit them. So, make sure to check whether your MS office is activated or not.
If it isn’t, do it immediately and check whether this was the cause of error ‘selection is locked Error in word software’. In order to activate the MS Office, you can follow this procedure.
- Click on File Tab on your MS Word
- Now, click on the Account option
- After that, enter your product key and activate your MS Word
- You will see a link to visit the official purchase page from where you can get your product key.
Make sure to do this thing genuinely. Using a legal copy of MS word will surely help you to get the best results by also making the online computer industry safe.
This is the best way to give your contribution to the developers for providing us these amazing software and online tools.
Method 4: Open your document in New Document Form
This is another one of the easiest methods to solve this problem. So, if you are not able to open your document using any method. You can just open a new file and then import your document there.
This will force your MS word to add all the existing information in your document into a new file where you can easily edit it in the way you want. This method should be easy for you if you are familiar with the MS Word. However, the complete process of doing it is given below.
- Double click on MS Word to open this software
- Then click on New to open a new file
- In the latest versions of MS Word, you have to click on Blank Document option
- Then, go to files and click on Open
- Then, select your file on the computer and it will be opened automatically
This is perhaps the best way to open any sort of protected document in your MS Word software without seeing any type of error.
Also, this method will allow you to make necessary changes to the file as a new document. Then you can save your file as a new document in your system.
Final Verdict
We hope this article has helped you to solve the error ‘Can make this change because the selection is locked’. We have tried to explain things as much as we can.
However, there could be any other issues located in your system if you are still not able to see good results. So, you can research more on the internet about various other methods to solve this problem.
In most of the cases, people were able to get rid of this error by following these methods we discussed above.
We hope you have found this article helpful in this regard. Make sure to let us know about the same in the comment section. Also, you can give us new ideas and suggestions.
We would love to get your genuine feedback. Along with that, do not forget to share this information with others too. They would get facilitated by this.
Stay connected with us to read regular articles on various interesting topics because we are committed to publish them for you.
Keywords:
how to, fix, you can’t make this change because the selection is locked, Microsoft Office, activate Microsoft office, file in use, protection has been applied, group content control has been applied, marked as final
Download Office permanent unlocker now
Microsoft Office is the most popular software developed by Microsoft. Word, Excel and PowerPoint have become part of day-to-life for Windows and Mac users. But times come when it doesn’t perform as we expected. There occurs plenty of issues. And In this post we are going to solve one of the most common error message. ie. «You can’t make this change because the selection is locked«.
This message is triggered because of these issues:
- Your Office is not activated or you are using expired version of Office.
- You have more than one version of Office installed and one of those version is not activated.
- File is in use.
- Protection has been applied.
- Group content control has been applied.
- Marked as final.
How to fix:
There is different way of solving problems according to their nature. We have noted 6 issues that may trigger that message in your office package. So let’s solve them.
Problem 1: Your Office is not activated or you are using expired version of Office.
One of the most common problem is, your office package is not activated. Or your license may has been expired.
Solution: (Activate your copy of Microsoft Office)
- Go to File Menu
- Click on Account, and If your subscription is expiredm you will need to purchase Office and activate
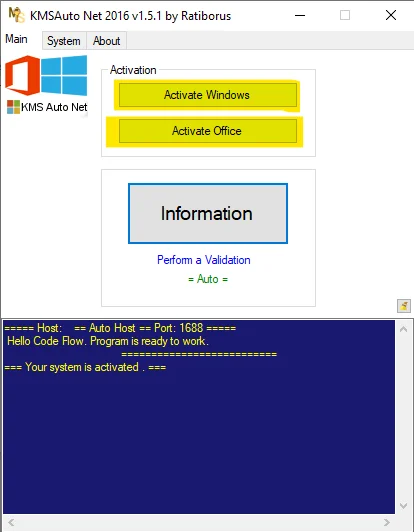
Alternatively (FREE Method) KMS-Activator
- At first, disabled windows defender or other third party antivirus.
- Download and extract KMS Auto Net Activator. (Download link is provided at the end of the post) You can find all details about kms activator on this page : KMS Activator
- Run the activator as administrator.
- Now from here click on activation to activate.
Problem 2: You have more than one version of Office installed and one of those version is not activated.
If you have installed more than one version of Office on your system. Then this problem may arise if any one of those version installed on your system is not activated or license is expired.
Solution: (Uninstall the version you do not have license for)
- Open control panel
- Find Programs and Features.
- From the list of installed programs, find Office.
- For Windows 10 Users, Open Settings > App & Features and look for Office Installation.
- If you have two copies of Microsoft Office, then uninstall the oldest install.
- And finally repair the remaining one.
Problem 3: File is in use.
If the file is used by another user for editing or is opened, or is editing from networks, then you have to wait until the file is closed.
Solution: (Simply wait Or you can make a copy of that file and use the copy.)
Problem 4: Protection has been applied.
If a file is under protection or restriction is applied, then this problem may occurs.
Solution: It can be solved in easy step
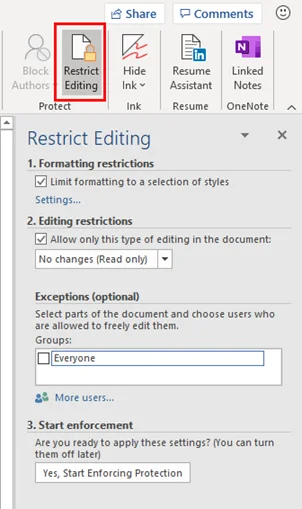
- Click the Review Ribbon
- Under protect — Click on Restrict Editing
- See if protection has been applied, if yes then unprotect it.
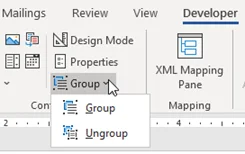
Problem 5: Group content control has been applied.
Solution: To remove Grouping
- Click on Developer
- Click on Group
- Click on Ungroup
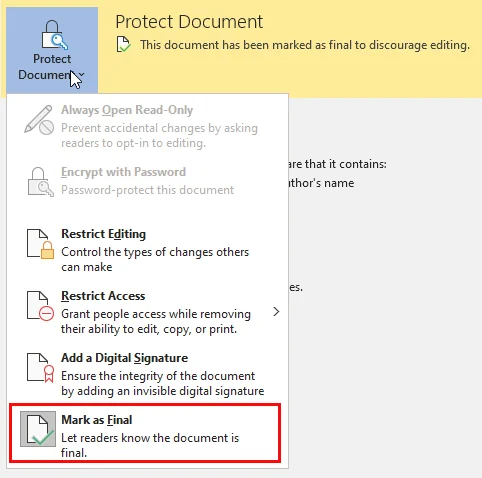
Problem 6: Marked as final.
Solution: Turn off marked as Final
- Click on File
- And Click on Protect Document
- From there — Click on Mark as Final to toggle off that setting.
Download KMS Activator

