
Symptoms
When you try to open a Microsoft Word document, you receive an error message similar to the following
The document
file name is locked for editing by another user. To open a read-only copy of his document, click…
where
file name is the name of the document that you tried to open.
Cause
This behavior may occur if Word determines that the owner file for the document already exists. This may occur if one or more of the following conditions are true:
-
Word previously quit improperly and, therefore, did not delete the owner file.
-or-
-
A second instance of Word is running in the background with the document already open.
-or-
-
The document is shared over a network, and another user has it open.
Resolution
To resolve this issue, first confirm that another user on the network does not have the document open. If the document is in use, open the document as read-only. If it is not in use, quit all instances of Word, and then remove the owner file. To do so, follow these steps.
NOTE: Because there are several versions of Microsoft Windows, the following steps may be different on your computer. If they are, see your product documentation to complete these steps.
-
Quit all instances of Word. To do so, follow these steps:
-
Save all your work, and then quit all programs.
-
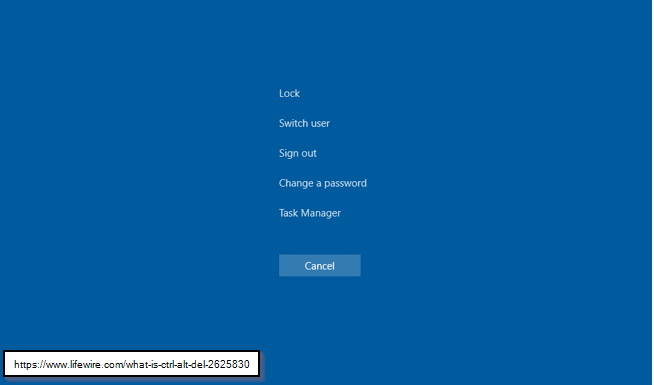
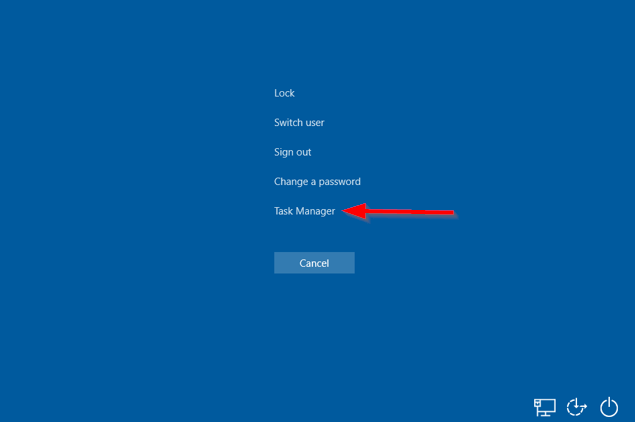
Press CTRL+ALT+DELETE to open the Windows Security dialog box.
-
Click Task Manager, and then click the Processes tab.
-
Click Winword.exe, and then click End Process.
-
In the Task Manager Warning dialog box, click Yes.
If you receive a message that states that the program is not responding, click End Now.
-
Repeat steps d and e for each occurrence of Winword.exe.
-
On the File menu, click Exit Task Manager.
-
-
Start Windows Explorer, and then browse to the folder that contains the document file that you tried to open when you received the error message.
-
Delete the owner file.
The owner file is located in the same folder as the document that you tried to open. The owner file name uses the following convention: It begins with a tilde (~), followed by a dollar sign ($), followed by the remainder of the document file name. The file name extension is .doc. For example, the owner file for Document.doc is named ~$cument.doc.
-
Start Word. If Word asks you whether you want to load the changes that were made to the Global or Normal template, click No.
-
Open your document.
More Information
Word creates an owner file when you open a previously saved Word document. An owner file is temporary and holds the logon name of the person who opens the document.
References
For additional information about Word temporary files, click the article number below to view the article in the Microsoft Knowledge Base:
211632 WD: How Word for Windows Uses Temporary Files
Need more help?

You can protect documents in Word with a password, but what if you forget? Here’s how to unlock a Word document with or without the password.
Microsoft Word allows you to protect your document with a password. You can opt to lock the entire document so that it won’t open without the correct password. If you prefer, you can lock the document for editing, so that anyone can open it, but only people with the password can unlock the Word document to make changes.
Once you lock a document, how do you unlock it again? And if you forget the password, is there anything you can do?
If you want to learn how to unlock a Word document with or without a password, follow the steps below.
How to Unlock a Word Document With a Password
There are two main ways to lock a Word document. You can lock the entire file so that it requires a password to open the file and read it. Alternatively, you can lock it for editing, so that people can read the file, but can’t edit it without a password.
If the entire document is locked, but you know the password, you can unlock the file quickly and easily.
To unlock a Word document with the password:
- Double-click the Word file as you would open any unlocked document.
- Enter the password in the pop-up window that appears.

- If you typed the correct password, the file will open as normal.

If you no longer wish to lock the Word document, you can remove the password so that it will open as normal in the future.
To remove password protection from a Word file:
- Open the file using the instructions above.
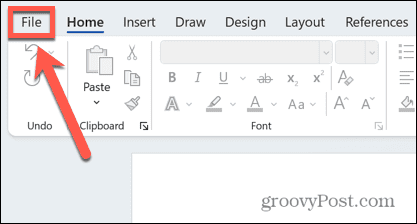
- Click File.

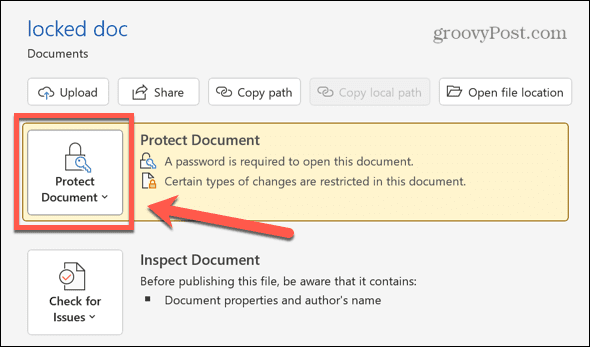
- Select Info.

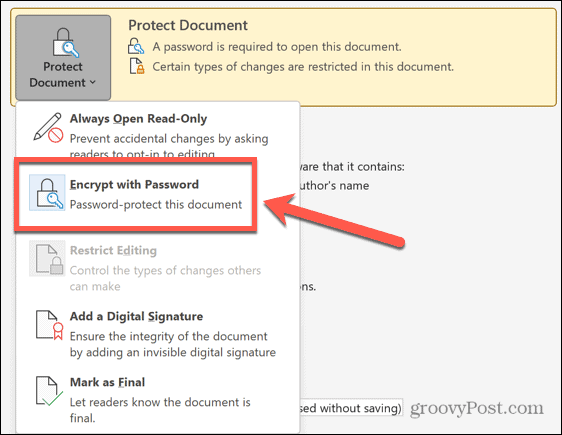
- Click the Protect Document icon.

- Select Encrypt With Password.

- Delete the current password from the password field and click OK.

- Save your file and it will now open without the need for a password.


How To Unlock a Document for Editing Using the Password
If you can open the document to read, but require a password to edit it, you can turn off the document protection as long as you know the password.
To unlock a Word document for editing:
- Open the document.
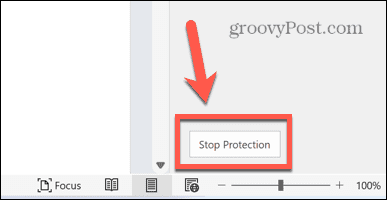
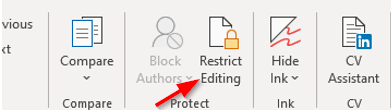
- Click the Review menu.

- If you cannot see the Restrict Editing icon in the ribbon, click Protect.
- Select Restrict Editing.

- Click Stop Protection.

- Enter the password in the pop-up window and click OK.

- The document can now be edited.
- Save the document—it can now be edited by anyone. If you close the document without saving it, it will be locked for editing again the next time it is opened.


How to Unlock a Document for Editing Without a Password
If a document is locked for editing, but can still be read, then it’s possible to use some workarounds to create a new Word document that you can edit, even if you don’t know or can’t remember the password.
How to Unlock a Document for Editing Using Google Docs
It’s possible to upload the document into Google Docs. You can then edit the document directly in Google Docs or export it back as a Word document that will now be editable.
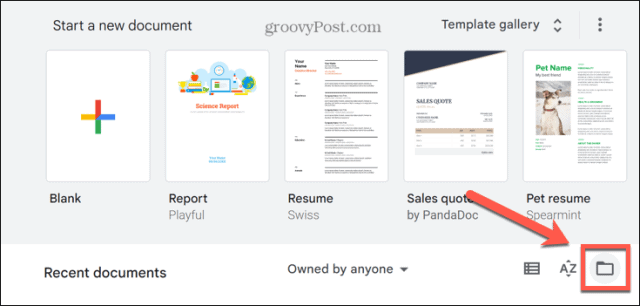
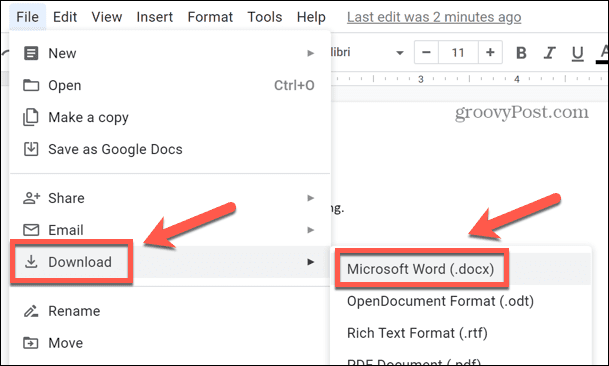
To unlock a Word docUMENT using Google Docs:
- Open Google Docs in a browser and sign in.
- Click the Folder icon.

- Select Upload.

- Click Browse and select the file you want to open or drag it directly into the Google Docs window.

- The file will open. You can edit in Google Docs and make any changes you wish.
- Alternatively, to save the file as a new Word document, click the File menu.

- Hover over Download and select Microsoft Word (.docx).

- The file will download. You can now open this Word document and edit it without the need for a password.


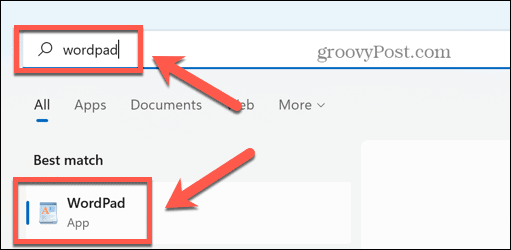
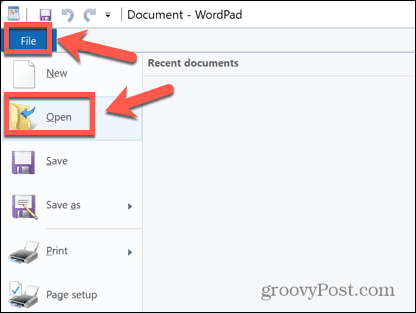
How to Unlock a Document for Editing Using WordPad
If you don’t have a Google Docs account and don’t want to set one up, you can achieve the same effect using WordPad, a basic word-processing app included with Windows.
To unlock a Word doc using WordPad:
- Click the Windows Search icon.

- Type WordPad and click the app in the results.

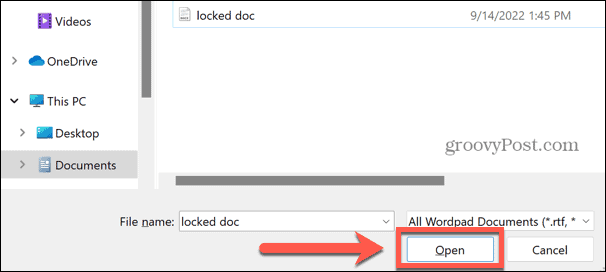
- Select File > Open and then select the locked file you want to open.

- Click Open and the Word document will open in WordPad.

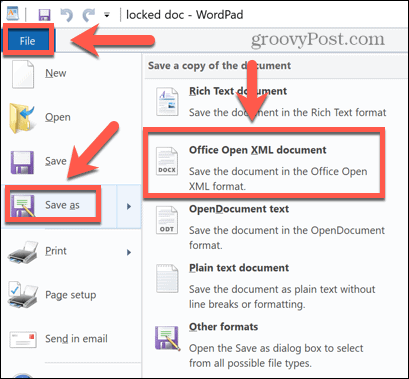
- Edit the document in WordPad or click File > Save As > Office Open XML Document.

- Name the file and click Save, and the file will save in Word .docx format. You can then open it in Word and edit the document without the need for a password.

How To Open a Locked Word Document if You Don’t Know the Password
If the entire document is locked and you don’t know the password, then the methods above won’t work as you won’t be able to open the Word document at all. In this case, your only real option is to try to crack the password.
There are websites and apps that can attempt to do this for you which can be found through a web search, but you are advised to use these sites or apps at your own risk.
Keep Your Files Protected
Knowing how to unlock a Word document allows you to open or edit files even if they’re locked with a password. As we’ve seen, locking Word documents won’t necessarily keep them fully protected.
There are other ways to protect your files, however. You could try using the Personal Vault on Microsoft OneDrive to keep your cloud files encrypted. It’s also possible to hide files and folders from search on Windows to make them harder to find.
If you’re an Apple user, you can set up Activation Lock on your Mac to protect your data if your computer is lost or stolen.
![]()
There are several reasons why a Word document might be locked for editing. In this post, we will take you through each possible cause and guide you through the process of how to fix it.
How to fix a Word Document locked for editing:
- Method 1: Check if other users have the document open.
- Method 2: Delete the temporary owner file.
- Method 3: Remove temporary Word files.
- Method 4: Make sure the document is not in read only.
- Method 5: Prevent email attachments opening in read view.
- Method 6: Change the password protection.
- Get Microsoft Word for just $8.25 per month with Microsoft 365 Apps for business.

PerfectIt – Proofread in MS Word
Proofread your Word document to fix style and consistency!
Method 1: Check if other users have the document open to fix a Word Document locked for editing
This is the simplest solution out of all the ones here. If your document that you are trying to open is on a shared network the problem could be someone else already having the file open. To solve this, just ask anyone on the network whether they have that file open and if they are not using it to close it so that you can do what you need to do.
Method 2: Delete temporary owner file to fix a Word Document locked for editing
Microsoft word automatically creates a temporary owner file when you open a document which had already been saved. An owner file is temporary and holds the logon name of the person who opens the document. These owner files normally remove themselves automatically when word is closed however sometimes a problem can occur where these files do not remove themselves, for example if word crashes these folders sometimes get left behind.
Step by Step guide to deleting temporary owner file
Follow the steps below to try resolve this issue:
Step 1) Save all your work/files on word that you currently have open
Step 2) Quit all programmes so that you have none open
Step 3) Open the Windows Security Dialog Box by clicking ‘Ctrl, Alt, Delete’
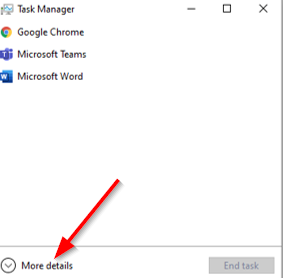
Step 4) Choose the ‘Task Manager’ selection
Step 5) Choose ‘More Details’ at the bottom of the box
Step 6) Select the ‘Processes’ tab
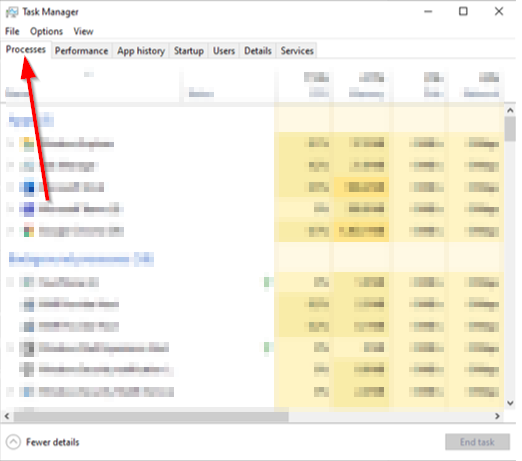
Step 7) Scroll until you find ‘winword.exe’
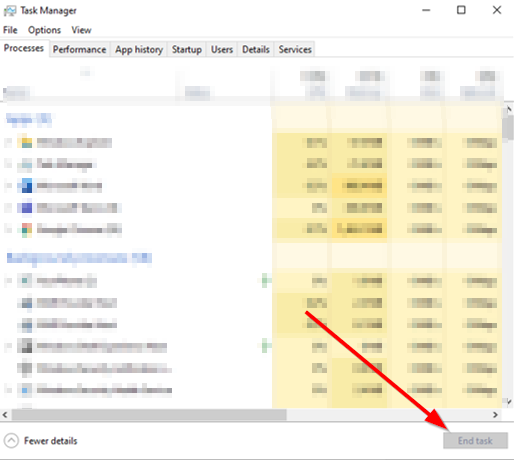
Step  Select ‘winword.exe’ and then press ‘end task’
Step 9) Open Windows Explorer
Step 10) Find the document file you were trying to open
Step 11) Locate the owner file (This is in the same folder with same name but the first two letters are replaced with ‘~$’. For example, ‘Bills.docx’ would be ‘~$lls.docx’.)
Step 12) Delete the owner file
Step 13) Start Word
Step 14) If you are asked if you want to load the changes that were made to the global or normal template select ‘no’
Step 15) Open your document
Now, you should be able to edit your file without a problem.
Depending on your version of Microsoft, these steps could be a bit different. If this does not work then check your product documentation and follow the steps there.
However, if this has not worked then below is a plan B that you can follow in another attempt to get it to work.
Method 3: Remove temporary Word files to fix a Word Document locked for editing
If removing the owner file did not work then there is a chance there are still some other temporary files that need to be found and deleted for you to be able to edit your document. There a few places these could be found. Deleting the temporary files is safe and nothing will be lost.
Location 1: Windows Temporary Folder
Step 1) Open windows explorer
Step 2) Click ‘view’ along the top

Step 3) Make sure ‘file name extensions’ and ‘hidden items’ are both checked

Step 4) In the search bar, type in ‘%temp%’ and press enter

Step 5) Delete any folders in there
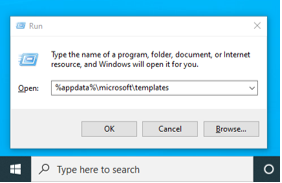
Location 2: User Templates Folder
Step 1) Press ‘Windows’ with ‘R’

Step 2) Type in ‘%appdata%microsofttemplates’
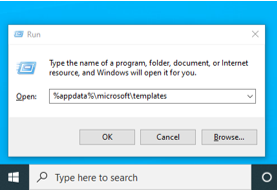
Step 3) Delete any temporary files in there
Location 3: Word Start Up Folder
Step 1) Press ‘Windows’ with ‘R’
Step 2) Type in ‘%appdata%microsoftwordstartup’
Step 3) Delete any temporary folders in there
After all three locations are checked, start up word again and retry to open your document. You should now have no issues with editing it.
Below are two more small things which could be checked if required.
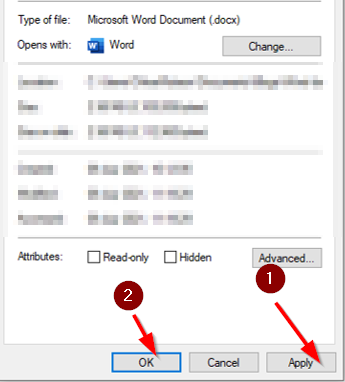
Method 4: Make sure the document is not in read only to fix a Word Document locked for editing
When you have a saved file in your documents, there is a simple check to make sure it is not read-only.
Step 1) Open windows explorer
Step 2) Locate the file which you want to edit
Step 3) Right click on the file
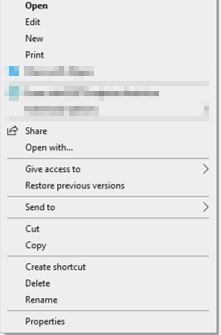
Step 4) Choose ‘Properties’
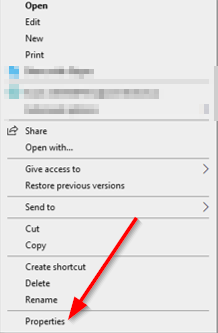
Step 5) Make sure ‘read-only’ is not ticked
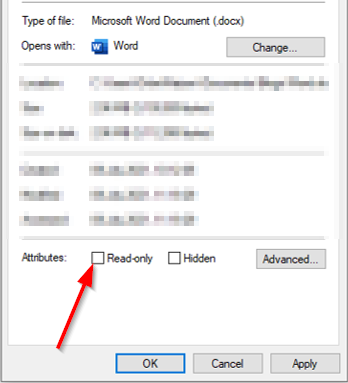
Step 6) Click ‘apply’ and then ‘ok’
Method 5: Prevent email attachments opening in reading view to fix a Word Document locked for editing
There is a way to stop attachments from emails automatically opening in reading view.
Below are the steps to follow:
Step 1) Open word
Step 2) Click ‘File’
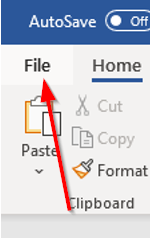
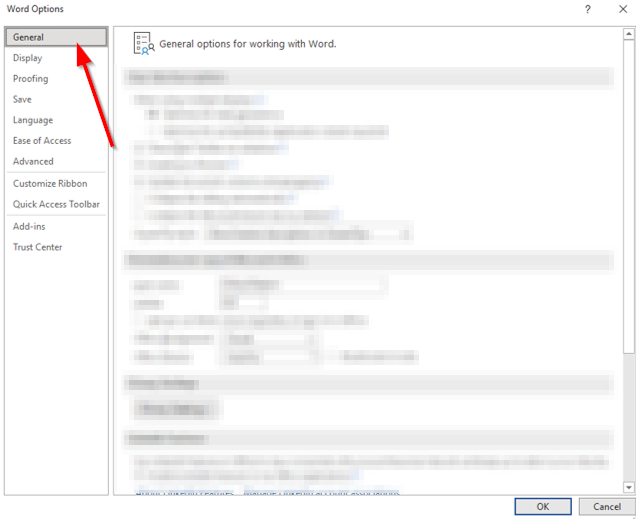
Step 3) Click ‘Options’
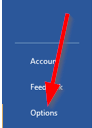
Step 4) Click ‘General’
Step 5) Scroll down to ‘Start Up Options’
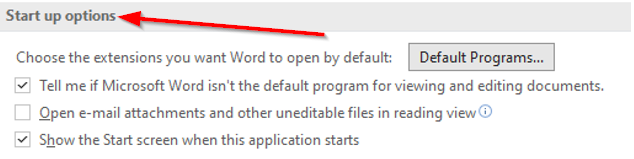
Step 6) Make sure that ‘Open email attachments and other uneditable files in reading views’ is unchecked
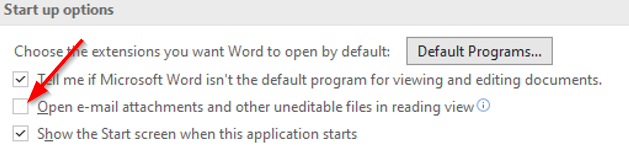
Step 7) Press ‘ok’
Method 6: Change password protection to fix a Word Document locked for editing
If you are the creator of the document or if you know the password (if it is a password protected document) then a simple way to allow editing for yourself or others you are sending it to is to remove the protection that stops editing.
Below are the steps on how to do this if you are unsure:
Step 1) Open the document which you or others need to edit
Step 2) Go to the ‘Review’ section

Step 3) Go to the ‘Protect’ section
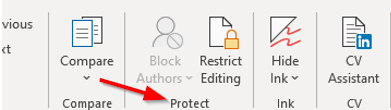
Step 4) Go to the ‘Restrict Editing’ section
Step 5) click ‘Stop Protection’
Step 6) At this point, if a password is needed it will need to be entered
Step 7) Press ‘ok’
Now that the protection is not on the document, anyone should be able to edit it where needed.


«How to unlock Word document and how do I get rid of the password protection?»
Do you want to unlock a read-only Word document for editing? Or unlock an encrypted word .doc file? Actually, you can solve both by using the methods in this post!
Besides, you can unlock Microsoft Word document with or without password. Now let’s check!

Part 1. Unlock Word Document with Password
Part 2. Unlock Word Document without Password
Tip: How to Lock a Microsoft Word Document
Part 1. Unlock Word Document with Password
Unlocking Word files on PC/Mac should be super easy if you remember the password. Here’s how to remove the password when «you can only read but can’t modify the Word doc», «you need password to open the Word document», or «selected fields are locked».
Method 1. Unlock Word Document for Editing
Here are the steps of how to unlock a word document that is locked for editing (Read only) and how to enable editing in word.
1. Open the locked Word doc, click «Review» and select «Restrict Editing» (in the Protect group).
2. Click «Stop Protection» and then enter the password in the pop-up window.

Tada! Now you can access and change any parts of the file after you. And this works for unrestricting a word document in Office 2010 — 2019.
Tips: For Office 2007, go Review (or Developer) > Protect Document > Restrict Formatting and Editing > Stop Protection.
Method 2. Decrypt a Word Doc (Open Password)
Would you like to remove password from a Word document so that you won’t need to enter the password to unlock a word doc every time you open it? Check it out!
MS Word 2010, 2013, 2016, 2019:
1. Open a password protected word doc and enter the password.
2. Click «File» and select «Info».
3. Click on «Protect Document» and select «Encrypt with Password».
4. When it prompts you, empty the password box and click «OK».


MS Word 2007:
1. Open the encrypted Word document and click the MS office button, then locate «Save As» and select Word Document.
2. In the pop-up window, click «Tool» and then «General Options».

3. Clear the password in the box and hit OK. Voila! Now you can close the Office and re-open it once again to check.

Method 3. Unlocking Fields in MS Word File
At times you may lock a field to ensure that it won’t get updated. Just select the field and press Ctrl+F11. (Tip: to update the field, you can press Shift+F9)
When you need to unlock selection in Microsoft word, just select the field and press «Ctrl + Shift + F11».
Did you fix «you can’t make this change because the selection is locked»? Very simple, isn’t it? But note this method only works if you’re unlocking a document in Word 2007 and later versions. For extra help, visit the official site Support Microsoft.
Part 2. Unlock Word Document without Password
It’s for sure that there are workarounds that can unlock an MS word document without password. Amazing! It’s not a big deal whether you forgot the Word password of «modify protected» or «encrypted».
Method 4. Unlock Editing Restricted Word without Password
Select this method if the Word document is readable and cannot be altered — your MS Word document is locked by restricting modifications (as read-only), not allowing you to edit password-protected doc or make any changes.
Let’s get this tricky solution — create a new one document and copy and paste the content! This is so much convenient since you don’t even need to bother unlocking Microsoft Word document.
1. Open the Word doc, press «Ctrl + A» keys and then copy all the contents.
2. Click File and create a new MS office doc. Now press «Ctrl + V» to paste.
3. Save the file on computer.
That’s it! After that, you can write and modify the doc.
Method 5. Unlock Encrypted Word without Password
This is for opening passwords, that is, to solve the problem of not being able to access Word files. In contrast, this method is more complicated, and you can unlock a locked Word document file with detailed steps.
Notepad is a widely used way to unlock a locked Word document file without password. And it’s nice and free of charge. The only problem is, you may find this method is much complicated that you expected.
Step 1. Save the document as an XML file
1. First, click on «File» and then find «Save As».
2. Navigate to «Save as type» and Select «Word XML Document (*.xml)» in the drop-down list. Then click the «Save» button and close MS Word.

Step 2. Open it with a TXT Editor and Type
1. Right-click on the saved XML file, select «Open with», and then choose «Notepad», «Word Pad», or Emacs, etc.
2. In Notepad, press «Ctrl + F» keys to search for enforcement.
3. Find w:enforcement = «1» and change it to w:enforcement = «0»
4. Find w:enforcement = «on» and change it to w:enforcement = «off»
5. Once you finish, click Save and then close it.

Step 3. Save the document as Word Doc again
1. Right-click on the .xml file and open it with «Microsoft Word»
2. Click «File» and «Save As», then go to Save as type and select «Word Document (*.docx)». Next, click «Save».

Tip: Rename the file before saving if you want to keep the original password-protected Word doc.
Great! I’m convinced that this can help you unprotect a word doc without password.
Method 6. Ultimate Way to Unlock Word Doc without Password
This is the last straw for doc unlocks. Try to use software to unlock a password-protected Word document when you forgot password. With Password Genius, you can recover Word password with a few clicks. Let’s get it!

Step 1. Download and install the word document unlocker on computer. Launch it and click «Recover Passwords for Files and Archives» in the interface.

Step 2. Hit «Word Password Recovery». Then click the folder icon and load your encrypted word document.

Step 3. After that, set the attack type and options, then click «Start».
Step 4. It takes a few minutes to figure out the password. Once finished, you can click «Copy» and use it to unlock a document in word.
As for the specific settings of attack types, see the following information.
Brute-force: Select the appropriate options under «Length» and «Range» respectively. (This mode is only available to users who still remember the length and range of Word password.)

Mask: Enter the known characters and «?» replacing unknown characters. (If you remember the length and some characters of passwords, this option is the best one.)

Dictionary: Click «Select Dictionary» to import the password dictionary (Just use the default dictionary or create a TXT document that contains all the possible passwords.)
Smart: You don’t need to set anything but only click Start. It’s super easy. The only issue is, it’ll take much longer than other attacks.
Additionally, it’s an integrated tool which has multiple uses, including crack password of Excel, WinRAR, Word, PPT, ZIP, PDF, etc. What’s more, its free trial version can crack passwords within 3 characters for free. It’s not completely freeware, though.
Another popular alternative tool is PassFab for Word. It is designed specifically to unlock word document, and also provides three attack modes: Dictionary Attack, Brute-force with Mask Attack, and Brute-force Attack. It is worth mentioning that its decryption speed is as high as 40X, you do not need to wait too long.
Tip: How to Lock a Microsoft Word Document
Also, you may want to know how to lock Word documents. Thus, I add the steps in this post.
Lock Word Document with Open Password
Open the document, click «File» > «Info» > «Protect Document» > «Encrypt with Password», and then enter a password and click «OK» to confirm.
How to Restrict Editing in Word with Password
Open the word file and click «Review» > «Restrict Editing» > «Allow only this type of editing in the document» > «No changes (Read only)»
If you want, you can mark some parts and make them to be unrestricted: Select part of the document and click Everyone (under Exceptions).
Lastly, click «Yes, Start Enforcing Protection», enter a password and confirm it.

Later, you’ll see «this modification is not allowed because the selection is locked» or «this document has certain edit capabilities that have been locked».
The Bottom Line
This article lists 6 effective ways to hopefully can unlock Word document file with or without password. No matter the encrypted password or restricted editing password, you can absolutely find a useful answer to troubleshoot locked word documents.
How do you unlock a word document? If you have any better ways, share with us with a comment or email, thank you very much!
Содержание
- Восстановление пароля методом смены формата
- Изменение формата файла
- Поиск пароля
- Альтернативный метод
- Изменение расширения файла
- Изменение содержимого архива
- Открытие защищенного файла
- Восстановление утерянного пароля с помощью утилиты Accent OFFICE Password Recovery
- Настройка Accent OFFICE Password Recovery
- Восстановление пароля
- Вопросы и ответы
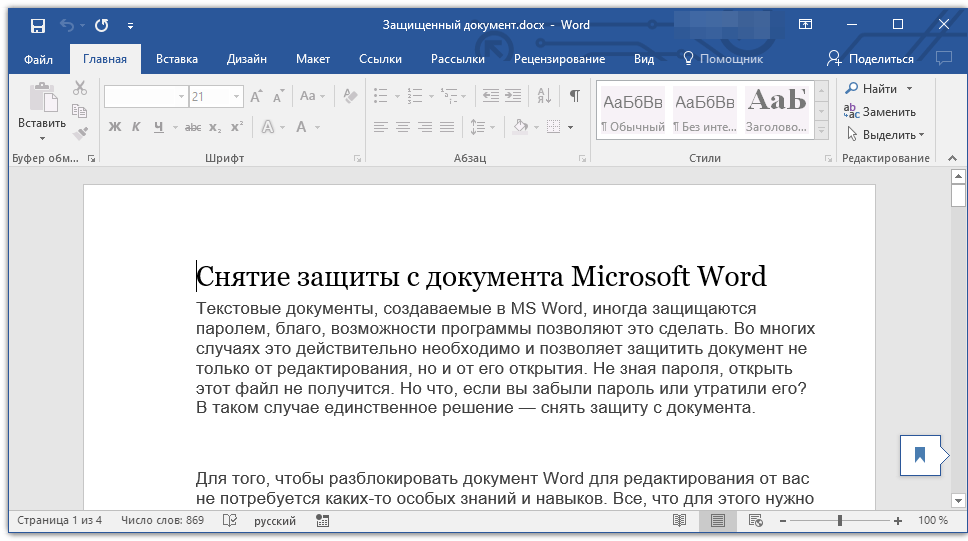
Текстовые документы, создаваемые в MS Word, иногда защищаются паролем, благо, возможности программы позволяют это сделать. Во многих случаях это действительно необходимо и позволяет защитить документ не только от редактирования, но и от его открытия. Не зная пароля, открыть этот файл не получится. Но что, если вы забыли пароль или утратили его? В таком случае единственное решение — снять защиту с документа.
Для того, чтобы разблокировать документ Word для редактирования от вас не потребуется каких-то особых знаний и навыков. Все, что для этого нужно — наличие того самого защищенного файла, Ворд, установленный на вашем ПК, любой архиватор (например, WinRar) и редактор Notepad++.

Урок: Как пользоваться Notepad++
Примечание: Ни один из методов, описанных в данной статье, не гарантирует 100-процентной вероятности открытия защищенного файла. Это зависит от ряда факторов, в числе которых версия используемой программы, формат файла (DOC или DOCX), а также уровень защиты документа (защита паролем или же только ограничение на редактирование).
Восстановление пароля методом смены формата
Любой документ содержит в себе не только текст, но и данные о пользователе, а вместе с ними и ряд другой информации, в числе которой и пароль от файла, если таковой имеется. Чтобы отыскать все эти данные, необходимо изменить формат файла, а затем «заглянуть» в него.
Изменение формата файла
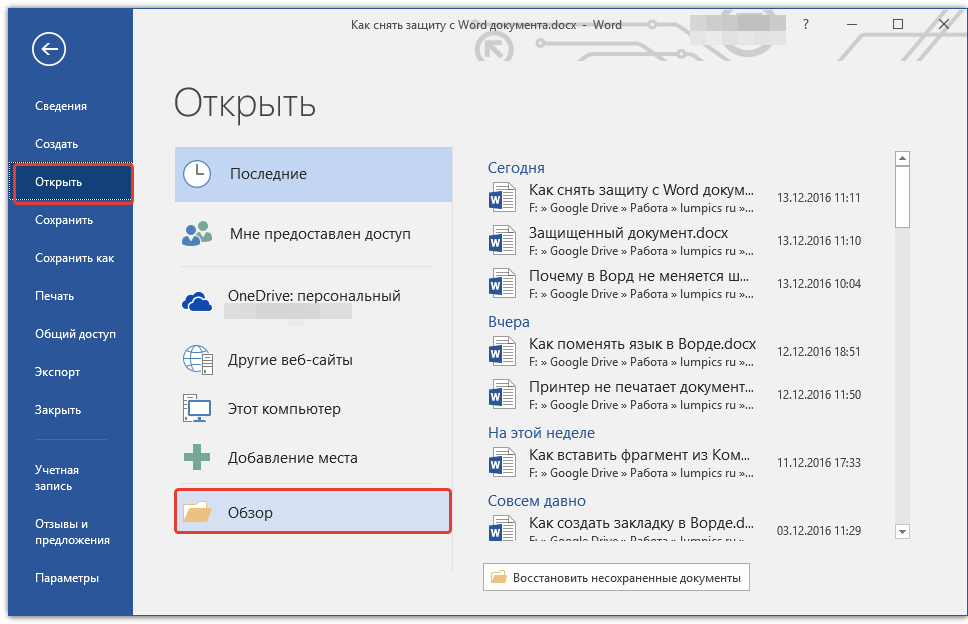
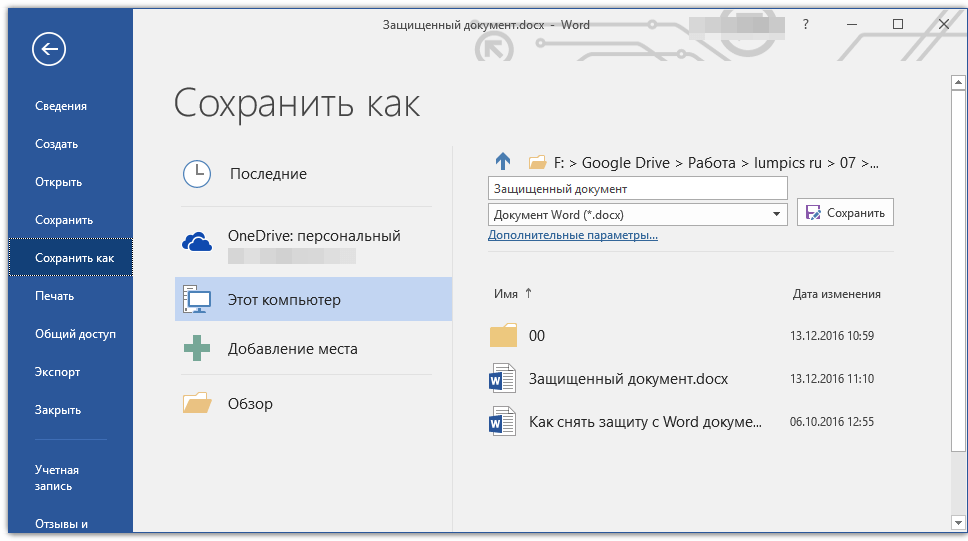
1. Запустите программу Microsoft Word (не файл) и перейдите в меню «Файл».
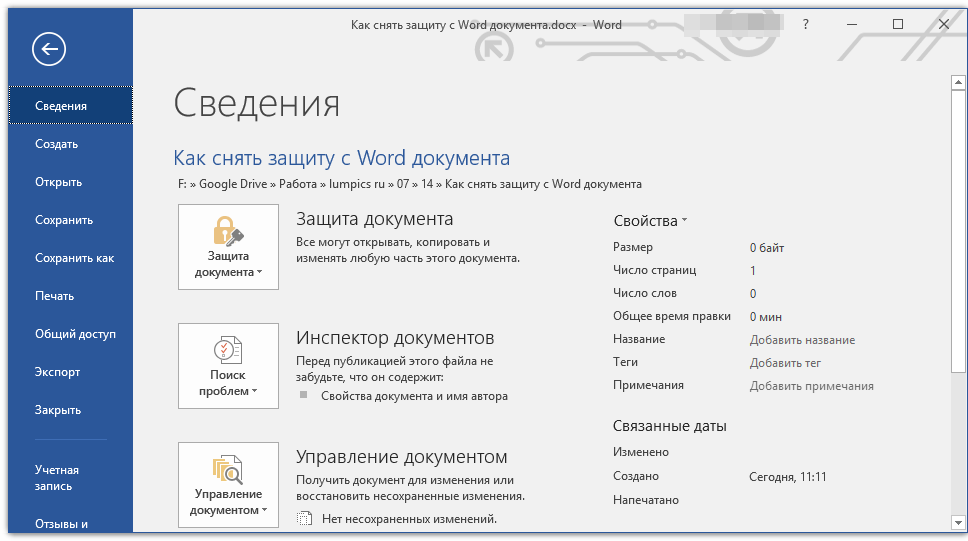
2. Выберите пункт «Открыть» и укажите путь к документу, который нужно разблокировать. Для поиска файла используйте кнопку «Обзор».
3. Открыть для редактирования его на данном этапе не получится, но нам этого и не нужно.
Все в том же меню «Файл» выберите пункт «Сохранить как».

4. Укажите место для сохранения файла, выберите его тип: «Веб-страница».
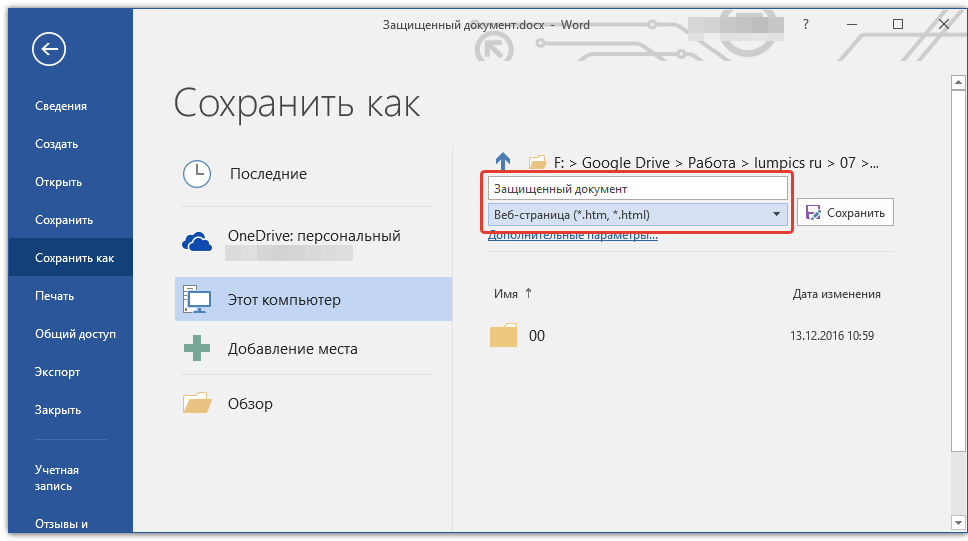
5. Нажмите «Сохранить» для сохранения файла в качестве веб-документа.
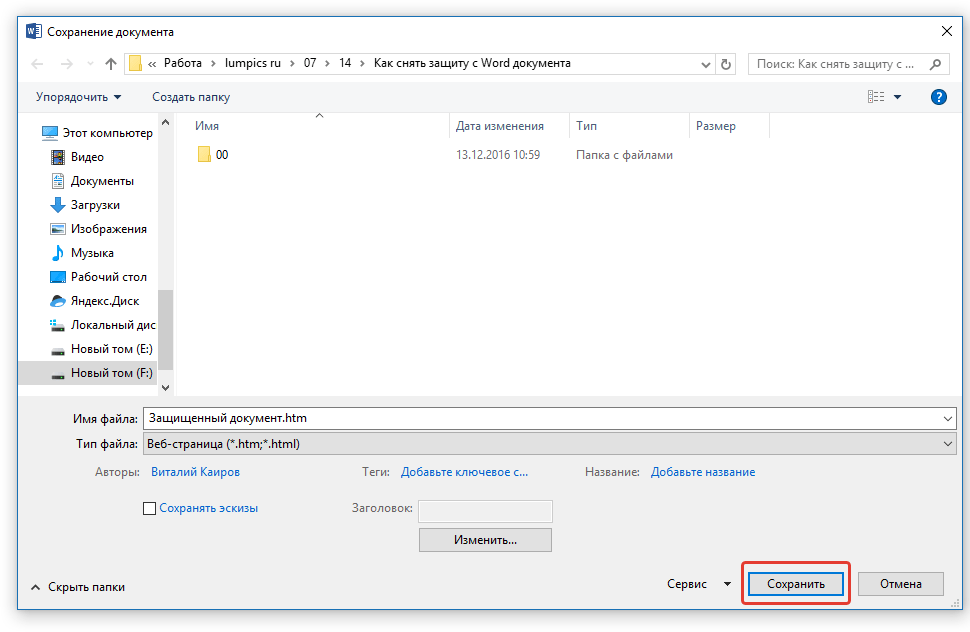
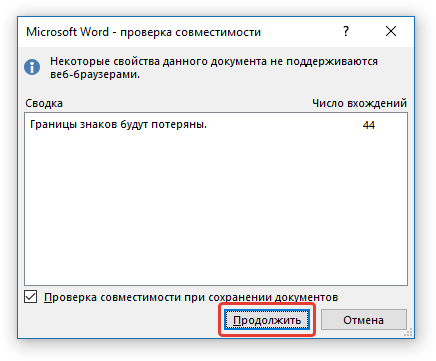
Примечание: Если в документе, который вы повторно сохраняете, применены особые стили форматирования, может появится уведомление о том, что некоторые свойства данного документа не поддерживаются веб-браузерами. В нашем случае это границы знаков. К сожалению, ничего не остается, как это изменение принять, нажав на кнопку «Продолжить».
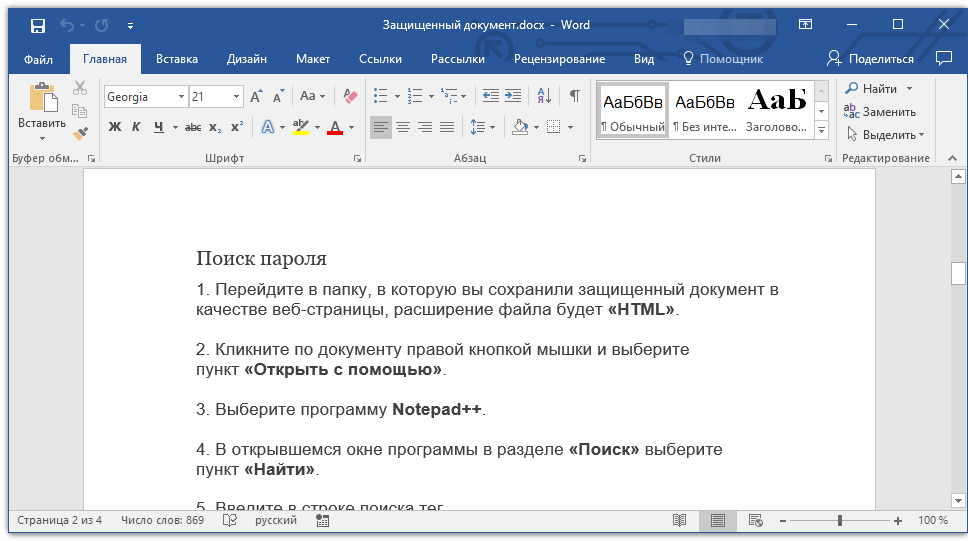
Поиск пароля
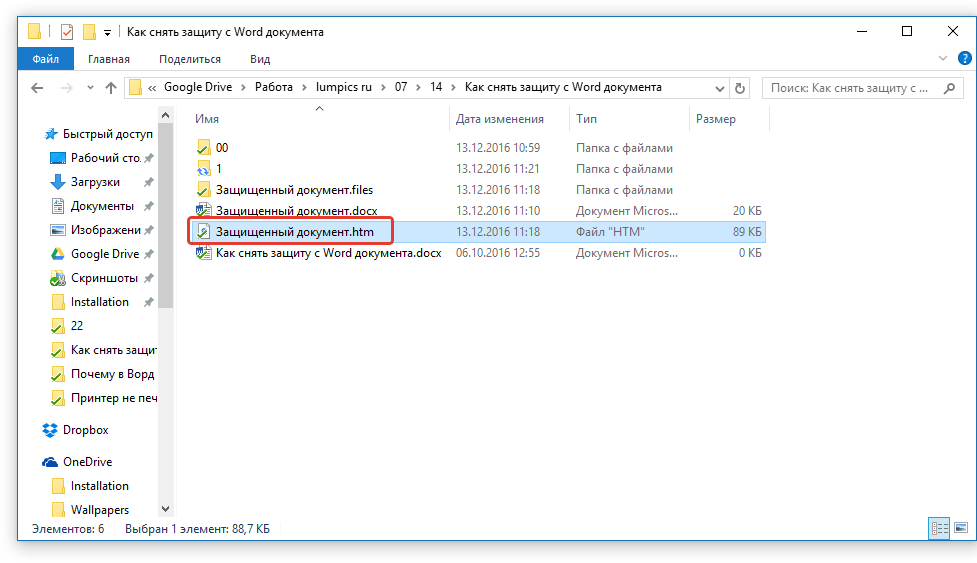
1. Перейдите в папку, в которую вы сохранили защищенный документ в качестве веб-страницы, расширение файла будет «HTM».
2. Кликните по документу правой кнопкой мышки и выберите пункт «Открыть с помощью».
3. Выберите программу Notepad++.
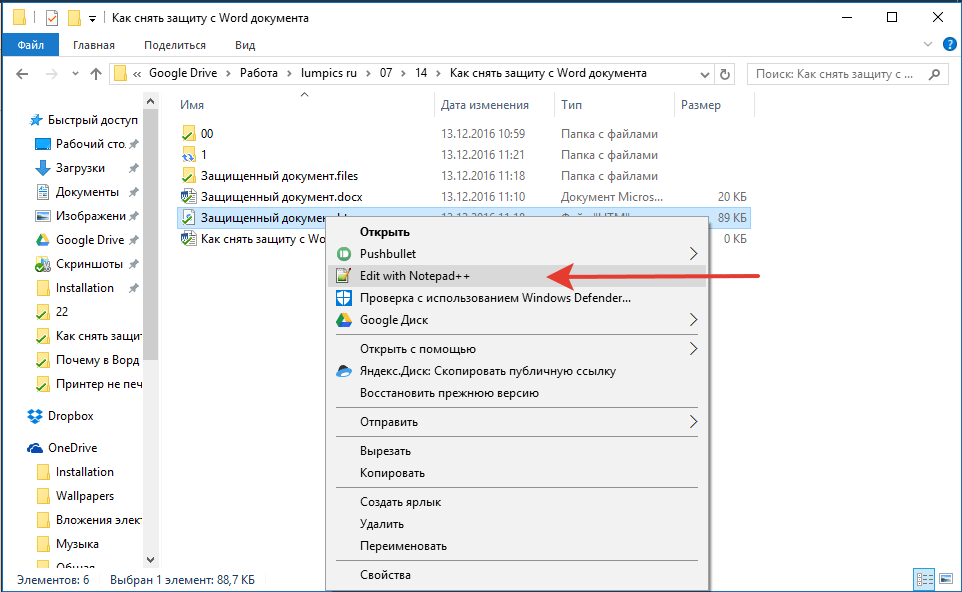
Примечание: В контекстном меню может содержаться пункт «Edit with Notepad++». Следовательно, выберите его для открытия файла.
4. В открывшемся окне программы в разделе «Поиск» выберите пункт «Найти».
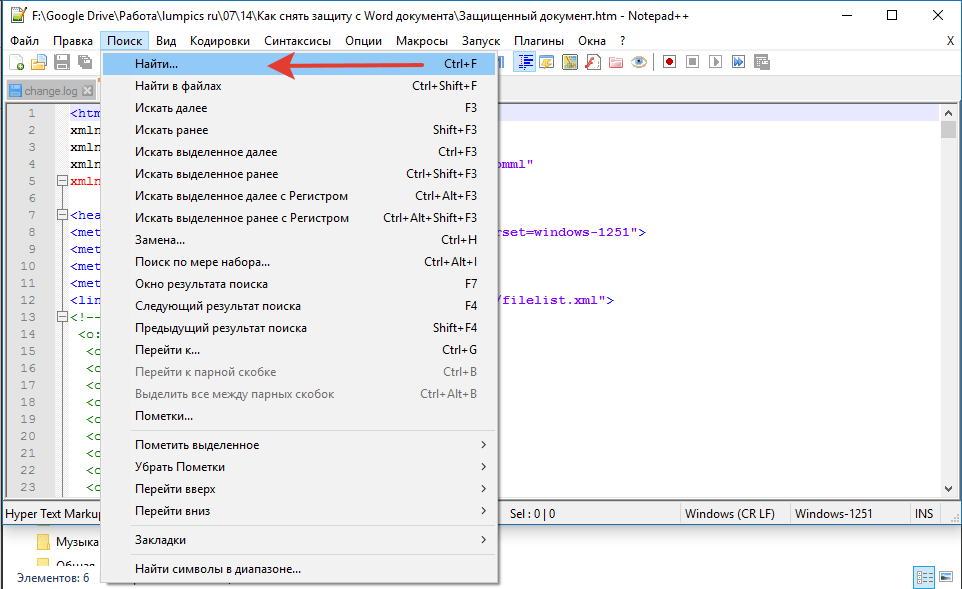
5. Введите в строке поиска в угловых скобках (<>) тег w:UnprotectPassword. Нажмите «Искать далее».
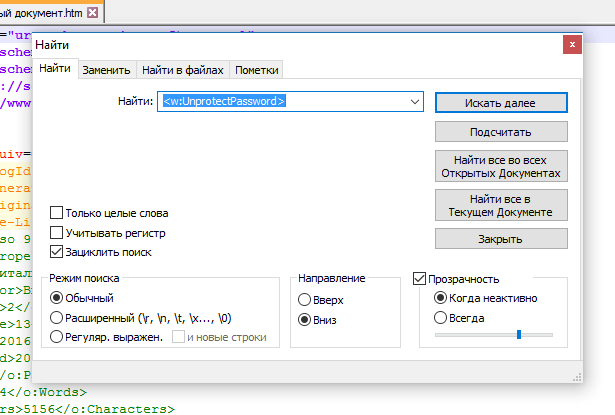
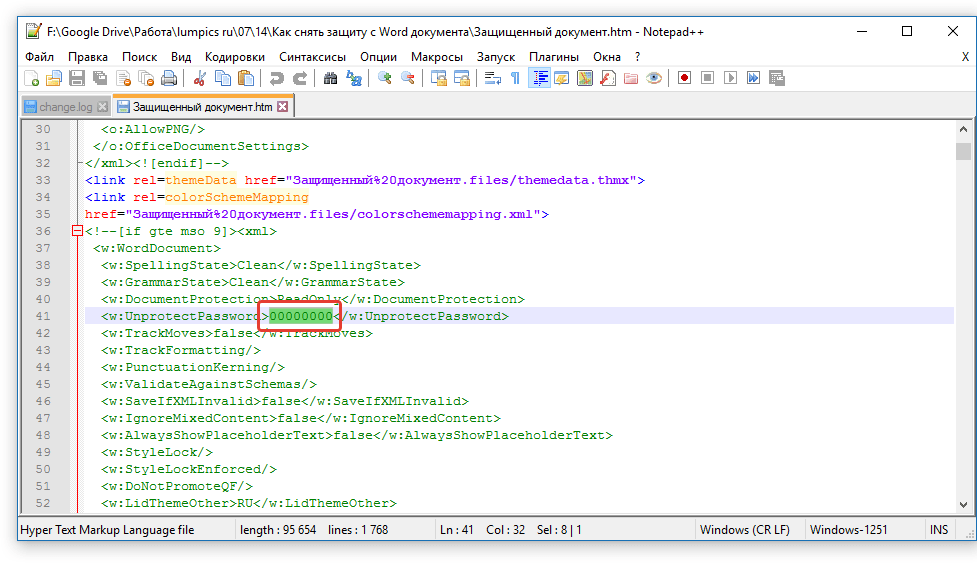
6. В подсвеченном фрагменте текста найдите строку схожего содержания: w:UnprotectPassword>00000000, где цифры «00000000», расположенные между тегами, это и есть пароль.
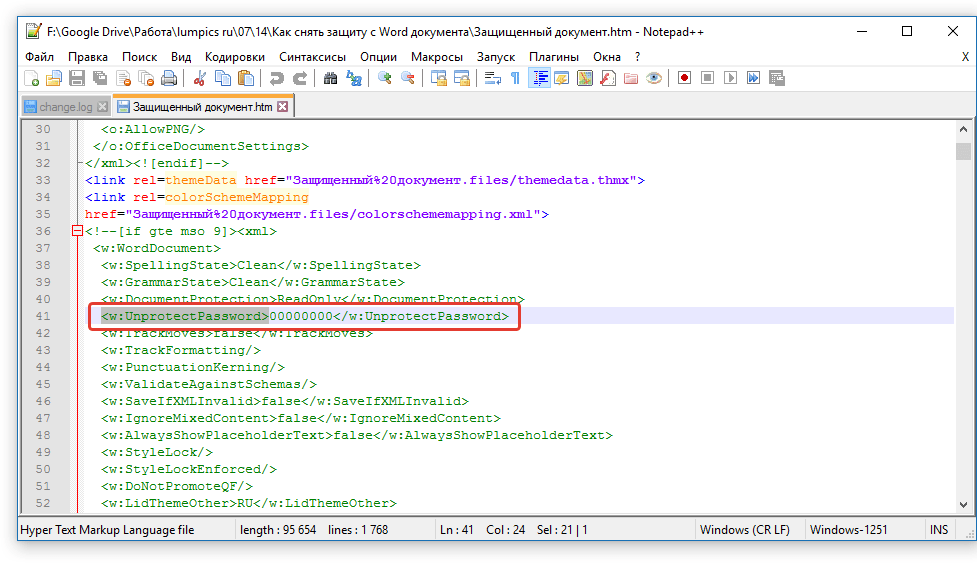
Примечание: Вместо цифр «00000000», указанных и использованных в нашем примере, между тегами будут находиться совсем иные цифры и/или буквы. В любом случае, это и есть пароль.
7. Скопируйте данные между тегами, выделив их и нажав «CTRL+C».
8. Откройте оригинальный документ Word, защищенный паролем (не его HTML-копию) и вставьте в строку ввода пароля скопированное значение (CTRL+V).
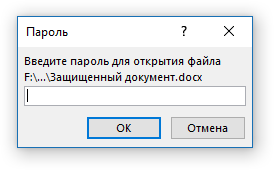
9. Нажмите «ОК» для открытия документа.
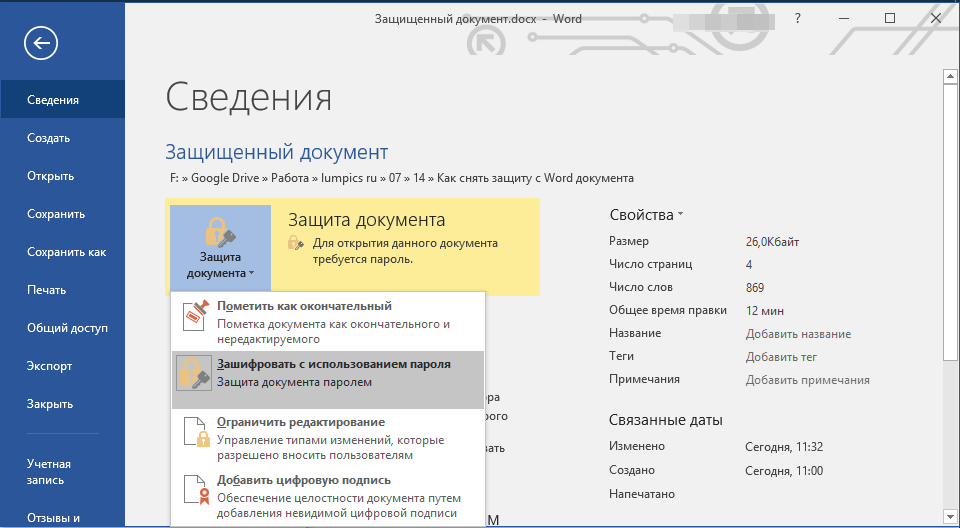
10. Запишите этот пароль или измените его на любой другой, который вы точно не забудете. Сделать это можно в меню «Файл» — «Сервис» — «Защита документа».
Альтернативный метод
Если вышеописанный метод вам не помог или же по каким-то причинам он вас не устроил, рекомендуем попробовать альтернативное решение. Данный метод подразумевает преобразование текстового документа в архив, изменение одного элемента, содержащегося в нем, и последующее преобразование файла обратно в текстовый документ. Нечто похожее мы проделывали с документом для извлечения из него изображений.
Урок: Как сохранить картинки из документа Ворд
Изменение расширения файла
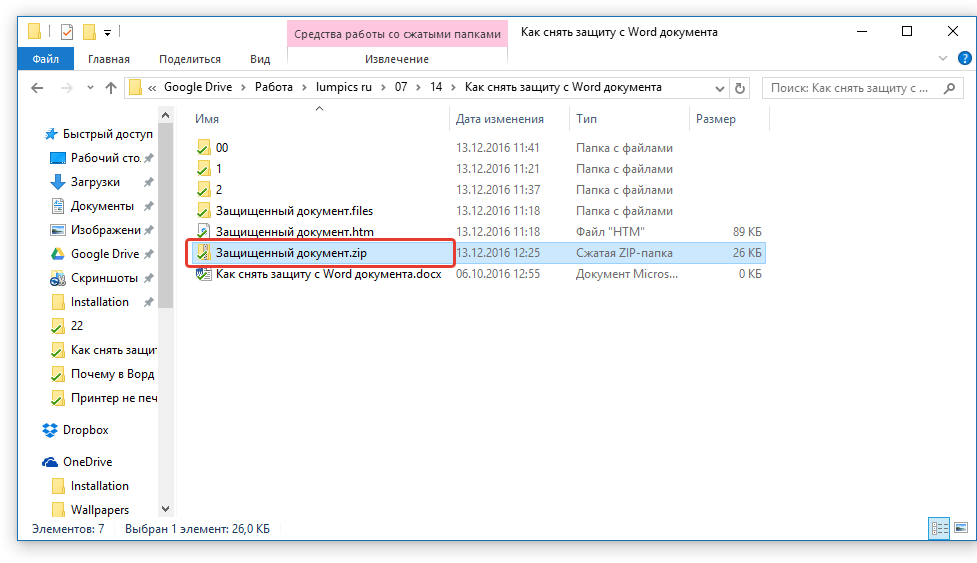
Откройте папку, в которой содержится защищенный файл, и измените его расширение с DOCX на ZIP. Для этого выполните следующее:

1. Кликните по файлу и нажмите F2.
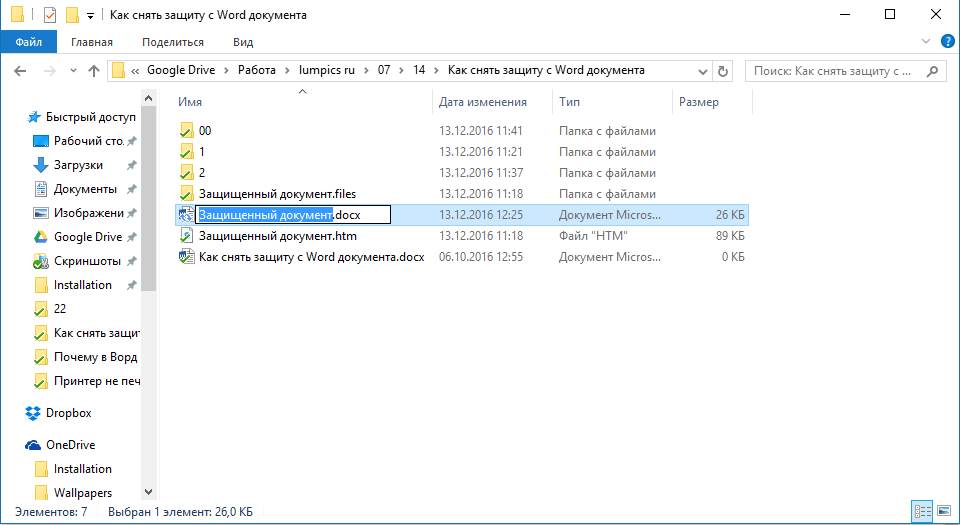
2. Удалите расширение DOCX.
3. Введите вместо него ZIP и нажмите «ENTER».
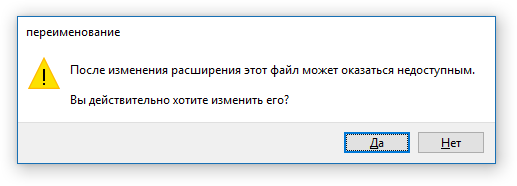
4. Подтвердите свои действия в появившемся окне.
Изменение содержимого архива
1. Откройте zip-архив, перейдите в папку word и найдите там файл «settings.xml».
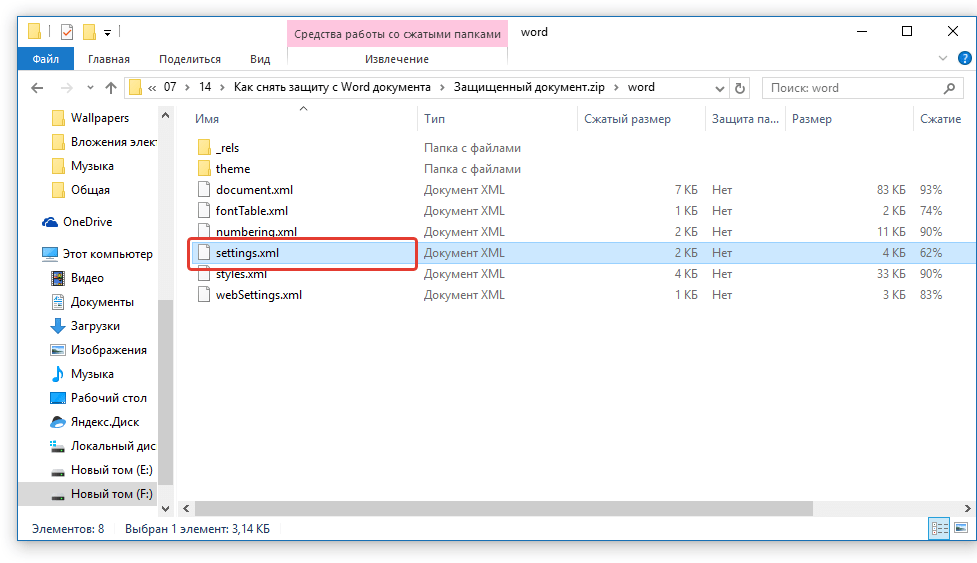
2. Извлеките его из архива, нажав на кнопку на панели быстрого доступа, через контекстное меню или путем простого перемещения из архива в любое удобное место.
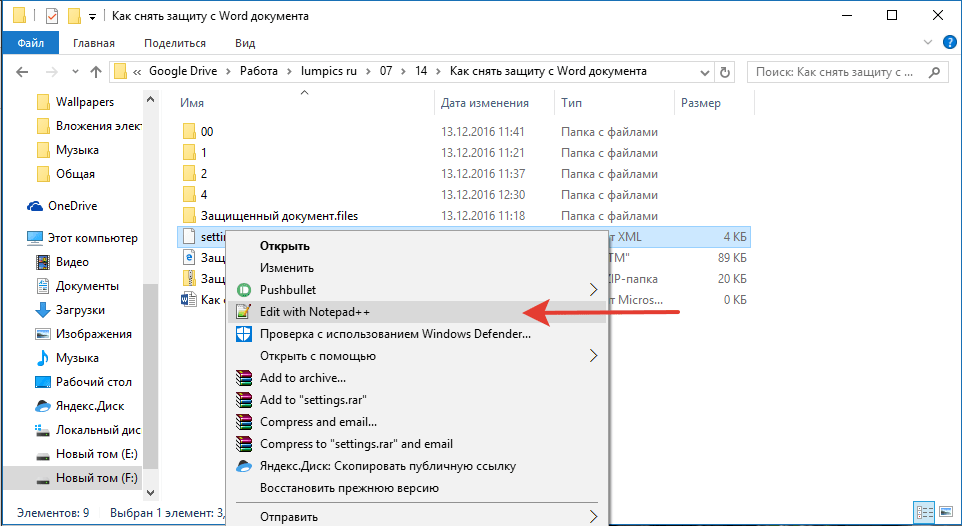
3. Откройте этот файл с помощью Notepad++.
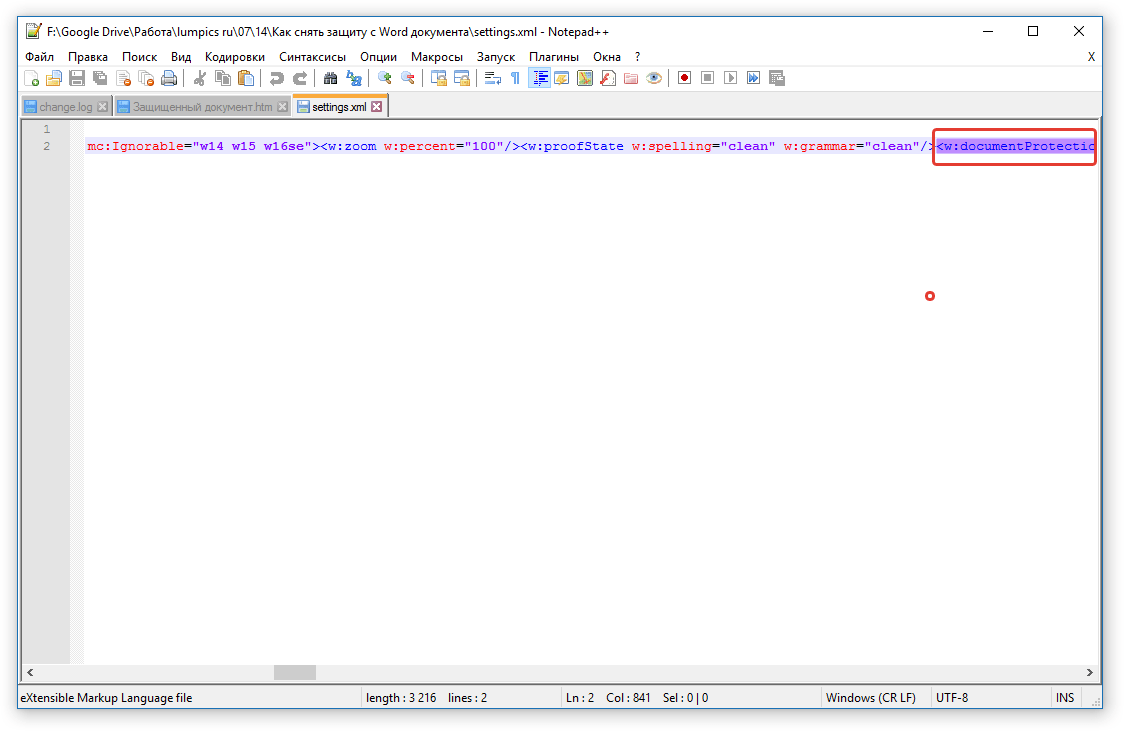
4. Найдите через поиск размещенный в угловых скобках тег w:documentProtection … , где «…» — это пароль.
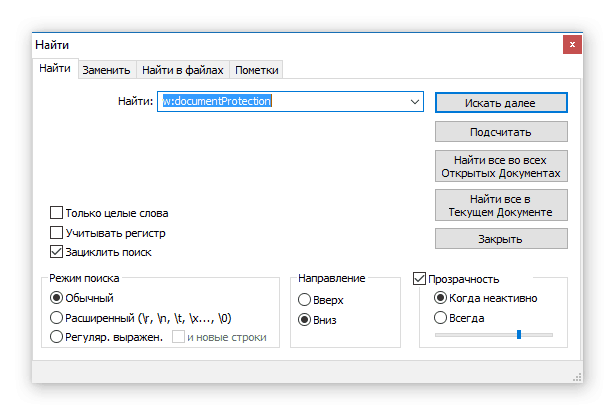
5. Удалите этот тег и сохраните файл, не изменяя его изначальный формат и имя.
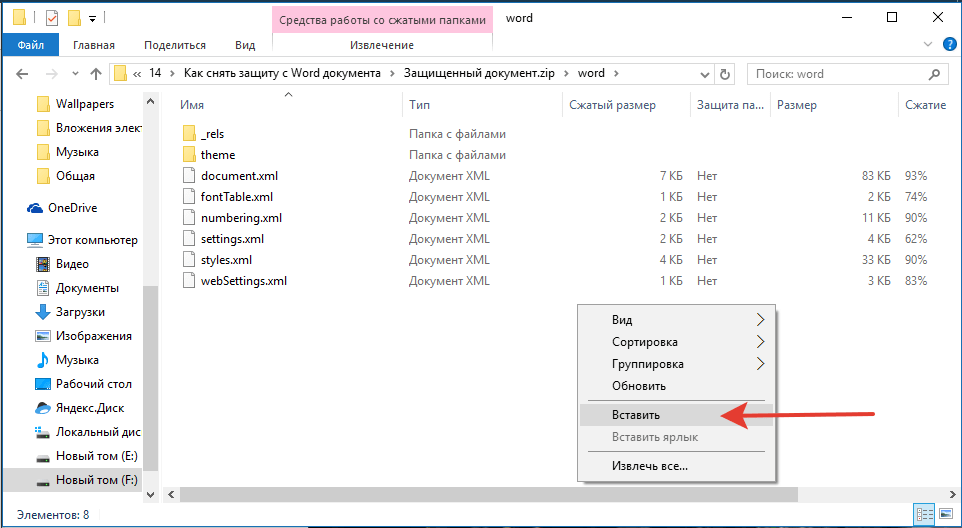
6. Добавьте измененный файл обратно в архив, согласившись на его замену.
Открытие защищенного файла
Измените расширение архива с ZIP снова на DOCX. Откройте документ — защита будет снята.
Восстановление утерянного пароля с помощью утилиты Accent OFFICE Password Recovery
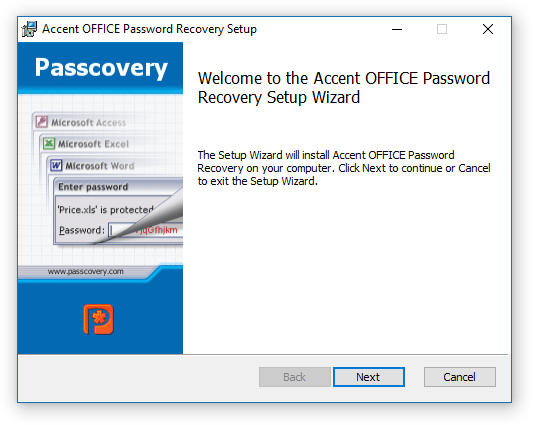
Accent OFFICE Password Recovery — это универсальная утилита для восстановления паролей в документах пакета Microsoft Office. Она работает практически со всеми версиями программ, как со старыми, так и с самыми новыми. Скачать ознакомительную версию можно на официальном сайте, для открытия защищенного документа базового функционала будет достаточно.

Скачать Accent OFFICE Password Recovery
Скачав программу, установите и запустите ее.
Прежде, чем приступить к восстановлению пароля, необходимо выполнить некоторые манипуляции с настройками.
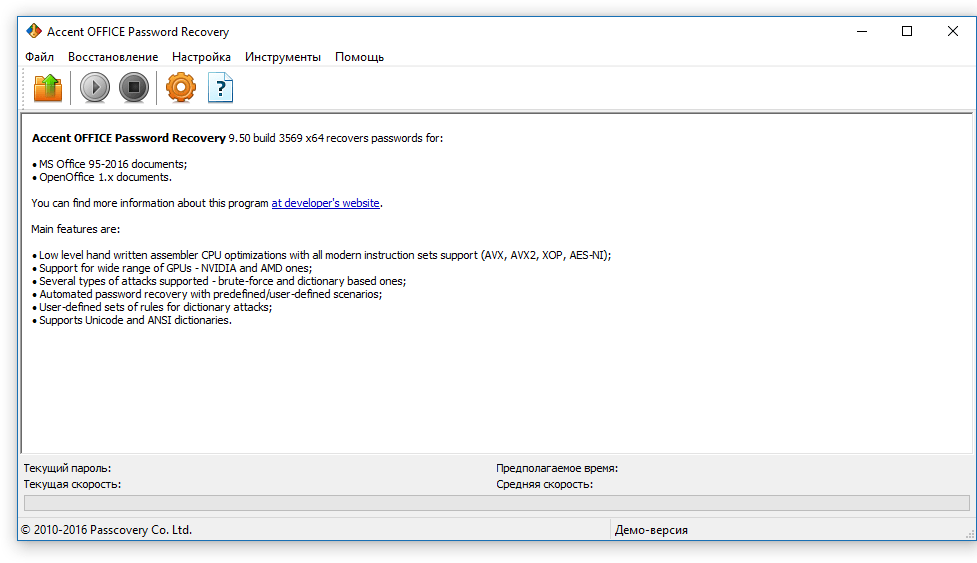
Настройка Accent OFFICE Password Recovery
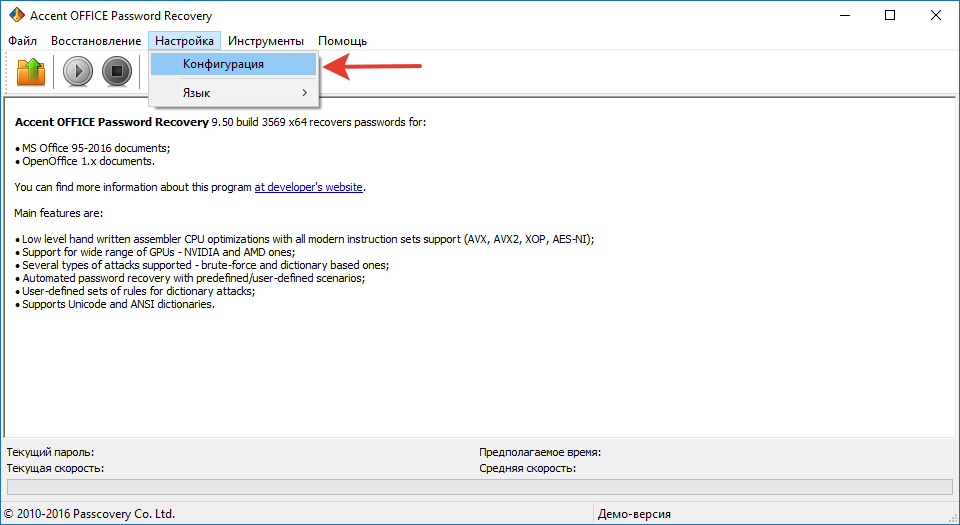
1. Откройте меню «Настройка» и выберите «Конфигурация».
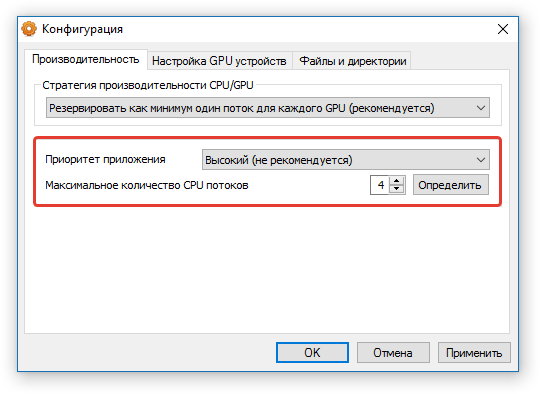
2. Во вкладке «Производительность» в разделе «Приоритет приложений» нажмите на небольшую стрелочку, расположенную около данного раздела, и выберите «Высокий» приоритет.
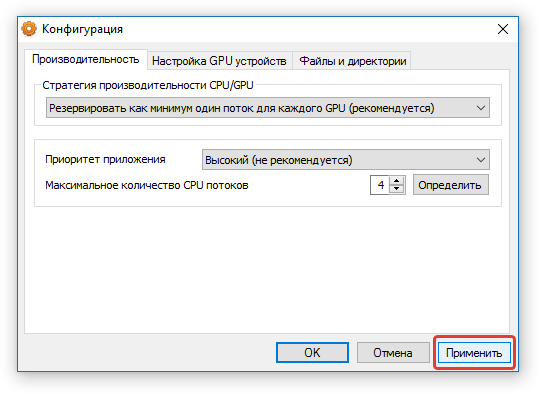
3. Нажмите «Применить».
Примечание: Если в данном окне все пункты не будут автоматически отмечены галочками, сделайте это вручную.
4. Нажмите «ОК» для сохранения внесенных изменений и выхода из меню настроек.
Восстановление пароля
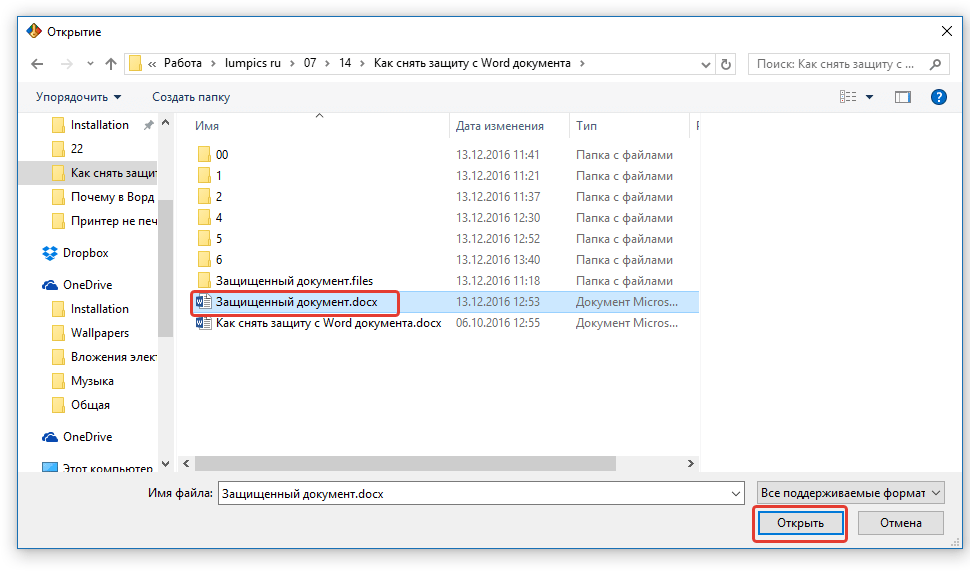
1. Перейдите в меню «Файл» программы Accent OFFICE Password Recovery и нажмите «Открыть».

2. Укажите путь к защищенному документу, выделите его левым кликом мышки и нажмите «Открыть».
3. Нажмите кнопку «Начать» на панели быстрого доступа. Будет запущен процесс восстановления пароля к выбранному вами файлу, это займет некоторое время.
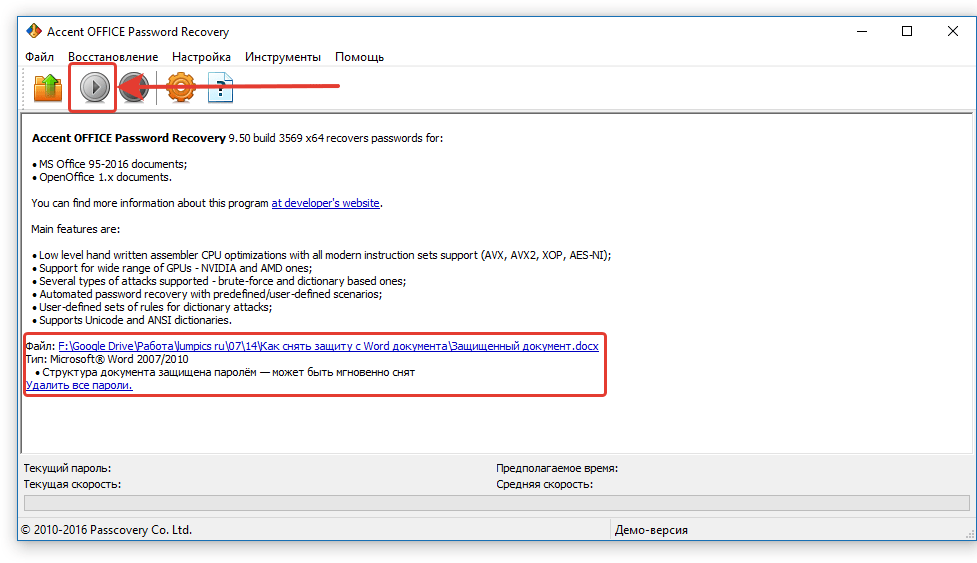
4. По завершению процесса на экране появится окно с отчетом, в котором и будет указан пароль.
5. Откройте защищенный документ и введите пароль, который был указан в отчете Accent OFFICE Password Recovery.
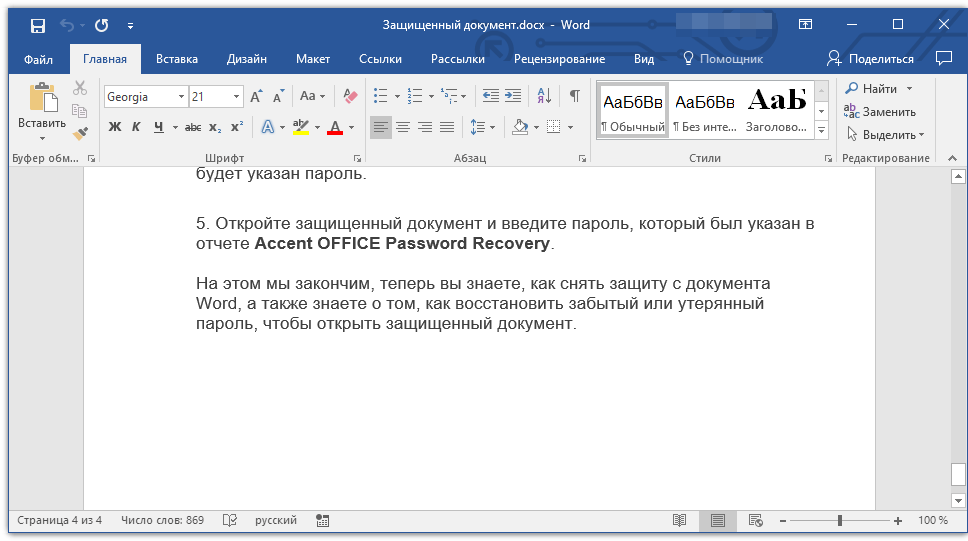
На этом мы закончим, теперь вы знаете, как снять защиту с документа Word, а также знаете о том, как восстановить забытый или утерянный пароль, чтобы открыть защищенный документ.
Does this error happen when you edit your word or excel files?

It is frustrating and annoying that you can not edit your .doc or .xlsx files in the middle of work. Don’t worry. This problem is easy to fix. Read on and get the solutions to handle «Word document locked for editing» and «Microsoft excel is locked for editing».
2 Ways to Unlock Microsoft Word Document That Is Locked for Editing
| Workable Solutions | Step-by-step Troubleshooting |
|---|---|
| 1. Quit All Instances of Word |
|
| 2. Uncheck «Encrypt content to secure data» |
|
Fix 1 — Quit All Instance of Word
Step 1. Save your work immediately and quit all running programs.
Step 2. Type Task Manager in the search box or press Ctrl + Alt + Delete to choose Task Manager in the list.
Step 3. Run Task Manager and select the Process tab.
Step 4. Find your Winword.exe, click it and choose End task in the bottom right corner.

Step 5. End Winword.exe one by one.
Step 6. On the Task Manager page, choose the File tab and click Exit.
Fix 2 — Uncheck «Encrypt content to secure data»
Step 1. Close word file.
Step 2. Right-click file and choose Properties > Click Advanced…
Step 3. Under the Compress or Encrypt attributes, uncheck Encrypt contents to secure data.
How to Unlock Excel File Locked for Editing — 5 Ways
- 1. Quit All Instance of Excel
- 2. Use Windows Management Console
- 3. File Is Editing by Another User
- 4. Remove Unsupported Features
- 5. Check Your File Format
Solution 1 — Quit All Instance of Word
Step 1. Save your work first and quit all programs.
Step 2. Press Ctrl + Alt + Delete to open the Windows Security Dialog box.
Step 3. Select Task Manager and go to the Process tab.
Step 4. Click EXCEL.EXE and click the End Task button in the bottom right corner.
Step 5. Repeat step 4 to end the process.
Step 6. Click the File tab and choose Exit in the top left corner.

Solution 2 — Use Windows Management Console
Step 1. Remember your file path and file name.
Step 2. Press Windows + R to open the Run window.
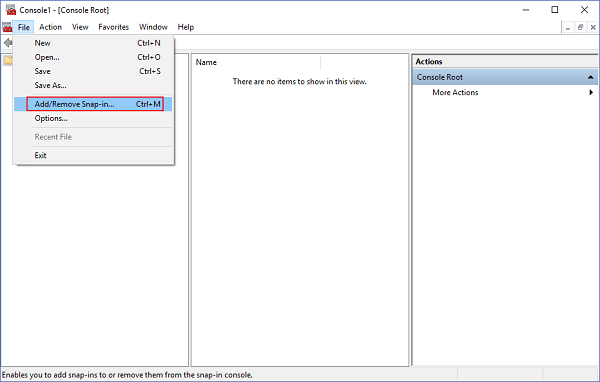
Step 3. Type mmc and press Enter. The Microsoft Management Console window pop up.
Step 4. Click the File tab in the top left corner, scroll down to select Add/Remove snap-in…
Step 5. On the Add or Remove Snap-ins window, you can check the list of Available snap-ins.
Step 6. Choose Shared Folders and then click Add.

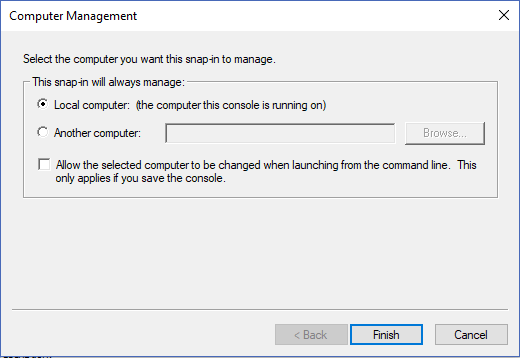
Step 7. Under the «Select the computer you want this snap-in to manage.», you can check the Local computer if you’ve logged in to the local server, if not, you can choose Another computer.
Step 8. Click OK > Go to the Tree view section, choose Shared Folder > click Open Files
Step 9. Find your desired files > Right-click it > Choose Close Open File

Solution 3 — File Is Editing by Another User
If your files are set up to be edited by more than one person, the reason your files can not be edited is that it is being used by other people. If you are don not need to do something urgent right now, you can choose Read-only. And, if you need to do something urgent like editing important file details, you can contact who opened the excel file and talk to somebody to close the .xlsx file.
Solution 4 — Remove Unsupported Features (Encryption/Add-ins)
In this part, we gonna list several features that might hassle your operation. You can check whether these functions are set in the file.
Feature 1 — Excel File Encryption
If you have set a password for excel files, we advise you to remove the password encryption.
Step 1. Open Microsoft Excel.
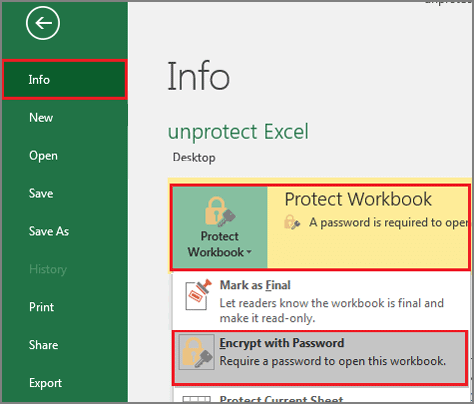
Step 2. Go to the File tab in the top left corner.
Step 3. Choose Info in the left panel > Click Protect Workbook > Select Encrypt with Password
Feature 2 — Add-ins
Some add-ins may affect your editing files, check the simple steps to disable add-ins:
Step 1. Click File > Options > Add-ins
Step 2. Choose COM Add-ins > Click Go
Step 3. Uncheck all add-ins in the list, and click OK.
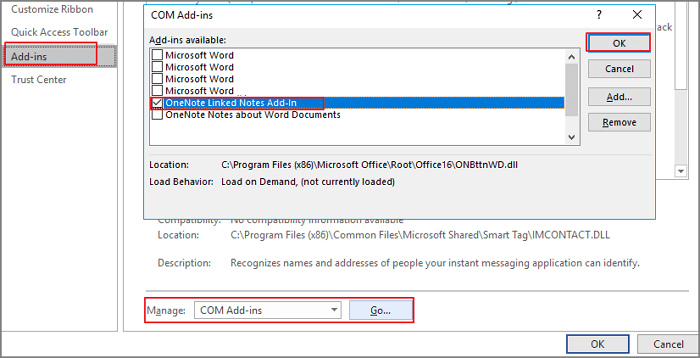
Step 4. Restart Excel.
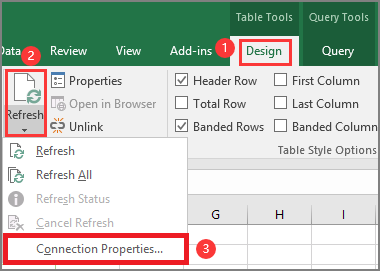
Feature 3. Refresh Data when opening files (Tables or Pivot Tables)
Navigate to Table Tools Design > Refresh > Connection Properties > Uncheck Refresh data when opening file
Solution 5. Check Your File Format
If you and your partners collaborate on the same Excel workbooks, you need to check your file name. Make sure your excel file name is .xlsx, .xlsm or .xlsb.
If not, follow the steps to convert file format: Click File tab > Save As > Browse > Save as type > Select .xlsx, .xlsm or .xlsb.
Why is My Excel File Locked for Editing?
1. The excel file was not closed properly the last time you used it.
2. Your colleague is opening the file.
3. You locked files by yourself.
Why Does Word Document Say Locked for Editing?
1. Your word file is co-authoring. (Editable by any person.) Another person is editing the document and you have to choose “Read-only”.
2. Improper quit.
3. Another instance of Word is running in the background.
Read more articles about Word: Microsoft Word Has Stopped Working
This tutorial will teach you how to unprotect Word documents that have lost or forgotten passwords.
Most of us use Microsoft Word for school and work. This word processor is convenient, especially if you are making a collaboration project with your group or team. A Word document is shareable and editable by multiple persons. Though you can set restrictions on your Word document on who can edit your file and who cannot. You can even lock or protect the document entirely by setting a password to make the content private.
Now, as protected as it sounds, sometimes the protections can cause problems like if you or your colleague forgot the Word document’s password. Let us say you’ll need to get access to a protected Word document for opening and editing, but without having the password, things can be a hassle.
If you are experiencing this problem, then learn how to unprotect Word documents without having a password.
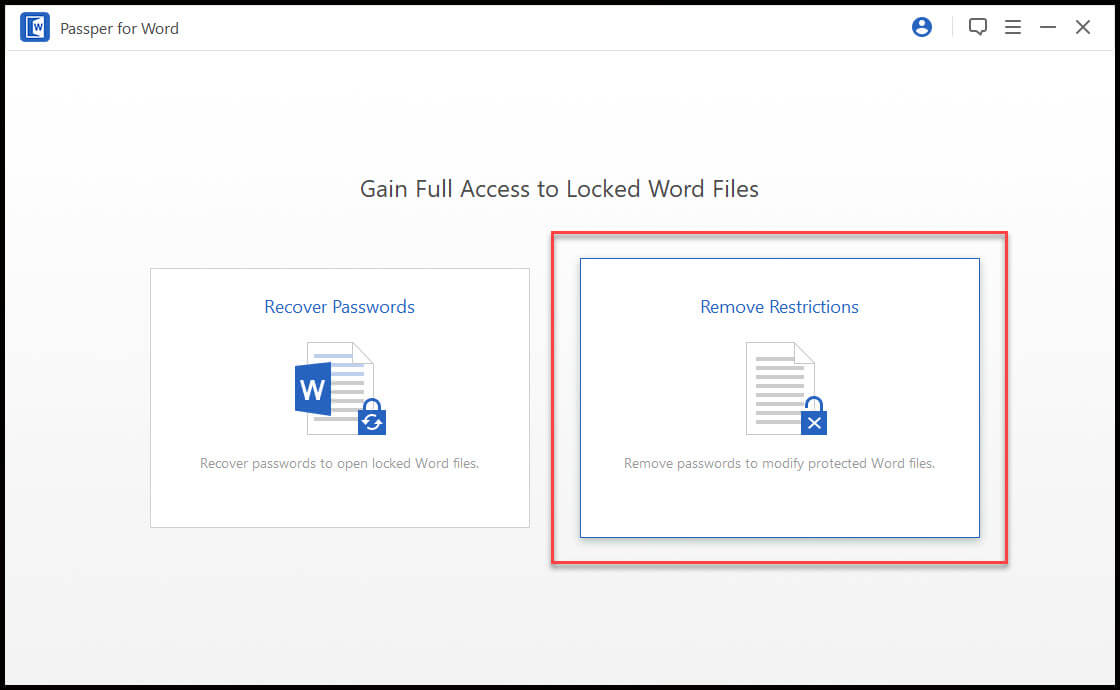
A simple yet effective way to unprotect a restricted Word document without a password is by using Passper for Word. Passper for Word is a password unlocker tool designed to help open and edit restricted and locked Word documents. This password unlocker tool will enable you to lift restrictions and protections without corrupting the data on the document.
Passper for Word can recover a forgotten password of a Word document and also if you want to delete, annotate, edit content, copy, and format restricted Word documents. It has two specific features; one is for unlocking a private document and the other is for editing a restricted document.
By using a convenient tool and following the easy steps I’ll be giving, you’ll be able to open and edit your Word document in no time.
How to Unprotect a Word Document for Editing Without Knowing the Password
These steps are for Word documents that are restricted from editing, not for opening a locked Word document.
Free Download
Use Passper for Word. This password remover tool will help you unprotect a restricted Word document fast.
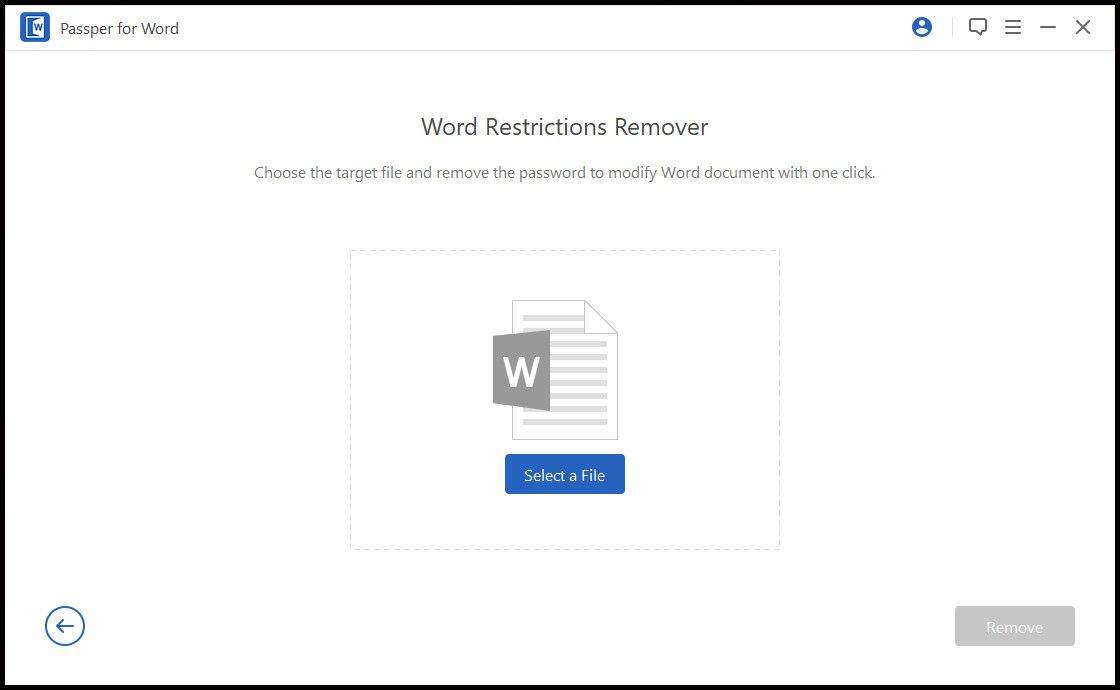
Step 1: Install and open Passper for Word software. Then, you’ll need to choose between the “Recover Passwords” or “Remove Restrictions” option. Since you only wanted to edit a restricted Word document, click “Remove Restrictions”.
Step 2: Once you’ve chosen your desired option next is to upload the restricted Word document. To upload the restricted Word document into the software, click on the “Select a File” option.
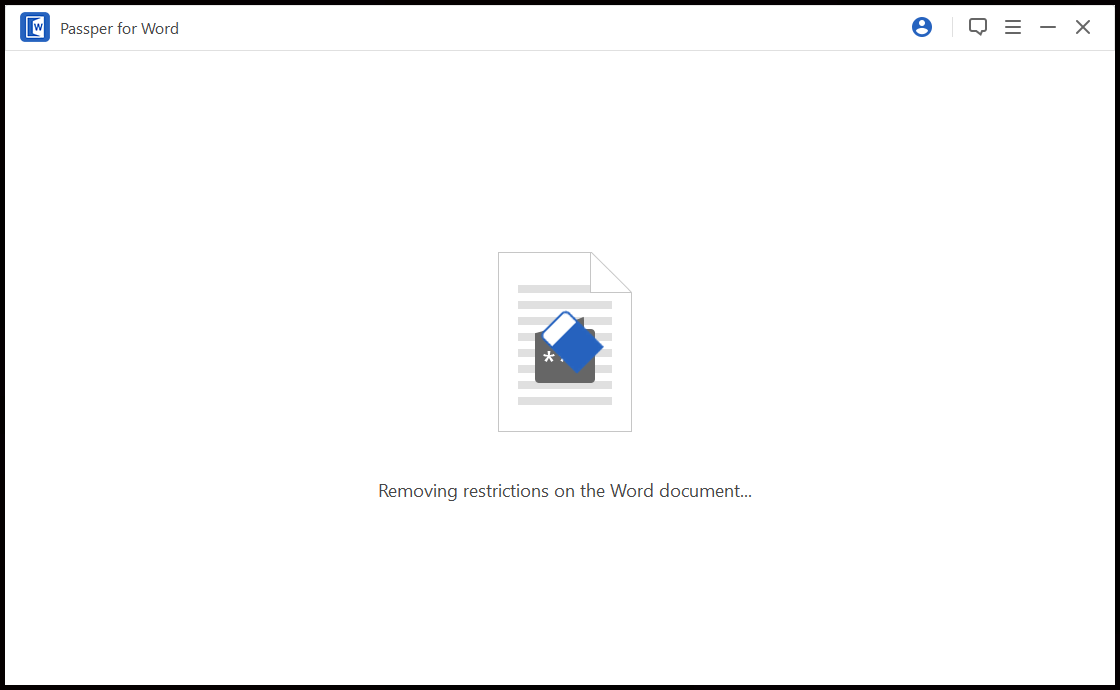
Step 3: After you uploaded the Word document, click “Remove”. This signals the software to begin the remove-restrictions process.
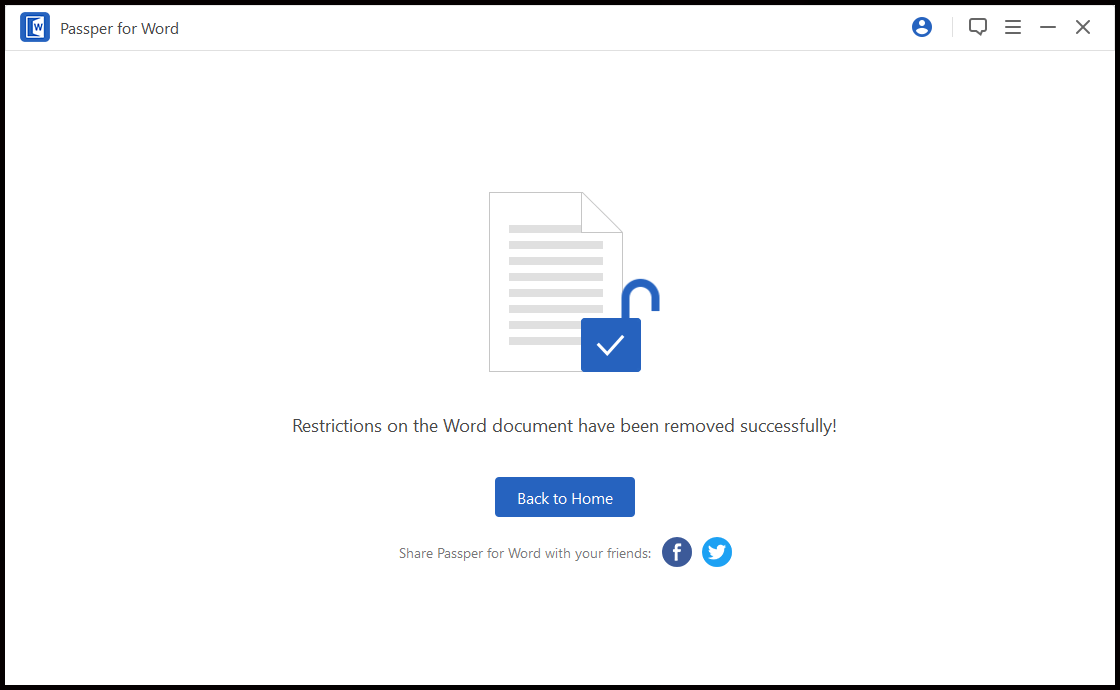
Step 4: Now, in just a few seconds, the Word document becomes editable. Click the Passper for Word folder on your desktop to check the unrestricted Word document. This will bring you to the unprotected Word document file path C:UsersUserNameDesktopPassper for Word.
How to Unprotect a Password Locked Word Document
Free Download
Use Passper for Word to open a locked Word document.
Step 1: Launch the software. This time you’ll need to select the “Recover Passwords” option.

Step 2: Click “Select a file” to upload the locked document into the software.

Step 3: Then, once the select a file option is checked, choose one of the 4 attack modes to use when recovering the password. Each of the modes is useful depending on the complexity of the encrypted password in the Word document.
These 4 attack modes are composed of:
- Combination attack – This mode combines letters, numbers, and symbols based on what you’ll give and the length of the password.
- Dictionary attack – This mode strings a list of passwords or uses the built-in dictionary of the software.
- Mask attack – This mode searches for the correct password based on the provided information.
- Brute force attack – This mode uses a brute approach to recover the forgotten password. Brute force mode will combine all characters until it unlocks the document. However, the length of the password can increase the recovery time.
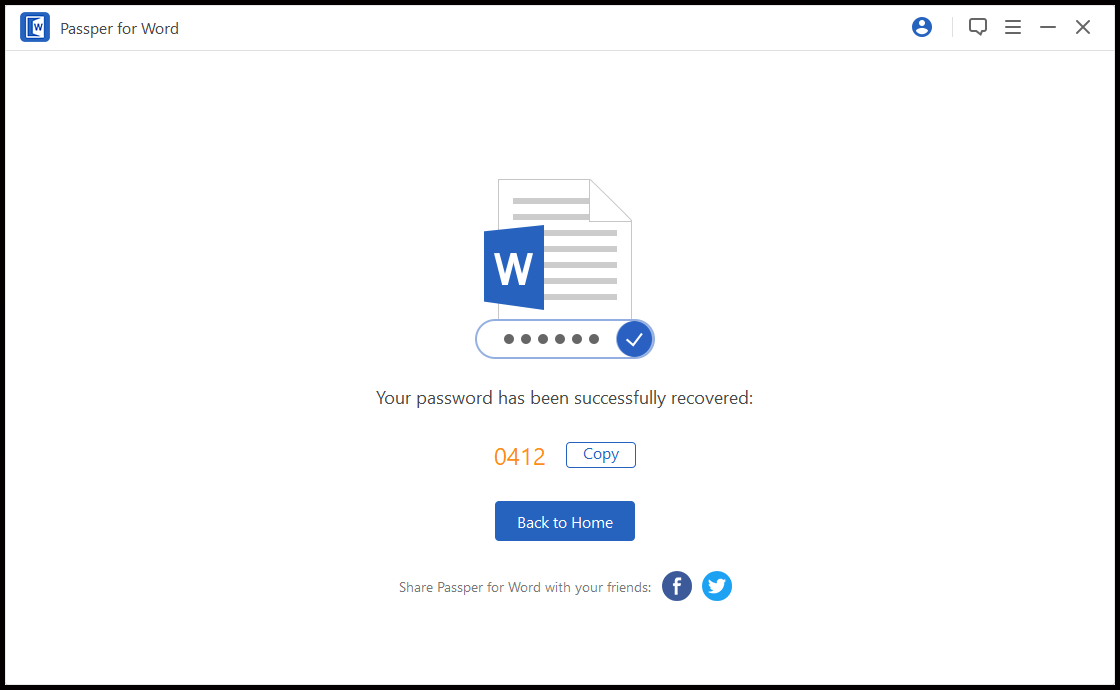
Step 4: Click “Recover” after you have selected an attack mode, then Passper for Word will start recovering the password.
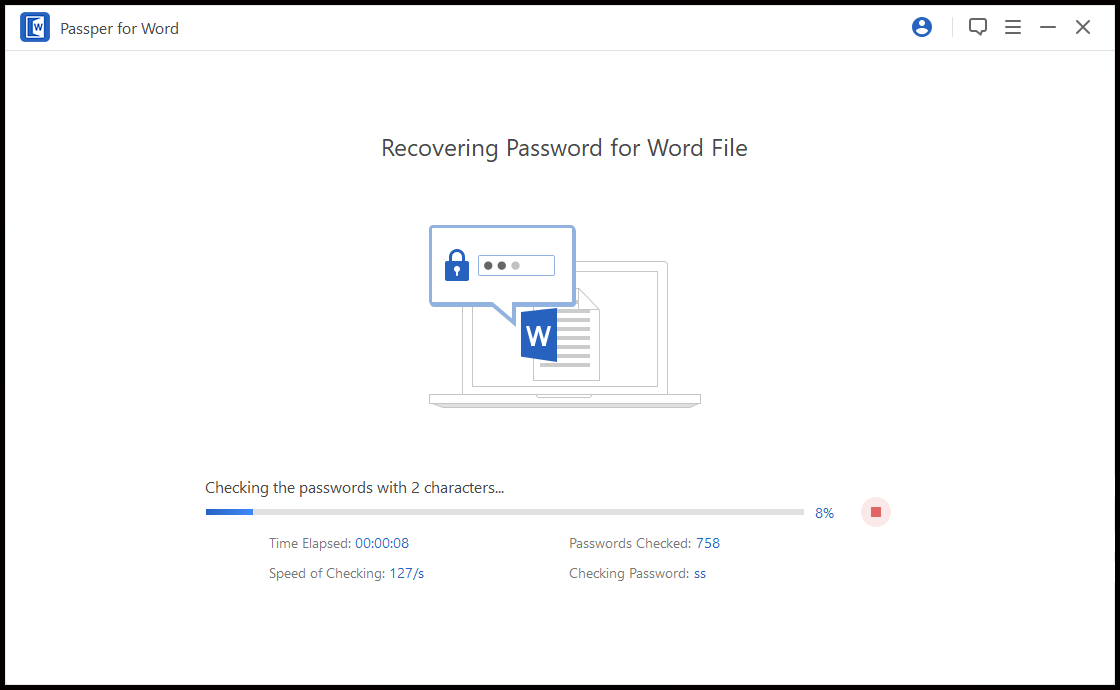
Wait for a few minutes and the password should appear on the screen. If the recovery is unsuccessful you can go back and try another attack mode option.
Just a tip whenever you encrypt a password on a Word document, make sure not to combine complex passwords or make it too long. Otherwise, you may end up waiting days or even forever before you recover the password.
How to Stop the Word Document Password Protection
Now that you have the password, you won’t have any problem opening the file. But if you want to remove the password incense you don’t want to get in the same trouble, then the following steps can help you.
Step 1: Open the Microsoft Word document and then click “File” and go to “Info” and select “Protect Document”.
Step 2: Under the “Protect Document” menu, select “Encrypt with Password” so you can remove the password.
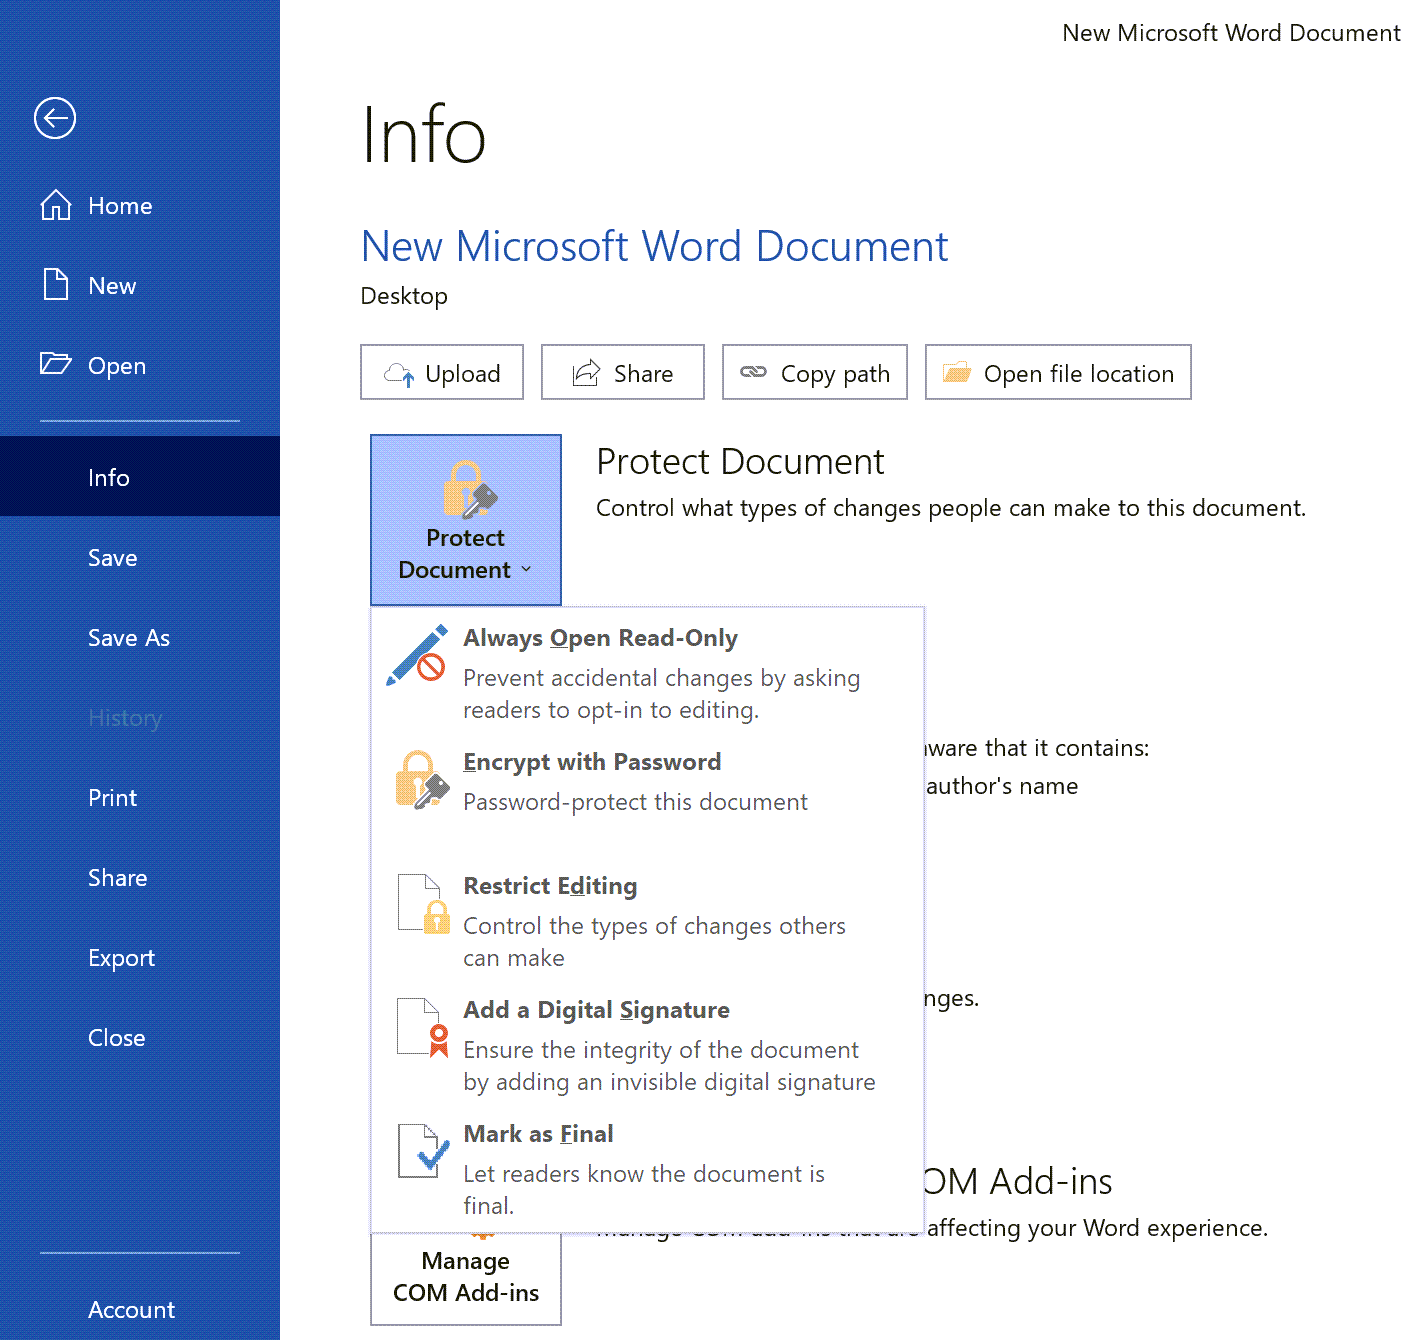
Step 3. Delete the encrypted password then click “OK”. This will remove the encrypted password from the Word document, making it an unprotected file.
I hope my tutorial helps you with the hassle of opening and editing a locked Word document. But if ever you’ll have trouble in the future opening a protected or restricted document, especially if you forgot the password you know your go-to tool, Passper for Word.