
 Please Note:
This article is written for users of the following Microsoft Word versions: 97, 2000, 2002, and 2003. If you are using a later version (Word 2007 or later), this tip may not work for you. For a version of this tip written specifically for later versions of Word, click here: Converting Field Results to Text.
![]()
Written by Allen Wyatt (last updated July 4, 2020)
This tip applies to Word 97, 2000, 2002, and 2003
Special fields have a great number of uses in Word. You already know that you can use fields to insert everything from the date and time to summary information for a document. There may be times, however, when you don’t want to use a field for information.
As an example, let’s say that you have a template that includes a field for today’s date in it. When you create a document based on the template, today’s date appears in the document. You make changes to the document, and then save it to disk. When you later open the document, instead of the original date, it contains the date of when you opened the file.
To get around this, you need to change the field contents to plain text before you save the file. In this instance, you would follow these steps:
- Create your new document based on the template. Today’s date should appear, as normal.
- Select the date in the document.
- Press Ctrl+Shift+F9. This converts the field to actual text. Thus, the date is switched from a field to real text for the date.
- Make any other changes necessary in the document.
- Save the document as normal.
That’s it. The next time you open the document, the date remains unchanged. You can also use this technique with any other field to convert it to text.
WordTips is your source for cost-effective Microsoft Word training.
(Microsoft Word is the most popular word processing software in the world.)
This tip (1035) applies to Microsoft Word 97, 2000, 2002, and 2003. You can find a version of this tip for the ribbon interface of Word (Word 2007 and later) here: Converting Field Results to Text.
Author Bio
With more than 50 non-fiction books and numerous magazine articles to his credit, Allen Wyatt is an internationally recognized author. He is president of Sharon Parq Associates, a computer and publishing services company. Learn more about Allen…
MORE FROM ALLEN
Symbols for Non-Printing Characters
Displaying non-printing characters can help you better understand the formatting and contents of your documents. What do …
Discover More
Problems with TOC Styles
If you generate a table of contents for your document, there may be some unexpected surprises in the way the TOC appears. …
Discover More
Patterns of Numbers with a Formula
Want to create a sequential pattern using formulas? It’s easy to do if you take a look at how your data repeats. This tip …
Discover More
More WordTips (menu)
Counting Fields in a Document
Need to count the number of times a particular field appears in a document? It’s easy to do when you apply the techniques …
Discover More
Inserting the User’s Name
Word keeps track of a name for the person using the program. If you want to add this person’s name into the document, …
Discover More
Entering a «Slashed Zero» in Your Document
Need to add the occasional zero with a slash through it? There are a couple of ways you can accomplish this task.
Discover More
 Fields are one of the most useful features of MS Word! I think that most of you know that you can use fields to insert anything in your document ranging from a date to the time, to summary information in a document!
There are times though, when you will not want to use a field for information. For instance, suppose you have a template that includes a field for the current date in it. when you create a document based on that template, the current date will appear in your document. You make changes to your document and save it to a CD. When next you open that document, instead of the original date, it will display the date you opened it.
To remedy this, you will need to change the field contents to plain text prior to saving your file.
Follow the steps below to learn how:
- Create your new document based on the template. The current date should appear, as it usually does.
- Select the date in your document.
- Click CTRL + Shift + F9, which will convert the field to actual text. The date has now been changed from a field to real text for the date.
- Make any other edits in your document that you like.
- Save your document as you normally would.
Now, when next you open that document, the date will be static and will not change!
You can use this method to convert any other field to text as well.
Hi, Dawn,
You can use the .Code property of the Field object to get the text between
the field braces, and then you have to do some work to extract the filename
from that string.
If you’re working in Word 2000 or later, you can use the Replace function to
do the work easily (assuming that the fields were inserted through the
Insert > Field dialog so they have uniform capitalization of the keywords):
Sub foo1()
Dim oFld As Field
Dim strFName As String
For Each oFld In ActiveDocument.Fields
If oFld.Type = wdFieldIncludeText Then
strFName = oFld.Code
‘ remove up to first quote
strFName = Replace(strFName, _
» INCLUDETEXT «»», «»)
‘ remove last quote & after
strFName = Replace(strFName, _
«»» * MERGEFORMAT «, «»)
‘ convert double backslashes
strFName = Replace(strFName, _
«\», «»)
MsgBox strFName
End If
Next oFld
End Sub
If you have to deal with Word 97, which doesn’t have the Replace function,
or if the capitalization of the keywords may be inconsistent, then you have
a bit more work to do:
Sub foo2()
Dim oFld As Field
Dim strFName As String
Dim nPos As Long
Const Qt As String = «»»»
For Each oFld In ActiveDocument.Fields
If oFld.Type = wdFieldIncludeText Then
strFName = oFld.Code
‘ remove quotes and
‘ everything before & after
nPos = InStr(strFName, Qt)
If nPos Then
strFName = Right(strFName, _
Len(strFName) — nPos)
nPos = InStr(strFName, Qt)
If nPos Then
strFName = Left(strFName, nPos — 1)
End If
End If
‘ change double backslashes to single
nPos = InStr(strFName, «\»)
Do While nPos
strFName = Left(strFName, nPos) & _
Right(strFName, _
Len(strFName) — nPos — 1)
nPos = InStr(strFName, «\»)
Loop
MsgBox strFName
End If
Next oFld
End Sub
Word has this nice feature which enables insertion of text fields, check boxes, drop-down lists, etc. You can use these elements to create a form in Word.
These elements are available under the tab menu Developer in the Word Ribbon. If you are unable to find this tab in the Ribbon, most likely you need to enable this using the Word Options dialog box.
To enable the Developer tab (Word 2007)
1. Click the Office button ![]() . A drop-down list appears.
. A drop-down list appears.
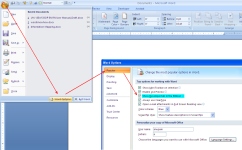
2. Click the Word Options button from the bottom of the list. Word Options dialog box appears.
3. On the dialog box, under the category Popular (see on the left hand side), select the option Developer tab in the Ribbon. Now, you can view the Developer tab in the Ribbon. See below image.
To insert a legacy check box
1. Click the Developer tab.
2. Under the group Controls, click the Legacy Tools button. A drop-down list of icons appears. See below image.
3. Under the section Legacy Form, click the check box icon as shown in the below image. Word creates a check box at the cursor position. By default, the checkbox is in design mode (you can see the Design Mode icon being enabled within the Controls group)

Note: If you wish, you can remove the shading of the check box by clicking the Form Field Shading icon under Legacy Form.
4. By the way, you cannot use the checkbox in design mode. To disable design mode, click the Design Mode icon within the Controls group.
Also, you should enforce protection to the document (or form) before you share it with others to capture information.
This step is applicable to all other controls as well.
To enforce protection
1. Under the Developer tab, within the group Protect, click icon Protect Document. A drop-down list appears.
2. From the drop-down menu, click Restrict Formatting and Editing. Restrict Formatting and Editing task pane appears on the right hand side.
3. From this dialog box, select option Allow only this type of editing in the document option. A drop-down is enabled. Select Filling in forms option from the drop-down list. See below image.
4. Click button Yes, Start Enforcing Protection. The Start Enforcing Protection dialog box appears, which prompts you to enter a password.
5. Enter a password and retype password. Your document is protected and the check box is now clickable.

Important: Remember that you cannot edit a protected document. If you wish to make changes in the document, you have to remove protection by entering the valid password.
To stop protection
1. Under the Developer tab, within the group Protect, click Protect Document. The Restrict Formatting and Editing task pane appears.
2. From the bottom of the dialog box, click the button Stop Protection. Enter valid password to remove protection.
To insert a drop-down list
1. Under the Developer tab, within the group Controls, click the Drop-Down List icon. A drop-down list appears in the document. See below image.

2. You can see the Properties button being enabled within the Controls group. Click Properties. The Content Control Properties dialog box appears.
3. In the dialog box, under section General, enter a Title of the drop-down list.
4. Under section Drop-Down List Properties , click button Add to enter the display name and value for the first list item in the Add Choice dialog box and then click OK. Item is added to the list.
In the similar way, you can keep adding items to the list.
5. Click the Modify/Remove button to edit/delete list items.
6. Finally, click OK to close the Content Control Properties dialog box. You can view the drop-down list displays all the list items. See below image.

7. Enforce protection to the document, so that list values cannot be modified.
To insert an ActiveX Control check box
1. Click the Developer tab.
2. Under the group Controls, click the Legacy Tools button.
3. From category ActiveX Controls, click the check box icon. A check box is created at the insertion point. See below image.
You can notice that the Design Mode icon being enabled within the Controls group. This is important to edit the check box properties.
4. Right-click the check box. From the right-click menu, click CheckBox Object and then click Edit. The check is in edit mode. You can enter a name of the checkbox.
5. From the right-click menu, click Properties to control properties of the check box.
6. Click Design Mode to disable. The check box is now clickable.

Note: The difference between a legacy and ActiveX control check box is that, ActiveX checkbox provides advanced or extended features, i.e. you can write program for it in visual basic to make the check box behave in different ways.
Insert text fields
1. Click the Developer tab.
2. Under the group Controls, click the icon Rich Text or Text. A text field is created in the document. See below image.
3. You can change the default text appearing in the text box by enabling the Design Mode button in the Control Group.

Insert a Combobox
- Under the Developer tab, within the group Controls, click the Combobox icon
 . A combobox is created at the cursor position.
 - Select the combobox and then click Properties (available within the group Controls. The Content Control Properties dialog box appears.
- In the dialog box, under the section General, enter a Title of the combobox.
- In the dialog box, under the section Drop-down List Properties, click the Add button. Add Choice dialog box appears.
- Enter a display name and value for the first list item. Click OK.
- Click Add again to enter a second list item. Click OK. You can keep adding as many item as you need.
- Finally, click OK.
 . A combobox is created at the cursor position.
The combobox list is populated with the list items. Remember, the combobox should not be in Design Mode to view the list of items. You can find the Design Mode icon within the group Controls . See below image.

Also See:
https://wordknowhow.wordpress.com/2014/04/03/how-to-create-radio-buttons-option-buttons-in-ms-word/
https://wordknowhow.wordpress.com/2014/04/03/how-to-create-or-add-checkboxes-checkbox-controls-to-your-word-document/
https://wordknowhow.wordpress.com/2014/04/08/how-to-add-a-text-field-in-word/