
Word for Microsoft 365 Word for Microsoft 365 for Mac Word 2021 Word 2021 for Mac Word 2019 Word 2019 for Mac Word 2016 Word 2016 for Mac Word 2013 Word 2010 Word for Mac 2011 More…Less
Text boxes and most shapes can include text in them. The text can be positioned horizontally or vertically, and it can appear on one line or wrap to multiple lines.
You can change the direction of the text, and you can also change the margins of text boxes and shapes for optimal spacing, or resize shapes for a better text fit.
Specify text direction in a shape or text box
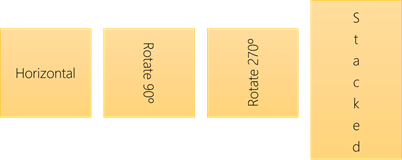
In a shape or text box, you can change the direction in which text is read. That is, you can pivot text 90 or 270 degrees so that it appears sideways.
-
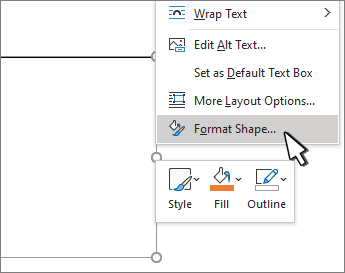
Right-click the edge of the shape or text box.
-
On the shortcut menu, select Format Shape.

-
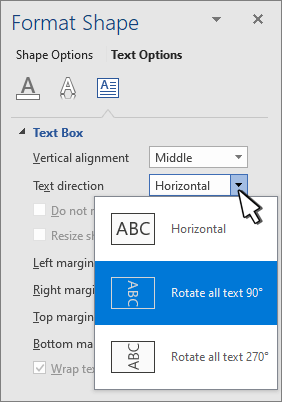
In the Format Shape pane, click Size/Layout & Properties
. -
Under Text Box, select the option that you want in the Text direction list.
 .
.
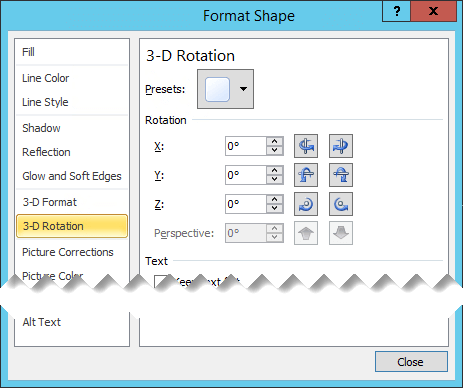
Rotate (mirror) text in a shape or text box

-
Right-click the box or shape and select Format Shape.
-
In the Format Shape pane, select Effects.
-
Select 3-D Rotation and in the X Rotation or Y Rotation box, enter 180.
-
(Optional) If your text box is filled with a color, you can remove the color in the Format Shape pane. Select Fill & Line
, select Fill, and then select No fill. -
(Optional) To remove the text box outline, right-click the text box, select Outline in the mini toolbar that appears, and choose No Outline.
 , select Fill, and then select No fill.
-
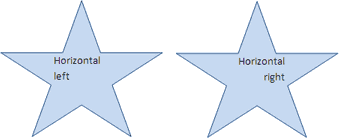
Select the paragraph, line of text, shape, or text box that you want to modify.
-
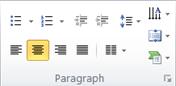
Go to Home and select the horizontal alignment option that you want.
-
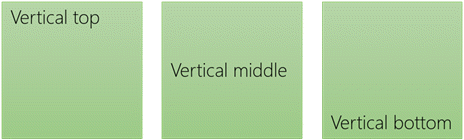
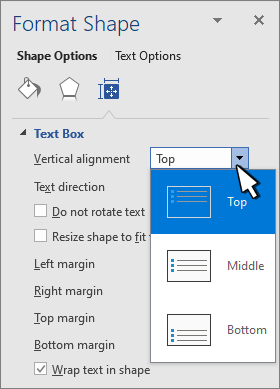
Right-click the border of the shape or text box.
-
On the shortcut menu, select Format Shape.
-
In the Format Shape pane, select Size/Layout & Properties
.
-
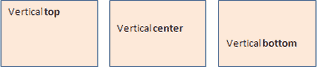
Select the option that you want in the Vertical alignment list.
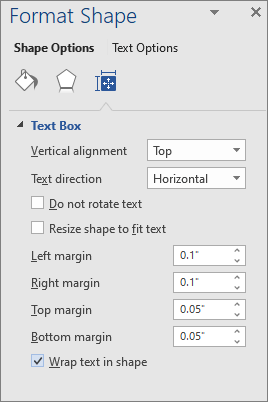
When text wraps, it automatically continues on a new line as it reaches the right border of the shape or text box.
-
Right-click the border of the shape or text box that contains the text you want to wrap.
-
On the shortcut menu, select Format Shape.
-
In the Format Shape pane, select Size/Layout & Properties
, and then select Wrap text in shape.
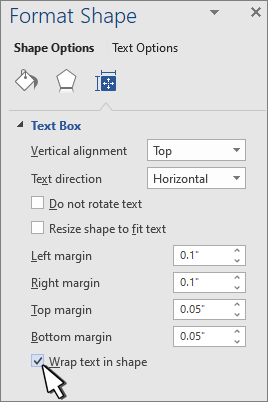
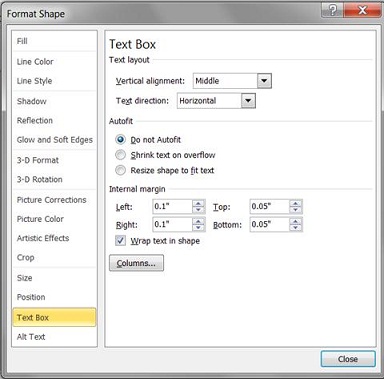
The margin is the distance between the text and the outer border of the enclosing shape or text box.
-
Right-click the border of the shape or text box.
-
On the shortcut menu, select Format Shape.
-
In the Format Shape pane, select Size/Layout & Properties
.
-
Specify a measurement in inches or millimeters (mm) for any of the following margins:
-
Left margin
Distance between the left border of a shape and the leftmost text -
Right margin
Distance between the right border of a shape and the rightmost text -
Top margin
Distance between the top border of a shape and the uppermost text -
Bottom margin
Distance between the bottom border of a shape and the lowest text
-
You can automatically increase the size of a shape or text box vertically so that the text fits inside it.
-
Right-click the border of the shape or text box.
-
On the shortcut menu, select Format Shape.
-
In the Format Shape pane, select Layout & Properties
, select Text Box, and then select Resize shape to fit text.

Tip: You can reduce the size of the text to fit it in the shape or text box by selecting Shrink text on overflow.
Specify text direction in a shape or text box
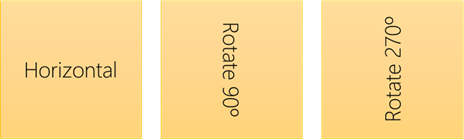
You can change direction of text in a shape or text box. For example, you can rotate text 90 or 270 degrees so that it appears sideways.
-
Right-click the edge of the shape or text box that contains the text.
-
On the shortcut menu, select Format Shape.
-
In the left pane of the dialog box, select Text Box.
-
Under Text layout, select the option that you want in the Text direction list.
-
Select Close.
Rotate (mirror) text in a shape or text box
-
Insert a text box or shape in your document, and then type and format your text.
-
Right-click the box or shape and select Format Shape.
-
In the Format Shape dialog box, select 3-D Rotation on the left.
-
In the X box, enter 180.
-
Select Close.
-
Click or tap in the paragraph, line of text, shape, or text box that you want to modify.
-
On the Home tab, select the horizontal alignment option that you want.
-
Right-click the border of the shape or text box.
-
On the shortcut menu, select Format Shape, and then select Text Box in the left pane.
-
Under Text layout, select the option that you want in the Vertical alignment list.
-
Select Close.
You can automatically increase the size of a shape or text box vertically so that the text fits inside it.
-
Right-click the border of the shape or text box that you want to resize.
-
On the shortcut menu, select Format Shape, and then select Text box in the left pane.
-
Under Autofit, select Resize shape to fit text.
-
Select Close.
Tip: You can reduce the size of the text to fit it in the shape or text box by selecting Shrink text on overflow.
The internal margin is the changeable distance between text and the outer border of a shape or text box.
-
Right-click the border of the shape or text box.
-
On the shortcut menu, select Format Shape, and then select Text Box in the left pane.
-
Under Internal Margin, choose one or more of the following:
-
Left
Specifies the distance between the left border of a shape and the text. -
Right
Specifies the distance between the right border of a shape and the text. -
Top
Specifies the distance between the top border of a shape and the text. -
Bottom
Specifies the distance between the bottom border of a shape and the text.
-
-
Select Close.
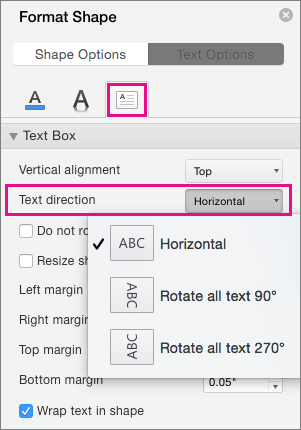
Specify text direction in a shape or text box
-
Control + Click the border of the shape or text box that contains the text, and then select Format Shape.
-
In the Format Shape pane on the right, select Text Options.
-
Select the third icon, Textbox, and then select the option that you want from the Text direction list.
Position text horizontally in a paragraph, text box or shape
-
Click or tap in the paragraph, line of text, shape, or text box that you want to modify.
-
Go to Home, and in the Paragraph group, click the horizontal alignment option that you want.

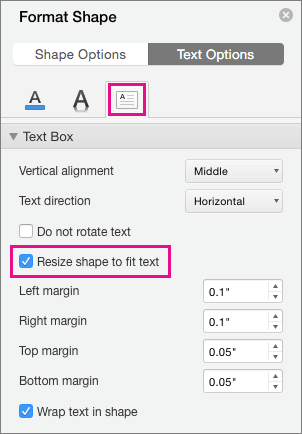
You can automatically increase the size of a text box or shape vertically so that the text fits inside it.
-
Control + Click the border of the shape or text box that you want to resize, and then select Format Shape.
-
In the Format Shape pane on the right, select Text Options.
-
Select Layout & Properties, and then select the check box next to Resize shape to fit text.
By default, the text wraps automatically as you type in a text box or shape. If you don’t want the text to wrap, do the following:
-
Control + Click the shape that contains the text, and then select Format Shape.
-
In the Format Shape pane on the right, select Text Options.
-
Select Layout & Properties, and then clear the check box next to Wrap text in shape.
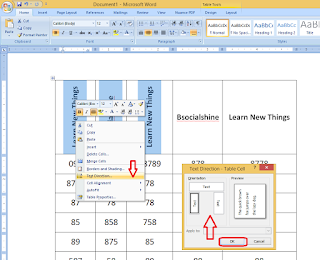
Specify text direction in a shape, text box, or table cell
-
Enter the text in the shape or text box or table cell, and then select the text.
-
Ctrl+Click the selected text, and then select Format Shape. On the Text Box tab in the dialog box, choose a direction from the Text Direction box.
Position text horizontally in a shape or text box
-
Select the text in the shape or text box.
-
On the Home tab, under Paragraph, select the horizontal alignment button that you want.
(Align Left, Centered, Align Right, Justified, or Distribute Text)

-
Select the text in the shape or text box.
-
On the Home tab, under Paragraph, select
, and then select the vertical alignment that you want.
 , and then select the vertical alignment that you want.
By default, the text wraps automatically as you type in a text box or shape. If you don’t want the text to wrap, do the following:
-
Select the text in the shape or text box.
-
Go to Format > Shape.
-
On the left side of the dialog box, select Text Box.
-
Under Internal Margin, clear the Wrap text in shape check box.
-
Select the text in the shape or text box.
-
Go to Format > Shape.
On the Format menu, select Shape.
-
On the left side of the dialog box, select Text Box.
-
Under Autofit, select Resize shape to fit text.
Need more help?
 Please Note:
This article is written for users of the following Microsoft Word versions: 97, 2000, 2002, and 2003. If you are using a later version (Word 2007 or later), this tip may not work for you. For a version of this tip written specifically for later versions of Word, click here: Changing Table Cell Text Direction.
![]()
Written by Allen Wyatt (last updated October 9, 2021)
This tip applies to Word 97, 2000, 2002, and 2003
Word allows you to quickly change the direction in which the text in a cell faces. For instance, you may want the text to be vertical instead of horizontal. You can change text direction by following these steps:
- Right-click your mouse on the cell whose text direction you want to change. A Context menu appears.
- Choose Text Direction from the Context menu. The Text Direction dialog box appears. (See Figure 1.)
- Select the Orientation you want used for your text.
- When satisfied, click on OK.
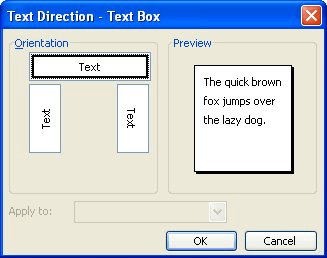
Figure 1. The Text Direction dialog box.
You can also do the same task using the Tables and Borders toolbar:
- Position the insertion point in the cell whose orientation you want to change.
- Click your mouse on the Change Text Direction tool on the Tables and Borders toolbar. Word changes the orientation of the text in the cell.
- Continue clicking on the Change Text Direction tool until the orientation is exactly as you want it.
WordTips is your source for cost-effective Microsoft Word training.
(Microsoft Word is the most popular word processing software in the world.)
This tip (1781) applies to Microsoft Word 97, 2000, 2002, and 2003. You can find a version of this tip for the ribbon interface of Word (Word 2007 and later) here: Changing Table Cell Text Direction.
Author Bio
With more than 50 non-fiction books and numerous magazine articles to his credit, Allen Wyatt is an internationally recognized author. He is president of Sharon Parq Associates, a computer and publishing services company. Learn more about Allen…
MORE FROM ALLEN
Selecting the First Cell In a Row
When creating macros, you’ll often have a need to select different cells in the worksheet. Here’s how to select the first …
Discover More
Deriving a Secant and Cosecant
Two rather common trigonometric functions are secants and cosecants. Excel doesn’t provide functions to calculate these, …
Discover More
Setting Spell-Checking Options
Like many things in Word, you can configure the way the spelling checker does its job. If you want to exercise more …
Discover More
More WordTips (menu)
Quickly Removing Table Borders
Insert a table in your document and Word assumes that you want borders around the table and its cells. Here’s a shortcut …
Discover More
Adjusting Table Row Height
When working with tables, you can adjust the height of individual rows. How you go about such adjustments depends on the …
Discover More
Keeping Table Rows Together
When you create a table that extends beyond a single page, you may want to make sure that the information in a table row …
Discover More
How to Rotate Text in Word
Change the text direction in Word
Updated on November 29, 2022
What to Know
- Rotate a text box: Go to Insert > Text Box to create a text box. Select the box and drag the rotation handle to the right or left to rotate.
- Rotate text within a text box: Select Drawing Tools Format > Text Direction and choose either Rotate all text 90° or Rotate all text 270°.
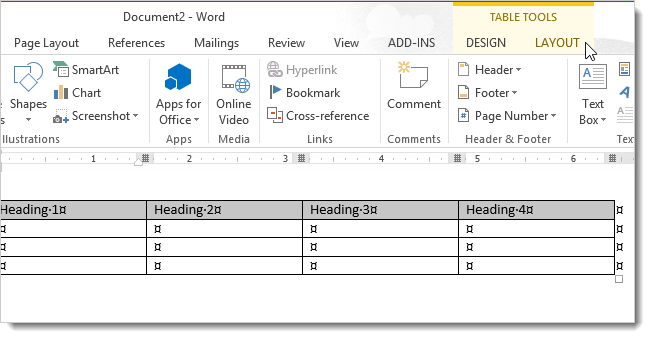
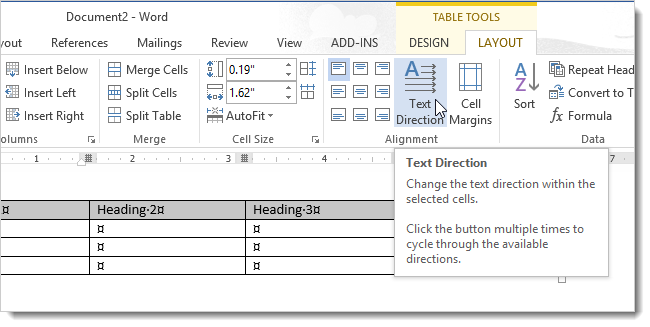
- Change the direction of a table: Go to Insert > Table to create a table. Select a cell, then select Table Tools Layout > Text Direction.
You can use a text box or table in Microsoft Word to orient text in any direction you like. In this guide, we show you how to rotate a text box, how to rotate text within a text box, and how to change the direction of a table in the desktop versions of Microsoft Word for PC or Mac. (This task cannot be done in Word Online or the Word mobile apps.)
How to Rotate a Text Box in Word
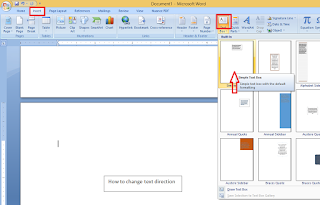
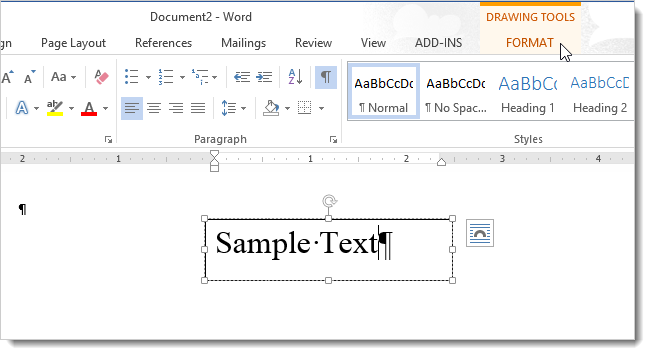
Text boxes make it easy to change the direction of text in word. All you do is create the text box, add some text, and decide how to rotate the text box.
To create a text box, select Insert > Text Box and choose one of the built-in designs. To add text, select the text box and begin typing.
Drag the rotation handle on a text box to rotate the text.
To rotate the text with the rotation handle, select the text box and drag the rotation handle to the right or to the left. Release it when the text is in the direction you want.
To rotate the text box by 15-degree increments, hold Shift while dragging the rotation handle.
To rotate the text box 90 degrees:
- In Word for PC: Select the text box, select Layout > Rotate, and choose either Rotate Right 90° or Rotate Left 90°.
- In Word for Mac: Click the text box, click Shape Format > Arrange > Rotate > Rotate, and choose either Rotate Right 90° or Rotate Left 90°.
Choose a custom rotation angle.
To set a custom rotation angle:
- In Word for PC: Select the text box, select Layout > Rotate, and select More Rotation Options. From the Size tab, change the rotation angle to the angle you need.
- In Word for Mac: Click the text box, click Shape Format > Arrange > Rotate > Rotate, and click More Rotation Options. From the Size tab, change the rotation angle so the text points in the direction you need.
How to Rotate Text in a Text Box
Instead of rotating the text box, you can opt to rotate the text inside the box instead.
You can also rotate text inside a shape.
Choose how to rotate text inside a text box.
To rotate text in a text box, select Drawing Tools Format > Text Direction and choose either Rotate all text 90° or Rotate all text 270°. The text will appear vertically on the page.
To align the text inside a text box, select Drawing Tools Format > Align Text, and align the text with the right side of the text box, the left side, or the center.
How to Change Text Direction in a Table
You can also rotate text inside a table. Rotating text makes it possible to have narrow rows in a table.
To create a table, select Insert > Table and choose a table size.
Change text direction in a Word table.
To change text direction in a table:
-
Select the cell containing the text you want to change direction.
-
To change the text direction, select Table Tools Layout > Text Direction. The text will rotate to the right. Select Text Direction again to rotate the text another 90 degrees.
-
To change the text alignment, choose an Alignment option to change how the text appears in the cell. You can align the text to the center, to the left, to the right, to the bottom, or to the top.
FAQ
-
How do I rotate a picture in Word?
Select the picture you want to rotate, then select and hold the rotation handle that appears just above the picture. While still holding, drag the handle to the left or right to rotate. Note that if you have multiple pictures selected at once, they will all rotate individually.
-
How do I rotate a document in Word?
To rotate a document in Word, select Layout > Orientation, and then choose the page orientation you prefer: Landscape (horizontal) or Portrait (vertical).
-
How do I rotate a single page in Word?
Select the page you want to reorient, then select Page Layout > Page Setup and choose either Portrait or Landscape under Orientation. Then select Apply to > Selected text.
Thanks for letting us know!
Get the Latest Tech News Delivered Every Day
Subscribe
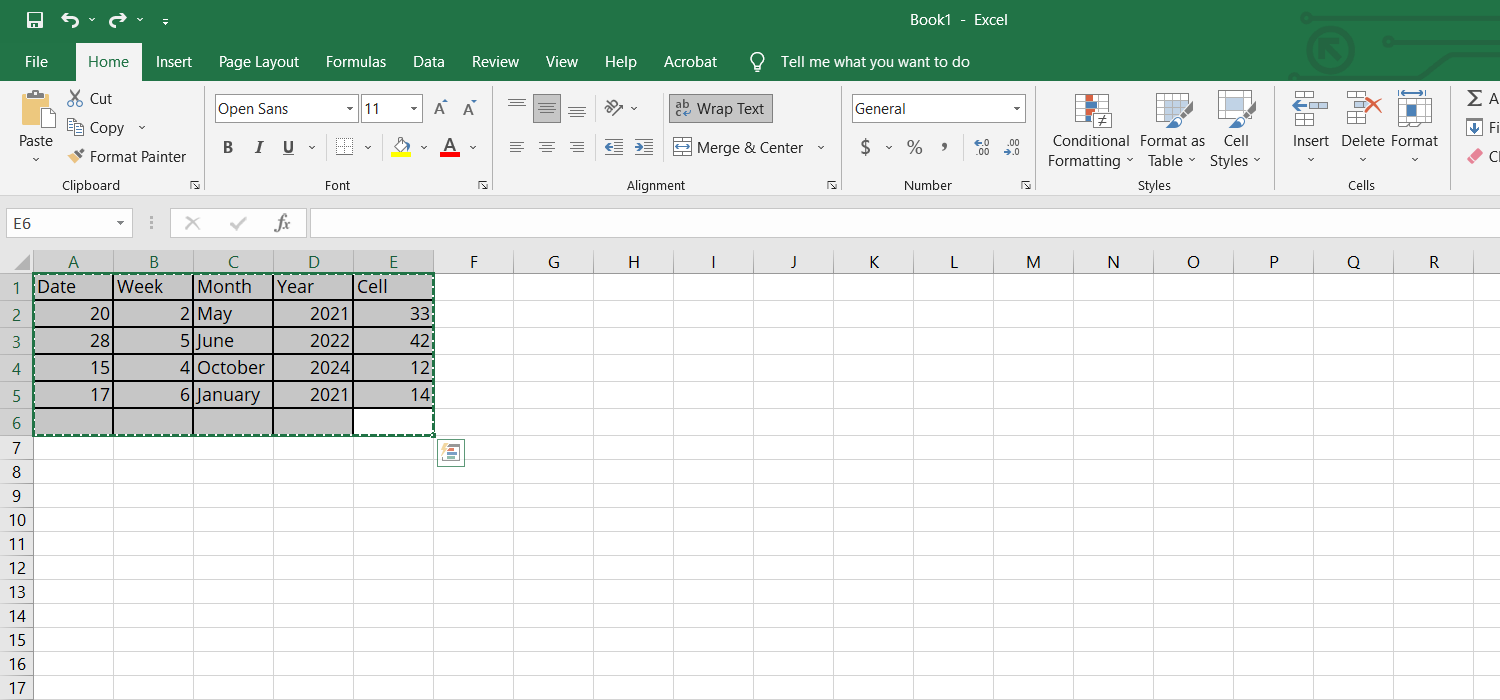
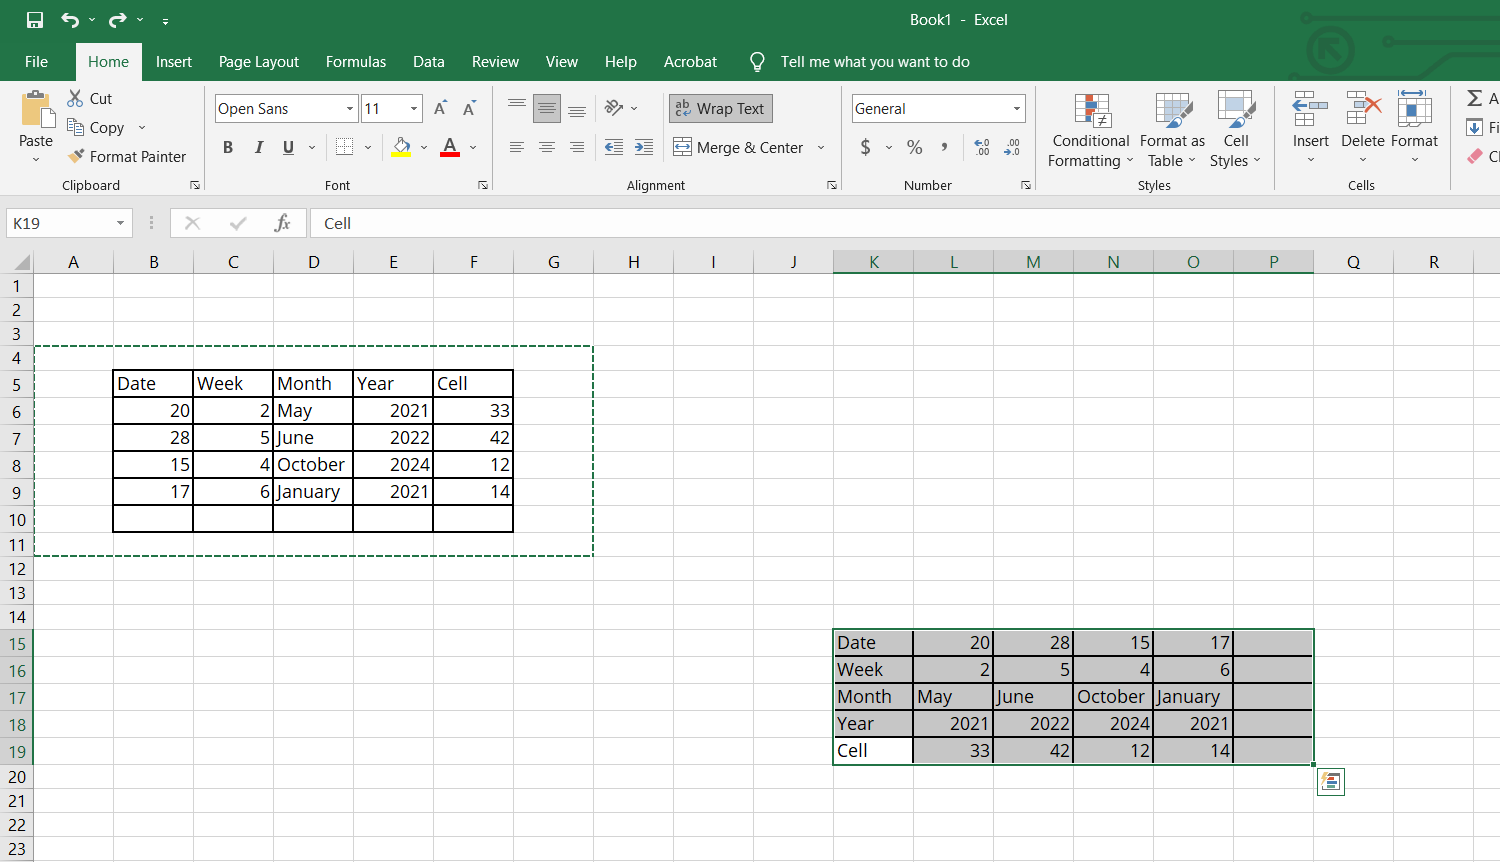
Using tables help make your document look more professional and visually appealing. It makes your text and numbers look neat and well-organized within the main content. Some tables are best presented in a different orientation, especially when it contains a lot of columns.
However, MS Word doesn’t give you a straightforward way to accomplish the task.
Fortunately, we found more than one clever way to get the job done!

Now, there are about three ways to rotate a table in Word.
- Using the Text Direction button
- Using a textbox
- By converting your table into an image
Without any delay, let’s get right to it!
Method 1: Using the Text Direction Button
This method utilizes the text direction feature of MS Word. While it doesn’t literally rotate the table, this method allows you to view it in a different orientation as the words rotate. You’ll have to redo any formatting you’ve done on the table itself to make it look the way it needs to.
Here’s how you can access the Text Direction button.
Step 1: Open up a Word document.
Before we get started, we’ll need to open up an MS Word file with a table in it. Feel free to open a fresh new one. If you’re already working on a document, feel free to use that. Don’t worry about messing up your file, as you can easily revert any unwanted changes.

Step 2: Select the table.
Once your document is ready, select the table by clicking the Move icon at the top right corner of the table.

Step 3: Click the Text Direction button.
Go to the Layout tab under the Table Tools category. Note that this category will only be visible once a table is selected. Now, under the Alignment group, click the Text Direction button. You can click on the button several times to cycle through the available directions.

Voila! You’ve just used the Text Direction button to rotate a table in MS Word.
Method 2: Using a Text Box
In this method, we’ll show you the steps on how to insert a table into a text box. This will easily rotate the table at any angle. You’ll also find this method helpful, especially when you’re handling multiple tables in a document.
Here’s how you can do that!
Step 1: Open up a Word document.
To get started, let’s open up a Word document first. If you already have one open, feel free to use that. Otherwise, you can always create a new one to follow us along the way. Just make sure to insert a table in it.

Step 2: Insert a text box.
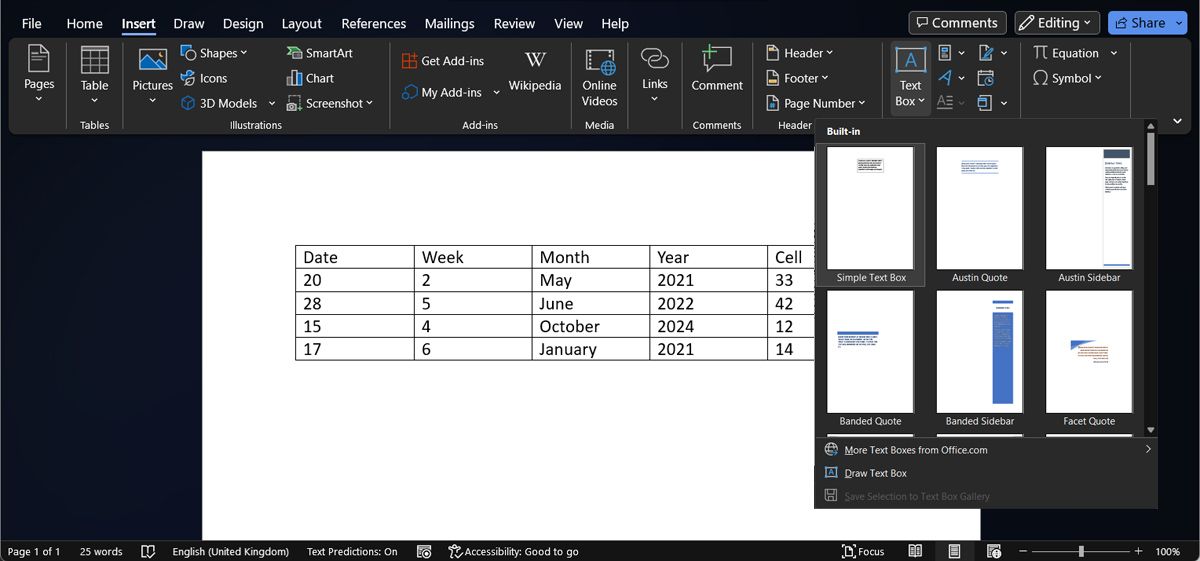
Go to the Insert tab and click the Text Box drop-down menu at the top right of your window. Next, select Simple Text Box from the choices. Now, delete the default text in the text box by hitting the Delete key on your keyboard.

Step 3: Move your table into the text box.
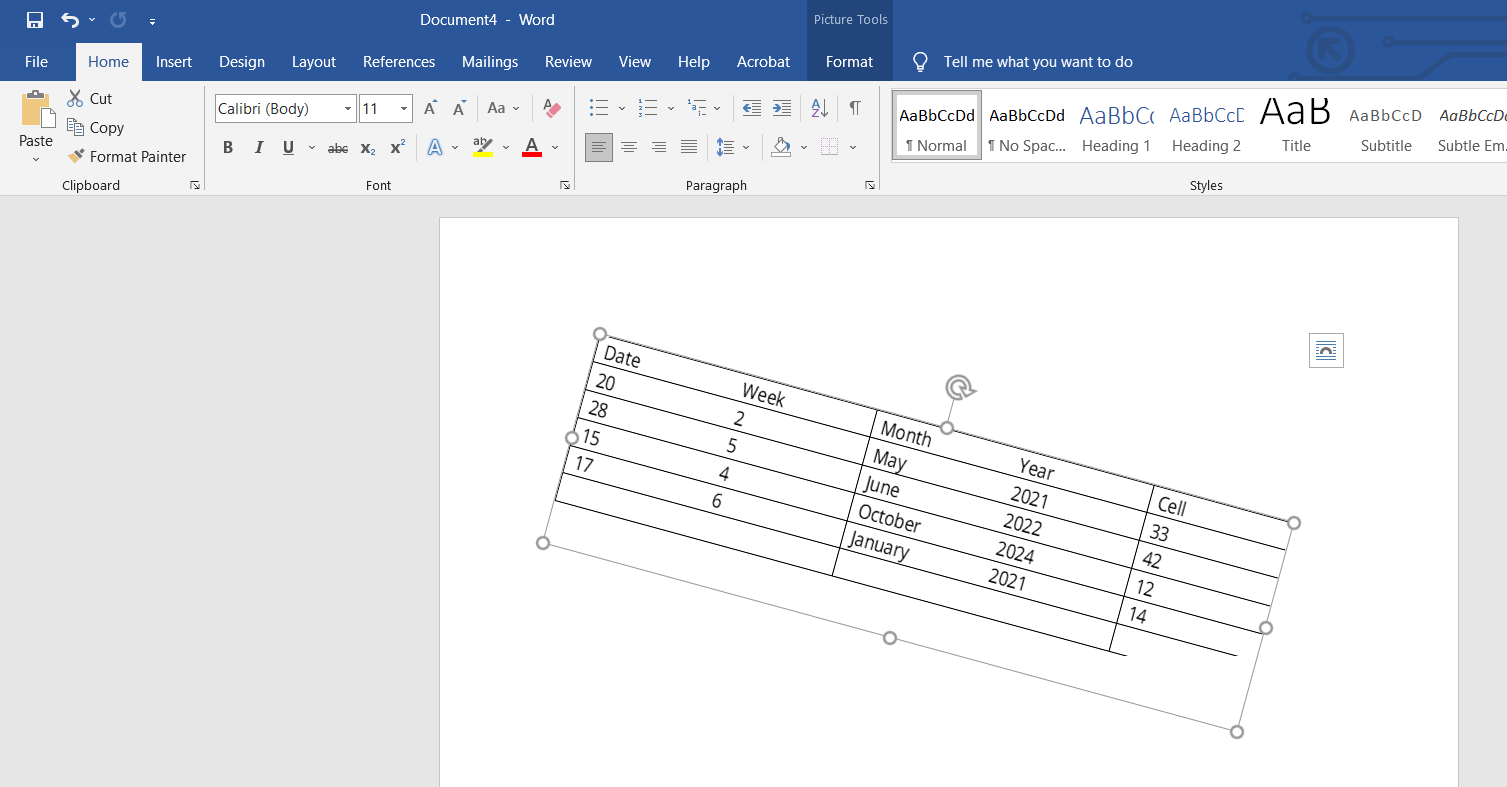
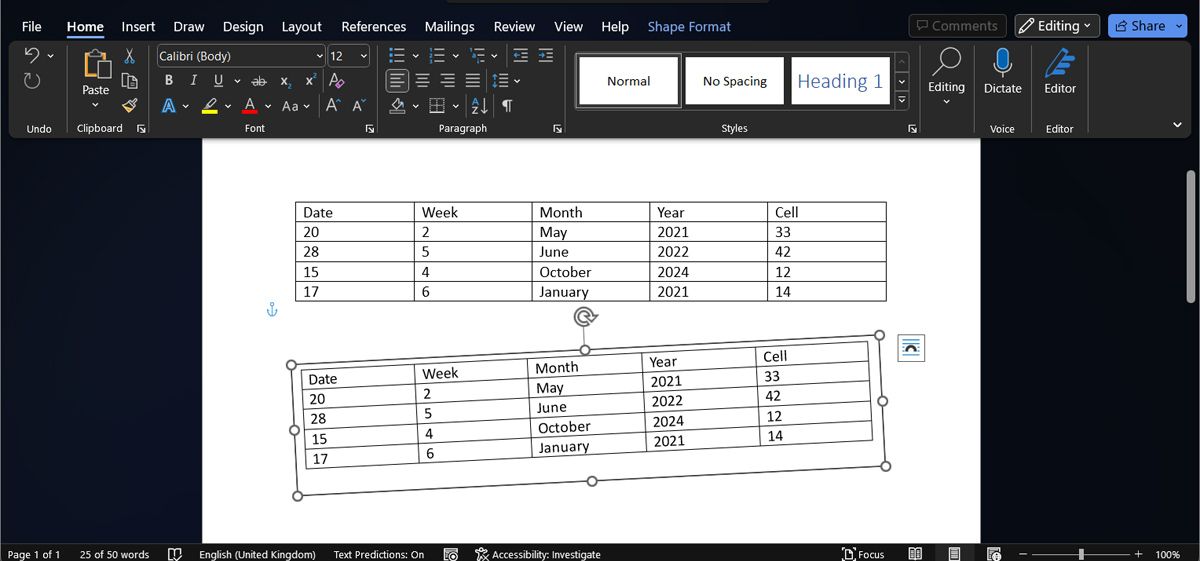
Once we have the text box ready, drag and drop your table in it. Alternatively, you can select the entire table and press CTRL + X keys to cut the table. Then, click inside the text box and press CTRL + V to paste the table.

At this point, you may have noticed that your table gets cut, don’t fret. You’ll have to resize the text box to fit the entire table in. Simply drag the bottom right circle of the text box toward the bottom right corner of your document until the whole table becomes visible.

Step 4: Rotate the text box.
After moving the table into the text box, you’re now ready to rotate it.
Click and hold the Rotate icon at the top center of the text box. Rotate it clockwise or counterclockwise according to your preference.

Voila! You’ve just used a text box to rotate a table in Word.
Method 3: By Converting Your Table into an Image
Images are relatively easy to move around in Word documents. It’s for this reason that you’ll want to convert your table into an image. However, once converted, you won’t be able to edit the contents of your table anymore.
So, if you have no further changes to your table, then let’s dive right in.
Step 1: Open up an MS Word file.
Before anything else, we’ll need to open an MS Word document with a table in it first. Feel free to use your own personal file to follow the steps laid out here. Otherwise, you can always create a new one. Remember to simply press the CTRL + Z keys to easily revert any unwanted changes.

Step 2: Take a snapshot of the table.
To take a screenshot of your table, press the Windows Logo + Shift + S keys on your keyboard. This will launch the Windows 10 Snip & Sketch Tool. Click and drag your mouse from the top left corner of the table to its bottom right. This will highlight your table in a rectangular shape.

Finish the snapshot by letting go of the mouse cursor. A notification will appear at the lower right corner of your window. Click this notification to launch the Snip & Sketch work window and click CTRL + C to copy the snapshot. If you don’t want to recheck anymore, you can simply click CTRL + C without opening the work window.

Step 3: Paste the image.
On your Word document, click on the part of the page where you want the image to be placed. Then, hit the CTRL + V keys on your keyboard to paste the image.
For this example, we’ll paste the image right below our table.

Step 4: Delete the table.
Now that you have your table as an image, you can already delete the original table.
If you think you’ll still need the original table in the future, then cut and paste it onto a new document. Otherwise, select the table by clicking the Move icon found at the top left corner of it. After that, right-click on the table and select Delete Table.

Step 5: Rotate the image.
Finally, click the Rotate icon at the top center of the image. Then, rotate the image clockwise or counterclockwise to suit your needs.

Congratulations! You’ve just rotated a table in Word.
Conclusion
Congratulations! You’ve finally reached the end of this article. We hope we’ve helped figure out how to rotate a table in MS Word. Before you go, here’s a quick recap of what we covered.
In this guide, we’ve presented three different methods to rotate a table in MS Word. One technique employs preset text directions using the Text Direction button. Another makes use of the text box feature while the last one utilizes the image rotation function. Note that the first method can be more cumbersome than the others.
We hope you’ve found this article helpful!
How to Change Text Direction in Table & Text in MS Word
1. Select column or rows in table and right click and navigate on “Text Direction” select orientation type and click “ok”
2. To change direction of text click on “Insert” – “Text Box” and take “Simple Text Box” type your matter in the text box.
3. Select the text box and click on “Text Direction”

Watch video tutorial… Please like, share & subscribe
at
17:08
This article will show you different ways to write text vertically in a Word document. You will be able to change text directions or the orientation of text in Microsoft Word. It is easy to write text vertically in Microsoft Word and Excel. Read the steps of how to create text vertically in Microsoft Word using WordArt or a text box.
Table of contents
- Create text vertically in Word using WordArt
- Write text vertically using a Text box
- Change the text direction in a table
- Rotate text direction of multiple cells in a table
- Align text vertically in Microsoft Word
- Write text vertically in an Excel spreadsheet
- Change the orientation of text
- Conclusion
Create text vertically in Word using WordArt
You can always change the orientation of your text in Microsoft Word by following the steps below.
- First, go to the Insert tab at the top of your Word document
- Go to the Text group in the ribbon > Then click on the WordArt icon

Once you click on the WordArt icon, it will open a selection of different styles. You can click on each one of these 15 A’s.

Click on any letter A > The WordArt box opens in your Word document. Inside the box, it says, Your text here. You may have noticed that the Drawing Tools tab appeared at the top of the document.

Start writing text inside the box. We have written the word; Unbelievable. Now follow the steps below to create text direction vertically in Microsoft Word.

- Click on your text in your WordArt box to open the Drawing Tools tab
- Go to Drawing Tools tab > Format
- Then go to the Text group in the ribbon
- Click on the Text Direction icon > You can select one of these options;
- Horizontal
- Rotate all text 90°
- Rotate all text 270°

If you like to see the preview of these text directions, you can continue with the steps below.
Click on Text Direction Options to see the options.

- It will automatically open the Text Direction – Text Box
- Under Orientation, you can click on one of the three different boxes
- Once you click on it, you can see the preview on the right
- Click OK if you are satisfied with the changes

Your text will automatically change into your chosen position in the text box. This is one of the methods you can use to write text vertically in Microsoft Word.

Write text vertically using a Text box
You can also create text vertically in Microsoft Word using a text box. This is almost the same as the WordArt box. It is easy to open a text box by following the steps below.
- First, go to the Insert tab at the top of your Word document
- Then go to the Text group in the ribbon > Click on the Text Box icon
- Click on the first icon called Simple Text Box

It will insert a simple text box in your Word document. Now you can write text inside the text box.

We have written the same word again; Unbelievable. Once you are finished, you can resize the text box by selecting one of the four bullet points on the edges. Click on one of the text box’s edges and drag it to the left or right to make it smaller. It will change the order of the letters.

If you click on the down-right corner, you should drag it left and down. As the box narrows, it will automatically change the letters to the next line. The picture below shows you how the letters will be stacked under each other.

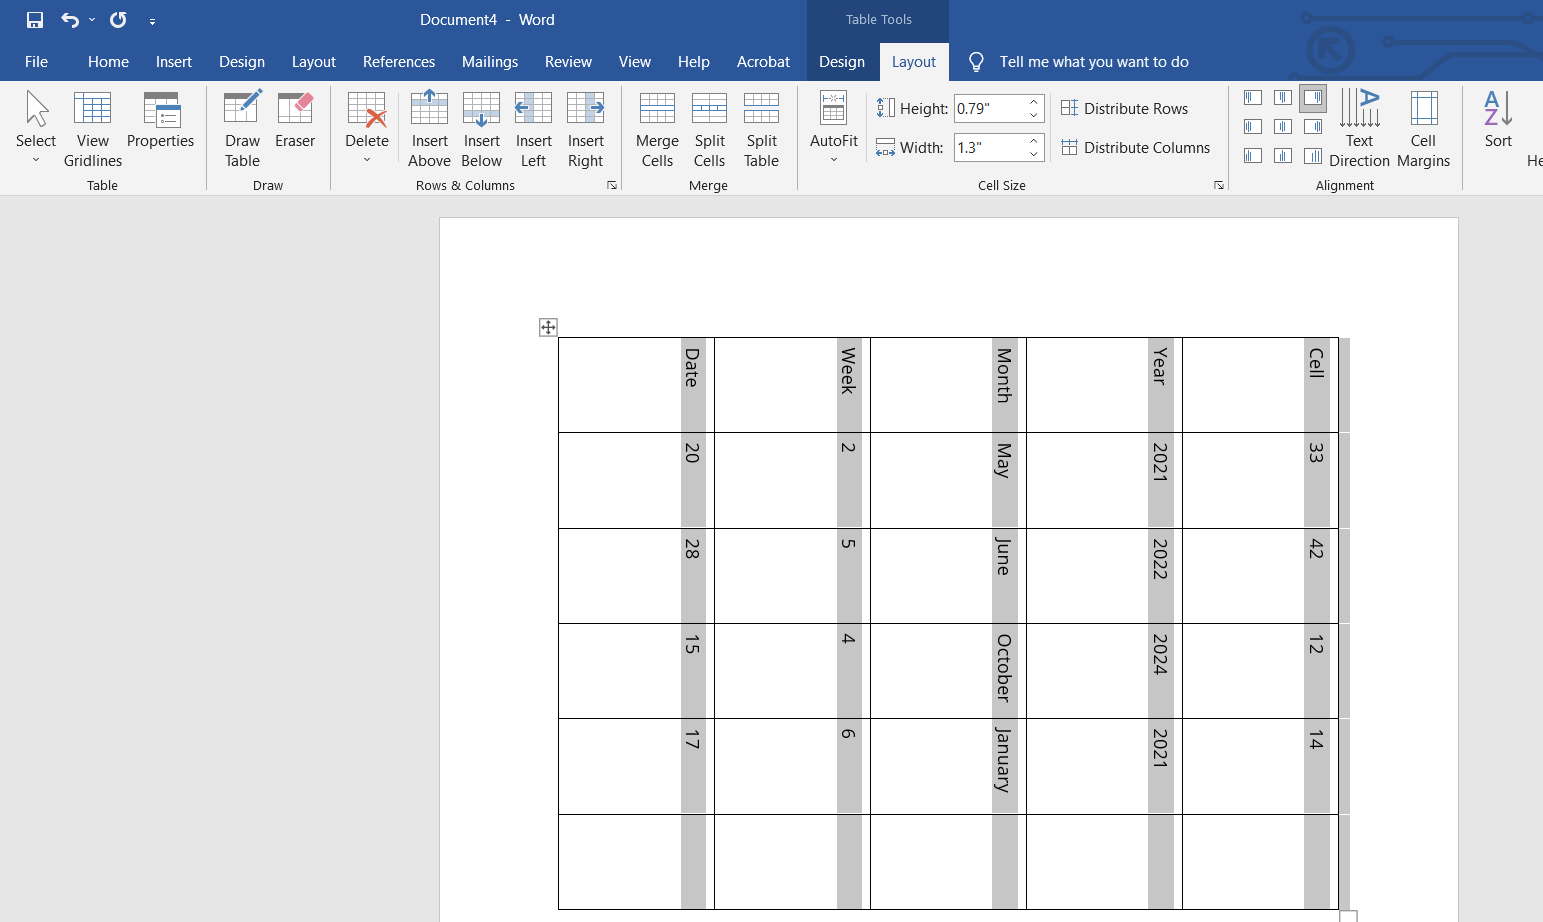
Change the text direction in a table
If you have created a table in your Word document, you can also write text vertically. It can help you to make a table look smaller. Read the steps below to change text directions in a table in Microsoft Word.
Before you start doing anything, you must have inserted a table in your Word document. Read the article on how to insert a table in Microsoft Word if you don’t know it. Once you have inserted a table, you can follow the guidelines below.
- Start by clicking on the cell you want to rotate vertically in your table
- Then go to the Table Tools at the top of the document > Click on Layout
- Go to the Alignment group in the ribbon
- Here you can click on Text Direction > If you keep clicking on the Text Direction icon, the text will change direction
- There are three different options;
- Vertically upwards
- Horizontal
- Vertically downwards

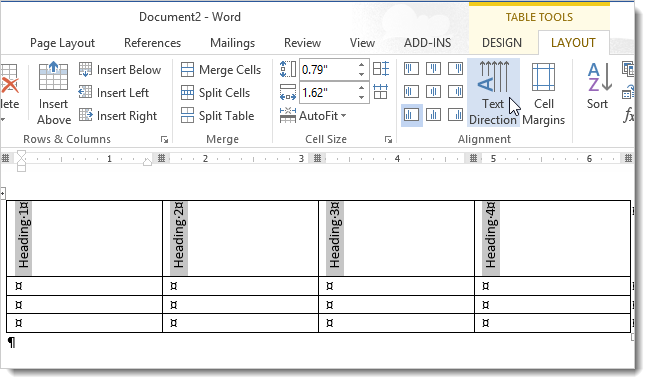
Rotate text direction of multiple cells in a table
If you want to change the text direction of multiple cells, you can do this under the Table Tools tab. Follow the steps below to rotate the text inside a table.
- First, you should select the text of a table.
- Go to the Layout tab under Table Tools.
- Then click on the Text Direction icon in the Alignment group till you are satisfied. If you keep clicking, it will return the text to the original state.
The picture below shows you the steps to change the orientation of the text of multiple cells inside a table in Microsoft Word. You can see that the Text Direction icon is now facing vertically downwards. The small icon next to it shows the text’s alignment, which tells you where to place it in a cell. There are nine options to choose from: top, bottom, left, center, or right in a cell. In our case, it is called Align Top Right.

Align text vertically in Microsoft Word
It is better to align the text after you change the text direction. Luckily, there are nine icons to click on, which you can find in the Alignment ribbon. After you decide on the text direction, you should choose the text alignment. It is divided into three rows, where you can Align Top, Center, or Bottom. Each row is divided into three columns to change text alignment to the Left, Center, or Right of a cell.
The picture below shows you a different direction and alignment of the text. Read the steps to understand how you can easily align text inside a table.
- Select the text in a single cell or multiple cells
- Go to Layout under Table Tools
- Then click on the Text direction until the text is facing vertically upwards
- Thereafter you can click on the small icons on the left of the Text Direction
- Select one of the nine small icons to align the text
- We have chosen Align Center

Write text vertically in an Excel spreadsheet
Excel does have a format option for writing text vertically. Therefore you can try to open an Excel spreadsheet in your Word document.
- Click the Insert tab
- Click on the Table icon
- Select Excel spreadsheet
The picture below shows you how to get there. Thereafter it will automatically insert an Excel spreadsheet into your Word document.

Your Word document will look different as you can write inside the small Excel spreadsheet. The picture below shows the look of your Word document after you inserted the Excel spreadsheet. Now you can see how to write or create text vertically in Microsoft Word with an Excel spreadsheet.

Now you have to open the Format Cells box to write text vertically in Excel. Before you start, you need to write some text in a cell.
- Right-click on the cell that contains the text you want to rotate
- Select Format Cells
- Or use the keyboard shortcut by pressing: Ctrl + 1

It will open the Format Cells box like the picture beneath. You have to make a few changes to change the text vertically.
- First, you have to click on the Alignment tab at the top
- Then go to Orientation on the right
- Click on Text written horizontally
- It will change from the color white to black
- Click OK to confirm the changes

The picture below shows you how to write text vertically with one character on each line in Microsoft Word. Remember that you can follow the same steps if you want to write text vertically in an Excel spreadsheet.

Change the orientation of text
You can also click on the orientation button to rotate your text diagonally or vertically. Open your Word document and insert an Excel spreadsheet. Or you can open an Excel document and follow the same steps. Before you start, you need to write text in a cell in your Excel spreadsheet.
- First, you have to be in the Home tab
- Now, go to the Alignment group in the ribbon > Click on the orientation button
- Select Vertical Text

By default, you can see the cells’ gridlines, which are the gray border lines around the cells. If you print your Word document, you will not see the gray lines on the paper. If you still want to remove the gridlines, you can do this in the Format Cells box.
- Select the entire Excel spreadsheet by clicking on the upper-left corner
- Or double-click inside the Excel spreadsheet to edit
- Then right-click on the selected spreadsheet > Select Format Cells

- It will open the Format Cells box. Go to the Fill tab at the top
- Under Background Color > Select the color white
- Click OK

The vertical text will look like the picture below in Word, with the letters keeping their normal orientation. If you click outside the Excel spreadsheet, you will only see the text written without any lines.

Conclusion
It is easy to write text vertically in Microsoft Word. You can write text vertically in Excel and insert an Excel spreadsheet in your Word document. Then you can click on the orientation button to change the text in Microsoft Word. Using the text direction button under Table Tools in Word, you can rotate text inside a table.
Microsoft Word doesn’t permit changing the direction of normal paragraph text.
However, it does permit you to change the direction of text in case of Tables, shapes, or text boxes. Whether you want to change the text from Vertical to Horizontal or vice versa, it’s possible with shapes and tables.
With that being said, I’ll demonstrate how you can leverage
tables, shapes or text boxes to change text directions in Word.
To change text direction in Word using shapes or text boxes, obey the following instructions.
First insert a rectangular shape or text box that will contain the text. If you don’t know the steps to insert shapes in Word, follow the steps below:
- Click on the Insert tab.
- Click on the Shapes button in the Illustrations group.
- Select and draw the rectangle shape.
This is the shape that will contain the text. Don’t worry if you have a colored shape, I’ll soon show you how to remove the shape border and color shading so that it won’t be visible.

- Right-Click on the rectangle and select Add
Text.

- Now type your text inside the shape.

- To remove the shape color, right-click on it for the shortcut menu. Then Select the Fill drop-down and select No Fill. Alternatively, select the shape and go to Drowing Tool Format tab, under the Shape Style category, select Fill > No Fill.

The remaining steps will now show you how to change the text direction in word.
- The simplest way is to click and drug the rotate icon of the shape. (see screenshot)

For another way to change the text direction in the shape, continue with the steps below.
- Click on the Drawing Tool Format tab
- In the Text group, click on the Text Direction button.

- From the drop-down list, select how you want the
text direction to be. If you don’t like the 90° or 270° rotation, click on the Text
Direction options for more options.

As you change the text direction, the shape size will automatically
scale to accommodate your text. You may have to also adjust the shape afterward
to make the text in the shape more presentable.
NOTE: The above steps can also be used to change text
direction in text boxes in Word.
- Remove the shape color and border.
If you are new to shapes in Word, you might have problem removing the shape border and shading. If the border and shading is ok for you then ignore this step.
To remove the inside shading of the shape, click on the
shape and go to the Drawing Tool Format tab. In the shapes style group,
click on Shape Fill and select No Fill.

This will remove the color shading inside the shape.
In this case, you should change the text color in the shape
to black. White text may become invisible on a white background.
Change text direction in Word using Tables
Text in a table must not always flow from left to right.
So, to change the text direction in in a table, obey the instructions
below:
- Click inside the cell containing the text you want to change direction.
- If you want to change the text direction of a group of cells, select this group of cells by clicking and dragging over the cells.

- Click on the Table Tools Layout tab.
- In the Alignment group, click on the Text Direction button.

- Each time you click on the Text Direction button, the text changes direction by 90 degrees.

- Keep on clicking on this button until you are
pleased with the text direction.
As you change the text direction, the cell size will automatically
scale to accommodate your text. You may have to also adjust the rows and
columns afterward to make your table fit to be seen.
Want to rotate a table in Word? It’s easier than you think! Check out these simple steps to learn how to rotate tables and present data in new ways.

Microsoft Word is one of the best productivity apps available. Word allows you to do a lot of things. But, when it comes to rotating tables, it isn’t a walk in the park. In this article, you will learn how to rotate any table within Microsoft Word. Read on to find out.
How to Create a Table in Microsoft Word
Before we go ahead to rotate a table, we’ll show you how to create one in Word if you haven’t already. To create a table in Word:
- Open Microsoft Word on your PC, and select Blank document to create a new document.
- Select Insert menu from the menu toolbar > Insert Table.
- Enter the number of rows and columns your table should have and tap OK.
- Alternatively, move the cursor over the table structure provided to select the table rows and columns, and left-click to insert the table.
You should now have a table ready. If not, check out our tips on how to create perfect tables in Microsoft Word. And if you need to create more complicated tables, use Microsoft Word’s Draw Table feature instead.
How to Rotate a Table in Microsoft Word
Once you have your table ready, there are three ways to rotate the table in Word. But none of these methods are official ways of changing table orientation in Word.
1. By Changing the Text Direction
One easy way to rotate your table in Word is by using the built-in Text Direction feature. It’s not an official way of changing table orientation, but it can be an easy way if you want to flip your table.
- Select the entire table by moving the cursor over it and hitting the four-fold arrow that shows up on the top.

- Choose the Layout tab from the top menu bar.

- Tap Text Direction from the tools bar. Word will rotate all the table text 90 degrees clockwise. Another tap on Text Direction will flip the text from 90 degrees to 180 degrees, and so on.


As you may have noticed, Text Direction doesn’t give you full autonomy on which angles your table should be rotated. Additionally, it doesn’t rotate the table itself, but only the text within it.
To get full autonomy, we’ll have to use a workaround. That brings us to method number two.
2. Converting a Table to an Image
Unlike the text direction method, the image method will give you a lot more freedom to rotate your table. The major problem with this method is that you cannot edit the table once you convert it to an image.
- Open your Word document with a table.
- Select the entire table by moving the cursor on top of it and tapping the four-fold arrow button.
- Right-click anywhere on the table and select copy. Alternatively, you can use Ctrl + C for Windows or Cmd + C for Mac to copy the table. Here is a comprehensive list of Microsoft Word shortcuts.
- Delete the original table.
- Tap the same spot on the document where the original table was located.
- Right-click and select Picture (shown as a clipboard with an image) under Paste Options.

The table will now be pasted as an image. With an image table, it’s pretty easy to rotate the way you want.
- Tap the image to select, and place your cursor above the rotate icon on top of the table.

- Hold the left-click button on the mouse, then move your table around to rotate it to your preferred orientation.
Once you turn the table into an image and rotate it, you can stop the image from moving around your Word document, no matter how you edit it.
3. Using a Text Box
Turning your table into an image is an easy way to rotate it, but you no longer can edit the content of the table. To keep the content editable, while rotating the table, you could use a Text Box. Here’s how you can do it:
- Open the Insert tab.
- From the Text section, select Text Box > Simple Text Box.

- Place the Text Box and delete its text.
- Cut or copy the table and paste it inside the text box.
- Readjust the text box size so it doesn’t cut any part of the table.
- Use the handle to rotate it.
4. Using Microsoft Excel
If you use Word, high chances are you also use Excel. So, in the third and final method, we use Excel to help rotate your table in Word.
- Copy your table in Microsoft Word.
- Open Microsoft Excel, and create a new document by selecting Blank Workbook.
- Paste your table by using Ctrl + V or Cmd + V.

- Copy your pasted table in Excel.
- Click in an empty cell and right-click. A pop-up menu will appear.
- Select Transpose under Paste Options. If you can’t find the transpose option under Paste Options, go to Paste Special > Transpose.

The transpose option will rotate the table from portrait to landscape mode.

- Next, copy the transposed table and paste it inside your Word document.

If you often have to copy data from other apps, you should take a look at our guide on how to import data into Microsoft Word.
Transform Your Tables in Word
If you want to rotate your tables in Microsoft Word, this tutorial has you covered. Depending on what you want to do, you can choose one of the three methods. The Excel trick only turns your tables into landscape orientation, but you get more freedom by using the image option.
But if you want the possibility to edit the table after rotating it, you should insert a text box. Hopefully, Microsoft Word will add a native option to rotate tables, which should make the process a lot easier and help you put together professional Microsoft Word documents.

There may be times when you want to change the direction of text in Word. This is easily done using text boxes or shapes or using cells in a table. We will show you both methods for changing the direction of text.
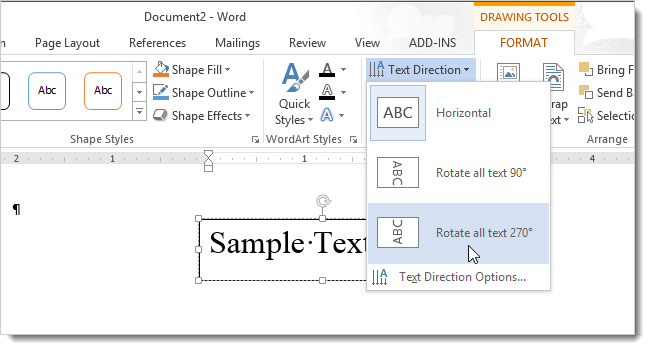
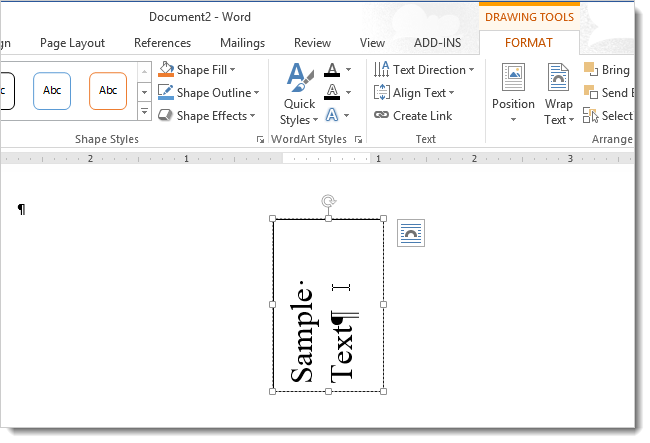
Change the Direction of Text in a Text Box or Shape
To change the direction of text using a text box or shape, insert a text box using the Text Box tool in the Text section of the Insert tab or a shape using the Shapes tool in the Illustrations section of the Insert tab. Enter text into the text box or shape. Make sure the text box or shape is selected and click the Format tab under Drawing Tools.

In the Text section of the Format tab, click Text Direction and select an option to rotate the text. Symbols next to the options show you how the text will display after applying each option.
The text is rotated and the text box is reshaped accordingly.
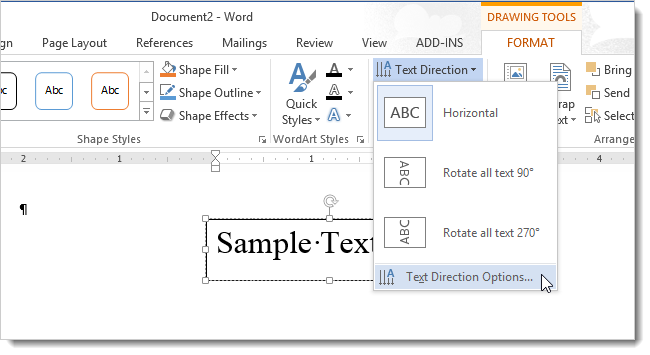
You can also select Text Direction Options from the Text Direction drop-down menu to rotate text.
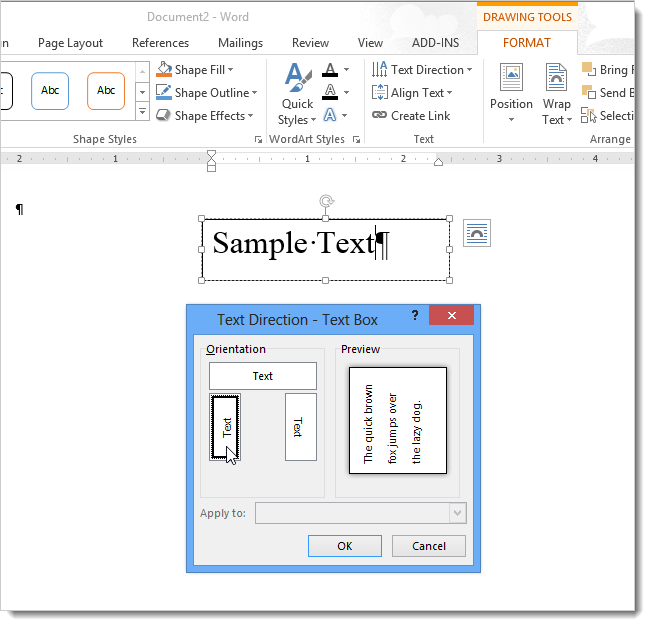
Select an Orientation on the Text Direction dialog box. A Preview displays on the right side of the dialog box. Click OK to accept your selection.
Change the Direction of Text in Table Cells
You can also change the direction of text in one or more table cells. To do so, select the cells for which you want to change the text direction and click the Layout tab under Table Tools.
Click Text Direction in the Alignment section of the Layout tab.
Each time you click Text Direction, a different direction is applied. Keep clicking the button until the desired direction is applied.
You can also right click on the selected text in the table cells and select Text Direction from the popup menu to change text direction in a table.
READ NEXT
- › How to Get a Refund on the PlayStation Store
- › The New Winamp Is Here, but It’s Not What You’d Expect
- › Android’s Nearby Share Has (Unofficially) Arrived on Mac
- › Discord Direct Message Won’t Go Away? Here’s the Fix
- › Save Hundreds on Elegoo’s New PHECDA Laser Engraver Through Kickstarter
- › Windows 11 Has a New Photo Gallery in the File Explorer
How-To Geek is where you turn when you want experts to explain technology. Since we launched in 2006, our articles have been read billions of times. Want to know more?
На чтение 2 мин Опубликовано 21.07.2015
Иногда при работе в Word нужно изменить направление текста. Это делается либо с помощью текстовых полей или фигур, либо ячеек таблицы. Мы покажем Вам оба способа.
Изменяем направление текста в текстовом поле или фигуре
Вы можете изменить направление текста в текстовом поле или фигуре. Для этого вставьте текстовое поле при помощи инструмента Text Box (Текстовое поле), который находится в разделе Text (Текст) на вкладке Insert (Вставка). Фигуру можно вставить, воспользовавшись инструментом Shapes (Фигуры) в разделе Illustrations (Иллюстрации) на этой же вкладке. Введите текст в текстовое поле или фигуру. Убедитесь, что текстовое поле или фигура выделены и перейдите на вкладку Drawing Tools / Format (Средства рисования / Формат).
В разделе Text (Текст) вкладки Format (Формат) кликните Text Direction (Направление текста) и выберите нужный вариант поворота текста. Картинки справа от названий команд демонстрируют, как будет выглядеть текст, если выбрать тот или иной вариант поворота.
Теперь текст повёрнут и текстовое поле изменило свою форму соответствующим образом:
Кроме этого, настроить поворот текста можно, выбрав пункт Text Direction Options (Направление текста) из выпадающего меню Text Direction (Направление текста).
В появившемся диалоговом окне в разделе Orientation (Ориентация) представлены возможные варианты поворота текста. В разделе Preview (Образец), в правой части диалогового окна, показан результат поворота. Выберите подходящий вариант и нажмите ОК.
Изменяем направление текста в ячейках таблицы
Вы также можете изменить направление текста в одной или нескольких ячейках таблицы. Для этого выделите ячейки, в которых нужно изменить направление текста, и перейдите на вкладку Table Tools / Layout (Работа с таблицами / Макет).
В разделе Alignment (Выравнивание) нажмите кнопку Text Direction (Направление текста).
При каждом нажатии данной кнопки применяется новое направление текста. Нажмите на неё несколько раз, чтобы выбрать нужное.
Ещё один способ настроить нужное направление для текста в таблице – кликнуть правой кнопкой мыши выделенный текст непосредственно в таблице и выбрать пункт Text Direction (Направление текста) в появившемся контекстном меню.
Оцените качество статьи. Нам важно ваше мнение: