
Align text horizontally
-
In the text box, select the text that you want to change the horizontal alignment for.
-
On the Home tab, click the alignment option that you want
 .
.
 .
.Align text vertically
You can align all the text in a text box with the top, middle, or bottom of the text box.
-
Click the outer edge of the text box to select it.
-
On the Shape Format tab, click Format Pane.
-
Click the Shape Options tab if it isn’t already selected.
-
Click the text box icon
, and then click Text Box. -
Choose Top, Middle, or Bottom from the Vertical alignment drop-down list.
 , and then click Text Box.
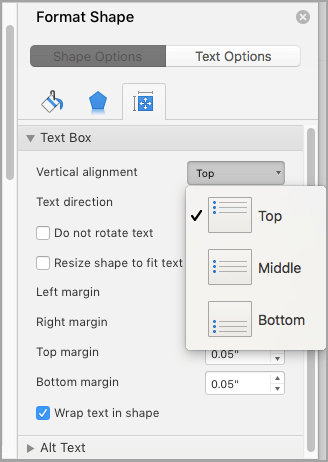
Adjust the text box margins
-
Click the outer edge of the text box to select it.
-
On the Shape Format tab, click Format Pane.
-
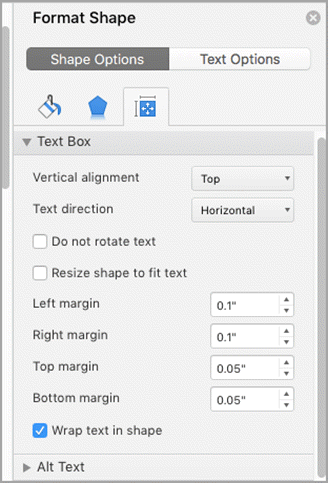
Click the Shape Options tab if it isn’t already selected.
-
Click the text box icon
, and then click Text Box. -
You can adjust the left, right, top, and bottom margins.
Important:
Office for Mac 2011 is no longer supported. Upgrade to Microsoft 365 to work anywhere from any device and continue to receive support.
Upgrade now
Align text horizontally
-
In the text box, select the text that you want to change the horizontal alignment for.
-
On the Home tab, under Paragraph, click the alignment option that you want
.
Align text vertically
You can align all the text in a text box with the top, middle, or bottom of the text box.
-
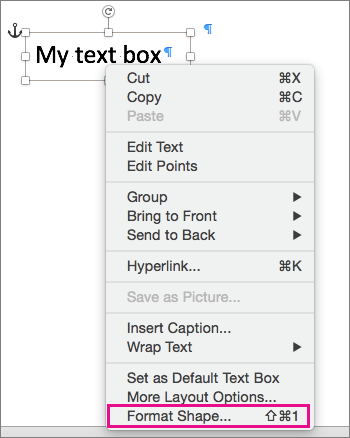
Click the outer edge of the text box to select it.
-
Click the Format tab (the purple contextual tab that appears next to the Home tab), and then under Text Box, click Change text alignment within the text box
. -
Click the alignment option that you want.
 .
.Adjust the text box margins
-
Click the outer edge of the text box to select it.
-
On the Format menu, click Shape.
-
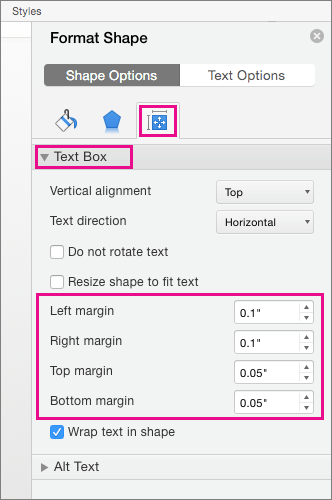
In the left pane of the Format Shape dialog box, click Text Box.
-
Under Internal Margin, adjust the measurements to increase or decrease the distance between the text and the outer border of the text box.
Publisher for Microsoft 365 Publisher 2021 Publisher 2019 Publisher 2016 Publisher 2013 Publisher 2010 Publisher 2007 More…Less
-
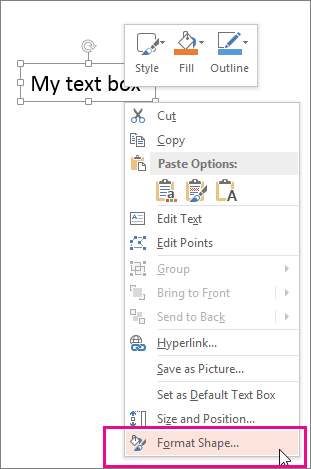
Right-click the selection rectangle of the shape or text box you want to change.
-
On the shortcut menu, click Format <object type>, and then click the Text Box tab.
-
Under Text Box Margins, adjust the measurements to increase or decrease the distance between the text and the outer border of the text box or a shape.
Note: You cannot make rounded margins. To place text in a rounded shape, use AutoShapes.
Need more help?
Want more options?
Explore subscription benefits, browse training courses, learn how to secure your device, and more.
Communities help you ask and answer questions, give feedback, and hear from experts with rich knowledge.
In our tutorials, there are articles introducing the method to insert, remove, position text box and extract text from text box. This article is going to give the documentation of how to set the internal margin for textbox with the position and line style settings included using Spire.Doc.
Note: before start, please download the latest version of Spire.Doc and add the .dll in the bin folder as the reference of Visual Studio.
Step 1: Create a Word document and add a section.
            Document document = new Document();
            Section sec = document.AddSection();
Step 2: Add a text box and append sample text.
            TextBox TB = document.Sections[0].AddParagraph().AppendTextBox(310, 90);
            Paragraph para = TB.Body.AddParagraph();
            TextRange TR = para.AppendText("Using Spire.Doc, developers will find a simple and effective method to endow their applications with rich MS Word features. ");
            TR.CharacterFormat.FontName = "Cambria ";
            TR.CharacterFormat.FontSize = 13;
Step 3: Set exact position for the text box.
            TB.Format.HorizontalOrigin = HorizontalOrigin.Page;
            TB.Format.HorizontalPosition = 80;
            TB.Format.VerticalOrigin = VerticalOrigin.Page;
            TB.Format.VerticalPosition = 100;
Step 4: Set line style for the text box.
            TB.Format.LineStyle = TextBoxLineStyle.Double;
            TB.Format.LineColor = Color.CornflowerBlue;
            TB.Format.LineDashing = LineDashing.DashDotDot;
            TB.Format.LineWidth = 5;
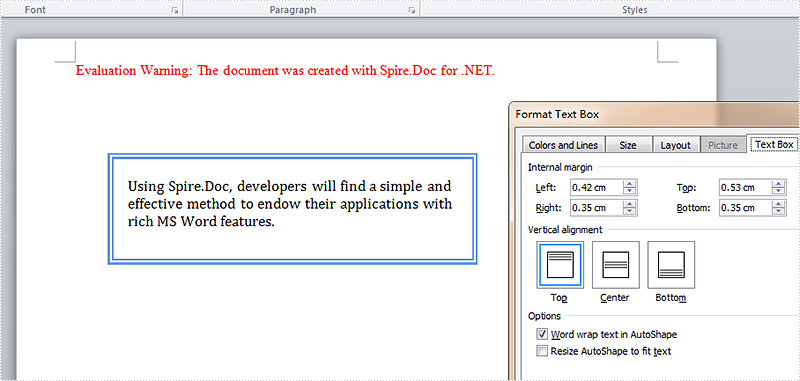
Step 5: Set internal margin for the text box:
            TB.Format.InternalMargin.Top = 15;
            TB.Format.InternalMargin.Bottom = 10;
            TB.Format.InternalMargin.Left = 12;
            TB.Format.InternalMargin.Right = 10;
Step 6: Save the document and launch to see effects.
            document.SaveToFile("result.docx",FileFormat.docx2013);
            System.Diagnostics.Process.Start("result.docx");
Effects:
Full Codes:
using System;
using System.Collections.Generic;
using System.Linq;
using System.Text;
using Spire.Doc;
using Spire.Doc.Documents;
using Spire.Doc.Fields;
using System.Drawing;

namespace Demo
{
    class Program
    {
        static void Main(string[] args)
        {

            Document document = new Document();
            Section sec = document.AddSection();

            TextBox TB = document.Sections[0].AddParagraph().AppendTextBox(310, 90);
            Paragraph para = TB.Body.AddParagraph();
            TextRange TR = para.AppendText("Using Spire.Doc, developers will find a simple and effective method to endow their applications with rich MS Word features. ");
            TR.CharacterFormat.FontName = "Cambria ";
            TR.CharacterFormat.FontSize = 13;

            TB.Format.HorizontalOrigin = HorizontalOrigin.Page;
            TB.Format.HorizontalPosition = 80;
            TB.Format.VerticalOrigin = VerticalOrigin.Page;
            TB.Format.VerticalPosition = 100;

            TB.Format.LineStyle = TextBoxLineStyle.Double;
            TB.Format.LineColor = Color.CornflowerBlue;
            TB.Format.LineDashing = LineDashing.DashDotDot;
            TB.Format.LineWidth = 5;

            TB.Format.InternalMargin.Top = 15;
            TB.Format.InternalMargin.Bottom = 10;
            TB.Format.InternalMargin.Left = 12;
            TB.Format.InternalMargin.Right = 10;

            document.SaveToFile("result.docx",FileFormat.docx2013);
            System.Diagnostics.Process.Start("result.docx");
        }
    }
}
Gus Porteners
-
#1
Is it possible to set the default margins of the textbox to zero?
I use unlined text boxes a lot and find it a chore to every time having to
set the margins to zero.
Here is hoping….
Gus Porteners
Advertisements
pre
-
#2
Try this one:
With ActiveDocument.Shapes.AddShape(msoShapeRectangle, _
40, 100, 250, 140).TextFrame
.TextRange.Text = «Here is some text»
.MarginBottom = 0
.MarginLeft = 10
.MarginRight = 0
.MarginTop = 10
End With
pre
Suzanne S. Barnhill
-
#3
This is worth a try.
1. In a new document, insert a text box.
2. Right-click and Format Text Box.
3. Change the margins. Do not make any other changes. OK out.
4. Right-click and choose Set AutoShape Defaults.
This *may* work. To set this default for all new documents, you’d need to
make this change in Normal.dot. For tips on finding and opening Normal.dot,
see
http://www.mvps.org/word/FAQs/AppErrors/BlankDocNotBlank.htm
—
Suzanne S. Barnhill
Microsoft MVP (Word)
Words into Type
Fairhope, Alabama USA
Word MVP FAQ site: http://www.mvps.org/word
Email cannot be acknowledged; please post all follow-ups to the newsgroup so
all may benefit.
Gus Porteners
-
#4
Thank You Suzanne. It works a treat and will be a great timesaver for me.
Gus
Advertisements
Gus Porteners
-
#5
Many thanks for the prompt reply.
I tried Suzanne Barnhill’s suggestion and it works a treat.
I’ll keep your solution up my sleeve!
Gus
Want to reply to this thread or ask your own question?
You’ll need to choose a username for the site, which only take a couple of moments. After that, you can post your question and our members will help you out.
Ask a Question
Note: If you’re looking for information about setting page margins in Office programs, see the related links below.
-
Right-click the border of the shape or text box you want to adjust the margin for and then click Format Shape.
-
Click the Size & Properties icon (Layout & Properties in Word)
, and then click Text Box. -
In the box for each margin, click the down arrow to decrease the distance. The change is applied immediately, so you can tell when you’ve got it right.
 , and then click Text Box.
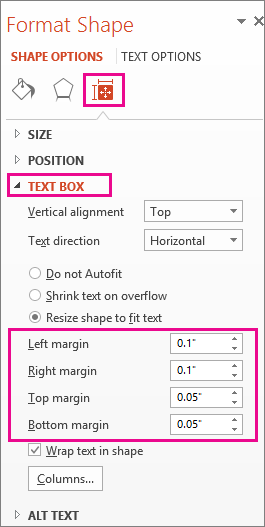
Tip: In PowerPoint, you can reduce the size of the text to fit it into the shape or text box by clicking Shrink text on overflow.
For more information about text boxes
Add, copy, or delete a text box
Set text direction and position in a shape or text box in Word
Change the colors in a text box or shape
Remove or change the border on a text box or shape
For information about page margins
-
Word
-
PowerPoint
-
Excel
-
Publisher
Top of Page
-
Ctrl+Click the border of the shape or text box you want to adjust the margin for, and then click Format Shape.
-
On the Shape Options tab, click the Layout & Properties icon and then click Text Box.
-
In the box for each margin, click the down arrow to decrease the distance. The change is applied immediately, so you can tell when you’ve got it right.
Office Online doesn’t support the ability to edit margins in shapes and text boxes.
Achieve more control and flexibility with your documents
Updated on September 11, 2022
What to Know
- Select Insert > Text Box > choose a text box template. Select and drag box to the position you want.
- To resize text, select and drag circles around the edge. To rotate text, select and drag the circular arrow.
- Place the cursor inside the text box and type the information you want to appear.
This article explains how to use text boxes in Microsoft Word. Instructions apply to Word for Microsoft 365, Word 2019, Word 2016, and Word 2013.
How to Insert a Text Box in Word
Start by opening the document you want to add a text box to. Then follow the steps below.
-
On the ribbon, select Insert.
-
In the Text group, select Text Box, then choose a text box template.
-
The new text box appears in the middle of the text, and the Shape Format tab is automatically selected.
-
Select and drag the box to the position you want. To resize the text box, select and drag the circles around the edge. To rotate the text box, select and drag the circular arrow at the top of the box.
-
Place the cursor inside the text box and type the information you want to appear there.
Why Use Text Boxes?
When you type text in Microsoft Word, you have options for making it look a particular way on the page (such as changing the page margins), but those options are limited. Text boxes expand your formatting repertoire by offering additional control and flexibility for how your text appears. You can place a text box anywhere within a document and format it with different colors and fonts. This feature is especially helpful for creating a blockquote or a sidebar.
Customize a Text Box
After you create a text box, you can customize it in a number of ways.
-
To bring up options, place the cursor inside the text box and right-click. Choose an option and follow the screen prompts to add a border, change the style, or adjust the way the text box interacts with the other text on the page.
Alternatively, use the controls on the Shape Format tab.
-
To go directly to the Layout Options menu, select the text box, then select the Layout Options icon (it looks like a horseshoe and is located to the right of the text box).
-
Change the text, make more adjustments, or move the box to another location at any time. To delete a text box, select its border, then press Delete on the keyboard.
Thanks for letting us know!
Get the Latest Tech News Delivered Every Day
Subscribe
Microsoft Word is characterized by the offer of a large number of tools that will help you enrich your texts in different ways . This is how you will also have the opportunity to include text boxes in your spreadsheet.
In general, areas of texts are mainly used for quote a document or to capture an important summary on a specific point of it. In addition, these elements can be placed anywhere on the sheet in a very simple way.
It is important that when insertion of these elements in the text , they have a correct configuration , in terms of alignment of text and marges of the box. This is why below we will you learn how to do this configuration quickly and easily , for this, follow in detail everything that we will explain in the post.
What are the alignment and interior margins of a text box?
In each text document, there must be a alignment and an inner and outer margin, these are the factors that will take care of donner to the text an order correct for its design . In the case of internal margins, it is the transparent space that exists between the element and the border. This space can be defined even if element has no border .
While alignments in the text , they are also very important and constantly used. Therefore, in the case of Microsoft Word, you can find out what the horizontal alignment , which includes alignment left, center, alignment right and justify, and that you will always find in word ribbon .
In the case of vertical alignment , what very few users know , it is split the text between what is the top and bottom margin , and which is generally reflected in book and document covers where the title must have lower and upper vertical alignment .
Therefore, these are very important functions in any text, because they are responsible for configure the page and maintain the order of all the elements that appear on it, and who can not only be added to text , but also other elements such as images, shapes, a text box , Among others.
Taking into account the meaning of these functions and their goals , we will explain here what are the main steps to set up alignment and margins in a text box in Microsoft Word.
To do this, follow in detail each of the methods that we will explain to you below:
Put vertical text
In case you want configure vertical text alignment , you can do it very quickly and easily. Keep in mind that with this function you will be in able to define whether you want the text to be at the top, center or bottom of the text box.
To apply this function, perform each of the steps that we will teach you below:
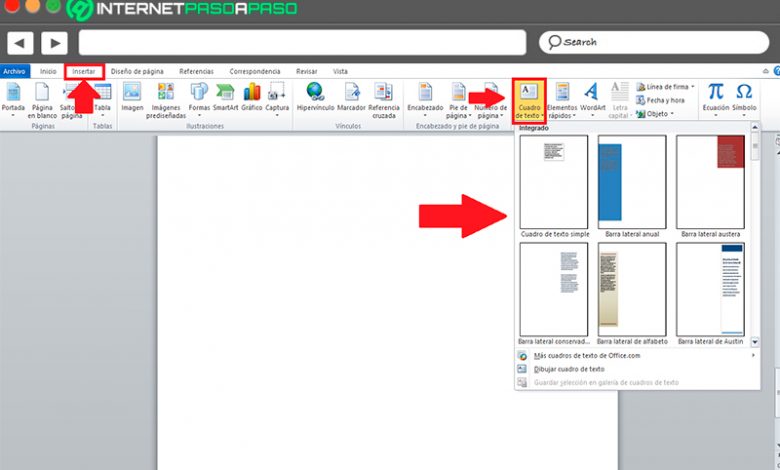
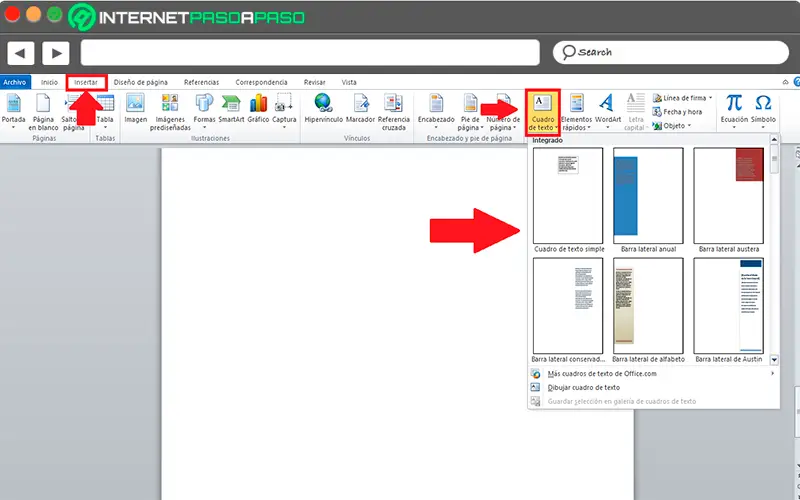
- The first thing to do is to apply the «Text zone» in your spreadsheet, for that you have to go to the «Ribbon» and select the tab there «Insert».
- Now in the section «Text», you will find the option «Text zone», here you have to click on it.
- Then different table models will appear , in that case, select the one you like the most and that matches your needs.
- Once you have selected the desired box , it will appear as follows in your spreadsheet .
«UPDATE ✅ Do you want to know how to configure text alignment and text box margins in Microsoft Word? ⭐ ENTER HERE ⭐ and learn everything »
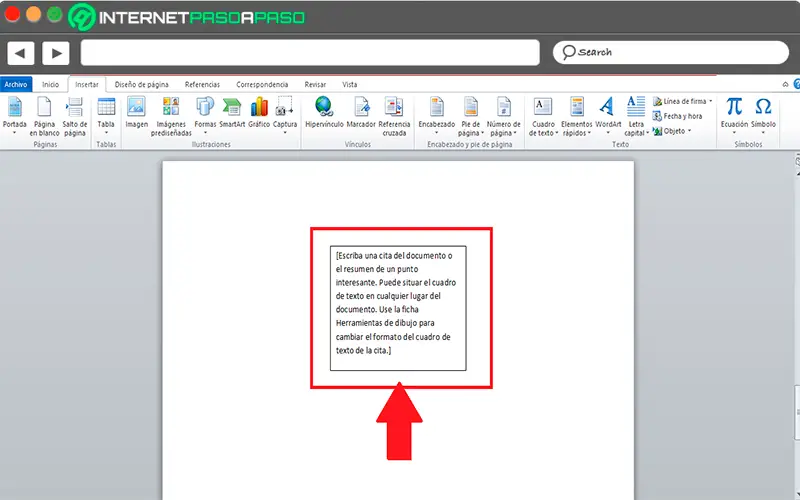
- The next thing will be to to select by clicking on it. Now in the one of the corners of the box, right click and in the options menu that appears, select «Format of the form».
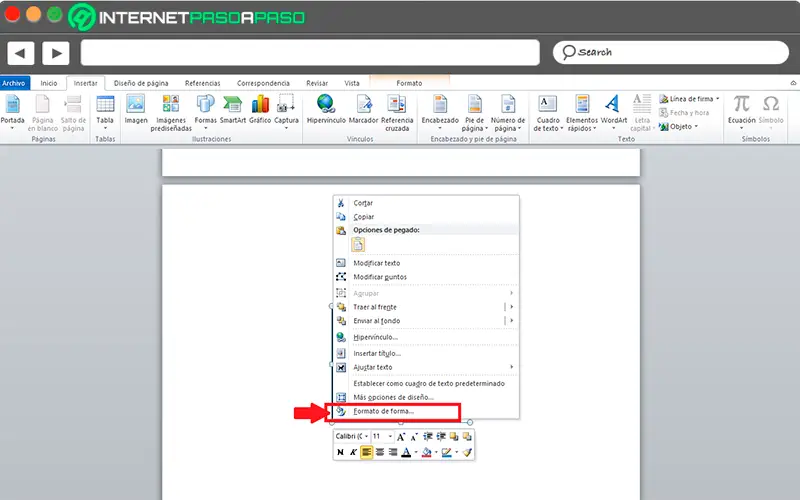
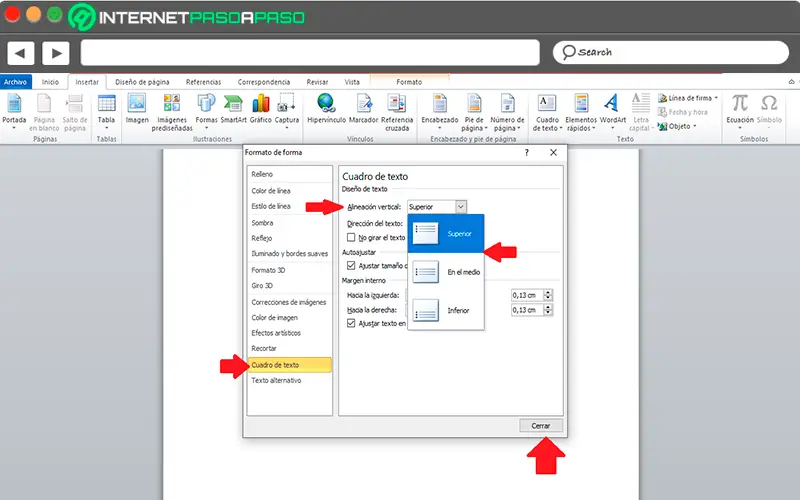
- Here a new window will open where you will find different options , in this case you must select the element « Zone of text».
- Now in the right part of the window you will find the section «Text design» and the options available for text alignment . Here you have to select the «Vertical Alignment» section.
- There you will see how a menu is displayed with three options «Top», «In the middle» and «Bottom», in this case, select the location you want and click on «To close».
- That way you can align text vertically which is in your text box in Word .
Put horizontal text
If you want align the text horizontally, the process will be much simpler, because you have these tools at a glance in the ribbon> Home.
For that, proceed as following:
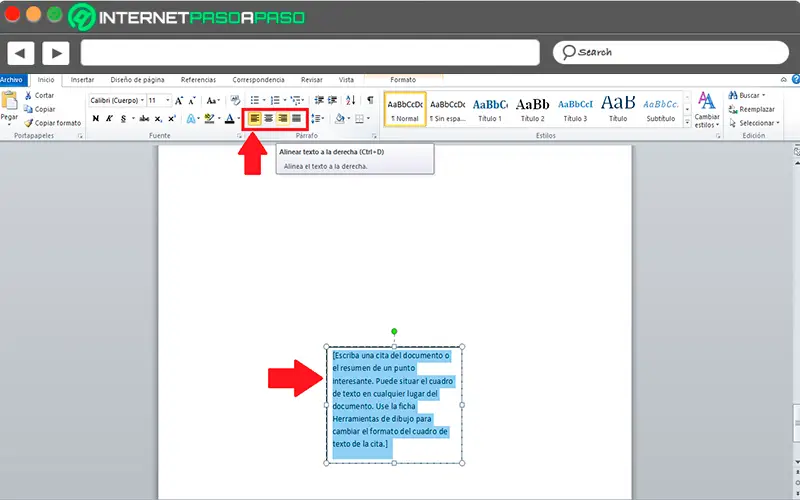
- The first thing to do will be to select the text located inside the box that you wish align horizontally .
- Once selected you must go to tape and there you select the tab «Start», now go to the section «Paragraph» and there select the alignment you want to give to the text , in this case it may be «Align left», «Center», «Align right» or «Justify». Here you must choose the alignment you need . That way you can apply this function to place your text horizontally in Word .
Define the margins
Finally, you must configure the margins . This process is very simple and similar to the vertical alignment configuration .
To perform this function, you need to follow each of these steps:
- The first thing will be to select the text box on your worksheet .
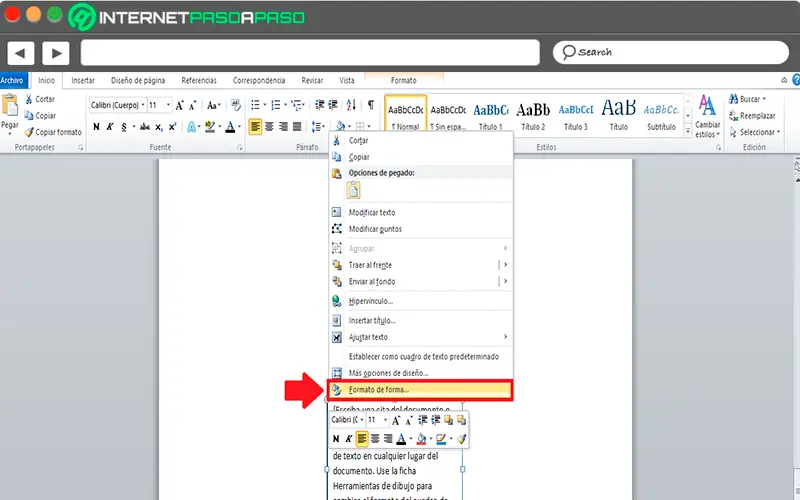
- Now right click on one of the corners of the box to display the drop-down menu .
- Here you need to select the item «Format of the form».
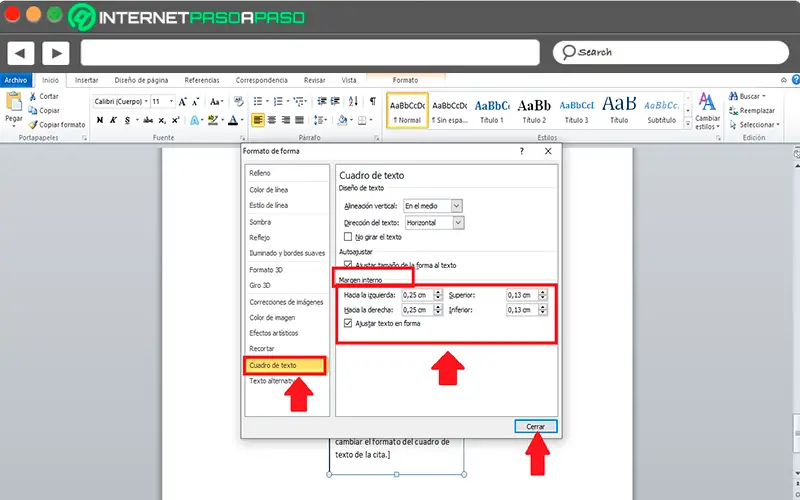
- The next thing to do is select the section «Text zone».
- There the window where you have applied vertical alignment will appear again . But in this case, you should look in socks where the section appears «Internal margin».
- As you can see you will be able to set the distance you want your text to have from the right, left, bottom or top margin . Once all these aspects have been modified, you just have to click on «To close» for the changes to take effect.
If you have any questions, please leave them in the comments, we will get back to you as soon as possible, and it will be a great help for more community members as well. Thank you!


There are three different ways to adjust page margins in Microsoft Word:
- Adjust page margins with the ruler
- Use preset margins
- Create custom margins
This tutorial is also available as a YouTube video showing all the steps in real time.
Watch more than 100 other document software tutorials on my YouTube channel.
The images below are from Word in Microsoft 365. The steps are the same in Word 2019, Word 2016, Word 2013, and Word 2010. However, your interface may look slightly different in those older versions of the software.
Adjust Page Margins with the Ruler
This method is only recommended for short documents. If your document is long or has multiple sections, see the preset and custom margin methods below.
Important note: Skip to step 3 if your ruler is already visible.
- Select the View tab in the ribbon.

- Select Ruler in the Show group.

- Press Ctrl + A on your keyboard to select the entire document.
Pro Tip: Select All from the Ribbon

As an alternative to Ctrl + A, you can select the entire document from the ribbon:
1. Select the Home tab in the ribbon.
2. Select the Select button in the Editing group.
3. Select the Select All option from the drop-down menu.
- Hover your cursor over the inner border of the gray area on the left or right end of the horizontal ruler until your cursor becomes a double arrow. (You should see a tooltip that says, “Left margin” or “Right margin.”)
![]()
- Slide the double-arrow cursor to the left or right to adjust the margin.
- To adjust the top or bottom margins, hover your cursor over the inner border of the gray area of the vertical ruler until your cursor becomes a double arrow. Then, slide the double-arrow cursor up or down to adjust the margin.

Should You Adjust Margins with the Ruler Marker?

The square ruler marker in the horizontal ruler can be used to move the left edge of the text.
However, this technique indents your text; it doesn’t adjust the margin.
Although the visual effect is the same, creating unnecessary indents can cause problems with other formatting within longer documents.
The preset method and custom method shown below offer more precise control over margins.
Use Preset Margins
Important note: Preset margins only affect your current section. If you want to apply a preset to an entire document with multiple sections, press Ctrl + A to select the entire document before performing these steps.
- Select the Layout tab in the ribbon.

- Select the Margins button in the Page Setup group.

- Select one of the preset margins from the drop-down menu:
-
- Normal
- Narrow
- Moderate
- Wide
- Mirrored (This is for binding documents like a book.)
- Office 2003 Default

After you make your selection, the Margins drop-down menu will close, and your margins will adjust immediately.
Pro Tip: The preset menu is also available in the Print tab in the backstage view.
Create Custom Margins
- Select the Layout tab in the ribbon (see figure 7).
- Select the dialog box launcher in the Page Setup group.

- Enter your new margins in inches (whole numbers or decimals) in the Top, Left, Bottom, and Right text boxes in the Page Setup dialog box.

- Select a location in the Apply to menu:
-
- This section
- This point forward
- Whole document
The This section option won’t appear if your document doesn’t have section breaks.

- Select the OK button to close the Page Setup dialog box.

As always, save your file to save your changes.
Related Resources
How to Adjust Line Spacing in Microsoft Word
How to Create, Change, and Delete Tabs in Microsoft Word
Three Ways to Indent Paragraphs in Microsoft Word
How to Create Newspaper-Style Columns in Microsoft Word
How to Adjust Letter Spacing in Microsoft Word (PC & Mac)
How to Adjust the Space between Words in Microsoft Word
Updated August 22, 2021