
Lesson 21: Text Boxes
/en/word2016/shapes/content/
Introduction
Text boxes can be useful for drawing attention to specific text. They can also be helpful when you need to move text around in your document. Word allows you to format text boxes and the text within them with a variety of styles and effects.
Optional: Download our practice document.
Watch the video below to learn more about text boxes in Word.
To insert a text box:
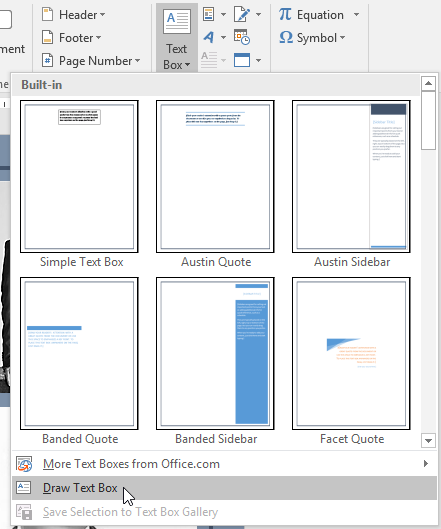
- Select the Insert tab, then click the Text Box command in the Text group.

- A drop-down menu will appear. Select Draw Text Box.

- Click and drag anywhere on the document to create the text box.
- The insertion point will appear inside the text box. You can now type to create text inside the text box.
- If you want, you can select the text and then change the font, color, and size by using the commands on the Format and Home tabs. To learn more about using these formatting commands, see our Formatting Text lesson.
- Click anywhere outside the text box to return to your document.


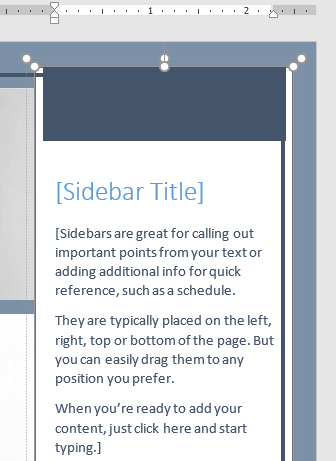
You can also select one of the built-in text boxes that have predefined colors, fonts, positions, and sizes. If you choose this option, the text box will appear automatically, so you will not need to draw it.
To move a text box:
- Click the text box you want to move.
- Hover the mouse over one of the edges of the text box. The mouse will change into a cross with arrows.
- Click and drag the text box to the desired location.

To resize a text box:
- Click the text box you want to resize.
- Click and drag any of the sizing handles on the corners or sides of the text box until it is the desired size.

Modifying text boxes
Word offers several options for changing the way text boxes appear in your document. You can change the shape, style, and color of text boxes or add various effects.
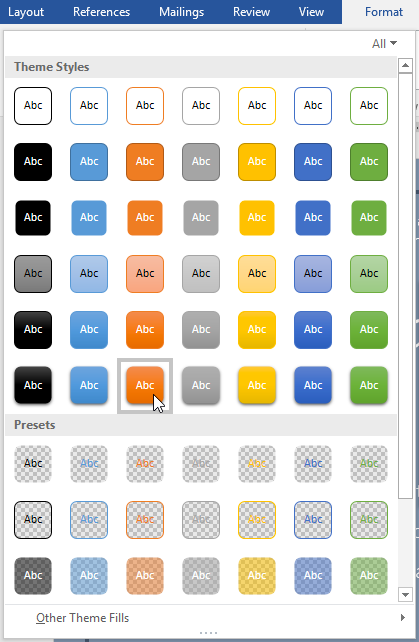
To change the shape style:
Choosing a shape style allows you to apply preset colors and effects to quickly change the appearance of your text box.
- Select the text box you want to change.
- On the Format tab, click the More drop-down arrow in the Shape Styles group.
- A drop-down menu of styles will appear. Select the style you want to use.
- The text box will appear in the selected style.

If you want to have more control over text box formatting, you can use any of the shape formatting options such as Shape Fill and Shape Outline. To learn more, see our Shapes lesson.
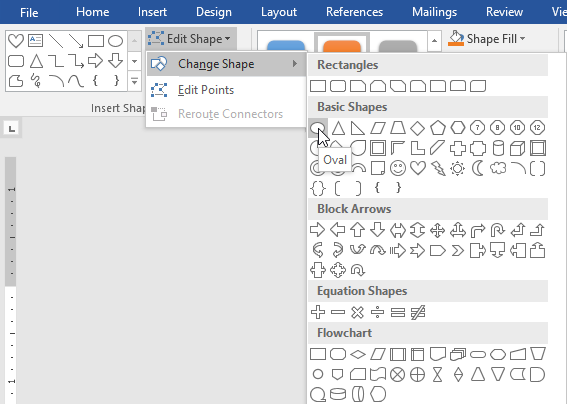
To change the text box shape:
Changing the shape of a text box can be a useful option for creating an interesting look in your document.
- Select the text box you want to change. The Format tab will appear.
- From the Format tab, click the Edit Shape command.
- Hover the mouse over Change Shape, then select the desired shape from the menu that appears.
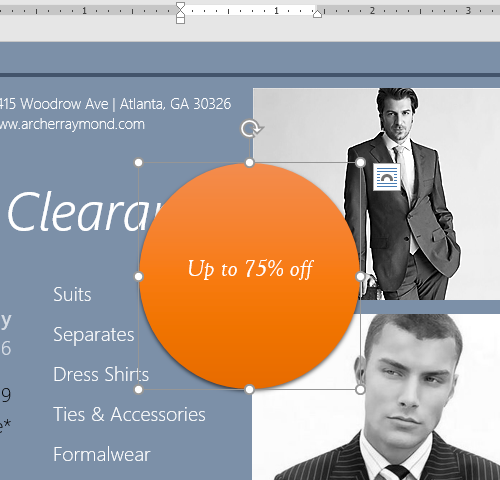
- The text box will appear formatted as the shape.

Challenge!
- Open our practice document.
- Insert a Simple Text Box.
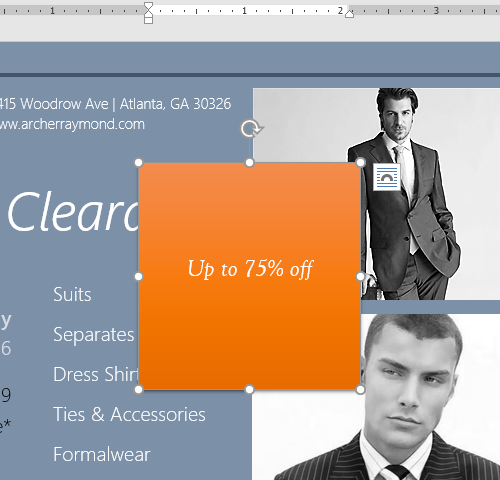
- In the text box, type Get an additional 25% off when you mention this ad!
- Change the font to Gadugi, 20 pt, Center Align.
- Change the shape of the text box to Double Wave from the Stars and Banners group.
- Change the text box style by selecting any style in the Intense Effect row.
- Drag the text box to the space below Buy 1, Get 1 Free* and Formalwear.
- When you’re finished, your document should look something like this:


/en/word2016/aligning-ordering-and-grouping-objects/content/
Achieve more control and flexibility with your documents
Updated on September 11, 2022
What to Know
- Select Insert > Text Box > choose a text box template. Select and drag box to the position you want.
- To resize text, select and drag circles around the edge. To rotate text, select and drag the circular arrow.
- Place the cursor inside the text box and type the information you want to appear.
This article explains how to use text boxes in Microsoft Word. Instructions apply to Word for Microsoft 365, Word 2019, Word 2016, and Word 2013.
How to Insert a Text Box in Word
Start by opening the document you want to add a text box to. Then follow the steps below.
-
On the ribbon, select Insert.
-
In the Text group, select Text Box, then choose a text box template.
-
The new text box appears in the middle of the text, and the Shape Format tab is automatically selected.
-
Select and drag the box to the position you want. To resize the text box, select and drag the circles around the edge. To rotate the text box, select and drag the circular arrow at the top of the box.
-
Place the cursor inside the text box and type the information you want to appear there.
Why Use Text Boxes?
When you type text in Microsoft Word, you have options for making it look a particular way on the page (such as changing the page margins), but those options are limited. Text boxes expand your formatting repertoire by offering additional control and flexibility for how your text appears. You can place a text box anywhere within a document and format it with different colors and fonts. This feature is especially helpful for creating a blockquote or a sidebar.
Customize a Text Box
After you create a text box, you can customize it in a number of ways.
-
To bring up options, place the cursor inside the text box and right-click. Choose an option and follow the screen prompts to add a border, change the style, or adjust the way the text box interacts with the other text on the page.
Alternatively, use the controls on the Shape Format tab.
-
To go directly to the Layout Options menu, select the text box, then select the Layout Options icon (it looks like a horseshoe and is located to the right of the text box).
-
Change the text, make more adjustments, or move the box to another location at any time. To delete a text box, select its border, then press Delete on the keyboard.
Thanks for letting us know!
Get the Latest Tech News Delivered Every Day
Subscribe

If you want to highlight portions of text in your document, you can insert text boxes. But what you might not know is that you can link these boxes in Microsoft Word and have the text within them flow continuously.
Maybe you have a brochure that uses text boxes to call out features of a product or service. Or maybe you have a document and use text boxes for helpful tips or pull quotes. By linking the text boxes together, you can type in one text box and have the overflow of text move to the next one.
RELATED: How to Add Sideheads and Pull Quotes to Microsoft Word Documents
You can use a preformatted text box or draw and format your own. Head to the Insert tab, click the Text Box drop-down arrow, and choose or draw your first text box. You can start typing your text in the first box or wait until you add and link the second one.

Follow the same steps to insert your second text box. If you choose a preformatted text box, you’ll need to remove the sample text inside. A requirement for linking one text box to another is that the second text box must be empty. Just select all of the text in the preformatted box and press Delete.
Click to select your first text box. Then go to the Shape Format tab and click “Create Link” in the text section of the ribbon.
You’ll see your cursor change to a pitcher. Move your pitcher to the second text box and click inside of it. This creates the link between the two.
Now when you type within the first text box and reach the bottom of the shape, the text will continue inside the second text box automatically.
You can continue to add text boxes and link those as well. So, if you want to add a third, select the second text box and create a link the same way to the third text box.
You can move text boxes to different pages or rotate the boxes without it affecting the linked ones.
RELATED: How to Make Diagonal Text in Word
Resize and Format Linked Text Boxes
If you resize a text box by dragging a corner or edge, the text inside adjusts between the linked boxes. As you can see in the screenshot below, we made the first text box smaller, so the overflow of text automatically moved to the second text box.
If you format the font inside of a text box, it does not affect the text in the linked text box. This allows you to use italics, bold, or a different font color in the various boxes.
Keep in mind, however: if the size of a text box changes and the text flows into the linked box, it will bring with it the formatting you applied as shown below.
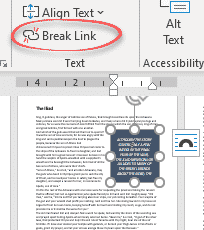
Break a Text Box Link
If you decide later you want to unlink the text boxes, this is easy to do. Select the first text box, go to the Shape Format tab, and click “Break Link” in the Text section of the ribbon. Follow the same process to unlink your remaining text boxes if necessary.
When you break the link, all of the text in the second text box appears in the first. You may need to resize the first text box to see it all.
Linking text boxes in Microsoft Word is a good way to display a continuous short story, list of tips, set of instructions, or something similar without affecting the main part of your content. And to keep those boxes safe from editing, you can lock text boxes in Word as well.
READ NEXT
- › How to Mirror or Flip Text in Microsoft Word
- › The New Winamp Is Here, but It’s Not What You’d Expect
- › Discord Direct Message Won’t Go Away? Here’s the Fix
- › Windows 11 Has a New Photo Gallery in the File Explorer
- › How to Get a Refund on the PlayStation Store
- › Android’s Nearby Share Has (Unofficially) Arrived on Mac
- › Save Hundreds on Elegoo’s New PHECDA Laser Engraver Through Kickstarter
How-To Geek is where you turn when you want experts to explain technology. Since we launched in 2006, our articles have been read billions of times. Want to know more?
In this article, we are going to introduce you 2 methods to match the text box size with the inside text size in your Word.
There and then you must have inserted text box into your Word document. However the problem remains there is that when you drag the text box to enlarge or narrow its size, the size of the text within does not change accordingly. What an ailing issue! As usual, we are here to relieve you from the big headache.
As a matter of fact, it’s not a rocket science to address the problem. Following are two methods you can employ in your Word file.
Method 1: Make Text Box Size Fit Text
- First and foremost, click “Insert”.
- Then go to click “Text Box” in “Text” group.

- Next enter your text into the box.
- Then click one of the text box lines to select the textbox.
- Next right click.
- Go to choose “Format Shape” option on the list-menu.

- Now in “Format Shape” dialog box, you first click “Text Box” option on the left side column.
- Then on the right side area, check “Resize shape to fit text” box under “Autofit”.
- Next click “Close” button.


Only when you check “Resize shape to fit text” box, can you adjust your text size without worrying the text box size failing to fit it.
- Now, you can select the text.
- Then click “Home” tab.
- Next choose a font size for the text. You will see the text box changes according to the font size.


Method 2: Convert Text Box to a Picture
- First thing is to repeat the first 5 steps in method 1.
- This time you choose “Cut” option on the list-menu. Or you can simply press “Ctrl+ X” in this step.

- Next, click “Home” tab.
- Then click the upside-down triangle on “Paste” icon in “Clipboard” group.
- And click “Paste Special” option.

- Now in “Paste Special” dialog box, click “Picture (Enhanced Metafile)”.
- Then click “OK”.
\" ->Click \"OK\"")


\" ->Click \"OK\"")
You will see the text box has been converted to a picture.
- Go to click the picture and the handles will show.
- Click one of the handles and drag to enlarge the picture. Then you find the text seems larger.


But you have to understand that the size of the text actually does not change. When you enlarge the picture, you only zoom in the text.
Comparison of 2 Methods
| Methods | Advantages | Disadvantages |
| Make Text Box Size Fit Text | 1. The text size does change.
2. You don’t have to worry that the text will outsize the text box. 3. You can edit text all the time. 4. The text display effect will not get undermined. |
1. You have to manually resize the text.
2. You have to check “Resize shape to fit text” box in “Format Shape” first. Otherwise the text may outsize the text box. |
| Convert Text Box to a Picture | The text will be larger as you enlarge the picture, so you don’t have to adjust it manually. | 1. You cannot edit the text once you convert it to picture.
2. The text display effect will get undermined. 3. The text size actually does not change. |
Quickly Retrieve Word Files
Most of us will be panic if our files get corrupt. True. File damage is definitely a serious data disaster in nowadays. Even so there is still a remedy for you that is to get a professional Word repair tool to restore your files as soon as possible.
Author Introduction:
Vera Chen is a data recovery expert in DataNumen, Inc., which is the world leader in data recovery technologies, including tools to repair Excel and pdf repair software products. For more information visit www.datanumen.com
Reading
a lengthy text document can make anyone bored in minutes. However, there are
few simple ways to make your documents more attractive and appealing to the
reader. One such option is to add colorful text boxes in-between paragraphs.
This is a useful way to show important action points on full text based
documents. In this article, let us explore how to create text box in Word
document.
Related: How to quickly add dividers in Word?
We
will discuss the following options based on Word 2016 or later version.
- Create text box from existing text
- Creating empty text box
- Changing text box size and position
- Changing text direction
- Deleting borders
Creating
Text Box from Existing Text
You can convert any of the existing text paragraph and list to a text box in Word. Let’s see how to do that.
- First open your document and select the paragraph you want to convert to a text box.
- Switch to the “Insert” tab from the ribbon menu.
- Open the “Text Box” menu.
- Word offers a selection of predefined text boxes, for example for creating sidebars with quotes.
- However, for converting the existing text, select the entry “Draw Text Box” in the lower pane.

This will instantly add a bordered text box around
the selected text. Word treats text boxes as a drawing and you can design the
box as per your need using the “Drawing Tools” menu. You can move the text
boxes anywhere in the document, depending on the layout. This can be useful for
the design of flyers and brochure.
Creating
Empty Text Box
Of course, you do not necessarily need existing text to
create a new text box. Alternatively, you can also create empty text boxes and
enter the text into them later.
- Place the cursor where you want to insert a text box.
- Reopen the “Insert” menu and select “Text Box” option.
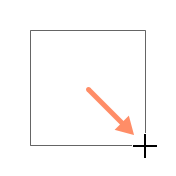
- Click the “Draw Text Box” menu item. You will see the cursor now changed to cross hair shape.
- Draw out the text box while holding down the left mouse button.
- Then enter the text into the text box.
- You can look at the various options in the context menu of your text box for designing your text box.

Changing
Text Box Size and Position
When
you have created a text box out, you have various options for editing. You can
design it, change the size and place it anywhere in your document.
- You can change the size of the box using the handles on the edges of it. Word will automatically adjust the text content inside the box.
- It is also possible to freely move the box using the mouse. You can hover over the mouse to change the cursor into a star shape, allowing you to drag the box.
- Formatting is also possible as usual, for example, right-click on the selected text to use the Mini toolbar and format the text in bold or change the alignment.
- You can click on the “Layout Options” button on the side of the text box to wrap text box with the content on your document.

Changing
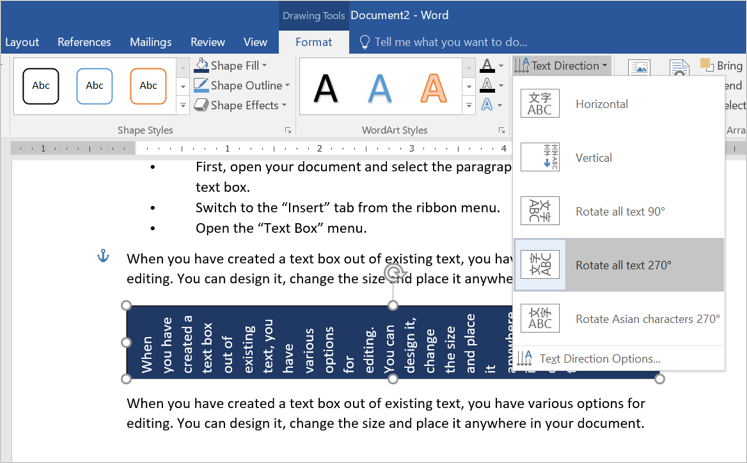
Text Direction
Within
a text box, you can also influence the text direction. Besides the default
horizontal alignment the text can also run vertically.
- What about if you want to rotate the text inside text box? This is also
very easy. Open the “Text Direction”. - Double click on the text box to open “Drawing Tools” menu. Click on the
“Text Direction” menu and select the entry, “Rotate all text 270°”. - The text is now set vertically in the text box and you can adjust the
format and position of the box.
- You can move the text box between paragraphs or columns by dragging the
box while keeping the left mouse button pressed.
Related: How to embed Excel table in Word document?
Deleting
Borders and Content
By
default, text boxes are displayed with borders, but you do not have to keep
them. You can easily remove the borders.
- Click on the text box to open the “Drawing Tools” and select “Shape Outline”
button under “Format” menu. - Now, select the entry “No Outline” to remove the borders from the box.
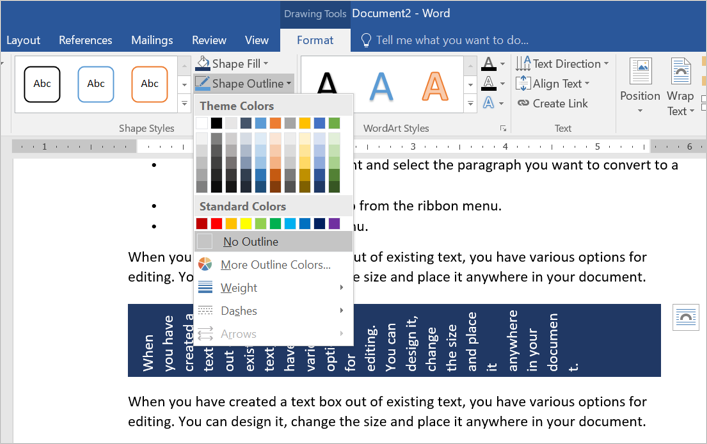
- You can also apply different colors, weight and styles to the border if
you want. - In order to delete a text box content, simply click inside the box and
edit or delete the content. Alternatively, select the text box by clicking on
the border and press delete to completely delete the box. - In this respect, text boxes behave in the same way as other drawing
objects.
Using Text Box Templates
The best and easy way to use text box in Word is to
select one of the predefined text box template. You can select from one of the good-looking
templates from the “Text Box” menu dropdown.

For example, you can use text box in a sidebar
format or choose one of the colorful formats. You can adjust the layout
positions to align the content beside the box.

You can also customize the text box and create a
custom template as a Quick Parts.
- First, select the box you want to use as templates.
- Go to “Insert > Text Box” and choose “Save Selection to Text Box Gallery” option.
- Fill up the details to create a new building block.
- You can view the saved template under “Text Box” menu dropdown from next time onwards.
Other Formatting Options
The “Formatting Tools” menu offers various
additional options for customizing your text box content. You can double click
on any text box to view the menus applicable for drawing object. Below are some
of the activities you can do with the formatting tools:
- Apply shape styles like fill, effects and borders.
- Create WordArt inside text box.
- Change text direction.
- Position and wrap the content around the text box.
Microsoft Word, MS Office, Office 2007, Office 2010, Office 2013, Office 2016, Office 2019, Office 365 /
14 May 2019
Separate text boxes in Microsoft Word can be linked so text in one box can automatically flow into another text box later on the same page or document.
Yet again with Word, there’s some extra tricks available beyond simple linking of boxes.
Linked boxes is a trick that’s a common feature in professional publishing and layout tools that was quietly added to Word.
Create Text Box Link
At its simplest, put two text boxes in a document. Click in the first one, then choose Format | Text | Create Link. The mouse pointer changes into a flowing cup to click into another text box.

Now the unseen text from the first text box appears in the linked box.
All the text will automatically flow between the boxes as needed, for example if you change the text inside the boxes or change the size of the text boxes. No cut/paste or juggling of text required.
Empty the text box
The target or ‘linked to’ text box has to be empty and that includes the placeholder text Microsoft adds to every new text box automatically.
Delete that text before trying to link.
Copy the text box
For consistency, we suggest making and formatting the first text box. Then duplicate (copy and paste) that box to other places in your document.
Text Boxes don’t have styles so changing the look of one box has to be manually copied to any others. If at all possible, format once then clone to other locations.
The text inside a text box can (and usually should) have a style applied to it.
Linking more than two text boxes
Multiple text boxes can be linked to make a chain of three or more. Do that by selecting the last box in the current chain and linking it to the next empty box.
Sadly, there’s no way to link multiple boxes at once.
Text is a single linked block
The text in linked text boxes is treated as a single entity by Word. Click inside a linked text box and press Ctrl + A (Select All) will select all the text in all linked text boxes (and not select text outside the boxes).
Text inside boxes all selected with a single Ctrl + A shortcut.
That makes it easy to reformat all the text.
But linked text boxes are not linked in other ways
Create Link only applies to text. Nothing else about the text boxes are linked.
A change in the look or size of a text box has no effect on any linked box.
Nor are text boxes grouped in the selection pane
Break the link
To unlink text boxes, click in the first or source text box then Format | Text | Break Link.
There are two ways you can insert a text into a Word document
First method:
From the Ribbon, under the tab Insert, within the group Text, click the Text Box icon. You can view a gallery of built-in text boxes in a drop-down list. From the ribbon under the tab insert within the group text click the text box icon you can view a gallery of built in text boxes in a drop-down list
- Click to insert one of these into your document. Depending on the Text Wrapping property of the selected text box, it may sit on top of text, behind the text, in line with text, surrounded by text, etc.
- Now, to reveal the text wrapping property of the inserted text box, click the text box on the borders. Text Box Tools tab appears on the Ribbon.
- Click the Format tab under this. Under the Format tab, within the group Arrange, click the Text Wrapping icon. From the drop-down menu, you can view various text-wrapping styles and the one highlighted is the default style. You can change this property as required.

You can also create a new empty text box from the gallery drop-down. Click Draw Text Box from the bottom of the drop-down. The mouse pointer changes to a plus symbol and you can draw a text box.

Note: Text wrapping styles are: In Line with Text, Square, Tight, Behind Text, In Front of Text, Top and Bottom, and Through. All these style are self-explanatory.
Difference between Square and Tight
You may wonder about the difference between Square and Tight styles, as in both case text surrounds the box. Difference lies in the manner that text surrounds. With Square, text takes the shape of a square around the box (irrespective box shape). With Tight, surrounding text takes the shape of the box (e.g. star shaped box, trapezoid, hexagon, etc.)
Second method:
- From the Ribbon, under the tab Insert, within the group Illustrations, click Shapes. From the gallery of Shapes, under Basic Shapes, click the Rectangle shape.
- The mouse pointer changes to a plus symbol and you can draw a rectangular shape in your document. What you can draw is a basic rectangular shape and you cannot enter text readily.
- Right-click the shape and from the right-click menu, select Add Text. The shape transforms to a text box and you can enter text.
- Change the text-wrapping property of the text boxes as explained above.
How to fix text boxes in one line
If you select the text wrapping style of a text box to In Line with Text, the text box gets fixed to that line. So, the text box will move only with the line.
Formatting text boxes
You can design a text box with fill color, gradient color, border color, shadow, 3D effects, and many more.
- Right-click on the borders of the text box and from the right-click menu, select Format Text Box. Format Text Box dialog box appears.
- From the Colors and Lines tab, apply fill color, change transparency of color, add border line color, change border line pattern, etc.
- From the Size tab, select height and width of the text box, lock aspect ratio,
- In the Layout tab, you can select the text wrapping type as discussed above. You can also specify height and width of the text box relative to the page, page margin, etc.
- In the Text Box tab, set the left, right, bottom, and top margins the text inside the text box. Also, set the vertical alignments: Top, Center, or Bottom.
Use built in text box styles
You can select the built in text box styles from the Text Box Styles group under Text Box Tools tab >> Format tab >> Tex Box Styles
Change direction of text inside text box
If you want the text inside text box to appear vertically (from top or bottom), under the Format tab, within group Text, click Text Direction.
Flow text from one box to another
Select a text box and from the Format tab, within group Text, click Create Link. A coffee cup icon appears. Then click the next text box (should be a empty text box) to which you want the text to flow from the first text box. Done. It links the first text box to the second. Want to break the link, right-click on the first text box, then from the right click menu, select Break Forward Link.

Cut, Copy, and Paste text boxes
Click on the borders of text box and then right-click. From the right-click menu, select Copy to copy text box, select Cut to delete text box, and select Paste to paste the check box at the point of insertion.
Changing the text box shape
Under Text Box Tools tab >> Format tab >> Tex Box Styles, click Change Shape. From the drop-down, select any of the shapes. Text box takes the selected shape.
Grouping text boxes
If you are using multiple text boxes in one place to create a design, flow chart, etc., you can group all to manage them easily, move them all together. To group, press CTRL and click on the borderlines of all text boxes one by one. Release the CTRL button and right-click on the selected text boxes. From the right-click menu, select Group under Grouping.
I wrote a Windows Forms program using C#. It contains textboxes and a data-grid.
I want to export the data into a Word file to use the template. I added the library of Microsoft Word into my code.
Also I created textboxes «shapes» inside the Word file and putted inside them text to be find from my c# program
For now everything seems okay, But I’m stuck at the C# side, I can replace the normal text, but not the text inside textboxes «Inside the word file»
And here is my code:
private void FindAndReplace(Word.Application wordapp, object ToFindText, object replaceWithText)

        {
            object matchCase = true;
            object matchWholeWord = true;
            object matchWildCards = false;
            object matchSoundLike = false;
            object matchAllforms = false;
            object forward = true;
            object format = false;
            object matchKashida = false;
            object matchDiactitics = false;
            object matchAlefHamza = false;
            object matchControl = false;
            object matchread_only = false;
            object visible = true;
            object replace = 2;
            object wrap = 1;

            wordapp.Selection.Find.Execute(ref ToFindText,
                ref matchCase, ref matchWholeWord,
                ref matchWildCards, ref matchSoundLike,
                ref matchAllforms, ref forward,
                ref wrap, ref format, ref replaceWithText,
                ref replace, ref matchKashida,
                ref matchDiactitics, ref matchAlefHamza,
                ref matchControl);

        }


        private void CreateWordDocument(object filename, object SaveAs)
        {
            Word.Application wordApp = new Word.Application();
            object missing = Missing.Value;
            Word.Document myWordDoc = null;

            if (File.Exists((string)filename))

            {
                object readOnly = false;
                object isVisible = false;
                wordApp.Visible = false;

                myWordDoc = wordApp.Documents.Open(ref filename, ref missing, ref readOnly,
                    ref missing, ref missing, ref missing,
                    ref missing, ref missing, ref missing,
                    ref missing, ref missing, ref missing,
                    ref missing, ref missing, ref missing, ref missing);

                myWordDoc.Activate();

                //find and replave
                this.FindAndReplace(wordApp, "<date1>", textBox2.Text);
                this.FindAndReplace(wordApp, "<date2>", textBox3.Text);

            }

            else
            {
                MessageBox.Show("File not found!");
            }

            //Svae as
            myWordDoc.SaveAs2(ref SaveAs, ref missing, ref missing, ref missing,
                ref missing, ref missing, ref missing,
                ref missing, ref missing, ref missing,
                ref missing, ref missing, ref missing,
                ref missing, ref missing, ref missing);


            myWordDoc.Close();
            wordApp.Quit();
            MessageBox.Show("File Created!");


         }
A text box is a graphical container that holds text and works like a minidocument you can place anywhere within a regular document. Although it holds text, a text box itself is actually a graphic; the text it contains is independent from the document’s body text. You can format a text box’s text in most of the same ways you can format a document’s normal text. But because the box is a shape, you can drag it to a different position, resize it, and format it like other shapes.
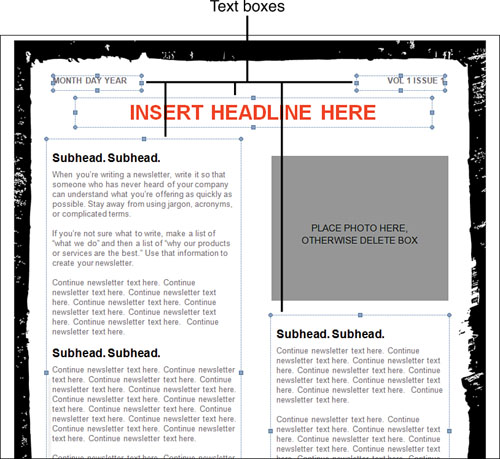
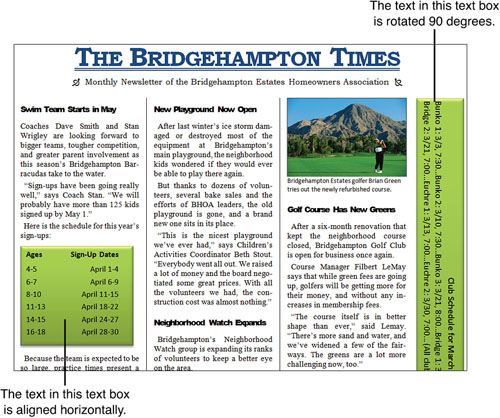
The text box is one of the secret weapons of great document layouts. In fact, lots of multicolumn documents, such as the newsletter template shown in Figure 1, don’t use columns at all. Instead, they are laid out with text boxes. In the figure, the newsletter is just a series of text boxes, sized and formatted in different ways, but neatly arranged to imitate a two-column design.
Figure 1. A newsletter template laid out with text boxes rather than columns. Each text box is indicated by its handles and borders.
The following sections show you how to insert a text box into a document, resize and move it, format the box itself and the text inside it, and other cool tricks.
Inserting a Text Box
You can create a text box in two ways. The first (and quicker) way is to insert a building block that is already formatted. The second (and slower) way is to draw a text box with your pointer and do all the formatting yourself. Either way, when a text box is selected, the Drawing Tools Format tab appears on the Ribbon and the text box is surrounded by a thin border and selection/sizing handles.
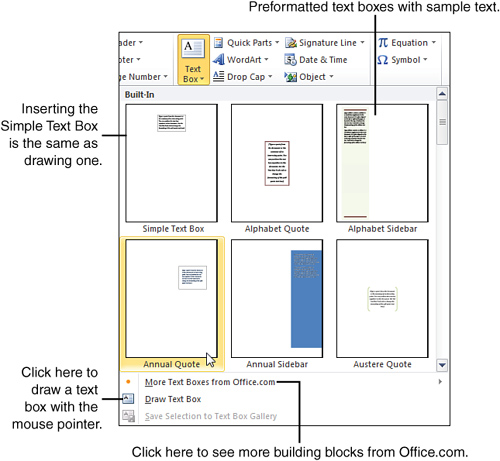
Creating a Text Box from a Building Block
If you create a text box from a building block, most of the work is done for you. The building blocks used for text boxes are preformatted with a border (and sometimes a fill) that coordinates with the document’s theme colors. The text is already formatted, too. All you need to do is add your own text. Here’s how to create a text block from a building block:
|
1. |
On the Insert tab, click Text Box. A menu drops down, showing thumbnail versions of Word’s built-in building blocks for text boxes, as shown in Figure 2. Figure 2. Selecting a building block from the Text Box menu.
|
|
2. |
In the Built-In section of the menu, click one of the thumbnails. The new text box contains sample text, so you can see how it is formatted. The sample text is selected so you can delete it or type over it. If you select the Simple Text Box building block, Word inserts a box in the middle of the page, in front of the document’s text. If you select any other building block, it is inserted as shown in the Text Box menu; the document’s text wraps around the block according to that block’s default text wrapping setting. |
|
3. |
Press Del to delete the sample text from the box. A blinking insertion point appears in its place. |
|
4. |
Type your text into the text box. |
|
5. |
Click outside the text box to deselect it. |
If you want to see more building blocks, click More Text Boxes From Office.com on the Text Box menu. A submenu pops out, showing a selection of text boxes available from the Office.com website. Click any building block to add it to the document.
Drawing a Text Box
You can draw a text box with your pointer, but you’ll have to do all the formatting when you’re done. Here’s how to draw a text box:
|
1. |
On the Insert tab, click Text Box. |
|
2. |
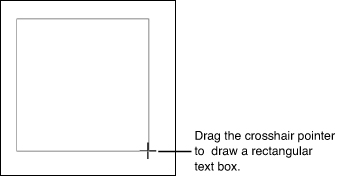
Click Draw Text Box. The pointer changes to a crosshair. |
|
3. |
Drag the pointer to draw a box, as shown in Figure 3. When you release the mouse button, the insertion point appears inside the finished text box. Figure 3. Drawing a text box.
|
|
4. |
Type your text into the text box. |
|
5. |
Click outside the text box to deselect it. |
When you draw a text box, Word inserts the box wherever you draw it and places the box in front of the document’s text.
Resizing a Text Box
The way you can resize a text box depends on how you created it:
- If you drew the box (or inserted the Simple Text Box building block), resize it by doing any of the following:
- Drag any of its handles.
- On the Format tab, click the Size button; then use the Height and Width spin controls to set specific dimensions for the box.
- Click the Size group’s dialog box launcher to open the Layout dialog box. On the Size tab, set specific dimensions in the Height and Width sections, or use the Scale section to set the text box’s size as a percentage of its current size. Click OK when you finish.
- If you created the text box from a building block, its sizing options may be restricted, as shown in Figure 4. If you can’t resize the box by dragging its handles or by using the Size tools on the Format tab, open the Layout dialog box. On the Size tab, click Absolute in both the Height and Width sections; then click OK. Now you can resize the box as if it were drawn.
Figure 4. By default, a building block’s height or width may be set to Relative, restricting your ability to resize it.

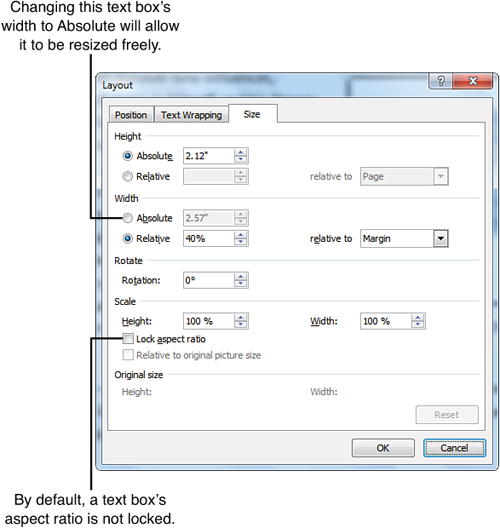
For some building blocks, the height and/or width may be set to Relative in the Layout dialog box. The Relative option ensures that the box’s height or width always stays in proportion to some aspect of the page. For easy resizing, change the text box’s Height and Width options to Absolute.
By default, a text box’s aspect ratio is not locked; if you leave it that way, you can resize the text box freely by dragging.
Moving a Text Box
To move a text box, click its border and drag it to a new location, as shown in Figure 5. If the text box was created from a building block (other than the Simple Text Box building block), the document’s text wraps around the box as determined by the building block’s text wrapping setting.
Figure 5. Moving a text box by dragging its border.
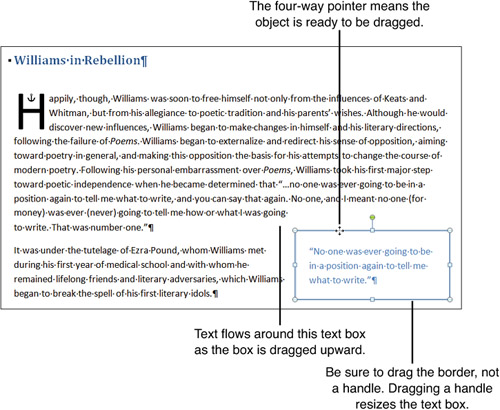
If you created the box by drawing it or by using the Simple Text Box building block, the box appears in front of the document’s text. You can change this by applying a different text wrapping option to the text box. Then you can move the text box by dragging.
Formatting a Text Box
A text box is basically the same thing as an AutoShape (a rectangle), but this shape is special because it’s already set up to hold text. You can format a text box by using the shape-formatting tools on the Format tab.
By default, Word formats a text box with an outline and a fill. The outline and fill can be the same or different colors, or you can apply a special effect to either one. However, in some cases, it’s a good idea to remove both the outline and the fill. For example, if your document has a colored background, you can make the background show through the text box by removing its shape formats. If you ever use text boxes for laying out a page (as shown back in Figure 1), the document will look cleaner if you omit the fills and outlines from the text boxes.
Formatting Text in a Text Box
Text in a text box is basically the same as text in a document; it just fits in a smaller space. A text box can hold multiple paragraphs, including numbered and bulleted lists. You can format a text box’s text in just about all the same ways you format a document’s body text. Select the text in the box; then apply formats from the Font and Paragraph groups of the Home tab. Text in a text box can be formatted with styles, too.
You can also do a couple of neat tricks with a text box’s text:
- Change text direction: By default, text is aligned horizontally in a text box. You can set text to run vertically, reading either from top to bottom (rotated 90 degrees) or from bottom to top (rotated 270 degrees). Figure 6 shows an example of how rotated text can be used to create a cool effect and make use of limited page space. To change text direction, click the text box to activate the Format tab, click Text Direction, and then choose an option from the drop-down menu.
Figure 6. In the text box along the right-hand edge of this newsletter, the text is rotated 90 degrees.

- Change text alignment: You can vertically align text at the top, center, or bottom of a text box. To set the alignment, go to the Format tab, click Align Text, and then choose an option from the drop-down menu.
Linking Text Boxes
You can use multiple text boxes to create fancy or complicated-looking layouts. For example, if you’re designing a multicolumn document but don’t want to mess with columns, you can use text boxes instead. Or if you want to create a boxed “sidebar” that spans two pages of a document, you can use two text boxes (one on each page) to hold the sidebar’s content.
The key to tricks like this is linking. When you link two or more text boxes, Word treats them as though they are a single box. When you fill the first box with text, just keep typing; the text jumps to the next box and continues there.
Creating Linked Text Boxes
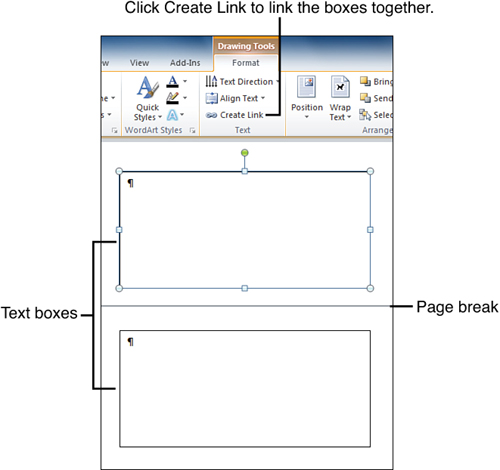
To make the linking process easy, start by creating all the text boxes you’re going to need. Here’s a simple example:
|
1. |
Create two text boxes. Figure 7 shows two empty text boxes; the first is at the bottom of one page, and the second is at the top of the following page. Figure 7. Two text boxes, ready for linking.
|
|
2. |
Click the first text box. The Format tab appears on the ribbon. |
|
3. |
Click Create Link. The mouse pointer changes to the shape of a pitcher. |
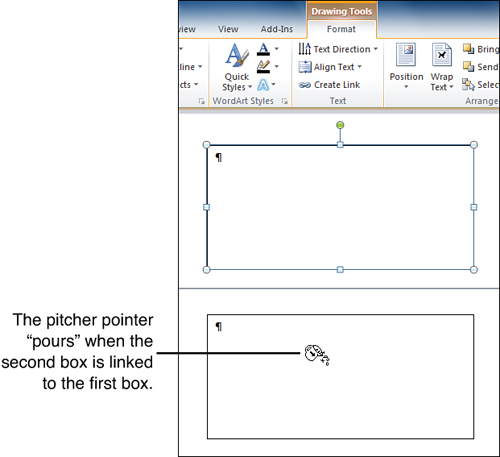
|
4. |
Point to the second text box, and notice that the pitcher is tilted to look like its contents are pouring into the second text box, as shown in Figure 8. Figure 8. Linking the second text box to the first one.
|
|
5. |
Click the second text box. It is now linked to the first text box. |
The linking process goes a little differently if you need to link three or more boxes. Suppose you have four boxes; in this case, you would start by linking box 3 to box 4, then link box 2 to box 3, and finally link box 1 to box 2. Sounds crazy, but it works