
Align text horizontally
-
In the text box, select the text that you want to change the horizontal alignment for.
-
On the Home tab, click the alignment option that you want
 .
.
 .
.Align text vertically
You can align all the text in a text box with the top, middle, or bottom of the text box.
-
Click the outer edge of the text box to select it.
-
On the Shape Format tab, click Format Pane.
-
Click the Shape Options tab if it isn’t already selected.
-
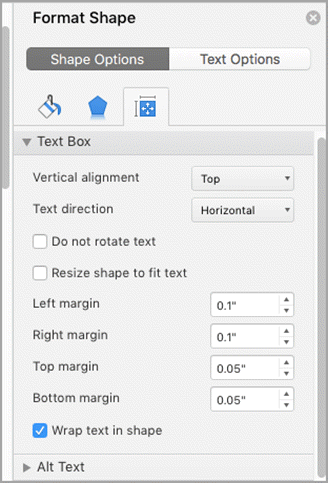
Click the text box icon
, and then click Text Box. -
Choose Top, Middle, or Bottom from the Vertical alignment drop-down list.
 , and then click Text Box.
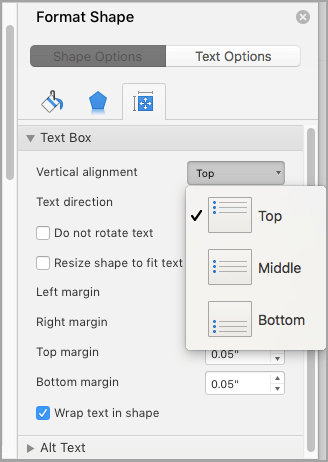
Adjust the text box margins
-
Click the outer edge of the text box to select it.
-
On the Shape Format tab, click Format Pane.
-
Click the Shape Options tab if it isn’t already selected.
-
Click the text box icon
, and then click Text Box. -
You can adjust the left, right, top, and bottom margins.
Important:
Office for Mac 2011 is no longer supported. Upgrade to Microsoft 365 to work anywhere from any device and continue to receive support.
Upgrade now
Align text horizontally
-
In the text box, select the text that you want to change the horizontal alignment for.
-
On the Home tab, under Paragraph, click the alignment option that you want
.
Align text vertically
You can align all the text in a text box with the top, middle, or bottom of the text box.
-
Click the outer edge of the text box to select it.
-
Click the Format tab (the purple contextual tab that appears next to the Home tab), and then under Text Box, click Change text alignment within the text box
. -
Click the alignment option that you want.
 .
.Adjust the text box margins
-
Click the outer edge of the text box to select it.
-
On the Format menu, click Shape.
-
In the left pane of the Format Shape dialog box, click Text Box.
-
Under Internal Margin, adjust the measurements to increase or decrease the distance between the text and the outer border of the text box.
I’m trying to create a textbox in Word using VBA, but Word consistently createst the textbox with left and right indents about 5 inches apart, indented about 1 inch from each side. I’ve tried everything I can think of — setting the indents myself (failed), clearing all paragraph formatting first (failed), clearing all tab stops (failed), and resetting the left/right indents a second time at the end of my code.
I can see the tab stops when I click in the created text box, and if I manually move them the text inside responds appropriately. Does anyone know what am I doing wrong (or not doing)? The ShapeTboxCreate subroutine just creates teh text box normally, but converts the parameters (in inches) to points before passing them to the .Shapes.AddShape(msoTextBox,...) function.
Thank you.
   Set tbox = ShapeTboxCreate(0.5, 0.37, 7.5, 0.75)
   tbox.name = "Header Title Box"
   selection.ClearParagraphAllFormatting
   selection.Collapse wdCollapseStart
   tbox.TextFrame.TextRange.ParagraphFormat.TabStops.ClearAll
   tbox.TextFrame.TextRange.ParagraphFormat.LeftIndent = 0
   tbox.TextFrame.TextRange.ParagraphFormat.RightIndent = 0
   tbox.TextFrame.TextRange.Text = "My Text Here"
Here is the subroutine. It converts the parameters (in inches) to points and creates the rectangle.
Function ShapeRectCreate(left As Single, top As Single, width As Single, _
   height As Single) As Shape
Dim shp As Shape
Set shp = ActiveDocument.shapes.AddShape(msoShapeRectangle, 0, 0, _
      InchesToPoints(width), InchesToPoints(height))
shp.RelativeHorizontalPosition = wdRelativeHorizontalPositionPage
shp.RelativeVerticalPosition = wdRelativeVerticalPositionPage
shp.left = InchesToPoints(left)
shp.top = InchesToPoints(top)
Set ShapeRectCreate = shp
End Function
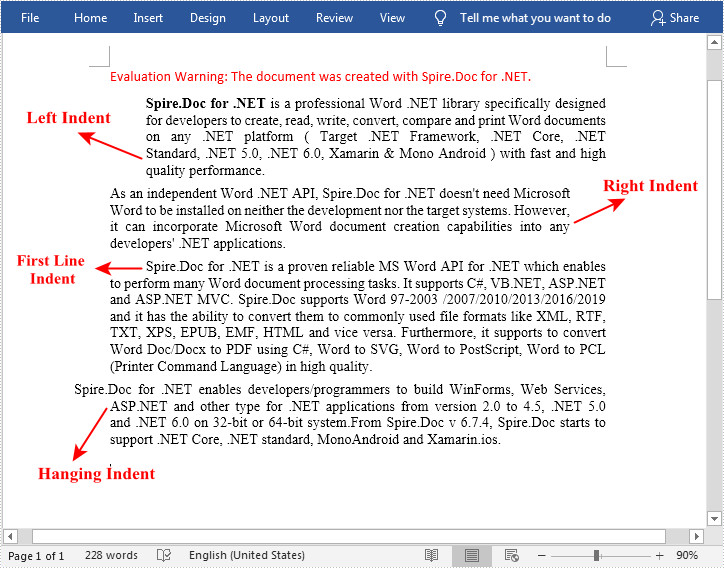
In Word documents, indentation is a paragraph format used to adjust the distance between paragraph body and page margin. It includes left indent, right indent, first line indent and hanging indent. Left indent and right indent can be applied to all lines of a paragraph, while first line indent can only be applied to first line of a paragraph. As for the hanging indent, it can be applied to every line of the paragraph except the first one. This article introduces how to programmatically set paragraph indents in a Word document using Spire.Doc for .NET.
Install Spire.Doc for .NET
To begin with, you need to add the DLL files included in the Spire.Doc for .NET package as references in your .NET project. The DLL files can be either downloaded from this link or installed via NuGet.
PM> Install-Package Spire.Doc
Set Paragraph Indents in Word
The table below lists some of the core classes and properties that are used to set different paragraph indents in a Word document.
| Name | Description |
| ParagraphFormat Class | Represents the format of a paragraph. |
| ParagraphFormat.LeftIndent Property | Returns or sets the value that represents the left indent for paragraph. |
| ParagraphFormat.RightIndent Property | Returns or sets the value that represents the right indent for paragraph. |
| ParagraphFormat.FirstLineIndent Property | Gets or sets the value for first line or hanging indent. Positive value represents first-line indent, and Negative value represents hanging indent. |
The detailed steps are as follows:
- Create a Document instance.
- Load a sample Word document using Document.LoadFromFile() method.
- Get a specified section using Document.Sections[] property.
- Get a specified paragraph using Section.Paragraphs[] property.
- Get the paragraph format using Paragraph.Format property, and then set the paragraph indent using the above listed properties of ParagraphFormat class.
- Save the document to another file using Document.SaveToFile() method.
- C#
- VB.NET
using Spire.Doc;
using Spire.Doc.Documents;

namespace WordIndent
{
    class Program
    {
        static void Main(string[] args)
        {
            //Create a Document instance
            Document doc = new Document();

            //Load a sample Word document
            doc.LoadFromFile("sample.docx");

            //Get the first paragraph and set left indent
            Paragraph para1 = doc.Sections[0].Paragraphs[0];
            para1.Format.LeftIndent = 30;

            //Get the second paragraph and set right indent
            Paragraph para2 = doc.Sections[0].Paragraphs[1];
            para2.Format.RightIndent = 30;

            //Get the third paragraph and set first line indent
            Paragraph para3 = doc.Sections[0].Paragraphs[2];
            para3.Format.FirstLineIndent = 30;

            //Get the fourth paragraph and set hanging indent
            Paragraph para4 = doc.Sections[0].Paragraphs[3];
            para4.Format.FirstLineIndent = -30;

            //Save the document to file
            doc.SaveToFile("Indent.docx", FileFormat.Docx2010);
        }
    }
}
Apply for a Temporary License
If you’d like to remove the evaluation message from the generated documents, or to get rid of the function limitations, please request a 30-day trial license for yourself.
Achieve more control and flexibility with your documents
Updated on September 11, 2022
What to Know
- Select Insert > Text Box > choose a text box template. Select and drag box to the position you want.
- To resize text, select and drag circles around the edge. To rotate text, select and drag the circular arrow.
- Place the cursor inside the text box and type the information you want to appear.
This article explains how to use text boxes in Microsoft Word. Instructions apply to Word for Microsoft 365, Word 2019, Word 2016, and Word 2013.
How to Insert a Text Box in Word
Start by opening the document you want to add a text box to. Then follow the steps below.
-
On the ribbon, select Insert.
-
In the Text group, select Text Box, then choose a text box template.
-
The new text box appears in the middle of the text, and the Shape Format tab is automatically selected.
-
Select and drag the box to the position you want. To resize the text box, select and drag the circles around the edge. To rotate the text box, select and drag the circular arrow at the top of the box.
-
Place the cursor inside the text box and type the information you want to appear there.
Why Use Text Boxes?
When you type text in Microsoft Word, you have options for making it look a particular way on the page (such as changing the page margins), but those options are limited. Text boxes expand your formatting repertoire by offering additional control and flexibility for how your text appears. You can place a text box anywhere within a document and format it with different colors and fonts. This feature is especially helpful for creating a blockquote or a sidebar.
Customize a Text Box
After you create a text box, you can customize it in a number of ways.
-
To bring up options, place the cursor inside the text box and right-click. Choose an option and follow the screen prompts to add a border, change the style, or adjust the way the text box interacts with the other text on the page.
Alternatively, use the controls on the Shape Format tab.
-
To go directly to the Layout Options menu, select the text box, then select the Layout Options icon (it looks like a horseshoe and is located to the right of the text box).
-
Change the text, make more adjustments, or move the box to another location at any time. To delete a text box, select its border, then press Delete on the keyboard.
Thanks for letting us know!
Get the Latest Tech News Delivered Every Day
Subscribe
Formatting text in MS Word is both pleasingly simple and annoyingly complicated. Take text indentation, for example. The basics are very easy to grasp. But there are many extra options that you may miss if you’re not already a confident Microsoft Word user. To help out, then, we’ve prepared this complete guide on how to indent text in a document.
The Tab Key
One simple way to indent text is to place the cursor at the start of a paragraph and hit the tab key on your keyboard. In Microsoft Word, this adds a 0.5” (1.27cm) indent at the left margin. It also automatically formats the text so that subsequent paragraphs have a first-line indent.
If all you want to do is begin each paragraph with a half-inch indent, this is fine. But for more control over text indentation in your document, read on.
How to Indent Text
You can find the basic indentation options in Microsoft Word on the main ribbon. This includes the Paragraph section of the Home tab, where you will find Increase Indent and Decrease Indent buttons.
The Increase Indent button adds a 0.5” (1.27cm) indent at the left margin for the entire paragraph (not just the first line). The Decrease Indent button, meanwhile, does the exact opposite.
Alternatively, go to Layout > Paragraph on the ribbon and adjust the values in the left and right indent boxes as required. This has the added bonus of letting you indent text by a custom amount.
Find this useful?
Subscribe to our newsletter and get writing tips from our editors straight to your inbox.

Special Indentations
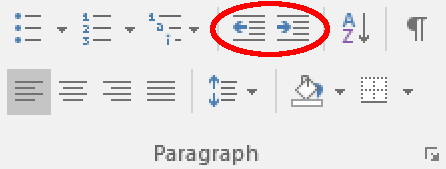
For even more control over the indentation in your document, you can open the main Paragraph menu. This can be accessed by going to Home > Paragraph, clicking the Line and Paragraph Spacing button, and then selecting Line Spacing Options… from the dropdown menu.
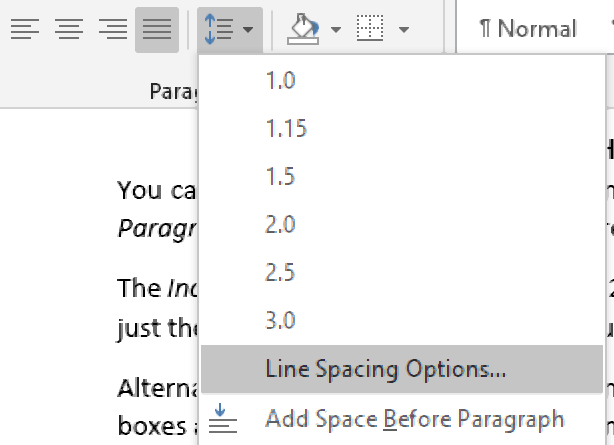
In the new window, you will find an Indentation section. The left and right indent options here work the same as in the Layout tab on the ribbon.
The other settings here can be used to add special indentations to your document. These include:
- First line – This option indents the first line of each paragraph to a custom value. Typically, this type of indent would be used as an alternative to paragraph spacing.
- Hanging – This will indent each line after the first in a paragraph. The most common use for this is to add a hanging indent in a reference list (e.g., as required in APA referencing).
- Mirror indents – Clicking this will change the left and right indent options to say Inside and Outside This will mean that indents are “mirrored” on odd and even pages, which helps ensure consistent formatting when printing something in a book format.
To use these options, simply select the text you want to format with the cursor, open the paragraph menu, choose the type and size of indent you want to apply, and click OK to change the indentation for the selected text.
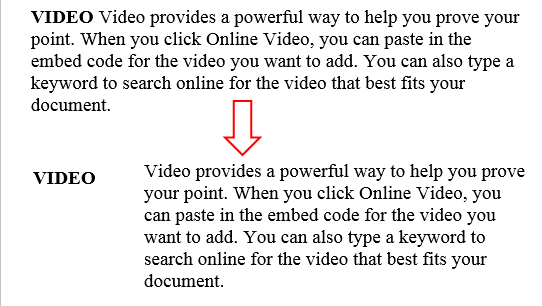
Have you ever wondered whether it’s possible to type in the margin of a Word document? Something like this:
I was the other day because I recalled seeing it in some papers and books but never on the Word documents people typically type. So it turns out it’s actually possible and is relatively easy to accomplish using either one of two methods.
The methods discussed below will work on all versions of Word from 2003 and later. If you’ve trouble following the instructions, watch the embedded video from my channel to see the steps.
Method 1: Type Text in the Margin using Negative Indentation
This method uses the indent option to move the target text past the margin. The indent buttons on the ribbon however don’t accomplish this, and so we need to use the paragraph settings dialog for this.
1. Select the text you need in the margin.
2. Right-click on the selected text and select Paragraph. This is the easiest way to do this plus it works in all versions of MS Word as of this writing.
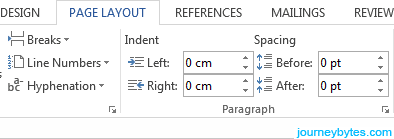
Alternatively, you can also click on the little arrow inside the paragraph options in the ribbon or simply head to the Page Layout tab for quick access to the indentation settings (MS Word 2007 and later only).
3. In the dialog under Indentation, enter a negative value inside the left box e.g. -1.75 cm, -2 cm or -2.5cm etc. then click the Ok button.

If you need the text inside the right margin instead of the left, first align the text to the right then enter a negative value in the right box e.g. -1.75 cm, -2 cm or -2.5cm etc.
Note: Don’t enter a very high value (above -3 cm) as this will move the text outside the page boundary.
Method 2: Type Text in the Margin using a Text Box
The first method works quite quick but I realized later on that it may not be practical in most situations. Reason being, the indentation setting applies to the whole line and as such you can’t add text on the same line without it being constrained to this setting.
Clearly, most of us don’t want this and this is where the text box comes in.
The text box method works a bit differently on Word 2003 and Word 2007 and later versions. I’ll cover both cases individually.
i. Using the Text Box in Word 2007 and later
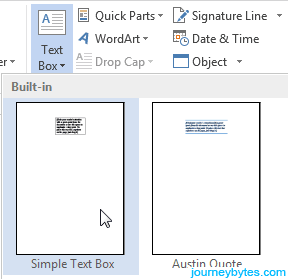
1. Go to the Insert tab, click the Text Box button then choose Simple Text Box.
2. Enter and format the text you need in the margin inside the text box.
3. Drag the text box inside the margin that you want.
4. To remove the text box boundary, select the text box then switch to the Format tab in the ribbon. Now just look for Shape outline, click the small arrow beside it and select No Outline. That’s it!
ii. Using the Text Box in Word 2003
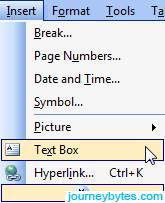
1. In the menu bar under Insert select Text Box.
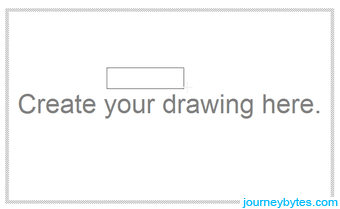
2. Doing that will only insert a blank canvas. To draw a text box, click and hold inside the canvas, then drag your mouse. Release the button once the size meets your needs.
3. Enter and format the text you need in the margin inside the text box.
4. Drag the text box inside the margin that you want. You can now delete the canvas by clicking inside it followed by pressing the Delete button on your keyboard.
Note: If you delete the canvas without moving the text box, the text box will also be deleted.
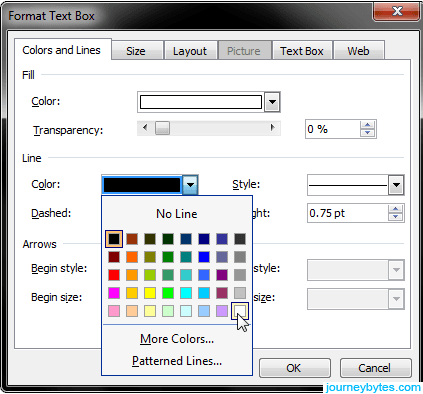
5. To remove the text box boundary, first select the text box, right-click on the boundary then select Format Text Box. You can also just double-click on the boundary.
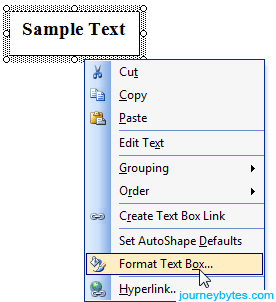
6. In the Format Text Box dialog, go to the line settings and change the colour to white. Press the Ok button and you’re done!
Still having problems? Just drop me a comment below and I’ll get to you as soon as I can.
 Block paragraphs are the default in Microsoft Word. Block paragraphs are aligned with the left margin with no indentation and are visually separated by line spaces. Although block paragraphs are popular online, traditionally indented paragraphs are more common in print publishing, business writing, and academic research. Today’s tutorial shows three ways to indent paragraphs in Microsoft Word:
1. Indent single paragraphs with the tab key
2. Indent all paragraphs with the ruler
3. Indent all paragraphs with the Paragraph dialog box
This tutorial is also available as a YouTube video showing all the steps in real time.
Watch more than 200 other writing-related software tutorials on my YouTube channel.
The images below are from Word for Microsoft 365. These steps also apply to Word 2021, Word 2019, Word 2016, Word 2013, and Word 2010.
Indent Individual Paragraphs in Word
If you want to indent single, existing paragraphs, the quickest method is the Tab key.
The Tab Key Method
1. Insert your cursor at the start of the paragraph.
2. Press the Tab key on your keyboard.
See “How to Create, Change, and Delete Tabs in Microsoft Word” for more information about using tab stops.
If you want to indent all existing paragraphs, the quickest method is the ruler.
However, you can also use the Paragraph dialog box if you would like to make additional adjustments to alignments and line spacing simultaneously.
The Ruler Method
If your document is blank, skip to step 5.
1. Select the Home tab in the ribbon.

2. Insert your cursor into a paragraph.
3. Select Select in the Editing group.

4. Select Select Text with Similar Formatting in the drop-down menu. Note that older versions of Word will say “Select All Text With Similar Formatting,” instead.
This option will select all the paragraphs in the document.
Caution: Other text with paragraph formatting (such as a title formatted with a large font size rather than with one of Word’s preset heading styles) will also be selected.

If your ruler is already visible, skip to step 7.
5. Select the View tab in the ribbon.

6. Select Ruler in the Show group.

7. Move the top ruler marker to the right to the desired indent length.

Your paragraphs should be indented as you move the ruler marker.
The Paragraph Dialog Box Method
1. Select the Home tab in the ribbon (see figure 1).
If your document is blank, skip to step 5.
2. Insert your cursor into a paragraph.
3. Select Select in the Editing group (see figure 2).
4. Select Select Text with Similar Formatting in the drop-down menu (see figure 3). Note that older versions of Word will say “Select All Text With Similar Formatting,” instead.
This option will select all the paragraphs in the document.
Caution: Other text with paragraph formatting (such as a title formatted with a large font size rather than with one of Word’s preset heading styles) will also be selected.
5. Select the Paragraph group’s dialog box launcher.

6. Select the Special menu arrow in the Paragraph dialog box.
![]()
7. Select First line in the Special drop-down menu.

8. Use the increment arrows to adjust the length of the indent.

9. Make any additional adjustments to alignment or line spacing.
10. Select the OK button to save your selection(s) and close the Paragraph dialog box.

Related Resources
How to Create and Customize Headings in Microsoft Word
How to Insert Copyright, Trademark, and Registered Symbols in Microsoft Word
How to View the Word Count in Microsoft Word
How to Adjust Page Margins in Microsoft Word
How to Create Hanging Indents in Microsoft Word
Updated January 14, 2023
Select the paragraph to be indented; From the Home tab, Paragraph group, select the dialog box launcher; Check that the Indents and Spacing tab is selected; In the Indentation section set the indent value you require.
Contents
- 1 How do you indent 0.5 in Word?
- 2 How do I indent the second line in Word?
- 3 What is the shortcut key for 1.5 line spacing?
- 4 How will you use indent commands?
- 5 How do I put spaces before paragraphs in Word?
- 6 How do I do 1.5 spacing on Word?
- 7 How do you do 1.5 spacing on Microsoft Word?
- 8 What is L Ctrl?
- 9 How do I indent tab in Word?
- 10 How do you make a 0.2 hanging indent?
- 11 What is indent example?
- 12 How do I add a space between words in Word?
- 13 How do I make no space between lines in Word?
- 14 Is 1.0 single-spacing?
- 15 Where is the spacing in Microsoft Word?
- 16 How do you set 1 inch margins on Microsoft Word?
- 17 What does Ctrl Shift E?
- 18 What is Ctrl E in word?
- 19 What does Ctrl k do in word?
- 20 Why can I not indent on word?
How do you indent 0.5 in Word?
One simple way to indent text is to place the cursor at the start of a paragraph and hit the tab key on your keyboard. In Microsoft Word, this adds a 0.5” (1.27cm) indent at the left margin. It also automatically formats the text so that subsequent paragraphs have a first-line indent.
How do I indent the second line in Word?
Select OK.
- Select the paragraph where you want to add a hanging indent.
- Go to Format > Paragraph.
- Under Special, select one of the following indent styles: Hanging. First Line. None. On Hanging and First Line indents, you can adjust the depth of the indent with the By field.
- Select OK.
What is the shortcut key for 1.5 line spacing?
Ctrl+5
Pressing Ctrl+5 changes to 1.5 line spacing.
How will you use indent commands?
To use the Indent commands:
- Select the text you want to indent.
- Make sure you are on the Home tab.
- Click the Increase Indent command to increase the indent by increments of 1/2 inch. Increasing the indent.
- Click the Decrease Indent command to decrease the indent by increments of 1/2 inch.
How do I put spaces before paragraphs in Word?
To format paragraph spacing:
- Select the paragraph or paragraphs you want to format.
- On the Home tab, click the Line and Paragraph Spacing command. Click Add Space Before Paragraph or Remove Space After Paragraph from the drop-down menu.
- The paragraph spacing will change in the document.
How do I do 1.5 spacing on Word?
To format line spacing:
- Click Format on the menu bar.
- Select Paragraph. The Paragraph dialog box appears.
- Click the Indents and Spacing tab.
- In the line spacing drop-down menu, you can select single, 1.5, or double spacing. The default is single spacing.
- Click OK.
How do you do 1.5 spacing on Microsoft Word?
Change the line spacing in a portion of the document
- Select one or more paragraphs to update.
- Go to Home > Line and Paragraph Spacing.
- Select Line Spacing Options and choose an option in the Line spacing box.
- Adjust the Before and After settings to change spacing between paragraphs.
- Select OK.
What is L Ctrl?
Alternatively referred to as Control+L and C-l, Ctrl+L is a keyboard shortcut whose function differs depending on the program being. For example, in Microsoft Word, Ctrl+L is used to align text with the left edge of a document (margin).Ctrl+L in Excel and other spreadsheet programs.
How do I indent tab in Word?
To indent using the Tab key:
- Place the insertion point at the very beginning of the paragraph you want to indent.
- Press the Tab key. On the Ruler, you should see the first-line indent marker move to the right by 1/2 inch.
- The first line of the paragraph will be indented.
How do you make a 0.2 hanging indent?
Create a hanging indent
- Select the text where you want to add a hanging indent.
- Go to Home > Paragraph dialog launcher. > Indents and Spacing.
- Under Special, select Hanging. You can adjust the depth of the indent using the By field.
- Select OK.
What is indent example?
When you press the “Tab” button in a word processing program so the first line of your text starts further inward than the second, this is an example of indent.A space left when you “tab” to move text inward in a word processing program is an example of an indent.
How do I add a space between words in Word?
Change the spacing between characters
- Select the text that you want to change.
- On the Home tab, click the Font Dialog Box Launcher, and then click the Advanced tab.
- In the Spacing box, click Expanded or Condensed, and then specify how much space you want in the By box.
How do I make no space between lines in Word?
Change the line spacing in Word
- Select Design > Paragraph Spacing.
- Hover the cursor over each option to see a preview, and then select the option you want. For single spacing, select No Paragraph Space.
Is 1.0 single-spacing?
Line spacing is the distance between lines. In earlier versions of Word, the default line spacing distance is “1.0,” or single-spacing, which stacks lines closely together with minimal space between. The amount of that space varies depending on the font used.
Where is the spacing in Microsoft Word?
Go to Home > Line and Paragraph Spacing. Select Line Spacing Options, and then choose the options you want under Spacing. To change the spacing before or after the selected paragraphs, select the arrow next to Before or After and enter the amount of space that you want. Select Set as Default.
How do you set 1 inch margins on Microsoft Word?
To set the top margin of all other pages to 1 inch:
- At least one line down from the top of Page 1, place cursor before or after any text in the order.
- Click Page Layout > Margins > Custom Margins.
- In the Page Setup Window, change the top margin to 1 inch.
- Select “This point forward” from the Apply to selection box.
- Click Ok.
What does Ctrl Shift E?
Ctrl-Shift-E. Turn revision tracking on or off. Ctrl-A. Select everything in the document.
What is Ctrl E in word?
Ctrl+E. Align the text to the left. Ctrl+L. Align the text to the right. Ctrl+R.
What does Ctrl k do in word?
In Microsoft Word and other word processors, pressing Ctrl + K inserts a hyperlink at the text cursor’s current location.
Why can I not indent on word?
To fix this, click the Microsoft Office button, select Word Options . Under Proofing , click AutoCorrect Options… . Under AutoFormat As You Type tab (in the Automatically as you type section), make sure that the “Set left- and first-indent with tabs and backspaces” option is checked.
An indentation or indent is an empty space at the beginning of a line of
written or printed text recommended to use instead of spaces or tabs at the beginning of lines. Automatic text indentation makes Word documents formatting consistent and easy to change.
There are several types of indents in the Word document:
- The First Line Indent indicates the first line of the paragraph.
Instead of using the first-line indents, a
space between paragraphs
or even an empty line is often used. In modern word-processing, it is not
recommended to use the first-line indents and the
spaces between paragraphs in the same document.Notes:
- The first-line indent in the first paragraph of any text
is optional since it is obvious where the paragraph begins.
However, the
Drop caps
may apply for such paragraphs. - Do not use spaces or tabs to indent the first line — when you
change the style of different paragraphs. It will be difficult
to reconcile them.

- The first-line indent in the first paragraph of any text
- Professionally printed material in English typically does not indent the first
paragraph but indents those that follow. So, a negative indent or
hanging indent is used, as an indent that indents all text except the
first line:
The hanging indents are used in Bibliographies, Reference pages, and sometimes in scripts, dictionary entries, and footnotes.
- Another standard modern English style is the lack of indentation, and the addition of vertical white space to create «block paragraphs»:
The block paragraphs are commonly used for block quotations.


Customize the paragraph format
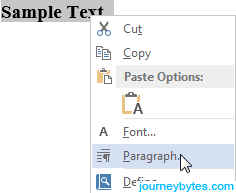
1. Click the paragraph you want to format or select
multiple paragraphs.
2. Do one of the following:
- On the Home tab, in the Paragraph group, click the dialog box
launcher:
- Choose Paragraph… from the shortcut menu (right-click or press
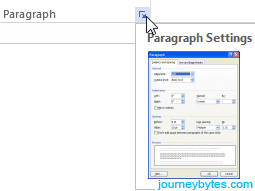
Shift+F10) to display the Paragraph dialog box:


3. In the Paragraph dialog box, choose or
type the appropriate values for Left, Right, or Special
(First line or Hanging) indents:

Use the ruler
To do so, click in the paragraph you want to format or select multiple paragraphs, and
then drag the First Line Indent marker left or right to the desired location.
Increase/decrease text indentation
- Using the keyboard:
You can press Ctrl+T to create a hanging indent that aligns body text with the first tab marker. (By default, tabs are set every 0.5 inches).
You can press Ctrl+Shift+T to “unhang” an indent, regardless of how the hanging indent was created.
Press Ctrl+Shift+M to decrease a paragraph’s indent by one tab stop. By default, tab stops are set every 0.5 inches.
Press Ctrl+M to increase a paragraph’s indent by one tab stop. By default, tab stops are set every 0.5 inches.
You can instantly add a full line space before a paragraph by selecting the paragraph(s) you want to format and pressing Ctrl+0 (zero). If you select multiple paragraphs, pressing Ctrl+0 adds a blank line space before each paragraph in the selection.
- Using the mouse:
To increase/decrease text indentation for the selected text, on the Home tab, in the Paragraph group, click the Decrease Indent or Increase Indent button:

or


See also this tip in French:
Comment
créer un retrait négatif de première ligne.