
Excel for Microsoft 365 Word for Microsoft 365 Outlook for Microsoft 365 PowerPoint for Microsoft 365 Project Online Desktop Client Excel 2021 Word 2021 Outlook 2021 PowerPoint 2021 Project Professional 2021 Project Standard 2021 Excel 2021 for Mac Word 2021 for Mac PowerPoint 2021 for Mac Excel 2019 Word 2019 Outlook 2019 PowerPoint 2019 Project Professional 2019 Project Standard 2019 Excel 2016 Word 2016 Outlook 2016 PowerPoint 2016 Project Professional 2016 Project Standard 2016 Excel 2013 Word 2013 Outlook 2013 PowerPoint 2013 Project Professional 2013 Project Standard 2013 Excel 2010 Word 2010 Outlook 2010 PowerPoint 2010 More…Less
Shape Outline lets you choose the color, thickness, or style of the outside border of a text box, shape, or SmartArt graphic. By setting the border to No Outline, you remove the border altogether.
Important: In Word and Outlook, you must first anchor multiple objects before selecting them. Select one object. Next, press and hold Ctrl while you select more objects
Note: If you’re changing the border of a SmartArt graphic, select the graphic, and find Shape Outline on the Format tab.
Try the «sketched» outline
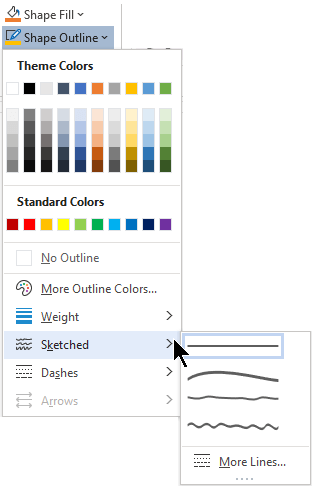
If you’re using Microsoft 365, you can give a casual, hand-drawn look to shapes with the Sketched outline.
-
Select an existing shape in your document, or draw a new one.
-
With the shape selected, on the Shape Format tab, select Shape Outline > Sketched, and then select a line width.
(The smaller the point size («pt»), the thinner the line is.)

Set the line thickness
-
Select the text box or shape border.
If you want to change multiple text boxes or shapes, click the first text box or shape, and then press and hold Ctrl while you click the other text boxes or shapes.
-
Go to Format > Shape Outline, point to Weight, and then choose a thickness.
If you don’t see the Format tab, make sure you’ve selected the text box or shape.
Note: If you don’t see the thickness you want, select More Lines, and set the thickness you want in the Width box.
-
Select the text box or shape.
If you want to change multiple text boxes or shapes, click the first text box or shape, and then press and hold Ctrl while you click the other text boxes or shapes.
-
Click the Format tab, click Shape Outline, point to Dashes, and then click the style you want.
If you don’t see Format tab, make sure you’ve selected the text box or shape.
-
Select the text box or shape.
-
On the Format tab, click Shape Outline, point to Dashes, and then select More Lines.
-
In the Format Shape pane, under Line, select the line style options that you want.
-
Select the text box or shape.
If you want to change multiple text boxes or shapes, click the first text box or shape, and then press and hold Ctrl while you click the other text boxes or shapes.
-
On the Format tab, click Shape Outline, and then click No Outline.
See also
Add, change, or delete borders from documents or pictures
Add a fill or effect to a shape or text box
Apply or remove cell borders on a worksheet
-
Select the text box or shape.
If you want to change multiple text boxes or shapes, click the first text box or shape, and then press and hold Ctrl while you click the other text boxes or shapes.
-
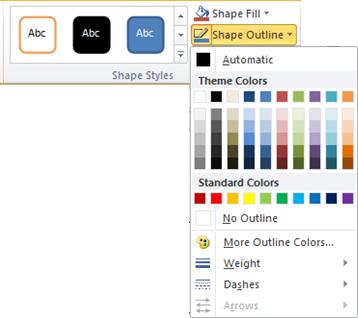
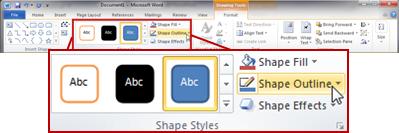
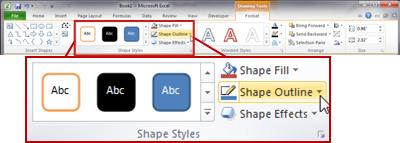
Under Drawing Tools, on the Format tab, in the Shape Styles group, click Shape Outline, point to Weight, and then click the line weight that you want.
If you don’t see the Drawing Tools or Format tabs, make sure that you have selected the text box or shape. You might have to double-click the text box or shape to open the Format tab.
Note: If you don’t see the thickness you want, select More Lines, and set the thickness you want in the Width box.
-
Select the text box or shape.
If you want to change multiple text boxes or shapes, click the first text box or shape, and then press and hold Ctrl while you click the other text boxes or shapes.
-
Under Drawing Tools, on the Format tab, in the Shape Styles group, click Shape Outline, point to Dashes, and then click the border style that you want.
If you don’t see the Drawing Tools or Format tabs, make sure that you have selected the text box or shape. You might have to double-click the text box or shape to open the Format tab.
-
Select the text box or shape.
-
Under Drawing Tools, on the Format tab, click Shape Outline, point to Dashes, and then select More Lines.
-
In the Format Shape dialog box, under Line Style, select the line style options that you want.
-
Select the text box or shape border that you want to remove.
If you want to change multiple text boxes or shapes, click the first text box or shape, and then press and hold Ctrl while you click the other text boxes or shapes.
-
Under Drawing Tools, on the Format tab, in the Shape Styles group, click Shape Outline, and then click No Outline.
If you don’t see the Drawing Tools or Format tabs, make sure that you have selected the text box or shape. You might have to double-click the text box or shape to open the Format tab.

See also
Add a fill or effect to a shape or text box
Add, change, or delete borders from documents or pictures
Add, copy, or delete a text box
Apply or remove cell borders on a worksheet
Need more help?
Excel for Microsoft 365 for Mac Word for Microsoft 365 for Mac PowerPoint for Microsoft 365 for Mac Excel 2021 for Mac Word 2021 for Mac PowerPoint 2021 for Mac Excel 2019 for Mac Word 2019 for Mac PowerPoint 2019 for Mac Excel 2016 for Mac Word 2016 for Mac PowerPoint 2016 for Mac More…Less
Here’s how to add a line, pattern, or custom border to a text box, picture, and other objects in Word, PowerPoint, or Excel for Mac.
Note: If you didn’t add the border to the shape, text box, picture, or other object in Mac Office, you can’t change or remove the border for the object.
Try the «Sketched» outline
If you’re using Microsoft 365 for Mac (version 16.28 or later), you can give a casual, hand-drawn look to shapes with the Sketched outline.
-
Select an existing shape in your document, or draw a new one.
-
With the shape selected, on the Shape Format tab, select Shape Outline > Sketched, and then select a line width. (The smaller the point size («pt»), the thinner the line is.)
Add or remove a border for a shape or text box
-
Select the shape or text box to which you want to add, change, or remove a border.
-
Click Shape Format, and then click the arrow next to Shape Outline.
-
Do any of the following:
To
Do This
Add or change the color of the border
Either click the color that you want, or mix your own color by clicking More Outline Colors.
Add or change the thickness of the border
Point to Weight, and then choose the line weight that you want.
Add or change the style of the border
Point to Dashes, and then click the line style that you want.
Remove the border from the shape or text box
Click No Outline.

Add or remove a picture border
-
Select the picture to which you want to add, change, or remove a border.
-
Click Picture Format, and then click the arrow next to Picture Border.
-
Do any of the following:
To
Do This
Add or change the color of the border
Either click the color you want, or mix your own color by clicking More Outline Colors.
Add or change the thickness of the border
Point to Weight, and then choose the line weight you want.
Add or change the style of the border
Point to Dashes, and then click the line style you want.
Remove the border from the picture
Click No Outline.

See also
Add a page border
Need more help?
Want more options?
Explore subscription benefits, browse training courses, learn how to secure your device, and more.
Communities help you ask and answer questions, give feedback, and hear from experts with rich knowledge.
Text boxes in an MS Word document are a very useful feature. Text within a box acts as a highlight for the reader. Here, we will show you how to:
- Add a Text Box
- Remove a Text Box
- Customize a Text Box Border
- Change Border Color
- Create Dashed Border
- Change Border Thickness
Let us begin.
Step #1: Open the Word document.
Open the Word document where you want to add the text box.
Step #2: Add the Text Box
Position the cursor where you want the text box to appear.
In the top menu bar, click on the Insert tab to change the ribbon.

In the section Text, click on the Text Box icon to open a dialog box for Built-In text boxes.

Click on the text box you find suitable. We select the Simple Text Box.

Word adds the text box in the document.

Remove a Text Box
Step #1: Open the Word document.
Open the Word document that has at least one text box.
Step #2: Remove the text box
Click on the text box boundary to select it.

Press the Delete button on your keyboard.
Word will delete the text box from your document.
Customize a Text Box Border
Step #1: Open the Word document.
Open the Word document that has at least one text box.
Step #2: Customize the text box border
Click on the text box boundary to select it.

Right-click on the text box boundary to open a menu.
Click on Format AutoShape/Picture.

This opens a dialog box for Format Text Box.
Click on the Colors and Lines tab.

Change Border Color
Under Line, click on the down arrow on the right-hand side of Color:.

This opens a dialog box for Theme Colors and Standard Colors.
Click on the color of your choice.

The chosen color will appear against the Color: tab under Line.

Note: At this point, you can click on OK at the bottom of the dialog box to exit. Word will change the color of the box to your chosen color. Else, move to the next step to make more changes.
Create Dashed Border
In the Format Text Box dialog box, under Line, click on the down arrow on the right side of Dashed:.

This opens a choice for different dashed lines.
Select the most suitable dashed line.

The chosen dashed line will appear against the Dashed: tab under Line.

Note: At this point, you can click on OK at the bottom of the dialog box to exit. Word will make the changes to the text box as per your choices above. Else, move to the next step to make more changes.
Change Border Thickness
In the Format Text Box dialog box, under Line, click on the down arrow on the right side of Style:.

This opens a choice for lines of a different style.
Each line style has its weight in points on its left.
Select the line most suitable to you.

The chosen line style will appear against the Style: tab.
The weight of the chosen line style will appear against the Weight: tab under Style:.

The choice of line styles offers only a few discrete weights.
To change the line weight, select the number next to Weight:.
Change the number as you like.

Click on OK at the bottom of the Format Text Box dialog box to exit.
Word will make the changes to the text box according to all your choices.

Conclusion
Follow our step-by-step instructions to add or delete text boxes in your Word document. Beautify your text boxes with our instructions. We have shown you how to change the border color, style of the border line, and the thickness of the border.
Contents
- 1 How do you format a box border?
- 2 How do you format a box border around a paragraph?
- 3 How do I change the border color of a text box in Word?
- 4 How do I do borders in Word?
- 5 How do you put a decorative border around text in Word?
- 6 How do I edit border lines in Word?
- 7 How do you put a box around multiple paragraphs in Word?
- 8 How do you start a paragraph with spaces in Word?
- 9 How do you put a border around a text box?
- 10 How do you do a 1/2 point outline?
- 11 How do you change input tag border color?
- 12 How do I turn a text box into a frame?
- 13 How do I edit a border in Word 2010?
- 14 How do I change the page border?
- 15 How do I remove a text box border in Word?
- 16 How do I fix weird spacing between words in Word?
- 17 How do I get rid of large gaps between paragraphs in Word?
- 18 How do I get rid of large space between paragraphs in Word?
- 19 How do I put a border around a picture in Word 2019?
- 20 How do I put a border around a text box in Powerpoint?
Under Drawing Tools, on the Format tab, in the Shape Styles group, click Shape Outline, point to Dashes, and then click the border style that you want. If you don’t see the Drawing Tools or Format tabs, make sure that you have selected the text box or shape.
How do you format a box border around a paragraph?
How to Put Borders Around a Paragraph in Word 2016
- Place the insertion pointer in a paragraph.
- Click the Home tab.
- In the Paragraphs group, click the triangle next to the Borders command button. The Borders menu appears.
- Choose a border style from the menu.
How do I change the border color of a text box in Word?
Change the border color
- Select the shape or text box.
- On the Drawing Tools Format tab, click Shape Outline, and then click More Outline Colors.
- In the Colors box, either click the color that you want on the Standard tab, or mix your own color on the Custom tab.
How do I do borders in Word?
Add a border to a page
- Go to Design > Page Borders.
- Make selections for how you want the border to look.
- To adjust the distance between the border and the edge of the page, select Options. Make your changes and select OK.
- Select OK.
How do you put a decorative border around text in Word?
Go to Home > Borders, and then open the menu of border choices.
Add a border to selected text
- Select a word, line, or paragraph.
- On the Home tab, click the arrow next to the Borders button.
- In the Borders gallery, click the border style that you want to apply.
How do I edit border lines in Word?
Modify a border
- Open Microsoft Word.
- Click the Page Layout tab.
- In the Page Background group, click the Page Borders option.
- In the Borders and Shading window (shown below), if not already selected, click the Page Border tab.
- Make the desired changes to the border that is currently set for the document or page.
How do you put a box around multiple paragraphs in Word?
Re: Single Border Around Multiple Paragraphs
- Put the cursor at the far left of the first (bulleted) paragraph and press Shift+tab (to remove the list indent)
- Repeat #1 for the second bulleted paragraph.
- Select all eight paragraphs.
- Apply the box border.
How do you start a paragraph with spaces in Word?
To format paragraph spacing:
- Select the paragraph or paragraphs you want to format.
- On the Home tab, click the Line and Paragraph Spacing command. Click Add Space Before Paragraph or Remove Space After Paragraph from the drop-down menu.
- The paragraph spacing will change in the document.
How do you put a border around a text box?
Add a custom border
- Right-click the text box, AutoShape, picture, or object that you want to add the border to.
- Select the appropriate Format
Used sparingly, borders are a great way to get attention. Here’s how to add a line, pattern, or custom border to a text box, picture, and other objects in Word, PowerPoint, or Excel for Mac.
Note: If you didn’t add the border to the shape, text box, picture, or other object in Mac Office, you can’t change or remove the border for the object.
Word
Add or remove a border for a shape or text box
-
Select the shape or text box to which you want to add or remove a border.
-
Click Shape Format, and then click the arrow next to Shape Outline.
-
Do any of the following:
To
Do This
Add or change the color of the border
Either click the color that you want, or mix your own color by clicking More Outline Colors.
Add or change the thickness of the border
Point to Weight, and then choose the line weight that you want.
Add or change the style of the border
Point to Dashes, and then click the line style that you want.
Remove the border from the shape or text box
Click No Outline.
Add or remove a picture border
-
Select the picture to which you want to add or remove a border.
-
Click Picture Format, and then click the arrow next to Picture Border.
-
Do any of the following:
To
Do This
Add or change the color of the border
Either click the color you want, or mix your own color by clicking More Outline Colors.
Add or change the thickness of the border
Point to Weight, and then choose the line weight you want.
Add or change the style of the border
Point to Dashes, and then click the line style you want.
Remove the border from the picture
Click No Outline.
PowerPoint
Add or remove a border for a shape or text box
-
Select the shape or text box to which you want to add or remove a border.
-
Click Shape Format, and then click the arrow next to Shape Outline .
-
Do any of the following:
To
Do This
Add or change the color of the border
Either click the color you want, or mix your own color by clicking More Outline Colors.
Add or change the thickness of the border
Point to Weight, and then choose the line weight you want.
Add or change the style of the border
Point to Dashes, and then click the line style you want.
Remove the border from the shape or text box
Click No Outline.

Add or remove a picture border
-
Select the picture whose border you want to add or remove.
-
Click Picture Format, and then click the arrow next to Picture Border.
-
Do any of the following:
To
Do This
Add or change the color of the border
Either click the color you want, or mix your own color by clicking More Outline Colors.
Add or change the thickness of the border.
Point to Weight, and then choose the line weight you want.
Add or change the style of the border
Point to Dashes, and then click the line style you want.
Remove the border from the picture
Click No Outline.

Excel
Add or remove a border for a shape or text box
-
Select the shape or text box to which you want to add or remove a border.
-
Click Shape Format, and then click the arrow next to the Shape Outline.
-
Do any of the following:
To
Do This
Add or change the color of the border
Either click the color you want, or mix your own color by clicking More Outline Colors.
Add or change the thickness of the border
Point to Weight, and then choose the line weight you want.
Add or change the style of the border
Point to Dashes, and then click the line style you want.
Remove the border from the shape or text box
Click No Outline.

Add or remove a picture border
-
Select the picture whose border you want to add or remove.
-
Click Picture Format, and then click the arrow next to Picture Border.
-
Do any of the following:
To
Do This
Add or change the color of the border
Either click the color you want, or mix your own color by clicking More Outline Colors.
Add or change the thickness of the border
Point to Weight, and then choose the line weight you want.
Add or change the style of the border
Point to Dashes, and then click the line style you want.
Remove the border from the picture
Click No Outline.

Word
Do any of the following:
Add a border to a shape or text box
-
Select the shape or text box that you want to add a border to.
-
On the Format tab, under Shape Styles, click Line.
-
Do any of the following:
To
Do This
Add a colored border
Either click the color that you want, or mix your own color by clicking More Colors.
Add a border of a specific thickness
Point to Weights, and then choose the line weight that you want.
Add a border of a specific style
Point to Dashed, and then click the line style that you want.

Add borders to a table
-
Select the table that you want to add borders to.
-
Do any of the following:
To
Do This
Add a colored border
On the Tables tab, under Table Styles, click the arrow next to Lines, and then either click the color that you want, or mix your own color by clicking More Colors.
Add a border of a specific thickness
On the Tables tab, under Draw Borders, click the Line Weight
pop-up menu and choose the thickness that you want the borders to be.Add a border of a specific style
On the Tables tab, under Draw Borders, click the Line Style
pop-up menu, and choose the line style that you want the borders to have. -
On the Tables tab, under Draw Borders, click the arrow next to Borders
and then select or clear the table borders that you want.
 pop-up menu and choose the thickness that you want the borders to be.
 pop-up menu, and choose the line style that you want the borders to have.
 and then select or clear the table borders that you want.
Add a border to a picture
-
Select the picture that you want to add a border to.
-
On the Format Picture tab, under Picture Styles, click the arrow next to Border
. -
Do any of the following:
To
Do This
Add a colored border
Either click the color that you want, or mix your own color by clicking More Colors.
Add a border of a specific thickness
Point to Weights, and then choose the line weight that you want.
Add a border of a specific style
Point to Dashed, and then click the line style that you want.
PowerPoint
Do any of the following:
Add a border to a shape or text box
-
Select the shape or text box that you want to add a border to.
-
On the Format tab, under Shape Styles, click Line.
-
Do any of the following:
To
Do This
Add a colored border
Either click the color that you want, or mix your own color by clicking More Colors.
Add a border of a specific thickness
Point to Weights, and then choose the line weight that you want.
Add a border of a specific style
Point to Dashed, and then click the line style that you want.
Add borders to a table
-
Select the table that you want to add borders to.
-
Do any of the following:
To
Do This
Add a colored border
On the Tables tab, under Table Styles, click the arrow next to Lines, and then either click the color that you want, or mix your own color by clicking More Colors.
Add a border of a specific thickness
On the Tables tab, under Draw Borders, click the Line Weight
pop-up menu and choose the thickness that you want the borders to be.Add a border of a specific style
On the Tables tab, under Draw Borders, click the Line Style
pop-up menu, and choose the line style that you want the borders to have. -
On the Tables tab, under Draw Borders, click the arrow next to Borders
and then select or clear the table borders that you want.

Add a border to a picture
-
Select the picture that you want to add a border to.
-
On the Format Picture tab, under Picture Styles, click the arrow next to Border
. -
Do any of the following:
To
Do This
Add a colored border
Either click the color that you want, or mix your own color by clicking More Colors.
Add a border of a specific thickness
Point to Weights, and then choose the line weight that you want.
Add a border of a specific style
Point to Dashed, and then click the line style that you want.
Excel
Do any of the following:
Add a border to a shape or text box
-
Select the shape or text box that you want to add a border to.
-
On the Format tab, under Shape Styles, click Line.
-
Do any of the following:
To
Do This
Add a colored border
Either click the color that you want, or mix your own color by clicking More Colors.
Add a border of a specific thickness
Point to Weights, and then choose the line weight that you want.
Add a border of a specific style
Point to Dashed, and then click the line style that you want.
Add a border to a picture
-
Select the picture that you want to add a border to.
-
On the Format Picture tab, under Picture Styles, click the arrow next to Border
. -
Do any of the following:
To
Do This
Add a colored border
Either click the color that you want, or mix your own color by clicking More Colors.
Add a border of a specific thickness
Point to Weights, and then choose the line weight that you want.
Add a border of a specific style
Point to Dashed, and then click the line style that you want.
See also
Add, change, or remove a page border
What is a border in Word?
A border in MS Word is a line, a set of lines, or designed shapes that appear around the boundaries of pages/images/shapes/textboxes.
Page borders are mostly used to design flyers and brochures, and sometimes book covers. Borders can be lines of different styles and weights or colorful graphics as illustrated in the picture below.

To add a page border in Word:
- Launch Microsoft Word.
- Click on the Design tab for Word 2013, 2016 and 2019.
- Click on the Page Layout tab for Word 2010 and older.
- In the Page Background group, click on Page Borders.

The Borders and Shading dialog box will appear. This
dialog box offers options for you to choose the style or size of border for
your page or pages.
- Select the Box option. This will give you a square border around your pages.
- In the Style section, select the type of line you want if you want to use a line or group of lines as your border.
- You can also change the color and width of the line.

- Instead of using a line, you can also use some
designed shapes or art as borders in your Word document.

NOTE: By default, Word adds the borders to all the pages in the document. If you don’t want this behavior, in the Apply to drop-down, select the first page only to add borders to only the first page. You can also break your pages into sections so that you can add borders to those sections alone.

How to make a custom border in word
It is very simple to make a custom border in Word.
- First, click to activate the Design tab.
- In the Page Background group, click the Page Border command to display the Borders and Shading dialog.
- Under the Settings group, select the Custom option from the list of choices. Now set the border styles and widths.

- Also, go to the Apply to box to decide whether you want the border to be applied to the entire document. Word will apply borders to every page in the document by default.
How to remove border in word
To remove border in Word:
- Click on the Design tab.
- In the Page Background group, click on Page
Borders. The Borders and Shading window will appear. - Click on None under Setting at the
left.

The none option will remove all the borders on all the pages
in your Word document.
How to add a Christmas border in word
To add a Christmas border in Word:
- Click on the Design tab.
- In the Page Background group, click on Page Borders. The Borders and Shading window will appear.
- Click on Box option under Settings at the left.
- Click on the Art dropdown, scroll up and down until you see the Christmas tree, click on it.
- Now click OK to add a Christmas border into Your Word document.

How to add a paragraph border in word
Aside from adding page borders in Word, you can also add
paragraph borders.
As a page border surrounds the entire page, a paragraph border surrounds only the selected paragraph.
Thus, to add a paragraph border in Word:
- Click anywhere inside the paragraph to which the
border will be added. - Click on the Home tab.
- In the Paragraph group, click on the Borders
command - A list of border options appears, click on Outside
Borders. - A line border will now surround the entire
paragraph.

How to add border to picture in word
Pictures in your document look fancier when framed.
There are different preset styles of borders you can add to
a picture to make it look nicer in your document. This feature is called Picture
Styles in MS Word.
The quickest way to add a border to a picture is to choose a preset style from the Styles gallery.
Obey the instructions below:
- Click to select the picture to add the border.

- Upon selecting the picture, a Picture Tool Format will appear on the ribbon. Click on this tab.
- In the Picture Style group, select the picture style that you like.
- The selected border will be added to the picture.

how to remove text box border in word
To remove text box border in Word:
- Click to select the text box.

- The Format tab will appear. If you don’t
see the Format tab, make sure the text box is selected. - Click on the Format tab.
- Click Shape Outline in the Shape Styles
category. - Then click on No Outline.

The No Outline command will remove the text box border from your Word document.
Including a text box in a Word document provides you with the ability to display text outside of the regular document content. This text box can then be formatted and moved around, but you may be wondering how to remove the border from that text box if you don’t need it.
You can remove borders from text boxes in a Word document by selecting the border of the text box, choosing the Shape Format tab at the top of the window, then clicking the Shape Outline button and selecting the No Outline option from the drop down list.
Microsoft Word handles a text box like a separate object, much like if you added a picture or a table to your document. As such, it has a variety of formatting options that you can apply.
But if you have never had to change a setting for a text box, you may be having trouble figuring out where all of those options are.
Our guide below will show you how to get rid of your text box border in Microsoft Word so that you don’t see the line surrounding the box in your document.
How to Delete a Text Box Border in Microsoft Word
- Open your document.
- Click on the text box border.
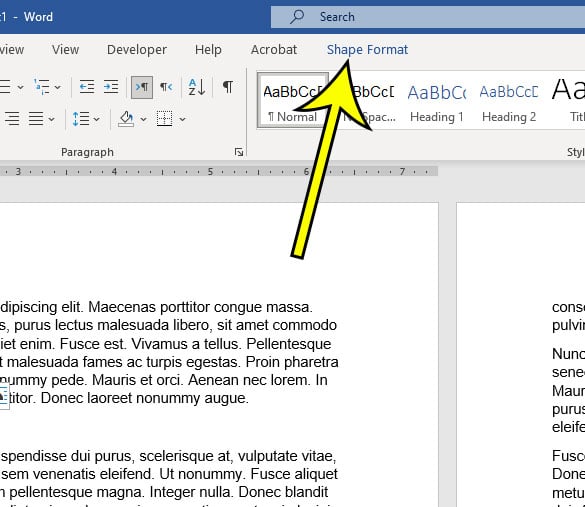
- Select the Shape Format tab.
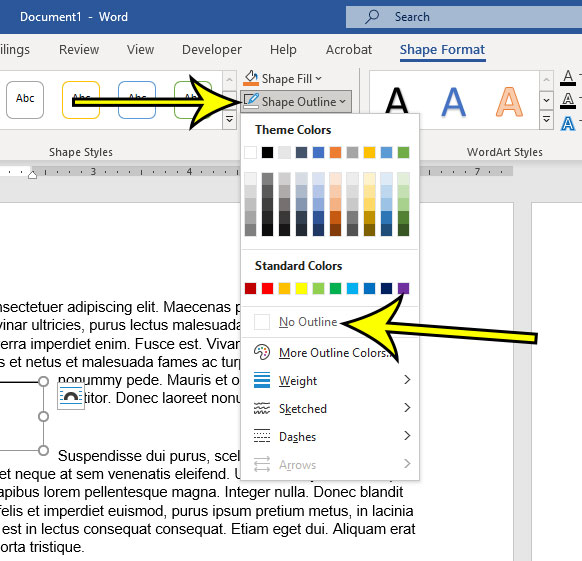
- Click the Shape Outline button and choose No Outline.
Our article continues below with additional information on how to remove text box border in Word, including pictures of these steps.
Learn how to draw a line through text in Google Docs if you also use that program and want to learn about some of its less common text formatting tools.
How to Get Rid of the Border on a Text Box in Word 2016 (Guide with Pictures)
The steps in this article were performed in the Microsoft Word for Office 365 version of the application, but will work in most other versions of Word as well.
Step 1: Open the document with the text box whose border you wish to remove.
Step 2: Click on the text box border, which will select the entire object.
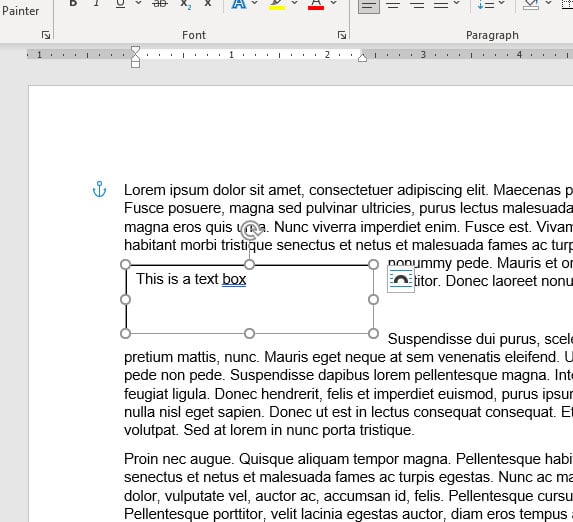
If you are having trouble clicking on the text box border, you can also choose to click inside of the text box.
Step 3: Select the Shape Format tab at the top of the window.
Note that this tab is only visible when the text box is selected, so you won’t see it when you are editing the body of your document.
Step 4: Click the Shape Outline button in the Shape Styles group in the ribbon, then choose the No Outline option from the drop down.
Now that you know how to remove text box border in Word you will be able to fix issues that arise in your document related to text box borders.
You will still see a line around the text box, as it is currently selected. However, when you click on another part of the document, that line should be gone, allowing you to see how the text box will look now that you have eliminated the border.
More Information on How to Remove Border from Text Box in Word
While the steps in this tutorial discuss removing the border completely, you can use these same steps if you want to use a different color for your border.
The text box border can be further customized from this menu by selecting the Weight, Sketched, or Dashes option. This will change things such as the style of the text box border, or its thickness. There is also an option on the Shape Outlines menu that says More Outline Colors, which you can choose if you don’t see the color that you want to use for the border.
Word also gives you the option to adjust the fill color of your text box. By default the text box background is white, but you can make it almost any other color that you would like. This is accomplished by going to Shape Format > Shape Fill then selecting the desired background color. If you do change the background color, you may also need to change the text color. You can do this by selecting the text inside of the text box, then using the Font formatting options found on the Home tab.
if you need to do something other than removing the border from a text box, then you will find a lot of options on the Format Shape dialog box. you can open this menu by clicking the small Format Shape button that appears at the bottom-right of the Shape Styles group in the ribbon.
Here you will find ways to customize your shape or text box, including:
- Changing the line style
- Adjusting the line weight
- Changing the shape border
- Changing the vertical alignment or text direction
- Using different margins for the content inside of the text box
- Adding various effects to the text box like shadow, reflection, glow soft edges, and more
- Applying or removing a fill color from the text box
There is even a tab for Text Options that let you select the formatting and layout settings for the text that is inside of the text box.
When you combine all of these different customization options along with the ability to create a custom border or remove a border from a text box then you can see just how many options there are for you to format the text box the way that you want.
If you need to change multiple text boxes at the same time inside of your document, then you can do that by clicking the first text box, then hold Ctrl key on your keyboard, and clicking on the additional text boxes that you want to change.
Note that doing this will cause you to apply the same changes to each of the selected text boxes. So if you give a different border style from the Borders tab then it will apply that effect to each of the selected text boxes.

Kermit Matthews is a freelance writer based in Philadelphia, Pennsylvania with more than a decade of experience writing technology guides. He has a Bachelor’s and Master’s degree in Computer Science and has spent much of his professional career in IT management.
He specializes in writing content about iPhones, Android devices, Microsoft Office, and many other popular applications and devices.
Read his full bio here.
I want to create a textbox in microsoft word with only top border as we commonly find in place where signature is needed, like where we have a line above the word Signature.
asked Mar 7, 2013 at 18:18
![]()
Soham DasguptaSoham Dasgupta
1,5146 gold badges21 silver badges30 bronze badges
A variation on Mr. J’s answer: insert a text box, remove the border, then insert a horizontal line by typing --- (three dashes) followed by Enter. If there’s too much white space above the line, select the paragraph above the line and shrink it –– Ctrl+<, i.e., Ctrl+Shift+,, is a keyboard shortcut that does that.
answered Mar 7, 2013 at 19:04
![]()
To achieve the same effect as the others have described, you can also select the first paragraph in your text box and set its top border to whatever line style you want. This option is in the Paragraph section of the Home ribbon.
answered Mar 7, 2013 at 19:12
![]()
you can put in a plain text box, then format it to remove the border («no line»), then insert a 1 cell table in the text box and you can set either the top or bottom border to solid or whatever
![]()
CharlieRB
22.5k5 gold badges55 silver badges104 bronze badges
answered Mar 7, 2013 at 18:33
![]()
Mr. JMr. J
672 bronze badges

When you need to highlight a portion of text, it’s not always convenient to use a text box. To emphasize a paragraph while keeping it within the main content, you can put a border around that text in Word instead.
You can put a border around specific text, such as a single sentence, or an entire paragraph. Let’s look at how to do both as well as customize the border.
Select the text you want to surround with a border and go to the Home tab. Click the drop-down arrow next to Borders and choose “Borders and Shading.”

Use a Setting option on the left or the buttons below Preview on the right to add the border around the text. You can also adjust the Style, Color, and Width settings in the center of the window to customize the line for the border.
RELATED: How to Add Borders to or Change Borders on a Table in Word
In the Apply To drop-down box on the right side, select “Text” and when you finish, click “OK” to apply the border.
You’ll then see your text outlined with a border.
Put a Border Around a Paragraph
If you have an entire paragraph you’d like to place a border around, the process is similar. However, you have a few extra customization options.
RELATED: How to Put Borders Around Images in Microsoft Word
Select the paragraph you want to surround with a border and head to the Home tab. Click the Borders drop-down arrow and pick one of the quick border options such as Outside Borders or All Borders.
This places the border around the paragraph from margin to margin on each side and gives you a fast way to add the border. But you can also customize the border and adjust the space between the border and the text.
Select the bordered paragraph, click the drop-down arrow next to Borders on the Home tab, and choose “Borders and Shading.”
Like with customizing the border for specific text, you can change the Style, Color, and Width for the border line. Confirm that “Paragraph” is selected in the Apply To drop-down box. Then, to adjust the spacing, click “Options” on the right side of the window.
At the top, use the arrows or enter the number of points for the spacing on the top, bottom, left, and right of the border in relation to the text. As you make the changes, you’ll see a preview directly below. Click “OK” when you finish.
Make any other adjustments you want in the Borders and Shading window and click “OK” when you’re done to apply the border.
RELATED: How to Change Page Margins in Word
Remove a Border From Text in Word
If you decide later to remove a border you’ve added, it takes only a few clicks. Select the text or paragraph containing the border and revisit the Home tab. Click the drop-down arrow next to Borders and pick “No Border.”
Text boxes in Word are great ways to call out portions of text. But if you want to keep your text in line with the rest and simply highlight a small piece, consider surrounding it in a border. For other types of borders, take a look at how to create a page border in Word.
READ NEXT
- › How to Outline Text in Adobe Photoshop
- › How to Mirror or Flip Text in Microsoft Word
- › How to Install Unsupported Versions of macOS on Your Mac
- › The Best Steam Deck Docks of 2023
- › Microsoft Outlook Is Adding a Splash of Personalization
- › This 64 GB Flash Drive From Samsung Is Just $8 Right Now
- › Liquid Metal vs. Thermal Paste: Is Liquid Metal Better?
- › Why Your Phone Charging Cable Needs a USB Condom
How-To Geek is where you turn when you want experts to explain technology. Since we launched in 2006, our articles have been read billions of times. Want to know more?
Achieve more control and flexibility with your documents
Updated on September 11, 2022
What to Know
- Select Insert > Text Box > choose a text box template. Select and drag box to the position you want.
- To resize text, select and drag circles around the edge. To rotate text, select and drag the circular arrow.
- Place the cursor inside the text box and type the information you want to appear.
This article explains how to use text boxes in Microsoft Word. Instructions apply to Word for Microsoft 365, Word 2019, Word 2016, and Word 2013.
How to Insert a Text Box in Word
Start by opening the document you want to add a text box to. Then follow the steps below.
-
On the ribbon, select Insert.
-
In the Text group, select Text Box, then choose a text box template.
-
The new text box appears in the middle of the text, and the Shape Format tab is automatically selected.
-
Select and drag the box to the position you want. To resize the text box, select and drag the circles around the edge. To rotate the text box, select and drag the circular arrow at the top of the box.
-
Place the cursor inside the text box and type the information you want to appear there.
Why Use Text Boxes?
When you type text in Microsoft Word, you have options for making it look a particular way on the page (such as changing the page margins), but those options are limited. Text boxes expand your formatting repertoire by offering additional control and flexibility for how your text appears. You can place a text box anywhere within a document and format it with different colors and fonts. This feature is especially helpful for creating a blockquote or a sidebar.
Customize a Text Box
After you create a text box, you can customize it in a number of ways.
-
To bring up options, place the cursor inside the text box and right-click. Choose an option and follow the screen prompts to add a border, change the style, or adjust the way the text box interacts with the other text on the page.
Alternatively, use the controls on the Shape Format tab.
-
To go directly to the Layout Options menu, select the text box, then select the Layout Options icon (it looks like a horseshoe and is located to the right of the text box).
-
Change the text, make more adjustments, or move the box to another location at any time. To delete a text box, select its border, then press Delete on the keyboard.
Thanks for letting us know!
Get the Latest Tech News Delivered Every Day
Subscribe