
Excel for Microsoft 365 Word for Microsoft 365 Outlook for Microsoft 365 PowerPoint for Microsoft 365 Project Online Desktop Client Publisher for Microsoft 365 Excel 2021 Word 2021 Outlook 2021 PowerPoint 2021 Project Professional 2021 Project Standard 2021 Publisher 2021 Excel 2019 Word 2019 Outlook 2019 PowerPoint 2019 Project Professional 2019 Project Standard 2019 Publisher 2019 Excel 2016 Word 2016 Outlook 2016 PowerPoint 2016 Project Professional 2016 Project Standard 2016 Publisher 2016 Excel 2013 Word 2013 Outlook 2013 PowerPoint 2013 Project Professional 2013 Project Standard 2013 Publisher 2013 Word 2010 More…Less
In a text box or shape, you can quickly change the color of text, the inside (fill) color, or the color of the border.
Let’s select the shape—the Drawing Tools appear in the ribbon, with the Format tab active.
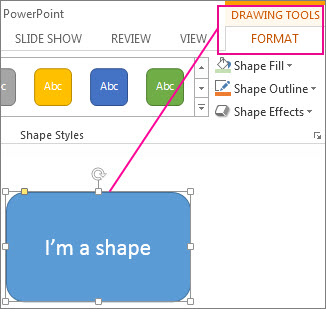
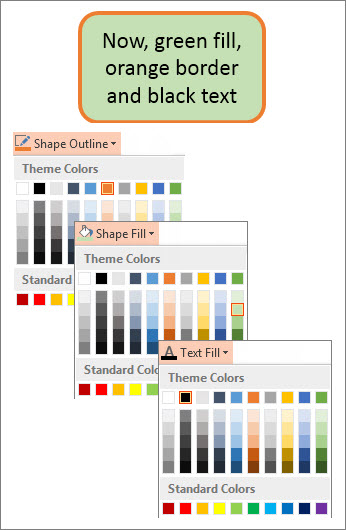
Here’s the same shape after we changed the border to orange, the fill to a light green, and the text to black. We used the Shape Outline, Shape Fill, and Text Fill commands, available on the Format tab under Drawing Tools.
Although the changes we’ll make below are shown in Microsoft PowerPoint, they work the same way in Excel, Word, Outlook, and Project.
Change the text color
-
Select the shape or text box border. When you do that, the Drawing Tools appear.
To change multiple shapes or text boxes, click the first shape or text box, and then press and hold Ctrl while you click the other shapes or text boxes.
-
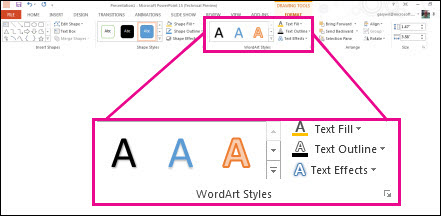
On the Drawing Tools Format tab, click Text Fill and, under Theme Colors, pick the color you want.
Note: The Text Fill and Text Outline menus might not be active until you start typing in your shape.

To change the text to a color that isn’t in the theme colors
-
Select the shape or text box.
-
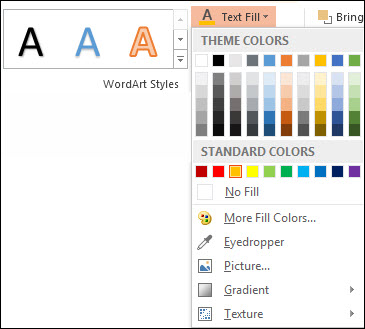
On the Drawing Tools Format tab, click Text Fill > More Fill Colors.
-
In the Colors box, either click the color you want on the Standard tab, or mix your own color on the Custom tab. Custom colors and colors on the Standard tab aren’t updated if you later change the document theme.
-
Change the inside (fill) color
-
Select the shape or text box to change. When you do that, the Drawing Tools appear.
To change multiple shapes or text boxes, click the first shape or text box, and then press and hold Ctrl while you click the other shapes or text boxes.
-
Click Shape Fill, and under Theme Colors, pick the color you want.
To change the fill color to a color that isn’t in the theme colors
-
Select the shape or text box.
-
On the Drawing Tools Format tab, click Shape Fill > More Fill Colors.
-
In the Colors box, either click the color you want on the Standard tab, or mix your own color on the Custom tab. Custom colors and colors on the Standard tab aren’t updated if you later change the document theme.
-

Change the border color
-
Select the shape or text box border. When you do that, the Drawing Tools appear.
If you want to change multiple shapes or text boxes, click the first shape or text box, and then press and hold Ctrl while you click the other shapes or text boxes.
-
On the Drawing Tools Format tab, click Shape Outline and, under Theme Colors, pick the color you want.
To change the border to a color that isn’t in the theme colors
-
Select the shape or text box.
-
On the Drawing Tools Format tab, click Shape Outline, and then click More Outline Colors.
-
In the Colors box, either click the color that you want on the Standard tab, or mix your own color on the Custom tab. Custom colors and colors on the Standard tab aren’t updated if you later change the document theme.
-

Tip: In PowerPoint, you can also change the border color by clicking Shape Outline (on the Home tab, in the Drawing group).
See Also
Remove or change the border on a text box or shape
Add a fill or effect to a shape
Change the font color (text color)
Change the background or color in Word
Change a message background in Outlook
Change the background color of your slides in PowerPoint
Insert WordArt
Add shapes
Need more help?
Text boxes in an MS Word document are a very useful feature. Text within a box acts as a highlight for the reader. Here, we will show you how to:
- Add a Text Box
- Remove a Text Box
- Customize a Text Box Border
- Change Border Color
- Create Dashed Border
- Change Border Thickness
Let us begin.
Step #1: Open the Word document.
Open the Word document where you want to add the text box.
Step #2: Add the Text Box
Position the cursor where you want the text box to appear.
In the top menu bar, click on the Insert tab to change the ribbon.

In the section Text, click on the Text Box icon to open a dialog box for Built-In text boxes.

Click on the text box you find suitable. We select the Simple Text Box.

Word adds the text box in the document.

Remove a Text Box
Step #1: Open the Word document.
Open the Word document that has at least one text box.
Step #2: Remove the text box
Click on the text box boundary to select it.

Press the Delete button on your keyboard.
Word will delete the text box from your document.
Customize a Text Box Border
Step #1: Open the Word document.
Open the Word document that has at least one text box.
Step #2: Customize the text box border
Click on the text box boundary to select it.

Right-click on the text box boundary to open a menu.
Click on Format AutoShape/Picture.

This opens a dialog box for Format Text Box.
Click on the Colors and Lines tab.

Change Border Color
Under Line, click on the down arrow on the right-hand side of Color:.

This opens a dialog box for Theme Colors and Standard Colors.
Click on the color of your choice.

The chosen color will appear against the Color: tab under Line.

Note: At this point, you can click on OK at the bottom of the dialog box to exit. Word will change the color of the box to your chosen color. Else, move to the next step to make more changes.
Create Dashed Border
In the Format Text Box dialog box, under Line, click on the down arrow on the right side of Dashed:.

This opens a choice for different dashed lines.
Select the most suitable dashed line.

The chosen dashed line will appear against the Dashed: tab under Line.

Note: At this point, you can click on OK at the bottom of the dialog box to exit. Word will make the changes to the text box as per your choices above. Else, move to the next step to make more changes.
Change Border Thickness
In the Format Text Box dialog box, under Line, click on the down arrow on the right side of Style:.

This opens a choice for lines of a different style.
Each line style has its weight in points on its left.
Select the line most suitable to you.

The chosen line style will appear against the Style: tab.
The weight of the chosen line style will appear against the Weight: tab under Style:.

The choice of line styles offers only a few discrete weights.
To change the line weight, select the number next to Weight:.
Change the number as you like.

Click on OK at the bottom of the Format Text Box dialog box to exit.
Word will make the changes to the text box according to all your choices.

Conclusion
Follow our step-by-step instructions to add or delete text boxes in your Word document. Beautify your text boxes with our instructions. We have shown you how to change the border color, style of the border line, and the thickness of the border.
Last updated 2014-10-23
You can change the color, weight, or style of the outside border of a text box or shape, or remove the border altogether.
Notes:
-
If you want to delete a text box, see Add, copy, or delete a text box.
What do you want to do?
-
Change the color of a text box or shape border
-
Change the weight of a text box or shape border
-
Change the style of a text box or shape border
-
Remove the border from a text box or shape
Change the color of a text box or shape border
Note: To change the border of a text box or shape, follow the steps below.
-
Select the text box or shape border that you want to change.
If you want to change multiple text boxes or shapes, click the first text box or shape, and then press and hold CTRL while you click the other text boxes or shapes.
-
Under Drawing Tools, on the Format tab, in the Shape Styles group, click Shape Outline, and under Theme Colors, select the color that you want. .
If you do not see the Drawing Tools or Format tabs, make sure that you have selected the text box or shape. You might have to double-click the text box or shape to open the Format tab.
Notes:
-
To change the border to a color that isn’t in the theme colors, do the following:
-
Select the text box or shape.
-
Under Drawing Tools, on the Format tab, click Shape Outline, and then click More Outline Colors.
-
In the Colors dialog box, either click the color that you want on the Standard tab, or mix your own color on the Custom tab. Custom colors and colors on the Standard tab are not updated if you later change the document theme.
-
-
In PowerPoint, you can also change the border on the Home tab, in the Drawing group, by clicking Shape Outline.
The Drawing group on the Home tab in the PowerPoint 2010 ribbon.
-


Top of Page
Change the weight of a text box or shape border
Note: To change the border of a text box or shape, follow the steps below.
-
Select the text box or shape border that you want to change.
If you want to change multiple text boxes or shapes, click the first text box or shape, and then press and hold CTRL while you click the other text boxes or shapes.
-
Under Drawing Tools, on the Format tab, in the Shape Styles group, click Shape Outline, point to Weight, and then click the line weight that you want.
If you do not see the Drawing Tools or Format tabs, make sure that you have selected the text box or shape. You might have to double-click the text box or shape to open the Format tab.
Notes:
-
To create a custom line weight, do the following:
-
Select the text box or shape.
-
Under Drawing Tools, on the Format tab, click Shape Outline, point to Weight, and then select More Lines.
-
In the Format Shape dialog box, under Line Style, in the Width box type the weight that you want.
-
-
In PowerPoint, you can also change the border on the Home tab, in the Drawing group, by clicking Shape Outline.
The Drawing group on the Home tab in the PowerPoint 2010 ribbon.
-

Top of Page
Change the style of a text box or shape border
Note: To change the border of a text box or shape, follow the steps below.
-
Select the text box or shape border that you want to change.
If you want to change multiple text boxes or shapes, click the first text box or shape, and then press and hold CTRL while you click the other text boxes or shapes.
-
Under Drawing Tools, on the Format tab, in the Shape Styles group, click Shape Outline, point to Dashes, and then click the border style that you want.
If you do not see the Drawing Tools or Format tabs, make sure that you have selected the text box or shape. You might have to double-click the text box or shape to open the Format tab.
Notes:
-
To create a custom line style, do the following:
-
Select the text box or shape.
-
Under Drawing Tools, on the Format tab, click Shape Outline, point to Dashes, and then select More Lines.
-
In the Format Shape dialog box, under Line Style, select the line style options that you want.
-
-
In PowerPoint, you can also change the border on the Home tab, in the Drawing group, by clicking Shape Outline.
The Drawing group on the Home tab in the PowerPoint 2010 ribbon.
-

Top of Page
Remove the border from a text box or shape
-
Select the text box or shape border that you want to remove.
If you want to change multiple text boxes or shapes, click the first text box or shape, and then press and hold CTRL while you click the other text boxes or shapes.
-
Under Drawing Tools, on the Format tab, in the Shape Styles group, click Shape Outline, and then click No Outline.
If you do not see the Drawing Tools or Format tabs, make sure that you have selected the text box or shape. You might have to double-click the text box or shape to open the Format tab.
Tip: In PowerPoint, you can also remove the border on the Home tab, in the Drawing group, by clicking Shape Outline.

The Drawing group on the Home tab in the PowerPoint 2010 ribbon.
Top of Page
- Remove From My Forums
-
Question
-
how to change the textbox border color
for example i have textbox1 and textbox2
i want textbox1 border color = black and textbox2 border color = blue
how to do that ?
maybe without draw a rectangle
Answers
-
Honestly, the easiest way is to place the TextBox in a Panel. Set the Panel BackColor to the color you want the border to be, and size it/position the TextBox until you achieve the desired border size. You can also build all of this into a user control and place everything via code on your control’s properties.
Unfortunately, no amount of painting code is going to work at the managed level. The TextBox control does not raise or in anyway ultilize the OnPaint method or associated event. If you really want to draw on a TextBox you must use the WindowsAPI to hook the underlying text control and paint on it through the API.
Hope that helps.
-
UPDATE!!
Thanks to the guys on this thread: http://forums.microsoft.com/MSDN/ShowPost.aspx?PostID=1739720&SiteID=1&mode=1 there is possilby a very simple way to get a TextBox that you can paint on.
I suggest keeping an eye on the thread referenced above in case someone else finds a flaw in the idea.
Here is the code for a TextBox that raises the Paint event and has an OnPaint method that works when you override it. Create this control and then inherit from it to create textboxes that can be drawn on:
Code Snippet
Public Class PaintableTextBoxBase
Inherits System.Windows.Forms.TextBox
Private Const WM_Paint As Integer = &HF
Protected Overrides Sub OnTextChanged(ByVal e As System.EventArgs)
MyBase.OnTextChanged(e)
Me.Invalidate()
End Sub
Protected Overrides Sub WndProc(ByRef m As System.Windows.Forms.Message)
MyBase.WndProc(m)
If m.Msg = WM_Paint Then
Dim gfx As System.Drawing.Graphics
gfx = MyBase.CreateGraphics
Dim pe As New System.Windows.Forms.PaintEventArgs(gfx, MyBase.ClientRectangle)
Me.OnPaint(pe)
RaiseEvent Paint(Me, pe)
gfx.Dispose()
End If
End Sub
Public Shadows Event Paint(ByVal sender As Object, ByVal e As System.Windows.Forms.PaintEventArgs)
End Class
Here is an example that inherits from the PaintableTextBoxBase to create a BorderedTextBox:
Code Snippet
Public Class BorderedTextBox
Inherits PaintableTextBoxBase
Private mBorderSize As TextBoxBorderSize
Private mBorderColor As Color = Color.Black
Public Property BorderSize() As TextBoxBorderSize
Get
Return Me.mBorderSize
End Get
Set(ByVal value As TextBoxBorderSize)
Me.mBorderSize = value
Me.Invalidate()
End Set
End Property
Public Property BorderColor() As Color
Get
Return Me.mBorderColor
End Get
Set(ByVal value As Color)
Me.mBorderColor = value
Me.Invalidate()
End Set
End Property
Protected Overrides Sub OnPaint(ByVal e As System.Windows.Forms.PaintEventArgs)
MyBase.OnPaint(e)
If Me.mBorderSize > 0 Then
Dim rct As New Rectangle(e.ClipRectangle.Location, e.ClipRectangle.Size)
Dim pn As New Pen(Me.mBorderColor, Me.mBorderSize)
e.Graphics.DrawRectangle(pn, rct)
End If
End Sub
Public Enum TextBoxBorderSize
Thin = 2
Medium = 4
Thick = 6
Heavy = 8
End Enum
End Class
This is really interesting stuff! I’m still concerned about the call to CreateGraphics as I’ve always been told to avoid this method in most circumstances, but we’ll see how it works out…!
-
Marked as answer by
Monday, March 15, 2010 8:48 PM
-
Marked as answer by
Reading
a lengthy text document can make anyone bored in minutes. However, there are
few simple ways to make your documents more attractive and appealing to the
reader. One such option is to add colorful text boxes in-between paragraphs.
This is a useful way to show important action points on full text based
documents. In this article, let us explore how to create text box in Word
document.
Related: How to quickly add dividers in Word?
We
will discuss the following options based on Word 2016 or later version.
- Create text box from existing text
- Creating empty text box
- Changing text box size and position
- Changing text direction
- Deleting borders
Creating
Text Box from Existing Text
You can convert any of the existing text paragraph and list to a text box in Word. Let’s see how to do that.
- First open your document and select the paragraph you want to convert to a text box.
- Switch to the “Insert” tab from the ribbon menu.
- Open the “Text Box” menu.
- Word offers a selection of predefined text boxes, for example for creating sidebars with quotes.
- However, for converting the existing text, select the entry “Draw Text Box” in the lower pane.

This will instantly add a bordered text box around
the selected text. Word treats text boxes as a drawing and you can design the
box as per your need using the “Drawing Tools” menu. You can move the text
boxes anywhere in the document, depending on the layout. This can be useful for
the design of flyers and brochure.
Creating
Empty Text Box
Of course, you do not necessarily need existing text to
create a new text box. Alternatively, you can also create empty text boxes and
enter the text into them later.
- Place the cursor where you want to insert a text box.
- Reopen the “Insert” menu and select “Text Box” option.
- Click the “Draw Text Box” menu item. You will see the cursor now changed to cross hair shape.
- Draw out the text box while holding down the left mouse button.
- Then enter the text into the text box.
- You can look at the various options in the context menu of your text box for designing your text box.

Changing
Text Box Size and Position
When
you have created a text box out, you have various options for editing. You can
design it, change the size and place it anywhere in your document.
- You can change the size of the box using the handles on the edges of it. Word will automatically adjust the text content inside the box.
- It is also possible to freely move the box using the mouse. You can hover over the mouse to change the cursor into a star shape, allowing you to drag the box.
- Formatting is also possible as usual, for example, right-click on the selected text to use the Mini toolbar and format the text in bold or change the alignment.
- You can click on the “Layout Options” button on the side of the text box to wrap text box with the content on your document.

Changing
Text Direction
Within
a text box, you can also influence the text direction. Besides the default
horizontal alignment the text can also run vertically.
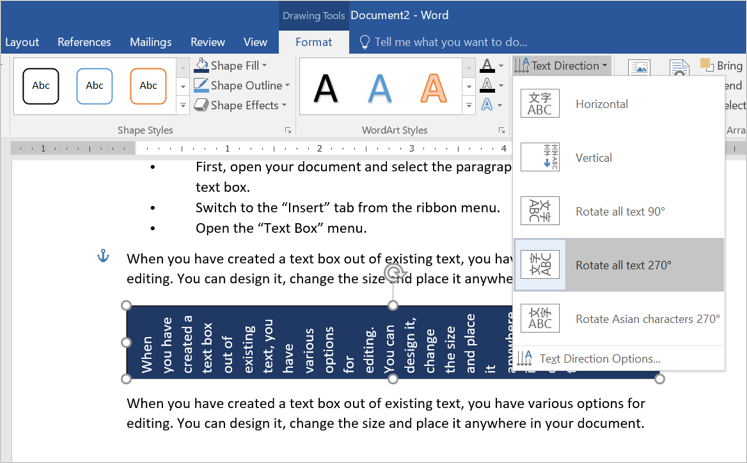
- What about if you want to rotate the text inside text box? This is also
very easy. Open the “Text Direction”. - Double click on the text box to open “Drawing Tools” menu. Click on the
“Text Direction” menu and select the entry, “Rotate all text 270°”. - The text is now set vertically in the text box and you can adjust the
format and position of the box.
- You can move the text box between paragraphs or columns by dragging the
box while keeping the left mouse button pressed.
Related: How to embed Excel table in Word document?
Deleting
Borders and Content
By
default, text boxes are displayed with borders, but you do not have to keep
them. You can easily remove the borders.
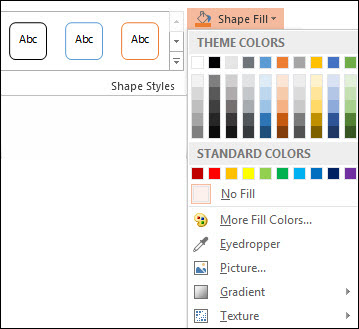
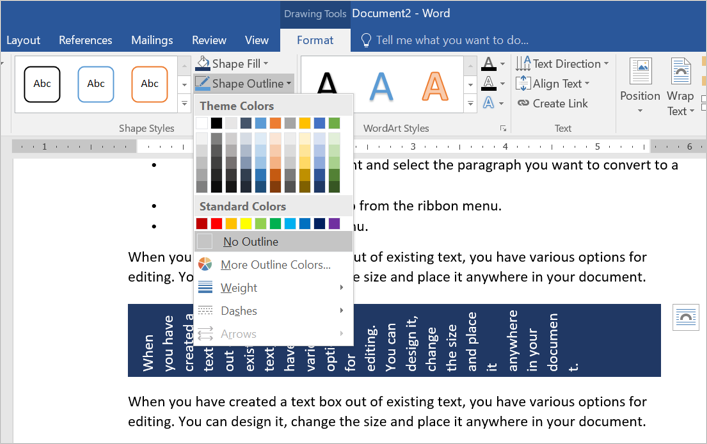
- Click on the text box to open the “Drawing Tools” and select “Shape Outline”
button under “Format” menu. - Now, select the entry “No Outline” to remove the borders from the box.
- You can also apply different colors, weight and styles to the border if
you want. - In order to delete a text box content, simply click inside the box and
edit or delete the content. Alternatively, select the text box by clicking on
the border and press delete to completely delete the box. - In this respect, text boxes behave in the same way as other drawing
objects.
Using Text Box Templates
The best and easy way to use text box in Word is to
select one of the predefined text box template. You can select from one of the good-looking
templates from the “Text Box” menu dropdown.

For example, you can use text box in a sidebar
format or choose one of the colorful formats. You can adjust the layout
positions to align the content beside the box.

You can also customize the text box and create a
custom template as a Quick Parts.
- First, select the box you want to use as templates.
- Go to “Insert > Text Box” and choose “Save Selection to Text Box Gallery” option.
- Fill up the details to create a new building block.
- You can view the saved template under “Text Box” menu dropdown from next time onwards.
Other Formatting Options
The “Formatting Tools” menu offers various
additional options for customizing your text box content. You can double click
on any text box to view the menus applicable for drawing object. Below are some
of the activities you can do with the formatting tools:
- Apply shape styles like fill, effects and borders.
- Create WordArt inside text box.
- Change text direction.
- Position and wrap the content around the text box.
Lesson 17: Text Boxes
/en/word2003/formatting/content/
Introduction
By the end of the lesson, you should be able to:
- Create a text box
- Move and resize a text box
Creating a text box
Placing text inside of a text box helps focus the reader’s eye on the page content. Newsletters, flyers, reports, announcements, school projects, and other types of publications often use Word’s text box feature.
Text boxes can be formatted with shadings, color, borders, and graphics, making for an impressive display of your Word skills.
To create a text box:
- Click Insert on the menu bar.
- Select Text Box from the menu list.
- The mouse pointer becomes a crosshair, and a drawing canvas appears.
- Place your insertion point where you want your text box.
- Left click and drag the text box until it is the appropriate size. Release the left mouse button when ready.
- The text box will by default contain a white background color and a thin black border.
 crosshair, and a drawing canvas appears.
Note: When you create a text box in Word 2003, the drawing canvas appears by default. The canvas helps you arrange and resize the objects you are working with.
To insert text into the text box:
- Click once inside the text box.
- The box is selected, and a blinking insertion point appears inside the box.
- Begin typing.
- Format text (change font, font size, and style) in the usual manner. (Select text first, and make changes later.)
Moving and resizing text boxes
To resize a text box:
- Click once on one of the box’s borders. The box is now highlighted.
- Sizing handles (small circles) appear. Hover the mouse pointer over any of the sizing handles (small circles) until it turns into a diagonally pointing arrow.

- Click and drag the sizing handle until the box is the desired size.
To move a text box:
- Click once on the text box’s border.
- Hover your mouse pointer over the border until it becomes a crosshair with arrows.
- Using this crosshair, click and drag the box until it is in the desired location.
The Format Text Box dialog box
As mentioned earlier, the default for the text box in Word is a white background with a thin, black border. Using the Format Text Box dialog box, you can choose different fill colors and lines, as well as size and layout.
To use the Format Text Box dialog box:
- Double-click a text box border. The Format Text Box dialog box appears.
OR
- Right-click the text box border and select Format Text Box. The Format Text Box dialog box appears.
To access the text box feature from the Drawing toolbar:
- Click View on the menu bar.
- Select Toolbar and then Drawing from the cascading menu. The Drawing toolbar appears at the bottom of your document.
- Click the Text box button . Don’t confuse this button with the Rectangle button. You cannot insert text using the Rectangle button.
 . Don’t confuse this button with the Rectangle button. You cannot insert text using the Rectangle button.

- The Format Text Box dialog box offers you several tabs to choose from:
- Color and Lines: Fill text box with color and define the border colors, styles, and weight
- Size: Define a specific size
- Layout: Text wrap and alignment
- Text Box: Internal margins
Challenge!
- Open your document.
- Insert a text box or text boxes with the information you want to display on your flyer or newsletter.
- Make decisions about your text box.
- Do you want the line to be visible?
- If so, what color do you want the line?
- What type of line style do you want?
- Try to create text boxes that look similar to the ones displayed below, as well as creating your own.
- Practice using different font styles and sizes within the text boxes you create.
- Save and close the document.
Note: If you are unsure what you would like for your flyer or newsletter, try several options. Remember, you can always click the Undo feature if you change your mind.
/en/word2003/working-with-columns/content/
Here is my complete Flat TextBox control that supports themes including custom border colors in normal and focused states.
The control uses the same concept mentioned by Reza Aghaei https://stackoverflow.com/a/38405319/5514131 ,however the FlatTextBox control is more customizable and flicker-free.
The control handles the WM_NCPAINT window message in a better way to help eliminate flicker.
Protected Overrides Sub WndProc(ByRef m As Message)

    If m.Msg = WindowMessage.WM_NCPAINT AndAlso _drawBorder AndAlso Not DesignMode Then 'Draw the control border

        Dim w As Integer
        Dim h As Integer
        Dim clip As Rectangle
        Dim hdc As IntPtr

        Dim clientRect As RECT = Nothing
        GetClientRect(Handle, clientRect)

        Dim windowRect As RECT = Nothing
        GetWindowRect(Handle, windowRect)

        w = windowRect.Right - windowRect.Left
        h = windowRect.Bottom - windowRect.Top

        clip = New Rectangle(CInt((w - clientRect.Right) / 2), CInt((h - clientRect.Bottom) / 2), clientRect.Right, clientRect.Bottom)

        hdc = GetWindowDC(Handle)

        Using g As Graphics = Graphics.FromHdc(hdc)

            g.SetClip(clip, CombineMode.Exclude)

            Using sb = New SolidBrush(BackColor)
                g.FillRectangle(sb, 0, 0, w, h)
            End Using

            Using p = New Pen(If(Focused, _borderActiveColor, _borderNormalColor), BORDER_WIDTH)
                g.DrawRectangle(p, 0, 0, w - 1, h - 1)
            End Using

        End Using

        ReleaseDC(Handle, hdc)

        Return

    End If

    MyBase.WndProc(m)

End Sub
I have removed the default BorderStyle property and replaced it with a simple boolean DrawBorder property that controls whether to draw a border around the control or not.
Use the BorderNormalColor property to specify the border color when the TextBox has no focus, and the BorderActiveColor property to specify the border color when the control receives focus.
The FlatTextBox comes with two themes VS2019 Dark and VS2019 Light, use the Theme property to switch between them.
Complete FlatTextBox control code written in VB.NET
https://gist.github.com/ahmedosama007/37fe2004183a51a4ea0b4a6dcb554176
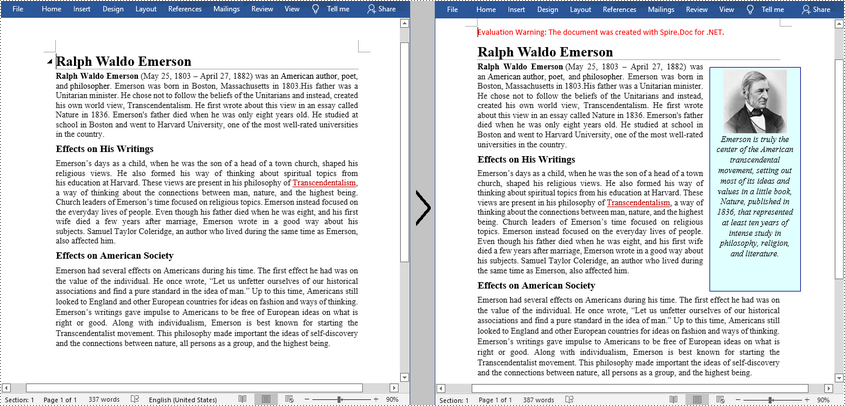
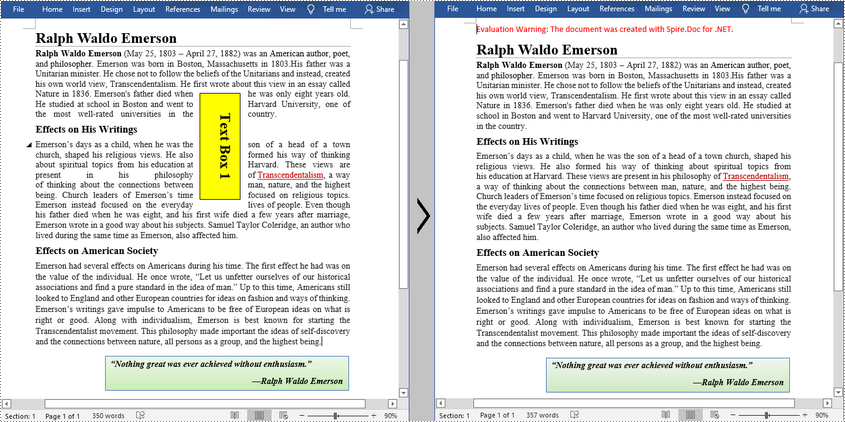
A text box is a movable, resizable container for storing text or images. In Word documents, you can insert text boxes as sidebars or to bring focus to some important text, such as headings or quotes. Occasionally, you may also need to delete some mistakenly added text boxes. In this article, you will learn how to programmatically insert or remove a text box in a Word document using Spire.Doc for .NET.
- Insert a Text Box in a Word Document
- Remove a Text Box from a Word Document
Install Spire.Doc for .NET
To begin with, you need to add the DLL files included in the Spire.Doc for .NET package as references in your .NET project. The DLLs files can be either downloaded from this link or installed via NuGet.
PM> Install-Package Spire.Doc
Insert a Text Box in a Word Document
Spire.Doc for .NET provides the Paragraph.AppendTextBox(float width, float height) method to insert a text box in a specified paragraph. After the text box is inserted, Spire.Doc for .NET also provides the TextBox class for users to format the text box by setting its properties, such as Format, Body etc. The detailed steps are as follows.
- Create a Document instance, and then load a sample Word document using Document.LoadFromFile() method.
- Get the first section using Document.Sections[] property, and then add a paragraph to the section using Section.AddParagraph() method.
- Add a text box to the paragraph using Paragraph.AppendTextBox(float width, float height) method.
- Get the format of the text box using TextBox.Format property, and then set the text box’s wrapping type, position, border color and fill color using the properties of TextBoxFormat Class.
- Add a paragraph to the text box using TextBox.Body.AddParagraph() method, and then set its alignment.
- Insert an image to the paragraph using Paragraph.AppendPicture() method, and then set the size of the inserted image.
- Insert text to the text box using Paragraph.AppendText() method, and then set the text font.
- Save the document to another file using Document.SaveToFile() method.
- C#
- VB.NET
using Spire.Doc;
using Spire.Doc.Documents;
using Spire.Doc.Fields;
using System.Drawing;

namespace InsertTextbox
{
    class Program
    {
        static void Main(string[] args)
        {
            //Create a Document instance
            Document document = new Document();

            //Load a sample Word document
            document.LoadFromFile("Ralph.docx");

            //Insert a textbox and set its wrapping style
            TextBox TB = document.Sections[0].AddParagraph().AppendTextBox(130, 320);
            TB.Format.TextWrappingStyle = TextWrappingStyle.Square;

            //Set the position of the textbox
            TB.Format.HorizontalOrigin = HorizontalOrigin.RightMarginArea;
            TB.Format.HorizontalPosition = -100;
            TB.Format.VerticalOrigin = VerticalOrigin.Page;
            TB.Format.VerticalPosition = 130f;

            //Set the border style and fill color of the textbox
            TB.Format.LineColor = Color.DarkBlue;
            TB.Format.FillColor = Color.LightCyan;

            //Insert an image to textbox as a paragraph
            Paragraph para = TB.Body.AddParagraph();
            DocPicture picture = para.AppendPicture(@"C:UsersAdministratorDesktopRalph.jpg");

            //Set alignment for the paragraph
            para.Format.HorizontalAlignment = HorizontalAlignment.Center;

            //Set the size of the inserted image
            picture.Height = 90;
            picture.Width = 90;


            //Insert text to textbox as the second paragraph
            TextRange TR = para.AppendText("Emerson is truly the center of the American transcendental movement, "
                + "setting out most of its ideas and values in a little book, Nature, published in 1836, "
                + "that represented at least ten years of intense study in philosophy, religion, and literature.");

            //Set alignment for the paragraph
            para.Format.HorizontalAlignment = HorizontalAlignment.Center;

            //Set the font of the text
            TR.CharacterFormat.FontName = "Times New Roman";
            TR.CharacterFormat.FontSize = 12;
            TR.CharacterFormat.Italic = true;

            //Save the result file
            document.SaveToFile("AddTextBox.docx", FileFormat.Docx);
        }
    }
}
Remove a Text Box from a Word Document
Spire.Doc for .NET provides the Document.TextBoxes.RemoveAt(int index) method to delete a specified text box. If you want to delete all text boxes from a Word document, you can use the Document.TextBoxes.Clear() method. The below example shows how to remove the first text box from a Word document.
- Create a Document instance.
- Load a sample Word document using Document.LoadFromFile() method.
- Remove the first text box using Document.TextBoxes.RemoveAt(int index) method.
- Save the document to another file using Document.SaveToFile() method.
- C#
- VB.NET
using Spire.Doc;

namespace Removetextbox
{
    class Program
    {
        static void Main(string[] args)
        {
            //Create a Document instance
            Document Doc = new Document();

            //Load a sample Word document
            Doc.LoadFromFile("TextBox.docx");

            //Remove the first text box
            Doc.TextBoxes.RemoveAt(0);

            //Remove all text boxes
            //Doc.TextBoxes.Clear();

            //Save the result document
            Doc.SaveToFile("RemoveTextbox.docx", FileFormat.Docx);
        }
    }
}
Apply for a Temporary License
If you’d like to remove the evaluation message from the generated documents, or to get rid of the function limitations, please request a 30-day trial license for yourself.
What is a border in Word?
A border in MS Word is a line, a set of lines, or designed shapes that appear around the boundaries of pages/images/shapes/textboxes.
Page borders are mostly used to design flyers and brochures, and sometimes book covers. Borders can be lines of different styles and weights or colorful graphics as illustrated in the picture below.

To add a page border in Word:
- Launch Microsoft Word.
- Click on the Design tab for Word 2013, 2016 and 2019.
- Click on the Page Layout tab for Word 2010 and older.
- In the Page Background group, click on Page Borders.

The Borders and Shading dialog box will appear. This
dialog box offers options for you to choose the style or size of border for
your page or pages.
- Select the Box option. This will give you a square border around your pages.
- In the Style section, select the type of line you want if you want to use a line or group of lines as your border.
- You can also change the color and width of the line.

- Instead of using a line, you can also use some
designed shapes or art as borders in your Word document.

NOTE: By default, Word adds the borders to all the pages in the document. If you don’t want this behavior, in the Apply to drop-down, select the first page only to add borders to only the first page. You can also break your pages into sections so that you can add borders to those sections alone.

How to make a custom border in word
It is very simple to make a custom border in Word.
- First, click to activate the Design tab.
- In the Page Background group, click the Page Border command to display the Borders and Shading dialog.
- Under the Settings group, select the Custom option from the list of choices. Now set the border styles and widths.

- Also, go to the Apply to box to decide whether you want the border to be applied to the entire document. Word will apply borders to every page in the document by default.
How to remove border in word
To remove border in Word:
- Click on the Design tab.
- In the Page Background group, click on Page
Borders. The Borders and Shading window will appear. - Click on None under Setting at the
left.

The none option will remove all the borders on all the pages
in your Word document.
How to add a Christmas border in word
To add a Christmas border in Word:
- Click on the Design tab.
- In the Page Background group, click on Page Borders. The Borders and Shading window will appear.
- Click on Box option under Settings at the left.
- Click on the Art dropdown, scroll up and down until you see the Christmas tree, click on it.
- Now click OK to add a Christmas border into Your Word document.

How to add a paragraph border in word
Aside from adding page borders in Word, you can also add
paragraph borders.
As a page border surrounds the entire page, a paragraph border surrounds only the selected paragraph.
Thus, to add a paragraph border in Word:
- Click anywhere inside the paragraph to which the
border will be added. - Click on the Home tab.
- In the Paragraph group, click on the Borders
command - A list of border options appears, click on Outside
Borders. - A line border will now surround the entire
paragraph.

How to add border to picture in word
Pictures in your document look fancier when framed.
There are different preset styles of borders you can add to
a picture to make it look nicer in your document. This feature is called Picture
Styles in MS Word.
The quickest way to add a border to a picture is to choose a preset style from the Styles gallery.
Obey the instructions below:
- Click to select the picture to add the border.

- Upon selecting the picture, a Picture Tool Format will appear on the ribbon. Click on this tab.
- In the Picture Style group, select the picture style that you like.
- The selected border will be added to the picture.

how to remove text box border in word
To remove text box border in Word:
- Click to select the text box.

- The Format tab will appear. If you don’t
see the Format tab, make sure the text box is selected. - Click on the Format tab.
- Click Shape Outline in the Shape Styles
category. - Then click on No Outline.

The No Outline command will remove the text box border from your Word document.