
In LaTeX, one could use vfill before a paragraph to align it to the bottom of the page. Is there a similar function in Microsoft Word 2007? I am trying to avoid multiple new lines or text boxes since the contents of the page will change
asked Dec 12, 2014 at 14:15
![]()
6
Just like in the old days of HTML, creating a table that has the size of the entire page with two rows will do the trick. You can anchor the table to the page. Inside each table cell, you can select horizontal and vertical alignment.
As an alternative, you can create one table cell, make sure the document text goes around or above & below it and anchor the table to the bottom of the page. Set the row height to fit. This way, you don’t have the disadvantages of the table (eg different behavior of tab) in the regular body text.
Actually, I’ve seen official internal document templates of a company that used this trick to layout its text for project templates etc.
answered Dec 13, 2014 at 1:44
![]()
agtoeveragtoever
6,2141 gold badge23 silver badges37 bronze badges
2
This is an old question but it is possible with frames, an old feature of Word that Microsoft, for some reason, no longer exposes by default in the Word user interface. Frames are similar to text boxes but the text in them remains part of the main document. Note that this means that if you add text before the framed paragraph, it can move off the page you set it up on and onto the next one!
- Select the paragraph you want to align
- In the Ribbon, choose View, Macros, View Macros or hold down ALT and type T M, M. The Macros dialog box will open.
- Type
InsertFrameand click Run (this is a poorly-documented feature of Word; if you know the name of a command, typing its name into the Macro dialog will run it). Word will convert the paragraph into a frame. - Double-click the Frame border, or right-click and choose Format Frame. The Frame dialog will open.
- Change the Vertical Position drop-down to «Bottom» (the Relative To drop-down should update automatically to «Margin) and click OK.
- By default, Word puts a border around frames. Right-click and choose Borders & Shading to get rid of it.
If you find yourself using frames a lot, you can put it back on the user interface by using the Customize dialog.
answered Jul 16, 2019 at 15:32
![]()
Ken KeenanKen Keenan
3353 silver badges7 bronze badges
1
The cleanest way to do this is to use page setup dialogue (under Layout in the ribbon)
Make sure to add section break before and after the text you wish to be on the bottom of the page. Always start new section on a new page.

![]()
answered May 3, 2020 at 20:37
![]()
1
I came across slightly different way to do this.
- Create a single cell table (it can be border-less)
- Put your text in the single cell
- Go to the table properties
- On the Table tab, set the «Text Wrapping» to «Around»
- Click on the «Positioning» button
- Leave the Horizontal Position and Relative fields as is (Left/Column)
- Set the Vertical Relative field to «Page»
- Set the Vertical Position field to a reasonable values (e.g., a single line worked well at 9.5″ on letter sized pages — you can override the defaults in the pull down).
- Click OK to leave the
Table Positioningwindow. - Click OK to leave the
Table Propertieswindow
Your table (and contained text) will now float at the bottom of the page. You’ll have to update the position if you change the page size of course, but you don’t have to pad the bottom of the table with white space so the text doesn’t sit in the footer.
answered Nov 3, 2017 at 20:03
![]()
BIBDBIBD
1,5466 gold badges22 silver badges32 bronze badges
Increase the bottom margin and adjust the footer to accommodate the text. Place the text in the footer and add a page number under the text, if needed. (You can use page field code if you want.) Place a section break at the bottom of the page so that the bottom margin and footer for the subsequent pages can be restored to their desired settings.
answered Oct 25, 2019 at 23:33
![]()
Simply create a textbox and under format>arrange>align select align bottom
answered Feb 6, 2016 at 14:04
![]()
1
If you’ve ever pressed Enter a bunch of times to move text to the bottom of the page in a Word document, then aren’t alone.
Many Word users will take this approach since there isn’t an obvious way to position text at the bottom of a document.
But this can cause problems later, as each of the line breaks that you add when you press Enter are technically part of the document, which means that your positioning could be affected if you add more content.
Our tutorial below will show you another way to vertically align text to the bottom of the page in Microsoft Word.
How to Put Text at the Bottom in a Word Document
- Open the document.
- Select the text to move.
- Click the Layout tab.
- Click the Page Setup button.
- Choose the Layout tab.
- Select the Vertical alignment dropdown and choose Bottom.
- Click OK.
Our guide continues below with additional information on how ot align some of the text on one of your pages to the bottom of the page, including pictures of these steps.
You can also check out our Word center text vertically guide for more information on putting text in the middle of the page.
New documents that you create in Microsoft Word will align your content to the top of the page by default.
This means that when you start typing, the text will appear on the top-most line in the document. This is a very common requirement for most documents, and many people find this to be the setting that they need.
But you may occasionally encounter a situation where you need your text to align to the bottom of the page. This means that your typing will appear on the bottom-most line in the document, then will move up a line as you add more text.
Our guide below will show you how to switch to bottom align in Microsoft Word by changing the vertical alignment setting found on the Page Setup menu.
If you use Microsoft’s speech-to-text feature, then our change read aloud voice in Word guide can show you how to change the voice that it uses.
How to Align to the Bottom of the Page in Microsoft Word (Guide with Pictures)
The steps in this article were performed in Microsoft Word for Office 365, but will work in most other recent versions of Microsoft Word as well.
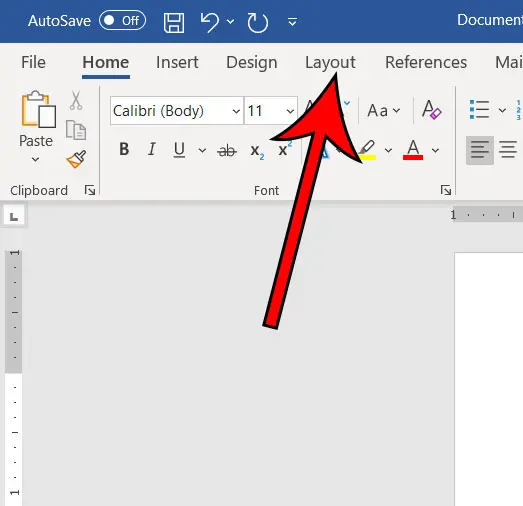
Step 1: Open the document in Word.
Step 2: Select the Layout tab at the top of the window.
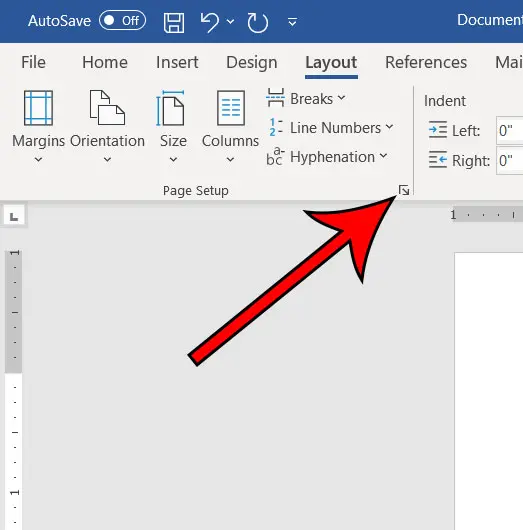
Step 3: Click the small Page Setup button at the bottom-right of the Page Setup section of the ribbon.
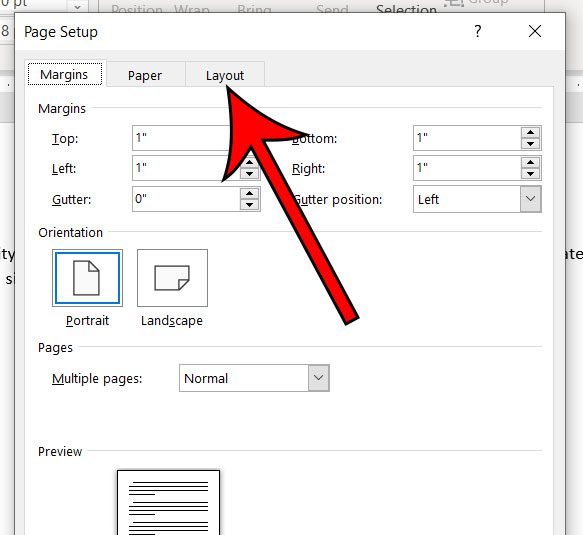
Step 4: Choose the Layout tab at the top of the window.
Step 5: Click the Vertical alignment dropdown menu and choose the Bottom option.
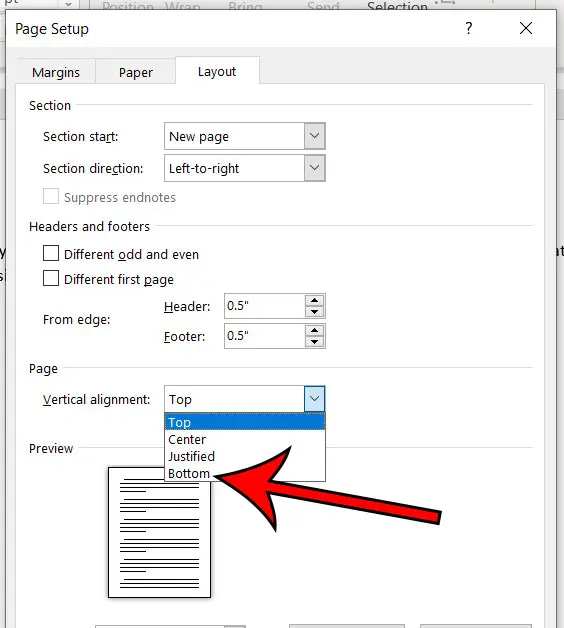
Step 6: Click OK to apply the change.
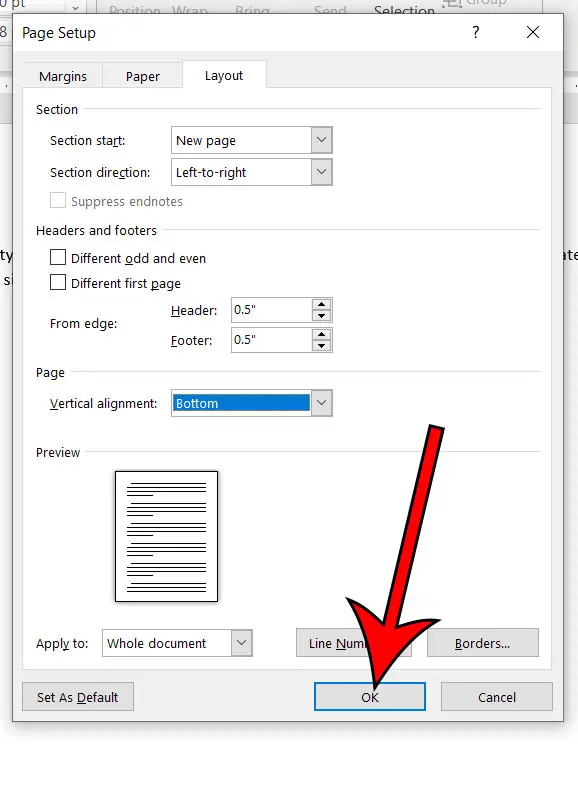
Now you should see that your document content is aligned at the bottom of the page instead of the top.
Now that you know how ot position text on the bottom of the page in Microsoft Word documents you will be able ot quickly adjust the vertical position of some of the text on a page if you need it at the bottom instead of the top.
Additional Sources
- How to insert a check mark in Microsoft Word
- How to do small caps in Microsoft Word
- How to center text in Microsoft Word
- How to merge cells in Microsoft Word tables
- How to insert a square root symbol in Microsoft Word

Matthew Burleigh has been writing tech tutorials since 2008. His writing has appeared on dozens of different websites and been read over 50 million times.
After receiving his Bachelor’s and Master’s degrees in Computer Science he spent several years working in IT management for small businesses. However, he now works full time writing content online and creating websites.
His main writing topics include iPhones, Microsoft Office, Google Apps, Android, and Photoshop, but he has also written about many other tech topics as well.
Read his full bio here.
https://SURU.tinytake.com/sf/MTQxMTgzOV81MDc2MDI2
I want to stick some text of the bottom of the page, like on the screen, just before footer always. When there is text (from mergefield), next should be new lines. I hope screenshot make it easier to see.
![]()
asked Mar 13, 2017 at 7:56
![]()
2
You can put the text in a text box or frame with position set to «Bottom
Relative to Margin». It’s the only idea I have due you don’t want to use a footer.
Or you can see this article
Basically it gives three options:
- Negative left indent
- Margin text box
- Anchor to the header
answered Mar 13, 2017 at 8:27
![]()
I found the solution to the problem on Microsoft’s page and I hope that this page comes up for as many people as possible.
Select the text you want to stick to the bottom (or top) of the page. Under Layout tab take a look at the bottom right of the page layout section and you should see a small arrow that, when clicked on, opens a new menu. In that menu, go to layout tab and set vertical alignment to be «bottom». IMPORTANT! Make sue that the next menu option (at the bottom of that window) is set to «apply to selected sections» otherwise, you will be writing from the bottom of the page upwards.
Here is the source image that helped me. https://filestore.community.support.microsoft.com/api/images/0382c4a8-ade9-4fc4-be66-bcd2c7101479?upload=true
Here is the visual representation:

Note that the person who took the screenshot set the last setting to whole document, not just selected sections.
If selected sections option isn’t available, make sure you selected a text before opening the menu.
Hope this helps!
![]()
Markus Meyer
3,17210 gold badges25 silver badges35 bronze badges
answered Aug 25, 2022 at 8:21
![]()
Table of Contents
- What Microsoft Word tool can help you find synonyms to improve your word choice?
- Can solid circles be changed to other symbols?
- What method moves text from one place to another?
- What would you click to open the Paragraph dialog box Quizizz?
- What does dialog box mean?
- What are the 2 types of dialog boxes?
- What is an example of a dialog box?
- What is a dialog box and how do you close it?
- How do I close a dialog box in Word 2013?
- Where is the word dialog box?
- What are the types of dialog box?
- How do I create a Windows dialog box?
- How do you open a dialog box?
- What is modeless dialog box?
- What is the difference between modal and modeless dialog box?
- How do you make a modeless dialog box in VC ++?
- What is the difference between modal and modeless form?
- What can I use instead of modals?
- Are modals bad?
- What is a modal front end?
- What’s the difference between modal and popup?
- What is a modal verb example?
- When should you use modals?
- How do you avoid modals?
- Should you use modals on mobile?
- What is the difference between modal and non modal commands mention an example for each one?
- What is L in CNC programming?
- What is G code used for?
- What does modal mean in English?
what is the block of text at the bottom of the page called? header. footer.
In recent versions of Microsoft Word, highlight a word and then either click the “Thesaurus” button under the “Review” tab or use the shortcut Shift + F7 to reach the Microsoft thesaurus. A list of similar words will appear, and clicking on one of these will lead to further synonyms.
Can solid circles be changed to other symbols?
Bullets must be small solid circles and cannot be changed to other symbols.
What method moves text from one place to another?
When you release the mouse button, the text moves to its new position. This method is called drag-and-drop editing. You can also drag to copy text. To do this, you hold down the Ctrl key as you drag the selection to an additional location.
What would you click to open the Paragraph dialog box Quizizz?
Use the Ctrl+Z keyboard shortcut. Use the keyboard to retype the paragraph. There is no easy way to do it. What do you do if the spelling and grammar checker finds an error that is not really an error?
What does dialog box mean?
: a window (see window sense 10) on a computer screen for choosing options or inputting information.
What are the 2 types of dialog boxes?
Dialog boxes have two fundamental types:
- Modal dialog boxes require users to complete and close before continuing with the owner window.
- Modeless dialog boxes allow users to switch between the dialog box and the owner window as desired.
What is an example of a dialog box?
An example of a dialog box is the about box found in many software programs, which usually displays the name of the program, its version number, and may also include copyright information.
What is a dialog box and how do you close it?
Click the x button from the top right corner of the dialog box that you’d like to close. Clicking this button should close the box and make it vanish. However, this could sometimes make alternate other boxes open up instead. Use a context-Close task from the taskbar listing for the dialog box that appears.
How do I close a dialog box in Word 2013?
Using the task bar: Right-click the icon referring to the dialog box from the Windows taskbar and click “Close”.
Where is the word dialog box?
To summon the Font dialog box, obey these steps: Click the Home tab. In the Fonts group, click the dialog box launcher button. The button is found in the lower-right corner of the Font group.
What are the types of dialog box?
There are 3 types of dialog boxes: modeless, modal, and system modal.
How do I create a Windows dialog box?
To create a new dialog box
- In Resource View, right-click your . rc file and select Add Resource.
- In the Add Resource dialog box, select Dialog in the Resource Type list, then choose New. If a plus sign (+) appears next to the Dialog resource type, it means that dialog box templates are available.
How do you open a dialog box?
Give it a try:
- Open an application and then press Ctrl-O, or click the Open icon, to display the Open dialog box.
- Right-click any of the files or folders displayed in that dialog and you’ll see a context menu pop open. This is the same context menu you’ll find in Explorer windows.
What is modeless dialog box?
Modeless dialog box is the dialog box in which the screen remain stable and available to all the user for use at any time but it doesn’t stop their and allow other user work to be carried out without any interference.
What is the difference between modal and modeless dialog box?
Modal dialog boxes, which require the user to respond before continuing the program. Modeless dialog boxes, which stay on the screen and are available for use at any time but permit other user activities.
How do you make a modeless dialog box in VC ++?
To create a modeless dialog box, call your public constructor and then call the dialog object’s Create member function to load the dialog resource. You can call Create either during or after the constructor call. If the dialog resource has the property WS_VISIBLE, the dialog box appears immediately.
What is the difference between modal and modeless form?
The Difference Between Modal and Modeless Modal dialog boxes will not permit users to work with the parent window once they are invoked; While modeless dialog boxes will permit users to access the parent window, even after they are invoked.
What can I use instead of modals?
If a modal isn’t right, but shifting screens is less than ideal, there are alternatives like slides, accordions, expanding panes, or enhanced tooltips. These are all great ways to add content while minimizing friction, but none is a universal replacement for the humble modal.
Are modals bad?
So are modals bad? The answer is modals are completely normal and probably won’t go anywhere in the next 5–10 years. However, you need to be very careful when you’re using them. Consider alternative options — if the challenge you’re facing cannot be solved without a modal, then go fo it.
What is a modal front end?
A modal window creates a mode that disables the main window but keeps it visible, with the modal window as a child window in front of it. Users must interact with the modal window before they can return to the parent application. This avoids interrupting the workflow on the main window.
What’s the difference between modal and popup?
When a modal window opens, it opens inside the current page. With popup windows, users can often miss them because they don’t grab the user’s attention. When users click the browser window, the browser window comes to the front and the popup window hides behind it.
What is a modal verb example?
These are verbs that indicate likelihood, ability, permission or obligation. Words like: can/could, may/might, will/would, shall/should and must.
When should you use modals?
Use modal dialogs to ask for information that, when provided, could significantly lessen users’ work or effort. Modals can work effectively when the information being requested or presented is relevant or can streamline the completion of the current task.
How do you avoid modals?
If you can’t avoid modal windows
- The modal window should have a descriptive title.
- The modal window should have a Cancel button.
- The modal window should have a Close button.
- Escape should close the window.
- Close when clicking outside the modal window.
- Add a drop shadow and a transparent background.
Should you use modals on mobile?
If you want users to view your modal window content with ease, avoid using modal windows on your mobile site. Not only that, but users never lose their context because inline accordions open on the same page. Modals take users out of their context when it covers up the screen.
What is the difference between modal and non modal commands mention an example for each one?
For example, G4 (dwell) is non-modal. Modal commands are arranged in sets called “modal groups”. Only one member of a modal group may be in force at any given time….Modal Codes.
| Group 1 | {G0, G1, G2, G3, G80, G81, G82, G83, G84, G85, G86, G87, G88, G89} – motion |
|---|---|
| Group 10 | {G98, G99} – return mode in canned cycles |
What is L in CNC programming?
L – Repetition count for subprogram/fixed cycle. M – Miscellaneous function (M-code) N – Block or sequence number. O – Program number. P – Subprogram number call; Work offset number (used with G10); Dwell time in milliseconds; Block number in main program when used with M99.
What is G code used for?
G-code is the programming language used to control CNC machinery. A program is a sequence of codes and data that tells the machine what to do. The programmed codes, along with the right tooling in a CNC machine center, allow for correct and repeatable part manufacturing.
What does modal mean in English?
In English grammar, a modal is a verb that combines with another verb to indicate mood or tense. A modal, also known as a modal auxiliary or modal verb, expresses necessity, uncertainty, possibility, or permission.
![]()
Written by Allen Wyatt (last updated July 27, 2020)
This tip applies to Word 2007, 2010, 2013, and 2016
Mindy would like to decrease the space that appears between the last line of text on a page and the common text (document title, date, page number, etc.) that appears in her page’s footer. She’s unclear on how to do this in Word, so is looking for a bit of direction.
There are actually two—and possibly six—settings at play when Word lays out your text near the bottom of a page. The first setting is your actual page margin setting. This setting determines the margins for the main body of text on each page of your document. Start by displaying the Page Layout tab of the ribbon and then clicking the small icon at the bottom-right of the Page Setup group. Word displays the Page Setup dialog box. (See Figure 1.)
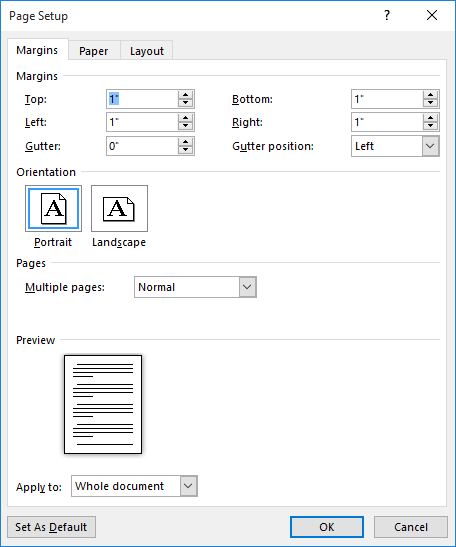
Figure 1. The Margins tab of the Page Setup dialog box.
Note the settings in the Margins area, particularly the Bottom setting. This is where you set your bottom margin for the page. If the Bottom setting is 1 inch, then Word makes sure that nothing in the body of your text extends into the one-inch of space at the bottom of the printed page.
Now display the Layout tab of the dialog box. (See Figure 2.)
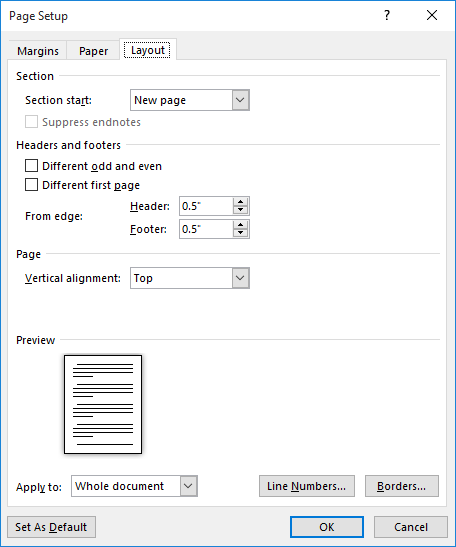
Figure 2. The Layout tab of the Page Setup dialog box.
The setting you want to pay attention to here is the Footer setting. Note that this setting specifies how far the footer should appear from the bottom edge of your printed page. Thus, a setting of .5 inches means that the footer will appear a half-inch from the bottom of the page. The setting actually represents where the baseline of the bottom line in the footer will appear. (The baseline is the imaginary line on which letters «sit.» Some letters include descenders—like the lowercase j or p—which means those letters «descend» below the baseline.)
For the most part it is these two settings—Bottom on the Margins tab and Footer on the Layout tab—that together define the distance between the body text and the footer text. You can reduce the distance between the text and the footer by decreasing the Bottom setting and/or increasing the Footer setting.
You’ll want to make sure that you don’t «overlap» the Bottom and Footer settings. For instance, you wouldn’t want to specify a Bottom setting of .75 inches and a Footer setting of .8 inches. If you do something like this, then Word gives the Footer setting precedence and implicitly «moves» the bottom text margin so that the footer and the body text don’t print on top of each other.
I mentioned earlier that there are potentially three other settings which can affect the space between body text and footer text. There are four settings that can be applied to paragraphs (either explicitly or through the use of styles) that affect what happens to paragraphs at the bottom of a page. You can see these settings if you display the Home tab of the ribbon and click the small icon at the bottom-right of the Paragraph group. Word displays the Paragraph dialog box. You want to pay attention to the Line and Page Breaks tab. (See Figure 3.)
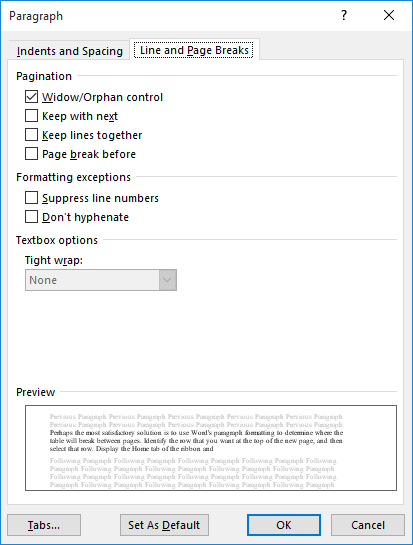
Figure 3. The Line and Page Breaks tab of the Paragraph dialog box.
At the top of the tab are four settings that control how Word «paginates» the paragraph. They have the following effect on text that appears at the bottom of a page:
- Widow/Orphan Control. If a single line would appear at the top of the following page, an extra line is moved from the bottom of the page so that at least two lines appear at the top of the next page. If this movement means that a single line is left at the bottom of the page, then the entire three-line paragraph is moved to the top of the next page.
- Keep with Next. The paragraph must appear with the paragraph that follows it, so it is moved to the next page.
- Keep Lines Together. All lines in the paragraph must appear on the same page, so if at least one line would normally flow to the next page, then the entire paragraph is moved to the next page.
- Page Break Before. The paragraph is moved to the next page.
Any of these settings coming into play would obviously affect the distance between what is at the bottom of the page and any footer on the page.
WordTips is your source for cost-effective Microsoft Word training.
(Microsoft Word is the most popular word processing software in the world.)
This tip (13438) applies to Microsoft Word 2007, 2010, 2013, and 2016.
Author Bio
With more than 50 non-fiction books and numerous magazine articles to his credit, Allen Wyatt is an internationally recognized author. He is president of Sharon Parq Associates, a computer and publishing services company. Learn more about Allen…
MORE FROM ALLEN
Better Ways to Insert Symbols
The traditional way to insert symbols into a document is to use the Symbol dialog box. This tip looks at ways other than …
Discover More
Find and Replace in a Column or Row
Need to search for information in a table? Word allows you to easily limit your search to an entire column or row, as …
Discover More
Printing Workbooks in a Folder
This tip presents two techniques you can use to print multiple workbooks all at the same time. Both techniques involve …
Discover More
![]()
Download Article
Multiple easy-to-follow ways to add footnotes in Word
![]()
Download Article
Footnotes allow you to cite sources or explain a concept in detail without sidetracking the main text. Word makes managing footnotes easy, as new footnotes are numbered automatically, and the footnotes area expands and shrinks dynamically based on the amount of text. Give your document a professional feel by strategically using footnotes to clarify information and credit your sources.
-

1
Click the «References» tab. This is located at the top of the window, typically between «Page Layout» and «Mailings». This tab lets you insert various reference tools, such as a table of contents, footnotes and endnotes, citations, captions and more.
-
2
Place your cursor where you want the footnote to appear. By default, footnotes will be designated by increasing superscript numbers. Place the cursor where you want the number to appear.
Advertisement
-
3
Click the «Insert Footnote» button. This is located in the «Footnotes» section of the «References» tab. The footnote number will be inserted, and a separator bar will be added to the bottom of the page. Your cursor will automatically be taken to the footnote at the bottom of the page so that you can fill it out.
- An endnote is like a footnote except the reference occurs at the end of the document. By default, endnotes are numbered with Roman numerals (i, ii, iii, etc.).
- Alternatively, you can press Ctrl + Alt + F to create a footnote, or Ctrl + Alt + D to create an endnote.
-
4
Change when your footnotes numbering resets. By default, your footnotes will increase in number throughout your whole document. You can change this so that the numbers restart every page or at section breaks in the document.[1]
- Click the Menu button in the bottom-right corner of the «Footnotes» section. This will open the «Footnote and Endnote» window. In the «Format» section, use the «Numbering» drop-down menu to select when you want the footnote numbers to restart.
- You can insert section breaks into your document by clicking the «Page Layout» tab, clicking the «Breaks» button in the «Page Setup» section, and then selecting the type of break you’d like to insert. Besides changing the way footnotes are numbered, section breaks are great for making layout changing to specific portions of a document.
-
5
Change your footnote formatting. If you’d rather have symbols instead of numbers, want the footnotes to appear below the text instead of at the bottom of the page, or want the numbering to start at a different number, you can change this from the «Footnote and Endnote» window. Click the Menu button in the bottom right-corner of the «Footnotes» section to open it.
- Click Symbol… to choose a symbol from the Symbol menu. You can choose any character from any font, though the «Symbols» font will open by default.


Advertisement
-
1
Switch to Print Layout view. Click View and select Print Layout.
-
2
Place your cursor where you want the footnote to appear. Your footnote will appear at the cursor, so place the cursor at the end of the text that you want to create a footnote reference for.
-
3
Insert the footnote. Click the «Document Elements» tab, and then click the «Footnote» button in the «Citations» section. A footnote will be inserted at your cursor and you will be taken to the footnote text section to enter the contents of the footnote. The footnote text will be at the bottom of the same page as the footnote, separated by a line.
- Alternatively, you can press Command + Option + F to create a footnote, or Command + Option + E to create an endnote.
-
4
Change your footnote formatting. If you’d rather have symbols instead of numbers, want the footnotes to appear below the text instead of at the bottom of the page, or want the numbering to start at a different number, you can change this from the «Footnote and Endnote» window. Click Insert and select Footnote.
- Click Symbol… to choose a symbol from the Symbol menu. You can choose any character from any font, though the «Symbols» font will open by default.
- By default, your footnotes will increase in number throughout your whole document. You can change this so that the numbers restart every page or at section breaks in the document. In the «Format» section, use the «Numbering» drop-down menu to select when you want the footnote numbers to restart.
- You can apply your formatting changes to just your selected text, the current section, or your entire document.
- Click Symbol… to choose a symbol from the Symbol menu. You can choose any character from any font, though the «Symbols» font will open by default.


Advertisement
-
1
Switch to Print Layout view. Click View and select Print Layout.
-
2
Place your cursor where you want the footnote to appear. Your footnote will appear at the cursor, so place the cursor at the end of the text that you want to create a footnote reference for.
-
3
Insert the footnote. Click Insert → Reference → Footnote… to open the «Footnote and Endnote» window. Select «Footnote», and then choose your numbering option. You can have Word number your footnotes automatically, or you can choose a custom symbol to insert.
- In Word 2004/2008, click Insert → Footnote….
- Alternatively, you can press Ctrl + Alt + F to create a footnote, or Ctrl + Alt + D to create an endnote in Windows. On a Mac, press Command + Option + F to create a footnote, or Command + Option + E to create an endnote.
-
4
Enter your footnote text. Your footnote will be created and you will be taken to the footnote text section at the bottom of the page. You can enter the text you want for the footnote, and then click back in your document when you are finished.


Advertisement
Add New Question
-
Question
Why is my first footnote printing on the next page?

A header or footnote is applied to all pages when put in a document. Unless it is a page number generated by the document (which you select). Otherwise, the header and footnote follows you through all of your pages.
-
Question
How do I insert more information into a footnote that already exists?
You can double click on an existing footnote to edit it.
-
Question
When I create a footnote for a word, does it appear each time I use the word?
No, it doesn’t. Footnotes are bound to locations in the document, not to words. This means that, even if you change the word or the text around the footnote, the footnote remains where it is.
Ask a Question
200 characters left
Include your email address to get a message when this question is answered.
Submit
Advertisement
Video
Thanks for submitting a tip for review!
About This Article
Article SummaryX
1. Click References.
2. Click the desired location.
3. Click Insert Footnote.
4. Select a number format.
5. Select a symbol.
6. Click Insert.
Did this summary help you?
Thanks to all authors for creating a page that has been read 808,785 times.