
Создание оригинальных документов с помощью бесплатных шаблонов Microsoft Word
Корпорация Майкрософт предлагает широко различные шаблоны Word для бесплатных и расширенных шаблонов Word для подписчиков Microsoft 365. Если вы планируете использовать праздничную вечеринку, наполняя счет учебного заведения или задайте комбинацию соответствующей буквы или сопроводительного письма, вы можете найти шаблоны для Word, которые должны замещаться.
Шаблоны документов Microsoft Word позволяют быстро создавать рекламные листовки для вашей организации, а не пополнить скидки на свой бизнес-ресивер, что позволит вам нарисовать буклет, чтобы ваши рестораны были в туалетах или в течение важных медицинских данных. Шаблоны Word также размещает огромной пополняемойе выбор связанных и титульных букв и сопроводительных писем, которые файлами были созданы для поочередного задания.
Шаблоны Microsoft Word готовы к использованию, если вы короткие время и просто филлабле структуру для листов, календаря или буклета. Они также будут полностью настраиваются, когда вы осьминожкее немного индустриаус и хотите создать более персонализированную структуру. Эти бесплатные шаблоны Word доступны всем пользователям, йоу’е знакомство с Microsoft Word или нет.
Word Templates
Seldom do we get the opportunity to flaunt our creative side. It is an undisputable fact that each human being is endowed with a creative sense that is often suppressed. Think about it, no matter what you do, you are bound to follow the conventions that had been fixed generations ago. Everywhere you go, whatever you do, you are expected to abide by a set of accepted norms and traditions. You can also visit Blank Invoice Template. Even if it something as insignificant as writing a letter, you are forced to abide by the format.In such cases, isn’t a blank template in word a welcome change? Not only can you make the most of the blank space provided to you, but also use the same template for a number of purposes! What could be better than that! So what are you waiting for? A Blank Template is the simplest and most innovative way of designing something!

Blank Business Card Free Word Template Download

thepapermillstore.com
Blank Invoice Free MS Word Format Template

cashboardapp.com
Blank Newspaper Template Free Word 2010 Format

tweedy5th.weebly.com
Blank Payroll Template Free MS Word Format Template

daf.csulb.edu
Blank Rental Agreement Free Word 2010 Format Free Download

biggerpockets.com
Blank Tag Word Format Template

onlinelabels.com
Free Download Blank Calendar Word Template

calendarpedia.com
Free Word Format Blank Complaint Letter

healthcomplaints.ie
Free Download Blank Rubric Template MS Word Format

ci.esc13.net
2010 Word Format Basic Design Blank Template Free

Crop Design Blank Word Free Template

> Types of Blank Templates
Technically, there are different kinds of blank templates that you can use. Some of them are-
- Postcards– Now it is a well known fact that postcards must be attractive enough to draw attention. Instead of using templates already available, simply go for blank templates in ms word to create the ones you want.
- Invitations– While inviting someone to a special occasion, you should be able to customize the invitation just the way you please. That is possible only with the help of blank templates.
- Letters– Irrespective of the kind of letter, wouldn’t it be great to have complete freedom when it comes to the format? Hence, you should definitely try out Microsoft Word blank templates.
> Why Use Blank Templates?
You might argue that to download blank templates would be pointless, but that would be wrong. Think of it this way, if you download a blank template, you can use the Free Word Template for a number of purposes. Why, you could easily use a template you once downloaded for a letter to write a birthday invitation card. Also let’s not forget, such blank templates would allow you to customize them to your heart’s content. Isn’t that what you want?
> How to Use Blank Templates?
If you haven’t been able to figure out how to utilize your blank template free download, you can keep these in mind the next time-
- Pay careful attention to the design. Unlike templates that have been designed already, blank templates in word format need to be designed by you.
- First and foremost, you must decide on the purpose. What is it that you want your blank template to do? Once you have answered this, you are ready to proceed.
- While choosing the blank template, make sure it is readily customizable and editable. Otherwise, what is the point of using a blank template anyway?
- If you are selecting a blank template, remember, if you utilize it properly, it could be of immense use to you!
> Come To Us!
Are you looking for free blank templates? Then you must pay a visit to template.net without a second thought!
More in Word Templates
| 38+ Microsoft Calendar Templates – Free Word, Excel Documents … | Microsoft Brochure Template — 34+ Free Word, PDF, PPT, Publisher … |
| 22+ Microsoft Newsletter Templates – Free Word, Publisher … | 40+ Blank Resume Templates – Free Samples, Examples, Format … |
| Facebook Template – 49+ Free Word, PDF, PSD, PPT Format … | Blank Table Templates – 4 Free Word, PDF Documents Download … |
| 10 Best Blank Invitation Templates | 50+ Microsoft Invitation Templates — Free Samples, Examples … |
Whether you’re starting from a built-in template or updating one of your own, Word’s built-in tools help you update templates to suit your needs. To update your template, open the file, make the changes you want, and then save the template.
In Microsoft Word, you can create a template by saving a document as a .dotx file, .dot file, or a .dotm fie (a .dotm file type allows you to enable macros in the file).
-
Click File > Open.
-
Double-click This PC. (In Word 2013, double-click Computer).
-
Browse to the Custom Office Templates folder that’s under My Documents.
-
Click your template, and click Open.
-
Make the changes you want, then save and close the template.
Add content controls to a template
Make your templates flexible by adding and configuring content controls, such as rich text controls, pictures, drop-down lists, or date pickers.
For example, you might create a template that includes a drop-down list. If you allow editing to the drop-down list, other people can change the list options to meet their needs.
Note: If content controls are not available, you may have opened a document or a template that was created in an earlier version of Word. To use content controls, you must convert the document to the Word 2013 file format by clicking File > Info > Convert, and then clicking OK. After you convert the document or template, save it.
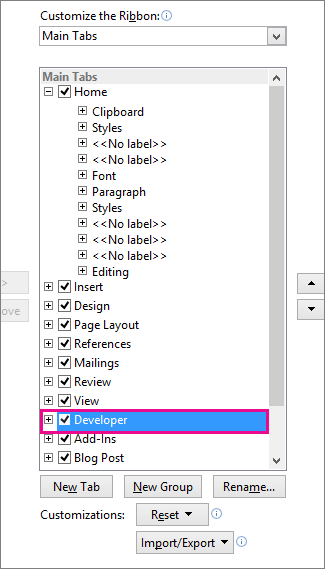
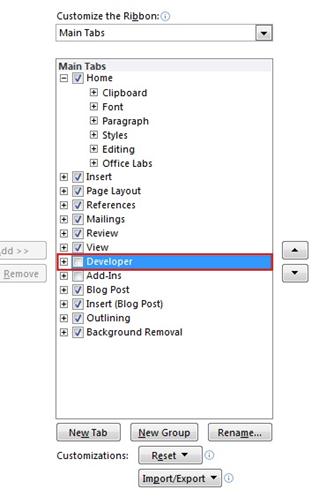
Before you can add content controls, you need to show the Developer tab.
-
Click File > Options > Customize Ribbon.
-
Under Customize the Ribbon, select Main Tabs.
-
In the list, select the Developer check box, and then click OK.
Add content controls
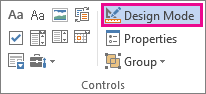
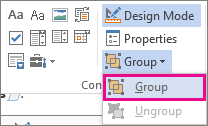
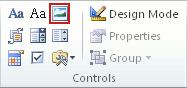
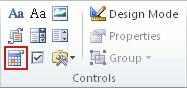
On the Developer tab, in the Controls group, click Design Mode, and then insert the controls that you want.
Insert a text control where users can enter text
In a rich text content control, users can format text as bold or italic, and they can type multiple paragraphs. If you want to limit what users add, insert the plain text content control.
-
In the document, click where you want to insert the control.
-
On the Developer tab, in the Controls group, click Rich Text Content Control
 or the Plain Text Content Control .
 or the Plain Text Content Control
  .
.Insert a picture control
-
Click where you want to insert the control.
-
On the Developer tab, in the Controls group, click Picture Control
.
 .
.Insert a combo box or a drop-down list
In a combo box, users can select from a list of choices that you provide or they can type in their own information. In a drop-down list, users can only select from the list of choices.
-
On the Developer tab, in the Controls group, click the Combo Box Content Control
or Drop-Down List Content Control . -
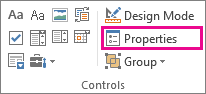
Select the content control, and then on the Developer tab, in the Controls group, click Properties.
-
To create a list of choices, click Add under Combo Box Properties or Drop-Down List Properties.
-
Type a choice in the Display Name box, such as Yes, No, or Maybe. Repeat this step until all of the choices are in the drop-down list.
-
Fill in any other properties that you want.
 or Drop-Down List Content Control
  .
.
Note: If you select the Contents cannot be edited check box, users won’t be able to click a choice..
Insert a date picker
-
Click where you want to insert the date picker control.
-
On the Developer tab, in the Controls group, click the Date Picker Content Control
.
 .
.Insert a check box
-
Click where you want to insert the check box control.
-
On the Developer tab, in the Controls group, click the Check Box Content Control
.
 .
.Insert a building block gallery control
You can use building block controls when you want people to choose a specific block of text.
For example, building block controls are helpful if you’re setting up a contract template, and you need to add different boilerplate text depending on the contract’s specific requirements. You can create rich text content controls for each version of the boilerplate text, and then you can use a building block gallery control as the container for the rich text content controls.
You can also use a building block control in a form.
-
Click where you want to insert the control.
-
On the Developer tab, in the Controls group, click Building Block Gallery Content Control
. -
Click the content control to select it.
-
On the Developer tab, in the Controls group, click Properties.
-
Click the Gallery and the Category for the building blocks that you want to make available in the building block control.
 .
.Set or change the properties for content controls
-
Select the content control, and click Properties in the Controls group.
-
In the Content Control Properties dialog box, choose whether the content control can be deleted or edited when someone uses your template.
-
To keep several content controls or even a few paragraphs of text together, select the controls or the text, and then click Group in the Controls group.
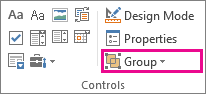
For example, perhaps you have a three-paragraph disclaimer. If you use the Group command to group the three paragraphs, the three-paragraph disclaimer cannot be edited and can be deleted only as a group.
Add instructional text to a template
Instructional text can enhance the usability of the template that you create. You can change the default instructional text in content controls.
To customize the default instructional text for your template users, do the following:
-
On the Developer tab, in the Controls group, click Design Mode.
-
Click the content control where you want to revise the placeholder instructional text.
-
Edit the placeholder text and format it any way you want.
-
On the Developer tab, in the Controls group, click Design Mode to turn off the design feature and save the instructional text.
Add protection to a template
You can add protection to individual content controls in a template to help prevent someone from deleting or editing a particular content control or group of controls, or you can help protect all of the template content with a password.
Add protection to parts of a template
-
Open the template that you want to add protection to.
-
Select the content controls to which you want to restrict changes.
Tip: Select multiple controls by holding down the CTRL key while you click the controls.
-
On the Developer tab, in the Controls group, click Group, and then click Group again.
-
On the Developer tab, in the Controls group, click Properties.
-
In the Content Control Properties dialog box, under Locking, do any of the following:
-
Select the Content control cannot be deleted check box, which allows the content of the control to be edited but the control itself cannot be deleted from the template or a document that is based on the template.
-
Select the Contents cannot be edited check box, which allows you to delete the control but does not allow you to edit the content in the control.
-
Use this setting when you want to protect text if it is included. For example, if you often include a disclaimer, you can help ensure that the text stays the same, and you can delete the disclaimer for documents that don’t require it.
Assign a password to a template
To assign a password to the document so that only reviewers who know the password can remove the protection, do the following:
-
Open the template that you want to assign a password to.
-
On the Review tab, in the Protect group, click Restrict Editing.
-
Under Start enforcement, click Yes, Start Enforcing Protection.
-
Type a password in the Enter new password (optional) box, and then confirm the password.
Important: If you choose not to use a password, anyone can change your editing restrictions.
Use strong passwords that combine uppercase and lowercase letters, numbers, and symbols. Weak passwords don’t mix these elements. Strong password: Y6dh!et5. Weak password: House27. Passwords should be at least 8 characters long. In general, longer a password is, the more secure it is.
It is critical that you remember your password. If you forget your password, Microsoft cannot retrieve it. Store the passwords that you write down in a secure place away from the information that they help protect.
A template is a document type that creates a copy of itself when you open it.
For example, a business plan is a common document that is written in Word. Instead of creating the structure of the business plan from scratch, you can use a template with predefined page layout, fonts, margins, and styles. All you have to do is open a template and fill in the text and the information that is specific to your document. When you save the document as a .docx or .docm file, you save your document separately from the template on which it is based.
In a template, you can provide recommended sections or required text for others to use, as well as content controls such as a predefined drop-down list or a special logo. You can add protection to a section of a template, or you can apply a password to the template to help protect the contents of the template from changes.
You can find Word templates for most kinds of documents on Office.com. If you have an Internet connection, click the File tab, click New, and then click the template category that you want. You can also you can create your own templates.
You can start with a blank document and save it as a template, or you can create a template that is based on an existing document or template.
Start with a blank template
-
Click the File tab, and then click New.
-
Click Blank document, and then click Create.
-
Make the changes that you want to the margin settings, page size and orientation, styles, and other formats.
You can also add content controls such as a date picker, instructional text, and graphics that you want to appear in all new documents that you base on the template.
-
Click the File tab, and then click Save As.
-
Give the new template a file name, select Word Template in the Save as type list, and then click Save.
Note: You can also save the template as a Word Macro-Enabled Template (.dotm file) or a Word 97-2003 Template (.dot file).
-
Close the template.
-
Click the File tab, and then click New.
-
Under Available templates, click New from existing.
-
Click a template or a document that is similar to the one that you want to create, and then click Create New.
-
Make the changes you want to the margin settings, page size and orientation, styles, and other formats.
You can also add content controls such as a date picker, instructional text, and graphics you want to appear in all new documents that you base on the template.
-
Click the File tab, and then click Save As.
-
Give the new template a file name, select Word Template in the Save as type list, and then click Save.
Note: You can also save the template as a Word Macro-Enabled Template (.dotm file) or a Word 97-2003 Template (.dot file).
-
Close the template.
Building blocks are reusable pieces of content or other document parts that are stored in galleries to be accessed and reused at any time. You can also save building blocks and distribute them with templates.
For example, you may create a report template that provides your template users with two cover letter types to choose from when they create their own report based on your template.
-
Save and close the template that you have designed just the way you want it and to which you want to add building blocks for template users to choose from.
-
Open the template.
Keep open the template to which you want to add building block options for template users.
-
Create the building blocks that you want to provide to your template users.
When you fill out the information in the Create New Building Block dialog box, in the Save in box make sure to click the template name.
-
Distribute the template.
When you send or make the template available to others, the building blocks you saved with the template will be available in the galleries you specified.
You can offer flexibility to anyone who may use your template by adding and configuring content controls, such as rich text controls, pictures, drop-down lists, or date pickers.
For example, you might provide a colleague with a template that includes a drop-down list, but your colleague wants to use a different set of options in the drop-down list in the document that he’s distributing based on your template. Because you allowed editing to the drop-down list when you added the content control to the template, your colleague can quickly and easily change the template to meet his needs.
Note: If content controls are not available, you may have opened a document or a template that was created in an earlier version of Word. To use content controls, you must convert the document to the Word 2010 file format by clicking the File tab, clicking Info, clicking Convert, and then clicking OK. After you convert the document or template, save it.
To add content controls, you need to show the Developer tab.
Show the Developer tab
-
Click the File tab.
-
Click Options.
-
Click Customize Ribbon.
-
Under Customize the Ribbon, click Main Tabs.
-
In the list, select the Developer check box, and then click OK.
Add content controls
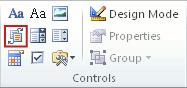
On the Developer tab, in the Controls group, click Design Mode, and then insert the controls that you want.
Insert a text control where users can enter text
In a rich text content control, users can format text as bold or italic, and they can type multiple paragraphs. If you want to limit what users add, insert the plain text content control.
-
Click where you want to insert the control.
-
On the Developer tab, in the Controls group, click Rich Text Content Control
or the Plain Text Content Control .
 or the Plain Text Content Control
  .
.Insert a picture control
-
Click where you want to insert the control.
-
On the Developer tab, in the Controls group, click Picture Control.
Insert a combo box or a drop-down list
In a combo box, users can select from a list of choices that you provide or they can type in their own information. In a drop-down list, users can only select from the list of choices.
-
On the Developer tab, in the Controls group, click the Combo Box Content Control
or Drop-Down List Content Control . -
Select the content control, and then on the Developer tab, in the Controls group, click Properties.
-
To create a list of choices, click Add under Combo Box Properties or Drop-Down List Properties.
-
Type a choice in the Display Name box, such as Yes, No, or Maybe.
Repeat this step until all of the choices are in the drop-down list.
-
Fill in any other properties that you want.
Note: If you select the Contents cannot be edited check box, users won’t be able to click a choice.
 or Drop-Down List Content Control
  .
.Insert a date picker
-
Click where you want to insert the date picker control.
-
On the Developer tab, in the Controls group, click the Date Picker Content Control.
Insert a check box
-
Click where you want to insert the check box control.
-
On the Developer tab, in the Controls group, click the Check Box Content Control.

Insert a building block gallery control
You can use building block controls when you want people to choose a specific block of text.
For example, building block controls are helpful if you’re setting up a contract template, and you need to add different boilerplate text depending on the contract’s specific requirements. You can create rich text content controls for each version of the boilerplate text, and then you can use a building block gallery control as the container for the rich text content controls.
You can also use a building block control in a form.
-
Click where you want to insert the control.
-
On the Developer tab, in the Controls group, click Building Block Gallery Content Control.
-
Click the content control to select it.
-
On the Developer tab, in the Controls group, click Properties.
-
Click the Gallery and the Category for the building blocks that you want to make available in the building block control.
Set or change the properties for content controls
-
Select the content control, and click Properties in the Controls group.
-
In the Content Control Properties dialog box, choose whether the content control can be deleted or edited when someone uses your template.
-
To keep several content controls or even a few paragraphs of text together, select the controls or the text, and then click Group in Controls group.
For example, perhaps you have a three-paragraph disclaimer. If you use the Group command to group the three paragraphs, the three-paragraph disclaimer cannot be edited and can be deleted only as a group.
Add instructional text to a template
Instructional text can enhance the usability of the template that you create. You can change the default instructional text in content controls.
To customize the default instructional text for your template users, do the following:
-
On the Developer tab, in the Controls group, click Design Mode.
-
Click the content control where you want to revise the placeholder instructional text.
-
Edit the placeholder text and format it any way you want.
-
On the Developer tab, in the Controls group, click Design Mode to turn off the design feature and save the instructional text.
You can add protection to individual content controls in a template to help prevent someone from deleting or editing a particular content control or group of controls, or you can help protect all of the template content with a password.
Add protection to parts of a template
-
Open the template that you want to add protection to.
-
Select the content controls to which you want to restrict changes.
To select multiple controls hold down the CTRL key while you click the controls.
-
On the Developer tab, in the Controls group, click Group, and then click Group again.
-
On the Developer tab, in the Controls group, click Properties.
-
In the Content Control Properties dialog box, under Locking, do any of the following:
-
Select the Content control cannot be deleted check box, which allows the content of the control to be edited but the control itself cannot be deleted from the template or a document that is based on the template.
-
Select the Contents cannot be edited check box, which allows you to delete the control but does not allow you to edit the content in the control.
Use this setting when you want to protect text if it is included. For example, if you often include a disclaimer, you can help ensure that the text stays the same, and you can delete the disclaimer for documents that don’t require it.
-
Assign a password to a template
To assign a password to the document so that only reviewers who know the password can remove the protection, do the following:
-
Open the template that you want to assign a password to.
-
On the Review tab, in the Protect group, click Restrict Editing.
-
Under Start enforcement, click Yes, Start Enforcing Protection.
-
Type a password in the Enter new password (optional) box, and then confirm the password.
Important: If you choose not to use a password, anyone can change your editing restrictions.
Passwords should be 8 or more characters in length.
It is critical that you remember your password. If you forget your password, Microsoft cannot retrieve it. Store the passwords that you write down in a secure place away from the information that they help protect.
A template is a document type that creates a copy of itself when you open it.
For example, a business plan is a common document that is written in Word. Instead of creating the structure of the business plan from scratch, you can use a template with predefined page layout, fonts, margins, and styles. All you have to do is open a template and fill in the text and the information that is specific to your document. When you save the document as a .docx or .docm file, you save your document separately from the template on which it is based.
In a template, you can provide recommended sections or required text for others to use, as well as content controls such as a predefined drop-down list or a special logo. You can add protection to a section of a template, or you can apply a password to the template to help protect the contents of the template from changes.
You can find Word templates for most kinds of documents on Office.com. If you have an Internet connection, click the File tab, click New, and then click the template category that you want. You can also you can create your own templates.
Important:
Office 2007 is no longer supported. Upgrade to Microsoft 365 to work anywhere from any device and continue to receive support.
Upgrade now
You can start with a blank document and save it as a template, or you can create a template that is based on an existing document or template.
Start with a blank template
-
Click the Microsoft Office Button
, and then click New. -
Click Blank document, and then click Create.
-
Make the changes that you want to the margin settings, page size and orientation, styles, and other formats.
You can also add instructional text, content controls such as a date picker, and graphics that you want to appear in all new documents that you base on the template.
-
Click the Microsoft Office Button
, and then click Save As. -
Give the new template a file name, select Word Template in the Save as type list, and then click Save.
Note: You can also save the template as a Word Macro-Enabled Template (.dotm file) or a Word 97-2003 Template (.dot file).
-
Close the template.
-
Click the Microsoft Office Button
, and then click Open. -
Open the document that you want.
-
Make the changes that you want to appear in all new documents that you base on the template.
-
Click the Microsoft Office Button
, and then click Save As. -
Give the new template a file name, select Word Template in the Save as type list, and then click Save.
Note: You can also save the template as a Word Macro-Enabled Template (.dotm file) or a Word 97-2003 Template (.dot file).
-
Close the template.
-
Click the Microsoft Office Button
, and then click New. -
Under Templates, click New from existing.
-
Click a template that is similar to the one that you want to create, and then click Create New.
-
Make the changes you want to the margin settings, page size and orientation, styles, and other formats.
You can also add instructional text, content controls such as a date picker, and graphics you want to appear in all new documents that you base on the template.
-
Click the Microsoft Office Button
, and then click Save As. -
Give the new template a file name, click Word Template in the Save as type box, and then click Save.
Note: You can also save the template as a Word Macro-Enabled Template (.dotm file) or a Word 97-2003 Template (.dot file).
-
Close the template.
You can offer flexibility to anyone who may use your template by adding and configuring content controls, such as rich text controls, pictures, drop-down lists, or date pickers.
For example, you might provide a colleague with a template that includes a drop-down list, but your colleague wants to use a different set of options in the drop-down list in the document that he’s distributing based on your template. Because you allowed editing to the drop-down list when you added the content control to the template, your colleague can quickly and easily change the template to meet his needs.
Add content controls
Note: You can also add content controls to documents.
-
Click the Microsoft Office Button
, and then click Word Options. -
Click Popular.
-
Select the Show Developer tab in the Ribbon check box, and then click OK.
Note: The Ribbon is a component of the Microsoft Office Fluent user interface.
-
Open the template to which you want to add content controls, and then click where you want to insert a control.
-
On the Developer tab, in the Controls group, click the content control that you want to add to your document or template.
For example, you can click Rich Text to insert a rich text control that will appear in any document that is created by using the template.
Note: If content controls are not available, you may have opened a document that was created in an earlier version of Word. To use content controls, you must convert the document to the Word 2007 file format by clicking the Microsoft Office Button
, clicking Convert, and then clicking OK. After you convert the document, save it. -
Select the content control, and click Properties in the Controls group.
-
In the Content Control Properties dialog box, choose whether the content control can be deleted or edited when someone uses your template.
-
To keep several content controls or even a few paragraphs of text together, select the controls or the text, and then click Group in Controls group.
For example, perhaps you have a three-paragraph disclaimer. If you use the Group command to group the three paragraphs, the three-paragraph disclaimer cannot be edited and can be deleted only as a group.
Add instructional text to a template
Sometimes it is useful to include placeholder instructions for how to fill out a particular content control that you have added to a template. The instructions are replaced by content when someone uses the template.
-
On the Developer tab, in the Controls group, click Design Mode.
-
If you haven’t already added a content control to your document, click where you want the control to appear, and then click a control.
Note: If content controls are not available, you may have opened a document created in an earlier version of Word. To use content controls, you must convert the document to the Word 2007 file format by clicking the Microsoft Office Button
, clicking Convert, and then clicking OK. After you convert the document, save it. -
On the Developer tab, in the Controls group, click Design Mode.
-
Click the content control to which you want to add placeholder text.
-
Edit the placeholder text and format it any way you want.
If you add a text box content control and you want the placeholder text to disappear when someone types in their own text, in the Controls group, click Properties, and then select the Remove content control when contents are edited check box.
Save and distribute building blocks with a template
Building blocks are reusable pieces of content or other document parts that are stored in galleries to be accessed and reused at any time. You can also save building blocks and distribute them with templates. For example, you may create a report template that provides your template users with two cover letter types to choose from when they create their own report based on your template.
-
Save and close the template that you have designed just the way you want it and to which you want to add building blocks for template users to choose from.
-
Open the template.
Keep open the template to which you want to add building block options for template users.
-
Create the building blocks that you want to provide to your template users.
When you fill out the information in the Create New Building Block dialog box, in the Save in box make sure to click the template name.
-
Distribute the template.
When you send or make the template available to others, the building blocks you saved with the template will be available in the galleries you specified.
You can add protection to individual content controls in a template to help prevent someone from deleting or editing a particular content control or group of controls, or you can help protect all of the template content with a password.
Add protection to parts of a template
-
Open the template that you want to add protection to.
-
Select the content controls or the group of controls to which you want to restrict changes.
-
On the Developer tab, in the Controls group, click Properties.
-
In the Content Control Properties dialog box, under Locking, do any of the following:
-
Select the Content control cannot be deleted check box, which allows the content of the control to be edited but the control itself cannot be deleted from the template or a document that is based on the template.
-
Select the Contents cannot be edited check box, which allows you to delete the control but does not allow you to edit the content in the control.
Use this setting when you want to protect text if it is included. For example, if you often include a disclaimer, you can help ensure that the text stays the same, and you can delete the disclaimer for documents that don’t require it.
-
Add protection to all of the contents of a template
-
Open the template that you want to help protect from changes.
-
On the Developer tab, in the Protect group, click Protect Document, and then click Restrict Formatting and Editing.
-
In the Protect Document task pane, under Editing restrictions, select the Allow only this type of editing in the document check box.
-
In the list of editing restrictions, click the restrictions that you want.
-
To choose additional restriction options, such as who can read or change the document, click Restrict permission.
Restriction options include setting an expiration date for the document and allowing users to copy content.
-
Under Start enforcement, click Yes, Start Enforcing Protection.
-
To assign a password to the document so that only reviewers who know the password can remove the protection, type a password in the Enter new password (optional) box, and then confirm the password.
Important: If you choose not to use a password, anyone can change your editing restrictions.
For example, a business plan is a common document written in Word. Instead of creating the structure of the business plan from scratch, you can use a template with predefined page layout, fonts, margins, and styles. All you have to do is open a template and fill in the text and the information that is specific to your document. When you save the document as a .docx or .docm file, you save your document separately from the template on which it is based.
Templates are exactly like documents in that you can provide recommended sections or required text for others to use, as well as content controls such as a predefined drop-down list or a special logo. You can add protection to a section of a template, or you can apply a password to the template to help protect the contents of the template from changes.
You can find Word templates for most kinds of documents on Microsoft Office Online. If you have an Internet connection, click the Microsoft Office Button  , click New, and then click the template category that you want. Alternatively, you can create your own templates.
Blank Brochure on White Background Word Template
Blank Certificate Word Template
Document Folder Word Template
Woman Hand Filling in Document Word Template
Blank Flowchart Word Template
CEO Award Blank Word Template
Notebook Word Template
New Plans Word Template
Consumer Prices Word Template
Right Angle Abstract Word Template
Life Insurance Word Template
Work Place Word Template
Work Word Template
Internet Links Word Template
Business Diary Word Template
Old Paper Theme Word Template
Certificate Word Template
Signature In A Blue Colors Word Template
Paperclip Word Template
Manual Medical Record Word Template
Record Keeping Office Word Template
Medical Records In Data Base Word Template
Flying Pages Word Template
Office Stuff Word Template
Yellow Pages Word Template
Open Book At The Table Word Template
Computer Theme Word Template
Folders Word Template
Mosaic Parts Word Template
Calendar Word Template
Investment Councilor Word Template
Poetry Word Template
Summary of Claim Word Template
Old Book Word Template
New Page Word Template
Legal Documents Word Template
Evaluation Check Word Template
Accounting and Finance Word Template
Medical Reform Word Template
Archive Folder Word Template
Ancient Logbook Word Template
Application Form Word Template
Healthcare Word Template
Brace Symbol Theme Word Template
Red Page Word Template
Black Layers Arranged Like a Fan Word Template
Blackboard with Mortarboard Word Template
Yellow Binders Word Template
Can’t find what you are looking for?
Tell us what it is!
If you already have a file open in Word, you can create a new document by clicking File>New. You can also use the shortcut Ctrl+N (Command+N for Mac). To open a blank document, double-click the blank document option.
Contents
- 1 How do I create a blank document template?
- 2 Where is the blank document template?
- 3 How many ways can you make a blank Word document?
- 4 How do I create a document on my computer?
- 5 How do I create a blank document in Word 2016?
- 6 How do I create an envelope in Word?
- 7 How do I create a Word document in Microsoft Word?
- 8 How can I create a Word document online for free?
- 9 Why can’t I create a new Word document?
- 10 What is Ctrl N?
- 11 What are the 3 different ways of creating a blank document in Libreoffice writer?
- 12 What type of documents can be created in Microsoft Word?
- 13 How do you create a new text document?
- 14 How do you create a new document in Windows 10?
- 15 How do I create a fillable field template in Word?
- 16 How do I create a 2 page template in Word?
- 17 Can Microsoft Word create envelopes?
- 18 Does Word have a template for envelopes?
- 19 What is envelope in MS Word?
- 20 Is there a free version of Word?
How do I create a blank document template?
Start with a blank template
- Click the File tab, and then click New.
- Click Blank document, and then click Create.
- Make the changes that you want to the margin settings, page size and orientation, styles, and other formats.
- Click the File tab, and then click Save As.
Where is the blank document template?
Templates are typically located at C:Users[username]AppDataRoamingMicrosoftTemplates. In Word, go to File > Open > Browse > locate Templates > select Normal. dot or Normal.
How many ways can you make a blank Word document?
Three different ways of creating blank document in ms word.
How do I create a document on my computer?
Creating a document with Microsoft Word
- Open Microsoft Word.
- In newer versions of Word, the first screen asks what type of Word document you want to create.
- Once the blank document or template is open, any new information can be entered using a keyboard or on-screen keyboard.
To create a new blank document:
- Select the File tab to access Backstage view.
- Select New, then click Blank document.
- A new blank document will appear.
How do I create an envelope in Word?
Create an Envelope
- Click the Mailings tab.
- Click the Envelopes button in the Create group.
- Enter a Delivery and Return Addresses.
- (Optional) Click Options.
- Select your envelope’s options.
- Click OK.
- Click Print to print the envelope, or click Add to Document to add the envelope as a new page in the current document.
How do I create a Word document in Microsoft Word?
Create a document
- Open Word. Or, if Word is already open, select File > New.
- In the Search for online templates box, enter a search word like letter, resume, or invoice. Or, select a category under the search box like Business, Personal, or Education.
- Click a template to see a preview.
- Select Create.
How can I create a Word document online for free?
Go to office.com/login and select Word.
With Word for the web running in your web browser, you can:
- Create documents to add and format text, images, and page layouts.
- Get to your documents from your computer, tablet, or phone.
- Share and work with others, wherever they are.
Why can’t I create a new Word document?
If you cannot open a blank Microsoft Word document, chances are your template file in Word is corrupted. The template file in word, a.k.a. Normal.It affects how Word opens, closes, and saves as well. If you cannot open a new Microsoft Word document, your global template file within Word may be corrupted.
What is Ctrl N?
Alternatively referred to as Control+N and C-n, Ctrl+N is a keyboard shortcut most often used to create a new document, window, workbook, or other type of file.Ctrl+N in Word and other word processors.
What are the 3 different ways of creating a blank document in Libreoffice writer?
This is the list of documents it can create:
- Text Document.
- Spreadsheet.
- Drawing.
- Presentation.
- Database.
- HTML.
- XML Form.
- Master Document.
What type of documents can be created in Microsoft Word?
Word processing software can easily create, edit, store, and print text documents such as letters, memoranda, forms, employee performance evaluations (such as those in Appendix A), proposals, reports, security surveys (such as those in Appendix B), general security checklists, security manuals, books, articles, press
How do you create a new text document?
Windows 10
Open File Explorer and navigate to the folder where you want to create the text file. Right-click in the folder and go to New > Text Document. The text file is given a default name, New Text Document.
How do you create a new document in Windows 10?
Method #1: Create a new folder with a keyboard shortcut
- Navigate to the location where you want to create the folder.
- Hold down the Ctrl, Shift, and N keys at the same time.
- Enter your desired folder name.
- Navigate to the location where you want to create the folder.
- Right-click on a blank space in the folder location.
How do I create a fillable field template in Word?
Tech Tip: How to Create Fillable Forms in Microsoft Word
- Enable Developer Tab. Open Microsoft Word, then go to the File Tab > Options > Customize Ribbon > check the Developer Tab in the right column > Click OK.
- Insert a Control.
- Edit Filler Text.
- Design Mode button again to exit the mode.
- Customize Content Controls.
How do I create a 2 page template in Word?
How to Add Pages to a Word Template
- Open the template. Video of the Day.
- Place your cursor where you wish to add extra pages.
- Click the “Insert” tab.
- Select the “Pages” button in the Ribbon. A drop-down list appears.
- Select “Page Break.” A new page will appear. Repeat the process to add more pages to the template.
Can Microsoft Word create envelopes?
Create and print or save an envelope
On the Mailings tab, in the Create group, click Envelopes. In the Delivery address box, type the mailing address. If you want to format the text, select the text, right-click the selected text, and then click Font on the shortcut menu.
Does Word have a template for envelopes?
Envelope templates make your mailings look marvelous
The green wave design envelope template in Word is a particularly attractive option to catch your customers’ eye. You can also create your business stationery using a matching letterhead and Word envelope template.
What is envelope in MS Word?
Envelopes in Word are created through the use of styles that define specific elements of the envelope, such as return address and recipient address. You can modify the space allocated for these addresses by modifying the styles used by Word.
Is there a free version of Word?
Using Microsoft Word on a smartphone or a tablet might not be your first choice, but it’s possible and it’s also free. Previously, Microsoft had a standalone Word app for both iOS and Android, but it has now merged Word with Excel and Powerpoint on mobile in the single Microsoft Office application.