
Word for Microsoft 365 Word 2021 Word 2019 Word 2016 Word 2013 Word 2010 Word 2007 More…Less
In this article
-
Add a cell
-
Add a row above or below
-
Add a column to the left or right
-
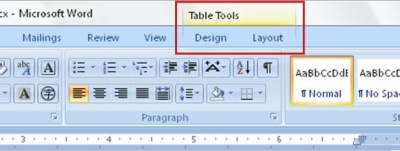
About the Table Tools contextual tabs
Add a cell
-
Click in a cell that is to the right of or above where you want to insert a cell.
-
Under Table Tools, click the Layout tab.
-
Click the arrow at the bottom, right-hand corner of the Rows & Columns section.
-
Click one of the following options.
Click
To
Shift cells right
Insert a cell and move all other cells in that row to the right.
Note: Word does not insert a new column. This may result in a row that has more cells than the other rows.
Shift cells down
Insert a cell and move the existing cells down one row. A new row is added at the bottom of the table.
Insert entire row
Insert a row above the cell that you clicked in.
Insert entire column
Insert a column to the left of the cell that you clicked in.
Top of Page
Add a row above or below
-
Click in a cell above or below where you want to add a row.
-
Under Table Tools, on the Layout tab, do one of the following:
-
To add a row above the cell, click Insert Above in the Rows and Columns group.
-
To add a row below the cell, click Insert Below in the Rows and Columns group.
-
Tip: To insert more than one row (or column) at the same time, select as many rows or columns as you want to add before you click the insert control. For example, to insert two rows above a row, first select two rows in your table and then click Insert Above.
Top of Page
Add a column to the left or right
-
Click in a cell to the left or right of where you want to add a column.
-
Under Table Tools, on the Layout tab, do one of the following:
-
To add a column to the left of the cell, click Insert Left in the Rows and Columns group.
-
To add a column to the right of the cell, click Insert Right in the Rows and Columns group.
-
Top of Page
About the Table Tools contextual tabs
You will need to know where the Design and LayoutTable Tools contextual tabs are when working on the design and structural layout of a table. The Design and Layout tabs are only visible after you have clicked inside of a table, and appear at the top of the screen on the ribbon.
Top of Page
See Also
Delete a row, column, or cell from a table
Add columns and rows to a table
Keyboard shortcuts for Microsoft Word on Windows
Need more help?
Want more options?
Explore subscription benefits, browse training courses, learn how to secure your device, and more.
Communities help you ask and answer questions, give feedback, and hear from experts with rich knowledge.
Tables in Word are useful in so many situations. In this post you’ll discover how to create tables, then manipulate and design them in the quickest and easiest way to provide that visual punch.
Clickable Table of Contents
Enhance your Word tables with these advanced features
1. What are tables in Word good for?
Tables are useful for 2 distinct reasons.
- To show an actual table of data, or
- To organise and postion text, images and other elements on the page.
Many years ago, typewriters ruled the world. And a feature of a good typewriter was the tab stop, which was a device that essentially let you control indentation.
Over the years many people have continued to use tabs to indent text, because of its convenience, but they are hard work to set up properly.
Tables provide a much easier way to organise content on a page.
1. Select the Insert tab.
2. Click the Tables icon in the Tables group.
3. Move your mouse pointer into the table grid until the required number of rows and columns are highlighted orange, then left-click.

An empty table is inserted into the document.
Two new tabs, Design and Layout are also added to the ribbon area, under the banner of Table Tools.


3. MOVING AROUND A Word TABLE
- While the table is empty, you can use the cursor keys to move around the cells. However, when the cells contain information, using the cursor keys will move through the cell content first before moving to the next cell
- You can left-click in any cell to position the cursor.
- Press Tab to move to the next cell. The cursor will move across and then down the table.
- Press Shift + Tab to move to the previous cell.

NB. Using Tab is better than using the cursors as it will move to the next/previous cell regardless of whether there is information in the cells.
NB2. If you press Tab while you are in the last cell, a new row will be added to the bottom of your table
4. SELECTING A CELL, ROW, COLUMN OR THE ENTIRE TABLE
To select a cell:
1. Position the mouse pointer inside the cell on the bottom-left corner of the cell.
The pointer will change shape to a solid black arrow that points up and right.
2. Left-click.

To select a row of a table:
1. Position the mouse pointer in the left margin in line with the row you want to select.
The mouse pointer will change to a white arrow that points up and right.
2. Left-click.

To select a column
1. Position the mouse pointer so that it rests on the top border of the table, above the column you want to select.
The mouse pointer will change to a solid black arrow pointing down.
2. Left-click.

To select the entire table:
1. Position your mouse pointer over the 4-headed arrow icon situated at the top-left of the table.
2. Left-click.

5. INSERTING AN EXTRA ROW OR COLUMN
To insert an extra row:
1. Position the cursor in a cell.
2. Select the Layout tab, under the Table Tools banner.
3. Click Insert Above or Insert Below in the Rows and Columns group

Here is a quick way to insert new rows:
1. Position the cursor to the left of the table, but in close proximity.
2. A plus symbol will appear above or below the mouse pointer indicating where the new row will be added.

3. Nudge the mouse pointer up or down to move the plus sign above or below.
4. Left-click to insert the new row,
To insert an extra column:
1. Position the cursor in a cell.
2. Select the Layout tab, under the Table Tools banner.
3. Click Insert Left or Insert Right in the Rows and Columns group

Here is a quick way to insert a new column:
1. Position the cursor above a column, but in close proximity to the table.
2. A plus symbol will appear to the left or right of the mouse pointer indicating where the new column will be added.
3. Nudge the mouse pointer left or right to move the plus sign to the left or the right of the column.
4. Left-click to insert the new column,

6. DELETING A ROW OR COLUMN
To delete the current row or column:
1. Position the cursor in any cell of the row you want to delete.
2. Select the Layout tab, under the Table Tools banner.
3. Click the Delete icon in the Rows and Columns group.

4. Choose Delete Row or Delete Column from the drop-down menu.
7. Quickly fORMATTING tables in Word
Word provides you with a number of pre-set table designs. This means that it formats the headings and the data, applies a variety of borders and colours the cells in a way that makes it look like a professionally produced table. As a beginner this simple technique will give you a good-looking table.
1. Position the cursor in any cell in the table.
2. Select the Design tab under the Table Tools banner.
The Table Styles group lists a number of table designs. To get the full list, click the More button beneath the table styles scroll bar
The default table style is Table Grid in the Plain Tables category which adds simple gridlines but no shading to your table.
Live Preview allows you to hover over a design and see it applied to your table. If you like what you see, click to select the table design.

In the Table Style Options group of the Design tab, tick the components that you have in your table. For example, if your table has column headings, tick Header Row. In doing this, the various parts of your table are formatted accordingly

Header Row
This will emphasise the header row by making the text bold or applying a different cell colour (depending on the table style selected.
Total Row
This will emphasise the bottom table row by making the text bold or applying a different cell colour (depending on the table style selected.
First Column
This will emphasise the first column (for labels etc.) by making the text bold or applying a different cell colour (depending on the table style selected.
Last Column
This will emphasise the last column (for row totals etc.) by making the text bold or applying a different cell colour (depending on the table style selected.
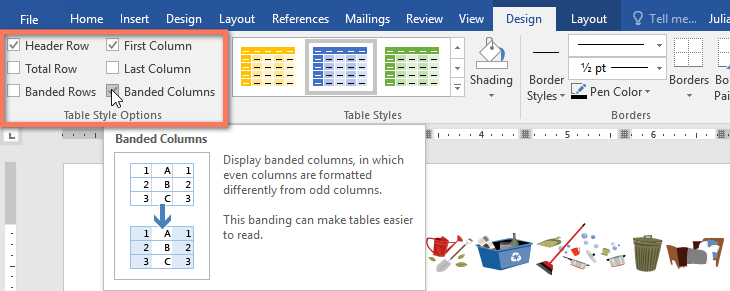
Banded Rows
This will make odd rows one colour and even rows a different colour. This helps readability.
Banded Columns
This will make odd columns one colour and even columns a different colour. This helps readability.
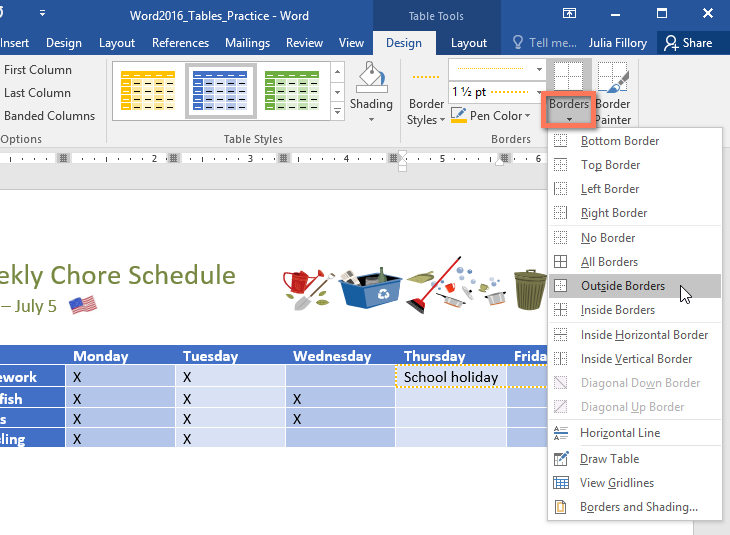
8. SETTING THE BORDERS AND SHADING
The Table Styles Gallery allows you to completely format a table with one click. Whereas you used to need some nous, anybody can now create a professional looking design.
However, you will often still need to apply your own border and shading, and manually change a table design. With a little effort can add a lot of flavour to your page and dramatically enhance the overall appearance of the document.
To set the borders for tables in Word:
1. Select the portion of the table that you wish to set the borders for. This may be the entire table, a row or rows, a column or columns or a selection of cells.
2. Select the Design tab under the Table Tools banner.
3. Select the Borders icon. A drop-down list appears. This list shows every combination of border that can be turned on or off. The icons with a shaded background are currently switched on. The rest are switched off.
4. Click any icon to switch the border on or off. The border style that is applied is the default style (½ pt solid black line ) or the last style that was used.

5. To apply customised borders, with different colours, styles and widths, click the Borders & Shading option at the bottom of the list to display the Borders and Shading dialog box.


Your selection will always have an outer border, and if you selected more than one cell, you will have some inside borders as well. The easiest way to use the dialog box is to start on the bottom-middle and work your way up and right.
1. Select the colour and width (thickness) that you would like for your border.

2. Choose a style (e.g. dotted, dashed, double, solid etc.)

3. Paint your borders. There are two ways to do this.
- The first way is to click directly on a border in the Preview itself.
- The second way is to click the appropriate icon around the edge of the Preview section that represents each border. Depending on which cells you selected in your table, some of these icons may not be available.

On the left-hand side of the dialog box, there are some pre-defined border combinations which you can use to save yourself some time. Depending on your selection of cells, the pre-defined options may differ. Here’s a run-down:

To shade the cells of tables in Word:
1. Select the portion of the table that you wish to shade. This may be the entire table, a row or rows, a column or columns or a selection of cells.
2. Select the Design tab under the Table Tools banner.
3. Click the Shading icon.
The colours that you see displayed match the current them of the document. Themes were discussed earlier in the course.
4. Click a colour in the palette.
While you can pick any colour, it is recommended to stick with the light colour shades, otherwise your tables will appear very loud and ugly, like they’re shouting in your face. Subtle is the order of the day. The exception to this is column headings or other cells that you wish to differentiate. Under these circumstances, you can use a dark colour, but use a light font with it.

If you cannot find the exact colour you need,
- Click the More Colours link underneath the palette. This displays a larger, more accurate colour palette.
- And if that’s not enough, click the Custom tab and you’ll get a really fine selection of colours (you can even enter your own RGB settings if you know them)

9. REPEATING table HEADINGS ON EVERY PAGE WHEN PRINTING
When you have large tables that occupy two or more pages, many people insert manual page breaks, then copy and paste their table header rows at the top of each page.
When rows are added or removed from tables in Word, the table headers end up half way down the page.
There is a simple tool that will eliminate this problem
1. Ensure that the table is a single table, with no manual page breaks in the middle, and one header at the top. The table header may occupy more than one row, it doesn’t affect the way this feature works.
2. Position the cursor somewhere in the top row of the table.
3. Select the Layout tab under the Table Tools banner.
4. Click the Repeat Header Rows icon ion the Data group.

Now, it doesn’t matter how many rows tables in Word contain, if the table ever spills across into another page, the header row (which normally displays the column headings) will always appear at the top of the table.
10. All the key points again
- Tables in Word serve 2 distinct purpose: to display a table of data and to organise and position items on the page
- To create table, select 2 tabs — Design and Layout under the Table Tools banner.
- There are 2 tabs — Design and Layout under the Table Tools banner.
- You can press the TAB key to move direct to the next cell and SHIFT and TAB together to move backwards through a table.
- The four elements of a table are cells, rows, columns and the whole table. Each can be selected.
- Rows can be inserted by selecting the Layout tab under Table Tools, then clicking the Insert Above or Insert Below icons. Alternatively, hover to the left of a row and click the plus symbol that appears above or below the mouse pointer.
- Columns can be inserted by selecting the Layout tab under Table Tools, then clicking the Insert
Left or Insert Right icons. Alternatively, hover above a table column and click the plus symbol that appears to the left or right of the mouse pointer. - Columns and rows and be removed from the table, by positioning the cursor in the row or column to be removed, then clicking the Delete icon on the Layout tab of Table Tools and choosing Delete
Row or Delete Column. - Tables can be formatted using the Table Style gallery or by manually setting the shading and borders manually. Both sets of tools are found on the Design ribbon of the Table Tools.
- When using the Microsoft Table Styles, you can control the behaviour of the formatting by setting the Table Style options – 6 tick boxes that define the structure of your table.
- For long tables that spill across onto subsequent pages, the top row, which normally contains the column headings can be set to repeat automatically. So there is no excuse for cutting and pasting headings midway through your table or taping pages together to make sense of the table!
I hope you found plenty of value in this post. I’d love to hear your biggest takeaway in the comments below together with any questions you may have.
Have a fantastic day.


About the author
Jason Morrell
Jason loves to simplify the hard stuff, cut the fluff and share what actually works. Things that make a difference. Things that slash hours from your daily work tasks. He runs a software training business in Queensland, Australia, lives on the Gold Coast with his wife and 4 kids and often talks about himself in the third person!
SHARE
Are you struggling to get your message across? When your Microsoft Word project contains information, try presenting it in the form of a Word table. Learn how to make tables in Word quickly with a template.


A table is a kind of chart that organizes and presents data in rows and columns. It makes information easier to grasp, understand, and analyze at a glance, compared to explaining the same data through plain text.
Microsoft Word gives you various ways to insert or create a table. And you’ve got granular control over the formatting, layout, and appearance of Microsoft Word tables. Table charts are useful in different types of Word projects, whether for personal, educational, or business use.
This article will show you how to make a table in Word using a template. Then edit and format it to change its appearance.
(Note: The screenshots and instructions that follow are made using Microsoft Word for Mac version 16.4. If you’re using a different version of Word, then the interface and steps may be different.)
How to Make & Edit MS Word Tables (Video)
In this video, you’ll learn how to quickly make tables in Mircosoft Word. Find out how to start with a premium template. Quickly customize it to make an attractive, professional MS Word table you can use and reuse.
To learn even more about MS Word tables and about templates than can be used for tables, study the step-by-step tutorial below:
How to Make Basic Tables in Word
Let’s start by learning how to make a basic table in Microsoft Word:
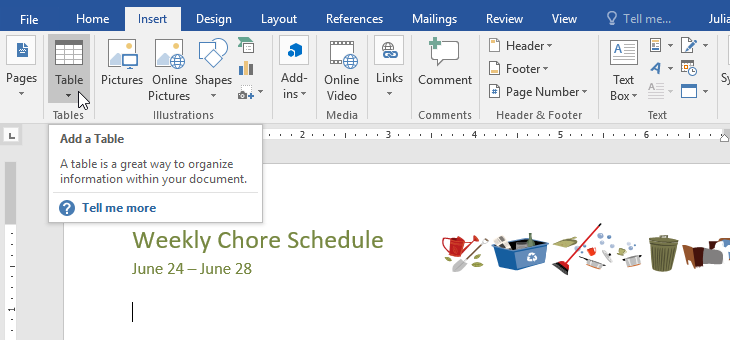
1. Insert a Table
You can create a basic Microsoft Word table in one of two ways:
Method 1. The Insert Tab
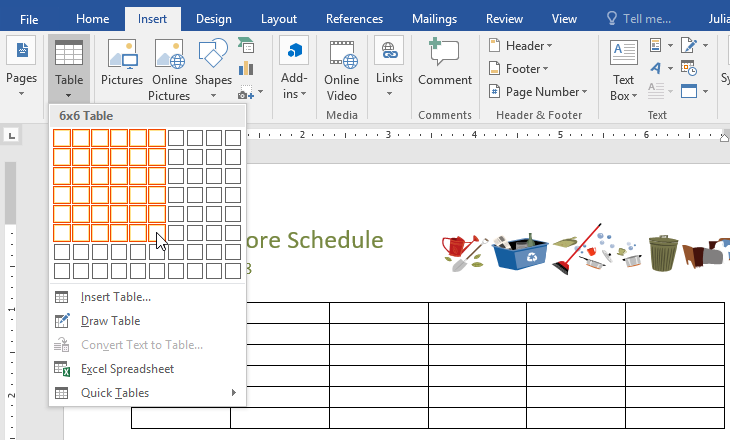
Click on the Insert tab, then click the Table button on the ribbon.


The Insert Table panel appears. Drag the cursor over the squares to specify the number of columns and rows you want to create. Click to apply.


Method 2. The Insert Menu
Go to Insert > Table….


The Insert Table panel opens. Specify the number of columns and rows you need. (You can always add or remove columns and rows later.)


Also select the Autofit Behavior you want the table to have. You’ve got several options:
- Initial column width. The default setting is Auto, which divides the entire width of your page window across the number of columns in the table. Or, you can specify a different column width.
- AutoFit to contents. Resizes the column width based on the width of the content inside the column.
- AutoFit to window. Distributes the columns equally across the entire width of the page window.
- Set as default for new tables. Check this option if you want the settings to be applied globally to all new tables you create.
When you’re happy with the options you’ve selected, click OK.


2. Draw a Table
Or, you can draw a table in MS Word. This is a useful feature if you want to create an irregular or more complicated table with columns and/or rows of varying widths.
To draw a table, click Insert > Table > Draw Table.


With your mouse or trackpad, click and drag the cursor to start drawing your table. You can begin by drawing the outermost boundary of the table first.


Then, click and drag the cursor to create columns and rows inside the table. When you’re done, click anywhere outside the table.


Here’s an example of an “irregular” table you can draw using this feature.


If you make a mistake, click Layout > Eraser to erase a line from the table.


Click and drag the eraser along the line you wish to erase. The line that’ll be erased appears as a thick, red line. Release the mouse or trackpad to erase.


Click outside the table when you’re done.
3. Convert Text to Tables and Vice Versa
Another way to create a table is by converting text into a table. This means you can take non-tabular data from a CSV or plain TXT file and convert them into a table.
First, copy and paste the non-tabular data into your Word document.


With the text selected, go to Insert > Table > Convert Text to Table….


The Convert Text to Table panel opens. Specify the settings you wish to use. Click OK.


The text is then converted into a table.


You can also do the opposite, which is to convert a table into text.
Select the cells or entire table you want to convert. Next, click on the Layout tab then click the Convert Table to Text icon.


The Convert Table to Text panel opens. This is where you’ll decide how you want to separate text that’s currently in different columns. When you’ve made a selection, click OK.


For this example, I chose to separate text with commas. This is what the converted table looks like.


4. Advanced: How to Insert a Table from Excel
If you’ve already created a table in Excel, you can embed it into your Word document.
Open the Excel file. Click and drag the mouse to select the table.


Go back to your Word document. Go to Edit > Paste Special ….


In the Paste Special panel, select Microsoft Excel Binary Worksheet Object, then click OK.


This embeds the Excel table into Word. It’s still an Excel table, which means you can’t edit or format the table in MS Word. You’ve got to do so in Excel.


Double-click anywhere in the table to launch the source file in Excel. When you make any changes to the table in Excel, the table embedded in your Word project automatically updates to reflect those changes.
Now you know how to make a table in MS Word using various options.
How to Edit Tables
At any time after creating your table, you can edit and customize it to look the way you want it to. Here are some steps for editing tables in Microsoft Word:
1. Add a Column or Row
To add a row or column, click inside a table cell. Right-click on the mouse, then click Insert.


Select one of the following:
- Columns to the Left. Adds a column to the left of the current column
- Columns to the Right. Adds a column to the right of the current column
- Rows Above. Adds a row above the current row
- Rows Below. Adds a row below the current row
- Cells … Inserts a cell and shifts the rest of the cells either to the right or down from where the cursor is
- Table … Inserts a table inside the current cell
Or, with the cursor in one of the cells, you can click on the Layout tab.


Then choose of the following buttons on the ribbon:
- Insert Above. Inserts a row above the current cell
- Insert Below. Inserts a row below the current cell
- Insert Columns to the Left. Inserts a column to the left of the current cell
- Insert Columns to the Right. Inserts a column to the right of the current cell
Finally, you can add a new row when you’ve reached the last cell in the last row of your table. Simply press tab and a new row appears.
2. Delete a Column or Row
To delete a cell, column, row, or table, click on the Layout tab > Delete.


Select one of the options that appear:
- Delete Cells …
- Delete Columns
- Delete Rows
- Delete Table
You can use the same steps to edit a table you’ve drawn. Or, you can use the Layout tab to add or delete rows and columns.


Merge Cells
Sometimes you may want to merge cells to present information more clearly. To merge cells, click and drag the cursor to select the cells you wish to merge.


On the Layout tab, click on the Merge Cells button.


Or, after selecting the cells to be merged, right-click on your mouse, then click Merge Cells.


Now the cells have been merged into one.


Split Cells
After merging cells, you can always split them again into separate cells.
Place the cursor in the merged cell, then click Layout > Split Cells.


Or, right-click on your mouse, then click Split Cells….


Either way, the Split Cells panel pops up. Specify the number of columns and rows you want to split the cell into. Click OK.


Split Table
You may decide that it makes more sense to split up a table into two separate tables. Microsoft Word lets you do that easily, too.
In this example, I want to split the table right above the Accessories cell. And so, I’ll place the cursor in that cell. Next, click on the Layout tab, then click the Split Table button.


Now, we’ve got two separate tables.


Table Formatting
When you first create a table, it looks plain and boring. But Microsoft Word has many features so you can format tables to look exactly the way you want them. Here are some common ways to format tables:
1. Table Styles
The easiest way to format a table is by using one of the pre-formatted table styles. Put the cursor in any cell in the table. Click on the Table Design tab. Next, click on the arrow to expand the Table Styles group.


Click on a style you want to use and it’s applied immediately.


You can change any style you’ve selected. Again, click on Table Design, expand the Table Style group, then click Modify Style.


The Modify Style panel opens. Make the selections you want, then click OK.


2. Use Your Own Formatting
The Table Design tab gives you control over the appearance of every aspect of your table. Click on the Table Design tab and any of the appropriate buttons on the ribbon.


Resize a Table
You can also resize your table. Click on any cell to select the table, then click and drag one of the corners to resize it.


Or, you can use the Layout tab to resize individual cells, specific rows or columns, or the entire table. Select the columns or rows you wish to resize. Specify the height and/or width you wish to apply.


You can also adjust column width by hand by using the Table Ruler. Click inside a column you want to change. Then, drag the sliders in the Table Ruler to set to desired width.


Text Wrapping
If you want text to flow around the table, you can do so by changing its text wrapping.
Click in any cell to select the table. Click Table > Table Properties….


In the Table Properties panel and under Text Wrapping, click Around > OK.


Now the text flows around the table.


Take note that the Table Properties panel allows you to format other qualities of the table, including:
- Size
- Alignment
- Positioning
- Borders and Shading
On the other tabs, you can change:
- Column, Row, and Cell Size
- Allow row to break across pages
- Repeat as header row at the top of each page
- Cell Vertical Alignment
- Alt Text (Title and Description) — more information about the table, to help people with vision or cognitive impairment who may not see the table
Find Great Styles for Microsoft Word
You don’t have to start from scratch to create an impressive and effective Word document — even if you don’t have design skills. You can find great styles by using a template for Word.


One great source for great Microsoft Word templates and professional graphics is Envato Elements. For one low monthly subscription, you get unlimited downloads of templates, graphics, fonts, and other creative tools you need for your project. It’s a terrific option if you create plenty of materials.
For single projects, GraphicRiver is an outstanding source for templates for Word. This marketplace gives you access to thousands of creative elements on a pay-per-use basis.
Learn More
Microsoft Word has many robust features to help you realize the vision you’ve got for your document. But with power comes complexity. That’s why it’s a good idea to learn how to use Microsoft Word.
These articles will help you get started:
Visualize Your Data with Microsoft Word Tables
Make your information clearer and easier to understand by learning how to make a table in Microsoft Word. Tables organize data into rows and columns, which makes them easier to grasp at a glance. Follow the steps in this article to create, format, and customize tables in Word.
You can also use a premium Word template to get a premium design created by designers. Get Word templates from Envato Elements, if you want unlimited downloads of templates, graphics, and other creative tools you need — all for one flat monthly fee.
Or, get premium templates for Word from GraphicRiver if you prefer to pay for each use of an item. Both sources give you access to thousands of design elements created by professionals, so you can save time, energy, and effort while creating an outstanding Word document.
Did you find this post useful?

Marketing & Communications Professional and Lifelong Learner/Canada
Lexi Rodrigo is a marketing and communications professional, copywriter, and course creator who helps remarkable brands and people get seen, heard, and known. Writing for the web since 2008, she has over 100+ blog posts published on Envato Tuts, Acadium, Mirasee, Vero, Copyblogger, FreelanceFolder, Business2Community, and others.
Lexi has supported multimillion-dollar companies and nonprofits in various marketing and communication roles. She has driven results like tripling the organic search traffic of a blog in three months and generating over $65 million in revenues, donations, and sponsorships.
She has a Bachelor of Arts degree in communications. She is also the co-author of «Blog Post Ideas: 21 Proven Ways to Create Compelling Content and Kiss Writer’s Block Goodbye.» When she’s not reading or writing, Lexi bakes bread, grows food, and takes long walks.
Создание таблиц в документе Word из кода VBA Excel. Метод Tables.Add, его синтаксис и параметры. Объекты Table, Column, Row, Cell. Границы таблиц и стили.
Работа с Word из кода VBA Excel
Часть 4. Создание таблиц в документе Word
[Часть 1] [Часть 2] [Часть 3] [Часть 4] [Часть 5] [Часть 6]
Таблицы в VBA Word принадлежат коллекции Tables, которая предусмотрена для объектов Document, Selection и Range. Новая таблица создается с помощью метода Tables.Add.
Синтаксис метода Tables.Add
|
Expression.Add (Range, Rows, Columns, DefaultTableBehavior, AutoFitBehavior) |
Expression – выражение, возвращающее коллекцию Tables.
Параметры метода Tables.Add
- Range – диапазон, в котором будет создана таблица (обязательный параметр).
- Rows – количество строк в создаваемой таблице (обязательный параметр).
- Columns – количество столбцов в создаваемой таблице (обязательный параметр).
- DefaultTableBehavior – включает и отключает автоподбор ширины ячеек в соответствии с их содержимым (необязательный параметр).
- AutoFitBehavior – определяет правила автоподбора размера таблицы в документе Word (необязательный параметр).
Создание таблицы в документе
Создание таблицы из 3 строк и 4 столбцов в документе myDocument без содержимого и присвоение ссылки на нее переменной myTable:
|
With myDocument Set myTable = .Tables.Add(.Range(Start:=0, End:=0), 3, 4) End With |
Создание таблицы из 5 строк и 4 столбцов в документе Word с содержимым:
|
With myDocument myInt = .Range.Characters.Count — 1 Set myTable = .Tables.Add(.Range(Start:=myInt, End:=myInt), 5, 4) End With |
Для указания точки вставки таблицы присваиваем числовой переменной количество символов в документе минус один. Вычитаем единицу, чтобы исключить из подсчета последний знак завершения абзаца (¶), так как точка вставки не может располагаться за ним.
Последний знак завершения абзаца всегда присутствует в документе Word, в том числе и в новом без содержимого, поэтому такой код подойдет и для пустого документа.
При создании, каждой новой таблице в документе присваивается индекс, по которому к ней можно обращаться:
|
myDocument.Tables(индекс) |
Нумерация индексов начинается с единицы.
Отображение границ таблицы
Новая таблица в документе Word из кода VBA Excel создается без границ. Отобразить их можно несколькими способами:
Вариант 1
Присвоение таблице стиля, отображающего все границы:
|
myTable.Style = «Сетка таблицы» |
Вариант 2
Отображение внешних и внутренних границ в таблице:
|
With myTable .Borders.OutsideLineStyle = wdLineStyleSingle .Borders.InsideLineStyle = wdLineStyleSingle End With |
Вариант 3
Отображение всех границ в таблице по отдельности:
|
With myTable .Borders(wdBorderHorizontal) = True .Borders(wdBorderVertical) = True .Borders(wdBorderTop) = True .Borders(wdBorderLeft) = True .Borders(wdBorderRight) = True .Borders(wdBorderBottom) = True End With |
Присвоение таблицам стилей
Вариант 1
|
myTable.Style = «Таблица простая 5» |
Чтобы узнать название нужного стиля, в списке стилей конструктора таблиц наведите на него указатель мыши. Название отобразится в подсказке. Кроме того, можно записать макрос с присвоением таблице стиля и взять название из него.
Вариант 2
|
myTable.AutoFormat wdTableFormatClassic1 |
Выбирайте нужную константу с помощью листа подсказок свойств и методов – Auto List Members.
Обращение к ячейкам таблицы
Обращение к ячейкам второй таблицы myTable2 в документе myDocument по индексам строк и столбцов:
|
myTable2.Cell(nRow, nColumn) myDocument.Tables(2).Cell(nRow, nColumn) |
- nRow – номер строки;
- nColumn – номер столбца.
Обращение к ячейкам таблицы myTable в документе Word с помощью свойства Cell объектов Row и Column и запись в них текста:
|
myTable.Rows(2).Cells(2).Range = _ «Содержимое ячейки во 2 строке 2 столбца» myTable.Columns(3).Cells(1).Range = _ «Содержимое ячейки в 1 строке 3 столбца» |
В таблице myTable должно быть как минимум 2 строки и 3 столбца.
Примеры создания таблиц Word
Пример 1
Создание таблицы в новом документе Word со сплошными наружными границами и пунктирными внутри:
|
Sub Primer1() Dim myWord As New Word.Application, _ myDocument As Word.Document, myTable As Word.Table Set myDocument = myWord.Documents.Add myWord.Visible = True With myDocument Set myTable = .Tables.Add(.Range(0, 0), 5, 4) End With With myTable .Borders.OutsideLineStyle = wdLineStyleSingle .Borders.InsideLineStyle = wdLineStyleDot End With End Sub |
В выражении myDocument.Range(Start:=0, End:=0) ключевые слова Start и End можно не указывать – myDocument.Range(0, 0).
Пример 2
Создание таблицы под ранее вставленным заголовком, заполнение ячеек таблицы и применение автосуммы:
|
1 2 3 4 5 6 7 8 9 10 11 12 13 14 15 16 17 18 19 20 21 22 23 24 25 26 27 28 29 30 31 32 33 34 35 36 37 38 39 40 41 42 43 44 45 46 47 48 49 50 51 52 53 54 55 56 57 58 59 60 |
Sub Primer2() On Error GoTo Instr Dim myWord As New Word.Application, _ myDocument As Word.Document, _ myTable As Word.Table, myInt As Integer Set myDocument = myWord.Documents.Add myWord.Visible = True With myDocument ‘Вставляем заголовок таблицы .Range.InsertAfter «Продажи фруктов в 2019 году» & vbCr myInt = .Range.Characters.Count — 1 ‘Присваиваем заголовку стиль .Range(0, myInt).Style = «Заголовок 1» ‘Создаем таблицу Set myTable = .Tables.Add(.Range(myInt, myInt), 4, 4) End With With myTable ‘Отображаем сетку таблицы .Borders.OutsideLineStyle = wdLineStyleSingle .Borders.InsideLineStyle = wdLineStyleSingle ‘Форматируем первую и четвертую строки .Rows(1).Range.Bold = True .Rows(4).Range.Bold = True ‘Заполняем первый столбец .Columns(1).Cells(1).Range = «Наименование» .Columns(1).Cells(2).Range = «1 квартал» .Columns(1).Cells(3).Range = «2 квартал» .Columns(1).Cells(4).Range = «Итого» ‘Заполняем второй столбец .Columns(2).Cells(1).Range = «Бананы» .Columns(2).Cells(2).Range = «550» .Columns(2).Cells(3).Range = «490» .Columns(2).Cells(4).AutoSum ‘Заполняем третий столбец .Columns(3).Cells(1).Range = «Лимоны» .Columns(3).Cells(2).Range = «280» .Columns(3).Cells(3).Range = «310» .Columns(3).Cells(4).AutoSum ‘Заполняем четвертый столбец .Columns(4).Cells(1).Range = «Яблоки» .Columns(4).Cells(2).Range = «630» .Columns(4).Cells(3).Range = «620» .Columns(4).Cells(4).AutoSum End With ‘Освобождаем переменные Set myDocument = Nothing Set myWord = Nothing ‘Завершаем процедуру Exit Sub ‘Обработка ошибок Instr: If Err.Description <> «» Then MsgBox «Произошла ошибка: « & Err.Description End If If Not myWord Is Nothing Then myWord.Quit Set myDocument = Nothing Set myWord = Nothing End If End Sub |
Метод AutoSum суммирует значения в ячейках одного столбца над ячейкой с суммой. При использовании его для сложения значений ячеек в одной строке, результат может быть непредсказуемым.
Чтобы просуммировать значения в строке слева от ячейки с суммой, используйте метод Formula объекта Cell:
|
myTable.Cell(2, 4).Formula («=SUM(LEFT)») |
Другие значения метода Formula, применяемые для суммирования значений ячеек:
- «=SUM(ABOVE)» – сумма значений над ячейкой (аналог метода AutoSum);
- «=SUM(BELOW)» – сумма значений под ячейкой;
- «=SUM(RIGHT)» – сумма значений справа от ячейки.
- Коллекция
Tables. - Форматирование
таблицы. - Строки
и столбцы. - Ячейки.
- Вычисления.
1.Коллекция Tables.
Таблица представляет собой
упорядоченную структуру, предназначенную для хранения организованных в виде
строк и столбцов наборов данных. Элемент таблицы, находящийся на пересечении
строки и столбца, называется ячейкой.
Таблица Word
имеет такую же структуру, как и электронная таблица Excel
– элемент таблицы, находящийся на пересечении строки и столбца, называется
ячейкой и идентифицируется по имени столбца и номеру строки.
В VBA для доступа к таблицам
используется объект Tables, являющийся семейством
объектов Table, каждый из которых связан с конкретной
таблицей. Для получения ссылки на семейство Tables
можно использовать свойство Tables объекта Document.
Общее число таблиц, имеющихся в
документе, содержится в свойстве Count. Для
получения доступа к конкретной таблице можно использовать метод Item, который является методом по умолчанию.
Синтаксис:
Set oblTable=objDocument.Tables.Item(Key)
Параметр Key,
является уникальным идентификатором каждой таблицы, хранящейся в объекте Tables.
Для создания новой таблицы
используется метод Add объекта Tables. Этот метод возвращает ссылку на созданную таблицу(Table).
objTables.Add (Range, NumRows,
NumColums)
Параметр Range
позволяет указать область документа, куда будет вставлена таблица. Если
параметр не пустой, т.е. имеется выделенная область, то она будет заменена
вставляемой таблицей.
Параметры NumRows,
NumColums позволяют указать на число строк и
столбцов таблицы.
Пример: создадим таблицу в
выделенном месте или там где стоит курсор.
2.Форматирование таблицы.
После создания таблицы ее можно
отформатировать нужным образом: добавить заливку, изменить формат границ,
изменить стиль и т.д.
В приложении Word
входит ряд готовых профессиональных шаблонов для форматирования таблиц, которые
позволяют значительно сэкономить время оформления таблицы.
Для их применения используется метод
AutoFormat.
objTable.AutoFormat(Format, [ApplyBorders,
ApplyShading, ApplyFont, ApplyColor, ApplyHeadingRows, ApplyLastRow, ApplyFirstColumn, ApplyLastColumn, AutoFit])
Параметр Format
содержит один из допустимых форматов. Список всех имеющихся форматов и
результат их применения можно увидеть в списке Стили таблицы окна диалога Автоформат таблицы (таблица®автоформат).
Параметр ApplyBorders
указывает, должны ли использоваться границы, установленные по умолчанию для
данного формата. Если True(значение по умолчанию), то
текущие границы будут заменены границами, предусмотренными в применяемом
автоформате.
Параметр ApplyShading
указывает, должна ли использоваться заливка. Если True
(значение по умолчанию), то для таблицы будет установлена заливка в
соответствии со значением, предусмотренном в
применяемом автоформате.
Параметр ApplyFont
указывает, должен ли изменятся шрифт таблицы. Если True, то для текста в таблице будет применен шрифт, предусмотренный
в применяемом автоформате.
Параметр ApplyColor
указывает на необходимость использования цветового оформления цветового
оформления таблицы. По умолчанию имеет значение True.
Параметр ApplyHeadingRows
указывает на необходимость изменения формата заголовков столбцов (первой строки
таблицы). По умолчанию имеет значение True.
Параметр ApplyLastRow
указывает на необходимость изменения формата последней строки таблицы. По
умолчанию имеет значение False, означающее, что
особый формат к последней строке не применяется.
Параметр ApplyFirstColumn
указывает на необходимость изменение формата первого столбца таблицы. По
умолчанию имеет значение True.
Параметр ApplyLastColumn
указывает на необходимость изменение формата последнего столбца таблицы. По умолчанию
имеет значение False, означающее, что особый формат к
последнему столбцу не применяется.
Параметр AutoFit
указывает на автоматический подбор ширины столбцов в зависимости от размещаемых
в них данных. По умолчанию имеет значение True.
Пример: применяем автоформат Классический2 к таблице, расположенной первой от начала
активного документа.
ActiveDocument.Tables(1).AutoFormat
Format:=WdTableFormat.wdTableFormatClassic2
Тип
используемого пользовательского форматирования содержится в свойстве AutoFormatType. Свойство возвращает одно из значений
типа wdTableFormat.
Для форматирования границ таблицы
используется свойство Borders, которое
возвращает ссылку на объект типа Вorders,
связанный с границами данной таблицы.
Синтаксис:
objTable.Borders
Пример: назначение первой таблице
в документе оформление границ.
With ActiveDocument.Tables(1).Borders
.OutsideLineStyle = wdLineStyleSingle внешние границы
.OutsideLineWidth =
wdLineWidth100pt
.InsideLineStyle = wdLineStyleSingle внутренние границы
.InsideLineWidth =
wdLineWidth300pt
End With
3.Строки и столбцы.
Таблица состоит из набора строк и
столбцов. Строки содержатся в семействе Rows, возвращаемое свойством Rows, а
столбцы – в семействе Columns, возврщаемое
свойством Columns.
Определенная строка или столбец связаны с объектами типа Row или Column. Доступ к конкретной строке или столбцу
осуществляется с помощью метода Item,
являющегося для объектов Rows и Columns методом
по умолчанию.
Индексация столбцов и строк
начинается с единицы. Индекс «единица» получает первая сверху строка и крайний
левый столбец. Индекс последней строки и столбца можно получить с помощью
свойства Count, которое возвращает количество
членов в коллекции.
Пример: выпадающее окно с
сообщением о количестве столбцов в таблице 1.
MsgBox ActiveDocument.Tables(1).Columns.Count
Для получения ссылок на первую
или последнюю строку (столбец) можно использовать свойства First и Last.
Для добавления в таблицу новых
строк (столбцов) используется метод Add.
Синтаксис:
ObjTable.Rows.Add (Before)
Параметр Before
– указывает, перед какой строкой будет вставлена строка. Если параметр опущен,
то строка добавляется в конец таблицы.
Пример:
Set tabv = ActiveDocument.Tables(1).Rows.Add(beforerow:=ActiveDocument.Tables(1).Rows(1))
Чтобы установить высоту строки,
используется метод SetHeight.
Синтаксис:
objRow.SetHeight(RowHeight, HeightRule)
параметр RowHeight
указывает на новую высоту строки в пунктах.
Параметр HeightRule
– указывает на способ изменения высоты:
WdRowHeightAtLeast
– размер, указанный в параметре RowHeigh, является
минимальным.
WdRowHeightAuto
— размер, указанный в параметре RowHeigh ,является
точным.
WdRowHeightExactly
– автоматический подбор высоты строк (параметр RowHeigh
игнорируется).
Получить информацию о текущей
ширине строки и правиле ее изменения можно с помощью свойств Height и HeightRule.
Синтаксис:
objRow.
Height [=Height]
Параметр Height
(тип Single) позволяет задать необходимую высоту
строки в пунктах.
Синтаксис:
objRow.
HeightRule[=Rule]
Параметр Rule
указывает на правило изменения ширины ячейки:
• wdRowHeightAtLeast
— минимальная ширина, которая может быть назначена строке, указывается в
свойстве Height;
• wdRowHeightExactly
— ширина строки должна быть точно равна значению, указанному в свойстве Height;
• wdRowHeightAuto —
ширина строки подбирается автоматически в зависимости от размера используемого
шрифта или размера вставок.
Чтобы установить одинаковую
высоту всех строк, необходимо использовать метод DistributeHeight
объекта Rows.
objRows.
DistributeHeight
Для украшения текста документа
часто используются прием создания отступа между левой границы ячейки и текстом.
Этот прием часто применяют при создании таблиц на web-страницах. Для создания
отступа в ячейках таблицы можно использовать свойство SpaceBetweenColumns.
При использовании этого свойства в объекте Rows
выполняется добавление отступа во все ячейки таблицы, а при использовании в Row — только для ячеек данной строки.
Синтаксис
objRows.SpaceBetweenColumns[ = Space]
Параметр Space
(тип Single) позволяет указать на ширину отступа
в пунктах. Значение, передаваемое параметром Space,
не может быть меньше 0 и больше ширины ячейки.
В приведенном ниже примере
показан код, позволяющий создать в первой строке первой таблицы активного
документа отступ, равный 36 пунктам.
Пример
With ActiveDocument.Tables(l)
.Rows(l).SpaceBetweenColumns = InchesToPoints(0.5)
End With
Чтобы установить ширину столбца и
правило ее изменения применяется метод SetWidth.
Этот метод используется как в объекте типа Columns,
так и объекте типа Column. Если используется метод
объекта Columns, то изменения ширины касаются всех
столбцов, а если метод объекта Column— то только
данного столбца.
оbjColumns.SetWidth(ColumnWidth, RulerStyle)
Параметр ColumnWidth
(тип Single) указывает на новую ширину столбца в
точках, а параметр RulerStyle (тип WdRulerStyle) — на способ изменения ширины. Параметр RulerStyle может принимать следующие
значения:
• wdAdjustNone (значение по умолчанию) — ширина столбца
соответствует указанному значению. Изменение ширины столбца выполняется за
счет смещения левой или правой границы таблицы (столбца).
• wdAdjustSameWidth —
ширина столбца соответствует указанному значению. Изменение ширины выполняется
за счет смещения внутренних границ таблицы. Правая граница сохраняет свое
положение.
• wdAdjustFlrstColumn — ширина первого столбца соответствует
указанному значению. Изменение ширины выполняется за счет смещения правой
границы столбца. Размер остальных столбцов сохраняется. Если ширина превышает
суммарную ширину первой и второй ячеек, то происходит сдвиг правой границы
таблицы.
• wdAdjustProportional — ширина первого столбца соответствует
указанному значению. Размер остальных столбцов подбирается автоматически, так
чтобы общая ширина таблицы сохранилась.
• Для
получения информации о текущей ширине столбца можно использовать свойство Width.
• Синтаксис:
• ОbjColumns.Width[=Width]
• Параметр
Width (типа Single)
позволяет указать нужную ширину столбца.
• Чтобы
установить одинаковую ширину всех столбцов, необходимо использовать метод DistributeWidth объекта Columns.
• Objcolumns.DistributeWidth
• Для
автоматического подбора ширины столбцов используется метод AutoFit.
• ObjColumn.AutoFit
• Для
удаления строк (столбцов) используется метод Delete.
• 4.Ячейки.
• Доступ
к ячейкам данной строки или столбца осуществляется с помощью объекта Cells, который является семейством объектов Cell, связанных с конкретными ячейками.
• Синтаксис:
•
Set
objCells = objTables.Rows(key).Cells
• или
•
Set
objCells=objTables.Columns(key).Cells
• Здесь
objTables указывает на таблицу, с ячейками
которой будет выполняться работа, а key –
строка или столбец в таблице, ячейки которой входят в семейство Cells.
•
• Ссылку
на определенную ячейку можно получить с помощью метода Cell
объекта Table.
• Синтаксис:
• ObjTable.Cell (Row,Column)
Set instable = ActiveDocument.Tables.Add(Selection.Range, 4, 10)
Для добавления новой ячейки используется метод Add.
Синтаксис:
ObjCells.Add [(BeforeCell)]
Параметр BeforeCell
указывает на ячейку, перед которой должна быть вставлена новая ячейка. Если
параметр опущен, то ячейка вставляется в конец столбца (строки). Метод
возвращает ссылку на созданную ячейку.
Все ячейки таблицы имеют свой уникальный индекс. Для
получения ссылки на ячейку из определенного семейства используется ее
порядковый номер: крайняя правая (или верхняя) ячейка имеет номер один, а
последняя (нижняя) – значение, определяемое свойством Count
для данного объекта Cells.
Чтобы узнать положение текущей ячейки в строке или столбце,
можно использовать свойство RowIndex или ColumnIndex. Оба свойства возвращают ссылку
на объект типа Cell и предназначены только для
чтения.
Для выделения (активизации) текущей ячейки используется
метод Select.
Синтаксис:
objCell.Select
Для объединения нескольких ячеек в одну (инструмент слияния)
используется метод Merge.
Синтаксис:
ObjCell.Merge (MergeTo)
Параметр MergeTo (типа Cell)
содержит объект типа Cell (ячейка), с которым
выполняется слияние. Если указана ячейка, не имеющая общей
границы с текущей, то выполняется слияние всех ячеек, находящихся в
прямоугольнике, у которого данная ячейка и ячейка, указанная в параметре MergeTo, являются угловыми.
Для разбиения объединенных ячеек или одной ячейки на
несколько используется метод Split.
Синтаксис:
ObjCell.Split[(NumRows,NumColumns)]
Параметр NumRows (типа long) содержит значение,
указывающее на число строк, на которые должна быть разбита данная ячейка.
Параметр NumColumns (типа long)
содержит значение, указывающее на число столбцов, на которые должна быть
разбита данная ячейка.
Пример:
ActiveDocument.Tables(1).Cell(1, 1).Split 2, 3
5.Вычисления.
Вычисления в таблицах Word выполняются так же, как и в любых других электронных
таблицах. Разница заключается только в возможностях использования функций. По
умолчанию в Word
определенно не очень много функций, однако, используя возможности VBA по подключению
дополнительных библиотек, например библиотеки функций Excel, их число можно значительно
увеличить.
Для указания ячейке, что в ней будет выполнятся
вычисление, используется метод Formula
объекта Cell.
Синтаксис:
ObjCell.Formula (Formula, NumFormat)
Параметр Formula
содержит строковое выражение, описывающее используемое выражение. Параметр NumFormat
определяет числовой формат данных, которые будут отображены в данной ячейке.
При использовании стандартных инструментов вставки формул
эти выражения содержатся в соответствующих полях. Например,
выражение “=SUM(A4:C4)” позволяет отобразить значение,
получаемое в результате выполнения суммирования значений трех ячеек: А4, В4,
С4. Кроме непосредственной ссылки на конкретные ячейки можно использовать общие
ссылки, например на все ячейки, расположенные выше(Above) или левее (Left).
По умолчанию в таблицах Word можно использовать следующие функции:
• Abs(X) — возвращает абсолютное значение
числа или формулы (без знака);
• And(X;Y) — возвращает значение 1, если оба логических выражения, X и
У, истинны, или 0 (ноль), если хотя бы одно из них ложно;
• Average(List) — возвращает среднее значение из
списка значений List,
• Count (List) — возвращает
количество элементов в списке List;
• Defined(X) — возвращает значение 1, если
выражение X допустимо, или 0 (ноль), если выражение не может быть
вычислено;
• Fal se —
возвращает значение 0 (ноль);
• Int(X) — возвращает целую часть
числа или значения формулы X;
• Min(List) — возвращает наименьшее значение в
списке List;
• Max(List) — возвращает наибольшее значение в
списке List;
• Mod(X;Y) — возвращает остаток от деления X на Y;
• Not(X) — возвращает значение 0 (ложь), если
логическое выражение X истинно, или 1 (истина), если оно ложно;
• Or(X;Y) — возвращает значение 1 (истина),
если хотя бы одно из двух логических
выражений X и Y
истинно, или 0 (ложь), если оба ложны;
• Product (List) — возвращает произведение
значений, включенных в список List.
Например функция «= Product (1,3,7,9)» возвращает значение 189;
• Round(X; У) — возвращает значение X, округленное до
указанного десятичного разряда Y;
• Sign (X) — указывает
знак числа: возвращает значение 1, если X > О, или -1 в противном случае;
• Sum(List) — возвращает сумму
значений или формул, включенных в список. List;
• True — возвращает значение 1.
• Параметр
NumFormat,
является маской, которая определяет формат числовых значений. Эта маска
может содержать ряд специальных символов, которые приведены ниже.
• 0
(нуль) — возвращает цифру. Если полученное значение не содержит цифру в этой
позиции, то возвращается 0 (нуль). Например, если имеется выражение типа Formula:=»= 4 + 5″,
NumFormat:=
«00,00», то возвращаемое значение будет следующим: «09,00».
• #
— возвращает цифру. Если полученное значение не содержит цифру в этой позиции,
возвращается пробел. Например, Formula:=”=
11 + 5″, NumFormat:=
«###» возвращает значение «-15».
• х — если «х»
находится слева от десятичного разделителя, цифры расположенные слева от него,
отбрасываются, а если справа — то значение округляется до указанного знака.
Например, Formula:=»=
111053 + 111439″, NumFormat:= «x$$$» возвращает значение «492», а Formula:=»= 1/8″, NumFormat:=
«0,00x»
возвращает значение «0,125».
• .
или , (десятичный разделитель) —задает
положение десятичного разделителя. Например, выражение NumFormat:
= «###, 00») возвращает значение типа «495,47».
• пробел
(разделитель групп разрядов) — разделяет число на группы по три
цифры в каждой.
Например, выражение NumForrcat:»###» возвращает значение
типа «2 456 800».
• минус)
— добавляет минус к отрицательным или пробел — ко всем остальным значениям.
• + (плюс) — добавляет плюс к положительным, минус к отрицательным
или пробел — к нулевым значениям.
• %,
$, * и т. д. — включает в значение указанный знак. Например, выражение (NumFormat:=
«##%») возвращает значение типа «33 %».
• Для
автоматического вычисления суммы значений можно использовать метод AutoSum.
• Синтаксис:
• ObjCell.AutoSum
• После
применения этого метода к данной ячейке в ней отображается значение, равное
сумме значений всех ячеек, расположенных выше или левее данной.
Параметр ApplyBorders
указывает, должны ли использоваться границы, установленные по умолчанию для
данного формата. Если True(значение по умолчанию), то
текущие границы будут заменены границами, предусмотренными в применяемом
автоформате.
Параметр ApplyShading
указывает, должна ли использоваться заливка. Если True
(значение по умолчанию), то для таблицы будет установлена заливка в
соответствии со значением, предусмотренном в
применяемом автоформате.
Параметр ApplyFont
указывает, должен ли изменятся шрифт таблицы. Если True, то для текста в таблице будет применен шрифт, предусмотренный
в применяемом автоформате.
Параметр ApplyColor
указывает на необходимость использования цветового оформления цветового
оформления таблицы. По умолчанию имеет значение True.
Параметр ApplyHeadingRows
указывает на необходимость изменения формата заголовков столбцов (первой строки
таблицы). По умолчанию имеет значение True.
Параметр ApplyLastRow
указывает на необходимость изменения формата последней строки таблицы. По
умолчанию имеет значение False, означающее, что
особый формат к последней строке не применяется.
Параметр ApplyFirstColumn
указывает на необходимость изменение формата первого столбца таблицы. По
умолчанию имеет значение True.
Параметр ApplyLastColumn
указывает на необходимость изменение формата последнего столбца таблицы. По умолчанию
имеет значение False, означающее, что особый формат к
последнему столбцу не применяется.
Параметр AutoFit
указывает на автоматический подбор ширины столбцов в зависимости от размещаемых
в них данных. По умолчанию имеет значение True.
Пример: применяем автоформат Классический2 к таблице, расположенной первой от начала
активного документа.
Тип
используемого пользовательского форматирования содержится в свойстве AutoFormatType. Свойство возвращает одно из значений
типа wdTableFormat.
Для форматирования границ таблицы
используется свойство Borders, которое
возвращает ссылку на объект типа Вorders,
связанный с границами данной таблицы.
Пример: назначение первой таблице
в документе оформление границ.
3.Строки и столбцы.
Таблица состоит из набора строк и
столбцов. Строки содержатся в семействе Rows, возвращаемое свойством Rows, а
столбцы – в семействе Columns, возврщаемое
свойством Columns.
Определенная строка или столбец связаны с объектами типа Row или Column. Доступ к конкретной строке или столбцу
осуществляется с помощью метода Item,
являющегося для объектов Rows и Columns методом
по умолчанию.
Индексация столбцов и строк
начинается с единицы. Индекс «единица» получает первая сверху строка и крайний
левый столбец. Индекс последней строки и столбца можно получить с помощью
свойства Count, которое возвращает количество
членов в коллекции.
Пример: выпадающее окно с
сообщением о количестве столбцов в таблице 1.
Для получения ссылок на первую
или последнюю строку (столбец) можно использовать свойства First и Last.
Для добавления в таблицу новых
строк (столбцов) используется метод Add.
Параметр Before
– указывает, перед какой строкой будет вставлена строка. Если параметр опущен,
то строка добавляется в конец таблицы.
Set tabv = ActiveDocument.Tables(1).Rows.Add(beforerow:=ActiveDocument.Tables(1).Rows(1))
Чтобы установить высоту строки,
используется метод SetHeight.
параметр RowHeight
указывает на новую высоту строки в пунктах.
WdRowHeightAtLeast
– размер, указанный в параметре RowHeigh, является
минимальным.
WdRowHeightAuto
— размер, указанный в параметре RowHeigh ,является
точным.
WdRowHeightExactly
– автоматический подбор высоты строк (параметр RowHeigh
игнорируется).
Получить информацию о текущей
ширине строки и правиле ее изменения можно с помощью свойств Height и HeightRule.
Параметр Height
(тип Single) позволяет задать необходимую высоту
строки в пунктах.
• wdRowHeightAtLeast
— минимальная ширина, которая может быть назначена строке, указывается в
свойстве Height;
• wdRowHeightExactly
— ширина строки должна быть точно равна значению, указанному в свойстве Height;
Lesson 23: Tables
/en/word/aligning-ordering-and-grouping-objects/content/
Introduction
A table is a grid of cells arranged in rows and columns. Tables can be used to organize any type of content, whether you’re working with text or numerical data. In Word, you can quickly insert a blank table or convert existing text to a table. You can also customize your table using different styles and layouts.
Optional: Download our practice document.
Watch the video below to learn more about creating tables.
To insert a blank table:
- Place the insertion point where you want the table to appear.
- Navigate to the Insert tab, then click the Table command.

- This will open a drop-down menu that contains a grid. Hover over the grid to select the number of columns and rows you want.
- Click the grid to confirm your selection, and a table will appear.
- To enter text, place the insertion point in any cell, then begin typing.
To navigate between cells, use the Tab key or arrow keys on your keyboard. If the insertion point is in the last cell, pressing the Tab key will automatically create a new row.
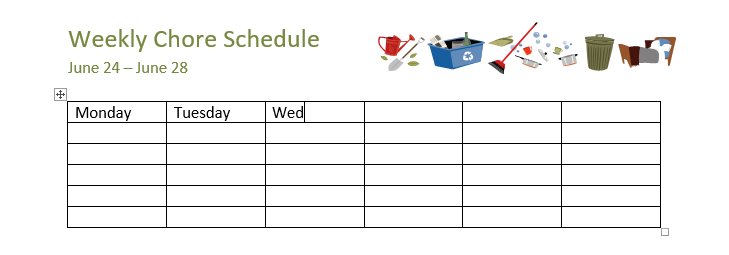
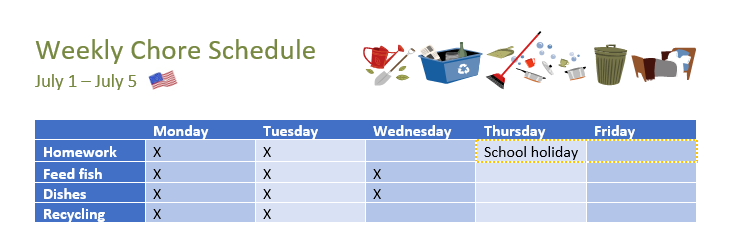
To convert existing text to a table:
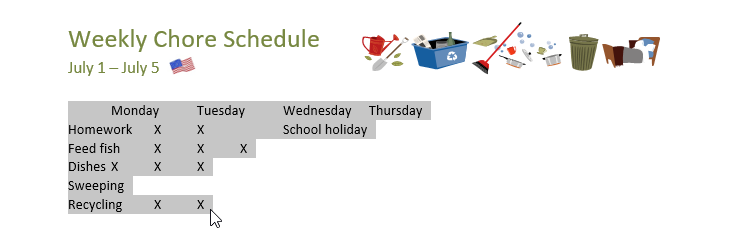
In the example below, each line of text contains part of a checklist, including chores and days of the week. The items are separated by tabs. Word can convert this information into a table, using the tabs to separate the data into columns.
- Select the text you want to convert to a table. If you’re using our practice file, you can find this text on page 2 of the document.
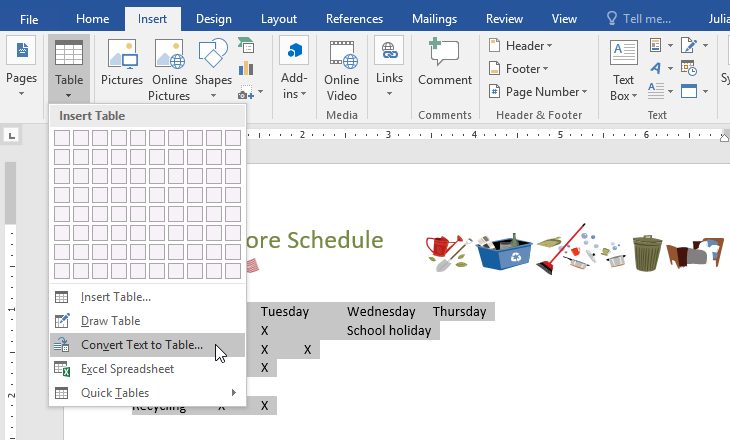
- Go to the Insert tab, then click the Table command.
- Select Convert Text to Table from the drop-down menu.
- A dialog box will appear. Choose one of the options under Separate text at. This is how Word knows what to put into each column.
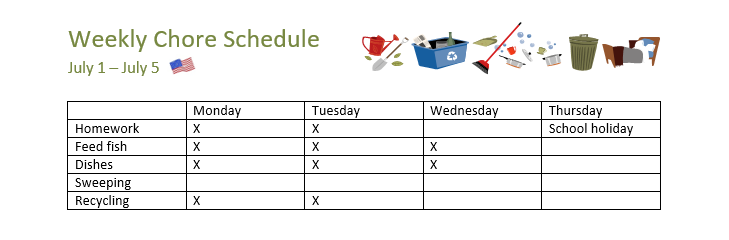
- Click OK. The text will appear in a table.

Modifying tables
You can easily change the appearance of your table once you’ve added one to your document. There are several options for customization, including adding rows or columns and changing the table style.
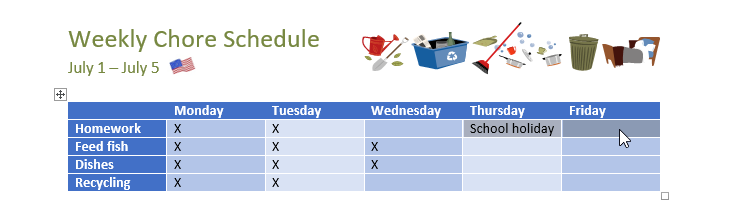
To add a row or column:
- Hover outside the table where you want to add a row or column. Click the plus sign that appears.
- A new row or column will be added to the table.
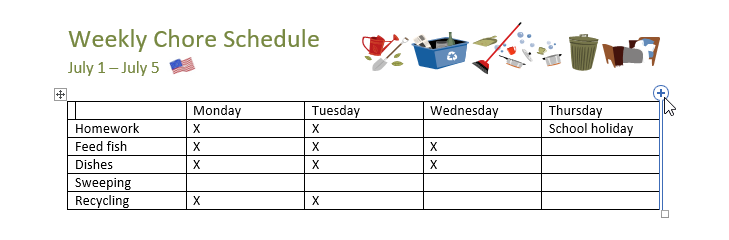
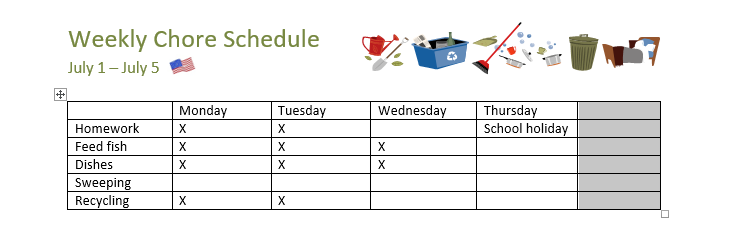
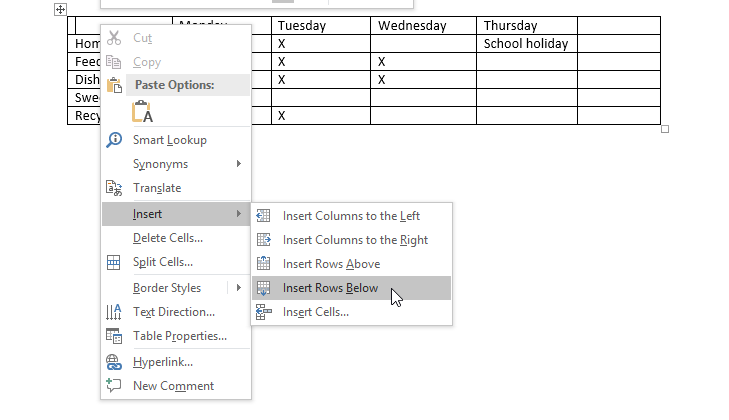
You can also right-click the table, then hover over Insert to see various row and column options.
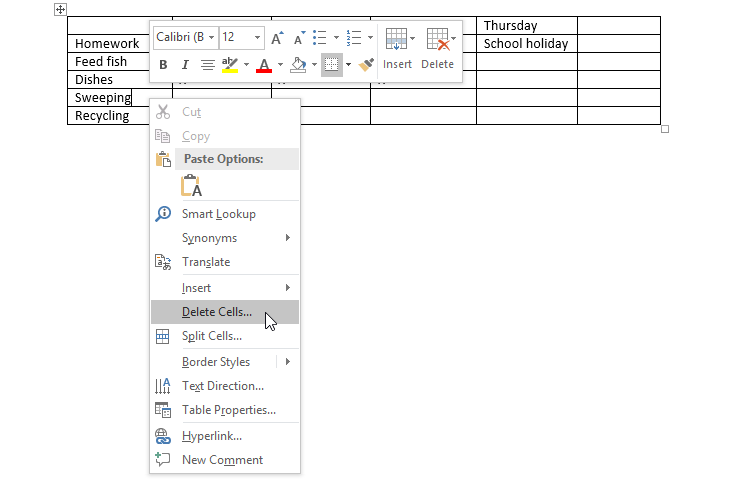
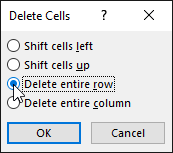
To delete a row or column:
- Place the insertion point in the row or column you want to delete.
- Right-click, then select Delete Cells from the menu.
- A dialog box will appear. Choose Delete entire row or Delete entire column, then click OK.
- The row or column will be deleted.
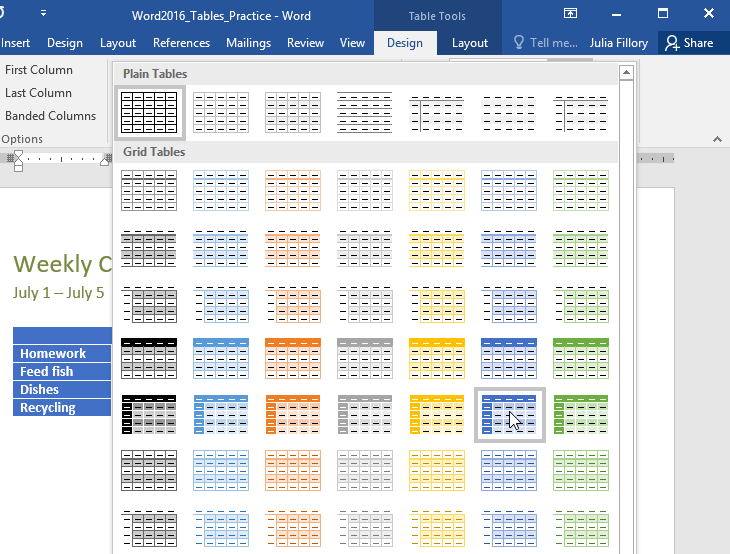
To apply a table style:
Table styles let you change the look and feel of your table instantly. They control several design elements, including color, borders, and fonts.
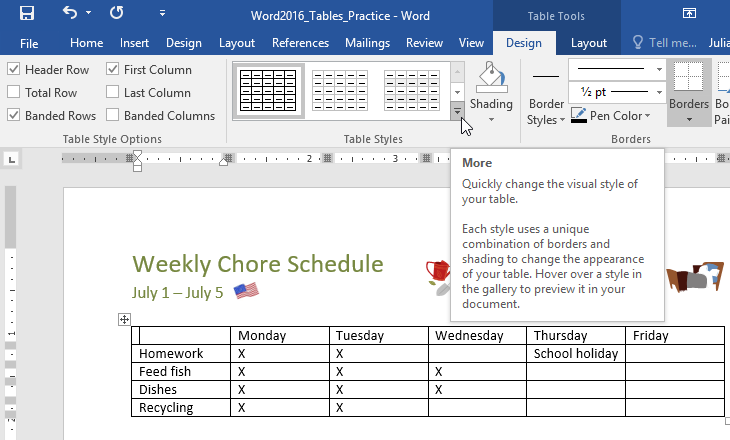
- Click anywhere in your table to select it, then click the Design tab on the far right of the Ribbon.
- Locate the Table Styles group, then click the More drop-down arrow to see the full list of styles.
- Select the table style you want.
- The table style will appear.
To modify table style options:
Once you’ve chosen a table style, you can turn various options on or off to change its appearance. There are six options: Header Row, Total Row, Banded Rows, First Column, Last Column, and Banded Columns.
- Click anywhere in your table, then navigate to the Design tab.
- Locate the Table Style Options group, then check or uncheck the desired options.
- The table style will be modified.
Depending on the Table Style you’ve chosen, certain Table Style Options may have a different effect. You might need to experiment to get the look you want.
To apply borders to a table:
- Select the cells you want to apply a border to.
- Use the commands on the Design tab to choose the desired Line Style, Line Weight, and Pen Color.
- Click the drop-down arrow below the Borders command.
- Choose a border type from the menu.
- The border will be applied to the selected cells.

Modifying a table using the Layout tab
In Word, the Layout tab appears whenever you select your table. You can use the options on this tab to make a variety of modifications.
Click the buttons in the interactive below to learn more about Word’s table layout controls.
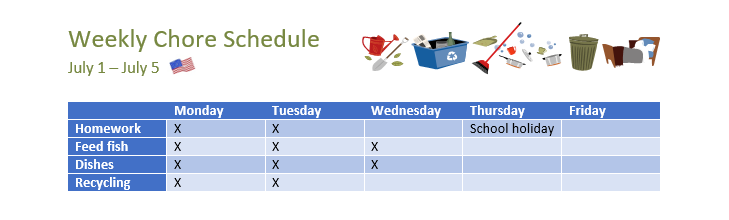
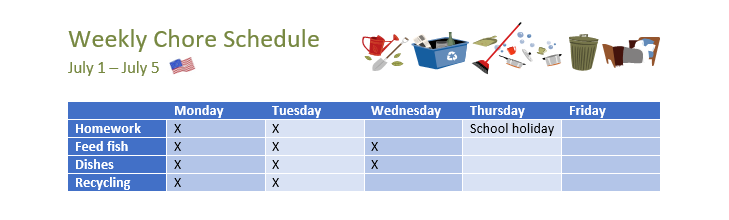
Challenge!
- Open our practice document.
- Scroll to page 3 and select all of the text below the dates July 8 — July 12.
- Use the Convert Text to Table to insert the text into a 6-column table. Make sure to Separate text at Tabs.
- Delete the Saturday column.
- Insert a column to the left of the Friday column and type Thursday in the top cell.
- Change the table style to any style that begins with Grid Table 5. Hint: Style names appear when you hover over them.
- In the Table Style Options menu, uncheck Banded Rows and check Banded Columns.
- Select the entire table. In the Borders drop-down menu, choose All Borders.
- With the table still selected, increase the table row height to 0.3″ (0.8 cm).
- Select the first row and change the cell alignment to Align Center.
- When you’re finished, your table should look something like this:


/en/word/charts/content/