
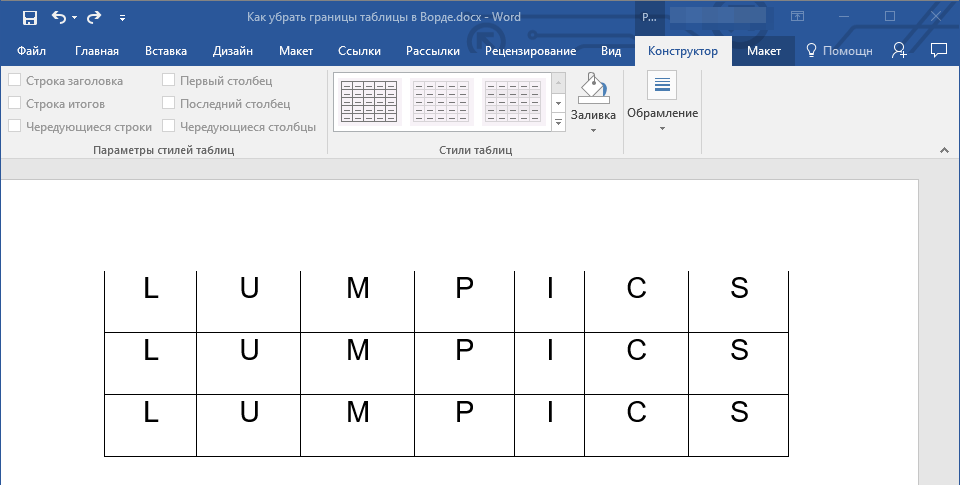
Click the “Layout” table under “Table Tools”. In the “Table” section of the “Layout” tab, click “View Gridlines”. The gridlines now display on the table. To turn off the gridlines for the table, simply select the table and click “View Gridlines” again.
Contents
- 1 How do I add gridlines to a table in Word?
- 2 How do I make table lines invisible in Word?
- 3 How do you insert lines in Word?
- 4 How do I view border lines in Word?
- 5 How do you insert multiple lines in Word?
- 6 How do you put a line through text?
- 7 How do you put a line above text in Word?
- 8 What are grid lines?
- 9 How do I turn on automatic border lines in Word?
- 10 How do I insert a specific row in a table in Word?
- 11 How do you put a line above and below text in Word?
- 12 How do you put a line under a letter in Word?
- 13 How do you get a line above a letter on a keyboard?
- 14 What is grid line with example?
- 15 How do you set out grid lines?
- 16 How do you write a grid line?
- 17 How do I fix lines in Word?
- 18 Why do lines keep appearing on my Word document?
- 19 How do you insert rows in an existing table?
- 20 How do you insert multiple rows?
How do I add gridlines to a table in Word?
Show or hide gridlines for all tables in a document
- Click the table.
- Click the Table Layout tab, and then under Settings, click Gridlines.
How do I make table lines invisible in Word?
Hover your mouse over the table until the table move handle displays in the upper left corner and then click this handle to select the entire table. Click “Table Tools,” select “Design,” click the arrow on the “Borders” button and then select “No Borders.” This hides the borders for the entire table.
How do you insert lines in Word?
Insert a line
- On the Insert tab, select Shapes.
- Under Lines, select any line style you like.
- Select a location in the document, hold and drag your pointer to a different location, and then release the mouse button.
How do I view border lines in Word?
Click the “Layout” table under “Table Tools”. In the “Table” section of the “Layout” tab, click “View Gridlines”. The gridlines now display on the table. To turn off the gridlines for the table, simply select the table and click “View Gridlines” again.
How do you insert multiple lines in Word?
Hold down the “Shift” key and press the “Underline ( _ )” key three times. Release both keys then press “Enter” to place a heavier line across the Word document.
How do you put a line through text?
When you have your text selected, look on the “Home” tab of Word’s Ribbon. In the “Font” group, click the Strikethrough button (it’s the three letters with a line drawn through them). Now, any text you had selected should be struck through. You can also apply strikethrough formatting using the Font window.
How do you put a line above text in Word?
Learn the steps on how to put a line above a letter or text in Microsoft Word. The first step is to highlight the text you want to place the line over and navigate to the insert tab then equation and lastly accent. From here, select the option Overbar which can be found under the subheading ‘Overbars and Underbars’.
What are grid lines?
Definition of grid line
: any of a series of numbered horizontal and perpendicular lines that divide a map into squares to form a grid by means of which any point may be located by a system of rectangular coordinates.
How do I turn on automatic border lines in Word?
If you can’t automatically add lines on your system, follow these steps:
- Choose AutoCorrect (or AutoCorrect Options) from the Tools menu. Word displays the AutoCorrect Options dialog box.
- Make sure the AutoFormat As You Type tab is selected.
- Make sure the Border Lines (or Borders) check box is checked.
- Click on OK.
How do I insert a specific row in a table in Word?
Method 3: Add Multiple Rows with “Insert Table” Option
- To begin with, click “Layout” and check the column width in “Cell Size” group.
- Secondly, click “Insert” tab.
- Then click “Table” icon.
- Next, choose “Insert Table” option on the drop-down menu.
- In “Insert Table” dialog box, enter the number of columns and rows.
How do you put a line above and below text in Word?
To insert a line in Word above and / or below a paragraph using the Borders button:
- Select the paragraph(s) to which you want to add a line.
- Click the Home tab in the Ribbon.
- Click Borders in the Paragraph group. A drop-down menu appears.
- Select the line you want to use.
How do you put a line under a letter in Word?
Hold the “Ctrl” key and press “U” to put a line under the letter.
How do you get a line above a letter on a keyboard?
These keyboard shortcuts will help you display text more accurately in your business documents.
- Open a document in Microsoft Word.
- Press “Ctrl-Shift” and the caret (” ^ “) key and then the letter to insert a circumflex accent.
- Press “Ctrl-Shift” and the tilde (” ~ “) key and then the letter to insert a tilde accent.
What is grid line with example?
Alternatively referred to as a column separator or row separator, grid lines or gridlines divide each of the cells, rows, and columns in a spreadsheet.
How do you set out grid lines?
- Step 1: Establish a baseline.
- Step 2: Place pegs along your baseline.
- Step 3: Place further pegs using right-angled triangles.
- Step 1: Establish a baseline.
- Step 2: Place pegs along your baseline.
- Step 3: Place pegs along perpendicular lines.
- Step 4: Fill in any missing pegs.
How do you write a grid line?
Lines can be addressed using their line number. In a left-to-right language such as English, column line 1 will be on the left of the grid, row line 1 on the top. Lines numbers respect the writing mode of the document and so in a right-to-left language for example, column line 1 will be on the right of the grid.
How do I fix lines in Word?
Change the line spacing in a portion of the document
- Select one or more paragraphs to update.
- Go to Home > Line and Paragraph Spacing.
- Select Line Spacing Options and choose an option in the Line spacing box.
- Adjust the Before and After settings to change spacing between paragraphs.
- Select OK.
Why do lines keep appearing on my Word document?
The line you’re seeing across the page is a paragraph border that Word has automatically inserted using AutoFormat. To get rid of it:Go to Format, Borders and Shading (Word 2002-2003) or click the Border drop-down in the Paragraph section of the Home tab of the Ribbon (Word 2007 and up)
How do you insert rows in an existing table?
Add a row above or below
- Click in a cell above or below where you want to add a row.
- Under Table Tools, on the Layout tab, do one of the following: To add a row above the cell, click Insert Above in the Rows and Columns group. To add a row below the cell, click Insert Below in the Rows and Columns group.
How do you insert multiple rows?
To insert multiple rows, select the same number of rows that you want to insert. To select multiple rows hold down the “shift” key on your keyboard on a Mac or PC. For example, if you want to insert six rows, select six rows while holding the “shift” key.
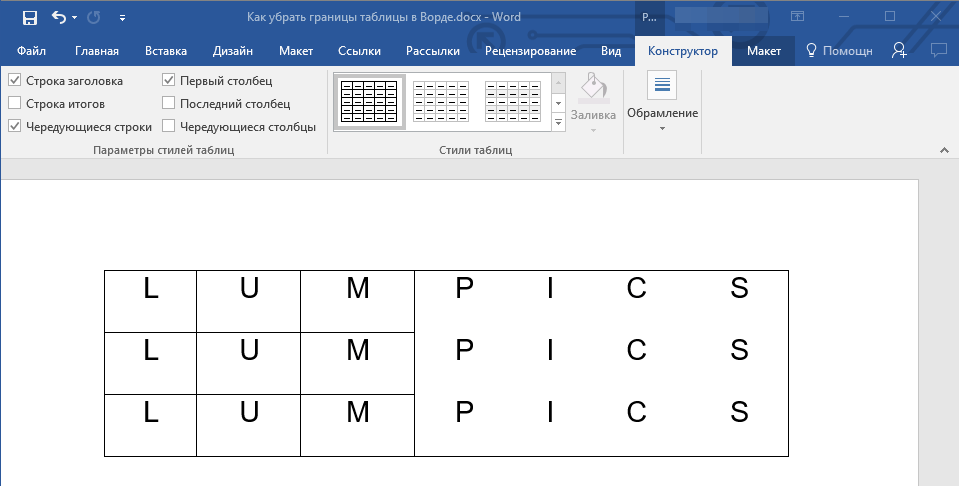
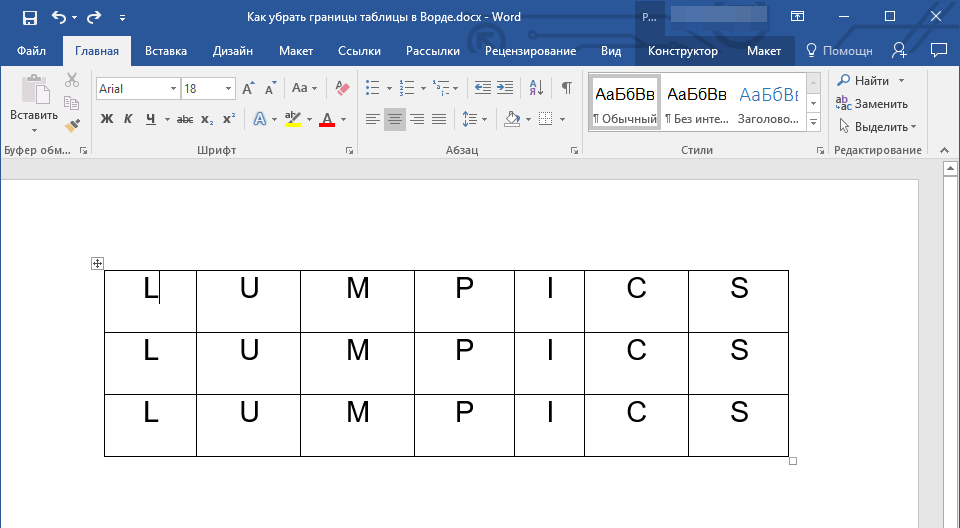
After you create a table, Microsoft Office Word 2007 offers you many ways to format that table. If you decide to use Table Styles, you can format your table all at once, and even see a preview of what your table will look like formatted in a particular style before you actually apply the style.
You can create a custom look for tables by splitting or merging cells, adding or deleting columns or rows, or adding borders. If you’re working with a long table, you can repeat the table headings on each page on which the table appears. To prevent awkward page breaks that disrupt the flow of your table, you can also specify just how and where the table should break across pages.
What do you want to do?
-
Use Table Styles to format an entire table
-
Add or remove borders
-
Display or hide gridlines
-
Add a cell, row, or column
-
Delete a cell, row, or column
-
Merge or split cells
-
Repeat a table heading on subsequent pages
-
Control where a table is divided
Use Table Styles to format an entire table
After you create a table, you can format the entire table by using Table Styles. By resting your pointer over each of the preformatted table styles, you can preview what the table will look like.
-
Click in the table that you want to format.
-
Under Table Tools, click the Design tab.
-
In the Table Styles group, rest the pointer over each table style until you find a style that you want to use.
Note: To see more styles, click the More arrow
 .
. -
Click the style to apply it to the table.
-
In the Table Style Options group, select or clear the check box next to each the table element to apply or remove the selected style.
 .
.Top of Page
Add or remove borders
You can add or remove borders to format a table the way that you want.
Add table borders
-
Under Table Tools, click the Layout tab.
-
In the Table group, click Select, and then click Select Table.
-
Under Table Tools, click the Design tab.
-
In the Table Styles group, click Borders, and then do one of
the following:-
Click one of the predefined border sets.
-
Click Borders and Shading, click the Borders tab, and then choose the options that you want.
-
Remove table borders from the whole table
-
Under Table Tools, click the Layout tab.
-
In the Table group, click Select, and then click Select Table.
-
Under Table Tools, click the Design tab.
-
In the Table Styles group, click Borders, and then click No Border.
Add table borders to specified cells only
-
On the Home tab, in the Paragraph group, click Show/Hide.
-
Select the cells that you want, including their end-of-cell marks.
-
Under Table Tools, click the Design tab.
-
In the Table Styles group, click Borders, and then click the border that you want to add.


Remove table borders from specified cells only
-
On the Home tab, in the Paragraph group, click Show/Hide.
-
Select the cells that you want, including their end-of-cell marks.
-
Under Table Tools, click the Design tab.
-
In the Table Styles group, click Borders, and then click No Border.
Top of Page
Display or hide gridlines
Gridlines show the cell boundaries of a table on the screen wherever the table doesn’t have borders applied. If you hide the gridlines in a table that has borders, you won’t see the change because the gridlines are behind the borders. To view the gridlines, remove the borders.
Unlike borders, gridlines appear only on the screen; they are never printed. If you turn off gridlines, the table is displayed as it will be printed.
Note: Gridlines are not visible when you view a document in a Web browser or in Print Preview.
Display or hide table gridlines in a document
-
Under Table Tools, on the Layout tab, in the Table group, click View Gridlines.
Top of Page
Add a cell, row, or column
Add a cell
-
Click in a cell that is located just to the right of or above where you
want to insert a cell. -
Under Table Tools, on the Layout tab, click the Rows & Columns Dialog Box Launcher.
-
Click one of the following options:
|
Click this |
To do this |
|
Shift cells right |
Insert a cell and move all other cells in that row to the right. Note: This option may result in a row that has more cells than the other rows. |
|
Shift cells down |
Insert a cell and move remaining existing cells in that column down one row each. A new row will be added at the bottom of the table to contain the last existing cell. |
|
Insert entire row |
Insert a row just above the cell that you clicked in. |
|
Insert entire column |
Insert a column just to the right of the cell that you clicked in. |
Add a row
-
Click in a cell that is located just below or above where you want to add a row.
-
Under Table Tools, click the Layout tab.
-
Do one of the following:
-
To add a row just above the cell that you clicked in, in the Rows and Columns group, click Insert Above.
-
To add a row just below the cell that you clicked in, in the Rows and Columns group, click Insert Below.
-
Add a column
-
Click in a cell that is located just to the right or left of where you want to add a column.
-
Under Table Tools, click the Layout tab.
-
Do one of the following:
-
To add a column just to the left of the cell that you clicked in, in the Rows and Columns group, click Insert Left.
-
To add a column just to the right of the cell that you clicked in, in the Rows and Columns group, click Insert Right.
-
Top of Page
Delete a cell, row, or column
-
Do one of the following:
To select
Do this
A cell
Click the left edge of the cell.
.A row
Click to the left of the row.
A column
Click the column’s top gridline or top border.
-
Under Table Tools, click the Layout tab.
-
In the Rows & Columns group, click Delete, and then click Delete Cells, Delete Rows, or Delete Columns, as appropriate.


Top of Page
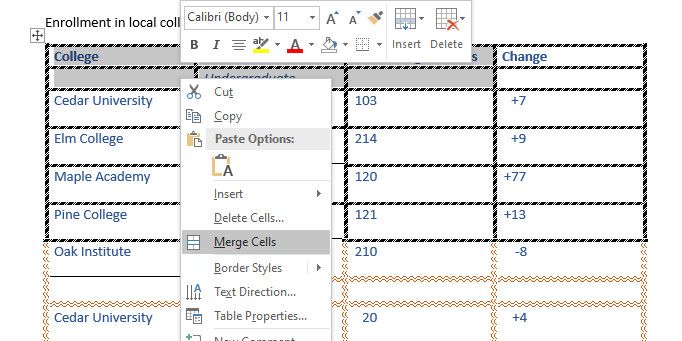
Merge or split cells
Merge cells
You can combine two or more cells in the same row or column into a single cell. For example, you can merge several cells horizontally to create a table heading that spans several columns.
-
Select the cells that you want to merge by clicking the left edge of a cell and then dragging across the other cells that you want.
-
Under Table Tools, on the Layout tab, in the Merge group, click Merge Cells.
Split cells
-
Click in a cell, or select multiple cells that you want to split.
-
Under Table Tools, on the Layout tab, in the Merge group, click Split Cells.
-
Enter the number of columns or rows that you want to split the selected cells into.
Top of Page
Repeat a table heading on subsequent pages
When you work with a very long table, it will be divided wherever a page break occurs. You can make adjustments to the table so that the table headings are repeated on each page.
Repeated table headings are visible only in Print Layout view and when you print the document.
-
Select the heading row or rows. The selection must include the first row of the table.
-
Under Table Tools, on the Layout tab, in the Data group, click Repeat Header Rows.
Note: Word automatically repeats the table headings on each new page that results from an automatic page break. Word does not repeat a heading if you insert a manual page break within a table.
Top of Page
Control where a table is divided
When you work with a very long table, it must be divided wherever a page break occurs. By default, if a page break occurs within a large row, Microsoft Word allows a page break to divide the row between the two pages.
You can make adjustments to the table to make sure that the information appears as you want it to when the table spans multiple pages.
Prevent a
table row from breaking across pages
-
Click in the table.
-
Under Table Tools, click the Layout tab.
-
In the Table group, click Properties, and then click the Row tab.
-
Clear the Allow row to break across pages check box.
Force a table to break across pages at a particular row
-
Click in the row that you want to appear on the next page.
-
Press CTRL+ENTER.
Top of Page
Here’s how to add, remove, and customize the border lines in Microsoft Word tables.

Microsoft Word is an unavoidable productivity tool for a lot of people. But whether you’re a daily user or only need it for urgent editing, some common tasks can become confusing.
If you often work with tables, we’ll show you how to get a better hold on table border lines in Word.
Creating Tables in Microsoft Word
Depending on your choice, Microsoft Word lets you choose whether to customize your table or add it automatically. Each of these options has its own application and usefulness in various scenarios.
As expected, the automatic option offers limited initial control over your tables. But it’s useful if you want to get a table with several rows and columns working quickly.
The custom option comes in handy when you need to draft a more interactive table with personal twists.
Take Control of Your Table Border Lines
So you’ve created a Word document, then sorted and arranged your pages as needed. You’ve also inserted your tables, but now you want to get a hold on how their border lines come through. There are several ways you can do that.
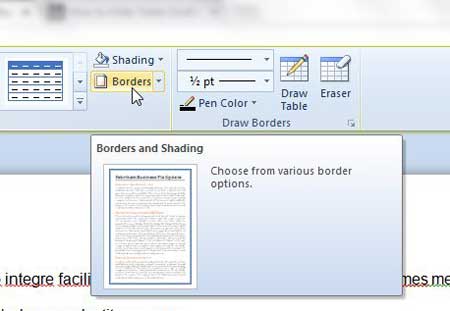
First off, the property that controls table border lines is the Borders option at the top Ribbon of Word. You’ll see this option under the Table Design tab when you highlight a table, but it’s always on the Home tab as well.
On the ribbon, go to Home > Paragraph and click the arrow-down button on the Borders button. Then select your preferred border line.
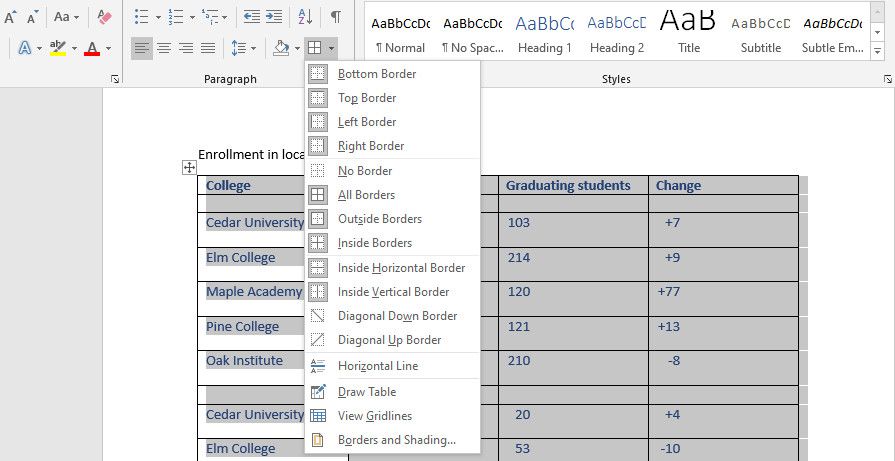
An alternative method is to right-click on the table you’ve created and click the arrow-down icon on the Borders button. Just like when using the Ribbon, use this to select a preferred border line option.
Note that if you highlight the whole table, any border line option you select applies to the entire table.
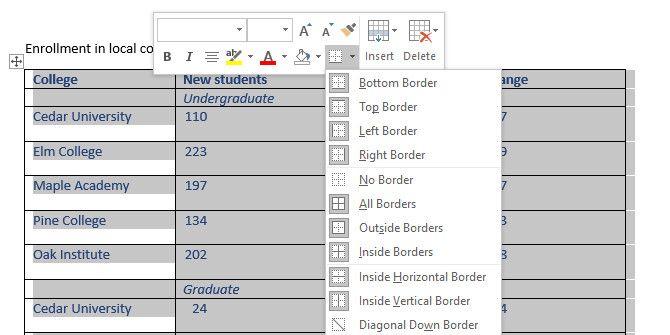
To apply the border line effect to a particular part of the table, highlight just that portion. Then repeat the process above to format the border lines to your preference.
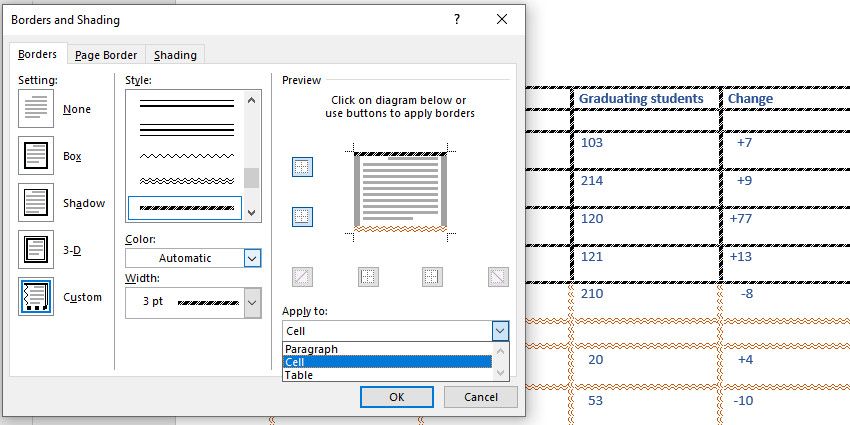
Adding Border Colors and Styling Border Lines
You can also control how your border lines come through by adding border colors and thinning or thickening the lines.
To do that, click the Borders button followed by Borders and Shading. Here, select Colors or Width to change those elements.
You can also change the styling of the border lines by scrolling through the Style option in the Borders and Shading window.
If you want to apply these styles to particular cells in your table, highlight them first. At the bottom-right corner of the Borders and Shading window, click the Apply to dropdown and select Cell.
To style each border line manually without highlighting cells, right-click on the table. Next, go to Border Styles and select your preferred border option.
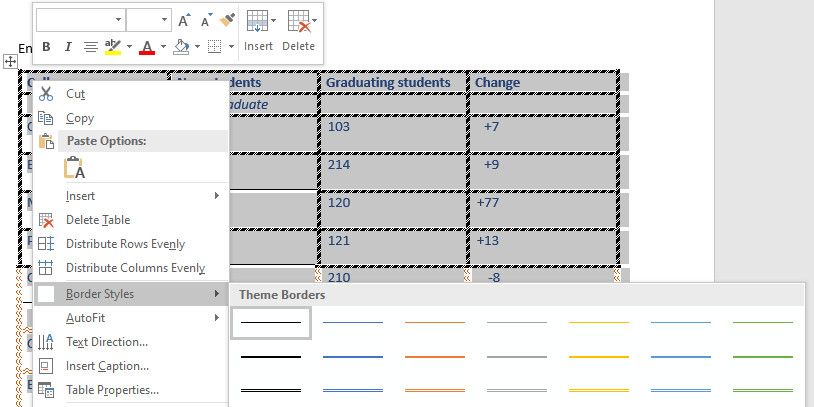
Merging and Splitting Cells
Another border control option is merging table cells. You can join two or more rows or columns by highlighting the ones you wish to join. Then, right-click on the table and click Merge Cells.
To split the merged cells into their default format, highlight the merged cells. Next, right-click on the table and click Split Cells.
Taking Control of Border Lines Is Easy
Manipulating table border lines in Microsoft Word isn’t difficult. But you’ll need a sharp eye to make your tables more professional and good-looking.
Play around with some of the available options, and you’ll find a suitable border style for your document before long.
Содержание
- Делаем границы таблицы невидимыми
- Включение сетки
- Скрытие всех границ таблицы
- Скрытие некоторых границ таблицы или границ некоторых ячеек
- Скрытие определенной границы или определенных границ в таблице
- Вопросы и ответы
Многофункциональный текстовый редактор MS Word имеет в своем арсенале довольно большой набор функций и широкие возможности для работы не только с текстом, но и с таблицами. Более подробно о том, как создавать таблицы, как с ними работать и изменять в соответствии с теми или иными требованиями, вы можете узнать из материала, размещенного на нашем сайте.
Урок: Как в Ворде сделать таблицу
Итак, как вы уже могли понять, прочитав наши статьи, о таблицах в MS Word мы написали весьма немало, предоставив ответы на многие актуальные вопросы. Однако, на один из не менее распространенных вопросов мы пока еще не ответили: как сделать прозрачную таблицу в Ворде? Именно об этом мы сегодня и расскажем.
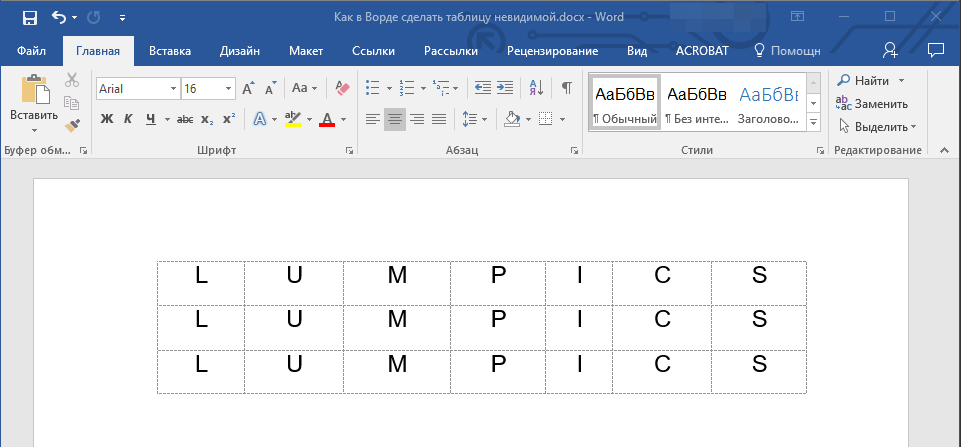
Делаем границы таблицы невидимыми
Наша с вами задача — скрыть, но не удалить границы таблицы, то есть, сделать их прозрачными, невидимыми, незаметными при печати, оставив при этом все содержимое ячеек, как и сами ячейки, на своих местах.
Важно: Прежде, чем приступить к скрытию границ таблицы, в MS Word необходимо включить параметр отображения сетки, так как в противном случае работать с таблицей станет очень сложно. Сделать это можно следующим образом.
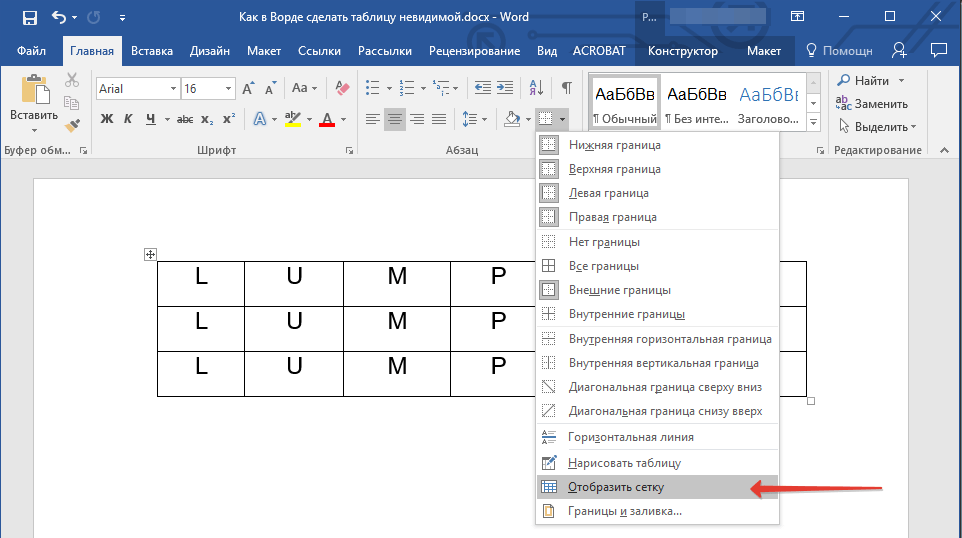
Включение сетки
1. Во вкладке “Главная” (“Формат” в MS Word 2003 или “Разметка страницы” в MS Word 2007 — 2010) в группе “Абзац” нажмите на кнопку “Границы”.
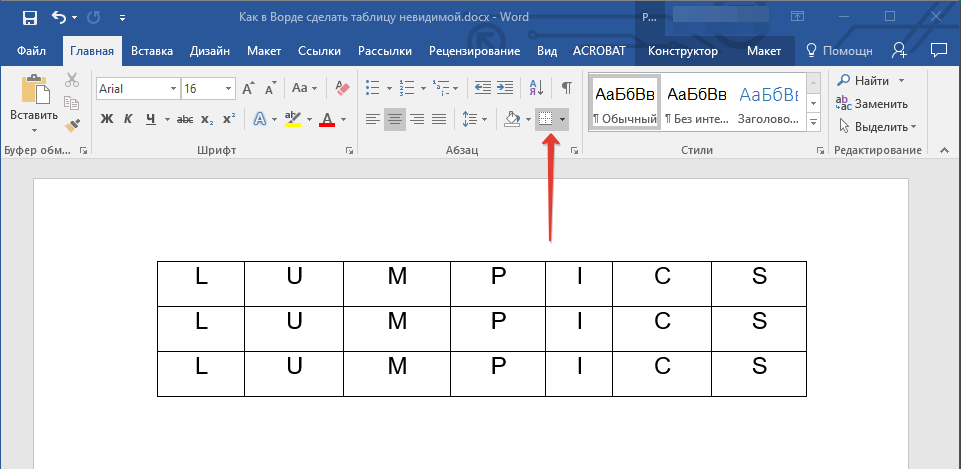
2. Выберите в развернувшемся меню пункт “Отобразить сетку”.
Сделав это, мы можем смело переходить к описанию того, как сделать невидимую таблицу в Ворде.
Скрытие всех границ таблицы
1. Выделите таблицу, используя для этого мышку.
2. Кликните правой кнопкой мышки по выделенному полю и выберите в контекстном меню пункт “Свойства таблицы”.
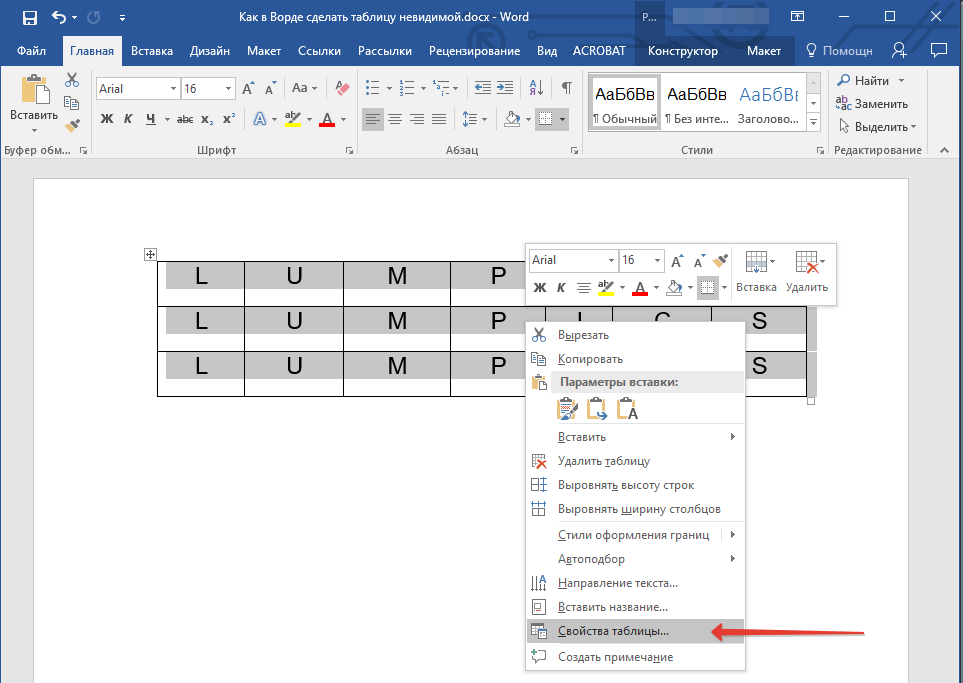

3. В открывшемся окне нажмите расположенную снизу кнопку “Границы и заливка”.
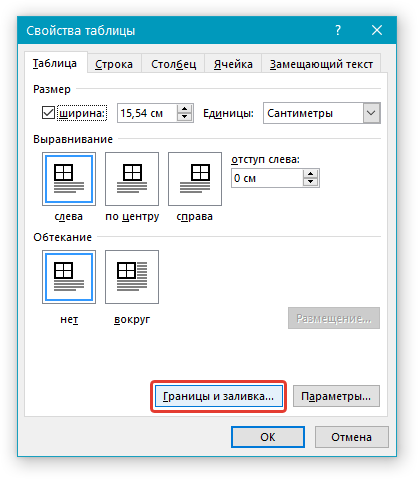
4. В следующем окне в разделе “Тип” выберите первый пункт “Нет”. В разделе “Применить к” установите параметр “таблице”.Нажмите кнопку “ОК” в каждом из двух открытых диалоговых окон.
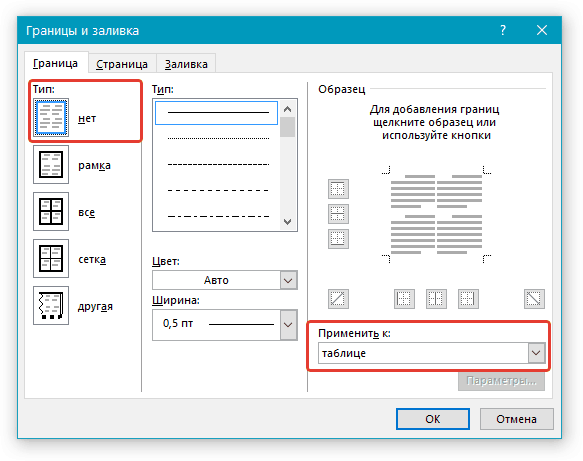
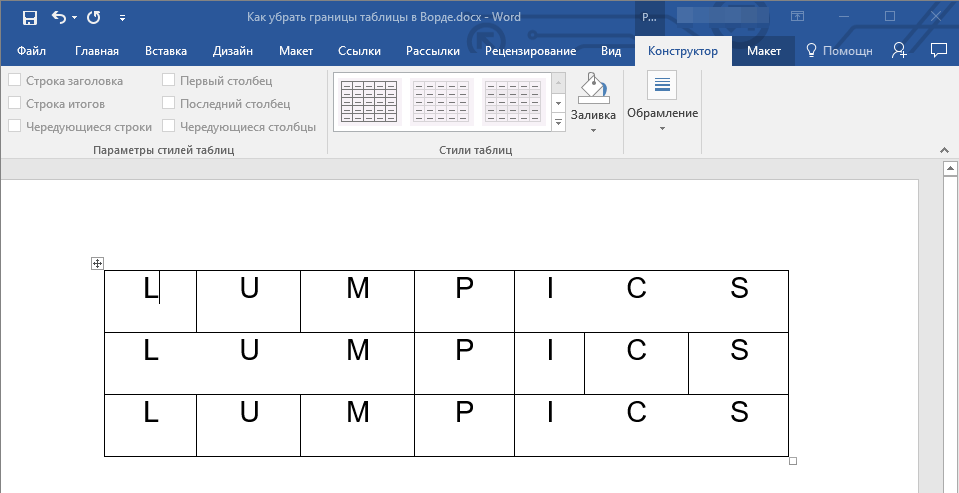
5. После того, как вы выполните вышеописанные действия, граница таблицы из сплошной линии одного цвета превратится в бледный пунктир, который, хоть и помогает ориентироваться в строках и столбцах, ячейках таблицы, но на печать при этом не выводится.
- Совет: Если вы отключите отображение сетки (меню инструмента “Границы”), пунктирная линия тоже исчезнет.
Скрытие некоторых границ таблицы или границ некоторых ячеек
1. Выделите ту часть таблицы, границы в которой необходимо скрыть.
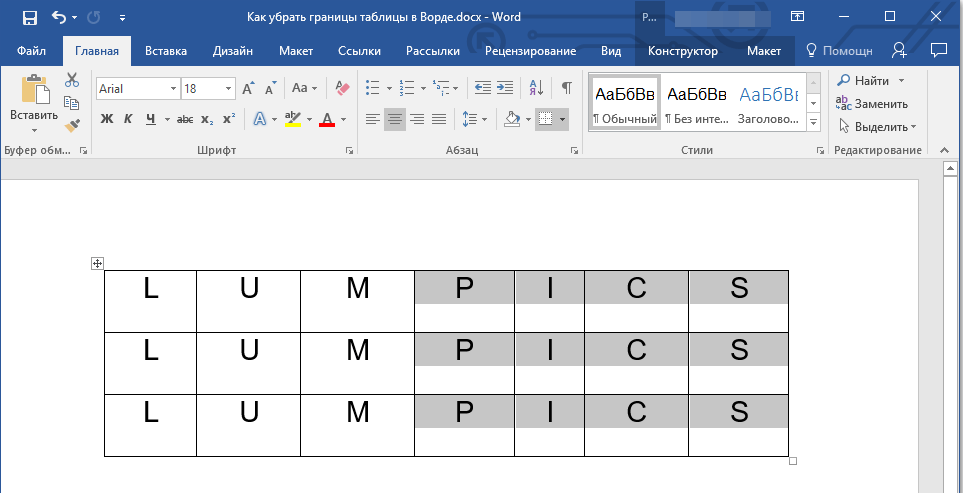
2. Во вкладке “Конструктор” в группе “Обрамление” нажмите на кнопку “Границы” и выберите необходимый параметр для скрытия границ.
3. Границы в выделенном вами фрагменте таблицы или выбранных вами ячейках будут скрыты. Если это необходимо, повторите аналогичное действие для другого фрагмента таблицы или отдельных ячеек.
Урок: Как сделать продолжение таблицы в Word
4. Нажмите клавишу “ESC”, чтобы выйти из режима работы с таблицей.
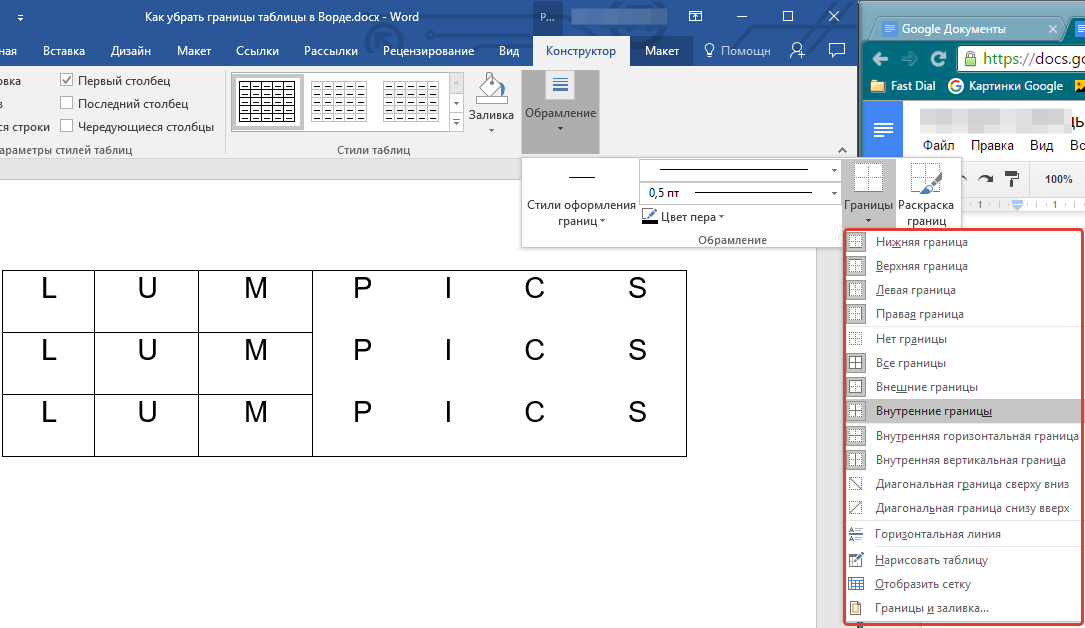
Скрытие определенной границы или определенных границ в таблице
Если это необходимо, вы всегда можете скрыть конкретные границы в таблице, не заморачиваясь при этом с выделением отдельного фрагмента или фрагментов.Данный метод особенно хорошо использовать в случае, когда вам необходимо скрыть не только одну конкретную границу, но и несколько границ, расположенных в разных местах таблицы, за один раз.
1. Кликните в любом месте таблицы, чтобы отобразилась основная вкладка “Работа с таблицами”.
2. Перейдите во вкладку “Конструктор”, в группе “Обрамление” выберите инструмент “Стили оформления границ” и выберите белую (то есть, невидимую) линию.
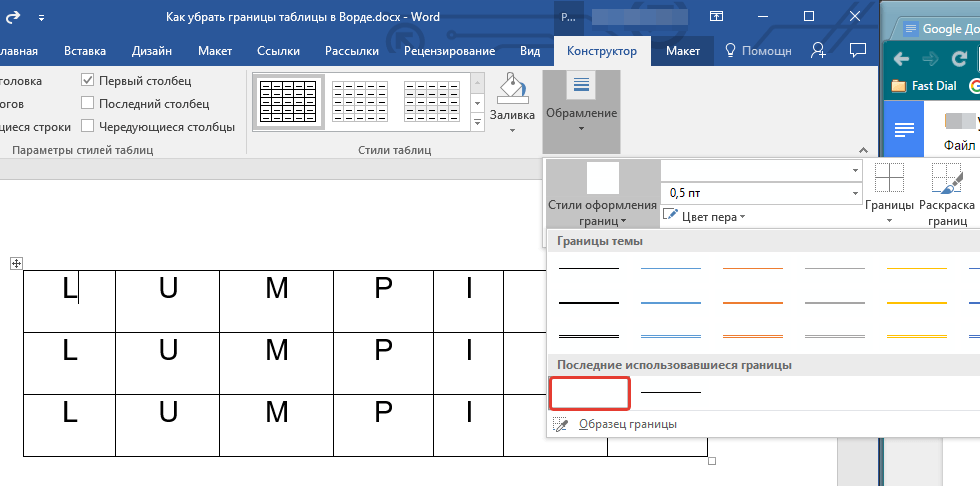
- Совет: Если белая линия не отображается в выпадающем меню, выберите сначала ту, которая используется в качестве границ в вашей таблице, а затем измените ее цвет на белый в разделе “Стили пера”.
Примечание: В более ранних версиях Ворда для скрытия/удаления отдельных границ таблицы необходимо перейти во вкладку “Макет”, раздела “Работа с таблицами” и выбрать там инструмент “Стиль линии”, а в развернувшемся меню выбирать параметр “Нет границ”.
3. Указатель курсора примет вид кисти. Просто кликните ею в том месте или тех местах, где необходимо убрать границы.
Примечание: Если вы кликните такой кистью по концу любой из внешних границ таблицы, она исчезнет полностью. Внутренние границы, обрамляющие ячейки, будут удаляться каждая отдельно.
- Совет: Для удаления границ нескольких ячеек подряд кликните левой кнопкой мышки на первой границе и протяните кисть до последней границы, которую вы хотите удалить, затем отпустите левую кнопку.
4. Нажмите “ESC”, чтобы выйти из режима работы с таблицами.
Урок: Как объединить ячейки таблицы в Ворде
На этом мы закончим, ведь теперь вы знаете еще больше о таблицах в MS Word и умеете скрывать их границы, делая полностью невидимыми. Желаем вам успехов и только положительных результатов в дальнейшем освоение этой продвинутой программы для работы с документами.
Table grid lines are NOT table borders. Borders display all the time in your document; borders show in print preview; and borders print. Table grid lines are guidelines for borderless tables or table cells. And you should turn them on when you’re working in Word.
Why? Because if you don’t, you may assume you’re working just in text, not in a table cell. Why is it important to know that? Well, if you decide to add more content, you may not add it in the correct place and so may mess up the table or the table sort order (if you use it).
Here’s a simple example. The first screen shot below shows a document without table grid lines and without the paragraph marks turned on. You can’t tell just by looking at it that this content is contained within a table.

The second screen shot shows the grid lines and paragraph marks turned on. Notice how it is obvious that the content has been placed in individual table cells.

This example is from Word 2003; Word 2007’s table grid lines are blue dashes not gray lines.
By showing the table grid lines, the author can make informed decisions about how to deal with the next piece of content they have to deal with. In the example above, they know they have to insert a new row to add a new reference to the list. Without table grid lines turned on, an author might just press Enter at the end of one reference and add the next one to the same table cell — this can cause problems when sorting a list alphabetically.
If you are using borderless tables in your document, do yourself a favor and turn on the grid lines:
- Word 2003: On the menu, go to Table > Show Gridlines.
- Word 2007/2010: Click inside any table, then go to the Table Tools > Layout tab, Table group and click View Gridlines.

(Please note: This article is not an argument for or against using tables for layout — the fact is, my client uses them for their Terms and References lists.)
Update February 2013:
The show gridline setting is associated with the computer, not the document, as far as I know.
The only way to guarantee that it’s turned on is to have it as part of an autorun/autoopen macro associated with the document’s template, or with the specific document.
See these blog posts for how to do that:
- https://cybertext.wordpress.com/2010/09/01/word-macro-to-show-field-shading-etc/
- https://cybertext.wordpress.com/2011/07/13/word-macro-to-show-all-formatting-on-opening-a-document/
When you add a table to a document in Microsoft Word, it will have borders around the table and its cells.
These borders can be useful in providing some visual separation of the data that you have entered into those cells.
But the needs of your document might not require table borders, which can leave you looking for a way to eliminate them.
Our tutorial below will show you how to remove table lines in Word documents.
How to Get Rid of Table Borders in Word Documents
- Open the document.
- Click inside a table cell.
- Select the Design tab.
- Click the Borders button.
- Choose None under the Setting column.
- Click Apply to and choose Table.
- Click the OK button.
Our guide continues below with additional information on how to remove borders from a table in Word, including pictures of these steps.
Word processing applications like the Microsoft Office version, Word, or the Google Apps version, Docs, allow you to add various objects to your document to help you convey information to your readers.
One such object is a table, and you can specify the number of rows and columns included in that table.
But you can also format a table in Word by adjusting the appearance of the table border. You can even remove the table borders in Microsoft Word if you don’t like how they look.
Borders on a table in Word 2010 can be helpful for keeping information organized for the person reading your document. But they can be distracting or ugly, depending upon the styling of the rest of your document.
You may have discovered how to remove the borders from an individual cell of your table, but are struggling to delete all of the borders at once.
Fortunately, this is something that you can accomplish with your Word 2010 document, allowing you to quickly remove all of your table borders at once so that your table information prints without those visible lines.
In some situations, you may want to have your text appear in the middle of the page. Our how to center text in Word tutorial can show you how to do that.
How to Remove Table Lines in Word 2010 (Guide with Pictures)
This tutorial will assume that you already have a Word document containing a table. The steps below will remove the borders from that table so that they are gone when you print the document.
You will still see blue gridlines on your screen to identify the borders of the table. You can read this article to learn how to remove those as well.
These steps will show you how to remove table lines in Word documents.
Step 1: Open your document in Microsoft Word 2010.
Open the document with the table lines.
Step 2: Click anywhere inside the table whose borders you want to remove.

Click inside one of the table cells.
Step 2: Click the Design tab under Table Tools at the top of the window.
Select the Table Tools – Design tab.
Step 3: Click the Borders button at the right side of the ribbon at the top of the window.
Choose the Borders button in the ribbon.
If you click the arrow to the right of the Borders dropdown menu then you can also see some different border style options as well.
Step 4: Click the None option at the left side of the window, make sure the Table option is selected at the bottom-right of the window under Apply To, then click the OK button at the bottom of the window.
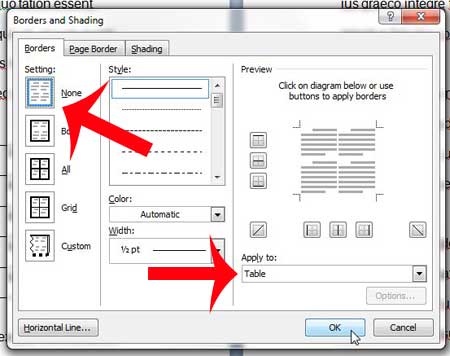
Select None, then choose Table under Apply To, then click OK.
You can then navigate to the Print Preview window and see how your table will look now that it is set to print without borders.

Now that you know how to remove table lines in Word you will be able to use this whenever you want to get rid of the borders in a table in your document, or even if you want to change something about the style of your table borders.
More Information on How to Remove Table Borders in Word 2010
Removing the borders from a table in a Microsoft Word document will only remove the lines that signify the borders. They are still technically there, even if you can’t see them. This means that data that you add to cells in your table will still respect the row and column boundaries of that table.
If you are trying to create one big “cell” then you may want to try using a text box from the Insert menu, or use a single-cell table instead. You can do this by adding a table that is only one row by one column. As you add content to that cell it will expand to accommodate the content, allowing that one cell to become quite large.
There are some other border options available for Microsoft Word tables as well. The options include:
- Box
- All
- Grid
- Custom
- None
If you don’t want to remove the table borders entirely then you may try one of those options instead to see if it produces the desired result. A table in Microsoft Word can look very different when you adjust the table gridlines or the way that your table cells look. Even if you don’t want the full set of lines on your horizontal and vertical rows if can be useful to format borders for the table so that you have black borders going around the perimeter of the whole table to separate it from the rest of the document content.
If you choose “None” then this border option will remove gridlines from the table entirely. If you select “Box” then this option will only show the outside borders of the table
Another interesting thing that you can try is setting the color of the table border to white, or whatever the page background color is in your document. You can change the table border color in Word from the Borders and Shading dialog box that we used in the steps above, but click the Color drop down menu instead and choose the color that matches the document background.
After you erase table lines in Word you may not like the way that it makes your table look. Fortunately you can always go back to the Borders and Shading window and choose a different table border setting to restore the lines to the table.
These same steps will work in most newer versions of Microsoft Word as well. In some versions, however, you will be selecting the Table Design tab rather than the Design tab.
If you want to reduce the number of sheets on which your document is printed, you can learn how to print two pages on one sheet in Word 2010.
Frequently Asked Questions About How to Remove Table Lines in Word
How do I delete an entire table from my Word document?
While the focus of this article has been on erasing table lines, you might discover that you need to remove the table from the document entirely.
If you place your mouse pointer inside one of the table cells you can select the Layout option in the menu bar at the top of the window.
You can then click the Delete button, and choose the Delete Table option to remove the table and its contents.
How do I adjust column width for an MS Word table?
If you would like to make a column smaller or larger in your Word table, then you can position your mouse over the left or right column border until you see a vertical line with an arrow on either side.
If you click and drag when you see this icon you will be able to make the column smaller or larger.
How can I add a new table to an open Word document?
If you need to add a table to your document then you can click in the document at the point where you want the table, then select the Insert tab at the upper left corner of the window.
You can then click the Table button, and choose the number of rows and columns for the table.
Additional Sources

Matthew Burleigh has been writing tech tutorials since 2008. His writing has appeared on dozens of different websites and been read over 50 million times.
After receiving his Bachelor’s and Master’s degrees in Computer Science he spent several years working in IT management for small businesses. However, he now works full time writing content online and creating websites.
His main writing topics include iPhones, Microsoft Office, Google Apps, Android, and Photoshop, but he has also written about many other tech topics as well.
Read his full bio here.
В многофункциональном текстовом редакторе Word пользователь может не только печатать текст, но и сопровождать его таблицами. По функционалу в работе с таблицами Word все же уступает классическому Excel. Однако базовые элементы оформления и возможности их настройки здесь присутствуют. Например, можно без проблем убрать границы у все таблицы или ее части.

Содержание
- Как убрать границы у таблицы в Word
- Вариант 1: Скрыть все границы у таблицы
- Вариант 2: Скрыть отдельные участки таблицы
- Вариант 3: Удаление определенных границ
Именно удалить границы у таблицы не получится, но вы сможете их скрыть. При отображении документа на компьютере и после печати данных границ не будет.
Если содержимое ячеек в дальнейшем планируется редактировать, то рекомендуется включить отображение сетки. Вместо границ будут пунктирные линии, которые значительно упростят дальнейшую работу с документом. При печати данного пунктира не будет, только в режиме работы с документом.
- Откройте документ с таблицей. Перейдите во вкладку «Главная» и там, в блоке «Абзац», кликните по инструменту «Границы». Расположение кнопки инструмента отмечено на скриншоте.
- Появится контекстное меню. Там кликните по кнопке «Отобразить сетку».

Теперь после скрытия основных границ у таблицы вы все равно будет знать размеры ее ячеек. Проделывать эту процедуру необязательно.
Вариант 1: Скрыть все границы у таблицы
Чтобы убрать границы у всей таблицы, проделайте следующие манипуляции:
- Сделайте выделение всей таблицы. Если у вас в документе только она и нет никакого другого текста, то можете воспользоваться сочетанием клавиш Ctrl+A – выделить все в документе.
- По выделенному участку кликните правой кнопкой мыши. В контекстном меню перейдите в раздел «Свойства таблицы».
- Откроется окошко настройки внешнего вида таблицы. В нем нажмите по кнопке «Границы и заливка».
- В следующем окне в разделе «Тип» выберите первый пункт «Нет». В разделе «Применить к» установите параметр «таблице». Нажмите кнопку «ОК» в каждом из двух открытых диалоговых окон.


Если вы ранее включили отображение сетки, то на месте границ появится пунктир. Он только помогает ориентироваться в таблице и редактировать ее, но на печать не выводится.
Вариант 2: Скрыть отдельные участки таблицы
В некоторых случаях не требуется скрывать все границы у таблицы, а нужно, например, только выделить отдельный блок. Тогда действуйте по следующей инструкции:
- В самой таблице выделите тот блок, который собираетесь скрыть. Можно выделять сразу несколько ячеек, а не всю таблицу.
- Переключитесь во вкладку «Конструктор», что расположена в верхней части интерфейса.
- Обратите внимание на блок «Обрамление». Там воспользуйтесь инструментом «Границы».
- В контекстном меню выберите «Внутренние границы». Таким образом, внутренние границы в выделенной области исчезнут, но останутся внешние, то есть блок не будет «вываливаться» из общей таблицы.

Читайте также:
Убираем интервал между абзацами в Word
Настройки табуляции в Word
Удаление ссылок и гиперссылок в документе Word
Устранение фона у текста в MS Word
Вариант 3: Удаление определенных границ
Иногда встречаются такие требования к оформлению документа, чтобы была скрыта только одна конкретная границы у таблицы. Это тоже можно очень быстро реализовать:
- Для примера удалим только верхнюю границу таблицы. Выделите все ячейки, прилегающие к ней.
- Переключитесь во вкладку «Конструктор», что расположена в верхней части интерфейса.
- Обратите внимание на блок «Обрамление». Там воспользуйтесь инструментом «Границы».
- В контекстном меню выберите «Верхняя граница». Если требуется удалить какую-то боковую границу, то выделяйте прилегающие к ней ячейки и выбирайте «Левая/правая граница».

Удалить полностью границы у таблицы в Word нельзя, да это и не требуется. Однако вы можете без проблем их скрыть так, чтобы сохранилась структура ячеек.
You are here: Home / Word / How to Remove Table Borders in Microsoft Word for Office 365
When you create a new table in Microsoft Word you are able to specify the number of rows and columns in that table. But the table will have borders, so you might be wondering how to remove table borders in Microsoft Word for Office 365.
Fortunately you have a lot of options for customizing the appearance of your table, including the styling of the borders. This includes whether or not the borders are even there.
By removing your table borders you can keep your data in that layout of of a table, but without the lines that identify the rows and columns.
Our guide below will show you how to remove the borders from a Word table.
- Open your document.
- Select all of the table cells.
- Choose Table Design.
- Click the Borders button.
- Select No Border.
Continue reading below for more information on removing table borders in Word, including pictures of these steps.
How to Remove Microsoft Word Table Borders
The steps in this article were performed in Microsoft Word for Office 365. However this method will also work in most other versions of Word.
Step 1: Open your document in Microsoft Word.
Step 2: Select all of the cells in the table.

You can click on the bottom-right cell and drag up to the top-left cell to select them all.
If you haven’t created the table yet, then you will need to do that first.
Step 3: Select the Table Design tab at the top of the window.

Step 4: Click the Borders button in the Borders section of the ribbon.

Step 5: Choose the No Border option from the dropdown menu.

There will still be a dotted line to indicate the cells, but the border won’t appear when you go to print the document.
You will notice that there some other styling options in the Borders section of the ribbon if you would like to change the appearance of your borders instead of removing them.
You can also adjust border settings using the Borders and Shading option at the bottom of the Borders dropdown menu.
Find out how to check for passive voice in Word if you would like to include that as an option when you run the spelling and grammar checker.

Matthew Burleigh has been a freelance writer since the early 2000s. You can find his writing all over the Web, where his content has collectively been read millions of times.
Matthew received his Master’s degree in Computer Science, then spent over a decade as an IT consultant for small businesses before focusing on writing and website creation.
The topics he covers for MasterYourTech.com include iPhones, Microsoft Office, and Google Apps.
You can read his full bio here.
Search
When creating a new table in MS Word, you can specify the number of rows and columns that the table must contain. But the table that appears has internal and external lines or borders. Borders make it easy to enter data in the cells. But you may want to print or display the table without some or any border showing up.
Word has many options that allow customizing the appearance of your table. You can change the styling of the borders. One of the styles includes suppressing the display of borders.
Removing the table borders or lines in MS Word does not disturb the data or the layout of the data. You only remove the lines that identify the rows and columns.
- Using the Borders Menu
- Using the Borders and Shading Dialog Box
We will show you in steps how to remove the table lines in your MS Word document.
Let us begin.
Method #1: Using the Borders Menu
Step #1: Open Word document.
Open the Word document that has a table with borders.

Step #2: Select the entire table
Hover the mouse pointer over the table.
A square icon appears in the top left-hand corner of the table.
Click on the square icon to select the entire table.

Step #3: Remove table lines
Click on the Design tab under Table Tools on the top menu bar to change the ribbon.

In the section Borders, click on the icon Borders.

A new menu will open.

Hover the mouse pointer on the appropriate button in the menu to:
- Remove the Bottom Border only
- Remove the Top Border only
- Remove the Left Border only
- Remove the Right Border only
- To show No Borders
- Remove All Borders
- Remove Outside Borders only
- Remove Inside Borders only
- Remove Inside Horizontal Borders only
- Remove Inside Vertical Borders only
Click on the one suitable for your table.
For instance, click on All Borders to remove all lines.

Method #2: Using the Borders and Shading Dialog Box
Step #1: Open Word document.
Open the Word document that has a table with borders.

Step #2: Select the entire table
Hover the mouse pointer over the table.
A square icon appears in the top left-hand corner of the table.
Click on the square icon to select the entire table.

Step #3: Remove table lines
Right-click anywhere inside the table.
In the menu that opens, click on Table Properties.

The Table Properties dialog will open.
Click on the Borders and Shading button.

The Borders and Shading dialog will open.
Under Borders, click on All.

Under Preview on the right-hand side, click and remove the lines you do not want.

Click on OK to exit the dialog.
Word will remove all the lines you have selected.

Conclusion
Use any one of the two methods above to remove table lines in your MS Word document. You can remove all lines or display some of them.