
Copy a Word table into Excel
Excel for Microsoft 365 Word for Microsoft 365 Excel 2021 Word 2021 Excel 2019 Word 2019 Excel 2016 Word 2016 Excel 2013 Word 2013 Excel 2010 Word 2010 Excel 2007 Word 2007 More…Less
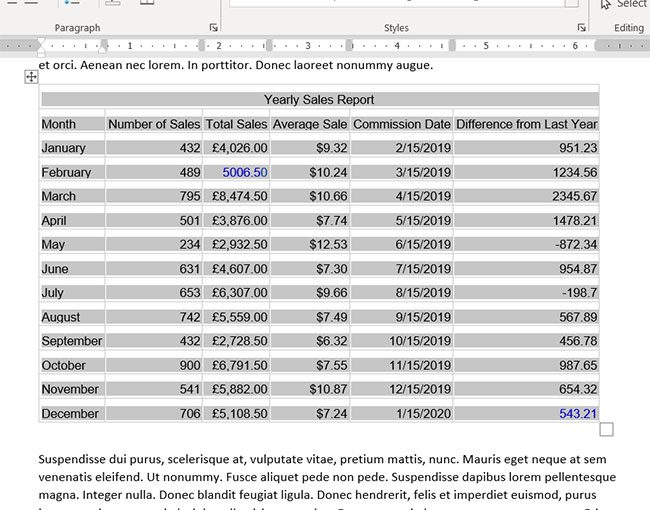
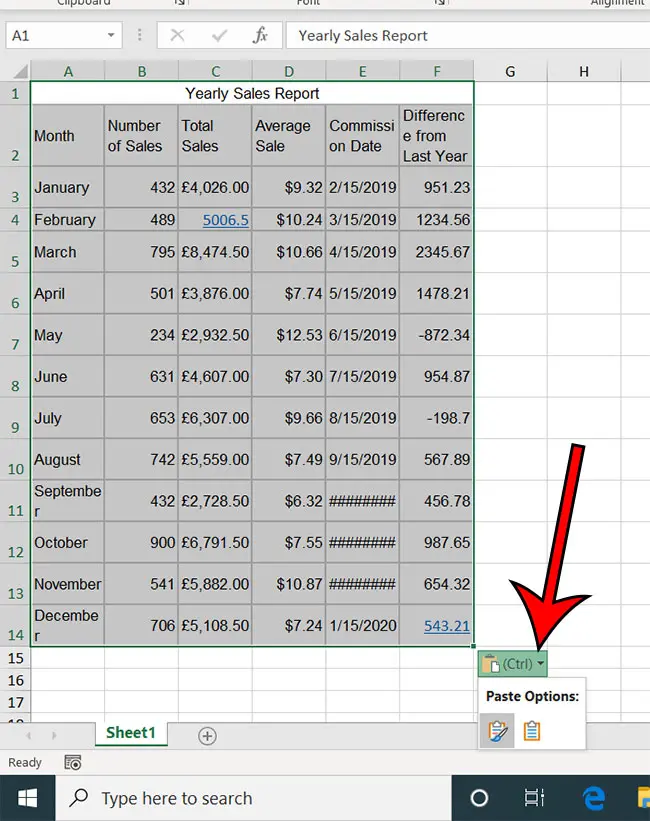
When you want to move data from a Word table to Excel, you can avoid having to retype that data by copying it from Word directly. When you copy data from a Word table into an Excel worksheet, the data in each Word table cell is pasted in an individual cell on the worksheet.
Important: After pasting the data, you may have to clean it up so that you can take advantage of the calculation features in Excel. For example, there may be unwanted extra spacing in cells, numbers may have been pasted as text rather than as numeric values that you can calculate, or dates are not displayed correctly. For help with formatting numbers as dates, currency, percentages, etc., see Format numbers. For help with formatting the style of your table, see Format an Excel table.
-
In a Word document, select the rows and columns of the table that you want to copy to an Excel worksheet. Make sure there aren’t any extra carriage returns in the cells of the table, otherwise this may cause extra rows in Excel.
-
To copy the selection, press CTRL+C.
-
In the Excel worksheet, select the upper-left corner of the worksheet area where you want to paste the Word table.
Note: Make sure that the paste area is empty before you paste the data. Data in Word table cells will replace any existing data in worksheet cells in the paste area. If necessary, review the table first in Word to verify its dimensions.
-
Press CRL+V.
-
To adjust the formatting, click Paste Options
 next to the data that you pasted, and then do the following:
-
To use the formatting that is applied to the worksheet cells, click Match Destination Formatting.
-
To use the formatting of the Word table, click Keep Source Formatting.
-
 next to the data that you pasted, and then do the following:
Note: Excel pastes the contents of each Word table cell into a single cell. After you paste the data, you can distribute the data across additional cells in a column (for example, to divide first and last names so that they appear in separate cells) by using the Text to Columns command. For more information, see Distribute the contents of a cell into adjacent columns.
Need more help?
Копирование таблицы Word в Excel
Excel для Microsoft 365 Word для Microsoft 365 Excel 2021 Word 2021 Excel 2019 Word 2019 Excel 2016 Word 2016 Excel 2013 Word 2013 Excel 2010 Word 2010 Excel 2007 Word 2007 Еще…Меньше
Если вы хотите переместить данные из таблицы Word в Excel, можно избежать повторного ввода, скопировав их прямо из Word. При копировании из таблицы Word на лист Excel данные в каждой ячейке таблицы Word вставляются в отдельную ячейку на листе.
Важно: После вставки данных может потребоваться очистить их, чтобы воспользоваться функциями вычислений Excel. Например, в ячейках могут быть ненужные пробелы, числа могут быть вставлены как текст, а не как числовые значения, с которыми можно выполнять вычисления, а даты могут отображаться неправильно. Сведения о форматировании чисел как дат, денежных единиц, процентов и т. д. см. в статье Форматирование чисел. Справку о форматировании таблицы можно найти в статье Форматирование таблицы Excel.
-
Выберите в документе Word строки и столбцы таблицы, которые вы хотите скопировать на лист Excel. Убедитесь, что в ячейках таблицы нет дополнительных возвратов каретки, в противном случае это может привести к лишним строкам в Excel.
-
Чтобы скопировать выделенный фрагмент, нажмите клавиши CTRL+C.
-
На листе Excel выделите левый верхний угол области, в которую нужно вставить таблицу Word.
Примечание: Перед вставкой убедитесь, что область пуста. Данные из ячеек таблицы Word заменят все существующие данные в ячейках листа, находящихся в области вставки. При необходимости перед копированием просмотрите таблицу в Word для проверки ее размеров.
-
Нажмите клавиши CTRL+V.
-
Чтобы настроить форматирование, нажмите кнопку Параметры
рядом с данными и сделайте следующее:-
Чтобы использовать форматирование, примененное к ячейкам листа, выберите вариант Использовать форматы конечных ячеек.
-
Чтобы использовать форматирование таблицы Word, выберите вариант Сохранить исходное форматирование.
-
 рядом с данными и сделайте следующее:
Примечание: Excel вставит содержимое каждой ячейки таблицы Word в отдельную ячейку. После вставки данных их можно распространить на другие ячейки в столбце (например, разделив имя и фамилию, чтобы они отображались в отдельных ячейках) с помощью команды Текст по столбцам. Дополнительные сведения см. в статье Распределение содержимого ячейки на соседние столбцы.
Нужна дополнительная помощь?
While it might initially seem like there wouldn’t be a lot of crossover in the types of information that you have in a Word document and an Excel spreadsheet, you might discover that you need to move data from one file to the other.
This is particularly likely when you’re dealing with a table in your document. Fortunately, there are ways to convert Word table to Excel so that you can analyze the data from your Word document using Excel’s powerful data tools.
How to Do a Microsoft Word to Excel Table Conversion
- Open Excel.
- Open your Word document.
- Highlight the table, then press Ctrl + C to copy it.
- Open Excel and choose where to put the table, then press Ctrl + V.
Our guide continues below with additional information on how to convert Word table to Excel data, including pictures of these steps.
Last update on 2023-04-13 / Affiliate links / Images from Amazon Product Advertising API
| As an Amazon Associate, I earn from qualifying purchases.
While Microsoft Excel features a number of advanced tools and settings to work with data in spreadsheet and table formats (there are even ways to convert text to numbers in Excel), Microsoft Word has some of those options, too.
If you’ve created a document in Microsoft Word that needed to reference some data, then it’s entirely possible that you have elected to present that data in a table format.
But you may have discovered that Word tables have a limited set of options for sorting data or performing mathematical operations on data, which could lead you to work with that data in Excel.
Fortunately, you can convert a Microsoft Word table to Excel using a copy and paste method that gets the data into a spreadsheet with just a few steps.
Do you need to combine some of the cells in your table? Our guide on how to merge cells in Word 2016 will show you how.
Use these steps to convert a Microsoft Word table to an Excel spreadsheet.
Step 1: Open Microsoft Excel.
Launch the Excel application or open an existing spreadsheet.
Step 2: Open the document with the table in Microsoft Word.
Open Word and select your document, or double-click on the document inside of a folder.
Step 3: Select the table cells in the Word document, then press Ctrl + C to copy them.
Click and drag with your mouse to select the table cells.
Note that you can choose to copy only part of the table, if you would prefer to do that.
Step 4: Click inside the Excel cell where you want the top-left cell, then press Ctrl + V to paste it.
Open your Excel spreadsheet, select the top-left cell where you want to paste the data, then use the Ctrl + V keyboard shortcut to paste the copied table.
You should now be able to view and edit the table data in Microsoft Excel.
Once you have that data in Excel you can read our Microsoft Excel Create Table Guide and see about some ways that you can make that data easier to use.
Now that you have completed our convert Word table to excel guide you can more easily move data between the two applications.
After you paste the data, a small Paste Options dialog button will appear next to it. You can click that button and select Match Destination Formatting to use the Excel formatting, or you can select Match Source Formatting to use the Word formatting.
Note that it’s possible your pasted table data includes some problematic characters or formatting that you may need to adjust.
For example, there may be extra lines in the cells which could cause empty rows in Excel, there may be blank spaces either preceding or following the cell data, or numbers may be formatted as text.
If you are having problems working with the data in Excel, then fixing these issues will typically resolve those problems.
Frequently Asked Questions About How to Export a Word Table to Excel
Can I copy an entire table from a Word file and put it into an Excel worksheet?
Yes, you are able to import data into an Excel workbook tab if you would like to edit that existing data in a spreadsheet instead of a document.
Simply open your Excel file and your Word document, copy the table data in the document, then paste it into Excel.
You can use the keyboard shortcut for both of these actions to make it easier.
Copy keyboard shortcut – Ctrl + C
Paste keyboard shortcut – Ctrl + V
Can I copy tabular data from a PDF file into a Microsoft Office application?
While Word and Excel have gotten better at being able to convert text from other places like a text file or a plain text text document, it might occasionally struggle with some data from sources like PDF files.
Sometimes it works properly and sometimes it doesn’t. A lot of the problems can arise from different formatting settings like fonts, or things like line breaks and paragraph breaks can make the data separate text in a way that is unhelpful.
You can always try copying and pasting the data from the PDF into the desired file, and use one of the different pasting options if a regular copy and paste isn’t working.
Is there a way to import data in Excel?
Yes, you can use Excel’s data importer if you would like to try another way to turn a file into a spreadsheet.
You can open Excel, then select the Data tab at the top of the window.
You can then choose one of the data import options from the Get & Transform section in the ribbon.
This will open a dialog box where you can specify the settings for the import and choose the file source.
The different import options available in Excel for Office 365 include:
– Get Data
– From Text/CSV
– From Web
– From Table/Range
– Recent Sources
– Existing Connections
Additional Sources
- How to subtract in Excel
- How to sort by date in Excel
- How to center a worksheet in Excel
- How to select non-adjacent cells in Excel
- How to unhide a hidden workbook in Excel
- How to make Excel vertical text

Matthew Burleigh has been writing tech tutorials since 2008. His writing has appeared on dozens of different websites and been read over 50 million times.
After receiving his Bachelor’s and Master’s degrees in Computer Science he spent several years working in IT management for small businesses. However, he now works full time writing content online and creating websites.
His main writing topics include iPhones, Microsoft Office, Google Apps, Android, and Photoshop, but he has also written about many other tech topics as well.
Read his full bio here.
“Is it possible to copy Word table into Excel without splitting cells into multiple Rows?”
This question is nothing new for us. Over the years, a lot of users have questioned this particular issue. But the funny thing is that this procedure is very simple. All you need to know are the specific steps required for the conversion. So, if you want to know more about conversion from Word table to Excel, check the article below.
As we have just said, it is not very complicated to convert a Word table to Excel. The steps are very simple, and the details are provided below. Check them out.
Option 1. Convert Word Table to Excel via Copy & Paste Feature
This is probably the simplest way to import Word table into Excel. Just copy the content from the Word document and paste it on the Excel document. It is as simple as that.
- Step 1: Open the Word document and copy the rows and columns of the table.
- Step 2: Then, press ‘Ctrl + C’ on the keyboard.
- Step 3: Now, open a new Excel document, and go to the top left corner.
- Step 4: Then, press ‘Ctrl + V’ on the keyboard.
The import the complete, but if you want to adjust the format; you can click on the ‘Paste Options’.
Option 2. Export Word Table to Excel using Excel’s Import External Data Feature
In this part, we will use the ‘Import External Data’ feature of MS Excel to convert Word table to Excel.
- Step 1: Open MS Word, click on ‘Tools’.
- Step 2: Then, check the box beside ‘Save Data Only For Forms’ and click ‘OK’.
- Step 3: After that, save the file and wait for the conversion dialog box will appear.
- Step 4: Then, go to the Excel sheet and click on ‘Data’. Click ‘Import External Data’ under ‘Import Data’.
- Step 5: Lastly, select the text file, and click ‘Import’.
This is another way to import the Word table to Excel. Try it out.
Part 2. How to Convert Excel Table to Word
The conversion from Excel to Word table is not a difficult task. But the fact is, MS Office offers several functions that even the most veteran Office users are unaware of. So, it is quite understandable that a user is having trouble making the conversion. Not to worry, the article below contains all the solutions, check it out. There are multiple ways to insert Excel table into Word. But not all the methods are equally effective or reliable. So, we have detailed only 3 of the best solutions for the conversion.
Solution 1. How to Insert Excel Table into Word via Insert Object Method
This method for insertion of Excel table into Word is used widely. The method is simple and works really well. Here’s how to insert Excel table into Word.
- Step 1: Launch the Word document, click on ‘Insert’.
-
Step 2: After that, click on ‘Object’.
- Step 3: Then, in the ‘Object’ panel, click on ‘Create from File’. Then, click ‘Browse’ to insert the Excel file.
- Step 4: Lastly, click ‘OK’ to complete the process.
This is the most popular way to insert the Excel table.
Solution 2. How to Insert Excel Table into Word via Insert Table Method
This is a very different way to insert an Excel table into Word. Follow the steps below carefully.
- Step 1: Open an MS Word document and click ‘Insert’.
- Step 2: Select the ‘Tables’ group option, then go for the ‘Table’ icon and select ‘Insert Table’.
- Step 3: You will see the options to set the number of columns and rows. There is also ‘AutoFit behavior’ and click ‘OK’.
- Step 4: Now, open the Excel file. Click on each cell and copy them.
- Step 5: Go back to the Word document and paste the content.
This is practically the manual method of copying the files from Excel to Word. It is effective but time-consuming.
Solution 3. How to Copy Table from Excel to Word via Copy-Paste Method
In this last method, you will copy the Excel table and paste it into the Word document. It is one of the easiest methods; let’s check out the steps. Here’s how to copy table from Excel to Word.
- Step 1: Open the Excel file and select the content of the document. Press ‘Ctrl + C’ on the keyboard to copy it.
-
Step 2: Now, open the MS Word file. Just make the right-click and choose any among the ‘Paste’ options.
This is probably the easiest way to insert the Excel table into Word.
Extra Tips. How to Unlock Word Document
After going through the previous part of this article, you shouldn’t have any trouble to copy table from Word to Excel. We have detailed the methods in absolute detail, and it is quite simple.
But in this part of the article, we will be discussing another issue. An issue that has affected a lot of MS Office users. Yes, we are talking about a way to open a locked MS document without the password, especially MS Word.
A lot of users encrypt their MS Word files using a password, the reason can be anything, but if that password is forgotten, you won’t be able to access that file. So, a professional password recovery software is required for the recovery of the said lost password.
Using professional software is the safest and fastest way of recovering the lost password. Needless to say, there are a lot of options available on the internet, but we recommend PassFab for Word.
This is an exceptional software with a top recovery rate. The UI is excellent, and operation is simple. Let’s check it out.
- Step 1: Complete the installation of PassFab for Word on a computer.
-
Step 2: Then, launch the program; the main interface will be visible.
-
Step 3: Click on the ‘Add’ button and import the encrypted Word document.
-
Step 4: Then you have to select an attack mode to proceed. Dictionary attack, Brute Force attack, and Brute Force with Mask; these are the options.
-
Step 5: When the attack mode is selected, PassFab will start the password recovery.
You have to wait a bit for the password recovery. The taken time depends on the complexity of the passcode. You can also watch this video about how to use iy.
Final Words
So, all that being said, the procedure to export Word table to Excel is not a complicated one. There are a copy and paste option, which is as simple as it sounds. The second option is to use MS Excel to insert the table. So, the methods are not complicated and can be executed without any hassle even by the most amateur user. Another thing is, if you have lost the password for your MS Word document, then using PassFab for Word is the best way to recover MS Word document password. Check out the user-guide on the above article.

Чаще приходится переносить таблицу из программы Microsoft Excel в приложение Word, чем наоборот, но все-таки случаи обратного переноса тоже не столь редки. Например, иногда требуется перенести таблицу в Excel, сделанную в Ворде, для того чтобы, воспользовавшись функционалом табличного редактора, рассчитать данные. Давайте выясним, какие способы переноса таблиц в данном направлении существуют.
Обычное копирование
Самый простой способ переноса таблицы выполняется методом обычного копирования. Для этого, выделяем таблицу в программе Word, кликаем правой кнопкой мыши по странице, и в появившемся контекстном меню выбираем пункт «Копировать». Можно, вместо этого, нажать на кнопку «Копировать», которая размещена вверху на ленте. Ещё один вариант предполагает, после выделения таблицы, нажатие на клавиатуре клавиш Ctrl+C.
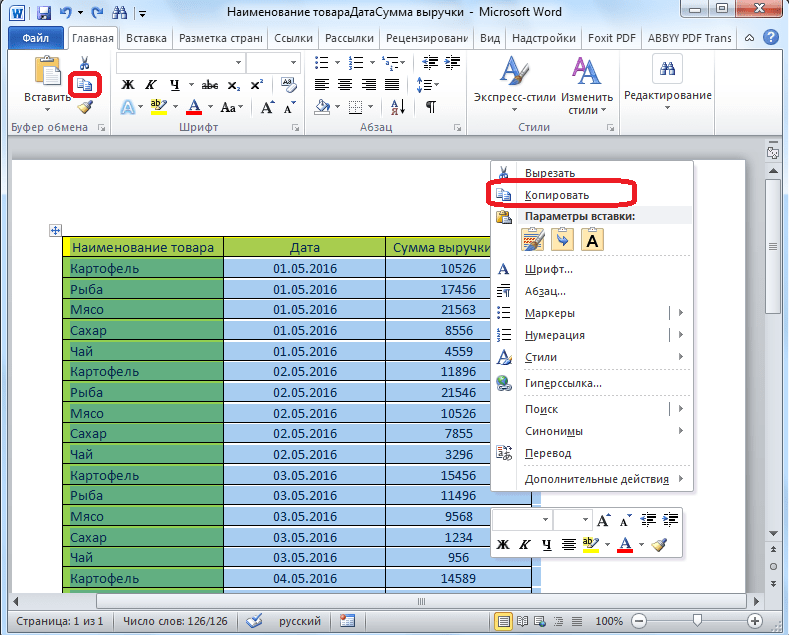
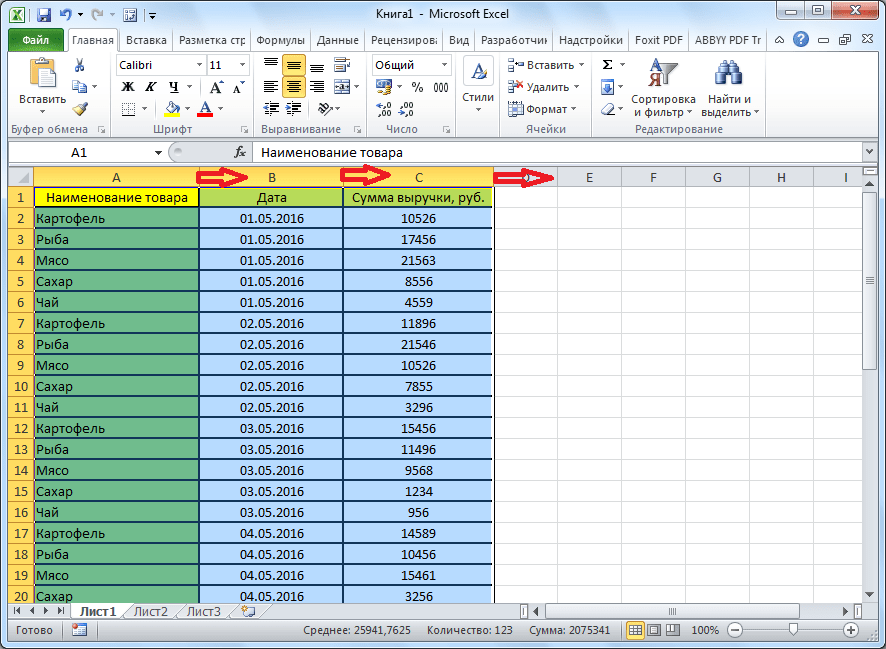
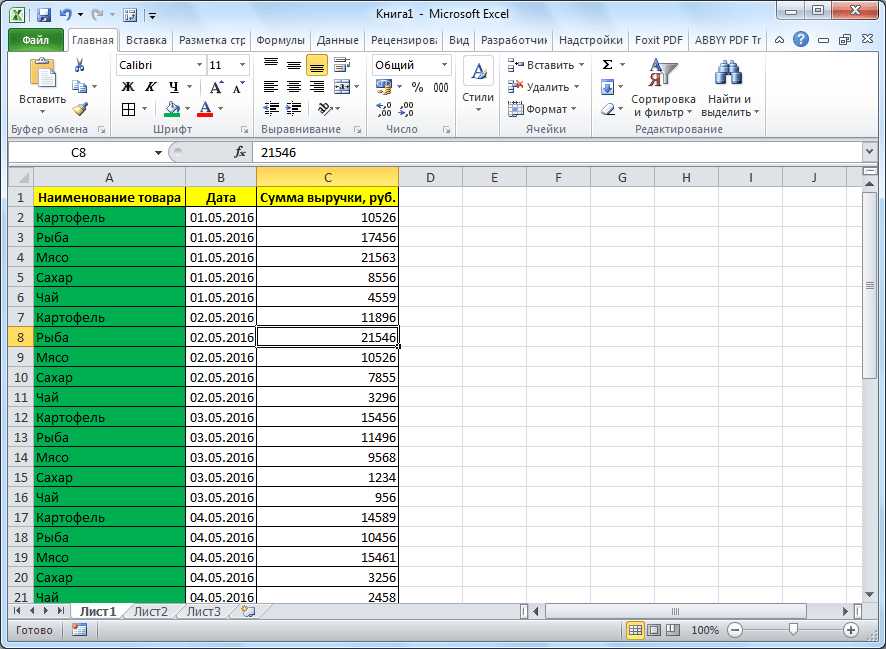
Таким образом, мы скопировали таблицу. Теперь нам нужно вставить её на лист Excel. Запускаем программу Microsoft Excel. Кликаем по ячейке в том месте листа, где хотим разместить таблицу. Нужно заметить, что эта ячейка станет крайней левой верхней ячейкой вставляемой таблицы. Именно из этого нужно исходить, планируя размещения таблицы.
Кликаем правой кнопкой мыши по листу, и в контекстном меню в параметрах вставки выбираем значение «Сохранить исходное форматирование». Также, можно вставить таблицу, нажав на кнопку «Вставить», расположенную на левом краю ленты. Или же, существует вариант набрать на клавиатуре комбинацию клавиш Ctrl+V.
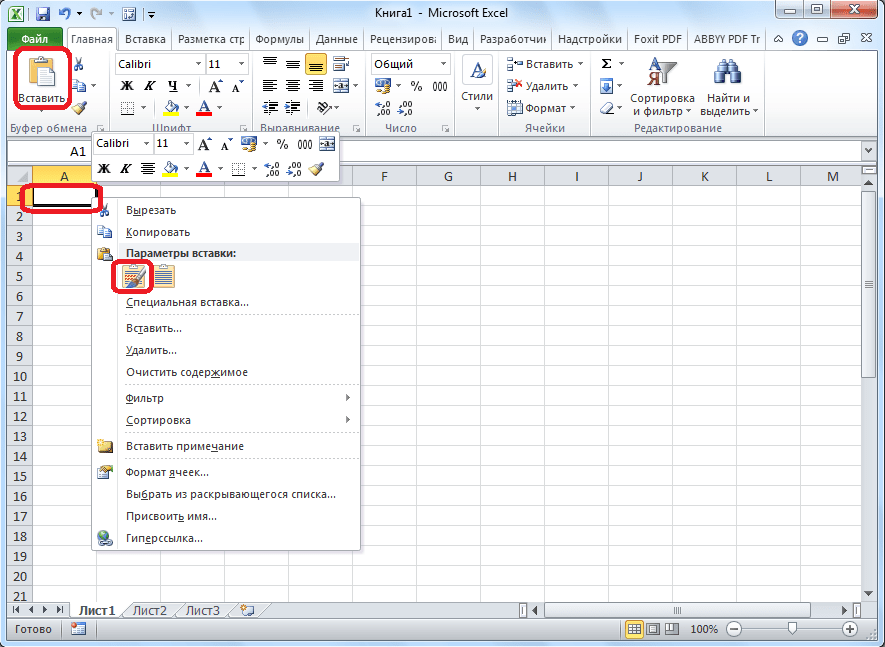
После этого, таблица будет вставлена на лист Microsoft Excel. Ячейки листа могут не совпадать с ячейками вставленной таблицы. Поэтому, чтобы таблица выглядела презентабельно, их следует растянуть.
Импорт таблицы
Также, существует более сложный способ переноса таблицы из Word в Excel, путем импорта данных.
Открываем таблицу в программе Word. Выделяем её. Далее, переходим во вкладку «Макет», и в группе инструментов «Данные» на ленте жмем на кнопку «Преобразовать в текст».
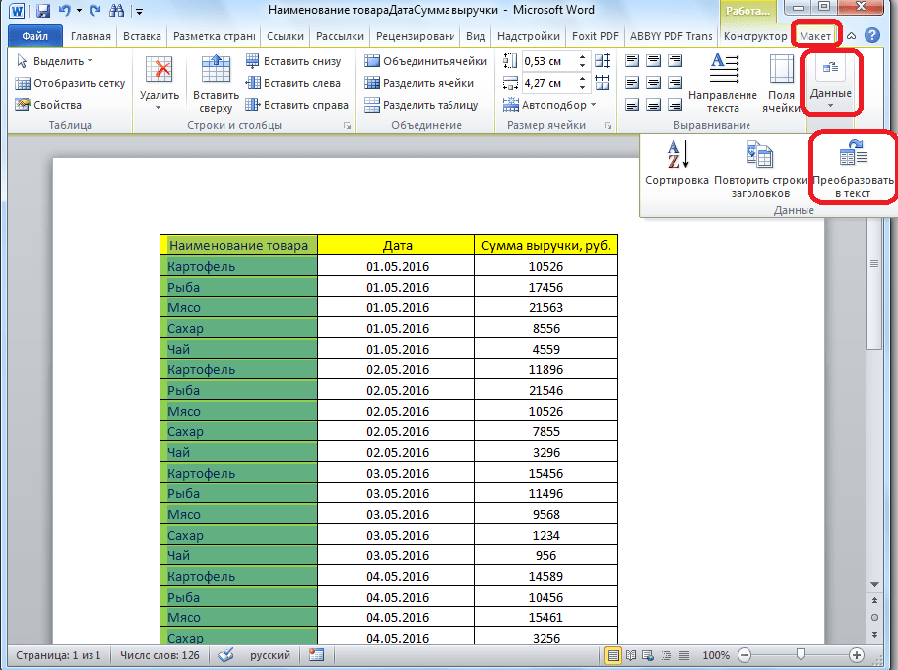
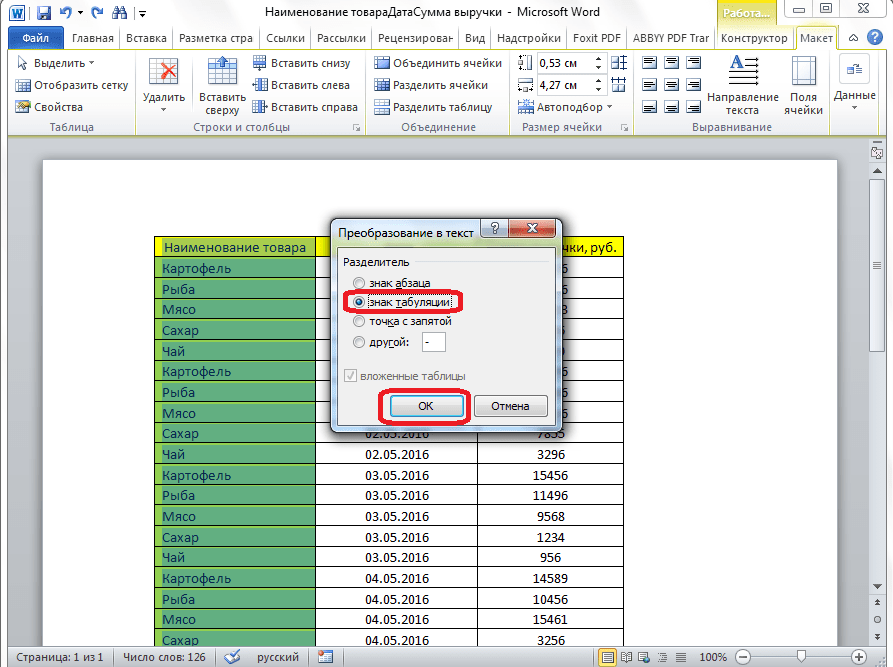
Открывается окно параметров преобразования. В параметре «Разделитель» переключатель должен быть выставлен на позицию «Знак табуляции». Если это не так, переводим переключатель в данную позицию, и жмем на кнопку «OK».
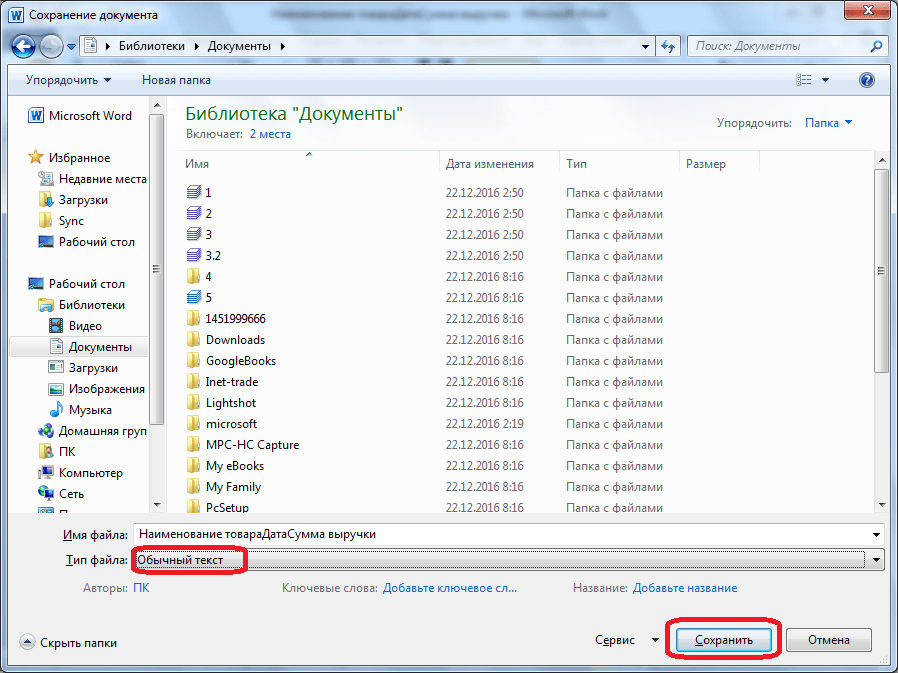
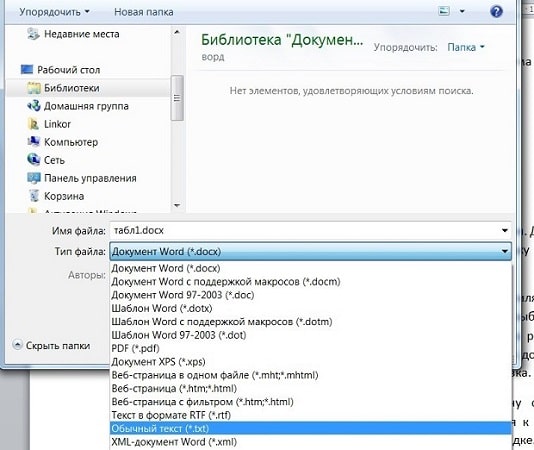
Переходим во вкладку «Файл». Выбираем пункт «Сохранить как…».

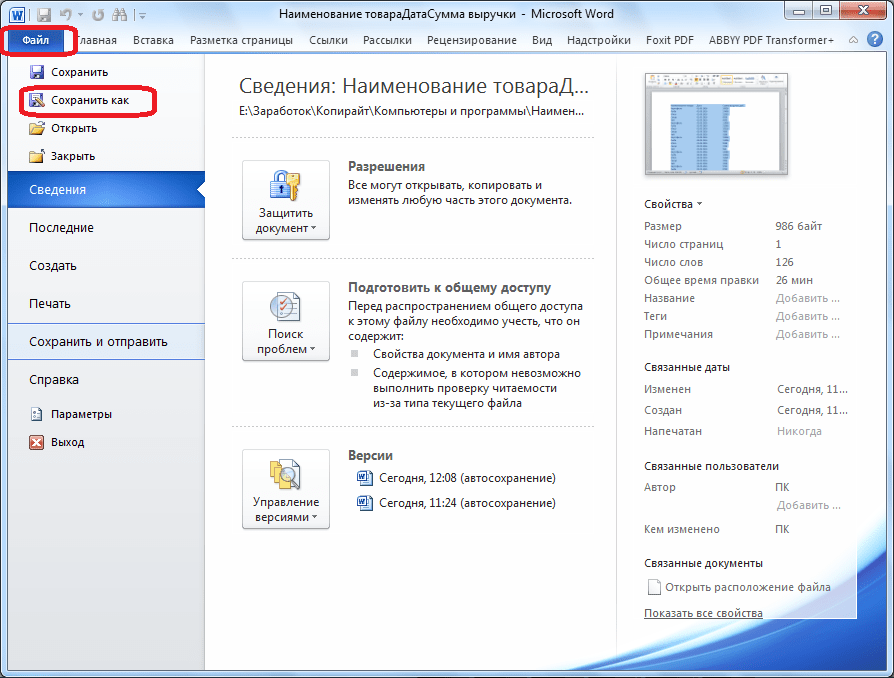
В открывшемся окне сохранения документа, указываем желаемое место расположения файла, который собираемся сохранить, а также присваиваем ему название, если название по умолчанию не удовлетворяет. Хотя, учитывая, что сохраненный файл будет являться лишь промежуточным для переноса таблицы из Word в Excel, особого смысла менять наименование нет. Главное, что нужно сделать – это в поле «Тип файла» установить параметр «Обычный текст». Жмем на кнопку «Сохранить».
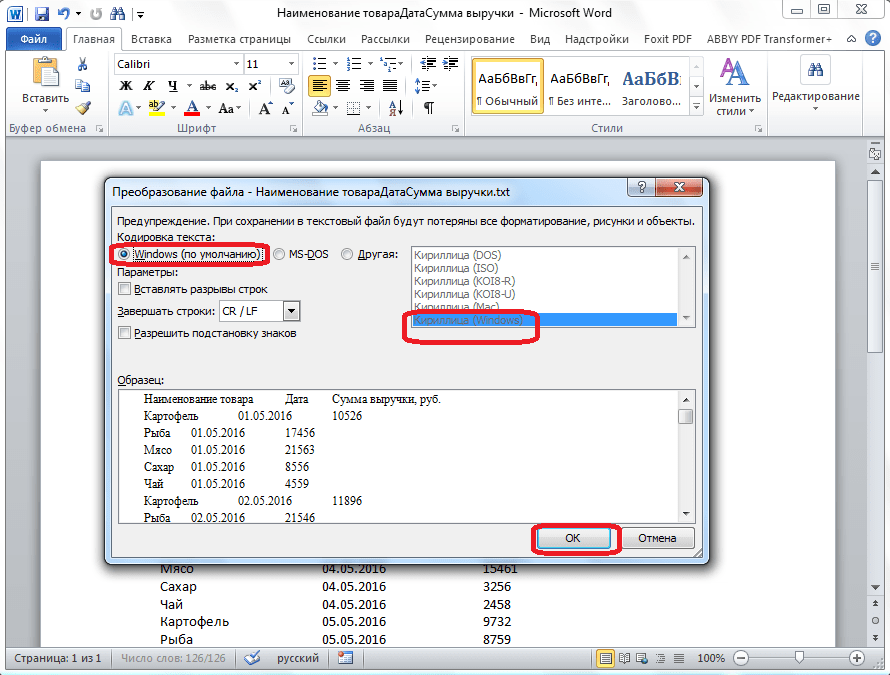
Открывается окно преобразования файла. Тут делать никаких изменений не нужно, а только следует запомнить кодировку, в которой вы сохраняете текст. Жмем на кнопку «OK».
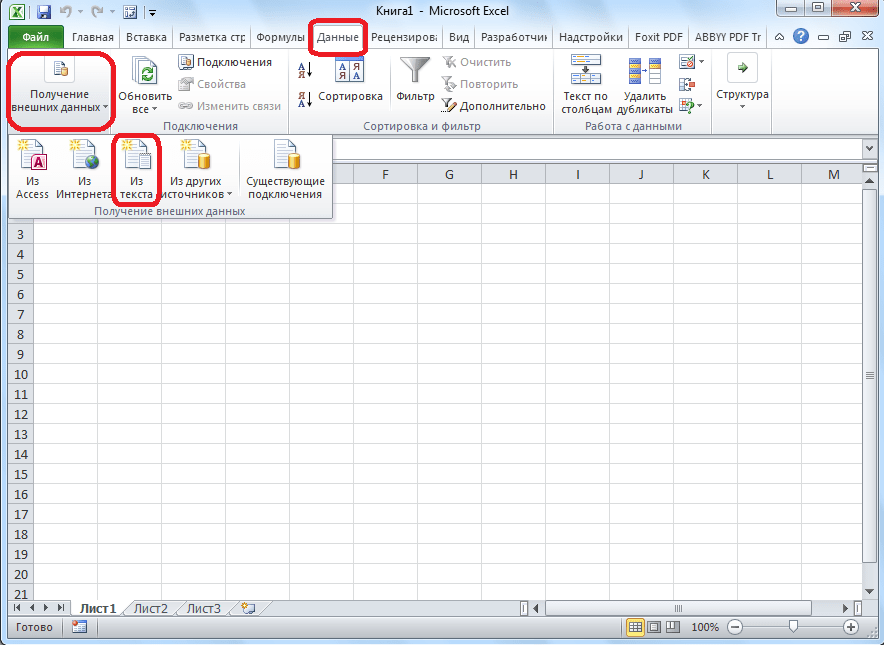
После этого, запускаем программу Microsoft Excel. Переходим во вкладку «Данные». В блоке настроек «Получить внешние данные» на ленте жмем на кнопку «Из текста».
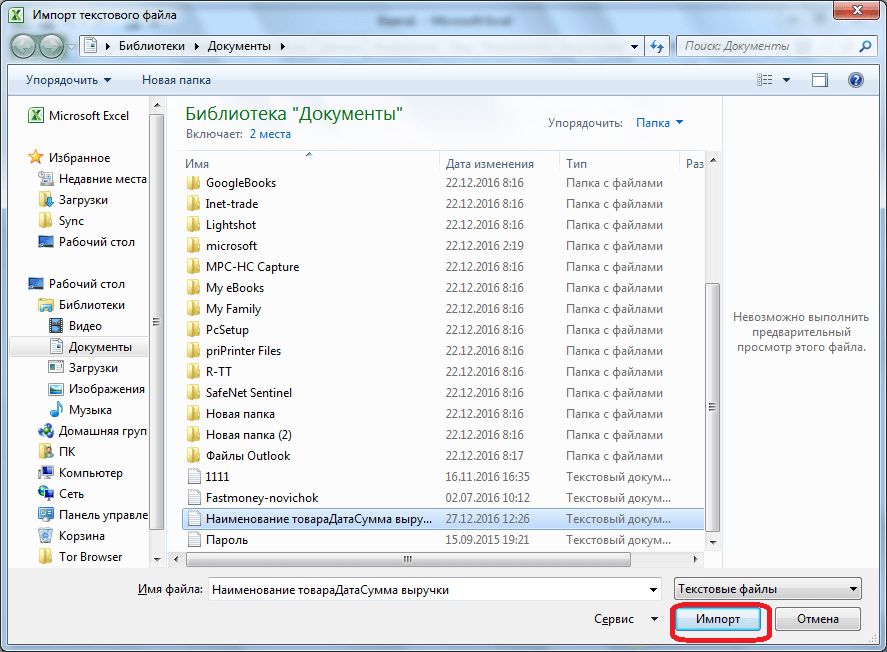
Открывается окно импорта текстового файла. Ищем тот файл, который сохранили ранее в Ворде, выделяем его, и жмем на кнопку «Импорт».
После этого, открывается окно Мастера текстов. В настройках формата данных указываем параметр «С разделителями». Устанавливаем кодировку, согласно той, в которой вы сохраняли текстовый документ в Ворде. В большинстве случаев это будет «1251: Кириллица (Windows)». Жмем на кнопку «Далее».
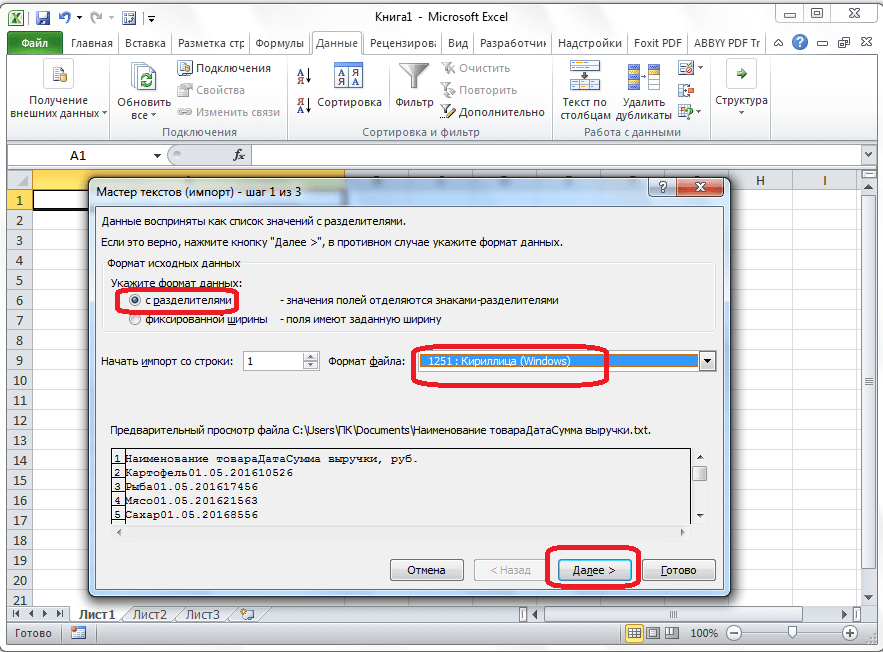
В следующем окне в настройке «Символом-разделителем является» устанавливаем переключатель в позицию «Знак табуляции», если он не установлен по умолчанию. Жмем на кнопку «Далее».

В последнем окне Мастера текста можно отформатировать данные в столбцах, с учетом их содержимого. Выделяем конкретный столбец в Образце разбора данных, а в настройках формата данных столбца выбираем один из четырёх вариантов:
- общий;
- текстовый;
- дата;
- пропустить столбец.
Подобную операцию делаем для каждого столбца в отдельности. По окончанию форматирования, жмем на кнопку «Готово».

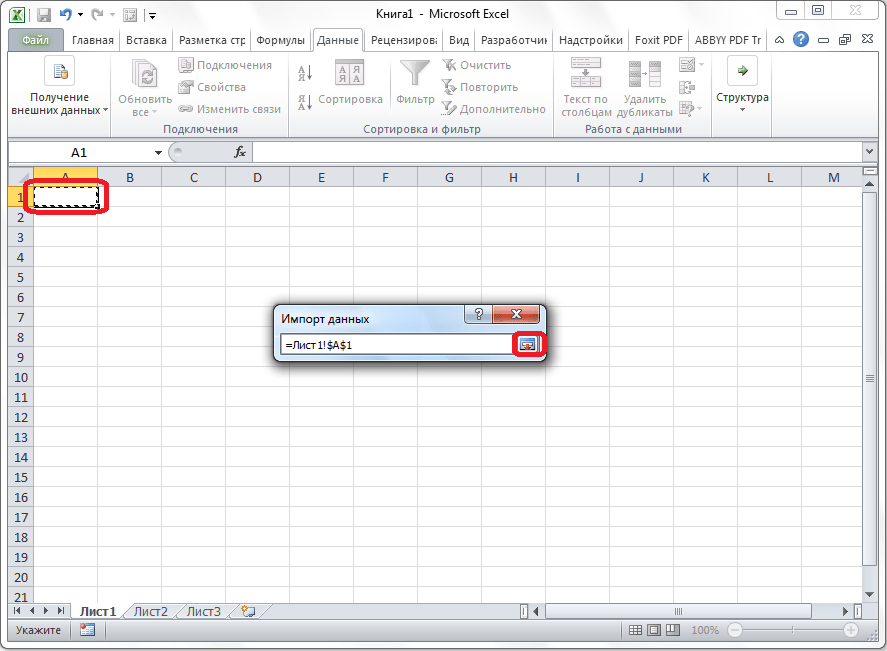
После этого, открывается окно импорта данных. В поле вручную указываем адрес ячейки, которая будет являться крайней верхней левой ячейкой вставленной таблицы. Если вы затрудняетесь это сделать вручную, то жмем на кнопку справа от поля.
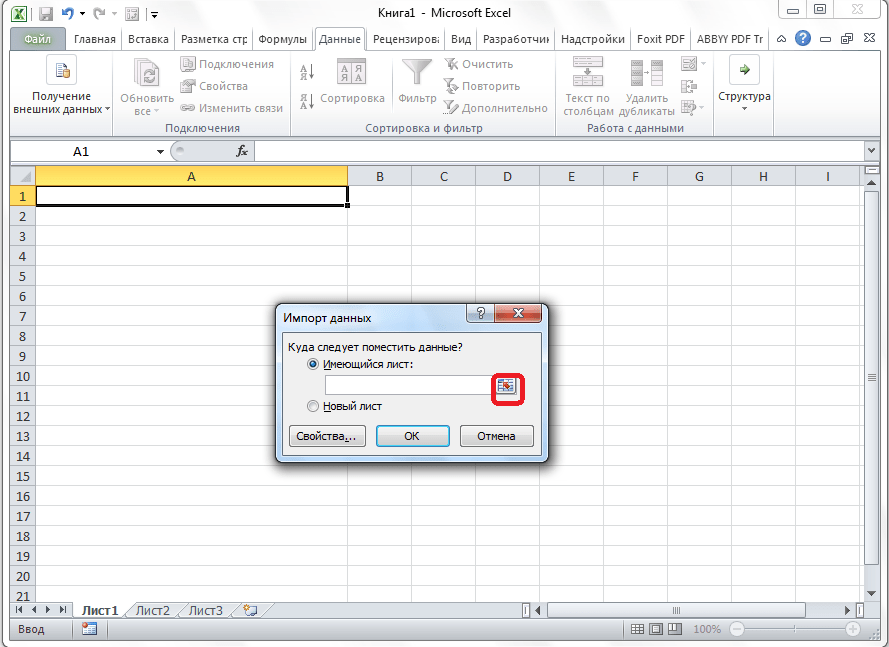
В открывшемся окне, просто выделяем нужную ячейку. Затем, кликаем по кнопке справа от введенных в поле данных.
Возвратившись в окно импорта данных, жмем на кнопку «OK».
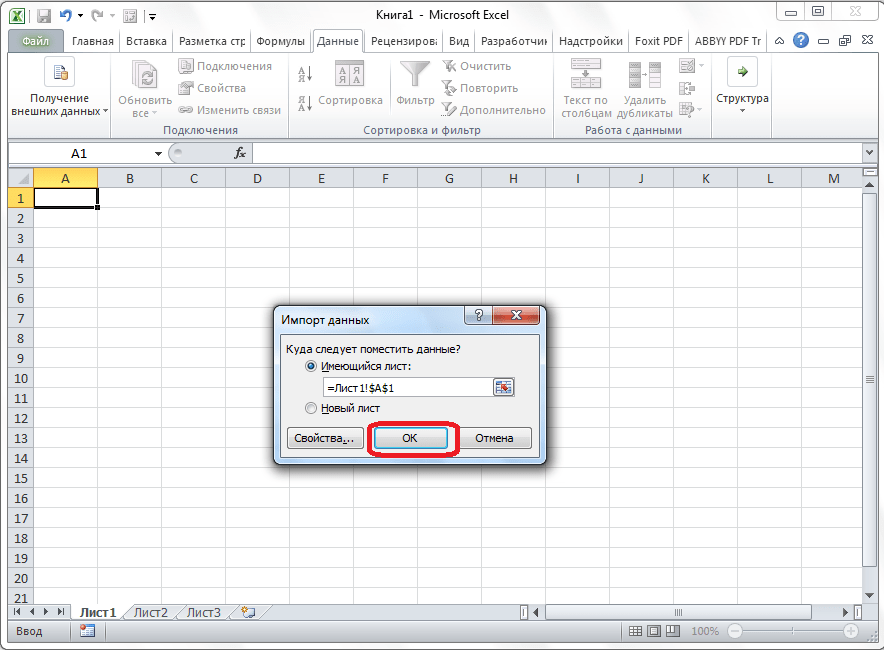
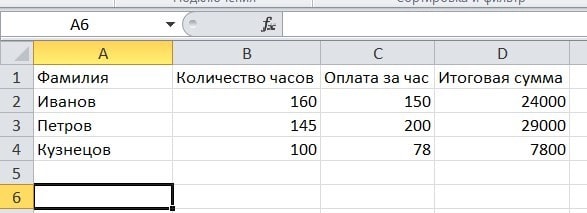
Как видим, таблица вставлена.

Далее, при желании, можно установить для неё видимые границы, а также отформатировать стандартными способами Microsoft Excel.
Выше были представлены два способа переноса таблицы из Word в Excel. Первый способ намного проще второго, и на всю процедуру уходит гораздо меньше времени. В то же время, второй способ гарантирует отсутствие лишних символов, или смещения ячеек, что вполне возможно при переносе первым способом. Так что, определяться с вариантом переноса, нужно отталкиваясь от сложности таблицы, и её предназначения.
Автор: Амиль | Дата публикации: 6.06.2019 | В разделе: Офисные программы
Ситуация, когда из ворда в эксель нужно переместить табличку с данными, встречается не так часто. Например, это может пригодиться, чтобы воспользоваться специальными формулами и быстро произвести какие-либо подсчеты. В статье рассмотрим пошаговую инструкцию, как перенести таблицу из Word в Excel.

Простое копирование
Первым и самым простым способом для переноса таблицы из ворда в эксель является ее простое копирование из исходного документа с последующей вставкой в другой. Поэтапно это делается следующим образом:
- Сначала нужно выделить всю таблицу, нажав на значок в виде двух пересекающихся двухсторонних стрелок в верхнем левом углу.
- Щелкнуть правой кнопкой в любом месте таблицы.
- Нажать «Копировать». Вместо этого можно одновременно нажать комбинацию клавиш Ctrl+C на клавиатуре.
- Создать новый файл Excel или открыть документ.
- На листе отметить А1 кликом левой кнопки мыши. Разумеется, можно выбрать любую другую ячейку, но следует принять во внимание, что именно она станет крайней левой верхней ячейкой перемещаемой таблицы.
- На верхней панели инструментов в разделе «Буфер обмена» нажать кнопку «Вставить», выбрав параметр «Сохранить исходное форматирование» (его выбор остается на усмотрение пользователя). Также можно воспользоваться комбинацией Ctrl и V.


После выполнения данной последовательности нужная таблица появится на листе эксель. Однако иногда информация, помещенная в ячейки, не отображается полностью. Тогда следует вручную растянуть столбцы и строки.
Импортирование данных из Word в Excel
Существует и другой вариант, который считается более сложным. Он позволяет не копировать и вставлять вручную, а импортировать данные из таблица с сохранением параметров. Пользователь, который хочет воспользоваться данным методом, должен четко следовать алгоритму действий, описанных ниже:
- Открыть исходную таблицу в программе Word и выделить ее, нажав на уже упомянутый в прошлом разделе значок со стрелками, появившийся в левом углу.
- Перейти в «Макет» в панели инструментов (в разделе «Работа с таблицами»).
- В самом правом разделе панели инструментов под названием «Данные» имеется функция «Преобразовать в текст».
- В появившемся окне параметров нужно выбрать знак табуляции в качестве «Разделителя». Подтвердить выбор нажатием «Ок».
- Перейти во вкладку «Файл» и нажать пункт «Сохранить как». Далее указываем место, где будет располагаться документ, даем ему наименование. Главное, что важно сделать, — это изменить тип файла. Он должен быть обычным текстом (.txt).
- Нажать «Сохранить». В открывшемся окне преобразования ничего менять не понадобится. Нужно только запомнить кодировку, например Windows (по умолчанию).


Дальнейшие действия производятся в программе Excel. Для начала ее нужно запустить. После этого:
- Перейти во вкладку «Данные», последовательно нажать «Получение внешних данных» — «Из текста».
- В открывшемся диалоговом окошке импорта нужно найти сохраненный ранее текстовый файл.
- Выбрать файл и подтвердить действие кликом по кнопке «Импорт».
- Далее перед пользователем появится окно, именуемое «Мастер текстов». В нем в настройках следует отметить формат данных «с разделителем». Также нужно установить кодировку, в который был сохранен текстовый файл. После этого нажать «Далее».
- В следующем окне в качестве символа-разделителя устанавливается знак табуляции и нажимается «Далее».
- Финальным шагом является форматирование данных, при этом во внимание принимается содержимое ячеек. Так, по порядку нажимая каждый из столбцов, пользователь присваивает ему одно из значений (общий, текст, дата или пропустить). В конце нажимается «Готово».
- На экране появится окно импорта, где указывается, на какой лист нужно поместить таблицу. Также в поле вводится адрес той ячейки, которая будет являться крайней левой верхней. Если вручную сделать это не получилось, следует кликнуть на кнопку, находящуюся рядом с полем для ввода данных. На сетке выделяем одним щелчком мыши нужную ячейку. После возврата в окно импорта данных нажимаем «Ок».


Перед пользователем появится таблица, которую в дальнейшем можно форматировать и редактировать встроенными инструментами.
Оба описанных выше варианта позволяют переместить таблицу из ворда в эксель. Несмотря на простоту первого способа, второй позволяет гарантировать отсутствие каких-либо посторонних символов или смещения ячеек. По этой причине перед переносом таблицы следует оценить ее сложность и назначение.
Другие инструкции: