
After you create a table, Microsoft Office Word 2007 offers you many ways to format that table. If you decide to use Table Styles, you can format your table all at once, and even see a preview of what your table will look like formatted in a particular style before you actually apply the style.
You can create a custom look for tables by splitting or merging cells, adding or deleting columns or rows, or adding borders. If you’re working with a long table, you can repeat the table headings on each page on which the table appears. To prevent awkward page breaks that disrupt the flow of your table, you can also specify just how and where the table should break across pages.
What do you want to do?
-
Use Table Styles to format an entire table
-
Add or remove borders
-
Display or hide gridlines
-
Add a cell, row, or column
-
Delete a cell, row, or column
-
Merge or split cells
-
Repeat a table heading on subsequent pages
-
Control where a table is divided
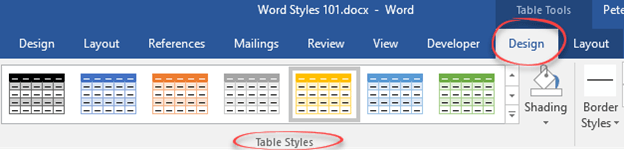
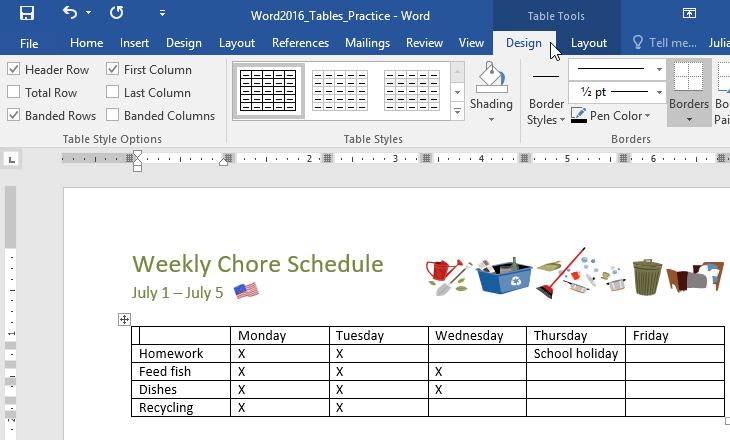
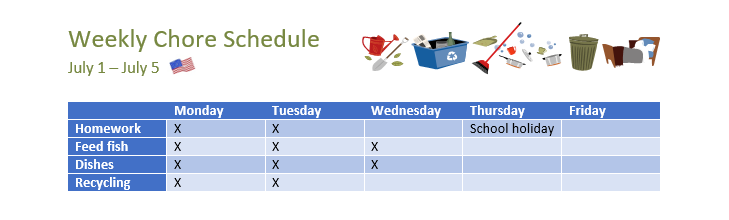
Use Table Styles to format an entire table
After you create a table, you can format the entire table by using Table Styles. By resting your pointer over each of the preformatted table styles, you can preview what the table will look like.
-
Click in the table that you want to format.
-
Under Table Tools, click the Design tab.
-
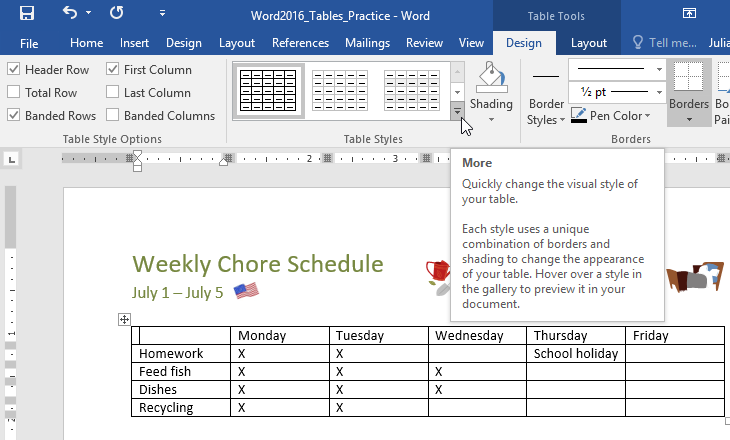
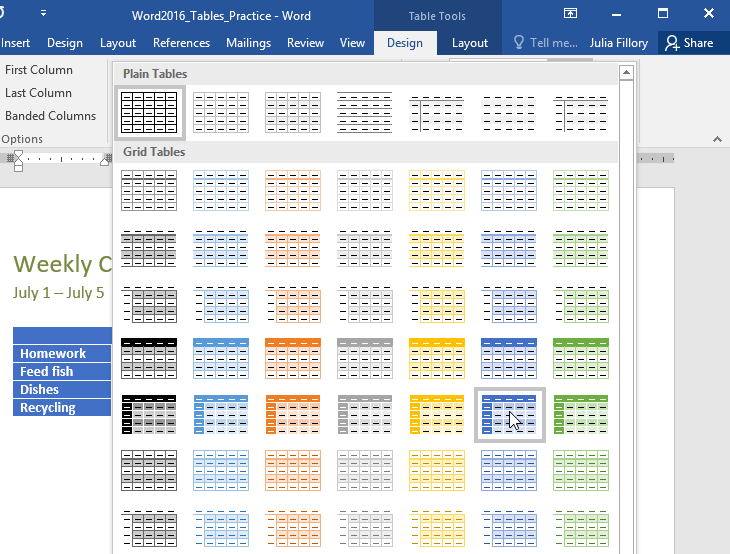
In the Table Styles group, rest the pointer over each table style until you find a style that you want to use.
Note: To see more styles, click the More arrow
 .
. -
Click the style to apply it to the table.
-
In the Table Style Options group, select or clear the check box next to each the table element to apply or remove the selected style.
 .
.Top of Page
Add or remove borders
You can add or remove borders to format a table the way that you want.
Add table borders
-
Under Table Tools, click the Layout tab.
-
In the Table group, click Select, and then click Select Table.
-
Under Table Tools, click the Design tab.
-
In the Table Styles group, click Borders, and then do one of
the following:-
Click one of the predefined border sets.
-
Click Borders and Shading, click the Borders tab, and then choose the options that you want.
-
Remove table borders from the whole table
-
Under Table Tools, click the Layout tab.
-
In the Table group, click Select, and then click Select Table.
-
Under Table Tools, click the Design tab.
-
In the Table Styles group, click Borders, and then click No Border.
Add table borders to specified cells only
-
On the Home tab, in the Paragraph group, click Show/Hide.
-
Select the cells that you want, including their end-of-cell marks.
-
Under Table Tools, click the Design tab.
-
In the Table Styles group, click Borders, and then click the border that you want to add.


Remove table borders from specified cells only
-
On the Home tab, in the Paragraph group, click Show/Hide.
-
Select the cells that you want, including their end-of-cell marks.
-
Under Table Tools, click the Design tab.
-
In the Table Styles group, click Borders, and then click No Border.
Top of Page
Display or hide gridlines
Gridlines show the cell boundaries of a table on the screen wherever the table doesn’t have borders applied. If you hide the gridlines in a table that has borders, you won’t see the change because the gridlines are behind the borders. To view the gridlines, remove the borders.
Unlike borders, gridlines appear only on the screen; they are never printed. If you turn off gridlines, the table is displayed as it will be printed.
Note: Gridlines are not visible when you view a document in a Web browser or in Print Preview.
Display or hide table gridlines in a document
-
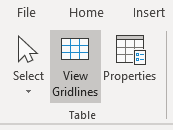
Under Table Tools, on the Layout tab, in the Table group, click View Gridlines.
Top of Page
Add a cell, row, or column
Add a cell
-
Click in a cell that is located just to the right of or above where you
want to insert a cell. -
Under Table Tools, on the Layout tab, click the Rows & Columns Dialog Box Launcher.
-
Click one of the following options:
|
Click this |
To do this |
|
Shift cells right |
Insert a cell and move all other cells in that row to the right. Note: This option may result in a row that has more cells than the other rows. |
|
Shift cells down |
Insert a cell and move remaining existing cells in that column down one row each. A new row will be added at the bottom of the table to contain the last existing cell. |
|
Insert entire row |
Insert a row just above the cell that you clicked in. |
|
Insert entire column |
Insert a column just to the right of the cell that you clicked in. |
Add a row
-
Click in a cell that is located just below or above where you want to add a row.
-
Under Table Tools, click the Layout tab.
-
Do one of the following:
-
To add a row just above the cell that you clicked in, in the Rows and Columns group, click Insert Above.
-
To add a row just below the cell that you clicked in, in the Rows and Columns group, click Insert Below.
-
Add a column
-
Click in a cell that is located just to the right or left of where you want to add a column.
-
Under Table Tools, click the Layout tab.
-
Do one of the following:
-
To add a column just to the left of the cell that you clicked in, in the Rows and Columns group, click Insert Left.
-
To add a column just to the right of the cell that you clicked in, in the Rows and Columns group, click Insert Right.
-
Top of Page
Delete a cell, row, or column
-
Do one of the following:
To select
Do this
A cell
Click the left edge of the cell.
.A row
Click to the left of the row.
A column
Click the column’s top gridline or top border.
-
Under Table Tools, click the Layout tab.
-
In the Rows & Columns group, click Delete, and then click Delete Cells, Delete Rows, or Delete Columns, as appropriate.


Top of Page
Merge or split cells
Merge cells
You can combine two or more cells in the same row or column into a single cell. For example, you can merge several cells horizontally to create a table heading that spans several columns.
-
Select the cells that you want to merge by clicking the left edge of a cell and then dragging across the other cells that you want.
-
Under Table Tools, on the Layout tab, in the Merge group, click Merge Cells.
Split cells
-
Click in a cell, or select multiple cells that you want to split.
-
Under Table Tools, on the Layout tab, in the Merge group, click Split Cells.
-
Enter the number of columns or rows that you want to split the selected cells into.
Top of Page
Repeat a table heading on subsequent pages
When you work with a very long table, it will be divided wherever a page break occurs. You can make adjustments to the table so that the table headings are repeated on each page.
Repeated table headings are visible only in Print Layout view and when you print the document.
-
Select the heading row or rows. The selection must include the first row of the table.
-
Under Table Tools, on the Layout tab, in the Data group, click Repeat Header Rows.
Note: Word automatically repeats the table headings on each new page that results from an automatic page break. Word does not repeat a heading if you insert a manual page break within a table.
Top of Page
Control where a table is divided
When you work with a very long table, it must be divided wherever a page break occurs. By default, if a page break occurs within a large row, Microsoft Word allows a page break to divide the row between the two pages.
You can make adjustments to the table to make sure that the information appears as you want it to when the table spans multiple pages.
Prevent a
table row from breaking across pages
-
Click in the table.
-
Under Table Tools, click the Layout tab.
-
In the Table group, click Properties, and then click the Row tab.
-
Clear the Allow row to break across pages check box.
Force a table to break across pages at a particular row
-
Click in the row that you want to appear on the next page.
-
Press CTRL+ENTER.
Top of Page
Create, Modify and Apply Table Styles in Word Documents
by Avantix Learning Team | Updated August 21, 2022
Applies to: Microsoft® Word® 2013, 2016, 2019, 2021 or 365 (Windows)
You can apply table styles to your Word tables to format them quickly and consistently. Word is shipped with several built-in table styles or you can create your own. You can edit table styles by modifying borders, shading, character formatting, paragraph formatting and table properties. If your document includes multiple tables, table styles can save a lot of time.
Note: Buttons and Ribbon tabs may display in a different way (with or without text) depending on your version of Word, the size of your screen and your Control Panel settings. For newer versionns of Word, Ribbon tabs may appear with different names. For example, the Table Tools Design tab may appear as Table Design.
Recommended article: How to Keep a Microsoft Word Table Together on One Page
Do you want to learn more about Microsoft Word? Check out our virtual classroom or live classroom Word courses >
Table styles and themes
Every Word document uses a document theme which includes a font theme and color theme. The colors used in table styles are based on the color theme.
You can select document themes, color themes and font themes using the Themes, Colors or Fonts drop-down menus on the Design tab in the Ribbon:

You can also create your own custom color themes so your tables can be formatted using your organization’s colors.
Display gridlines
When you are working with tables, it’s a good idea to turn gridlines on. Borders, which are a format, will print. Gridlines do not print.
To display gridlines:
- Click in a table.
- Click the Table Tools Layout or Table Layout tab.
- Click View Gridlines. Gridlines will stay on for all Word documents.
View Gridlines appears on the Table Tools Layout or Table Layout tab when you click in a table:
Apply a table style
If your Word document contains multiple tables that you want to format in a consistent way, it’s best to use table styles rather than applying manual or direct formatting to each table.
To apply a table style to a table:
- Click in the table.
- Click the Table Tools Design or Table Design tab in the Ribbon.
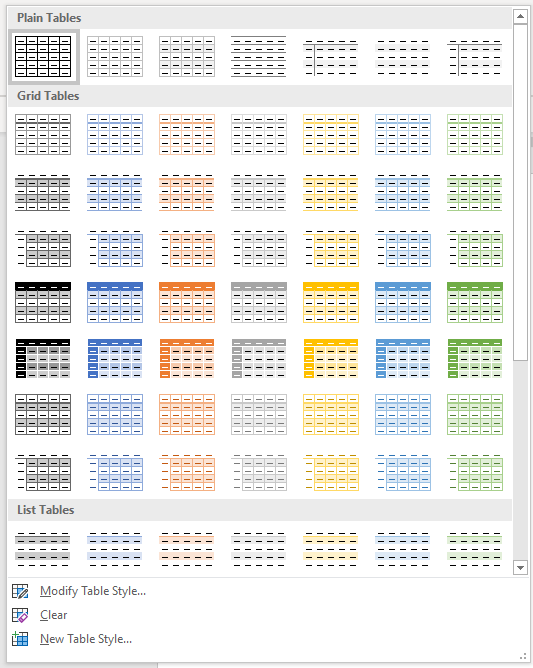
- Click the More down arrow on the bottom right in the Table Styles gallery. A drop-down menu appears.
- Hover over the various table styles. The table formatting will change as you move over different table styles in the gallery.
- Click the table style you want to apply.
Below is the Table Styles gallery (the current theme is the Office theme):
Note: Table styles do not include row height, column width or custom cell formatting for individual cells. If a user applies manual or direct formatting to a table (such as fills and borders) on the Table Tools Design or Table Design tab, this formatting will override the table style.
Apply Table Style Options
Once you have selected a table style, you can select or check different Table Style Options (which are affected by the formats in the selected table style).
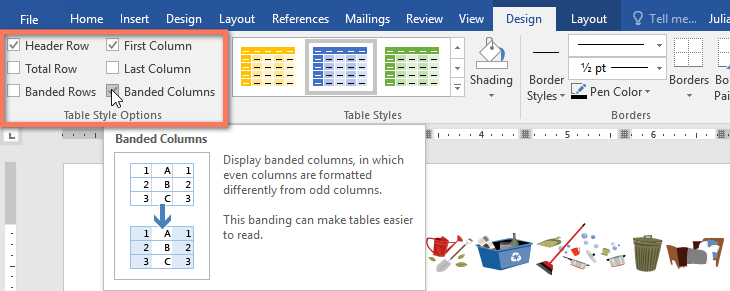
The six Table Style Options that you can apply are: Header Row, Total Row, Banded Rows, First Column, Last Column and Banded Columns. If you have selected a plain table style, you may not notice any changes in the table formatting if you select different Table Style Options.
Table Style Options appear on the Table Tools Design or Table Design tab as follows when you click in a table:
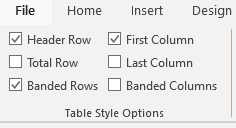
To select Table Style Options:
- Click in the table.
- Click the Table Tools Design or Table Design tab in the Ribbon.
- In Table Style Options, check or uncheck Header Row. If this option is checked, the header row will be formatted differently from the body rows.
- In Table Style Options, check or uncheck Total Row. If this option is checked, the last row will be formatted differently from the body rows.
- In Table Style Options, check or uncheck Banded Rows or Banded Columns for alternate row or column shading.
- In Table Style Options, check First Column or Last Column if you want the first or last column formatted differently from the other columns.
In the following table, Header Row and Banded Rows are checked in Table Style Options:

Modify a table style
You can modify a table style in a Word document and all tables using that table style will change.
To modify a table style:
- Click in the table.
- Click the Table Tools Design or Table Design tab in the Ribbon.
- Click the More down arrow on the bottom right in the Table Styles gallery. A drop-down menu appears.
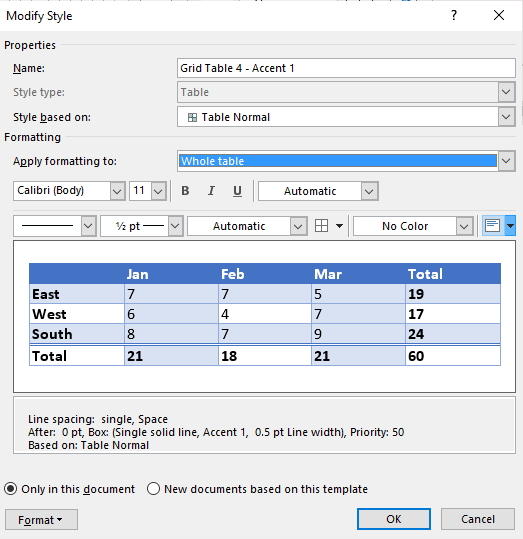
- Click Modify Table Style. A dialog box appears. You can also right-click a table style and select Modify.
- From the Apply Formatting to drop-down menu, select the element that you want to modify (such as Header row).
- Select the desired formatting such as font, font size, font color, fill and border.
- From the Apply Formatting to drop-down menu, select the next element that you want to modify.
- Select the desired formatting such as font, font size, font color, fill and border.
- Repeat for other elements.
- Select Only in this document or New documents based on this template. If you select Only in this document, the modified style will only be available for the current document. If you select New documents based on this template, then the table style will be modified for future documents based on the current template (usually the Normal template).
- Click OK.
Below is the Modify Style dialog box:
You can also click Format at the bottom of the dialog box and choose other options such as Font or Paragraph.
If you modify a table style and the tables using that style do not change, it’s likely that direct or manual formatting has been applied to the table which then overrides the table style. You may need to clear formatting in the table by selecting the table and clicking Clear Formatting on the Home tab in the Font group.
You can also modify Table Properties in a table style. Table properties include table alignment, row settings and cell margins.
To modify Table Properties in a table style:
- Click in the table.
- Click the Table Tools Design or Table Design tab in the Ribbon.
- Click the More down arrow on the bottom right in the Table Styles gallery. A drop-down menu appears.
- Click Modify Table Style. A dialog box appears. You can also right-click a table style and select Modify.
- Click Format on the bottom left of the dialog box. A drop-down menu appears.
- Click Table Properties. A dialog box appears.
- Click the Table tab and select an Alignment.
- Click the Row tab and select the desired options. For example, turn off Allow row to break across pages.
- Select any other formatting options you want to apply to the entire table.
- Click OK.
- Select Only in this document or New documents based on this template.
- Click OK.
Below is the Table Properties dialog box with the Table tab selected:

Create a new table style
You can also create a new or custom table style.
To create a custom table style:
- Click in the table.
- Click the Table Tools Design or Table Design tab in the Ribbon.
- Click the More down arrow on the bottom right in the Table Styles gallery. A drop-down menu appears.
- Click a table style to apply it as a base style.
- Click the More down arrow on the bottom right in the Table Styles gallery. A drop-down menu appears.
- Click New Table Style. A dialog box appears.
- Enter a name for the new table style in the Name box.
- Select the desired formatting.
- Select Only in this document or New documents based on this template.
- Click OK.
New Table Style appears at the bottom of the Table Styles gallery:
The new table style will appear in the Table Styles gallery under Custom (at the top of the gallery). If you want to delete it, right-click it in the gallery and select Delete Table Style.
Clear a table style
To clear a table style and remove formatting:
- Click in the table.
- Click the Table Tools Design or Table Design tab in the Ribbon.
- Click the More down arrow on the bottom right in the Table Styles gallery. A drop-down menu appears.
- Click Clear.
Clear appears at the bottom of the Table Styles gallery:
Set a default table style
You can also set a default table style for new tables in the current document or all new documents.
To set a default table style:
- Click in the table.
- Click the Table Tools Design or Table Design tab in the Ribbon.
- Click the More down arrow on the bottom right in the Table Styles gallery. A drop-down menu appears.
- Right-click the table style you want to use as the default style and select Set as Default from the drop-down menu. A dialog box appears.
- Select This document only or All documents based on the Normal.dotm template (the default template in Word is the Normal template).
- Click OK.
If you are working with documents with multiple tables, formatting with table styles can ensure that your tables are formatted consistently and save a lot of time.
Subscribe to get more articles like this one
Did you find this article helpful? If you would like to receive new articles, JOIN our email list.
More resources
4 Ways to Create a Table in Word
14 Shortcuts to Quickly Select Text in Microsoft Word
How to Create Headings in Word (Using Heading Styles)
How to Quickly Remove Hard Returns in Word Documents
10 Microsoft Word Tips, Tricks and Shortcuts for Selecting in Tables
Related courses
Microsoft Word: Intermediate / Advanced
Microsoft Excel: Intermediate / Advanced
Microsoft PowerPoint: Intermediate / Advanced
Microsoft Word: Long Documents Master Class
Microsoft Word: Styles, Templates and Tables of Contents
Microsoft Word: Designing Dynamic Word Documents Using Fields
VIEW MORE COURSES >
Our instructor-led courses are delivered in virtual classroom format or at our downtown Toronto location at 18 King Street East, Suite 1400, Toronto, Ontario, Canada (some in-person classroom courses may also be delivered at an alternate downtown Toronto location). Contact us at info@avantixlearning.ca if you’d like to arrange custom instructor-led virtual classroom or onsite training on a date that’s convenient for you.
Copyright 2023 Avantix® Learning
Microsoft, the Microsoft logo, Microsoft Office and related Microsoft applications and logos are registered trademarks of Microsoft Corporation in Canada, US and other countries. All other trademarks are the property of the registered owners.
Avantix Learning |18 King Street East, Suite 1400, Toronto, Ontario, Canada M5C 1C4 | Contact us at info@avantixlearning.ca
Вы не вошли. Пожалуйста, войдите или зарегистрируйтесь.
Страницы 1
Чтобы отправить ответ, вы должны войти или зарегистрироваться
Сообщений [ 6 ]
1 19.06.2014 13:15:06
- yshindin
- генерал-полковник
- Неактивен
- Откуда: Москва
- Зарегистрирован: 12.05.2012
- Сообщений: 447
- Поблагодарили: 171
Тема: Имена встроенных стилей в русской версии Word
К сожалению, у меня английская версия.
Нет ли у кого-нибудь таблицы с русскими и соответствующими английскими названиями встроенных стилей?
2 Ответ от Вождь 19.06.2014 16:12:04

- Вождь
- Модератор
- Неактивен

- Зарегистрирован: 07.01.2010
- Сообщений: 745
- Поблагодарили: 181
Re: Имена встроенных стилей в русской версии Word
Качайте: внешняя ссылка
Макросы под заказ и готовый пакет — mtdmacro.ru
3 Ответ от yshindin 19.06.2014 17:54:57
- yshindin
- генерал-полковник
- Неактивен
- Откуда: Москва
- Зарегистрирован: 12.05.2012
- Сообщений: 447
- Поблагодарили: 171
Re: Имена встроенных стилей в русской версии Word
Для получения списка стилей добавьте в модуль проекта пустого документа текст макроса и выполните его:
Sub ListBuiltinStyles()
Const StylesLimit As Long = 300
Dim ist As Long
Dim st As Style
For ist = 1 To StylesLimit
Set st = Nothing
On Error Resume Next
Set st = ActiveDocument.Styles(-ist)
On Error GoTo 0
If Not (st Is Nothing) Then
Selection.TypeText CStr(ist) & vbTab & st.Type & vbTab & st.NameLocal & vbCrLf
End If
Next ist
End Sub
Мне нужен русский вариант списка.
Вот пример распечатки списка встроенных стилей для английского варианта Word. Приведены: номер стиля (без знака минус), тип стиля (1-абзацный, 2-символьный, 3-табличный) и локализованное наименование стиля:
1 1 Normal
2 1 Heading 1
3 1 Heading 2
4 1 Heading 3
5 1 Heading 4
6 1 Heading 5
7 1 Heading 6
8 1 Heading 7
9 1 Heading 8
10 1 Heading 9
11 1 Index 1
12 1 Index 2
13 1 Index 3
14 1 Index 4
15 1 Index 5
16 1 Index 6
17 1 Index 7
18 1 Index 8
19 1 Index 9
20 1 TOC 1
21 1 TOC 2
22 1 TOC 3
23 1 TOC 4
24 1 TOC 5
25 1 TOC 6
26 1 TOC 7
27 1 TOC 8
28 1 TOC 9
29 1 Normal Indent
30 1 Footnote Text
31 1 Comment Text
32 1 Header
33 1 Footer
34 1 Index Heading
35 1 Caption
36 1 Table of Figures
37 1 Envelope Address
38 1 Envelope Return
39 2 Footnote Reference
40 2 Comment Reference
41 2 Line Number
42 2 Page Number
43 2 Endnote Reference
44 1 Endnote Text
45 1 Table of Authorities
46 1 Macro Text
47 1 TOA Heading
48 1 List
49 1 List Bullet
50 1 List Number
51 1 List 2
52 1 List 3
53 1 List 4
54 1 List 5
55 1 List Bullet 2
56 1 List Bullet 3
57 1 List Bullet 4
58 1 List Bullet 5
59 1 List Number 2
60 1 List Number 3
61 1 List Number 4
62 1 List Number 5
63 1 Title
64 1 Closing
65 1 Signature
66 2 Default Paragraph Font
67 1 Body Text
68 1 Body Text Indent
69 1 List Continue
70 1 List Continue 2
71 1 List Continue 3
72 1 List Continue 4
73 1 List Continue 5
74 1 Message Header
75 1 Subtitle
76 1 Salutation
77 1 Date
78 1 Body Text First Indent
79 1 Body Text First Indent 2
80 1 Note Heading
81 1 Body Text 2
82 1 Body Text 3
83 1 Body Text Indent 2
84 1 Body Text Indent 3
85 1 Block Text
86 2 Hyperlink
87 2 FollowedHyperlink
88 2 Strong
89 2 Emphasis
90 1 Document Map
91 1 Plain Text
92 1 E-mail Signature
93 1 z-Top of Form
94 1 z-Bottom of Form
95 1 Normal (Web)
96 2 HTML Acronym
97 1 HTML Address
98 2 HTML Cite
99 2 HTML Code
100 2 HTML Definition
101 2 HTML Keyboard
102 1 HTML Preformatted
103 2 HTML Sample
104 2 HTML Typewriter
105 2 HTML Variable
106 3 Table Normal
107 1 Comment Subject
108 4 No List
109 4 1 / a / i
110 4 1 / 1.1 / 1.1.1
111 4 Article / Section
112 3 Table Simple 1
113 3 Table Simple 2
114 3 Table Simple 3
115 3 Table Classic 1
116 3 Table Classic 2
117 3 Table Classic 3
118 3 Table Classic 4
119 3 Table Colorful 1
120 3 Table Colorful 2
121 3 Table Colorful 3
122 3 Table Columns 1
123 3 Table Columns 2
124 3 Table Columns 3
125 3 Table Columns 4
126 3 Table Columns 5
127 3 Table Grid 1
128 3 Table Grid 2
129 3 Table Grid 3
130 3 Table Grid 4
131 3 Table Grid 5
132 3 Table Grid 6
133 3 Table Grid 7
134 3 Table Grid 8
135 3 Table List 1
136 3 Table List 2
137 3 Table List 3
138 3 Table List 4
139 3 Table List 5
140 3 Table List 6
141 3 Table List 7
142 3 Table List 8
143 3 Table 3D effects 1
144 3 Table 3D effects 2
145 3 Table 3D effects 3
146 3 Table Contemporary
147 3 Table Elegant
148 3 Table Professional
149 3 Table Subtle 1
150 3 Table Subtle 2
151 3 Table Web 1
152 3 Table Web 2
153 3 Table Web 3
154 1 Balloon Text
155 3 Table Grid
156 3 Table Theme
157 2 Placeholder Text
158 1 No Spacing
159 3 Light Shading
160 3 Light List
161 3 Light Grid
162 3 Medium Shading 1
163 3 Medium Shading 2
164 3 Medium List 1
165 3 Medium List 2
166 3 Medium Grid 1
167 3 Medium Grid 2
168 3 Medium Grid 3
169 3 Dark List
170 3 Colorful Shading
171 3 Colorful List
172 3 Colorful Grid
173 3 Light Shading — Accent 1
174 3 Light List — Accent 1
175 3 Light Grid — Accent 1
176 3 Medium Shading 1 — Accent 1
177 3 Medium Shading 2 — Accent 1
178 3 Medium List 1 — Accent 1
179 1 Revision
180 1 List Paragraph
181 1 Quote
182 1 Intense Quote
183 3 Medium List 2 — Accent 1
184 3 Medium Grid 1 — Accent 1
185 3 Medium Grid 2 — Accent 1
186 3 Medium Grid 3 — Accent 1
187 3 Dark List — Accent 1
188 3 Colorful Shading — Accent 1
189 3 Colorful List — Accent 1
190 3 Colorful Grid — Accent 1
191 3 Light Shading — Accent 2
192 3 Light List — Accent 2
193 3 Light Grid — Accent 2
194 3 Medium Shading 1 — Accent 2
195 3 Medium Shading 2 — Accent 2
196 3 Medium List 1 — Accent 2
197 3 Medium List 2 — Accent 2
198 3 Medium Grid 1 — Accent 2
199 3 Medium Grid 2 — Accent 2
200 3 Medium Grid 3 — Accent 2
201 3 Dark List — Accent 2
202 3 Colorful Shading — Accent 2
203 3 Colorful List — Accent 2
204 3 Colorful Grid — Accent 2
205 3 Light Shading — Accent 3
206 3 Light List — Accent 3
207 3 Light Grid — Accent 3
208 3 Medium Shading 1 — Accent 3
209 3 Medium Shading 2 — Accent 3
210 3 Medium List 1 — Accent 3
211 3 Medium List 2 — Accent 3
212 3 Medium Grid 1 — Accent 3
213 3 Medium Grid 2 — Accent 3
214 3 Medium Grid 3 — Accent 3
215 3 Dark List — Accent 3
216 3 Colorful Shading — Accent 3
217 3 Colorful List — Accent 3
218 3 Colorful Grid — Accent 3
219 3 Light Shading — Accent 4
220 3 Light List — Accent 4
221 3 Light Grid — Accent 4
222 3 Medium Shading 1 — Accent 4
223 3 Medium Shading 2 — Accent 4
224 3 Medium List 1 — Accent 4
225 3 Medium List 2 — Accent 4
226 3 Medium Grid 1 — Accent 4
227 3 Medium Grid 2 — Accent 4
228 3 Medium Grid 3 — Accent 4
229 3 Dark List — Accent 4
230 3 Colorful Shading — Accent 4
231 3 Colorful List — Accent 4
232 3 Colorful Grid — Accent 4
233 3 Light Shading — Accent 5
234 3 Light List — Accent 5
235 3 Light Grid — Accent 5
236 3 Medium Shading 1 — Accent 5
237 3 Medium Shading 2 — Accent 5
238 3 Medium List 1 — Accent 5
239 3 Medium List 2 — Accent 5
240 3 Medium Grid 1 — Accent 5
241 3 Medium Grid 2 — Accent 5
242 3 Medium Grid 3 — Accent 5
243 3 Dark List — Accent 5
244 3 Colorful Shading — Accent 5
245 3 Colorful List — Accent 5
246 3 Colorful Grid — Accent 5
247 3 Light Shading — Accent 6
248 3 Light List — Accent 6
249 3 Light Grid — Accent 6
250 3 Medium Shading 1 — Accent 6
251 3 Medium Shading 2 — Accent 6
252 3 Medium List 1 — Accent 6
253 3 Medium List 2 — Accent 6
254 3 Medium Grid 1 — Accent 6
255 3 Medium Grid 2 — Accent 6
256 3 Medium Grid 3 — Accent 6
257 3 Dark List — Accent 6
258 3 Colorful Shading — Accent 6
259 3 Colorful List — Accent 6
260 3 Colorful Grid — Accent 6
261 2 Subtle Emphasis
262 2 Intense Emphasis
263 2 Subtle Reference
264 2 Intense Reference
265 2 Book Title
266 1 Bibliography
267 1 TOC Heading
4 Ответ от yshindin 19.06.2014 17:58:41
- yshindin
- генерал-полковник
- Неактивен
- Откуда: Москва
- Зарегистрирован: 12.05.2012
- Сообщений: 447
- Поблагодарили: 171
Re: Имена встроенных стилей в русской версии Word
Более точный текст макроса:
Sub ListBuiltinStyles()
Const StylesLimit As Long = 300
Dim ist As Long
Dim st As Style
For ist = 1 To StylesLimit
Set st = Nothing
On Error Resume Next
Set st = ActiveDocument.Styles(-ist)
On Error GoTo 0
If Not (st Is Nothing) Then
If st.BuiltIn Then
Selection.TypeText CStr(ist) & vbTab & st.Type & vbTab & st.NameLocal & vbCrLf
End If
End If
Next ist
End Sub
5 Ответ от Вождь 19.06.2014 18:07:58
- Вождь
- Модератор
- Неактивен
- Зарегистрирован: 07.01.2010
- Сообщений: 745
- Поблагодарили: 181
Re: Имена встроенных стилей в русской версии Word
Хм, я же выложил полный список ![]()
На заметку:
— в разных версиях Word, тип одного стиля может отличаться
— в Word 2013 встроенных стилей больше 300
Макросы под заказ и готовый пакет — mtdmacro.ru
6 Ответ от yshindin 19.06.2014 18:12:17
- yshindin
- генерал-полковник
- Неактивен
- Откуда: Москва
- Зарегистрирован: 12.05.2012
- Сообщений: 447
- Поблагодарили: 171
Re: Имена встроенных стилей в русской версии Word
Вождь, спасибо, не заметил вашей ссылки.
Сообщений [ 6 ]
Страницы 1
Чтобы отправить ответ, вы должны войти или зарегистрироваться
Похожие темы
- Отказаться от встроенных стилей
- Многоуровневая нумерация для встроенных стилей заголовков
- Перечень встроенных команд и макросов Microsoft Word
- Версии Word (Microsoft Office) и их кодовые обозначения
- Выбор версии редактора Word при открытии документа.
- Ввести обязательное указание используемой версии Word
- количество форм и их имена в активном документе
- W2010: импорт/экспорт стилей копирует не все атрибуты стилей?..
Имена встроенных стилей в русской версии Word
Если у вас возникли сложности при каких-то операциях с текстом в любой из версии Ворда, то самый лучший способ получить консультацию – обратиться на форум сайта Ворд Эксперт. На портале о Microsoft Office Word вы узнаете про: связь ворда экселем.
Здесь вы найдете ответы на самые популярные вопросы по этому текстовому редактору, касающиеся использования колонтитулов, удаления лишних пробелов или автоматической записи макросов. На портале о Microsoft Office Word вы узнаете про: как убрать в ворде перенос строки.
Более развернуто настройки всех версий программы и оформление, редактирование, форматирование документов обсуждаются в подфоруме «Настройки и Форматирование», а создание шаблонов и макросов для различных операция в подфоруме «Автоматизация». Наш сайт о Microsoft Office Word даст ответ про: как в word поставить цифры с разрядами.
Также вы можете найти готовые решения или сделать заказ в соответствующих разделах.
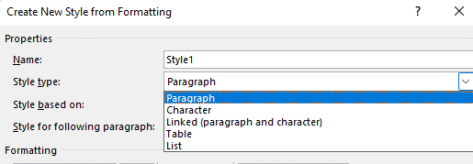
There are five different types of style (collection of formatting settings) in Microsoft Word. There’s three styles for text plus Tables and List styles.
Paragraph styles
Originally, Word only had paragraph styles. Styles could only be applied to an entire paragraph. Any changes to an individual word or phrase had to be done individually.
Get into the basics of Styles in Word
Character Styles
More recently, we got Character Styles. A character style can apply to any group of letters or words within a paragraph.
For example, a Style called ‘Names’ can ensure that all names in a document are consistently formatted say, in bold or italic, upper case etc.
Character styles were a welcome addition but created a new problem. Users had to make two styles with the same formatting settings, a Paragraph style and a matching Character style.
Linked Styles
Linked (paragraph and character) style is a (relatively) new and special type of style. It can act as either a paragraph style or a character style depending on how you use it.
Here’s the Heading 1 style used as both a paragraph style in heading and as a character style within the paragraph.

Before Linked Styles, users needed to maintain two styles – a paragraph version (eg ‘Heading 3’) and a character style (eg ‘Heading 3 char’).
As we’ve noted before, ‘Linked’ isn’t the best choice of terms for this type of style. Most styles are already ‘linked’ to others through style inheritance. ‘Merged’ or ‘Combined’ might have been clearer to most people – but we’re stuck with ‘Linked’.
All three text styles, Paragraph, Character and Linked are shown on the Modify Style | Style Type.
Icons for Paragraph, Character and Linked styles
A quick way to see what type of style is on the Styles list, look at the icon at right.
- ¶ (pilcrow) for Paragraph style
- a for character style
- ¶a for linked style

There are now other Styles – List and Table let you group settings for these Word elements under a single name.
Table Style
All the Table design settings can be grouped into a Table Style. The in-built Table Styles are on the Table | Design tab in the Table Styles gallery.
Pull-down the large Table Styles gallery, at the bottom there are style options. Or right-click on a style in the gallery to see more choices.
See 8 ways to improve on Word’s Table Styles
List Style
It’s similar for multi-level lists. There’s a gallery of in-built or custom List styles.

A list style can define the look of each level of a list as well as overall settings.
Check out
What is a Style in Word, Excel or Outlook?
Word: get a list of styles in a document
Word Styles from the beginning
Word: where are all the Style controls?
Word Style inheritance made clear and simple
Styles in Excel
OneNote 2010 Heading styles
Style Separators in Word
ВикиЧтение
Word 2007.Популярный самоучитель
Краинский И
Стили таблиц
Стили таблиц
Если оформление таблиц для вас является делом нелегким или же вы просто не располагаете достаточным количеством времени, чтобы форматировать таблицу, вы наверняка оцените наличие специальных стилей таблиц. С их помощью можно создать красиво оформленную таблицу за считанные секунды. Вы сможете быстро подобрать стиль оформления таблицы, создать свой вариант оформления или немного изменить имеющийся.
Стили таблицы находятся на вкладке Работа с таблицами ? Конструктор в группе Стили таблиц. По умолчанию на экране видно несколько стилей (их количество зависит от разрешения монитора) (рис. 5.22). Для вывода полного списка стилей щелкните на кнопке открытия диалогового окна Дополнительные параметры, на которой изображена стрелка, направленная вниз. Появится полный список стилей.
Рис. 5.22. Группа Стили таблицы
При наведении указателя мыши на образец стиля таблица в документе сразу принимает выбранное оформление (рис. 5.23). Для подтверждения выбора стиля нужно щелкнуть на его образце.
Word предлагает около ста вариантов автоматического форматирования для разных видов таблиц. Если же вы не нашли подходящий вариант, то можете создать свой. Для создания своего стиля таблицы на основе выбранного командой Изменить стиль таблицы меню выбора стилей (см. рис. 5.23).
Рис. 5.23. Выбор стиля таблицы
В появившемся окне Изменение стиля (рис. 5.24) можно выбрать тип, цвет линии, заливку, гарнитуру, кегль шрифта текста и др.
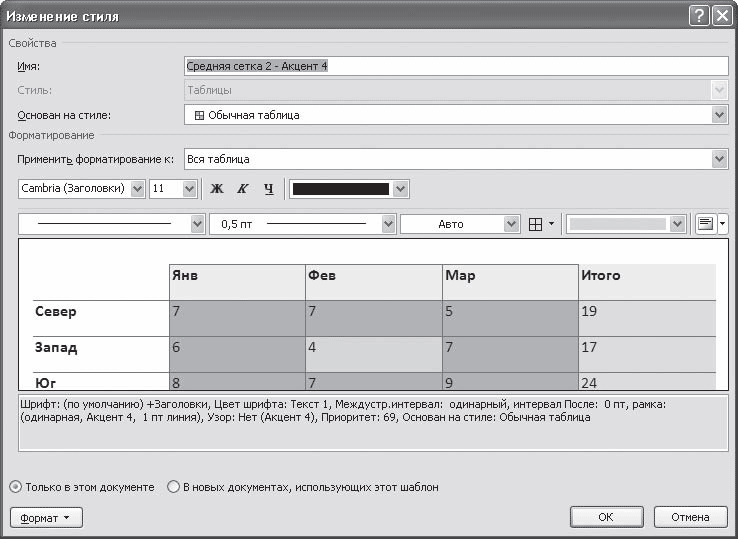
Рис. 5.24. Окно Изменение стиля
Для создания нового стиля таблицы воспользуйтесь командой Создать стиль таблицы меню выбора стилей (см. рис. 5.23). Появится окно Создание стиля, аналогичное окну Изменение стиля (см. рис. 5.24). В этом окне также можно указать тип, цвет линии, заливку, гарнитуру, кегль шрифта текста и т. д.
Данный текст является ознакомительным фрагментом.
Читайте также
Локальные стили
Локальные стили
То, что у каждого элемента-разделителя есть свое собственное содержание, делает эти элементы прекрасно подходящими для решений на Ajax. И снова HTML5 показывает свое происхождение из спецификации для веб-приложений.Однако если вы попытаетесь перенести
Стили
Стили
Внимание, умное определение! Стиль – это набор рассмотренных нами выше параметров форматирования, которые применяются единовременно к выделенному тексту.А говоря человеческим языком, берем текст, выбираем для него шрифт, форматируем абзац, короче, делаем красиво
Стили виджетов
Стили виджетов
Показанные нами ранее экраны были взяты из системы Linux, но приложения Qt будут выглядеть привычно для любой поддерживаемой платформы. Qt имитирует изобразительные средства используемой платформы, а не делает попытки все представить средствами, принятыми в
Стили слоев
Стили слоев
Стили слоев – это особые эффекты, которые применяются не ко всему изображению и не к выделенному фрагменту, а именно к выделенному (активному) слою. Программа Photoshop содержит множество стилей слоев: тень, свечение, тиснение, обводка, глянец и т. д. С помощью
Текстовые стили
Текстовые стили
С каждой текстовой надписью в AutoCAD связан некоторый текстовый стиль. При нанесении надписей используется текущий стиль, в котором заданы шрифт, высота, угол поворота, ориентация и другие параметры. В одном рисунке можно создавать и использовать несколько
Визуальные стили
Визуальные стили
Стиль отображения – это набор параметров, который управляет отображением кромок и теней на видовом экране. Управление визуальными стилями осуществляется из падающего меню View ? Visual Styles или инструментами плавающей панели Visual Styles.Устанавливать
Стили
Стили
Программа поддерживает пять стилей, которые вы можете применить к выделенному тексту. Стиль – это предустановленный набор атрибутов текста: размер, цвет, тип, атрибуты шрифта и т. д. Если в вашем документе есть, например, заголовки разных уровней, удобнее их
Визуальные стили
Визуальные стили
Стиль отображения – это набор параметров, который управляет отображением кромок и теней на видовом экране. Управление визуальными стилями осуществляется из падающего меню View ? Visual Styles или инструментами плавающей панели Visual Styles (рис. 23.1).
Рис. 23.1.
Стили
Стили
Для краткости мы будем говорить только о стилях текста, но сказанное справедливо и для упомянутых графических примитивов.Стили текста задаются с помощью альбома, расположенного в правой части окна редактора титров (рис. 9.20).
Рис. 9.20. Предопределенные стили
Стили печати
Стили печати
Стиль печати представляет собой свойство объекта, определяющее, как он будет распечатан на бумаге. Стиль печати объединяет набор параметров объекта, таких как цвет, тип и толщина линии и т. п. В отличие от других свойств, стиль печати может и не использоваться,
Текстовые стили
Текстовые стили
С каждой текстовой надписью в AutoCAD связан некоторый текстовый стиль. При нанесении надписей используется текущий стиль, в котором заданы шрифт, высота, угол поворота, ориентация и другие параметры. В одном рисунке можно создавать и использовать несколько
Стили пера
Стили пера
Стили пера задаются перечислимым типом DashStyle. Кроме того, для стилей пера определены следующие константы:
psSolid = DashStyle.Solid;
Сплошное перо
psClear = DashStyle.Clear;
Прозрачное перо
psDash = DashStyle.Dash;
Штриховое перо
psDot = DashStyle.Dot;
Пунктирное
Стили кисти
Стили кисти
Стили кисти задаются перечислимым типом BrushStyleType:
type BrushStyleType = (bsSolid, bsClear, bsHatch, bsGradient);
Константы имеют следующий смысл:
bsSolid
Сплошная кисть (по умолчанию)
bsClear
Прозрачная кисть
bsHatch
Штриховая кисть
bsGradient
Градиентная кисть
Для всех
Стили шрифта
Стили шрифта
Стиль шрифта задается перечислимым типом FontStyleType, который содержит следующие константы:
fsNormal – обычный;
fsBold – жирный;
fsItalic – наклонный;
fsBoldItalic – жирный наклонный;
fsUnderline – подчеркнутый;
fsBoldUnderline – жирный подчеркнутый;
fsItalicUnderline – наклонный
11.5. Стили
11.5. Стили
Стиль – это сочетание нескольких слоевых эффектов, которое можно сохранять и использовать в дальнейшем.Создайте любое изображение с несколькими слоями. Затем откройте палитру Styles (Стили) и щелкните на любом из примеров. К изображению будет применена стилевая
Видео: применение стиля таблицы
Совет. Видео не на вашем языке? Попробуйте выбрать Скрытые субтитры .
Проверьте, как это работает!
Придайте таблицам профессиональный вид с помощью стилей таблиц. Вы можете выбрать одну из цветовых схем, применить чередующиеся цвета строк, добавить строку заголовка или отформатировать строку итогов.
Применение стиля к существующей таблице
Выделите ячейки таблицы.
Перейдите на вкладку Конструктор.
В коллекции Стили таблиц выберите стиль, который хотите применить.
Примечание: Чтобы удалить стиль таблицы, перейдите на вкладку Конструктор. В коллекции Стили таблиц нажмите кнопку Дополнительные параметры и выберите пункт Очистить или Очистить таблицу.
Изменение параметров стиля таблицы
Чтобы изменить оформление таблицы, выполните одно или несколько из указанных ниже действий.
Чтобы применить специальное форматирование к первой строке таблицы, на вкладке Конструктор установите флажок Строка заголовка.
Чтобы применить специальное форматирование к последней строке таблицы, на вкладке Конструктор установите флажок Строка итогов.
Чтобы чередовать цвета строк или столбцов и упростить чтение таблиц, выберите Конструктор > Чередуются строки или Конструктор > Чередуются столбцы.
Повторение заголовка таблицы на последующих страницах в Word или Outlook
Выделите одну или несколько строк заголовка, которые должны повторяться на каждой странице.
На вкладке Макет нажмите кнопку Повторить строки заголовков.
Word 2010-Стиль таблицы
Как только вы выбрали стиль таблицы, вы можете включить различные варианты на или вне , чтобы изменить внешний вид таблицы. Есть шесть вариантов: строка заголовка, строка итогов, Пластинчатые Строки, Первая колонка, последний столбец, и чешуйчатые колонны.
>>Вернуться в оглавление уроков

Скачать Сотни Шаблонов
для Word:
Резюме и бланки,
Письма и договора.
Любая готовая
тематика и графика!
Чтобы применить стиль таблицы:
- Щелкните в любом месте таблицы. Дизайн появится вкладка на ленте.
- Выбор дизайна и найдите вкладку Стили таблиц.
- Нажмите Более стрелку раскрывающегося списка, чтобы увидеть все таблицы стилей.
- Наведите курсор мыши на различных стилях, чтобы увидеть предварительный просмотр.
- Выберите нужный стиль. Стиль таблицы будет отображаться в документе.
Чтобы изменить параметры таблицы стилей:
- Щелкните в любом месте таблицы. Дизайн появится вкладка.
- На дизайн вкладке проверить или снимите нужные параметры в таблице Параметры стиля группы.
В зависимости от стиля таблицы вы используете, некоторые параметры таблицы стилей могут иметь несколько иной эффект. Возможно, вам придется экспериментировать.
Чтобы добавить границы в таблицу:
- Выделите ячейки, которую вы хотите добавить границу.
- От дизайна вкладки, выберите требуемый Стиль линии , толщину линии и цвет пера .
- Нажмите границ стрелку.
- Из выпадающего меню выберите нужный тип границы.
- Граница будет добавлена в выделенных ячейках.
Стили таблиц
Если оформление таблиц для вас является делом нелегким или же вы просто не располагаете достаточным количеством времени, чтобы форматировать таблицу, вы наверняка оцените наличие специальных стилей таблиц. С их помощью можно создать красиво оформленную таблицу за считанные секунды. Вы сможете быстро подобрать стиль оформления таблицы, создать свой вариант оформления или немного изменить имеющийся.
Стили таблицы находятся на вкладке Работа с таблицами ? Конструктор в группе Стили таблиц. По умолчанию на экране видно несколько стилей (их количество зависит от разрешения монитора) (рис. 5.22). Для вывода полного списка стилей щелкните на кнопке открытия диалогового окна Дополнительные параметры, на которой изображена стрелка, направленная вниз. Появится полный список стилей.
Рис. 5.22. Группа Стили таблицы
При наведении указателя мыши на образец стиля таблица в документе сразу принимает выбранное оформление (рис. 5.23). Для подтверждения выбора стиля нужно щелкнуть на его образце.
Word предлагает около ста вариантов автоматического форматирования для разных видов таблиц. Если же вы не нашли подходящий вариант, то можете создать свой. Для создания своего стиля таблицы на основе выбранного командой Изменить стиль таблицы меню выбора стилей (см. рис. 5.23).

Рис. 5.23. Выбор стиля таблицы
В появившемся окне Изменение стиля (рис. 5.24) можно выбрать тип, цвет линии, заливку, гарнитуру, кегль шрифта текста и др.

Рис. 5.24. Окно Изменение стиля
Для создания нового стиля таблицы воспользуйтесь командой Создать стиль таблицы меню выбора стилей (см. рис. 5.23). Появится окно Создание стиля, аналогичное окну Изменение стиля (см. рис. 5.24). В этом окне также можно указать тип, цвет линии, заливку, гарнитуру, кегль шрифта текста и т. д.
Данный текст является ознакомительным фрагментом.
Продолжение на ЛитРес
Читайте также
Локальные стили
Локальные стили То, что у каждого элемента-разделителя есть свое собственное содержание, делает эти элементы прекрасно подходящими для решений на Ajax. И снова HTML5 показывает свое происхождение из спецификации для веб-приложений.Однако если вы попытаетесь перенести
Стили
Стили Внимание, умное определение! Стиль – это набор рассмотренных нами выше параметров форматирования, которые применяются единовременно к выделенному тексту.А говоря человеческим языком, берем текст, выбираем для него шрифт, форматируем абзац, короче, делаем красиво
Стили виджетов
Стили виджетов Показанные нами ранее экраны были взяты из системы Linux, но приложения Qt будут выглядеть привычно для любой поддерживаемой платформы. Qt имитирует изобразительные средства используемой платформы, а не делает попытки все представить средствами, принятыми в
Стили слоев
Стили слоев Стили слоев – это особые эффекты, которые применяются не ко всему изображению и не к выделенному фрагменту, а именно к выделенному (активному) слою. Программа Photoshop содержит множество стилей слоев: тень, свечение, тиснение, обводка, глянец и т. д. С помощью
Текстовые стили
Текстовые стили С каждой текстовой надписью в AutoCAD связан некоторый текстовый стиль. При нанесении надписей используется текущий стиль, в котором заданы шрифт, высота, угол поворота, ориентация и другие параметры. В одном рисунке можно создавать и использовать несколько
Визуальные стили
Визуальные стили Стиль отображения – это набор параметров, который управляет отображением кромок и теней на видовом экране. Управление визуальными стилями осуществляется из падающего меню View ? Visual Styles или инструментами плавающей панели Visual Styles.Устанавливать
Стили
Стили Программа поддерживает пять стилей, которые вы можете применить к выделенному тексту. Стиль – это предустановленный набор атрибутов текста: размер, цвет, тип, атрибуты шрифта и т. д. Если в вашем документе есть, например, заголовки разных уровней, удобнее их
Визуальные стили
Визуальные стили Стиль отображения – это набор параметров, который управляет отображением кромок и теней на видовом экране. Управление визуальными стилями осуществляется из падающего меню View ? Visual Styles или инструментами плавающей панели Visual Styles (рис. 23.1). Рис. 23.1.
Стили
Стили Для краткости мы будем говорить только о стилях текста, но сказанное справедливо и для упомянутых графических примитивов.Стили текста задаются с помощью альбома, расположенного в правой части окна редактора титров (рис. 9.20). Рис. 9.20. Предопределенные стили
Стили печати
Стили печати Стиль печати представляет собой свойство объекта, определяющее, как он будет распечатан на бумаге. Стиль печати объединяет набор параметров объекта, таких как цвет, тип и толщина линии и т. п. В отличие от других свойств, стиль печати может и не использоваться,
Текстовые стили
Текстовые стили С каждой текстовой надписью в AutoCAD связан некоторый текстовый стиль. При нанесении надписей используется текущий стиль, в котором заданы шрифт, высота, угол поворота, ориентация и другие параметры. В одном рисунке можно создавать и использовать несколько
Стили пера
Стили пера Стили пера задаются перечислимым типом DashStyle. Кроме того, для стилей пера определены следующие константы: psSolid = DashStyle.Solid; Сплошное перо psClear = DashStyle.Clear; Прозрачное перо psDash = DashStyle.Dash; Штриховое перо psDot = DashStyle.Dot; Пунктирное
Стили кисти
Стили кисти Стили кисти задаются перечислимым типом BrushStyleType: type BrushStyleType = (bsSolid, bsClear, bsHatch, bsGradient); Константы имеют следующий смысл: bsSolid Сплошная кисть (по умолчанию) bsClear Прозрачная кисть bsHatch Штриховая кисть bsGradient Градиентная кисть Для всех
Стили шрифта
Стили шрифта Стиль шрифта задается перечислимым типом FontStyleType, который содержит следующие константы: fsNormal – обычный; fsBold – жирный; fsItalic – наклонный; fsBoldItalic – жирный наклонный; fsUnderline – подчеркнутый; fsBoldUnderline – жирный подчеркнутый; fsItalicUnderline – наклонный
11.5. Стили
11.5. Стили Стиль – это сочетание нескольких слоевых эффектов, которое можно сохранять и использовать в дальнейшем.Создайте любое изображение с несколькими слоями. Затем откройте палитру Styles (Стили) и щелкните на любом из примеров. К изображению будет применена стилевая
Lesson 23: Tables
/en/word/aligning-ordering-and-grouping-objects/content/
Introduction
A table is a grid of cells arranged in rows and columns. Tables can be used to organize any type of content, whether you’re working with text or numerical data. In Word, you can quickly insert a blank table or convert existing text to a table. You can also customize your table using different styles and layouts.
Optional: Download our practice document.
Watch the video below to learn more about creating tables.
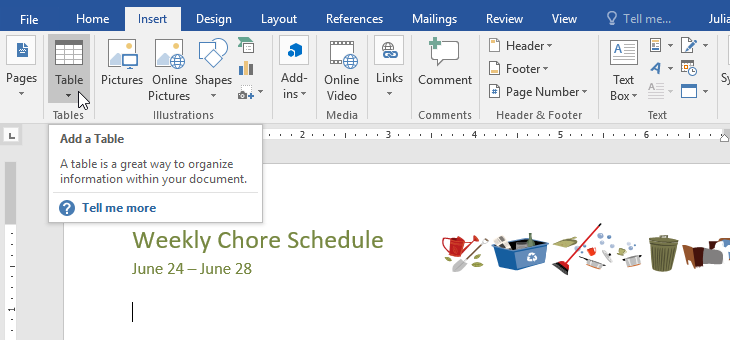
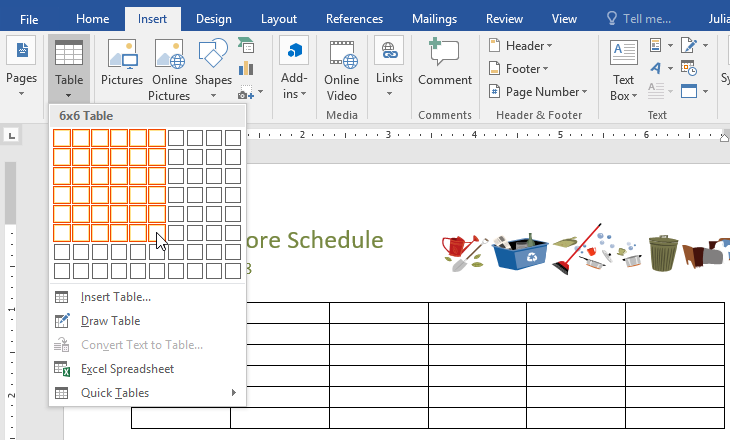
To insert a blank table:
- Place the insertion point where you want the table to appear.
- Navigate to the Insert tab, then click the Table command.
- This will open a drop-down menu that contains a grid. Hover over the grid to select the number of columns and rows you want.
- Click the grid to confirm your selection, and a table will appear.
- To enter text, place the insertion point in any cell, then begin typing.
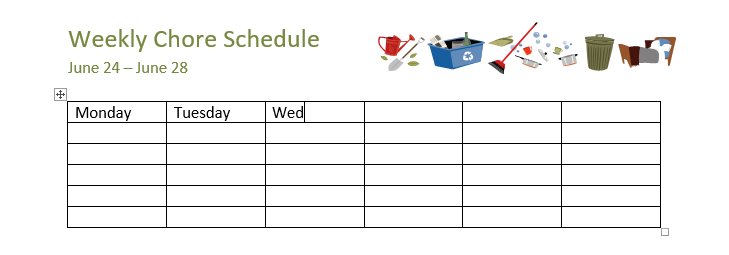
To navigate between cells, use the Tab key or arrow keys on your keyboard. If the insertion point is in the last cell, pressing the Tab key will automatically create a new row.
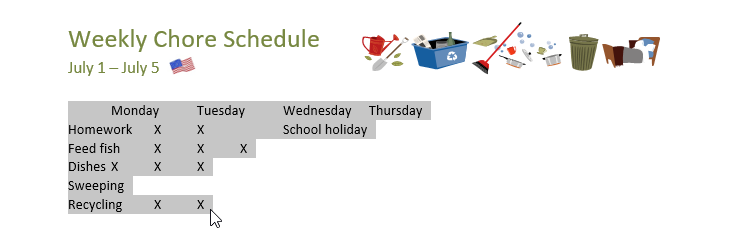
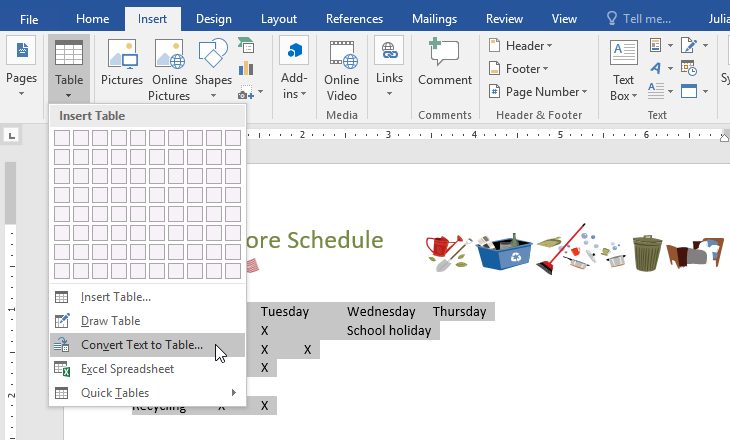
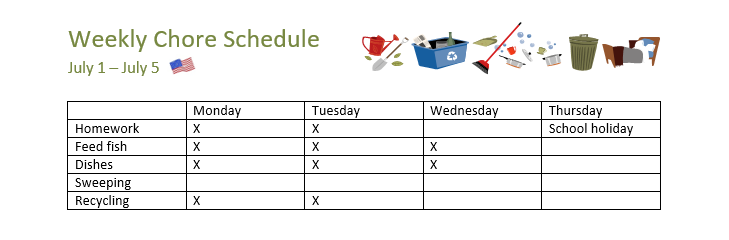
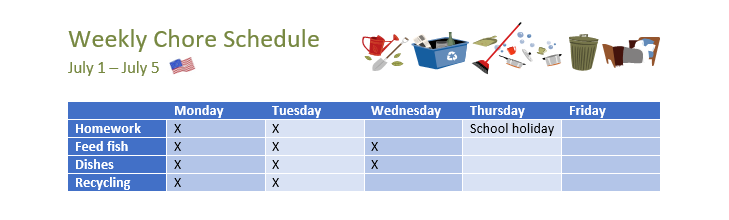
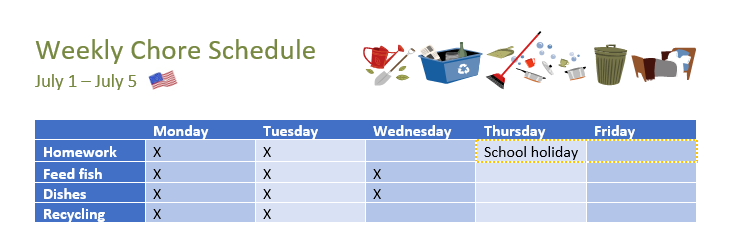
To convert existing text to a table:
In the example below, each line of text contains part of a checklist, including chores and days of the week. The items are separated by tabs. Word can convert this information into a table, using the tabs to separate the data into columns.
- Select the text you want to convert to a table. If you’re using our practice file, you can find this text on page 2 of the document.
- Go to the Insert tab, then click the Table command.
- Select Convert Text to Table from the drop-down menu.
- A dialog box will appear. Choose one of the options under Separate text at. This is how Word knows what to put into each column.
- Click OK. The text will appear in a table.

Modifying tables
You can easily change the appearance of your table once you’ve added one to your document. There are several options for customization, including adding rows or columns and changing the table style.
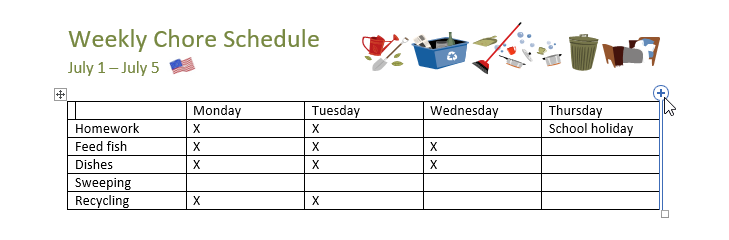
To add a row or column:
- Hover outside the table where you want to add a row or column. Click the plus sign that appears.
- A new row or column will be added to the table.
You can also right-click the table, then hover over Insert to see various row and column options.
To delete a row or column:
- Place the insertion point in the row or column you want to delete.
- Right-click, then select Delete Cells from the menu.
- A dialog box will appear. Choose Delete entire row or Delete entire column, then click OK.
- The row or column will be deleted.
To apply a table style:
Table styles let you change the look and feel of your table instantly. They control several design elements, including color, borders, and fonts.
- Click anywhere in your table to select it, then click the Design tab on the far right of the Ribbon.
- Locate the Table Styles group, then click the More drop-down arrow to see the full list of styles.
- Select the table style you want.
- The table style will appear.
To modify table style options:
Once you’ve chosen a table style, you can turn various options on or off to change its appearance. There are six options: Header Row, Total Row, Banded Rows, First Column, Last Column, and Banded Columns.
- Click anywhere in your table, then navigate to the Design tab.
- Locate the Table Style Options group, then check or uncheck the desired options.
- The table style will be modified.
Depending on the Table Style you’ve chosen, certain Table Style Options may have a different effect. You might need to experiment to get the look you want.
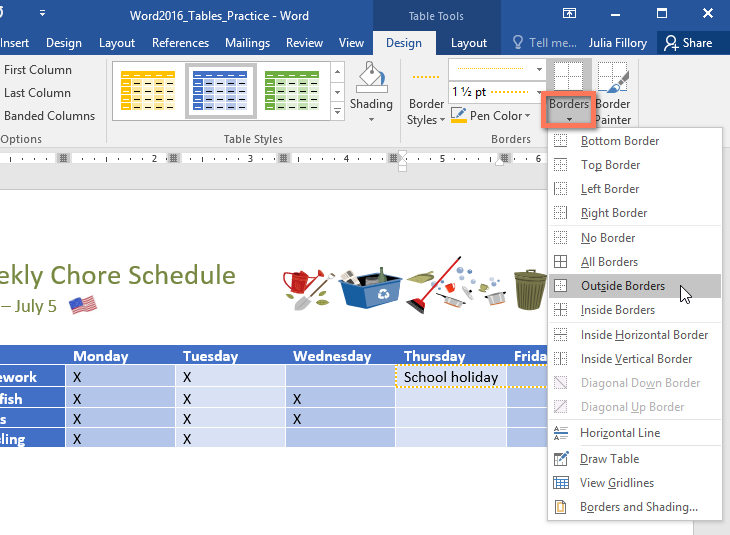
To apply borders to a table:
- Select the cells you want to apply a border to.
- Use the commands on the Design tab to choose the desired Line Style, Line Weight, and Pen Color.
- Click the drop-down arrow below the Borders command.
- Choose a border type from the menu.
- The border will be applied to the selected cells.

Modifying a table using the Layout tab
In Word, the Layout tab appears whenever you select your table. You can use the options on this tab to make a variety of modifications.
Click the buttons in the interactive below to learn more about Word’s table layout controls.
Challenge!
- Open our practice document.
- Scroll to page 3 and select all of the text below the dates July 8 — July 12.
- Use the Convert Text to Table to insert the text into a 6-column table. Make sure to Separate text at Tabs.
- Delete the Saturday column.
- Insert a column to the left of the Friday column and type Thursday in the top cell.
- Change the table style to any style that begins with Grid Table 5. Hint: Style names appear when you hover over them.
- In the Table Style Options menu, uncheck Banded Rows and check Banded Columns.
- Select the entire table. In the Borders drop-down menu, choose All Borders.
- With the table still selected, increase the table row height to 0.3″ (0.8 cm).
- Select the first row and change the cell alignment to Align Center.
- When you’re finished, your table should look something like this:


/en/word/charts/content/
You have an existing table in a Word 2007 document. It’s pretty plain and you want to jazz it up a little. Here’s how to quickly change the styles applied to your table.
Applying a table style to an existing table
- Select the table. The Design and Layout tabs for Table Tools are added to the ribbon (A).
- Select the Design tab.
- In the Table Style group (on the left [B]), select the check boxes for the effects you want. For example, if this table has a header row, select that check box; if you want banded rows, select that check box; if you have a Totals row, select that one, etc. (See also: Tips for using built-in table styles.)
- In the Table Styles group (C), click the drop-down arrow to the right of the example styles to see ‘thumbnail’ views of various table styles; scroll down to see all the variations.
- Hover over various thumbnails (D) to see how each one looks when applied to your table.
- Click on the thumbnail for the style you want to apply.

Modifying an existing table style
NOTE: Modifying a table style will change it for the future – at least for this document and possibly for all new documents based on this document’s template. Be certain you want to do this before you start.
- Select the table. The Design and Layout tabs for Table Tools are added to the ribbon.
- Select the Design tab.
- In the Table Styles group, the style applied to the table is shown with a faint orange border around its thumbnail.
- Right-click on the thumbnail, then select Modify Table Style.
- The Modify Style dialog box displays, showing the overall table settings (Apply formatting to is set to Whole table by default).

- To change settings that apply to the entire table, use the icons and drop-down lists in the Formatting section of this dialog box, as well as the settings under the Format button.
- To change settings that apply to various parts of the table (e.g. the header row, odd or even row banding, etc.), select that element from the Apply formatting to drop-down list, then use the icons and drop-down lists in the Formatting section of this dialog box, as well as the available settings under the Format button. Note: Not all settings are available. You can see some of the changes in the preview window.
- Select whether you want your table style changes to apply Only in this document or to New documents based on this template.
- Click OK.
- When you save your document, you will be asked to save the changes to the template if you selected that option in step 8.


Creating a new table style
- Insert a new table (Insert tab, Table icon).
- Select the table. The Design and Layout tabs for Table Tools are added to the ribbon.
- Select the Design tab.
- In the Table Styles group, click the drop-down arrow to the right of the example styles then select New Table Style (below the thumbnails). The Modify Style dialog box displays.
- Give your new style a Name.
- Leave the Style type set to Table.
- The default Style based on is set to Table Normal. While you can set up a table ‘from scratch’ using this, you will save quite a bit of time if you click the drop-down arrow for the Style based on field and work your way through the long list of existing table styles. As you select each, it displays in the preview window. When you find one that most closely matches the style you want, select it.
- Select an element from the Apply formatting to drop-down list, then use the icons and drop-down lists in the Formatting section of this dialog box, as well as the available settings under the Format button to style that element. Note: Not all formatting settings are available for all elements. You can see some of the changes in the preview window.
- Select whether you want your new table style to apply Only in this document or to New documents based on this template.
- Click OK.
- When you save your document, you will be asked to save the changes to the template if you selected that in step 9.
Setting a table style as the default for new tables
You’ve styled your table perfectly! Now you want that style to be applied to every table you create. Well, you can do it the slow way – insert a new table, then apply your table style to it. But it’s much easier to set your table style as the default. That way, whenever you insert a new table, it will be styled just the way you want. (Hint: If you only want the table style applied to some – not all – of your tables, add it to the Quick Tables list.)
- Select the table. The Design and Layout tabs for Table Tools are added to the ribbon.
- Select the Design tab.
- In the Table Styles group, the style applied to the table is shown with a faint orange border around its thumbnail.
- Right-click on the thumbnail of the style you want as the default, then select Set as Default.
- You are asked if you want to set it as the default table just for This document only or for All documents based on the (this document’s) template. Select an option, then click OK.
- To test that it’s now the default, go to the Insert tab and click the Table icon.
- As you drag your cursor over the rows and cells, a preview of the table shows in the document. It should look like the table style you selected as the default.

Warning
Applying table styles to an existing table can be problematic and may not work as expected, depending on the paragraph styles used in the existing table. No-one seems to have documented exactly how table styles and settings are meant to work and how conflicts are resolved. Better people than me (e.g. Microsoft MVPs) have tried to get them to work, but have failed. See these comments/discussions that apply to table styles from Word 2002 to 2007. Bottom line: There are issues…. Seemed like a good idea, but no-one appears to have got them to work as I had hoped.
- http://www.shaunakelly.com/word/tablestyles/index.html
- http://www.officekb.com/Uwe/Forum.aspx/word-tables/4609/Table-styles-new-in-2007
- http://www.officekb.com/Uwe/Forum.aspx/word-tables/6460/Word-2007-table-styles-do-they-work
[Links last checked September 2009]