
A lot of documents Word contain tables. If you have a small table, you may want to keep it on
one page even if Word tries to split it between pages.
To keep a table on one page, do the following:
1. Select the table:
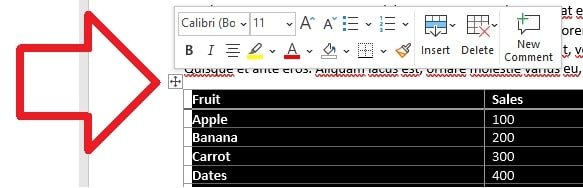
- You can select all rows or columns of the table one by one
- Move the mouse over the table until you see the table selection icons in the upper-left
corner of the table and then click it:

Note: You can also click on the table selection icon in the bottom-right corner
for the same effect.
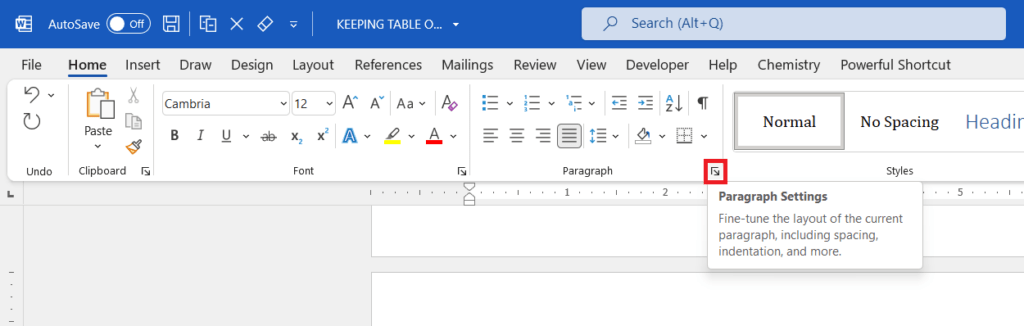
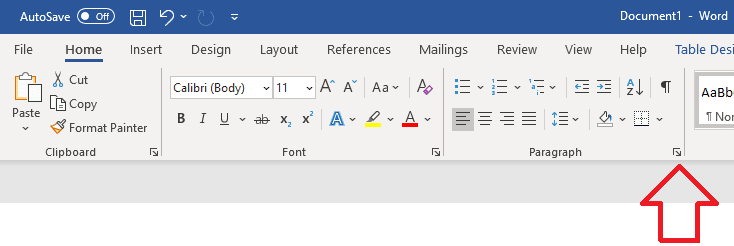
2. On the Home tab, in the Paragraph
group, click the dialog box launcher:

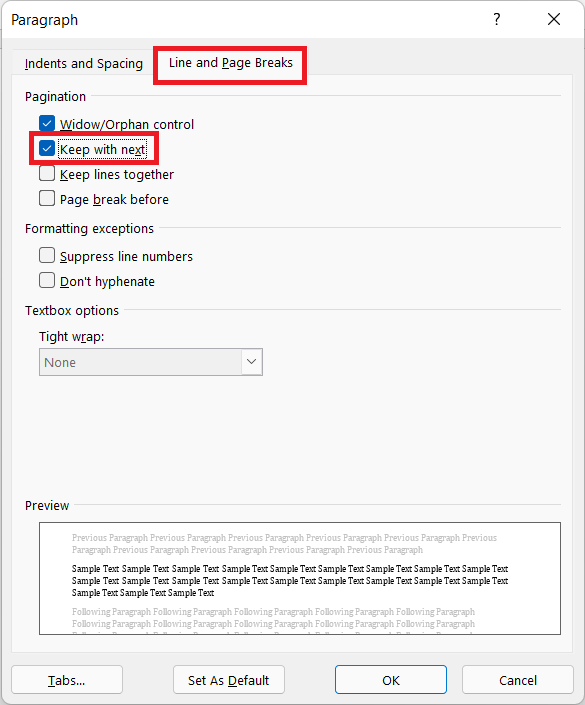
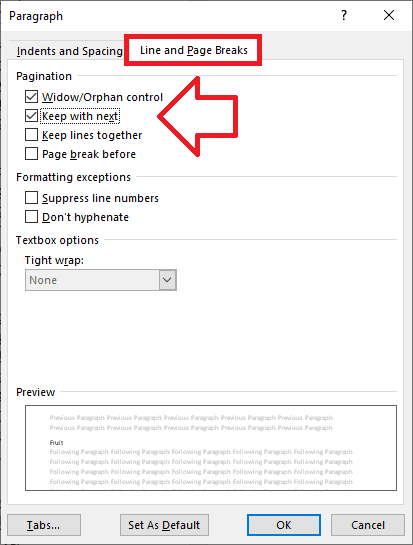
3. In the Paragraph dialog box, on the
Line and Page Breaks tab, select the Keep with next checkbox:

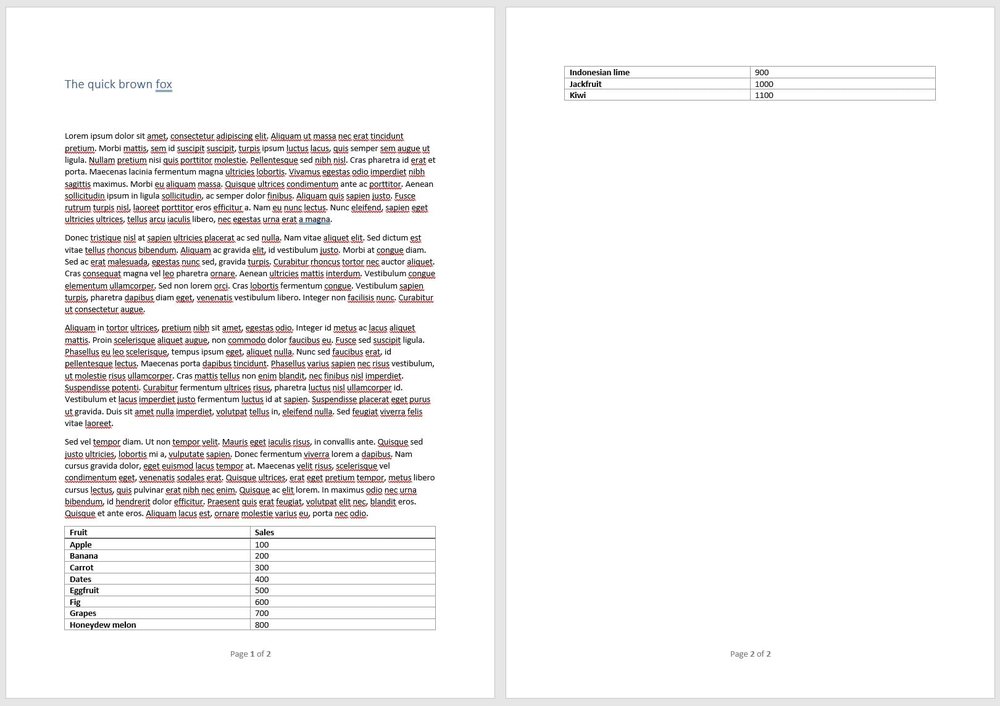
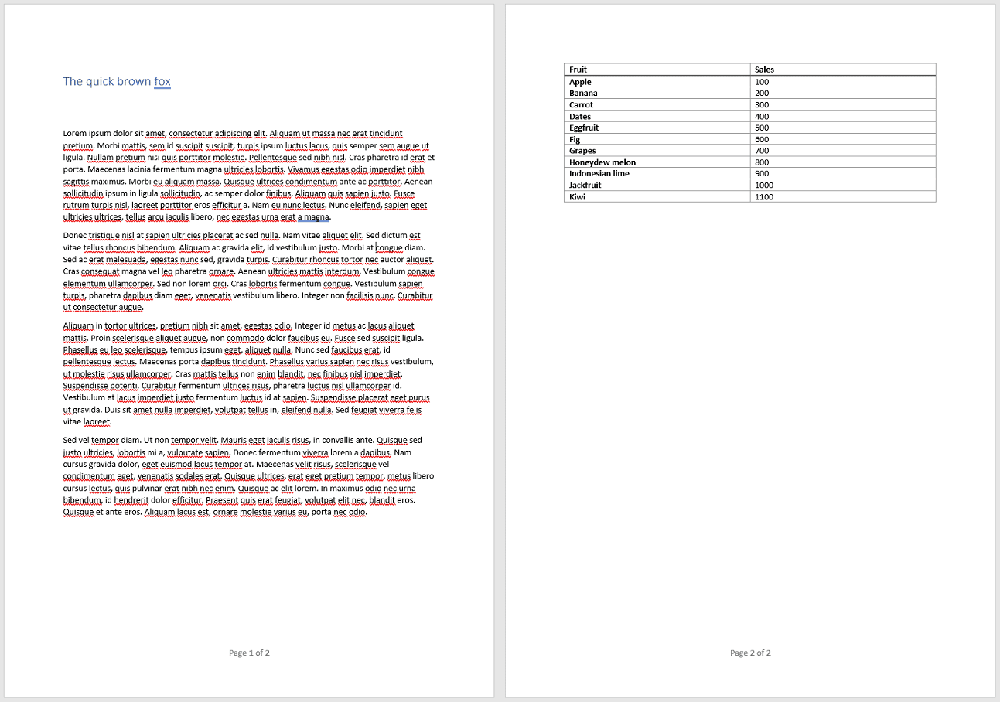
If you use the option Keep with next for entire table, it won’t be split to the different
pages:
- Before changes:

- After changes:


Notes:
- You can keep the text before the table with it, just do the same for the paragraph of the
text that you want to keep with the table.See
How to keep lines and paragraphs together in Word document. - If you have a big table that it can’t be displayed on one page, Word moves it on the next
page even if only one symbol leaves on the page and splits it anyway:

See also this tip in French:
Comment conserver un tableau dans une page d’un document Word.
Please, disable AdBlock and reload the page to continue
Today, 30% of our visitors use Ad-Block to block ads.We understand your pain with ads, but without ads, we won’t be able to provide you with free content soon. If you need our content for work or study, please support our efforts and disable AdBlock for our site. As you will see, we have a lot of helpful information to share.
Stop a Microsoft Word Table or Row from Breaking Across Pages
by Avantix Learning Team | Updated August 21, 2022
Applies to: Microsoft® Word® 2010, 2013, 2016, 2019, 2021 and 365 (Windows)
There are a few ways to keep a Microsoft Word row or table together on one page. When you want to stop a Word table from breaking across pages, the method you use depends on several factors including the size of the table. You can’t, for example, keep a table on one page if the table is larger than a page. Here, we’re also assuming the table is in the body of the document, not the header or footer.
Note: Buttons and Ribbon tabs may display in a different way (with or without text) depending on your version of Word, the size of your screen and your Control Panel settings. For newer versions of Word, Ribbon tabs may appear with different names. For example, the Table Tools Design tab may appear as Table Design.
Recommended article: How to Format Microsoft Word Tables Using Table Styles (Ultimate Guide)
Do you want to learn more about Microsoft Word? Check out our virtual classroom or in-person classroom Word courses >
Stop a table row from breaking across pages using Table Properties
If you want to simply stop a table row from breaking across pages, you can change the Table Properties:
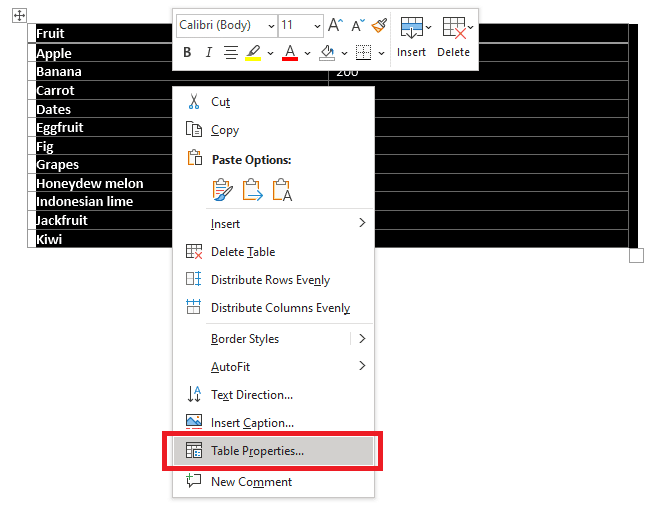
- Select the row or rows that should not break across pages (you may want to select the entire table).
- Click the Table Layout or Table Tools Layout tab in the Ribbon.
- Click Properties. You can also right-click and choose Properties from the context-sensitive menu. A dialog box appears.
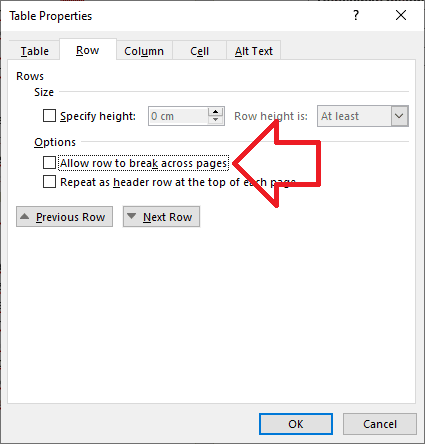
- Click the Row tab. Uncheck the check box to Allow row to break across pages.
- Click OK.
Below is the Table Properties dialog box with the Row tab selected:

Keep table rows together by keeping lines and paragraphs together
Another way to keep a table row or rows together is to force paragraph(s) in cells to keep with the next paragraph(s) and / or to keep the lines of paragraph(s) together. A paragraph is anything with a hard return after it. Also, it’s usually a good idea to turn on Show/Hide ¶ (which appears in the Paragraph group on the Home tab in the Ribbon).
To keep a row or rows together using the keep with next paragraph and / or keep lines together settings:
- Select the cell or cells with the paragraph(s) you wish to keep with next paragraph and keep lines together.
- Click the Home tab in the Ribbon.
- Click the dialog box launcher on the bottom right of the Paragraph group. The Paragraph dialog box appears.
- Click the Line and Page Breaks tab.
- Check Keep lines together to keep the lines of each paragraph together in the cell or cells you’ve selected.
- Check Keep with next to keep each paragraph in the cell or cells you’ve selected with the next paragraph. It’s usually best not to turn this option on for the last paragraph in the table as it will keep the paragraph in the last cell with the next paragraph following the table.
- Click OK.
Below is the Paragraph dialog box with the Line and Page Breaks tab selected:

Keep a table together by starting it on a new page
Another way to keep a table together is to force the first paragraph in the table to start on a new page.
To force the first paragraph in a table to start on a new page:
- Select the first paragraph in the table.
- Click the Home tab in the Ribbon.
- Click the dialog box launcher on the bottom right of the Paragraph group. The Paragraph dialog box appears.
- Click the Line and Page Breaks tab.
- Check Page break before.
- Click OK.
By the way, if you’re comfortable with styles, you could also use various paragraph settings in styles in your tables.
Other issues
If you’ve tried the strategies above and a table is still breaking across pages, there could be a number of reasons.
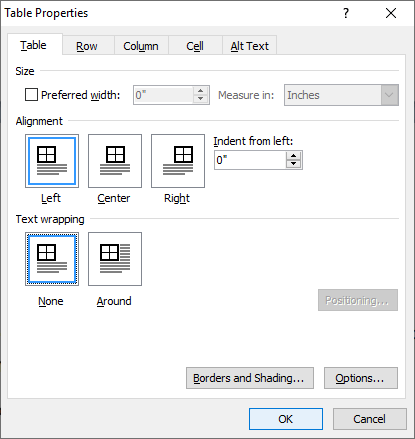
Ensure that the table is set so that it does not wrap around other text:
- Click in the table.
- Click the Table Layout or Table Tools Layout tab in the Ribbon.
- Click Properties. You can also right-click and choose Properties from the context-sensitive menu.
- In the Table Properties dialog box, click the Table tab.
- Click None under Text wrapping.
- Click OK.
Below is the Table Properties dialog box with the Table tab selected:
If a row is still breaking across pages, you may need to turn off the exact row height option:
- Select the row or rows that should not break across pages (you may want to select the entire table).
- Click the Table Layout or Table Tools Layout tab in the Ribbon.
- Click Properties. You can also right-click and choose Properties from the context-sensitive menu. A dialog box appears.
- Click the Row tab. Uncheck the check box to Allow row to break across pages.
- Uncheck Specify Height.
- Click OK.
You can also check for manual page breaks or section breaks in the table and delete them. However, be very careful deleting section breaks as they contain all information for the section.
To delete a page break or section break that has been inserted within a table:
- Ensure Show/Hide ¶ is turned on (which appears in the Paragraph group on the Home tab in the Ribbon).
- Select the problem page break or section break by dragging over it.
- Press Delete.
There can be some other issues like overly large indents in Table Properties so it’s worth checking the properties if you’re still having problems.
Subscribe to get more articles like this one
Did you find this article helpful? If you would like to receive new articles, JOIN our email list.
More resources
4 Ways to Create a Table in Word
How to Create a Table Template in Word
How to Create a Table of Contents in Word
How to Make Columns in Word (Newspaper-style)
How to View Word Count in Microsoft Word (4 Ways)
Related courses
Microsoft Word: Intermediate / Advanced
Microsoft Excel: Intermediate / Advanced
Microsoft PowerPoint: Intermediate / Advanced
Microsoft Word: Long Documents Master Class
Microsoft Word: Styles, Templates and Tables of Contents
Microsoft Word: Designing Dynamic Word Documents Using Fields
VIEW MORE COURSES >
Our instructor-led courses are delivered in virtual classroom format or at our downtown Toronto location at 18 King Street East, Suite 1400, Toronto, Ontario, Canada (some in-person classroom courses may also be delivered at an alternate downtown Toronto location). Contact us at info@avantixlearning.ca if you’d like to arrange custom instructor-led virtual classroom or onsite training on a date that’s convenient for you.
Copyright 2023 Avantix® Learning
Microsoft, the Microsoft logo, Microsoft Office and related Microsoft applications and logos are registered trademarks of Microsoft Corporation in Canada, US and other countries. All other trademarks are the property of the registered owners.
Avantix Learning |18 King Street East, Suite 1400, Toronto, Ontario, Canada M5C 1C4 | Contact us at info@avantixlearning.ca

Table provides a compact way to organize and show data that are difficult to be shown in text. For, better readability experience especially on printed document, it’s better to keep table on one page. In Ms Word, you can use the following trick to keep table from splitting into multiple pages.
Step 1: Select the entire table. (Quick tip: You can click on the table handle which appears on top left corner of the table to select the entire table)
Step 2: In Home tab open paragraph settings by clicking on the arrow icon at bottom right corner of paragraph group (see below image)
Step 3: In opened Paragraph window, go to “Line and Page Break” Tab and check “Keep with next”
Step 4: Click Ok to apply the setting that keeps table on one page.
Video Tutorial
The video showing the above entire process in action is as follows
Related Posts
If your whole table will fit on one page, but is being pushed onto the next page due to previous content (e.g. in a situation where the table starts half-way down the page), you may be tempted to insert a manual page-break before the table so it starts at the top of the next page.
However, this will also add a blank line at the top of the page, above the table, and there doesn’t seem to be a good way to get rid of this (aside from setting it to 1pt font, with no paragraph spacing, which is an ugly hack and somewhat fiddly).
An alternative approach that inserts a break without any additional whitespace is to select the first row of the table. Then click Paragraph Properties from the toolbar and tick ‘Page Break Before’. This will force the table to the top of the next page without any additional white-space.
This won’t solve the issue if your table is too big for a single page (scaling-down font sizes and other similar attributes is probably the only choice there) and it may need reverting if subsequent edits free up enough space to remove the need for a page break, but it is a good solution for some situations.
The following steps show how to format a table in a Word document so that the table does not split across multiple-pages (when it can fit in one page).
For example, the table at the bottom of page 1 has split into page 2.
- Select all rows in the table – but clicking inside the table then the cross-arrow at the top left of the table

- In the ‘Home’ menu, click on the ‘Paragraph’ settings icon

- Open the ‘Line and Page Breaks’ tab
- Tick ‘Keep with next’

- Click ‘OK’ to close the window
- The table should now be on its own page

Help! The table is still split between two pages!
If the table is still split between two pages – try disabling the table row setting ‘Allow row to break across pages’.
- Select all rows in the table – but clicking inside the table then the cross-arrow at the top left of the table
- Right-click in the table and choose ‘Table settings’

- Un-tick ‘Allow row to break across pages’

- Click ‘OK’ to save the changes.
Article Downloads
TIP: You may need to right-click and select ‘save link as’.