
Insert a table of contents
A table of contents in Word is based on the headings in your document.

Create the table of contents
-
Put your cursor where you want to add the table of contents.
-
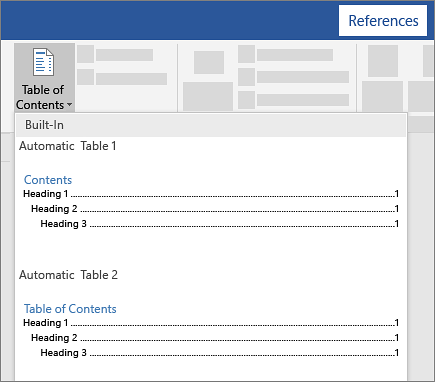
Go to References > Table of Contents. and choose an automatic style.

-
If you make changes to your document that affect the table of contents, update the table of contents by right-clicking the table of contents and choosing Update Field.
To update your table of contents manually, see Update a table of contents.
If you have missing entries
Missing entries often happen because headings aren’t formatted as headings.
-
For each heading that you want in the table of contents, select the heading text.
-
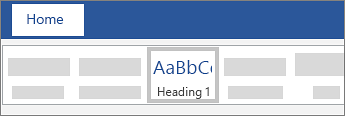
Go to Home > Styles, and then choose Heading 1.
-
Update your table of contents.
To update your table of contents manually, see Update a table of contents.
Create the table of contents
Word uses the headings in your document to build an automatic table of contents that can be updated when you change the heading text, sequence, or level.
-
Click where you want to insert the table of contents – usually near the beginning of a document.
-
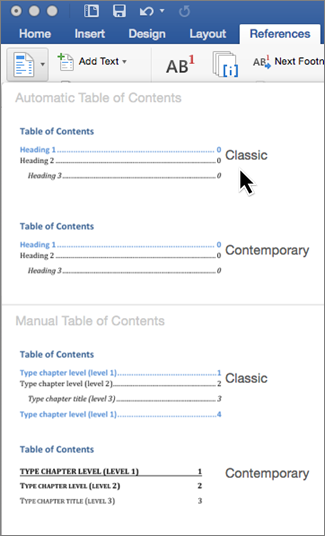
Click References > Table of Contents and then choose an Automatic Table of Contents style from the list.
Note: If you use a Manual Table of Contents style, Word won’t use your headings to create a table of contents and won’t be able to update it automatically. Instead, Word will use placeholder text to create the look of a table of contents so you can manually type each entry into the table of contents. To update your manual table of contents, see Update a table of contents.
If you want to Format or customize your table of contents, you can. For example, you can change the font, the number of heading levels, and whether to show dotted lines between entries and page numbers.
If you have missing entries
Missing entries often happen because headings aren’t formatted as headings.
-
For each heading that you want in the table of contents, select the heading text.
-
Go to Home > Styles, and then choose Heading 1.
-
Update your table of contents.
To update your table of contents manually, see Update a table of contents.
Word uses the headings in your document to build an automatic table of contents that can be updated when you change the heading text, sequence, or level.
-
Click where you want to insert the table of contents—usually near the beginning of the document.
-
On the toolbar ribbon, select References.
-
Near the left end, select Insert Table of Contents. (Or select Table of Contents > Insert Table of Contents.
The table of contents is inserted, showing the headings and page numbering in your document.
If you make changes to your document that affect the table of contents, you can update it by right-clicking the table and selecting Update Table of Contents.
Get the learning guide
For a hands-on guide that steps you through the process of creating a table of contents, download our Table of Contents tutorial. Or, in desktop Word, go to File > New, and search for table of contents.
See Also
Update a table of contents
Need more help?
![]()
Download Article
![]()
Download Article
- Adding a Table of Contents
- Updating the Table of Contents
- Stylizing the Table of Contents
- Video
|
|
|
This wikiHow teaches you how to customize and update the table of contents in your Word document. When you create a table of contents in Word, page numbers are added automatically based on the headings you’ve added to each section. Word makes it easy to customize the way the page numbers and section titles appear on the table. If you make changes to your document that affects your section headers or page numbers, you’ll need to choose the Update Table option so the table of contents remains correct.
-
1
Format the headings of each section of your document. Word’s table of contents builder automatically generates a table of contents based on the headings in your document.[1]
This means each section that you want represented in your table of contents must have a properly-formatted heading.- If a section should appear as a primary section in the table of contents, select its heading, click the Home tab, and then select Heading 1 on the «Styles» panel.
- To add a sub-section to the primary section in the table of contents, give that section a Heading 2 header: Select its heading and choose Heading 2 from the Styles section.
- You can can also use Heading 3, Heading 4, etc., to add even more pages to your table of contents.
- Make sure any page you want to include in the table of contents has a heading.
-
2
Click the location where you want to insert the table of contents. Typically this will be at the beginning of your document.
Advertisement
-
3
Click the References tab. It’s at the top of Word.
-
4
Click Table of Contents on the toolbar. It’s at the upper-left corner of Word. A list of Table of Contents styles will expand.
-
5
Select an automatic style template. Several style options appear for your table of contents—choose one of the suggested styles to get started. Once selected, this will add a table of contents that lists the page numbers for each of your formatted sections.


Advertisement
-
1
Click the References tab. It’s at the top of Word.[2]
- Use this method if you’ve made a change (changing a heading, adding/removing pages) to your document and need to update the table of contents to reflect that change.
- The only way to change the name of a section on the table of contents is to change the name of the corresponding header in the document.
-
2
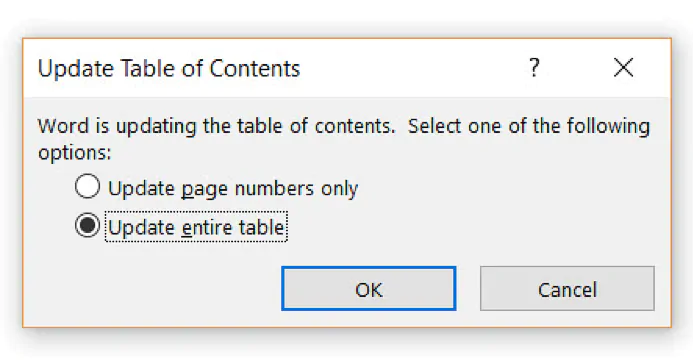
Click Update Table on the «Table of Contents» panel. It’s in the upper-left corner. Two options will appear.
-
3
Select an update option.
- Select Update page numbers only if you want to refresh the page numbers without applying any changes you’ve made to the headings.
- Select Update entire table to apply all heading and page number changes.
-
4
Click OK. The table of contents is now up-to-date.


Advertisement
-
1
Click the References tab. It’s at the top of Word.
-
2
Click Table of Contents on the toolbar. It’s at the upper-left corner of Word. A list of Table of Contents styles will expand.
-
3
Click Custom table of contents on the menu. This opens the Table of Contents dialog box.
-
4
Adjust your general preferences. The «Print Preview» box at the upper-left corner shows you how the printed table of contents will appear, while the «Web preview» box displays how it will look on the web.[3]
- Use the checkbox next to «Show page numbers» to show or hide page numbers. If you just want to hide page numbers on the web version of the table of contents, check the box next to «Use hyperlinks instead of page numbers.»
- Use the checkbox next to «Right align pages numbers» top adjust the alignment.
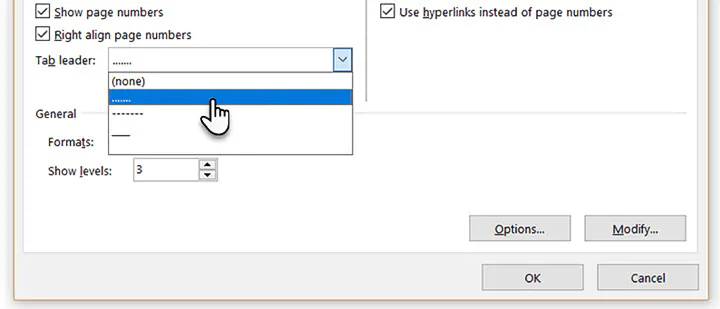
- To change the style of the line or pattern that separates the heading title and the page number, make your selection from the «Tab leader» menu.
- To choose another theme, select something from the «Format» menu.
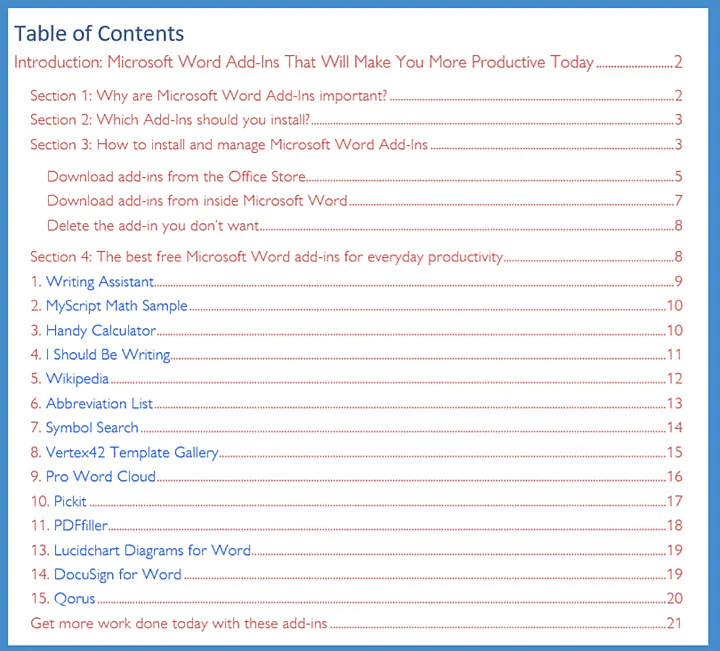
- To adjust how many heading levels are displayed in the table, select an option from the «Show levels» menu (the default is 3).
-
5
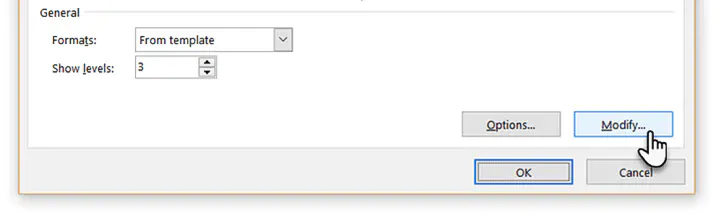
Click the Modify button. It’s in the lower-right corner of the window. This is where you can change the properties of the text on the table of contents page.
- If you don’t see this button, click the «Formats» menu and select From template. It should appear then.
-
6
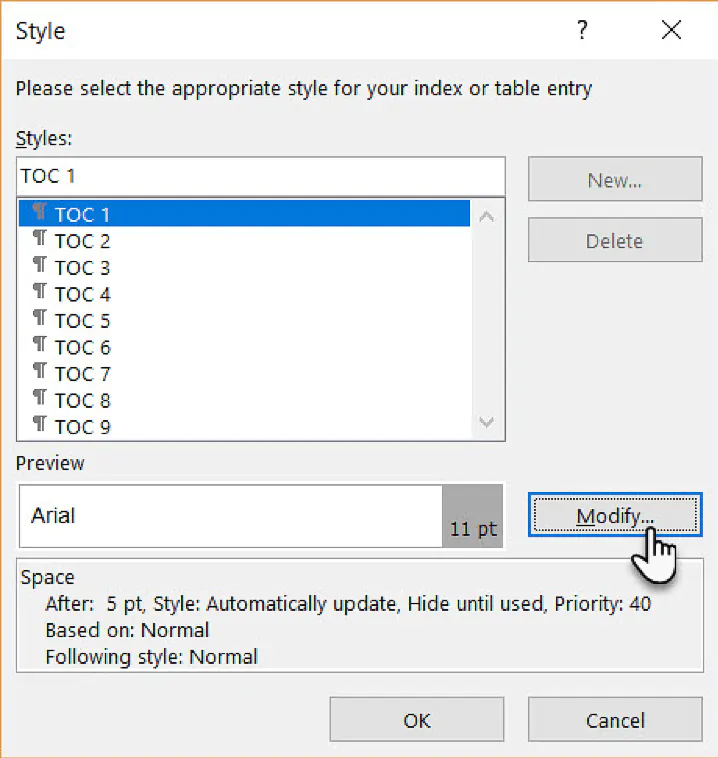
Select a style and click Modify. The styles you can change appear in the «Styles» box on the left side of the window. When you click a style (e.g., TOC 1), you’ll see the font size, spacing, and other details—clicking Modify allows you to change these details.
-
7
Make your changes and click OK. You can choose different fonts, alignments, colors, and numerous other details for each selected style. Alternatively, you can keep the defaults, which come from the table of contents template you selected.
-
8
Click OK. The style changes you’ve made will apply to your table of contents immediately.


Advertisement
Ask a Question
200 characters left
Include your email address to get a message when this question is answered.
Submit
Advertisement
Video
Thanks for submitting a tip for review!
About This Article
Article SummaryX
1. Click the References tab.
2. Click Update Table.
3. Select an update option.
4. Click OK.
Did this summary help you?
Thanks to all authors for creating a page that has been read 60,117 times.
Is this article up to date?
Многим пользователям при работе в текстовом редакторе Word необходимо правильно оформить содержание документа — сделать оглавление в Ворде. Оглавление в Word требуется для разных типов многостраничных документов, оформляемых в рабочих, научных или учебных целях. Оно применяется в различных типах документов: инструкция, руководство, проект, диссертация, курсовая, реферат, диплом, домашнее задание и т. д.
Содержание в Ворде представляет из себя оглавление с названиями глав, разделов, указанием номеров страниц и т. д., которое обеспечивает удобную навигацию по документу. Пользователь быстро попадет в необходимый раздел, параграф или главу документа, или переходит на нужную страницу с помощью ссылок из области оглавления.
Содержание:
- Изменение параметров оглавления в документе Word
- Как сделать содержание (оглавление) в Ворде вручную
- Автоматическое оглавление в Ворде: простой способ
- Как сделать оглавление отдельной страницей в Ворде
- Подбор дополнительных параметров оглавления документа
- Как изменить созданное оглавление
- Как обновить оглавление в Ворде
- Как убрать оглавление в Ворде
- Выводы статьи
Содержание в Word выполняет несколько практических функций:
- Внутренняя навигация для быстрого перехода к нужным частям документа.
- Привлечение внимания к содержимому документа.
- Отображение общей структуры текстового документа.
Обычно оглавление располагается в начале или в конце документа. Содержание размещают в документе в зависимости от предъявляемых требований к оформлению: после титульного листа, перед выходными данными, после заголовка на одной странице с прочим текстом и т. д.
В этой статье вы найдете инструкции о том, как сделать оглавление в Ворде пошагово. Все действия аналогично выполняются в версиях программы MS Word: Word 2019, Word 2016, Word 2013, Word 2010, Word 2007. Имейте в виду, что имеются некоторые отличия в интерфейсе разных версий приложения.
Изменение параметров оглавления в документе Word
В программе Microsoft Word, при создании оглавления документа, используются взятые за основу встроенные или созданные самостоятельно стили заголовков.
Если в исходном документе нет заголовков, то вам потребуется предварительно их создать, чтобы потом при оформлении использовать автособираемое оглавление в Word.
Выполните следующие действия:
- Откройте документ Word.
- Выделите текст, который будет использоваться в качестве заголовка.
- Во вкладке «Главная», из области «Стили» задайте подходящий стиль для заголовка.

Примените выбранные стили для форматирования всех заголовков этого документа.
По умолчанию, в Microsoft Word доступны заголовки трех уровней вложенности: «Заголовок 1», «Заголовок 2», «Заголовок 3». Обычно, в названии документа применяют стиль «Заголовок 1», в тексте для подзаголовков используют «Заголовок 2», а в файлах с более сложной иерархией не обойтись без подзаголовка «Заголовок 3».
Вы можете самостоятельно поменять настройки стилей:
- Нажмите стрелку в правом нижнем углу в области «Стили».
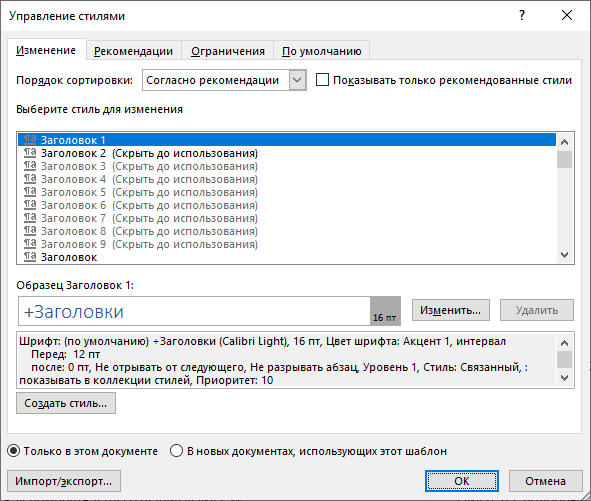
- В окне «Стили» нажмите на кнопку «Управление стилями».

- В окне «Управление стилями» поменяйте настройки выбранного стиля или создайте новый стиль.
В случае необходимости, в документ можно добавить стили для заголовков большей вложенности:
- Во вкладке «Ссылки» нажмите на кнопку «Оглавление».
- В контекстном меню выберите «Настраиваемое оглавление…».
- В окне «Оглавление», во вкладке «Оглавление», в разделе «Общие», в поле «Уровни» укажите цифру, подходящую для уровня заголовка.
- Нажмите на кнопку «ОК».
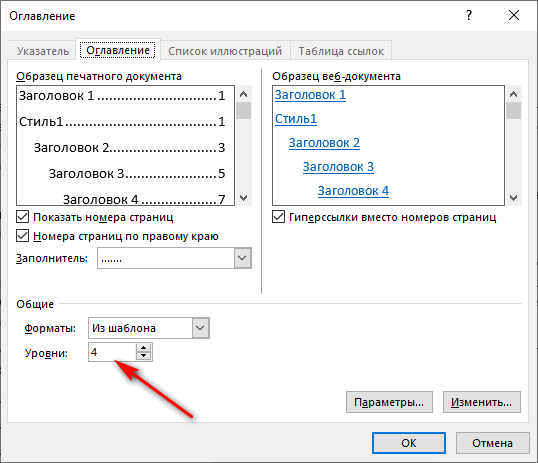
При необходимости, выберите больший уровень вложенности для заголовков, применяемых в данном документе: «Заголовок 4», «Заголовок 5» и т. д. Посмотрите, как отображаются новые заголовки этого документа в окнах «Образец печатного документа» или «Образец веб-документа».
Многие интересен ответ на вопрос о том, как сделать в содержании номера страниц автоматически. Если в оглавлении документа необходимо указывать номера страниц, то нужно активировать пункт «Показать номера страниц» (этот параметр включен по умолчанию). Соответственно, если в нумерация содержания вам не нужна в данном, конкретном документе, уберите флажок из этого пункта настроек в Ворде.
Настройте отображение номеров по правому краю. Этот параметр включен по умолчанию.
В поле «Заполнитель» выберите стиль для отбивки (точки, тире, сплошная линия) между названием заголовка и номером страницы. Подберите подходящий вариант или отключите этот параметр, чтобы убрать точки в оглавлении документа Word.
Как сделать содержание (оглавление) в Ворде вручную
Вполне может случится так, что в документе нет заголовков, отформатированных определенными стилями. В этом случае, вам нужно самостоятельно добавить оглавление на страницу документа Word.
Выполните следующие действия:
- В окне открытого документа Word откройте меню «Ссылки».
- Установите курсор мыши в подходящее место для вставки оглавления.

- В группе «Оглавление» нажмите на кнопку «Оглавление».
- В открывшемся меню «Встроенные» выберите пункт «Ручное оглавление».

- В том месте открытого файла Word, где размещен указатель мыши, появится область оглавления, в которую нужно вручную добавить заголовки документа.

Недостаток этого способа заключается в том, что, если изменятся названия разделов документа, вам придется применять эти изменения вручную. При изменении или дополнении текстового содержимого, а из-за этого может поменяться нумерация страниц, вам нужно будет самостоятельно менять номера страниц в оглавлении.
Принимая во внимание вышесказанное, лучше использовать наиболее простой вариант: создать содержание в Ворде автоматически с номерами страниц и подходящим стилем оформления заголовков.
Автоматическое оглавление в Ворде: простой способ
Воспользуйтесь встроенными функциями приложения, чтобы быстро сделать автоматическое оглавление документа Word. В исходном тексте заранее должны быть выделены заголовки, согласно иерархической структуре данного документа.
Пройдите следующие шаги:
- В окне документа Word откройте вкладку «Ссылки».
- Поставьте указатель мыши в то место, куда необходимо вставить оглавление.
- Нажмите на кнопку «Оглавление», которая расположена в группе «Оглавление».
- В открывшемся меню выберите из списка один из стилей автоматически собираемых оглавлений, которые подходят по параметрам, например, стиль «Автособираемое оглавление 1».

- В месте размещения курсора мыши появится область оглавления со всеми заголовками и номерами страниц, которые есть в данном документе.

В результате выполнения этой операции, в нашем документе было сделано автоматическое оглавление в Word.
По умолчанию, в каждом заголовке есть наполнитель (отбивка из точек) и номер страницы. Изменить эти параметры можно с помощью функции «Настраиваемое оглавление».
Если нажать на клавишу «Ctrl», а затем щелкнуть курсором по названию главы документа из заголовка, произойдет автоматический переход к месту, в котором находится соответствующий раздел документа.
Как сделать оглавление отдельной страницей в Ворде
При оформлении документа может понадобится отдельная страница, на которой будет размещено оглавление в Ворде. Чтобы реализовать эту возможность воспользуйтесь функцией разрыва страницы.
Вам нужно выполнить следующее:
- Установите указатель мыши перед оглавлением.
- Нажмите на клавиши «Ctrl» + «Enter».
- Щелкните курсором мыши после области оглавления.
- Снова нужно нажать на клавиши «Ctrl» + «Enter».

Подбор дополнительных параметров оглавления документа
Некоторым пользователям бывает недостаточно изменений, внесенных в параметры оглавления автоматически. В этом случае, есть возможность отрегулировать настройки дополнительных параметров оглавления.
Вам потребуется выполнить следующее:
- Открываем вкладку «Ссылки» в окне документа Word.
- Переходим в группу «Оглавление», а там нажимаем на кнопку «Оглавление».
- В открывшемся меню нажимаем на «Настраиваемое оглавление».
- Откроется вкладка «Оглавление» в окне «Оглавление».
- Чтобы изменить некоторые настройки нажмите на кнопку «Параметры…».
- В окне «Параметры оглавления» имеются опции, связанные с настройками стиля текста, уровнями структуры, полями элементов оглавления.

- Во вкладке «Оглавление» нажмите на кнопку «Изменить…», чтобы открыть инструмент с настройками выбора стиля для каждого уровня заголовка.

- Если нажать на кнопку «Изменить…», вам станут доступными дополнительные опции, применяемые к данному заголовку: стиль, форматирование, шрифт, отступы, интервалы и т. п.

- Не забудьте нажать на кнопку «ОК» для применения настроек.
Как изменить созданное оглавление
Бывают ситуации, когда после создания оглавления, может потребоваться внести некоторые коррективы в его стиль или форматирование.
Выполните следующее:
- В окне открытого документа Word кликните по области оглавления.
- В левом верхнем углу области оглавления отобразится панель, на которой вам следует нажать на кнопку «Оглавление».
- В открытом меню выберите другой способ форматирования для содержания данного документа.

Как обновить оглавление в Ворде
После внесения изменений и дополнений в текст документа, форматирование оглавления необходимо обновить. Это понадобится, например, если изменилась нумерация страниц.
Существует три простых способа для придания оглавлению актуального состояния.
1 способ:
- Щелкните по области оглавления в документе.
- В области «Оглавление» нажмите на пункт «Обновить таблицу».

2 способ:
- В окне открытого документа щелкаем по области оглавления.
- В области оглавления, в верхней левой части появится панель, на которой нужно нажать на кнопку «Обновить таблицу…».

3 способ:
- Щелкните правой кнопкой мыши по области оглавления.
- В контекстном меню выберите «Обновить поле».

- В окне «Обновление оглавления» выберите один из предложенных вариантов:
- обновить только номера страниц;
- обновить целиком.

Как убрать оглавление в Ворде
В некоторых случаях, оглавление документа становится ненужным, поэтому его нужно удалить. Чтобы удалить содержание (оглавление) в Ворде воспользуйтесь одним из предложенных способов.
1 способ:
- Щелкаем по области оглавления документа.
- В появившемся меню, расположенному левой верхней части области оглавления, нажмите на кнопку «Оглавление».
- В выпадающем меню выберите пункт «Удалить оглавление».

2 способ:
- В окне открытого документа Word переходим во вкладку «Ссылки».
- В группе «Оглавление» нажимаем на кнопку «Оглавление».
- В открытом меню выбираем «Удалить оглавление».

Выводы статьи
При создании документа Word необходимо выполнить оформление, одним из элементов которого является оглавление или содержание текстового документа. Оглавление позволяет быстро перемещаться к нужному разделу в содержимом, служит для привлечения внимания и показывает структуру документа.
Пользователь может самостоятельно создать оглавление вручную, или воспользоваться встроенными функциями приложения. В случае использования встроенных параметров, создание оглавления в документе выполняется автоматически с заранее выбранными стилями оформления.
Похожие публикации:
- Как поставить длинное тире в Ворде — 6 способов
- Встроенный переводчик Word: перевод текста документа
- Как убрать режим ограниченной функциональности Word 2019, 2016, 2013, 2010, 2007
- Как сделать нумерацию страниц в Word
- Как убрать выделение текста в Word — 6 способов
Look at the nearest Microsoft Word document you have. There’s a good chance that it’s a document that’s just a few pages long. And without a Word table of contents.
But pick up software documentation or a research report. It wouldn’t be called a “professional document” without a pretty well-formatted Table of Contents.
You shouldn’t look at the job of making a Table of Contents (we will occasionally call it a TOC also) as a chore. Making a TOC isn’t only for dense reports or your next bestseller. It can be for something as simple as a daily journal or a school assignment. You should create a Table of Contents whenever appropriate.
Microsoft Word makes it easy. We will look into a few ways to create a Table of Contents in Word.
But first, let’s go into the benefits of a Table of Contents for a Word document.
Get your free Word shortcuts cheatsheet!
Download the print-ready shortcut cheatsheet for Word.
Why is a Table of Contents so essential?
Are TOCs relevant when we have bookmarks and advanced search features on digital devices? The short answer is — Yes. A Table of Contents isn’t just for navigating long documents.
Here are five benefits you should immediately look at:
- It gives the reader a bird’s eye view of the document. A TOC is like an outline. At a glance, you can see how a document will flow from one topic to the next.
- It makes a document look professional. A document with a TOC looks more organized and professional than a document that lacks one.
- It is a key organizational aid for the author. Think of it like a roadmap and the first draft for a TOC can help you arrange your thoughts (and even brainstorm).
- It makes a document easier to discuss. A TOC can signal the quality of the document. Your teacher or your book agent can tell at a glance if the material is worth a read by just glancing at the table of contents.
- It gives you a learning path. A TOC is a well-ordered series of steps. Steal them from an instructional book to understand the learning path on any subject of your choice.
Check out this quick video on how to create a table of contents in Word:
How to Create a Table of Contents in Word
Microsoft Word can automatically build a Table of Contents for you. You need to only outline the content and then specify the heading styles with basic formatting. Let’s take this step by step.
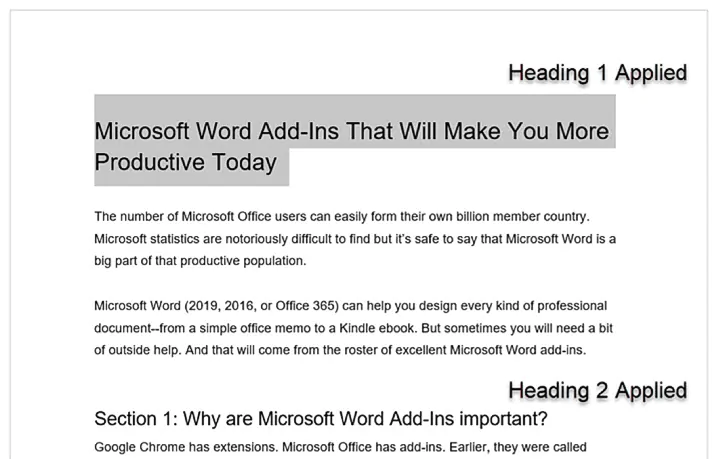
1. Format your document using heading styles. Select each chapter in your document and apply Heading Styles to them. Here, you are marking up the section headers so that Word can recognize them.
Go to Ribbon > Home > Styles. Select the text and apply headings for all the text you want to include in the table of contents.
 You can create a hierarchy within the main chapters with the help of the heading styles. For instance, use Heading 1 for new sections or chapters. Heading 2 for subsections within the section, and Heading 3 for smaller units or topics inside them.
Word scans the document for any text formatted as either Heading 1, 2, or 3 and then uses these to create the format for the TOC.
2. Position the Table of Contents on the page. Place the cursor on the specific position where you want the TOC to appear in your document. This is commonly somewhere at the beginning of the document.
4. Click the Table of Contents command. Go to Ribbon > References > Table of Contents. Choose from one of the two automatic types available. The only difference between the two is the heading of «Contents» or «Table of Contents» at the top.
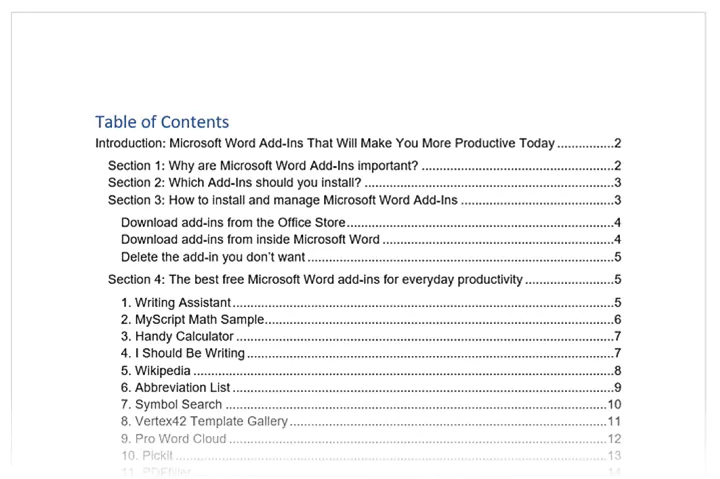
 5. The Table of Contents is inserted automatically. Word scans the document and uses the heading styles to construct the order of the sections and subsections and their page numbers. This is a barebones TOC and you can continue to work with this and make it more stylish.
6. Update the Table of Contents anytime. You can always update a Table of Contents that has been created automatically. Update the table if you change the heading styles, rearrange the contents, or change the text. Also, update it if you make any changes to the content that affects the page numbers.
To update a table of contents that was created automatically, click References > Update Table.
 Choose to Update page numbers only or Update entire table if you want to update the page numbers and the text.
 7. Create a Table of Contents manually. When the automatic method is so effortless, why would you feel the need to make one manually? There could be two reasons:
- The document is without any styles which Word can recognize.
- The document has too much of variety makes an automatic TOC difficult.
To create a manual table, go to References > Table of Contents > Click the dropdown to reveal the option for Manual Table.
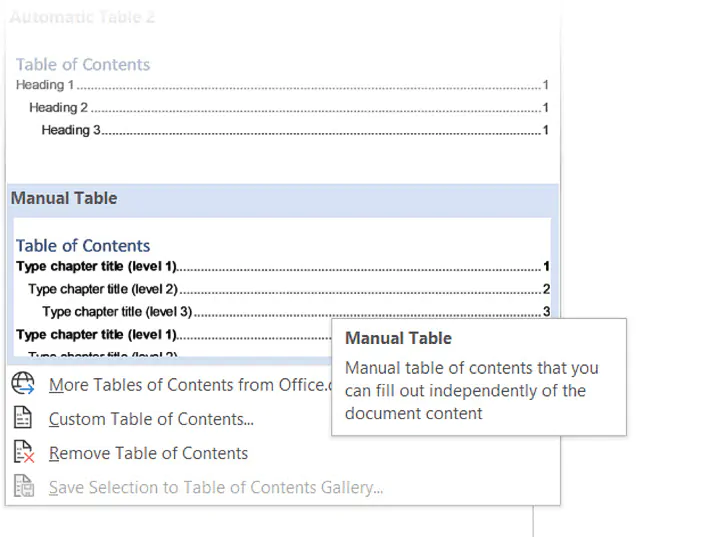
Microsoft Word inserts a TOC with placeholders which you can now edit. You can modify this with your own fonts and colors. Do remember that you also have to insert the page numbers manually too.
A TOC created manually cannot be updated automatically.
You do not have to settle for the basic Table of Contents that Microsoft Word creates for you. You can modify any TOC and even create a custom Table of Contents of your own.
How to customize the Table of Contents
You can easily customize a TOC with the Table of Contents dialog box. Go to References > Table of Contents > Custom Table of Contents to launch the dialog.
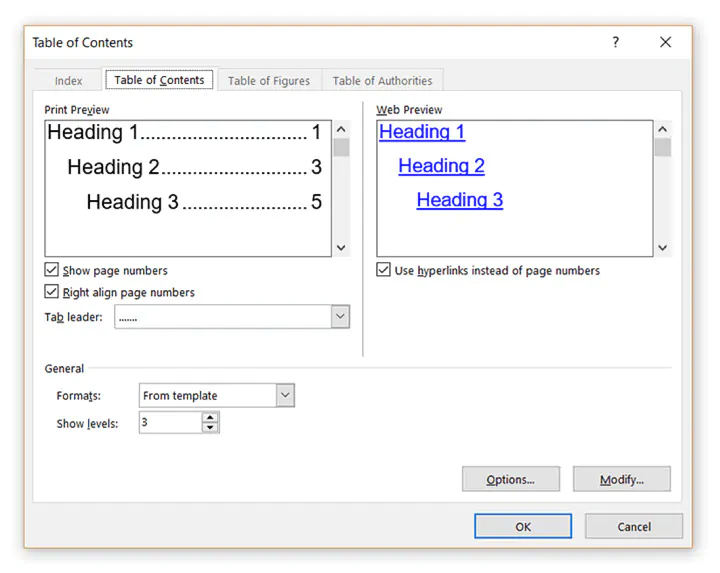
Any changes you make here will be visible in the Print Preview and Web Preview windows.
Seven advanced techniques to customize the TOC
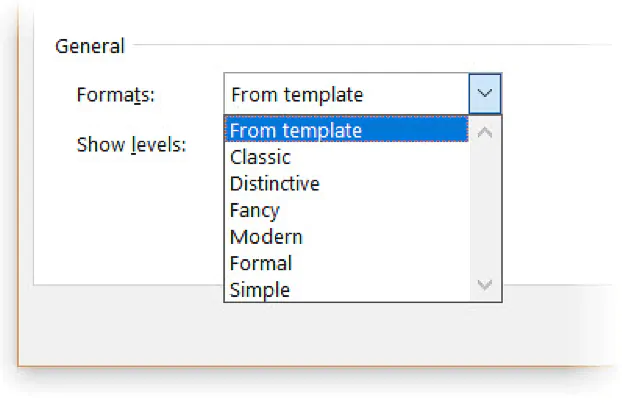
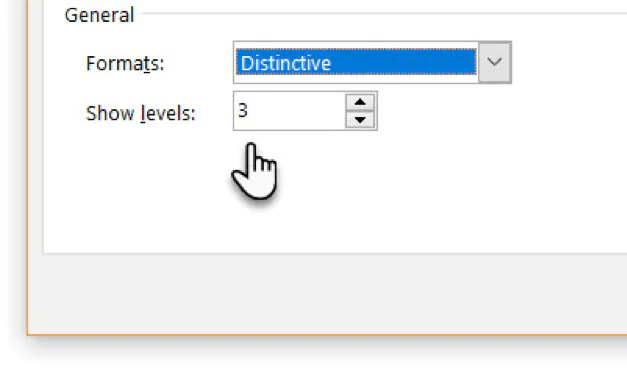
1. Choose a different format for the TOC
You can change an entire table by choosing a different format. In the General section, expand the dropdown for Formats and choose an appearance.
2. Change the appearance of the items in the TOC
Remember, the appearance of your TOC is ultimately controlled by style definitions. You may want to tweak the overall look of the TOC by creating your own styles for the headings. These modified styles can be saved alongside the in-built ones and applied across the document for a consistent look. Follow these steps.
1. Click Modify. If the Modify button is grayed out, change Formats to From template.
 2. In the Styles list, click the level that you want to change and then click Modify. Here, TOC 1 corresponds to heading level 1 in your document, TOC 2 to heading level 2, TOC 3 to heading 3 and so on.
 3. In the Modify Style dialog box, you can change the font or its color. Make any other formatting change like text indentation and then click OK.
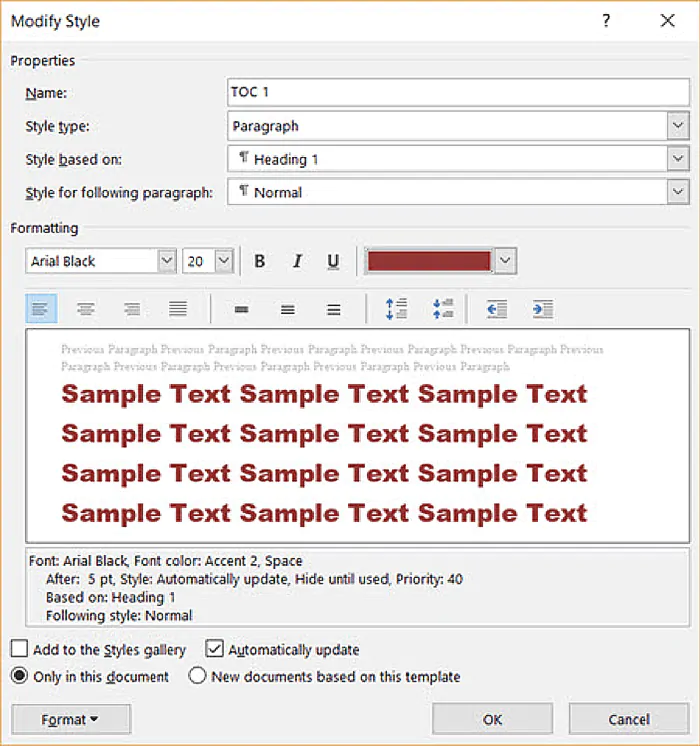
4. Before you click OK, you can choose whether the style change applies to the current document or to all future documents. To save it for future use, click the checkbox for Add to the Styles gallery.
3. Change the levels of the style headings shown
A TOC can be itemized, or you can just include the major sections. The Show levels number allows you to change the number of levels displayed in your table of contents. The “Levels” here refers to the style headings you have applied to your sections.
For instance: H1, H2, H3… etc. If you set it on 2, then all text with the Heading 1 style or the Heading 2 style is displayed.
4. Change or add dot leaders in the TOC
Dot leaders are the lines or dots that connect the items in the index to page numbers. These leader lines are mentioned in many style guides as a necessary part of thesis documents.
In the Table of Contents dialog box, click the dropdown for the Tab leader list and select the dotted line option. Alternatively, choose the leader line you want or select “none” to remove it from the TOC.
5. Add a non-heading style
Word won’t include a non-heading style when it inserts an automatic TOC. By default, Word only includes headings 1 through 9. But it gives you a method to include any other style you create in the index. Let’s say you want to add another heading called “A Brief Guide” at the top of the content and the TOC.
In the Table of Contents dialog box, click the Options button to open this screen:
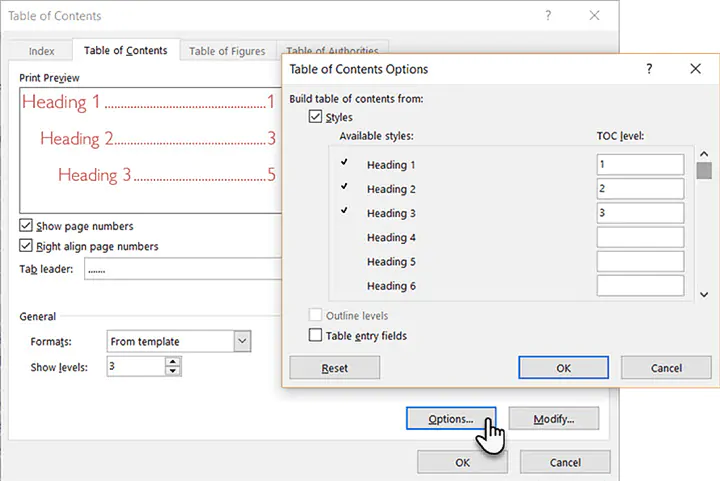
Right now, it maps the styles in use only to the TOC levels. As you can see, the three styles, Heading 1, Heading 2, and Heading 3 are mapped as levels 1. 2, and 3.
Go down the boxes until you find Title, which has no mapped TOC level. Enter 1 to map Title to the TOC top level.
Click OK twice to exit the dialogs. Word will prompt you to replace the contents. Click Yes to replace the TOC.
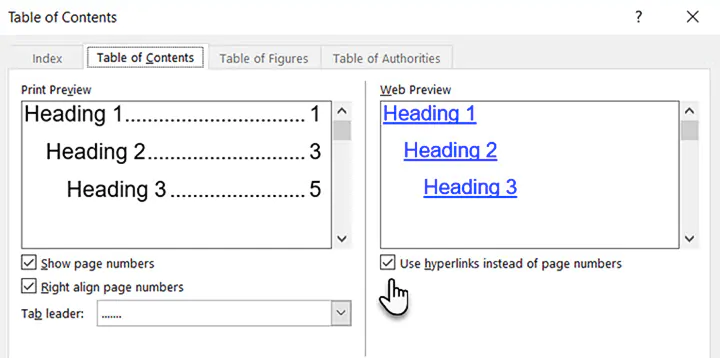
6. Create a clickable Table of Contents
Creating a hyperlinked Table of Contents is expected in the digital age. Navigation is faster. It is also another condition to submit a thesis or dissertation.
Click the Use hyperlinks instead of page numbers checkbox.
Also, uncheck the Show page numbers box if you just want to use the hyperlinks.
7. Place a simple border around the Table of Contents
You can use Word’s Shapes feature to insert a border around the TOC. Set Shape Fill to “No Fill” and then add Shape Styles or use Format Shape to design the look of the pseudo-border around the table.
Remember to add Table of Contents to your documents
The automatic Table of Contents feature is a time saver. But to catch the eye, you need to dive into different styles and custom tables. To sum up:
- Structure your document.
- Decide the levels you want to display.
- Change the style attributes to match your needs.
As you begin making your own, you will have your own questions. Hopefully, this guide has illustrated the basic process well enough for you to take the plunge. Are you more comfortable with Table of Contents now?
If you are looking to sharpen your Microsoft Office skills, check out our Microsoft Word course to learn time-saving tips and tricks for formatting your documents.
Ready to master Microsoft Office?
Start learning for free with GoSkills courses
Start free trial
When you’re creating or editing a long document, you’ll
probably have to create a table of contents. That might sound like a chore, but
fortunately, you can do it in just a few clicks. Then, if you change the document, Word can update the table of content instantly.
Best of all, Word includes hyperlinks to the various sections in your table of contents, so it isn’t just a visual aid for
printed documents, but it’s also perfect to make easy-to-browse online documents and PDFs with.
Creating the table of contents in Word itself is simple, but the tricky part is getting it to work the way you want. In this tutorial, I’ll show you everything you need to make a simple, auto-generated table of contents, and then get it to look the way you want in every version of Microsoft Word.
How to Make a Table of Contents in Microsoft Word (Screencast)
You can follow along using your own document, or if you prefer, download the zip file included for this tutorial. It contains a document called The Age of Einstein.docx, which is a public domain physics textbook (credit to the author, Professor Frank W.K. Firk).
Watch the video screencast above or follow the written tutorial instructions below for more detail on how to make a table of contents in Word.
Creating Your Table of Contents in Word
There are a few ways of creating a table of contents in Word, but only two that you’ll
ever use
- Create them automatically from built-in styles
- Create them from your custom styles
These methods work mostly the same in Windows and Mac versions of Microsoft Word.
Using MS Word built-in styles is the fastest and most common
technique, and using custom styles takes only a little more work. Sometimes,
you’ll want to use both techniques in the same document. Once you have a table of contents (TOC) in
a document, you can format it with its own styles. You don’t want to format the
TOC like regular text, because the formatting can easily get wiped out.
How the Textbook is Organized
Before doing anything to the document, let’s see how it’s
organized. Page 1 is the title, page 2 is blank and will hold the table of contents, page 3
is the preface, and after that comes the text. As you scroll down, notice that headings
and subheadings are formatted.
.jpg)
.jpg)
.jpg)
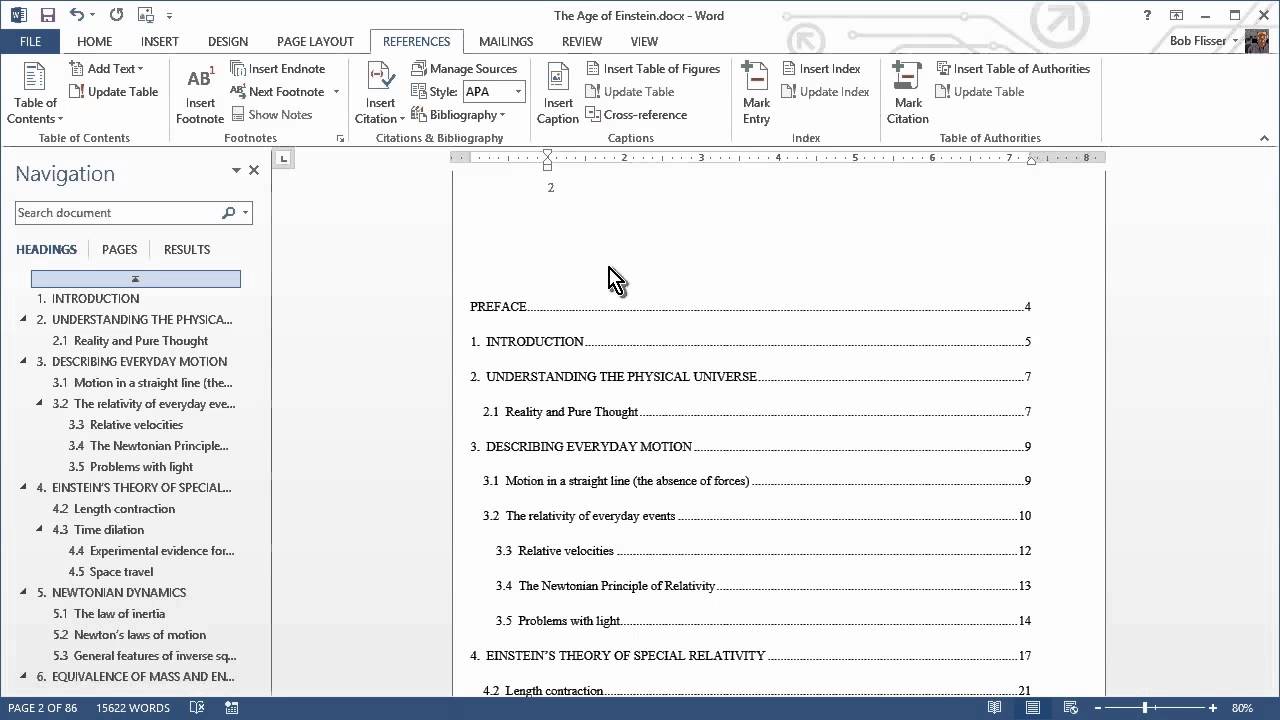
The best way to see the structure of the document is with
the Navigation Pane. (In some versions of Word for Mac, it may be called the Document Map Pane.)
In Windows, go to the View
tab, then click the check box to enable the Navigation Pane.
.jpg)
.jpg)
.jpg)
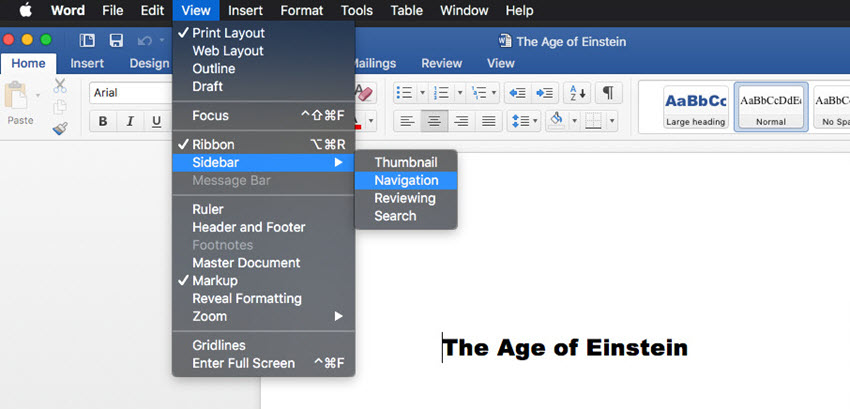
On the Mac, click the Sidebar option to show the drop-down menu. Click the arrow next to the option and click Navigation. (On older versions of the Mac software, the option is called Document Map Pane.)


On your Mac or PC, go back to the Home
tab if you’re not already there. Keep your eye on the Styles box on the ribbon,
and click the items in the pane to navigate through the book.
Notice that the
items with whole numbers – like 2.
Understanding the Physical Universe – are formatted as Heading 1, and items
with decimals – like 2.1 Reality and Pure
Thought – are formatted as Heading 2. There are also a few decimal items –
like 4.5 Space Travel – that are
formatted as Heading 3.
Tip: when
creating a document, the shortcuts for applying the Heading 1, 2 and 3 styles
are Ctrl-Alt-1, Ctrl-Alt-2, and Ctrl-Alt-3
(and Command-Opt-1, Command-Opt -2, and Command-Opt-3 on the Mac).
Generating a Table of Contents Using Built-In Header Styles in Word
Word can now turn those Heading styles into table of contents
entries. Click at the top of page 2. (Tip: in Windows, press Ctrl-G,
type 2, then press Enter. On the Mac, press Command-Opt-G, type 2, then press Return.)
In Windows, go to the References
tab on the ribbon, click the Table of
Contents button on the left, then choose one of the two built-in tables
from the list. Note that the thumbnails show that Headings 1, 2 and 3 will be
included.
It’s almost the same on the Mac. Go to the Insert menu, choose Index and Tables, then pick one of the
formats on the left and click OK.
This dialog box also shows that Headings 1-3 will be included.
.jpg)
.jpg)
.jpg)
As soon as you choose one, the table of contents gets inserted starting on
page 2, and Word automatically inserts a couple of more pages, so it all fits. In Windows, you can Ctrl-click one of the items, and it will hyperlink to the item in the document.
.jpg)
.jpg)
.jpg)
This works great, but there’s one problem. Before the
Introduction, there is a Preface that
should be included in the table of contents. And just before Appendix A1 is the heading for
the Appendix, and that should also be
included. But they weren’t, because they’re both formatted with a custom style
called Large heading, and custom
styles don’t get included in the default table of contents. The second method of creating table of contents in Word will fix that.
Creating a Table of Contents From Custom Styles in Word
Word can include any styles in a table of contents. We just
have to tell it which ones to choose. And we can update the table, rather than having
to delete it and start over.
In Windows, go back to the References tab, click the Table
of Contents button, then near the bottom of the menu, choose Custom Table of Contents. Click the Options button near the bottom of the dialog box to display the Table of Contents Options dialog box.
On the Mac, go to back to the Insert menu and choose Index
and Tables. In the Table of Contents section, click the Options button.
On the Mac or PC the Table of Contents Options dialog box shows that the Heading 1 style will have TOC level 1,
the Heading 2 style will have TOC level 2, and the Heading 3 style will have
TOC level 3.
.jpg)
.jpg)
.jpg)
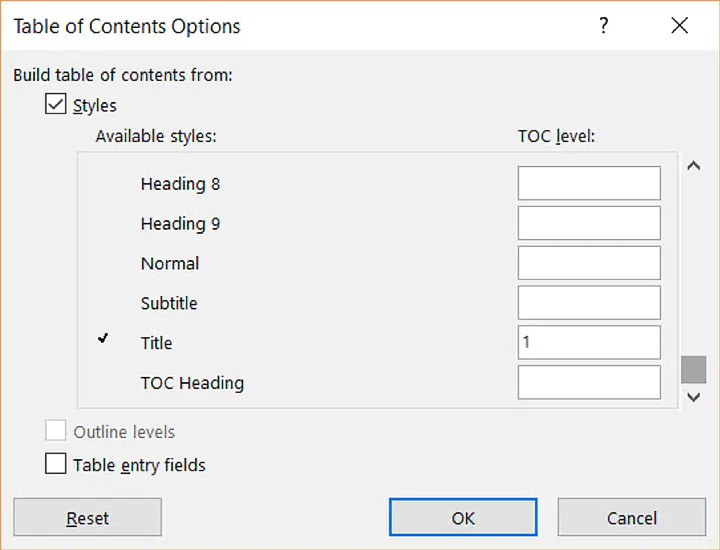
Scroll down to the bottom of the list (on the Mac, you’ll use the down slider). Then, in the box for Large heading, type a 1 to make it level 1. Table of Content levels can
come from more than one style.
.jpg)
.jpg)
.jpg)
Click OK in the
Table of Contents Options dialog, then OK again in the Table of Contents dialog box. When Word displays a message asking if you want to replace the
table, choose Yes. The Preface and Appendix are now both included in the table
of contents.
.jpg)
.jpg)
.jpg)
Manually Updating the Table of Contents in Word
There are other times when you’ll want to update the table
manually. This is handy when you change the text of one of the headings and
want the change reflected in the table of contents.
Scroll down to the page with the preface. At the top of the page replace
PREFACE with FORWARD. Make sure it still uses the Large heading style.
Go back to the top of the table of contents and click in it. Note that it
has a gray background; that means it’s a field, and fields can usually be
updated.
Click the Update Table
button either on the TOC itself (that button doesn’t always appear) or on the References tab, and the first entry changes to FORWARD. (On the Mac, right-click the table and choose Update Field from the pop-up menu. Choose the Update entire table option and click OK.)
.jpg)
.jpg)
.jpg)
Now that the table of contents displays the correct text, we
can apply nicer formatting though.
How to Modify Table of Contents Styles in Word
Each heading level of the table of contents has its own
style that’s automatically applied. All we have to do is change the formatting
of the styles to change the table’s appearance, here’s how:
- In Windows, in the References tab of the ribbon, click again on the Table of Contents button and choose Custom Table of Contents, near the
bottom. In the Table of Contents dialog box, click Modify. - On the Mac, click Insert > Index
and Tables. On the left side, choose From Template, then
click Modify. Everything else works
the same way as in Windows. - In the Table of Contents dialog box, click Modify, and another dialog box appears,
showing style names and formatting for the TOC heading levels. Select TOC
1. - Click the Modify
button just below it, and the Style dialog box appears. (On the Mac, it’s called the Properties dialog box.)
.jpg)
.jpg)
.jpg)
Format the style with Arial or Helvetica, 12 points, bold.
Then click OK.
.jpg)
.jpg)
.jpg)
- Repeat for the TOC 2 style, and set it to Arial
or Helvetica, 12 points, normal. - Repeat for the TOC 3 style, and set it to Arial
or Helvetica, 11 points, normal.
The table of contents should now look like this:
.jpg)
.jpg)
.jpg)
Conclusion
When you have a long document, you don’t have to fear
creating a table of contents. Whether you’re using Windows or a Mac, you can
insert one in just a few clicks, then use the same dialog box to change the
formatting.
As you learned in this table of contents tutorial, remember not to apply formatting directly to the table, because it
can get wiped out if you replace it. If you make any changes to the Word document itself, remember to click the top of the TOC and update it. Leave a comment below if you have any trouble making or tweaking your table of contents.
To learn more about working with Microsoft Word, study the following tutorials:
Editorial Note: This post was
originally published in 2014. It has been comprehensively revised to make it
current, accurate, and up to date by our staff—with special assistance from Laura Spencer.
Did you find this post useful?

Bob Flisser has authored many videos and books about Microsoft and Adobe products, and has been a computer trainer since the 1980s. He is also a web and multimedia developer. Bob is a graduate of The George Washington University with a degree in financial economics.