
Word for Microsoft 365 Word for Microsoft 365 for Mac Word 2021 Word 2021 for Mac Word 2019 Word 2019 for Mac Word 2016 Word 2016 for Mac Word 2013 Word 2010 Word 2007 More…Less
After you have created a table of contents in Word, you can customize the way it appears. Customizing your table of contents applies your preferences to your existing table. Like what you see, select OK. If you’re not happy with the look, just select Cancel and all changes are forgotten. Your table of contents will still be there.
To customize your existing table of contents:
-
Go to References > Table of Contents.
-
Select Custom table of contents.
-
Use the settings to show, hide, and align page numbers, add or change the tab leader, set formats, and specify how many levels of headings to show. For more info, see Custom table of contents .
-
Go to References > Table of Contents > Custom Table of Contents.
-
Select Modify. If Modify is grayed out, change Formats to From template.

-
In the Styles list, click the level that you want to change and then click Modify.
-
In the Modify Style pane make your changes.
-
Select OK to save changes. Repeat steps 3 and 4 for all the levels that you want to display in your table of contents.
To customize your existing table of contents:
-
Go to References > Table of Contents.
-
Select Custom table of contents.
-
Use the settings to show, hide, and align page numbers, add or change the tab leader, set formats, and specify how many levels of headings to show.
-
Go to References > Table of Contents > Custom Table of Contents.
-
Select Modify. If Modify is grayed out, change Formats to From template.
-
In the Styles list, click the level that you want to change and then click Modify.
-
In the Modify Style pane, make your changes.
-
Select OK to save changes. Repeat steps 3 and 4 for all the levels that you want to display in your table of contents.
To customize your existing table of contents, or create a new table:
-
Go to References>Table of Contents>Insert Table of Contents.
-
If you’ve already got a table of contents, customizations will be applied. If not, this will insert a new customized table.
-
Use the settings to show, hide, and align page numbers, add or change the tab leader, set formats, and specify how many levels of headings to show. For more info, see Custom table of contents .
-
Go to References > Table of Contents > Insert Table of Contents.
-
Select Modify. If Modify is grayed out, change Formats to From template.
-
In the Styles list, click the level that you want to change and then click Modify.
-
In the Modify Style pane make your changes.
-
Select OK to save changes. Repeat steps 3 and 4 for all the levels that you want to display in your table of contents.
Do you have a question about Word that we didn’t answer here?
Post a question on the Word Answers forum.
Need more help?
Want more options?
Explore subscription benefits, browse training courses, learn how to secure your device, and more.
Communities help you ask and answer questions, give feedback, and hear from experts with rich knowledge.
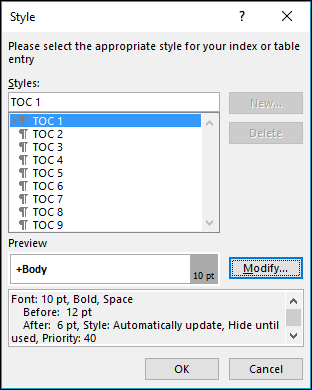
Table of Contents entries use nine levels of the pre-defined TOC styles (TOC 1, TOC 2, etc.) for formatting. All TOC styles extend the Body style of the document theme, but each TOC style has a specific indent and spacing settings. By default, Word uses the styles defined in the template attached to the document (by default, the template is normal.dotx):

You can modify the font, paragraph, tabs, border, and other formatting of these TOC styles the same way modify any other style. Using the customizations of the Table of Contents styles, you can:
- Change the line spacing to the double space:

- Format long Headings to avoid overlapping page numbers:

- Align the second line of the long title:
- Customize tab leaders for different headings in the Table of Contents:

Sure, you can format the text of these lists like regular text in the document. However, all changes you make to the Table of Contents without changing the Table of Contents style may be lost after updating fields in the document.
To customize an existing Table of Contents style, you need to select that style and open the Modify Style dialog box. Word offers several different ways how to open that dialog box:
- Using the Table of Contents dialog box.
- Using the Styles pane.
- Using the Reveal Formatting pane.
Open the Modify Style dialog box using the Table of Contents dialog box
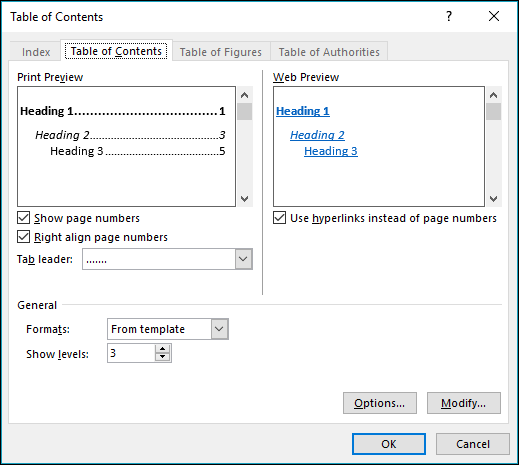
To modify TOC styles in the Table of Contents dialog box while creating a new Table of Contents (or editing an existing one), do the following:
1. Open the Table of Contents dialog box (see how to create a Table of Contents).
2. In the Table of Contents dialog box, on the Table of Contents tab, click the Modify… button:

3. In the Style dialog box:
- In the Styles list, select the style you want to modify:

- In the Preview field, see how the selected style looks,
- Under the Preview field, see the main options of the selected style,
- If you need to change the selected style, click the Modify… button.

Open the Modify Style dialog box using the Styles pane
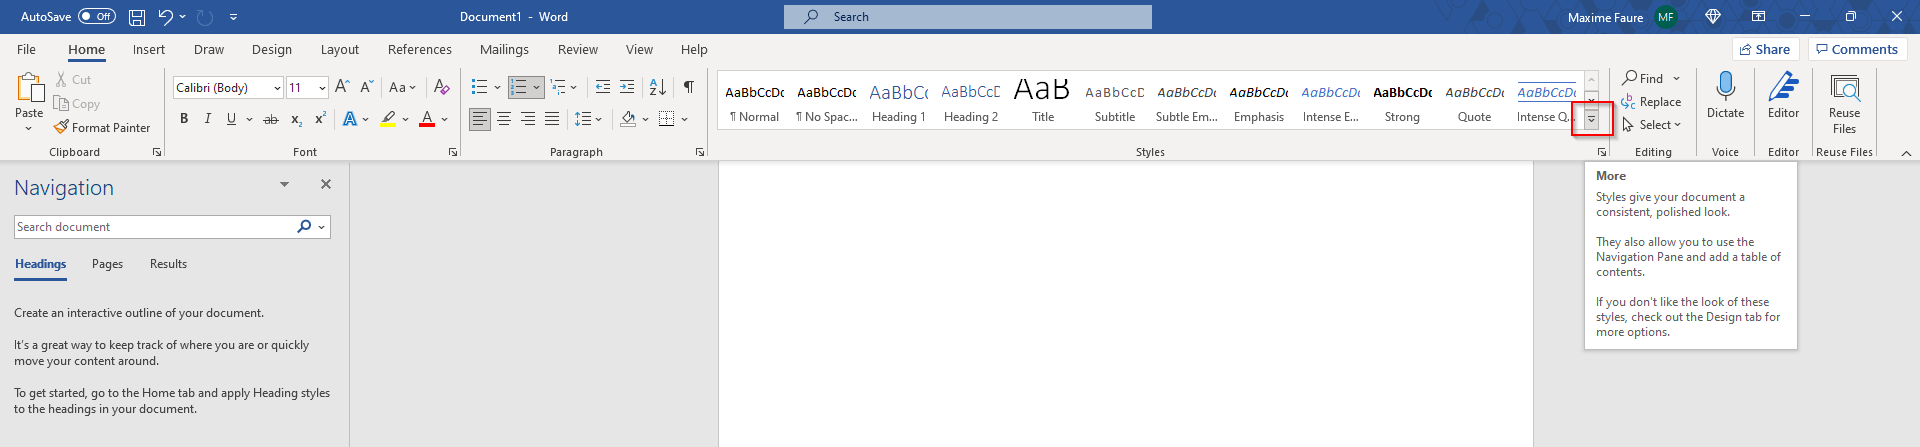
You can create or modify any style in a Word document using the Style pane. To open it, on the Home tab, in the Styles group, click the dialog box launcher (or press Ctrl+Shift+Alt+S):

On the Styles pane:
- Select the style you want to modify,
- Right-click and choose Modify… in the popup menu:

Open the Modify Style dialog box using the Reveal Formatting pane
The Reveal Formatting pane allows you to quickly review the font, paragraph, and section formatting used in the document content. See more about reviewing the text formatting quickly using the Reveal Formatting task pane.
1. Open Reveal Formatting pane by pressing Shift+F1:

- To view the formatting for the word, click on it
- To view the formatting for more than one word of the text, select the text fragment.
2. On the Reveal Formatting pane, in the Paragraph section, click on the PARAGRAPH STYLE link to open the Style dialog box.
3. In the Style dialog box:
- Select the style you want to modify,
- In the Preview field, Word shows how the selected style looks,
- Under the Preview field, Word shows the main options for the selected style,
- To make any changes, click the Modify… button:

Note: In some cases, more than one Style may be applied to the selected block of text; Word opens Hyperlink style if it can’t recognize which style it should open. You can scroll the list to choose the TOC style you need.
Modify the Table of Contents style
In the Modify Style dialog box, make the changes you need:

- In the Formatting section, make formatting changes as desired (for example, change the font, font size, color, and paragraph spacing),
- Click the Format tab:

Examples for the TOC style changes
Example 1: Change the line spacing to the double space
To change the line spacing, in the Modify Style dialog box:

- Select the Double space button,
- Make any other changes you need and click OK:
Note: You need to repeat this customization for all the TOC styles you use.
Example 2: Format long Headings using a right indentation
You can need to format the Table of Contents with long headings to avoid overlapping page numbers:

To format a long Heading that spans more than one line in the Table of Contents so that it doesn’t overlap the page numbers, do the following:
1. In the Modify Style dialog box, click the Format… button, then select Paragraph…
2. In the Paragraph dialog box, in the Indentation section, in the Right field, type or select the value you need. E.g., 0.2″:

3. Apply the changes for the style:

Note: If you have several long Headings with different TOC styles, you need to repeat this customization for all of them.
Example 3: Align the second line of the long title using a hanging indent
You can need to format the Table of Contents with the long headings for second and following lines:
To format a long Heading that spans more than one line in the Table of Contents so that it doesn’t overlap the page numbers, do the following:
1. In the Modify Style dialog box, click the Format… button, then select Paragraph…
2. In the Paragraph dialog box, in the Indentation section:
- In the Special dropdown list, select Hanging,
- In the By field, type or select the value you need. E.g., 0.8″:

3. Apply the changes for the style:

Note: If you have several long Headings with different TOC styles, you need to repeat this customization for all of them.
Example 4: Customize tab leaders for different headings in the Table of Contents
To customize the tab leaders for some TOC style, do the following:
1. In the Modify Style dialog box, click the Format… button, then select Tab…
2. In the Tab dialog box:
- In the Tab stop position field, type the value you want to position page numbers (usually, page width minus a minimal value such as 0.01″),
- In the Alignment section, select the Right option,
- In the Leader section, select the tab leader you prefer:

- Click the Set button to apply the Tab stop position.

3. Apply the changes to the style:

![]()
Download Article
![]()
Download Article
- Adding a Table of Contents
- Updating the Table of Contents
- Stylizing the Table of Contents
- Video
|
|
|
This wikiHow teaches you how to customize and update the table of contents in your Word document. When you create a table of contents in Word, page numbers are added automatically based on the headings you’ve added to each section. Word makes it easy to customize the way the page numbers and section titles appear on the table. If you make changes to your document that affects your section headers or page numbers, you’ll need to choose the Update Table option so the table of contents remains correct.
-
1
Format the headings of each section of your document. Word’s table of contents builder automatically generates a table of contents based on the headings in your document.[1]
This means each section that you want represented in your table of contents must have a properly-formatted heading.- If a section should appear as a primary section in the table of contents, select its heading, click the Home tab, and then select Heading 1 on the «Styles» panel.
- To add a sub-section to the primary section in the table of contents, give that section a Heading 2 header: Select its heading and choose Heading 2 from the Styles section.
- You can can also use Heading 3, Heading 4, etc., to add even more pages to your table of contents.
- Make sure any page you want to include in the table of contents has a heading.
-
2
Click the location where you want to insert the table of contents. Typically this will be at the beginning of your document.
Advertisement
-
3
Click the References tab. It’s at the top of Word.
-
4
Click Table of Contents on the toolbar. It’s at the upper-left corner of Word. A list of Table of Contents styles will expand.
-
5
Select an automatic style template. Several style options appear for your table of contents—choose one of the suggested styles to get started. Once selected, this will add a table of contents that lists the page numbers for each of your formatted sections.


Advertisement
-
1
Click the References tab. It’s at the top of Word.[2]
- Use this method if you’ve made a change (changing a heading, adding/removing pages) to your document and need to update the table of contents to reflect that change.
- The only way to change the name of a section on the table of contents is to change the name of the corresponding header in the document.
-
2
Click Update Table on the «Table of Contents» panel. It’s in the upper-left corner. Two options will appear.
-
3
Select an update option.
- Select Update page numbers only if you want to refresh the page numbers without applying any changes you’ve made to the headings.
- Select Update entire table to apply all heading and page number changes.
-
4
Click OK. The table of contents is now up-to-date.


Advertisement
-
1
Click the References tab. It’s at the top of Word.
-
2
Click Table of Contents on the toolbar. It’s at the upper-left corner of Word. A list of Table of Contents styles will expand.
-
3
Click Custom table of contents on the menu. This opens the Table of Contents dialog box.
-
4
Adjust your general preferences. The «Print Preview» box at the upper-left corner shows you how the printed table of contents will appear, while the «Web preview» box displays how it will look on the web.[3]
- Use the checkbox next to «Show page numbers» to show or hide page numbers. If you just want to hide page numbers on the web version of the table of contents, check the box next to «Use hyperlinks instead of page numbers.»
- Use the checkbox next to «Right align pages numbers» top adjust the alignment.
- To change the style of the line or pattern that separates the heading title and the page number, make your selection from the «Tab leader» menu.
- To choose another theme, select something from the «Format» menu.
- To adjust how many heading levels are displayed in the table, select an option from the «Show levels» menu (the default is 3).
-
5
Click the Modify button. It’s in the lower-right corner of the window. This is where you can change the properties of the text on the table of contents page.
- If you don’t see this button, click the «Formats» menu and select From template. It should appear then.
-
6
Select a style and click Modify. The styles you can change appear in the «Styles» box on the left side of the window. When you click a style (e.g., TOC 1), you’ll see the font size, spacing, and other details—clicking Modify allows you to change these details.
-
7
Make your changes and click OK. You can choose different fonts, alignments, colors, and numerous other details for each selected style. Alternatively, you can keep the defaults, which come from the table of contents template you selected.
-
8
Click OK. The style changes you’ve made will apply to your table of contents immediately.


Advertisement
Ask a Question
200 characters left
Include your email address to get a message when this question is answered.
Submit
Advertisement
Video
Thanks for submitting a tip for review!
About This Article
Article SummaryX
1. Click the References tab.
2. Click Update Table.
3. Select an update option.
4. Click OK.
Did this summary help you?
Thanks to all authors for creating a page that has been read 60,117 times.
Is this article up to date?

It’s tricky to make a good-looking and functional table of contents in Microsoft Word.
You might often encounter documents that have messy tables of contents along with navigation panes with links to missing headings, non harmonized styles, and badly structured sections.
This wouldn’t be a big problem for smaller documents, but with hundreds of pages in a file it ruins the user experience and makes it painful to navigate from one section to another. Not to mention that non-harmonized styles throughout the file can mess with the overall hierarchy of titles.
So how can you build a customizable and structured table of contents with pretty personalized titles and numbering? You’ll learn how in this guide.
How to Build a Table of Contents in Microsoft Word
How to Define Numbering Styles in Word
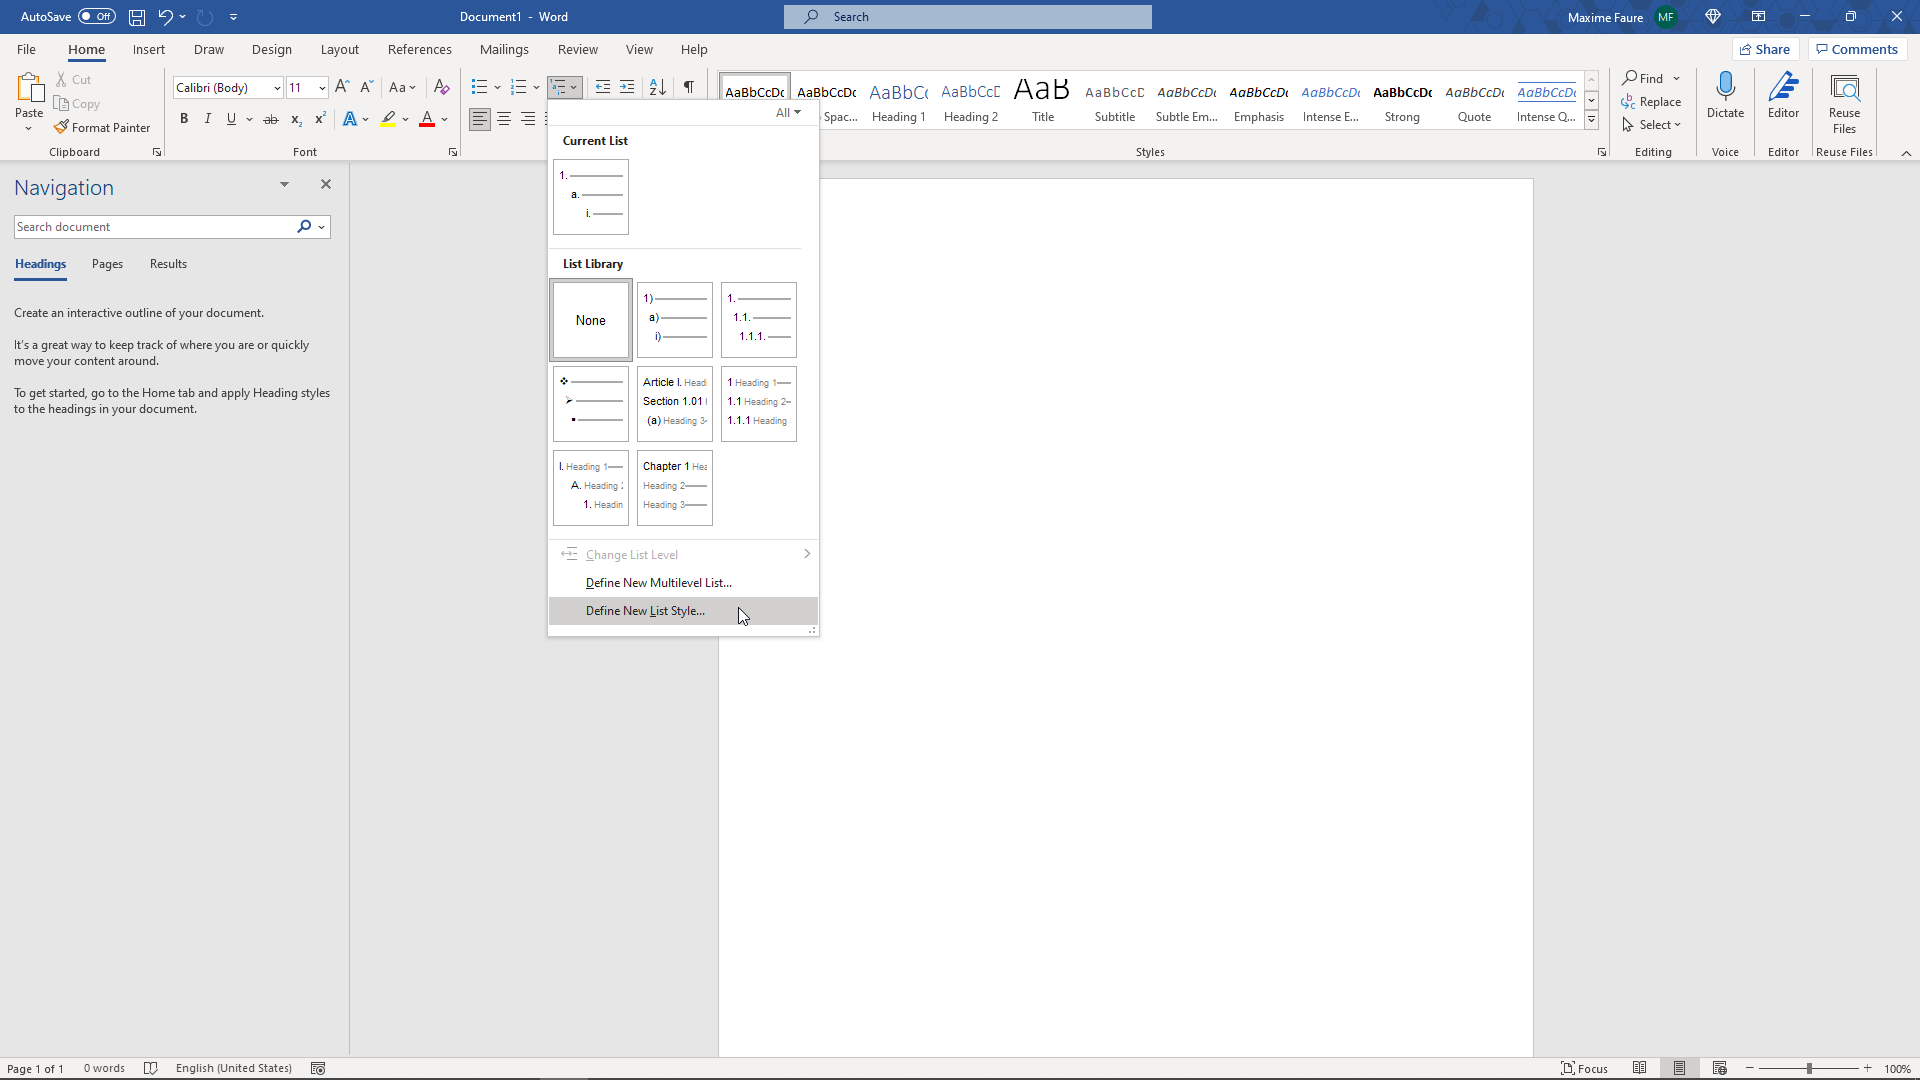
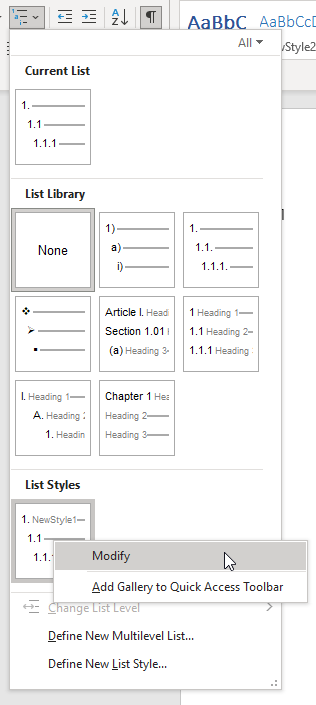
What we’re going to do first is define a new list style to create a personalized numbering for our titles. Go to the Home tab > Paragraph section and click the multilevel list button. Choose Define New List Style.
This will open the Define New List Style window which we will use to customize the numbering style and format of our titles.

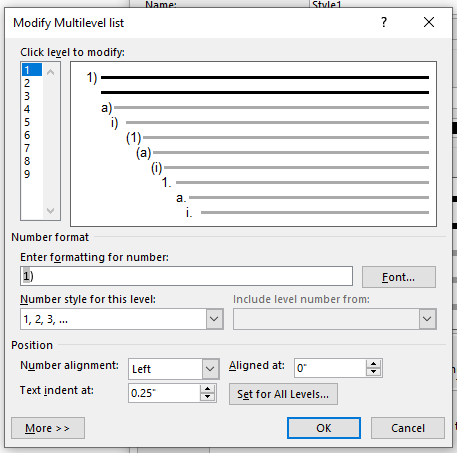
Name your style however you want (here MyNewListStyle), then click the Format button > Numbering… This will open the Modify Multilevel list window.
We will only define the numbering («1)»,»a)») and no format or style will be applied at this level. We’ll define and apply font styles and formats later on.
Let’s take the following numbering for our titles «1.»,»1.1″,»1.1.1″,»2.»,»2.1″,»2.2″ and so on.
First replace the parenthesis character with a dot character in the Enter formatting for number field. This will change the level 1 numbering format to «1.».
Then we’ll define the second level of numbering by clicking the number 2 in the Click level to modify list.

Change the Number style for this level by clicking the associated dropdown menu then select 1,2,3, … You should get this result:

Erase the parenthesis character in the Enter formatting for number field and place a dot before the «1». You should have «.1».
Now how do I get the numbering style 1.1 at level 2? Pretty simple! Place your mouse before the «.1» in the Enter formatting for number field. Then open the Include level number from dropdown menu and select Level 1.

This will insert the numbering for level 1 before your numbering for level 2. You should get this result:

Inserting numbers manually in this field will give you static numbers which won’t be linked to any dynamic numbering in your document. These numbers won’t be highlighted in grey in the Enter formatting for number field.
Let’s repeat the same steps for level 3. Select level 3 in the Click level to modify list. Select the right Number style for this level in the dropdown menu. Remove unwanted characters and add a dot before the «1».
Then place your mouse before the «.1» in the Enter formatting for number field and open the Include level number from dropdown menu and select level 2. Add a dot before the level 2 «1» in the Enter formatting for number field. Then open Include level number from and select level 1. You should get this result:

You can modify the space character following the number by clicking More >> then Follow number with and select what you want. Here I am going to use Tab character for all my levels.
Click the OK button and you’re all set for the numbering part! You won’t have to do these steps again as the styles you define can be available from one Word document to another. We’ll talk more about that later.
Your list style should be available by clicking the Multilevel list button in the Paragraph section of the Home tab.

We will now define our title styles.
How to Define Title Styles in Word
In the Home tab and under the Style section, click the down arrow next to the different styles available.
Then click Create a Style.

Give your new style a name. It’s good practice to include the level number where you’re going to apply this title so it’s easier to follow your title hierarchy. I am going to name mine NewStyle1 for level 1. Then click Modify.
If you’ve clicked OK too fast don’t worry – you can find your style and modify at anytime in the style section. You can edit it by right clicking on it and clicking Modify…


We are going to apply formatting to our title style.

Start by opening the Style based on dropdown menu and select Heading 1 for level 1. This is an important step for Word to understand the title hierarchy level. You’ll apply this step to each level (Heading 2 for your level 2 style, Heading 3 for your level 3 style…).
Then open the Style for following paragraph and select Normal. This will prevent any formatting from applying automatically to the following lines of text you type.
Open the Format menu and open the Numbering… menu. Make sure that None is selected then click OK. This will prevent any conflict between the numbering we defined earlier.

You can then select any font formatting that you want. This is what I picked:

Let’s create a style for level 2 and 3 by following the same steps. Be sure to have the numbering set to None each time. This is what I have for level 2:

And level 3:

We are now going to link our title styles with our numbering style.
Go to the Home tab, Paragraph section, Mutlilevel list. Then right click on the Numbering list style we created in the first part and click Modify.
Open the Numbering window by clicking Format. Select the level 1 and in the Link level to style dropdown menu select the level 1 style you created for your level 1 title. You should get this:

Repeat these steps for level 2 and 3.

Then click OK.
How to Apply Your New Title Styles
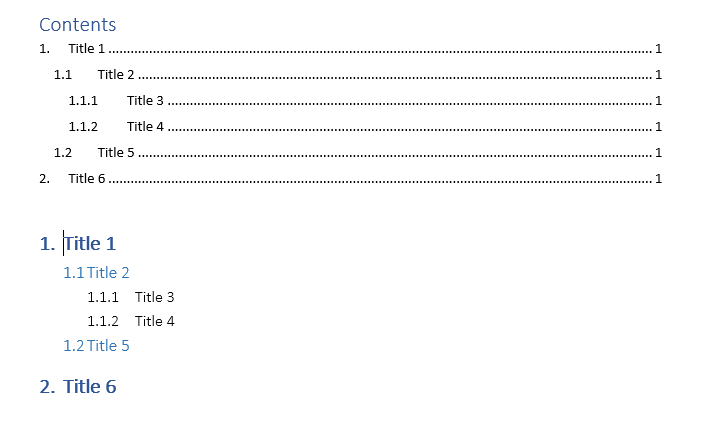
Now let’s try to apply our new title styles. Type in Title 1 in your document without any formatting applied.
If you already have a format applied you can remove it by clicking in the paragraph and applying the Normal style in the Styles section. This is useful to remove any unwanted formatting or styles you may find.
Now click in the Title 1 text and click on your newly created style for level 1. This will apply your level 1 style to the whole paragraph.
If you go to the View tab you can check the Navigation pane and see that «1. Title 1» just appeared as a selectable heading on the left Navigation panel, allowing you to go to it quickly.

Let’s try our other titles styles as well. Type in the text without formatting, place your mouse in the relevant paragraph, and then click on your newly created styles to apply them. You should get something like this:

As you can see on the left panel, all my titles are appearing in a structured way with harmonized numbering. You can collapse are expand these to navigate faster. There is also a search engine available on top of this panel.
You can now insert a structured table of contents by going to the References tab > Table of Contents > Automatic table 1. You should now have something like this:
You can customize this table of contents to only display titles down to a certain level by clicking Table of Contents > Custom table of Contents > decrease the Show levels number > OK.

How to Preserve Your Styles in Word
At the moment, these title styles are only available in this Word file. We are going to make them available every time we open Word as well as make them transferable to other people.
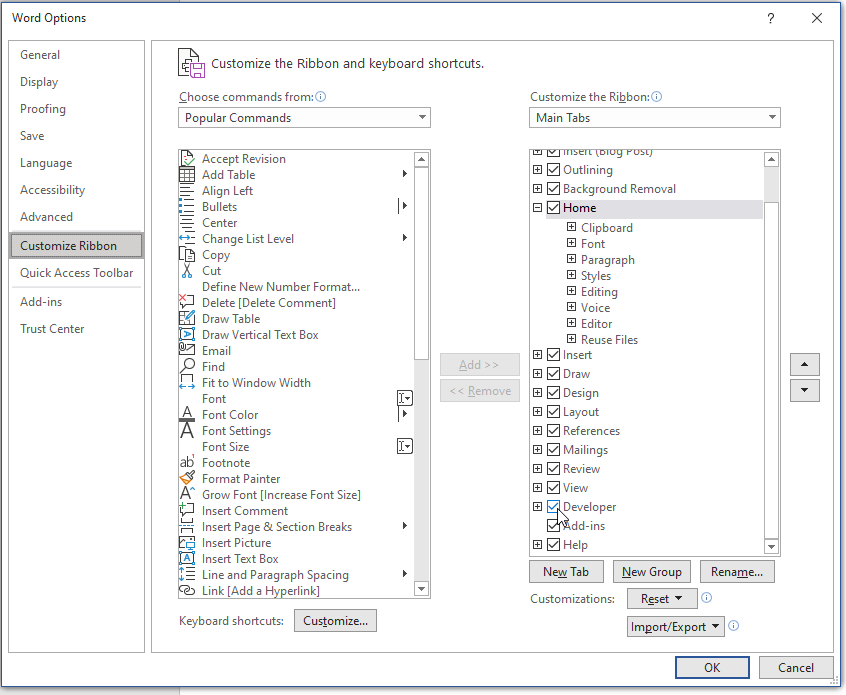
Open the Developer tab in Word. If you can’t see it displayed click File > Options > Customize Ribbon > Check Developer in the right panel > OK.
Once you’re in the Developer tab go to Document Template > Organizer.

In the left panel (in Document1 for me) you can see the styles available in this file. In the right panel are the styles available in the Normal.dotm which allows you to store styles that will be available every time you open Word.
Let’s select all our newly created styles then click Copy->. You should get something like this:

Now if you open another file your styles will be directly available in the styles section. This can be useful if you want to transfer styles among your group and harmonize the structure and format of your files.
That’s it!
Voilà! You are now able to build a structured Word document with customizable titles styles and a reliable navigation panel.
Learn to code for free. freeCodeCamp’s open source curriculum has helped more than 40,000 people get jobs as developers. Get started
You’ve built a Table of Contents in Microsoft Word using the Styles feature to mark the TOC entries or by marking them manually. And just when you’re about to pat yourself on the back for having an automatic Table of Contents in your document, you notice something’s a little … off. Maybe the font’s not quite right. Perhaps the font’s okay but the spacing’s not. Or the indentation. It could be you want/don’t want the dot leaders running up to the page numbers.
Suffice it to say you just want to alter the format of it. But how?
More…
First, let’s take a look at a sample generated Table of Contents:

Right away, I see several problems:
- Fonts are not consistent. There’s a mix of Times New Roman (the font for the rest of the brief) and Arial.
- I’d probably prefer a bit more white space between the second-level entries.
- I don’t like the way the right indentation on the second-level entries is behaving — too close to the page numbers.
Table of Contents: fix = replace
To fix the Table of Contents, I basically replace it. Yes, there are other ways to modify TOC entries (if you’re already comfortable with Styles), but I prefer this method because it doesn’t involve me searching all over the document for each Style and modifying it separately. To-may-to, to-mah-to.
First, we select the entire Table of Contents with the mouse and hit Delete.
Next, we can re-define the Table of Contents the way we want. To do that, we go to the References tab and find the Table of Contents menu on the far left:

Word 2007-2010

Word 2013-2016
That brings us to the Table of Contents dialog box. We’ll click Modify at the bottom:

… which will take us to the Style dialog box:

The secret to controlling TOC formatting: Styles
This dialog box lists all of the Styles associated with Table of Contents entries. Since the Styles control the formatting of the entries in the Table of Contents, we need to modify the Styles to correct the formatting. The first entry that has incorrect formatting is TOC 2 (the second-level entries). Click on that (click #1 above) to see the current settings in the Preview window, then click on Modify (click #2).

Here’s where we can fix everything that’s wrong with the second-level TOC entries: we can change the font from Arial to Times New Roman with the drop-down in the center, and we can fix the paragraph issues (the right indentation and the amount of vertical space before and after) by clicking on the Format button at the bottom and choosing Paragraph from the menu.
That will take us to the familiar Format Paragraph dialog box:

We can repeat the same steps for any other TOC entries that need adjusting, but you get the idea, right?
To check our progress, we go back to the Table of Contents dialog box:
Use Print Preview as a guide
Before …

… and after.
Notice how the Print Preview window (circled in red) has changed from the first time we saw it. Also notice that, if we want more/fewer TOC levels, or we want to alter or delete the dot leader, those options are available under General (in the lower third of the dialog box).
Now that we have finished modifying the TOC Styles, we can click OK to insert the new Table of Contents.
So, for my friend Judy, who has asked me repeatedly to do a tutorial on how to modify the format of a Table of Contents … there it is!
This content is part of a course
What you’ve learned here is just a small part of my Brief Builder’s Workshop course, where you can learn all sorts of skills for building better briefs, such as creating a Table of Authorities and configuring a Table of Contents (two ways). Click here for more information.