
Word for Microsoft 365 Word 2021 Word 2019 Word 2016 Word 2013 Word 2010 Word 2007 More…Less
You can use the numbered list feature in Word to add numbers to cells in a table.
Note: If a table cell contains multiple lines of text, Word numbers each line in the cell.
-
Select the table cells that you want to number.
To number the beginning of each row, select only the first column in the table by clicking the column’s top border.

-
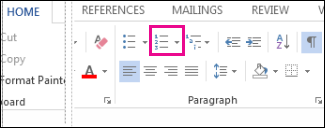
On the Home tab, in the Paragraph group, click Numbering.
Note: To select a different number format, right-click a number in the list, point to Numbering, click Define New Number Format, and then select the options that you want.

See also
Automatically number rows in Excel
Need more help?
For large tables in Word, it would be more convenient if we can auto number their rows or columns. Follow this article to learn how.
Many of us may know how to use the AutoNumber feature in Excel worksheets. In fact, this feature can also be applied to Word tables. For complex documents that may contain large tables, you may want Word to number the rows automatically to save time. Besides, if you have inserted auto-number to the rows or columns of a table, then you will never need to adjust numbers when you insert or remove rows or columns from your table anymore, because Word will update them automatically. In this article, we will mainly introduce how to do so.
Method 1: Create a Normal Auto-numbered List
For better understanding, I will show you how to insert an auto-numbered list in the first left column of the table like this: 
- Select the column of your table where you want to insert a numbered list.
- Go to “Home” tab, and then click “Numbering” drop down list.
- Select a numbered list from “Numbering Library”.


Method 2: Apply Customized Number Format
In Word, you can also change the style and format of the numbered lists. For example, sometimes you may need to restart the sequence, or specify a new start number like this:
To do so, you can follow these steps:
- Select the column of your table where you want to insert a numbered list with other formatting.
- Switch to “Home” tab, and click “Numbering” drop down list. And then select “Define New Number Format”

- In the subsequent dialog box, enter your customized number format under “Number Format” box.
- Select the style of numbers from “Number Style” drop-down list. And then click “OK” to save it.

- In this way, we will be able to define new number format of our own. And if we delete or add an item into the table, the numbered list will update accordingly.


Take Assistance of a Specialized Repair Tool
All in all, we can quickly add row or column numbers to a large Word table automatically. And also, Word provides many other features to bring common users convenience. However, Word sometimes can be affected by malware intrusion or virus attacks. Thus, it is essential to keep a stellar repair tool nearby to recover word. This tool is capable of examining Word files and restoring them to their prior condition in a jiffy.
Author Introduction
Kelly Zhao is a data recovery expert in DataNumen, Inc., which is the world leader in data recovery technologies, including excel recovery and pdf repair software products. For more information visit www.datanumen.com

on
March 27, 2008, 5:00 PM PDT
How to number rows in a Word table
Number Word table rows and columns
I love discovering an easy trick, especially one I’ve never seen used before. Did you know that you can quickly add row and column numbers to a Word table? Simply use the Numbering tool on the Formatting toolbar (in version 2003 and earlier):
- To number rows, select the left most column in the table and click Numbering on the Formatting toolbar. To select a column, hover the mouse over the column until Word displays the selection arrow (see below) and click. In Word 2007, select the column and then click Numbering in the Paragraph group on the Home tab.
- To number columns, select the top row in the table and click Numbering on the Formatting toolbar. To select a row, hover the mouse in the left margin just next to the row you want to click. When Word displays the selection tool (see below) click to select the row. In Word 2007, select the row and then click Numbering in the Paragraph group on the Home tab.
Select a column
Select a row
In truth, you can number any row or column, but most likely, you’ll want to display numbers to the left or across the top of the table. I realize that you won’t want to number most tables and columns, but I still like knowing I can do it.
Number rows
Number columns
-
Software
Tables are visual displays of data arranged in rows and columns. Table cells contain numbers, text, or a combination of numbers and text. Some cells can include images, symbols, links, and other objects. See how to create and modify tables in Word.
Each table should be referenced in the document content. Typically, tables have a number and a title, which are referenced. Microsoft Word offers functionality to create automatically updated numbers for figures, tables, and equations. The numbers and titles, created using the Captions functionality, are used to cross-reference tables in a document and create a List of Tables.
The word Table and a number identify a table then follows the caption. A caption is a short block of text that explain table contents without referring to the document content:

See more about creating numbers and captions for figures: images, pictures, charts, etc., creating captions for equations, and creating captions for photographs.
Attention! We highly recommend checking the formatting requirements, accepted by your college, university, company, or established on the project, etc.
Insert a caption for tables
To add automatically updated numbers and a title (caption) for a table, select it by:
- Selecting all rows or columns of the table one by one, or
- Moving the mouse over the table until you see the table selection icons in the upper-left corner of the table and clicking it:

Note: You can also click on the table selection icon in the bottom-right corner for the same effect. See how to select table elements for more details.

After selecting a table, do one of the following:
- On the References tab, in the Captions group, click the Insert Caption button:

- Right-click on the selection and select the Insert Caption… in the popup menu:


In the Caption dialog box:

Select the label and its position
- Under Options:
- From the Label dropdown list, select the item type you need:

- Table,
- Equation – see how to create captions for equations,
- Figure (selected by default) — see how to create captions for figures,
- Another label (in this example, My Caption) was created using the New Label… button (see how to create a new label below).
Note: Remember that each type of object you labeled will be numbered sequentially within its group.
- From the Position dropdown list, select one of the options:
- Above selected item (selected by default for the Table label), or
- Below selected item (selected by default for the Figure label).
Note: The captions for tables are usually located above the tables.
- From the Label dropdown list, select the item type you need:


Exclude label from caption
- Select the Exclude label from caption check box if you don’t need to add the label to the caption:
Some requirements recommend using the lowercase word table instead of the automatically added Table in Word cross-references.
The option Exclude label from caption hides the label from being displayed in cross-references or a List of Tables.
For example:
- When you insert a cross-reference with the selected option Entire captions or Only label and number (see more details how to use cross-references in Word), Word adds the capitalized label and number, as you see in the Caption field of the Caption dialog box. E.g., “are listed in Table 3” or “are listed in Table 3 Number of articles by statuses and products”.
- All captions, created with selected option Exclude label from caption, Word adds in cross-references as their numbers without the labels. Type the word table (as required) and insert a reference to a caption (e.g., “are listed in table 3”).

Add a new label
- Click the New Label… button to create a new label:
In the New Label dialog box, type a new label name:


Note: See also how to delete a custom label.
Modify caption numbering
- Click the Numbering… button if you want to change any of the numbering options:
In the Caption Numbering dialog box:

- In the Format dropdown list, select the numbering format you need (some requirements recommend using Latin capital letters instead of numbers for tables):
- Select the Include chapter number check box to include the chapter number in the caption number. After selecting this option, two more options will be unlocked:
- From the Chapter starts with style dropdown list, select the heading level you need to include in the caption:
- In the Use separator dropdown list, select the punctuation you need to insert between the chapter number and the table number:
- At the bottom of the dialog box, see how your choices will look in the Examples section. E.g., Table 2.3” means the third table in chapter 2.
- Click the OK button.
- From the Chapter starts with style dropdown list, select the heading level you need to include in the caption:


Add a title
- To add the text of your caption, click after the table number and enter the text. E.g.:

Notes:
- There are several standard requirements for table titles:
- Chicago style recommends using the table title in line with the label and number. E.g.:

- In opposite, APA (American Psychological Association) and MLA (Modern Language Association) styles recommend using the table title with one double-spaced line below the table number (see how to adjust line spacing). E.g.:

To create such a title, don’t type any text in the Caption field, leave it, then do the following:
- Create a caption without a title.
- Position cursor after a caption number and add a new line (by pressing Shift+Enter) in which type of title you need.
Note: You can press Enter and create a new paragraph instead of a new line. See how to create a List of Tables (Table of Figures) for more details.
- Format the caption to adjust line spacing (see how to change caption line spacing).
- In addition, MLA style recommends using a hanging indent to the second line of long titles. E.g.:

- Chicago style recommends using the table title in line with the label and number. E.g.:
- Word offers very helpful functionality to create a text that can be displayed in a List of Tables instead of a caption text. See how to create a Table of Contents Entry.
- For most requirements, the number and the title should be without an ending period. If you need a period after a number, type it in the Caption field.
- If a table spans more than one page, the first page of that table should have a complete caption; the subsequent pages should have an abbreviated caption consisting of a label, a number, and the word Continued. E.g., “Table 3. Continued”.


Using an AutoCaption
See Adding captions with AutoCaption.
Group a table and its caption
According to all requirements, a table (or its part) with its caption should appear on the same page. Word adds captions for tables as a regular paragraph with selected Keep with next option. See how to keep lines and paragraphs together for more details.
See also how to keep a table row on one page and keep a table on one page of a Word document.
Edit or modify a caption
Microsoft Word adds numbers in captions as fields.
![]()
You can show all fields in a document with a gray background, see how to turn on or turn off highlighting of fields in a Word document.
- Labels:
If needed, you can change the label. Word for Microsoft 365 will update the reference if available. In this case, Word will not create a new label and a separate numbering. Be careful!
- Numbers:
DO NOT edit caption numbers! If you change a number:
- In some cases, Word will update it, and you will lose your changes,
- Otherwise, the caption number may stop updating automatically.
- Text:
To add or modify a caption text, click on it and change what you need, like in a regular paragraph.
Do not forget to format a caption according to the requirements you use!
Delete a caption and an unnecessary label
If you need to remove some caption, select the caption paragraph (full line or several lines) and press Delete. Do not forget to update fields in the document!
To remove the unnecessary label, do the following:
1. Open the Caption dialog box.
2. In the Label dropdown list, select the label you want to remove.
3. Click the Delete Label to remove a custom label:

Note: You can’t delete predefined labels: Equation, Figure, and Table.
Update caption numbering
Word automatically updates references and numbering if you insert a new text. However, copying, deleting, or moving context often leads to confusion in the document. After such operations, you have to update all dependencies manually.
To update fields in the document, select the entire document by clicking Ctrl+A, and do one of the following:
- Press F9,
- Right-click on any of the fields and select Update Field in the popup menu:


Word will update all fields. You can be sure that the numbering and references are correct.
We strongly recommend checking a document at least visually after changes!
Jeff wanted to know how to find out how many rows he had in a very long table in his Word document. Word Count doesn’t tell you — it tells you how many lines in the document, but each cell (except one) in a table is treated as a ‘line’ for Word Count purposes.
You can find out how many rows (and/or columns) there are in an individual table by checking the table properties. Here’s how:
- Select the entire table. This selects all rows and columns.
- Right-click on the selected table and select Table Properties from the shortcut menu.
- Click on the Row tab — the number of rows selected is listed at the top of the dialog box.
- Click on the Column tab — the number of columns selected is listed at the top of the dialog box.
- Click Cancel to close the Table Properties dialog box.


NOTE 1: If you now select another table to check its number of rows and columns, you may find that when the Table Dialog box opens to the last-viewed tab (Row or Columns), no numbers are displayed. Just go back to the Table tab, then click the Row or Column tab again and the number should display. If it doesn’t, save and close the document, then close Word. Reopen the document and try it again (see my comment dated 17 December 2022).
NOTE 2: Merged cells are mostly treated as though the rows and columns existed as they did when the table was first created. However, if you’ve merged all the cells from several adjacent rows, the row count will reduce.