
Word for Microsoft 365 Word 2021 Word 2019 Word 2016 Word 2013 More…Less
Once you have a table in Word, you might decide to split that table into two or more tables. This way, you can create smaller tables, or add text in between two tables.
-
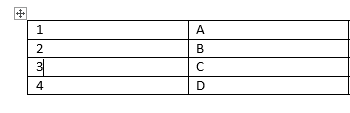
Put your cursor on the row that you want as the first row of your second table. In the example table, it’s on the third row.

When you click inside the table, two new Table tools tabs appear on the ribbon: DESIGN and LAYOUT. These tools are visible only when you are in the table, for example, when you add content to the cells.
-
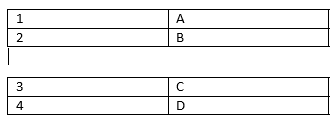
On the LAYOUT tab, in the Merge group, click Split Table.
The table splits into two tables.
You can split the table further, as long as there are multiple rows.

See Also
Insert a table — Word
Convert text to a table or a table to text
Use a formula in a Word or Outlook table
How to merge two tables
Need more help?
Want more options?
Explore subscription benefits, browse training courses, learn how to secure your device, and more.
Communities help you ask and answer questions, give feedback, and hear from experts with rich knowledge.
You are here
Tables in Microsoft Word are great, but the default settings for tables are sometimes not what you want. In particular, Word will split individual rows across two pages if it needs to. If you’d rather have Word break tables up between pages so that each row is kept intact and not split across two pages (i.e. force Word to insert a page break before the row rather than in the middle of the row), this lesson will show you how to do it.
Note that this lesson covers Microsoft Word 2007, 2010 and 2013 for Windows, and Microsoft Word 2011 for Mac.
Tell Microsoft Word not to split table rows across pages
This lesson assumes you have already created a table that spans two or more pages (or will do by the time you’ve finished creating it). Once you’ve done this, follow these steps:
Word will automatically repaginate the document to split the table so that each row is kept intact.
- This means that a row which was previously split between two pages will move onto the following page.
- Note that you can also use this technique to format just one row in your table. Simply right-click in the row inside the table that you want to stop from splitting across pages and follow the steps above.
Make your row settings the default for all future tables (the quick way)
Whilst the techniques described are useful, it’s a nuisance to have to set these options every time you create a new table in a document. In this section, we’ll look at how to make these settings the defaults.
At this point, you have now changed the table settings to match the settings of the current table; you should test it with a new document to ensure that the settings have indeed been set as the default.
Make your row settings the default for all future tables (more options)
It may be that you want more control over how the defaults are set for your tables. The following steps allow you control everything about your default table settings.
If you have any feedback on this lesson on stopping rows from breaking across pages, or you have a question about what was covered in this lesson, please leave us a comment below.
.
Want to learn more? Try these lessons:
.
.
Our Comment Policy.
We welcome your comments and questions about this lesson. We don’t welcome spam. Our readers get a lot of value out of the comments and answers on our lessons and spam hurts that experience. Our spam filter is pretty good at stopping bots from posting spam, and our admins are quick to delete spam that does get through. We know that bots don’t read messages like this, but there are people out there who manually post spam. I repeat — we delete all spam, and if we see repeated posts from a given IP address, we’ll block the IP address. So don’t waste your time, or ours. One other point to note — if you post a link in your comment, it will automatically be deleted.
Add a comment to this lesson
.
Comments on this lesson
If the posted method didn’t work, try this
.
Thanks for the tip
Hi Nick
Great tip — thanks. I’ve not tried that before, but it came in handy this week on a document I was creating.
Regards
David
.
That’s what I’m talking about
That was exactly what I needed. Thanks!
.
Exactly what I needed!
That was exactly what I needed. Thanks!
.
keeping rows from being split in Word tables
Even this method didn’t work for me. It didn’t have any effect. When trying to do this through Table Properties, I couldn’t even click on the box to disallow row splits (it was «grayed out»). I suspect this is tied to the fact that I’ve merged some cells in some columns of the table, because I haven’t encountered this problem before. I’m working on a MacBook Air, Word 2011. Thanks,
John S.
.
Hi John
Hi John
Yes — the moment you merge cells from two or more rows into one, you lose the ability to stop that merged row from splitting across pages. However, it works OK if you’ve merged cells within the same row.
Regards
David
.
word 2011 for mac — splitting merged rows
I couldn’t stop the merged rows from splitting, so I inserted a blank row where I wanted the table to split, removed all the borders so it was «invisible», then adjusted its height until it pushed the following row down onto the next page, where I wanted it. Seems to have worked…
.
Not allowing table to split across pages
Thank you for this tip — it worked — I have been battling this issue forever. I’d like to set it up as a default — do you know if I can do that?
thank you again
Debbie
.
Set table defaults
Hi Debbie
Yes — you can set this as the default. I’ve just updated the lesson to cover how to do this — let me know how you get on.
Regards
David
.
set MS table row defaults
Can I set table defaults in MS word such that any new table has
— head row repeatable when the table is plit
— non of the rows are split across pages
.
Thanks
Thanks for this, I was going a bit end-of-year crazy trying to fix a document with these settings.
.
Tables
The lesson was concise, easy to follow, and addressed my question completely. Very helpful.
.
Thanks Nick, that was helpful
Thanks Nick, that was helpful. That fixed one issue but I am still having an issue with the table splitting vertically or, rather, with the table moving right so that half of the table disappears off the right edge of the document when I add enough information to a cell. It appears to hit some unknown threshold that triggers the incident. Any ideas on how to fix this?
.
Avoiding page splited merged row cell
Thanks for marvelous information site.
The tips how to keep table rows together works nice. Till you have merged cells in a row. If a row containing a merged cell comes in end of the page it can happen that one or more of the un-merged rows stay on the first page. And the rest move to next page.
.
This did not work for me
I followed the instructions, selecting the + to select table and unchecking the box. No change to the table. Still split across pages. Quit and restarted Word, saved, and reloaded. The box is not checked, but the table is still split across pages.
.
keeping table rows together
Box is unchecked. Rows are all «keep together». No merged cells. Still splits across pages.
.
Life Saver
Was working on a tight deadline and was thrilled to find this tip. It worked precisely as I needed it to!!!
.
.
.
.
.
There are times when you find an entire Word Table or entire row move to a new page, leaving a large empty space in your document.
When this happens, you may find yourself wasting a lot of time trying to bring the Table or row back to where you would like it placed.
However, if it just doesn’t move you may be questioning just what is up with the Table.
There are many reasons this could be happening.
Control a Word Table split
In this blog I’ve included the following tips to help you control where your Table or row splits.
- Two fixes for when your entire Word Table is moving to next page
- Two fixes for when the entire Table row is moving to the next page
- Two fixes for when a Word Table Header row is not repeating on the following page
Use these as steps to check if Table properties and settings are the reason your Word Table or row isn’t splitting and instead moving on to the next page.
And check out the quick fix for if your Header rows aren’t repeating once you have your Table-split in place.
1. Entire Word Table moving to next page
If the entire Word Table is moving to a new page it may be that the Table has been formatted so that ALL rows stay together and don’t split over multiple pages.
To check if this is the cause, check the following settings.
Fix #1 — Check if rows have been formatted as Keep with Next
The Paragraph setting Keep with Next allows you to force rows to stay together. This option is fabulous if you are wanting the entire Table or maybe just a few rows to always remain together.
However, if you are unaware that this setting is turned on, it can be super frustrating trying to work out why your Table or rows are moving to a new page.
Removing this setting will allow your Table rows to move as normal.
Step 1: Select the entire Table.
Tip: you can easily do this simply by clicking the arrows at the top left of the Table.
Step 2: From the Home tab, click the Paragraph launcher arrow. This will open the Paragraph dialog box.
Step 3: Click the Line and Page Breaks tab.
Step 4: If the Keep with next option is checked, this is what may be causing the Table to move. Remove the check from the Keep with next box and then click OK.
Step 5: Word will now treat every row as an individual row and not try to keep all rows together on the same page.
Fix #2: All rows may be set to ‘Repeat Header Rows’
The Repeat Header Rows option is fabulous when you require the Header row of the Table repeated at the top of your Table if it spans multiple pages.
However, if every row has been set to be a Header Row the entire Table will move to a new page.
To fix this, select the entire Table and from the Table Layout tab click Repeat Header Rows to turn off the option.
If you require the Header row to be repeated, only select the top row or rows that are required and click Repeat Header Rows to turn the option on for only the selected rows.
2. Entire Table row is moving to the next page
Every Table has pre-set properties which can be customised to suit your needs.
One property that can be customised is how rows split between pages.
If you are finding the content of a row isn’t splitting over on to the next page, but instead moving the entire row to the next page it may be that a Row property has been changed to allow this to happen.
To check if this is the cause, check the following Table Properties settings.
Fix #1: Allow rows to break across pages isn’t selected
Step 1: Select the row or rows that are moving to the next page.
Step 2: From the Table Layout tab, select Properties.
Step 3: The Table Properties dialog box will open.
Step 4: Select the Row tab. If the Allow row to break across pages option isn’t checked, this is what is causing the entire row to move on to the next page. Place a check in the Allow row to break across pages box.
Step 5: Click OK. Your row will now split over multiple pages.
Fix #2: Allow rows to break across pages is greyed out
If the Allow row to break across pages option is greyed out, please check if your row contains text with a Text Direction other than horizontal.
A Text Direction setting other than horizontal will set the Allow row to break across pages option to greyed out.
It’s a simple fix. Just set the text direction back to horizontal and the Allow row to break across pages option will be available again.
3. Word Table Header row not repeating
Once you have your Table or row split you may still have the problem of your Header row not repeating.
There are two main causes for this.
Fix #1 Table Properties Text wrapping
The Table Properties setting for Text wrapping may be set to Around.
Step 1: To check this, from the Table Layout tab click Table Properties.
Step 2: On the Table tab, check if the Text wrapping option is set to Around. If it is, change this option to None.
Step 3: Click OK.
Your Header row should now be repeating on to the next page.
Fix #2 Merge a Split Table
When you split a Table the Header row in the will not repeat at the top of the split table.
If you would like the Header row to repeat, follow the steps below.
Step 1: Leave the Table as one Table (don’t split it). Select the row that you would like to start on the next page.
Step 2: From the Home tab, click the Paragraph launcher arrow. This will open the Paragraph dialog box.
Step 3: Click the Line and Page Breaks tab.
Step 4: Now select the Page break before option.
Step 5: Click OK. The Header row will now be repeated at the top of your Table.
Was this blog helpful? Let us know in the Comments below.
Instructions
1. Entire Word Table moving to next page
Fix #1 — Check if rows have been formatted as Keep with Next
- Select the entire Table.
- From the Home tab, click the Paragraph launcher arrow. This will open the Paragraph dialog box.
- Click the Line and Page Breaks tab.
- If the Keep with next option is checked, this is what may be causing the Table to move. Remove the check from the Keep with next box and then click OK.
Fix #2: All rows may be set to ‘Repeat Header Rows’
- Select the entire Table.
- Go to the Table Layout tab and select Repeat Header Rows.
- If you require the Header row to be repeated, only select the top row or rows that are required and click Repeat Header Rows to turn the option on for only the selected rows.
2. Entire Table row is moving to the next page
Fix #1: Allow rows to break across pages isn’t selected
- Select the row or rows that are moving to the next page.
- From the Table Layout tab, select Properties.
- The Table Properties dialog box will open.
- Select the Row tab. If the Allow row to break across pages option isn’t checked, this is what is causing the entire row to move on to the next page. Place a check in the Allow row to break across pages box.
- Click OK.
Fix #2: Allow rows to break across pages is greyed out
If the Allow row to break across pages option is greyed out, please check if your row contains text with a Text Direction other than horizontal. A Text Direction setting other than horizontal will set the Allow row to break across pages option to greyed out. Just set the text direction back to horizontal and the Allow row to break across pages option will be available again.
3. Word Table Header row not repeating
Fix #1 Table Properties Text wrapping
- Go to the Table Layout tab and click Table Properties.
- On the Table tab, check if the Text wrapping option is set to Around. If it is, change this option to None.
- Click OK.
Fix #2 Merge a Split Table
When you split a Table the Header row in the will not repeat at the top of the split table. If you would like the Header row to repeat, follow the steps below.
- Select the row that you would like to start on the next page.
- From the Home tab, click the Paragraph launcher arrow. This will open the Paragraph dialog box.
- Click the Line and Page Breaks tab.
- Now select the Page break before option.
- Click OK.
 Please Note:
This article is written for users of the following Microsoft Word versions: 97, 2000, 2002, and 2003. If you are using a later version (Word 2007 or later), this tip may not work for you. For a version of this tip written specifically for later versions of Word, click here: How to Stop a Table Row from Splitting Over Two Pages.
![]()
Written by Allen Wyatt (last updated July 25, 2020)
This tip applies to Word 97, 2000, 2002, and 2003
For some documents, it is par for the course to have tables extend from one page to another. As your tables get larger, Word automatically breaks tables so the most information can get on each page. This may mean that a row of your table may start on one page and end on the following page. Obviously, this is not acceptable for some tables. You may have the need to make sure that entire rows of your table stay together.
To make sure that Word doesn’t break a particular row of your table, follow these steps if you are using Word 97:
- Select the row (or rows) that you want to keep together.
- Choose Cell Height and Width from the Table menu. Word displays the Cell Height and Width dialog box with the Row tab selected.
- Make sure the Allow Row to Break Across Pages check box is cleared.
- Click your mouse on OK.
If you are using Word 2000, Word 2002, or Word 2003 the process is slightly different. Follow these steps, instead:
- Select the row (or rows) that you want to keep together.
- Choose Table Properties from the Table menu. Word displays the Table Properties dialog box; you should make sure the Row tab is selected. (See Figure 1.)
- Make sure the Allow Row to Break Across Pages check box is cleared.
- Click your mouse on OK.
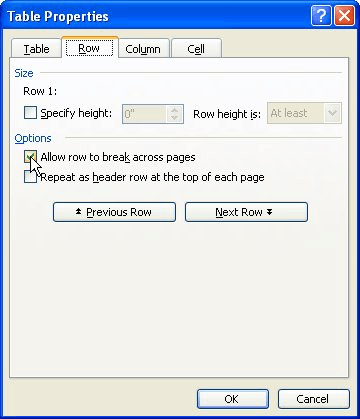
Figure 1. The Row tab of the Table Properties dialog box.
If you are not sure about where a table may break (or even if it will), but you want to make sure that no row of the table is divided, you simply need to select the entire table in step 1 rather than selecting a single row.
Remember that these steps won’t stop a table from splitting across two pages; it only stops individual rows from splitting across pages.
WordTips is your source for cost-effective Microsoft Word training.
(Microsoft Word is the most popular word processing software in the world.)
This tip (1827) applies to Microsoft Word 97, 2000, 2002, and 2003. You can find a version of this tip for the ribbon interface of Word (Word 2007 and later) here: How to Stop a Table Row from Splitting Over Two Pages.
Author Bio
With more than 50 non-fiction books and numerous magazine articles to his credit, Allen Wyatt is an internationally recognized author. He is president of Sharon Parq Associates, a computer and publishing services company. Learn more about Allen…
MORE FROM ALLEN
Intelligent Title Case
A common editorial need is to change the capitalization used on different words in a selection of text. Word provides a …
Discover More
Printing Return Address Labels
Want an easy way to create your own return address labels? Word provides the tool as a feature of the program.
Discover More
Spell-checking Uppercase Words
When Word checks the spelling of a document, it can either check or ignore words that are in uppercase letters. Here’s …
Discover More
Split a table
- Put your cursor on the row that you want as the first row of your second table. In the example table, it’s on the third row.
- On the LAYOUT tab, in the Merge group, click Split Table. The table splits into two tables.
Contents
- 1 What is the shortcut to split a table in Word?
- 2 Why can I not split a table across pages in Word?
- 3 Can you split a table vertically in Word?
- 4 Why is table splitting in Word?
- 5 How do I split a column in a table in Word?
- 6 How do I join two tables in Word?
- 7 What Ctrl Z do?
- 8 How do I break a table across pages in Pages?
- 9 How do you make a table not break across pages?
- 10 How do I make a table in Word continue onto the next page?
- 11 How do I split a Word document into two vertical sections?
- 12 How do I split a word page in two?
- 13 How do I split a Word document into two horizontal sections?
- 14 Where is table Tools in Word?
- 15 What are two methods to select a table?
- 16 How do I separate columns in a table?
- 17 How do I split a line in Microsoft Word?
- 18 How do I link tables in Word?
- 19 What does Ctrl Shift Alt R do?
- 20 What does Alt Tab do?
What is the shortcut to split a table in Word?
You can also use an easy shortcut key to split a table into multiple tables, please put the cursor at the cell where you want to split from, and then press Ctrl+ Shift+ Enter keys together to split the table into two parts.
Why can I not split a table across pages in Word?
Select the table which breaks across two pages, and then click Layout (under Table Tools) > Properties. See screenshot: 2. In the popping out Table Properties dialog box, (1) enable the Row tab, (2) uncheck the Allow row to break across pages option, and (3) click the OK button.
Can you split a table vertically in Word?
Merging two tables in Word is as easy as splitting them. To merge split tables vertically, simply select the second table, click it then drag it to the right border of the top-right cell. Be careful not to drag the table by the Move table icon, as this will only move the second table next to the first table.
Why is table splitting in Word?
As your tables get larger, Word automatically breaks tables so the most information can get on each page.Word displays the Cell Height and Width dialog box with the Row tab selected. Make sure the Allow Row to Break Across Pages check box is cleared. Click your mouse on OK.
How do I split a column in a table in Word?
Split cells
- Click in a cell, or select multiple cells that you want to split.
- Under Table Tools, on the Layout tab, in the Merge group, click Split Cells.
- Enter the number of columns or rows that you want to split the selected cells into.
How do I join two tables in Word?
1. Click on the table you want to drag, then the cross sign will be appeared, then click the cross sign to select the whole table. 2. Press Shift + Alt + Up arrow until the selected table is joined to above one.
What Ctrl Z do?
To reverse your last action, press CTRL+Z. You can reverse more than one action. To reverse your last Undo, press CTRL+Y. You can reverse more than one action that has been undone.
How do I break a table across pages in Pages?
If you have a large table that breaks across pages, you can specify where the table will break.
- Select the row before which you want the table to break.
- Choose Table > Table Properties.
- In the Row tab, choose Force under the Page Break Before Row option.
How do you make a table not break across pages?
Questions and answers
- Click into a cell in the row.
- Open the Layout tab under Table Tools and from the Table group select the Properties icon.
- Select the Row tab.
- Turn off the option to ‘Allow row to break across pages’
- Repeat for any other rows in the table.
- Click on OK.
How do I make a table in Word continue onto the next page?
In the table, right-click in the row that you want to repeat, and then click Table Properties. In the Table Properties dialog box, on the Row tab, select the Repeat as header row at the top of each page check box. Select OK.
How do I split a Word document into two vertical sections?
How can I split my Word document vertically and duplicate the text on both halves?
- Select & copy the existing text.
- On the Layout tab of the Ribbon in the Text Layout group click the Columns button, select Two.
- Click at the very bottom of the existing text.
- On the Layout tab, Page Setup group click Break, select Column.
How do I split a word page in two?
Highlight the text you wish to split into columns. Select the “Page Layout” tab. Choose “Columns” then select the type of columns you wish to apply. For this to fully work, you must have enough text typed to fill the first column before the text will start filling into the second column.
How do I split a Word document into two horizontal sections?
Microsoft Access Divide Word documents into sections using horizontal lines
- Put your cursor in the document where you want to insert the horizontal line.
- Go to Format | Borders And Shading.
- On the Borders tab, click the Horizontal Line button.
- Scroll through the options and select the desired line.
- Click OK.
Where is table Tools in Word?
When working within a table, the Table Tools tab appears in the Ribbon, and includes the Design and Layout tabs. You can easily sort data in a table in either ascending or descending order.
What are two methods to select a table?
To select an entire table using a keyboard, position the cursor in the first cell of the table. Press Alt + Shift + End on your keyboard to select to the end of the first row and then press Alt + Shift + Page Down to select to the last cell.
How do I separate columns in a table?
Split cells
- In the table, click the cell that you want to split.
- Click the Layout tab.
- In the Merge group, click Split Cells.
- In the Split Cells dialog, select the number of columns and rows that you want and then click OK.
How do I split a line in Microsoft Word?
Press and hold down the “Ctrl” key, which keeps your divider line straight. Position the cursor near the left margin under the place you want to divide. Press and hold down the left mouse button and drag the cursor to the right, drawing the divider. Release the mouse button and the “Ctrl” key.
How do I link tables in Word?
Add the link
- Select the text or object you want to use as a hyperlink.
- Right-click and then click Hyperlink .
- Under Link to, click Place in This Document.
- In the list, select the heading or bookmark that you want to link to.
What does Ctrl Shift Alt R do?
You can make a video recording of what is happening on your screen: Press Ctrl + Alt + Shift + R to start recording what is on your screen. A red circle is displayed in the top right corner of the screen when the recording is in progress. Once you have finished, press Ctrl + Alt + Shift + R again to stop the recording.
What does Alt Tab do?
Pressing Alt-Tab switches between all open applications in the Taskbar. The Alt key is held down while the Tab key is pressed to cycle through the icons of all the windows. When the Tab key is released, the highlighted window is brought to the foreground.