
You can change the look of a line shape by changing its color, line style, or weight. If you are using Excel, Outlook, Word, or PowerPoint, you can apply a predefined Quick Style to quickly change the look of your line.
Note: These features are available only in the desktop versions of the programs listed above.
What do you want to do?
-
Add a Quick Style to a line
-
Change the color of a line
-
Make a line dotted or dashed
-
Change the weight of a line
-
Work with lines in Project
-
Format cell borders in Excel
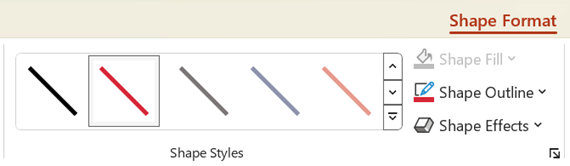
Add a Quick Style to a line
Quick Styles for lines include theme colors from the document theme, shadows, line styles, gradients, and three-dimensional (3-D) perspectives. When you position your pointer over a Quick Style thumbnail, you can see how the style affects your line. Try different Quick Styles until you find one that you like.
-
Select the line you want to change.
If you want to change multiple lines, select the first line, and then press and hold Ctrl while you select the other lines.
-
On the Format tab, click the Quick Style you want.

To see more Quick Styles, click the More button
.Note: If you don’t see the Format tab, make sure you’ve selected the line.
 .
.Top of Page
Change the color of a line
-
Select the line that you want to change.
If you want to change multiple lines, select the first line, and then press and hold CTRL while you select the other lines.
-
On the Format tab, click the arrow next to Shape Outline, and then click the color that you want.
Note: If you don’t see the Format tab, make sure you’ve selected the line.
To use a color that isn’t a theme color, click More Outline Colors, and then click the color you want on the Standard tab, or mix your own color on the Custom tab. Custom colors and colors on the Standard tab are not updated if you later change the document theme.

Top of Page
Make a line dotted or dashed
-
Select the line you want to change.
If you want to change multiple lines, select the first line, and then press and hold CTRL while you select the other lines.
-
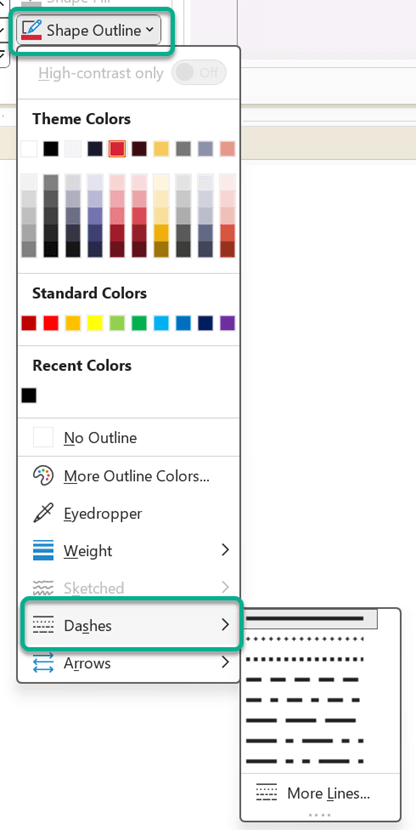
On the Format tab, click the arrow next to Shape Outline.
Note: If you don’t see the Format tab, make sure you’ve selected the line.
-
Point to Dashes, and then click the style you want.
To create a custom style, click More Lines, and then choose the options that you want.
Top of Page
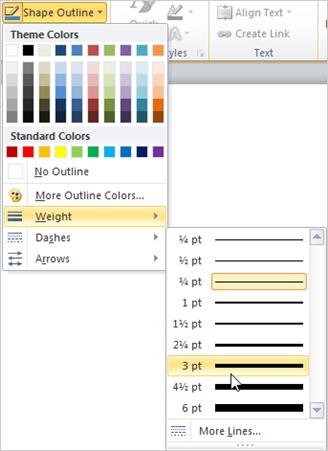
Change the weight of a line
-
Select the line that you want to change.
If you want to change multiple lines, select the first line, and then press and hold Ctrl while you select the other lines.
-
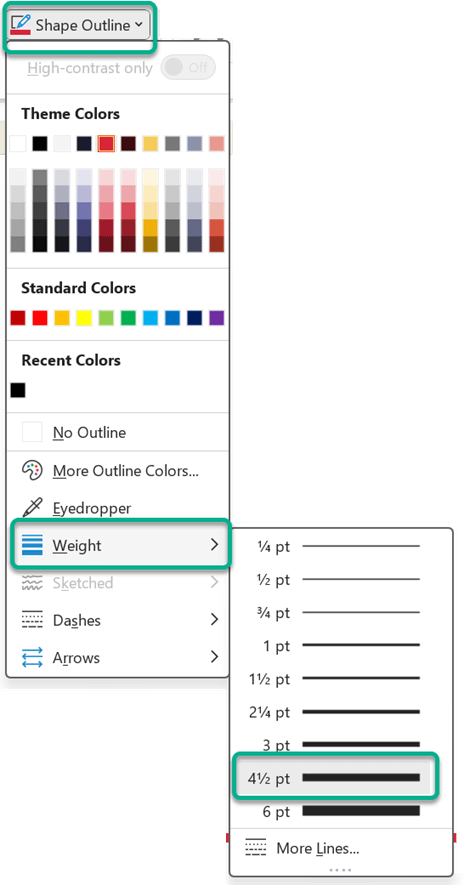
On the Format tab, click the arrow next to Shape Outline.
Note: If you don’t see the Format tab, make sure you’ve selected the line.
-
Point to Weight, and then click the line weight that you want.
To create a custom line weight, click More Lines, and then choose the options that you want.
Note: To draw a double line, draw a single line, copy and paste a second line next to it, and then group the two lines.
Top of Page
Format cell borders in Excel
If you want to apply line styles and colors to borders in Excel spreadsheets or tables, see the following articles:
-
Apply or remove cell borders
-
Create and apply a border cell style
-
Show or hide gridlines on a worksheet
Top of Page
Work with lines in Project
You need to have a Gantt chart open to follow these steps.
-
Right-click the line you want to change and click Properties.
-
Under Line, choose a color from the Color list and a line thickness from the Line list.
Top of Page
See Also
Draw or delete a line or connector
Format the bar chart of a Gantt Chart view in Project
Important:
Office 2010 is no longer supported. Upgrade to Microsoft 365 to work anywhere from any device and continue to receive support.
Upgrade now
What do you want to do?
-
Add a Quick Style to a line
-
Change the color of a line
-
Make a line dotted or dashed
-
Change the weight of a line
Add a Quick Style to a line
Quick Styles for lines include theme colors from the document theme, shadows, line styles, gradients, and three-dimensional (3-D) perspectives. Try different Quick Styles until you find one that you like. With live preview, when you position your pointer over a Quick Style thumbnail, you can see how the Quick Style affects your line.
-
Select the line that you want to change.
If you want to change multiple lines, select the first line, and then press and hold CTRL while you select the other lines.
-
Under Drawing Tools, on the Format tab, in the Shape Styles group, click the Quick Style that you want.
To see more Quick Styles, click the More button
.
Example of the Shape Styles group on the Format tabIf you do not see the Drawing Tools or Format tabs, make sure that you have selected the line. You might have to double-click the line to open the Format tab.

Top of Page
Change the color of a line
-
Select the line that you want to change.
If you want to change multiple lines, select the first line, and then press and hold CTRL while you select the other lines.
-
Under Drawing Tools, on the Format tab, in the Shape Styles group, click the arrow next to Shape Outline, and then click the color that you want.
Example of the Shape Styles group on the Format tab.If you do not see the Drawing Tools or Format tabs, make sure that you have selected the line. You might have to double-click the line to open the Format tab.
To change to a color that is not in the theme colors, click More Outline Colors, and then either click the color that you want on the Standard tab, or mix your own color on the Custom tab. Custom colors and colors on the Standard tab are not updated if you later change the document theme.
Top of Page
Make a line dotted or dashed
-
Select the line that you want to change.
If you want to change multiple lines, select the first line, and then press and hold CTRL while you select the other lines.
-
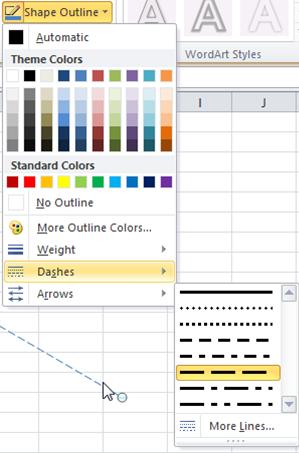
Under Drawing Tools, on the Format tab, in the Shape Styles group, click the arrow next to Shape Outline.
If you do not see the Drawing Tools or Format tabs, double-click the line to make sure that you selected it.
-
Point to Dashes, and then click the line style that you want.
To create a custom style, click More Lines, and then choose the options that you want.
Top of Page
Change the weight of a line
-
Select the line that you want to change.
If you want to change multiple lines, select the first line, and then press and hold CTRL while you select the other lines.
-
Under Drawing Tools, on the Format tab, in the Shape Styles group, click the arrow next to Shape Outline.
If you do not see the Drawing Tools or Format tabs, double-click the line to make sure that you selected it.
-
Point to Weight, and then click the line weight that you want.
To create a custom line weight, click More Lines, and then choose the options that you want.
Note: To draw a double line, draw a single line, copy and paste a second line next to it, and then group the two lines.
Top of Page
See Also
Draw or delete a line or connector
What do you want to do?
-
Add a Quick Style to a line
-
Change the color of a line
-
Make a line dotted or dashed
-
Change the weight of a line
-
Work with lines in Publisher
Add a Quick Style to a line
Important: Quick Styles are available only in these 2007 Microsoft Office system programs: Excel, Outlook, Word, and PowerPoint.
Quick Styles for lines include theme colors from the document theme, shadows, line styles, gradients, and three-dimensional (3-D) perspectives. Try different Quick Styles until you find one that you like. When you place your pointer over a Quick Style thumbnail, you can see how the Quick Style affects your line.
-
Select the line that you want to change.
If you want to change multiple lines, select the first line, and then press and hold CTRL while you select the other lines. For more information about selecting lines, see Select a shape or other object.
-
Under Drawing Tools, on the Format tab, in the Shape Styles group, click the Quick Style that you want.
To see more Quick Styles, click the More button
.If you do not see the Drawing Tools or Format tabs, double-click the line to make sure that you selected it.
Top of Page
Change the color of a line
-
Select the line that you want to change.
If you want to change multiple lines, select the first line, and then press and hold CTRL while you select the other lines. For more information about selecting lines, see Select a shape or other object.
-
Under Drawing Tools, on the Format tab, in the Shape Styles group, click the arrow next to Shape Outline, and then click the color that you want.
If you do not see the Drawing Tools or Format tabs, double-click the line to make sure that you selected it.
To change to a color that isn’t in the theme colors, click More Outline Colors, and then either click the color that you want on the Standard tab, or mix your own color on the Custom tab. Custom colors and colors on the Standard tab are not updated if you later change the document theme.
Make a line dotted or dashed
In Excel, Outlook, PowerPoint, and Word
-
Select the line that you want to change.
If you want to change multiple lines, select the first line, and then press and hold CTRL while you select the other lines. For more information about selecting lines, see Select a shape or other object.
-
Under Drawing Tools, on the Format tab, in the Shape Styles group, click the arrow next to Shape Outline.
If you do not see the Drawing Tools or Format tabs, double click the line to make sure that you selected it.
-
Point to Dashes, and then click the line style that you want.
To create a custom style, click More Lines, and then choose the options that you want.
Change the weight of a line
In Excel, Outlook, PowerPoint, and Word
-
Select the line that you want to change.
If you want to change multiple lines, select the first line, and then press and hold CTRL while you select the other lines. For more information about selecting lines, see Select a shape or other object.
-
Under Drawing Tools, on the Format tab, in the Shape Styles group, click the arrow next to Shape Outline.
If you do not see the Drawing Tools or Format tabs, double click the line to make sure that you selected it.
-
Point to Weight, and then click the line weight that you want.
To create a custom line weight, click More Lines, and then choose the options that you want.
Top of Page
Work with lines in Publisher
-
Select the line that you want to change.
If you want to change multiple lines, select the first line, and then press and hold CTRL while you select the other lines.
-
On the Drawing toolbar, click Dash Style
, Line/Border Style , or the arrow next to Line Color , and then click the style that you want.To change to a color that is not displayed, click More Outline Colors, and then either click the color that you want on the Standard tab, or mix your own color on the Custom tab.
To create a custom weight, click More Lines, and then choose the options that you want.
 , Line/Border Style
  , or the arrow next to Line Color
  , and then click the style that you want.
Top of Page
See Also
Draw or delete a line or connector
Select the table
- Using the mouse: Move the mouse over the table until you see the table selection icons in the upper-left corner of the table and click it:

Note: You can also click on the table selection icon in the bottom-right corner (resizing handle) for the same effect.
- Using the keyboard: To select table elements, on the Table Layout tab, on the Table group, click the Select button, then select the option you prefer:

- Select Cell
- Select Column
- Select Row
- Select Table
Format the table
After positioning the cursor anywhere in a table or selecting a table element, Word shows two tabs: Table Design and Layout. E.g.:

See also Select and format table elements in Word.
Apply a predefined Table style
There are several predefined styles you can use for the table. Styles include a variety of borders, colors, and other attributes that give a table a very professional appearance.
To choose any of the predefined styles, do the following:
1. Select the table.
2. On the Table Design tab, in the Table Styles group, in the Styles Gallery, click the More arrow to see the complete list of styles:

3. Select the table style you want:

The Table Styles gallery includes three categories of styles:
- Plain Tables have minimal formatting.
- Grid Tables include vertical separators between columns.
- List Tables do not include vertical column separators:

Note: The selected style overrides any previously added style changes for the table.
Modify the table style options
To change the table or selected style, on the Table Design tab, in the Table Style group, click Modify Table Style…:

In the Modify Style dialog box, make changes you want:

Note: Click the Format button at the bottom of the dialog box to change other options such as Font or Paragraph. See also how to clear formatting.
Customize the table formatting
After applying a table style, you can turn various options on or off to change their appearance. On the Table Design tab, in the Table Style Options group, there are six options:

- Header Row is the first row of the table that contains Headers that helps identify the contents of a particular column. Usually, the Header Row is formatted differently and should be repeated at the beginning of each new page for tables that extend beyond one page.
Note: According to most requirements, data tables should have a header row to provide a contextual structure that aids navigation.
- Total Row is the last row of the table. If this option is selected, the last row will be formatted differently from the body rows, designed to summarize the rows above it (see how to insert formulas).
- First Column used special formatting to the column. Usually, the First Column contains the row headings.
- Last Column applies special formatting to the column to summarize the earlier columns (see how to insert formulas).
- Banded Rows and Banded Columns alternate the background color of rows and columns (see how to change the background color for the selected cells below).
Note: Certain Table Style Options may have a different effect depending on the Table Style you’ve chosen. You might need to experiment to get the look you want.
Apply the border styles
To apply and remove cell borders, do the following:
1. Select the cells or entire table to which you want to add a border.
2. On the Table Design tab, in the Borders group, choose the desired Border Styles, Line Style, Line Weight, and Pen Color:

- Select the predefined Line Style, Line Weight, and Line Color from the Border Styles dropdown list:

- Select the Line Style:

- Select a border thickness from the Line Weight dropdown list:

- Select the border color from the Pen Color dropdown list:

- Select the borders from the Borders dropdown list:

Note: Select No Borders from the Borders dropdown list to remove borders from the selected cells.
- Draw the border where you want:
- After selecting border style or color, the Border Painter button is automatically checked, or
- If all that you want is selected already, just click the Border Painter button by yourself:

After any of these actions, your cursor changes to the brush. Now, draw the border where you need it:

Note: Use the Eraser button in the Draw group on the Table Layout tab to remove the unnecessary border:


Apply background colors and shading
To change the background color for some table elements, select them, then on the Table Design tab, in the Table Styles group, click the Shading button, then select the background color you prefer:

Note: To use a pattern instead of a solid color, on the Table Design tab, in the Borders group, click the dialog box launcher:

In the Borders and Shading dialog box, on the Shading tab, select a pattern in the Style list:

Layout of the table
The Table Layout tab includes commands for changing the entire table format, as well as commands for changing the appearance of individual table components such as cells, columns, rows:

See Select and format table elements in Word for more details.
Resize a table
- Using the mouse: To resize a table in a Word document, move the mouse over the table until you see the table resizing icons (handle) in the bottom-right corner of the table and click it:

Drag the table to the size you need, and then release the handle.
- Using the keyboard: Select a table (see also how to resize individual cells, specific rows, or columns); the do one of the following:
- On the Layout tab, in the Cell Size group, change the values in the Height and Width fields:

- Open the Table Properties dialog box by doing one of the following:
- On the Table Layout tab, in the Table group, click the Properties button:

- Right-click the table and select Table Properties… in the popup menu:

In the Table Properties dialog box, on the Table tab, in the Size section, select the Preferred width check box, then:
- In the Preferred width field, type or select the value you need,
- In the Measure in dropdown list, select one of the items:
- Percent to specify the percentage of the table width,
- Inches to fix the column width:

- On the Table Layout tab, in the Table group, click the Properties button:
- On the Layout tab, in the Cell Size group, change the values in the Height and Width fields:


See how to resize table elements for more details.
Freeze the table
Some Word tables change the width of their columns according to the data. To stop changing the table size when new data is inserted, do the following:
1. Select the table.
2. Open the Table Properties dialog box.
3. In the Table Properties dialog box, on the Table tab, click the Options… button:

4. In the Table Options dialog box, deselect the Automatically resize to fit contents check box:

See also how to fix the height of table rows.
Move a table
To move a table to a new page or a new document, select it, then use the Cut and Paste commands. You can also use the Copy command to leave a copy of the table in the original location.
Как сделать горизонтальную линию в Word
В этой статье мы рассмотрим, как сделать горизонтальную линию в ворде тремя способами:
- как сделать горизонтальную линию автозаменой;
- как вставить горизонтальную линию добавлением границы;
- и как нарисовать горизонтальную линию.
Начнем с самого быстрого и простого способа, как в ворде сделать горизонтальную линию.
Самый быстрый способ, как сделать горизонтальную линию в ворде
Для того чтобы быстро сделать горизонтальную линию, введите три или более специальных символа в новой строке и затем нажмите Enter. Word автоматически преобразует эти символы в горизонтальную линию. Стиль горизонтальной линии зависит от введенных символов:

Как сделать горизонтальную линию в Word – Стили горизонтальных линий в ворде
- Три или более «*» — пунктирная горизонтальная линия
- Три или более «=» — двойная горизонтальная линия
- Три или более «
» — волнистая горизонтальная линия
Эти горизонтальные линии часто используются в документах Word.
Как сделать горизонтальную линию с помощью границы
Также сделать горизонтальную линию в ворде можно используя границы абзаца.
1. Для этого установите курсор в месте, где хотите вставить горизонтальную линию.

Как сделать горизонтальную линию в Word – Место для вставки горизонтальной линии
- На вкладке « Главная » в группе « Абзац » нажмите на стрелку команды « Границы ».

Как сделать горизонтальную линию в Word – Вставка горизонтальной линии
- В открывшемся списке выберите пункт «Горизонтальная линия».

Как сделать горизонтальную линию в Word – Горизонтальная линия
- На месте курсора появится горизонтальная линия.

Как сделать горизонтальную линию в Word – Горизонтальная линия в ворде
- Чтобы настроить сделанную горизонтальную линию кликните по ней два раза левой клавишей мыши. Появиться диалоговое окно « Формат горизонтальной линии ».

Как сделать горизонтальную линию в Word – Настройка горизонтальной линии в ворде
В этом окне вы можете настроить ширину, высоту, цвет и выравнивание горизонтальной линии в ворде.
Больше информации о границах доступно в статье Как сделать рамку в Word.
Как сделать горизонтальную линию с помощью фигуры
Последний способ, как сделать горизонтальную линию в ворде – это нарисовать горизонтальную линию.
- Перейдите на вкладку « Вставка » и в группе « Иллюстрации » нажмите команду « Фигуры ».

Как сделать горизонтальную линию в Word – Фигуры
- В открывшемся списке выберите пункт «Линия».

Как сделать горизонтальную линию в Word – Линия
- Указатель мыши преобразуется в плюс. Щелкните в нужном месте документа, где хотите вставить горизонтальную линию, и удерживая нажатой клавишу Shift и кнопку мыши переместите указатель в другое место, а затем отпустите.

Как сделать горизонтальную линию в Word – Нарисованная горизонтальная линия в ворде
Вот такими способами можно сделать горизонтальную линию в ворде.
Вставка линии
Для разделения текста в документе или сообщении можно добавить в него горизонтальные линии.
Рисование линии
Чтобы добавить строку, выполните указанные здесь действия.
На вкладке «Вставка» выберите «Фигуры».
В области «Линии»выберите любой стиль линии.
Выберите место в документе, удерживайте и перетащите указатель в другое место, а затем отпустите кнопку мыши.
Вставка строки путем ввода символов
Горизонтальную линию проще всего добавить с помощью функции автоформата. Если три раза ввести определенные символы в собственной строке и нажать ввод, они мгновенно прев будут превратиться в горизонтальную линию.
Поместите курсор туда, куда вы хотите вставить горизонтальную линию.
Введите три указанных здесь символа и нажмите ввод.

Строка будет вставлена для всей ширины страницы. При вставке в столбец линия вставляется в соответствии с его шириной. Чтобы добавить текст над строкой, поместите курсор в нужное место и начните вводить его.
Примечание: Автоформат недоступен в Office Online. Если у вас есть классическая версия Office, нажмите кнопку Открыть в [имя программы], чтобы открыть документ в классической программе. Если у вас нет классической версии Office, вы можете скачать пробную версию или приобрести пакет.
Компьютерная грамотность с Надеждой
Заполняем пробелы – расширяем горизонты!
Как сделать непрерывную горизонтальную линию в Word: 4 способа
Казалось бы, зачем могут понадобиться четыре способа? Ведь практически каждый человек использует один способ, к которому он привык. Например, нажал на Shift и на клавишу «тире» несколько раз, вот и получилась горизонтальная линия.
— А что, если при этом получается пунктирная линия, а нужна сплошная?
— Скорее всего, на клавиатуре клавиша Shift неисправна. Тут придут на помощь другие способы.
Пожалуй, самый привычный способ сделать линию в Ворде – это использовать пару-тройку клавиш на клавиатуре.
I Тонкая, толстая, двойная, пунктирная линия с помощью клавиатуры
Ниже приведен рисунок клавиатуры с английской, но без русской раскладки, однако это не имеет значения, ибо нас интересует только три клавиши: Shift, тире и Enter.

Рис. 1. Три клавиши на клавиатуре: Shift, тире и Enter для непрерывной горизонтальной линии в Ворде
С помощью этих трех клавиш можно нарисовать непрерывную горизонтальную линию в Word: пунктирную или сплошную, тонкую или толстую, длинную или короткую.
1) При нажатии несколько раз на клавишу «-» (тире) в редакторе Word получаем пунктирную линию любой длины.
Чтобы сделать тонкую длинную линию на всю ширину страницы:
- Находим на клавиатуре клавишу «тире» (справа от клавиши «ноль», в зеленой рамке на рис. 1).
- С новой (!) строки в Word несколько раз нажимаем на эту клавишу: —
- И потом нажать на клавишу «Enter» (). Несколько напечатанных тире вдруг превратятся в непрерывную горизонтальную тонкую линию на всю ширину страницы.
2) При одновременном нажатии Shift и «-» (тире) печатается НЕ тире, а подчеркивание _________. Таким образом можно сделать непрерывную линию произвольной длины в любом месте документа.
Рис. 2. Тонкая и толстая горизонтальная линия в Word
Теперь печатаем толстую горизонтальную линию на всю ширину страницы:
- Снова находим эту же клавишу «тире», а также клавишу Shift (слева или справа, кому как нравится). Нажмите Shift, держите и не отпускайте.
- И теперь с новой (!) строки несколько раз (например, 3-4 раза) нажмите на тире (при этом не отпуская Shift): ___. Отпустите Shift.
- Теперь нажмите на клавишу Enter. Вы увидите толстую горизонтальную сплошную линию.
Подведем некоторые итоги в виде таблицы:

(Кликните для увеличения) Линии в Word с помощью клавиатуры
II Линия в Word с помощью таблицы
Горизонтальную линию можно получить, если использовать таблицу из одной клетки (1×1), в которой окрашена (будет видимой) только верхняя или нижняя граница, а остальные три стороны таблицы имеют незакрашенные границы (они будут невидимыми).
Ставим курсор в место, где должна быть линия. В верхнем меню Word кликаем:
- Вставка (1 на рис. 3),
- Таблица (2 на рис. 3),
- Одна клетка (3 на рис. 3).

Рис. 3. Как в Ворде вставить таблицу 1х1 (из одной клетки)
В результате получится таблица из одной большой клетки (1х1):
Осталось в таблице 1х1 с трех сторон убрать границы. Для этого
- переходим во вкладку «Главная» (1 на рис. 4),
- далее рядом с «Шрифт» находим «Абзац» и границы (2 на рис. 4),
- убираем все границы, кликнув «Нет границы» (3 на рис. 4),
- выделяем «Верхняя граница» или «Нижняя граница» (4 на рис. 4).

Рис. 4. Как в таблице Ворд убрать выделение границ (сделать границы невидимыми)
Наглядно я это показываю в видео (в конце статьи).
Кстати, на рис. 3 видно, что есть способ проще. Можно поставить курсор в начало строки в Word и кликнуть «Горизонтальная линия» (5 на рис. 4):
III Линия в Word с помощью рисования
Вставка (1 на рис. 5) – Фигуры (2 на рис. 5) – это еще один способ получить в Ворде горизонтальную линию.
Чтобы линия была строго горизонтальной, следует держать нажатой клавишу Shift и одновременно рисовать линию.

Рис. 5. Как нарисовать линию в Word
IV Линия в Ворде с помощью экранной клавиатуры
Чтобы найти экранную клавиатуру, в Поиск вводим фразу «экранная клавиатура», подробнее для Windows 7 ЗДЕСЬ, а для Windows 8 ТУТ.
Для Windows 10 найти экранную клавиатуру можно также путем ввода в строку Поиска слов «экранная клавиатура».

Рис. 6. Экранная клавиатура
Горизонтальную линию будем создавать так же, как в первом варианте с обычной клавиатурой. На экранной клавиатуре понадобится три кнопки: тире, Shift и Enter.
С новой строки в Word несколько раз кликаем по тире (1 на рис. 6) и жмем на Enter. Получится тонкая горизонтальная линия.
2 Shift, тире и Enter
С новой строки в Word клик сначала Shift (2 на рис. 6), потом Тире (1 на рис. 6). Получится подчеркивание. Так повторим еще 2 раза, а потом нажмем на Enter. В результате увидим толстую горизонтальную линию.
Как удалить линию?
Если такая линия не нравится, то чтобы удалить,
- надо сначала ее выделить,
- а затем либо нажать на клавишу Delete,
- либо на выделенной линии кликнуть ПКМ (правой кнопкой мыши), в появившемся контекстном меню выбрать «Вырезать».
Add or change the line color
- Click the table or select the cells where you want to add or change borders.
- On the Tables tab, under Draw Borders, click the arrow next to Line Color. , and then click the line color that you want.
- On the Tables tab, under Draw Borders, click the arrow next to Borders.
Contents
- 1 How do I change the border color in a table?
- 2 How do I change the lines on a table in Word?
- 3 How do I change the page border color in Word?
- 4 How do I make table lines darker in Word?
- 5 How do I change the space between lines in a table in Word?
- 6 How do I change the line spacing in Word table of contents?
- 7 How do I shade a whole line in Word?
- 8 How do you put a decorative border around text in Word?
- 9 How do I change the color of a table in Word?
- 10 How do I insert a thick black line in Word?
- 11 How do I change the border color in Word 2016?
- 12 How do I get rid of the white space in a table in Word?
- 13 How do I get rid of the white space after a table in Word?
- 14 How can you change the column width of a table?
- 15 How do I get rid of the dotted line in a Table in Word?
- 16 Why is there a gap in my Word Table?
- 17 What type of line spacing is used on a Table of Contents?
- 18 How do I highlight just one line in Word?
- 19 How do you highlight a full line?
- 20 How do you quickly highlight lines?
How do I change the border color in a table?
Go to Table Tools >Design > Table Styles > Borders, and then click the border option that you want to change.
Add or change a table border
- Use Pen Color to change the color of the border.
- Use Pen Weight to change the thickness of the border.
- Use Pen Style to change the line style of the border.
How do I change the lines on a table in Word?
Changing Spacing Between Table Cells
- Right-click anywhere within the table you want to format.
- Choose the Table Properties option from the Context menu.
- Make sure the Table tab is selected.
- Click on the Options button at the bottom of the dialog box.
- Make sure the Allow Spacing Between Cells check box is selected.
How do I change the page border color in Word?
Click the “Box” button on the left of the “Page Border” tab’s window. Click the “Color” drop-down menu and choose a color for the border. This color will apply to any black default borders under the “Style” or “Art” drop-down menus, but you can still get more colorful.
How do I make table lines darker in Word?
Add or change the line color
- Click the table or select the cells where you want to add or change borders.
- On the Tables tab, under Draw Borders, click the arrow next to Line Color. , and then click the line color that you want.
- On the Tables tab, under Draw Borders, click the arrow next to Borders.
How do I change the space between lines in a table in Word?
Change the line spacing in a portion of the document
- Select the paragraphs you want to change.
- Go to Home > Line and Paragraph Spacing.
- Choose the number of line spaces you want or select Line Spacing Options, and then select the options you want under Spacing.
How do I change the line spacing in Word table of contents?
LIne spacing in the table of contents
- Click in an entry you want to change.
- Right-click on that entry and select Paragraph.
- Change the space before and space after settings to what you want.
- Click on an entry for a different level and do the same.
- Repeat as needed.
How do I shade a whole line in Word?
Apply shading to words or paragraphs
- Select the word or paragraph that you want to apply shading to.
- On the Home tab, in the Paragraph group, click the arrow next to Shading.
- Under Theme Colors, click the color that you want to use to shade your selection.
How do you put a decorative border around text in Word?
Go to Home > Borders, and then open the menu of border choices.
Add a border to selected text
- Select a word, line, or paragraph.
- On the Home tab, click the arrow next to the Borders button.
- In the Borders gallery, click the border style that you want to apply.
How do I change the color of a table in Word?
Add Color With Page Borders Design Tab
- Highlight the table cells to which you want to apply the background color.
- Select the Design tab.
- In the Page Background group, select Page Borders.
- Select the Shading tab.
- Select the Fill drop-down arrow, then choose a color from the color chart.
How do I insert a thick black line in Word?
Step 1: Go to the Word document where you want to add a bold line. Step 2: Press the “Enter key” to make a space between text and line. Step 3: Press and hold the Shift and dash (“-“) keys. Once the line is drawn on the page, press “Enter Key.” You can see the Word automatically generate a bold line on the page.
How do I change the border color in Word 2016?
Change the color of fills, lines, and borders
- Right-click the object you want to change, and then click Format
Горизонтальная линия в Ворде — элемент дизайна, который служит для оформления текста или разделения документа на части. Добавление этого элемента в документ улучшает восприятие и удобство при чтении содержимого файла Word.
Вставка линий в Word помогает отформатировать документ, придать ему необходимый вид. Горизонтальная линия Word может сделать текст более легким для чтения, наличие линий делает документ более привлекательным.
Содержание:
- Как вставить горизонтальную линию в Ворде с помощью клавиатуры (1 способ)
- Как провести горизонтальную линию в Ворде с помощью добавления границы (2 способ)
- Как нарисовать горизонтальную линию в Ворде с помощью «Фигуры» (3 способ)
- Как в Ворде прочертить горизонтальную линию с помощью таблицы (4 способ)
- Как добавить горизонтальную линию в Ворде подчеркиванием (5 способ)
- Выводы статьи
- Как добавить горизонтальную линию в Word (видео)
Применение этого элемента дизайна в Microsoft Word поможет вашей работе выглядеть четко и профессионально как для личного, так и для корпоративного использования.
Из этого руководства вы узнаете, как сделать горизонтальную линию в Ворде, с помощью различных инструментов в текстовом редакторе Microsoft Word. Мы предложим вам три классических метода решения задачи и два нестандартных варианта. Инструкции этой статьи подходят для версий программы Microsoft Word: Word для Microsoft 365, Word 2021, Word 2019, Word 2016, Word 2013, Word 2010 и Word 2007.
Как вставить горизонтальную линию в Ворде с помощью клавиатуры (1 способ)
В этом методе мы используем функцию автоформата, чтобы разместить линию между строками текста, а не непосредственно в текстовой строке. Функция автоформата работает, когда до или после того места, где вы хотите поместить линию, нет текста.
Пройдите несколько шагов, чтобы вставить горизонтальную линию Word с помощью сочетаний клавиш клавиатуры:
- Откройте документ Word, а затем щелкните курсором мыши по тому месту документа, куда необходимо вставить горизонтальную линию.
- Введите три или более символов подряд для нужного стиля линии.
- Нажмите на клавишу «Enter» на клавиатуре.
Это действие превращает набранные символы в сплошную линию, которая доходит до края страницы под последней строкой текста.
Вы можете создавать различные стили для линий, вводя три или более определенных последовательных символа в строке. Ознакомьтесь со списком символов, которые вы можете ввести для создания линий, оформленных в разных стилях:
- Дефисы (—) образуют обычную простую линию.
- Знаки равенства (===) создают простую двойную линию.
- Звездочки (***) образуют пунктирную строку.
- Подчеркивание (___) создает одну жирную строку.
- Тильды (~~~) создают волнистую линию.
- Цифровые знаки с решеткой (###) образуют тройную линию с толстым центром.

Как провести горизонтальную линию в Ворде с помощью добавления границы (2 способ)
Сейчас мы расскажем, как добавить горизонтальную линию в Word без использования параметров автоформата или автозамены. Мы используем встроенный инструмент «Границы» из настроек оформления абзаца, расположенный на ленте приложения.
Выполните следующие действия:
- В окне открытого документа Word поместите курсор в то место документа, куда вы хотите вставить линию.
- Во вкладке «Главная» войдите в группу «Абзац», а затем щелкните по стрелке около кнопки «Границы».
- В раскрывающемся меню выберите пункт «Горизонтальная линия».

- Это действие помещает линию в указанное место на странице документа MS Word.

- Дважды щелкните левой кнопкой мыши по линии, чтобы отредактировать внешний вид этого элемента оформления документа.
- Откроется диалоговое окно «Формат горизонтальной линии», в котором можно изменить ширину, высоту, цвет и выравнивание линии.

- Нажмите на кнопку «ОК», чтобы применить эти настройки для оформления вида созданной горизонтальной линии.
Как нарисовать горизонтальную линию в Ворде с помощью «Фигуры» (3 способ)
Сейчас вы узнаете о третьем методе, с помощью которого можно нарисовать линию на странице документа Word. Меню «Фигуры» содержит несколько параметров линий, в том числе линии со стрелками на одном или обоих концах.
После того, как вы нарисуете линию, настройте цвет и внешний вид этого элемента. Линию можно нарисовать не по ширине листа, а произвольной длины.
Вам нужно пройти шаги, которые помогут вам вставить линию с помощью функции «Фигуры»:
- Откройте документ Word, перейдите во вкладку «Вставка».
- В группе «Иллюстрации» щелкните по значку «Фигуры».
- В открывшемся меню выберите форму линии в опции «Линии».

- Нарисуйте линию в любом месте документа, используя выбранный шаблон линии.
Чтобы нарисовать строго горизонтальную линию, сразу после выбора вида фигуры, нажмите и удерживайте клавишу «Shift», а затем проведите линию в нужном месте на странице документа.
- Во вкладке «Формат фигуры» (в некоторых версиях Word — Формат) измените внешний вид линии, цвет, примените другие эффекты.

Как в Ворде прочертить горизонтальную линию с помощью таблицы (4 способ)
Это не самый удобный нестандартный способ вставки линии в документ Word, но им также можно воспользоваться.
Выполните следующее:
- На странице документа Word установите в нужном месте указатель мыши.
- Откройте вкладку «Вставка».
- Щелкните по кнопке «Таблица» в группе «Таблица».
- В выпадающем меню выберите одну ячейку из предложенного макета таблицы.

- Во вкладке «Конструктор таблиц» щелкните по стрелке значка «Границы» в группе «Обрамление».
- В открывшемся меню поочередно снимите выделение с пунктов «Левая граница», «Правая граница», а также с одного из двух пунктов: «Верхняя граница» или «Нижняя граница», в зависимости от того, верхнюю или нижнюю линию вы хотите оставить на странице.

Рассмотрим еще один необычный способ создания горизонтальной линии в документе Word. Это не совсем правильный метод, но и этим вариантом можно воспользоваться, если вам будет удобно.
Проделайте следующие действия:
- Установите курсор мыши в нужном месте на открытой странице документа Word.
- В группе «Шрифт» нажмите на значок «Подчеркнутый».

Если вы хотите изменить обычный прямой вид подчеркивания по умолчанию, нажмите на стрелку у кнопки «Подчеркнутый», и выберите другой подходящий вариант.

- Нажимайте на клавишу «Space» (Пробел) до того места, где по вашему мнению должна заканчиваться горизонтальная линия.
- В самом конце напечатайте точку.
- В результате у нас появилась горизонтальная линия в документе Word.

- Выделите точку, а затем измените цвет точки на белый, который соответствует фону страницы Word, для скрытия этого символа.
Если необходимо измените цвет линии, сделайте следующее:
- Выделите линию на странице документа Microsoft Word.
- Войдите в группу «Шрифт».
- В опции «Цвета темы» выберите подходящий цвет из предложенных или воспользуйтесь палитрой с другими цветами.

Выводы статьи
Во время редактирования документа некоторые пользователи не знают, как начертить горизонтальную линию в Ворде. Этот элемент оформления придает документу привлекательность и удобство. Вы можете добавить горизонтальную линию в Word несколькими способами: при помощи клавиатуры, из настроек границ оформления абзаца, нарисовать с помощью функции фигуры, создать линию из таблицы или использовать метод подчеркивания.
Как добавить горизонтальную линию в Word (видео)
Похожие публикации:
- Как сделать вертикальный текст в Word — 5 способов
- Как написать дробь в Ворде
- Голосовой набор текста в Word — 3 способа
- Как перевернуть текст в Word — 5 способов
- Как сделать нумерацию страниц в Word