
Word for Microsoft 365 Outlook for Microsoft 365 Word 2021 Outlook 2021 Word 2019 Outlook 2019 Word 2016 Outlook 2016 Word 2013 Outlook 2013 Word 2010 Outlook 2010 Word 2007 Outlook 2007 More…Less
To set or change table options in Word or Outlook, right-click a table and choose Table Properties.
Note: If you want to set properties for a particular row, column, or cell, click in that row, column, or cell before making changes in the Table Properties dialog box.
In this article
-
Table properties
-
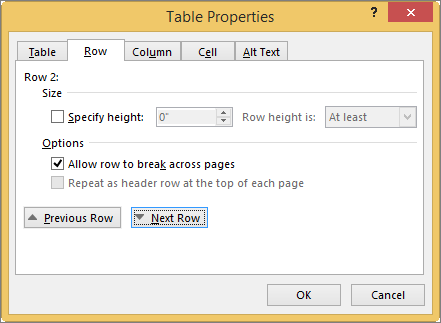
Row properties
-
Column properties
-
Cell properties
-
Alt text
Table properties

Click the Table tab to apply settings to your entire table:
-
Under Size, set the table’s overall width by selecting Preferred width and choosing a size. In the Measure in box, choose whether you want to measure the width in inches or a percentage of the page.
-
Under Alignment, choose whether you want to align your table to the left, center, or right of page. If you select Left, you can select an indentation distance in the Indent from Left box.
-
Under Text wrapping, select Around if you want nearby text on your page to wrap around your table; you can make text wrapping more precise by clicking Positioning, and then choosing options in the Table Positioning dialog box. If you don’t want text wrapping, select None.
-
Click Borders and Shading to change the border style, line color, and line width of your table.
-
Click Options to set more table properties, including top and bottom cell margins, cell spacing, and automatic resizing of cell contents.
Top of Page
Row properties
First, click in the row or select the rows you want to change, right-click, choose Table Properties, and then click the Row tab.
-
Under Size, set the row’s height by selecting Preferred height and choosing a size; you can further refine the height by selecting an option in the Row height is box.
-
Under Options, select options for breaking rows across pages or creating header rows.
-
To display the currently selected row at the top of the tab and navigate between rows without leaving the Table Properties dialog box, click Previous Row or Next Row.
Top of Page
Column properties
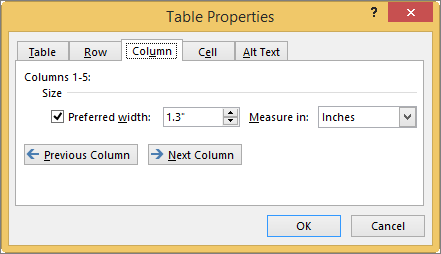
First, click in the column or select the columns you want to change, right-click, choose Table Properties, and then click the Column tab.
-
Under Size, set the column’s width by selecting Preferred width and choosing a size. In the Measure in box, choose whether you want to measure the width in inches or a percentage.
-
To display the currently selected column or columns at the top of the tab and navigate between columns without leaving the Table Properties dialog box, click Previous Column or Next Column.
Top of Page
Cell properties
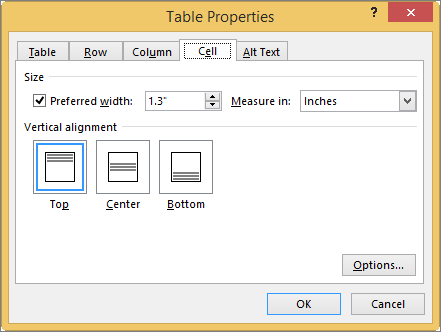
First, click in the cell that you want to change, right-click, choose Table Properties, and then click the Cell tab.
-
Under Size, set the cell’s width by selecting Preferred width and choosing a size. In the Measure in box, choose whether you want to measure the width in inches or a percentage.
-
Under Vertical alignment, choose an alignment option for the cell contents—Top (the default alignment), Center, or Bottom.
-
Click Options to set more cell properties, including top and bottom cell margins and text wrapping and fit options.
Top of Page
Alt text
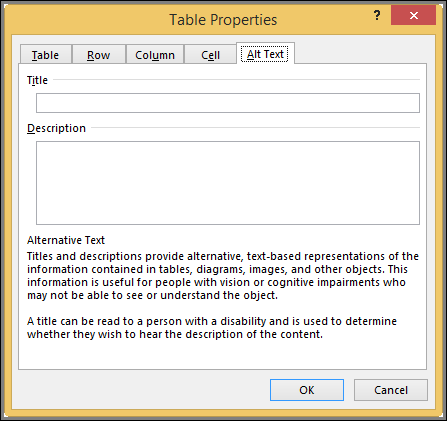
You can create alternative text (alt text) for your table to help people with screen readers understand the content of the table.
-
In the Description box, enter an explanation of the table.
-
In the Title box, enter a brief summary of the table.
Note: Unless you have a complex table, you will usually want to enter text in just the Description box. When you have complex content to describe, filling in the Title field is useful so that reading the full description is not necessary unless desired.
Top of Page
Need more help?
Want more options?
Explore subscription benefits, browse training courses, learn how to secure your device, and more.
Communities help you ask and answer questions, give feedback, and hear from experts with rich knowledge.
1
Add space for underlines
This option adds extra space for underlines.
2
Adjust line height to grid height in the table
When this option is turned on, the table row height snaps to the document grid. Used in East Asian text.
3
Align table rows independently
When this option is not selected, center-aligned or right-aligned non-wrapped tables are aligned as a whole without changing the relative positions of the rows.
When this option is selected, the rows of a center-aligned or right-aligned non-wrapped table are center-aligned or right-aligned independently. For example, the right edges of the rows of a right-aligned non-wrapped table line up evenly if the right edges do not line up when the table is left-aligned.
4
Allow hyphenation between pages or columns
5
Allow space between paragraphs of the same style in a table
6
Allow table rows to lay out apart
This option determines the behavior of a non-wrapped table that is laid out on the right side of a wrapped object and extends below the wrapped object.
When this option is not selected, the remainder of the table is positioned out to the right with the first part of the table.
When the option is selected, the remainder of the table is allowed to slide back to the left.
7
Allow tables to extend into margins
This option was new in Word 2003.
This option will retain the settings of a table that is extended past the margins of a document instead of using autofit to make the table fit within the margins.
This was enabled automatically under Tools > Options > Compatibility for Word 2000 and Word 2002. In Word 2003 and newer versions, the option is built in.
8
Auto space the way Word 95 does
(Word 2003: Auto space like Word 95)
This option determines how lines of text break (word wrap) in an East Asian Word 95 document.
9
Balance SBCS characters and DBCS characters
Not used in U.S. English Word.
10
Combine table borders the way Word 5.x for the Macintosh does
If a table contains two contiguous cells whose border is formatted differently, the left-most cell is displayed with the border width of the right-most cell.
11
Convert backslash characters into yen signs
Not used in U.S. English Word.
12
Disable OpenType Font Formatting Features
13
Do full justification the way WordPerfect 6.x for Windows does
To achieve full justification, WordPerfect compresses the spaces between words while Word expands them. This often results in different line breaks and leads to different page breaks.
Turn on this option to implement the WordPerfect justification method.
14
Don’t add automatic tab stop for hanging indent
This option ignores the automatic tab stop that Word 6.0 uses when creating a hanging indent.
15
Don’t add extra space for raised/lowered characters
This option prevents Word from inserting additional space between lines to accommodate raised or lowered characters.
16
Don’t add leading (extra space) between rows of text
This option displays text without leading between the lines. This is the same functionality that exists in Word versions 5.x for the Macintosh.
17
Don’t allow hanging punctuation with character grid
This option prevents the use of punctuation marks in East Asian text when the character grid is enabled. This option was new in Word 2002.
18
Don’t autofit tables next to wrapped objects
19
Don’t balance columns at the start of Continuous sections
This option prevents Word from balancing columns at the end of a section or document.
20
Don’t blank the area behind metafile pictures
This option prevents Word from obscuring any text or graphics surrounding an inserted metafile. Selecting this option decreases editing speed.
21
Don’t break constrained tables forced onto the page
22
Don’t break wrapped tables across pages
This option was new in Word 2002. This option prevents a wrapped table from breaking across a page break.
Note: The Allow row to break across pages option has no effect in a wrapped table.
23
Don’t center «exact line height» lines
This option changes the vertical position of text between the top of the line space and the bottom of the line space.
With this option turned off, any extra space is split between the ascender and descender. With the option turned on, all the extra space goes to the descender.
24
Don’t expand character spaces on a line that ends with SHIFT+RETURN
When a «justified» line of text ends with SHIFT+ENTER, Word prevents extra spacing between words and makes the line appear as «Align Left».
25
Don’t snap text to grid inside table with inline objects
This option was new in Word 2002. This option prevents Word from allowing East Asian text in a table cell to snap to the character grid when an «inline with text» object is inserted in the table cell.
26
Don’t use Asian rules for line breaks with character grid
This option was new in Word 2002. This option allows East Asian text to line-break the same as in earlier versions of Word when the character grid is turned on.
27
Don’t use hanging indent as tab stop for bullets and numbering
28
Don’t use HTML paragraph auto spacing
This option has two functions:
- If you have Auto set for Paragraph Spacing Before/After, and you turn this option on, Word adjusts Paragraph Spacing Before/After to 5 pt.
- With this option turned off (default setting), Word sets the spacing between paragraphs to the larger of Paragraph Spacing Before/After.
With this option turned on, Word uses both values of Paragraph Spacing Before/After between paragraphs. This is the same functionality as in earlier versions of Word.
29
Don’t use proportional width for Korean characters
30
Don’t vertically align inside of textboxes
31
Don’t vertically align table cells containing shapes
32
Draw underline on trailing spaces
Not used in U.S. English Word.
33
Expand/condense by whole number of points
This option rounds the measurement of the spacing for characters with condensed or expanded spacing to the nearest whole number.
34
Forget last tab alignment
This option forces tab settings at the end of lines to behave the same as in Word 97.
35
Lay out AutoShapes the way Word 97 does
When an AutoShape with Top & Bottom wrapping style applied appears at the bottom of a page, Word forces the AutoShape behind the text.
36
Lay out footnotes the way Word 6.x/95/97 does
This option positions footnotes as they were in earlier versions of Word.
37
Lay out tables with raw width
This option allows Word to determine the width of a table (table width + table indent) and prevents a table from being laid out in an area that is too small.
This option prevents the table from being clipped (cut off on the sides) or pushed off the page when it is aligned next to a floating object.
38
Print body text before header/footer
This option prints the main text layer before the Header/Footer layer, which allows for the process of PostScript codes in the text layer, the same way that Word 5.x for the Macintosh does. (This functionality is the reverse of the default order.)
39
Print colors as black on noncolor printers
This option prints all colors as black, instead of using grayscale (different shades of gray) when you use a printer that does not print color.
40
Select entire field with first or last character
This option was new in Word 2002. This option allows you to select the entire field when you select either the first or last character of the field result. This option does not work when the field code is displayed.
41
Set the width of a space like WordPerfect 5.x
WordPerfect calculates the width of a space in a proportional font differently from Word. In the WordPerfect interface, this default word spacing is named WordPerfect Optimal. The Word 97 text converters can use the WordPerfect formula for spacing.
42
Show hard page or column breaks in frames
If a frame contains a manual, or hard, page break or column break, Word displays it.
43
Split apart page break and paragraph mark
44
Substitute fonts based on font size
This option is used by the WordPerfect 6.x converter to make a font request based on font size first and, if a match is not found, to actually map the font.
45
Suppress extra line spacing at bottom of page
WordPerfect suppresses any extra line spacing from the last line on a page. For example, if line spacing is set to double, the final line on the page does not display white space below it.
Turn on this option to implement the line-spacing feature.
46
Suppress extra line spacing at top of page
This option prevents Word from adding extra line spacing at the top of a page. If the line spacing for the line at the top of a page is set for more than single spacing, Word ignores the extra spacing, so that the top margin does not increase.
47
Suppress extra line spacing at top of page the way Word 5.x for the Macintosh does
(Word 2003: Suppress extra line spacing at top of page like Word 5.x for the Mac)
This option prevents Word from adding extra line spacing at the top of a page. If the line spacing for the line at the top of a page is set for more than single line spacing, Word ignores the extra spacing, so that the top margin does not increase.
48
Suppress extra line spacing the way WordPerfect 5.x does
(Word 2003: Suppress extra line spacing like WordPerfect 5.x)
This option ensures that the layout of a converted WordPerfect document that is formatted with Automatic line height closely matches that of the original document.
49
Suppress Space Before after a hard page or column break
This option suppresses the space in a paragraph formatted with the Space Before option that follows a hard page break or column break.
50
Swap inside and outside mirror indents and relative positioning
51
Swap left and right borders on odd facing pages
If a paragraph has a left border (not a box) and the Different Odd/Even Headers check box or Mirror Margins check box is selected, Word prints the border on the right, on odd numbered pages.
52
Treat * as ** in mail merge data sources
In a data source, this option converts a delimiter composed of a backslash and quotation mark («) to two quotation marks (» «), so that Word can recognize quotation marks.
53
Truncate font height
This option rounds the font size up or down, as in WordPerfect 6.x for Windows.
54
Underline tab character in numbered lists
55
Use cached paragraph information for column balancing
56
Use larger small caps the way Word 5.x for the Macintosh does
This option applies small caps formatting in Word version 6.0 for the Macintosh the same way as in Word version 5.x for the Macintosh, which produces slightly larger small capital letters.
57
Use line-breaking rules
This option was new in Word 2002. This option controls line breaks in a Thai language document.
58
Use Normal style for bulleted and numbered lists
59
Use printer metrics to lay out document
If this option is selected, Word uses the information from the printer driver that is installed, as in some earlier versions of Word.
If this option is turned off (default), Word use built-in metrics to lay out the document. This means your document looks the same, no matter what printer driver is installed.
60
Use Word 2002 table style rules
This option was new in Word 2003. This option will preserve layout compatibility of tables styles used in Word 2002.
61
Use Word 2002-2007 style evaluation rules for font size and paragraph justification in tables
62
Use Word 2003 hanging-punctuation rules
63
Use Word 2003 indent rules for text next to wrapped objects
64
Use Word 2003 kerning pair rules
65
Use Word 2013 rules for hyphenation between pages and columns
66
Use Word 2003 table autofit rules
67
Use Word 6.x/95 border rules
This option suppresses paragraph borders when a paragraph is intersected by frames or wrapped drawing objects.
68
Use Word 97 line-breaking rules for Asian text
This option uses Word 97 line-breaking rules for Asian text.
69
Wrap lines the way Word 6.0 does
(Word 2003: Lines wrap like Word 6.0)
Not used in U.S. English Word.
70
Wrap trailing spaces to next line
This option automatically moves any spaces that trail into the margin after a word at the end of a line to the beginning of the next line.
 Please Note:
This article is written for users of the following Microsoft Word versions: 2007, 2010, 2013, 2016, 2019, and Word in Microsoft 365. If you are using an earlier version (Word 2003 or earlier), this tip may not work for you. For a version of this tip written specifically for earlier versions of Word, click here: Limiting Lines in a Table Cell.
![]()
Written by Allen Wyatt (last updated November 23, 2019)
This tip applies to Word 2007, 2010, 2013, 2016, 2019, and Word in Microsoft 365
Maria has a table that she doesn’t want to extend past three lines vertically in any given cell. She wonders if there is a way to lock how many lines there can be in any given cell of a table.
Normally the height of a row (which, of course, controls the height of cells in that row) can vary from row to row. Word does this so that whatever you place in the row can be fully accommodated by the table. There may be times when you don’t want the row to expand, but instead you want the row to be a specific height.
Here’s how you can set the row height to only allow three lines of text:
- Select the entire table. (Position the insertion point within the table, display the Layout tab of the ribbon, and choose Select Table from the Select pull-down list.)
- Right-click the selected table and then choose Table Properties from the Context menu. Word displays the Table Properties dialog box.
- Make sure the Row tab is selected. (See Figure 1.)
- In the Specify Height box, indicate how high you want each row. (For three lines of 12-point type, you should specify one-half inch.)
- Using the Row Height Is drop-down list, choose Exactly.
- Click OK.

Figure 1. The Row tab of the Table Properties dialog box.
Now your row height will never go above whatever you set in step 4. Note that this approach won’t stop someone from adding information that requires more than three lines in a table cell; it just won’t display anything beyond the first three lines.
WordTips is your source for cost-effective Microsoft Word training.
(Microsoft Word is the most popular word processing software in the world.)
This tip (8136) applies to Microsoft Word 2007, 2010, 2013, 2016, 2019, and Word in Microsoft 365. You can find a version of this tip for the older menu interface of Word here: Limiting Lines in a Table Cell.
Author Bio
With more than 50 non-fiction books and numerous magazine articles to his credit, Allen Wyatt is an internationally recognized author. He is president of Sharon Parq Associates, a computer and publishing services company. Learn more about Allen…
MORE FROM ALLEN
Starting in Safe Mode
By using a command-line switch, Excel can be started in safe mode. This means that the program is loaded with bare-bones …
Discover More
Making Bookmarks Bold
Do you want an easy way to see all the bookmarks in your document? Word provides a way to make them visible, or you can …
Discover More
Counting Only Money Winners
If a series of cells contain the amount of money won by individuals, you may want to count the number of individuals who …
Discover More
More WordTips (ribbon)
Self-Adjusting Column Widths
It is important to understand how column widths relate to the margins you may have set in your document. The reason is …
Discover More
Aligning Positive and Negative Whole Numbers in a Column
When you use a table to present numeric information, you may want to have Word align the numbers in the table. This can …
Discover More
Last-Row Border Formatting
When the last row displayed on a page doesn’t show the borders you want, it can be confusing to figure out how to get …
Discover More
Select the table
- Using the mouse: Move the mouse over the table until you see the table selection icons in the upper-left corner of the table and click it:

Note: You can also click on the table selection icon in the bottom-right corner (resizing handle) for the same effect.
- Using the keyboard: To select table elements, on the Table Layout tab, on the Table group, click the Select button, then select the option you prefer:

- Select Cell
- Select Column
- Select Row
- Select Table
Format the table
After positioning the cursor anywhere in a table or selecting a table element, Word shows two tabs: Table Design and Layout. E.g.:

See also Select and format table elements in Word.
Apply a predefined Table style
There are several predefined styles you can use for the table. Styles include a variety of borders, colors, and other attributes that give a table a very professional appearance.
To choose any of the predefined styles, do the following:
1. Select the table.
2. On the Table Design tab, in the Table Styles group, in the Styles Gallery, click the More arrow to see the complete list of styles:

3. Select the table style you want:

The Table Styles gallery includes three categories of styles:
- Plain Tables have minimal formatting.
- Grid Tables include vertical separators between columns.
- List Tables do not include vertical column separators:

Note: The selected style overrides any previously added style changes for the table.
Modify the table style options
To change the table or selected style, on the Table Design tab, in the Table Style group, click Modify Table Style…:

In the Modify Style dialog box, make changes you want:

Note: Click the Format button at the bottom of the dialog box to change other options such as Font or Paragraph. See also how to clear formatting.
Customize the table formatting
After applying a table style, you can turn various options on or off to change their appearance. On the Table Design tab, in the Table Style Options group, there are six options:

- Header Row is the first row of the table that contains Headers that helps identify the contents of a particular column. Usually, the Header Row is formatted differently and should be repeated at the beginning of each new page for tables that extend beyond one page.
Note: According to most requirements, data tables should have a header row to provide a contextual structure that aids navigation.
- Total Row is the last row of the table. If this option is selected, the last row will be formatted differently from the body rows, designed to summarize the rows above it (see how to insert formulas).
- First Column used special formatting to the column. Usually, the First Column contains the row headings.
- Last Column applies special formatting to the column to summarize the earlier columns (see how to insert formulas).
- Banded Rows and Banded Columns alternate the background color of rows and columns (see how to change the background color for the selected cells below).
Note: Certain Table Style Options may have a different effect depending on the Table Style you’ve chosen. You might need to experiment to get the look you want.
Apply the border styles
To apply and remove cell borders, do the following:
1. Select the cells or entire table to which you want to add a border.
2. On the Table Design tab, in the Borders group, choose the desired Border Styles, Line Style, Line Weight, and Pen Color:

- Select the predefined Line Style, Line Weight, and Line Color from the Border Styles dropdown list:

- Select the Line Style:

- Select a border thickness from the Line Weight dropdown list:

- Select the border color from the Pen Color dropdown list:

- Select the borders from the Borders dropdown list:

Note: Select No Borders from the Borders dropdown list to remove borders from the selected cells.
- Draw the border where you want:
- After selecting border style or color, the Border Painter button is automatically checked, or
- If all that you want is selected already, just click the Border Painter button by yourself:

After any of these actions, your cursor changes to the brush. Now, draw the border where you need it:

Note: Use the Eraser button in the Draw group on the Table Layout tab to remove the unnecessary border:


Apply background colors and shading
To change the background color for some table elements, select them, then on the Table Design tab, in the Table Styles group, click the Shading button, then select the background color you prefer:

Note: To use a pattern instead of a solid color, on the Table Design tab, in the Borders group, click the dialog box launcher:

In the Borders and Shading dialog box, on the Shading tab, select a pattern in the Style list:

Layout of the table
The Table Layout tab includes commands for changing the entire table format, as well as commands for changing the appearance of individual table components such as cells, columns, rows:

See Select and format table elements in Word for more details.
Resize a table
- Using the mouse: To resize a table in a Word document, move the mouse over the table until you see the table resizing icons (handle) in the bottom-right corner of the table and click it:

Drag the table to the size you need, and then release the handle.
- Using the keyboard: Select a table (see also how to resize individual cells, specific rows, or columns); the do one of the following:
- On the Layout tab, in the Cell Size group, change the values in the Height and Width fields:

- Open the Table Properties dialog box by doing one of the following:
- On the Table Layout tab, in the Table group, click the Properties button:

- Right-click the table and select Table Properties… in the popup menu:

In the Table Properties dialog box, on the Table tab, in the Size section, select the Preferred width check box, then:
- In the Preferred width field, type or select the value you need,
- In the Measure in dropdown list, select one of the items:
- Percent to specify the percentage of the table width,
- Inches to fix the column width:

- On the Table Layout tab, in the Table group, click the Properties button:
- On the Layout tab, in the Cell Size group, change the values in the Height and Width fields:


See how to resize table elements for more details.
Freeze the table
Some Word tables change the width of their columns according to the data. To stop changing the table size when new data is inserted, do the following:
1. Select the table.
2. Open the Table Properties dialog box.
3. In the Table Properties dialog box, on the Table tab, click the Options… button:

4. In the Table Options dialog box, deselect the Automatically resize to fit contents check box:

See also how to fix the height of table rows.
Move a table
To move a table to a new page or a new document, select it, then use the Cut and Paste commands. You can also use the Copy command to leave a copy of the table in the original location.
258
11 января 2005 года
![]()
SergeySV
1.5K / / 19.03.2003
Человек наверное уже сгорел  а я наконец только додумкал как это лучше…
Сначала я написал функцию, которая вычисляла высоту ячейки таблицы анализируя каждую строчку внутри: т.е. в каждой строчке определ. самый высокий символ + междустрочный интервал — суммируя таким образом все строчки в ячейке получалась высота ячейки.
Потом мне подсказали свойство range.Information(wdVerticalPositionRelativeToPage), таким образом мне достаточто было определить положение первой строчки, потом самой нижней+ее междустрочный интервал. Однако легко только все на словах: проблемы начались уже с определением первой/последней строчки — дело в том, что пустые строчки(которые просто с переводом строки) word не воспринимает как нормальные строчки и не добавляет их полноправно в коллекцию range.Sentences и потому range.Sentences.First (а также range.Sentences.Last) начинали безбожно врать, пришлось писать код по анализу и отлову ситуаций, когда первая/последняя строка в ячейке была пустой. Проблемой осталовалось также определением междустрочного интервала, потому что, то что возвращает свойство .LineSpacing никак не подходит для реальных вычислений, а подобрать формулу у меня так и не получилось. Да там помойму и невозможно это сделать, вот, можете запустить этот макрос и полюбоваться на фактические значения междустрочного интервала для разных шрифтов и множителей.
Код:
Sub Macros1()
Dim i As Long, k As Long
Dim raz As Single
Dim rTemp As Range
ActiveDocument.Tables.Add Range:=Selection.Range, NumRows:=1, NumColumns:= _
1, DefaultTableBehavior:=wdWord9TableBehavior, AutoFitBehavior:=wdAutoFitFixed
ActiveDocument.Tables(1).Cell(1, 1).Range.Text = «df» & vbCrLf & «df»
For k = 1 To 12
For i = 8 To 22
ActiveDocument.Tables(1).Cell(1, 1).Range.Sentences(1).Font.Size = i
ActiveDocument.Tables(1).Cell(1, 1).Range.Sentences(1).ParagraphFormat.LineSpacing = 6 + 6 * k
Set rTemp = ActiveDocument.Tables(1).Cell(1, 1).Range.Sentences(2)
Set rTemp = ActiveDocument.Range(Start:=rTemp.Start, End:=rTemp.Start + 3)
raz = rTemp.Information(wdVerticalPositionRelativeToPage) _
— ActiveDocument.Tables(1).Cell(1, 1).Range.Sentences(1).Information(wdVerticalPositionRelativeToPage)
raz = raz — i
Debug.Print «Коэф. междустр интерв-» & (k — 1) / 2 + 1 & » Размер шрифта-» & i & » Реальн междустр интервал-» & raz
Next i
Next k
End Sub
Так что если кто разобрался с междустрочными интервалами, пусть пишет сюда.
Но как говорится, хорошая мысля приходит опосля. Я решил в итоге переделать код и пойти простым путем (не понимаю почему я до этого сразу не додумался): не надо связывать с тектом внутри ячейки, а взять range всей ячейки (соответственно опред. ее верхний край) и вычесть положение верхнего края нижней ячейке. Для последней строки приходится брать параграф следйющий за таблицей (если таблица в самом конце документа, то за ней все равно есть пустой параграф). Пока только еще хорошенько не протестил на возможные баги, если в документе стоит какое-нибудь хитрое обтекание текстом таблицы…
Да, еще такой момент. В одном случае мы можем получить немного завышенное значение высоты — это когда измеряем высоты строки таблицы, которая на этом листе последняя, а следующая уже не умещается и переносится на следующий лист. И тогда соответственно вот на эту величину оставшегося неиспользованного пространства под нашей строкой до конца листа мы и получим ошибку…. Пока еще не знаю, как эту величину можно отследить и вычислить, буду думать… но в любом случае такая ситуация должна возникать редко — чтобы большой кусок листа под последней строкой на листе пропадал.
Сам код:
Код:
‘===================================================================================================
‘
‘ Модуль с функциями по вычислению ВЫСОТЫ ячейки/строки/таблицы
‘
‘===================================================================================================
‘
‘
‘ Основные функции:
‘ 1. HeightRow — вычисляет высоту выбранной строки таблицы
‘ 2. HeightTable — вычисляет высоту таблицы
‘
‘ Вспомогательные функции:
‘ 1. AbsDistBetwenRanges — измеряет абсол. расстояние между двумя range’ами
‘
‘===================================================================================================
Option Explicit
Public Function HeightRow(rRow As Row) As Single
‘ Функция вычисляет высоту выбранной строки таблицы
‘
‘[rRow] — строка таблицы, можно передавать например так — ActiveDocument.Tables(1).Rows(1)
Dim tTable As Table
Dim cCell As Cell
Dim r1 As Range, r2 As Range
Dim lMaxCol As Long, lMaxRow As Long
On Error GoTo Er_
Set tTable = rRow.Parent
‘ проверяем, может нам и не придется вычислять высоту строки самим
For Each cCell In rRow.Cells
If cCell.HeightRule = wdRowHeightExactly Then
HeightRow = cCell.Height
GoTo Ex_
End If
Next
‘ позиция Top
Set r1 = rRow.Range
If rRow.Index < tTable.Rows.Count Then
‘ получ. след. строку таблицы
Set r2 = tTable.Rows(rRow.Index + 1).Range
Else
‘ это послед. строка таблицы
lMaxRow = tTable.Range.Information(wdMaximumNumberOfRows)
lMaxCol = tTable.Range.Information(wdMaximumNumberOfColumns)
‘ переходим на параграф следующ. за таблицей, он станет нашим нижним range
Set r2 = tTable.Cell(lMaxRow, lMaxCol).Range
With r2
.Collapse Direction:=wdCollapseStart
.Move Unit:=wdParagraph, Count:=2
.Select
End With
End If
‘ вычисляем высоту
HeightRow = AbsDistBetwenRanges(r1, r2)
Ex_:
Exit Function
Er_:
HeightRow = 0
Resume Ex_
End Function
Public Function HeightTable(tTable As Table) As Single
‘ Функция вычисляет высоту таблицы
‘
‘[tTable] — ссылка на таблицу, можно передавать например так — ActiveDocument.Tables(1)
Dim r1 As Range, r2 As Range
Dim lMaxCol As Long, lMaxRow As Long
On Error GoTo Er_
‘ позиция Top
Set r1 = tTable.Cell(1, 1).Range
‘ позиция Bottom
lMaxRow = tTable.Range.Information(wdMaximumNumberOfRows)
lMaxCol = tTable.Range.Information(wdMaximumNumberOfColumns)
Set r2 = tTable.Cell(lMaxRow, lMaxCol).Range
With r2
.Collapse Direction:=wdCollapseStart
.Move Unit:=wdParagraph, Count:=2
.Select
End With
‘ вычисляем высоту
HeightTable = AbsDistBetwenRanges(r1, r2)
Ex_:
Exit Function
Er_:
HeightTable = 0
Resume Ex_
End Function
Public Function AbsDistBetwenRanges(r1 As Range, r2 As Range) As Single
‘ измеряет абсолютное расстояние (в points) между двумя range’ми (их верхними углами),
‘ учитывая тот факт, что range’ы могут находится на разных листах
‘ и у каждого листа может быть свой размер и свои отступы
‘
‘[r1] — первый range
‘[r2] — второй range, между которыми будет измеряться расстояние.
Dim snR1Top As Single, snR2Top As Single
Dim snR1Page As Single, snR2Page As Single
Dim snDistPages As Single
Dim rTemp As Range
Dim i As Long
On Error GoTo Er_
snR1Top = r1.Information(wdVerticalPositionRelativeToPage)
snR2Top = r2.Information(wdVerticalPositionRelativeToPage)
snR1Page = r1.Information(wdActiveEndPageNumber)
snR2Page = r2.Information(wdActiveEndPageNumber)
Set rTemp = r1
‘ определяем кто выше
If snR1Page < snR2Page Then
‘ считаем страницы между ними
For i = snR1Page + 1 To snR2Page — 1
Set rTemp = rTemp.GoTo(What:=wdGoToPage, Which:=wdGoToAbsolute, Count:=i)
snDistPages = snDistPages + rTemp.PageSetup.PageHeight _
— rTemp.PageSetup.BottomMargin _
— rTemp.PageSetup.TopMargin
Next i
‘ вычисляем итоговое расстояние
AbsDistBetwenRanges = r1.PageSetup.PageHeight — r1.PageSetup.BottomMargin — snR1Top _
+ snDistPages _
+ snR2Top — r2.PageSetup.TopMargin
ElseIf snR1Page > snR2Page Then
‘ считаем страницы между ними
For i = snR2Page + 1 To snR1Page — 1
Set rTemp = rTemp.GoTo(What:=wdGoToPage, Which:=wdGoToAbsolute, Count:=i)
snDistPages = snDistPages + rTemp.PageSetup.PageHeight _
— rTemp.PageSetup.BottomMargin _
— rTemp.PageSetup.TopMargin
Next i
‘ вычисляем итоговое расстояние
AbsDistBetwenRanges = r2.PageSetup.PageHeight — r2.PageSetup.BottomMargin — snR2Top _
+ snDistPages _
+ snR1Top — r1.PageSetup.TopMargin
Else ‘ на одной странице находятся
AbsDistBetwenRanges = Abs(snR1Top — snR2Top)
End If
Ex_:
Exit Function
Er_:
AbsDistBetwenRanges = 0
Resume Ex_
End Function