
Word for Microsoft 365 Outlook for Microsoft 365 Word 2021 Outlook 2021 Word 2019 Outlook 2019 Word 2016 Outlook 2016 Word 2013 Outlook 2013 Word 2010 Outlook 2010 Word 2007 Outlook 2007 More…Less
To set or change table options in Word or Outlook, right-click a table and choose Table Properties.
Note: If you want to set properties for a particular row, column, or cell, click in that row, column, or cell before making changes in the Table Properties dialog box.
In this article
-
Table properties
-
Row properties
-
Column properties
-
Cell properties
-
Alt text
Table properties

Click the Table tab to apply settings to your entire table:
-
Under Size, set the table’s overall width by selecting Preferred width and choosing a size. In the Measure in box, choose whether you want to measure the width in inches or a percentage of the page.
-
Under Alignment, choose whether you want to align your table to the left, center, or right of page. If you select Left, you can select an indentation distance in the Indent from Left box.
-
Under Text wrapping, select Around if you want nearby text on your page to wrap around your table; you can make text wrapping more precise by clicking Positioning, and then choosing options in the Table Positioning dialog box. If you don’t want text wrapping, select None.
-
Click Borders and Shading to change the border style, line color, and line width of your table.
-
Click Options to set more table properties, including top and bottom cell margins, cell spacing, and automatic resizing of cell contents.
Top of Page
Row properties
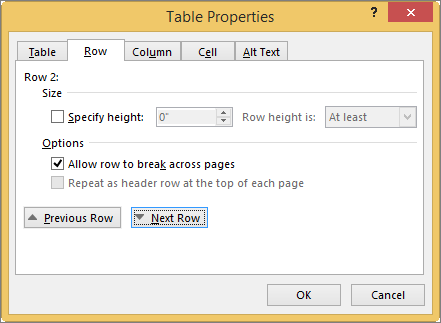
First, click in the row or select the rows you want to change, right-click, choose Table Properties, and then click the Row tab.
-
Under Size, set the row’s height by selecting Preferred height and choosing a size; you can further refine the height by selecting an option in the Row height is box.
-
Under Options, select options for breaking rows across pages or creating header rows.
-
To display the currently selected row at the top of the tab and navigate between rows without leaving the Table Properties dialog box, click Previous Row or Next Row.
Top of Page
Column properties
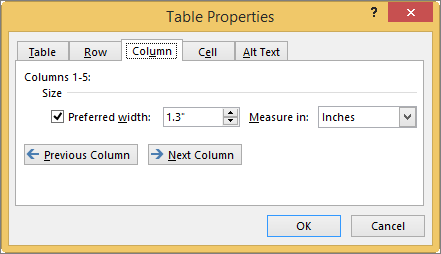
First, click in the column or select the columns you want to change, right-click, choose Table Properties, and then click the Column tab.
-
Under Size, set the column’s width by selecting Preferred width and choosing a size. In the Measure in box, choose whether you want to measure the width in inches or a percentage.
-
To display the currently selected column or columns at the top of the tab and navigate between columns without leaving the Table Properties dialog box, click Previous Column or Next Column.
Top of Page
Cell properties
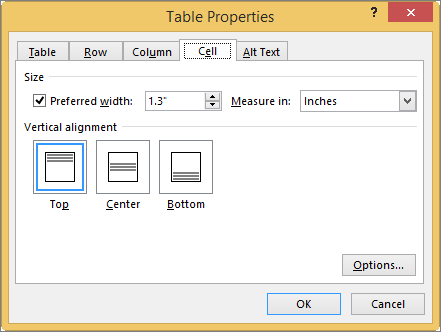
First, click in the cell that you want to change, right-click, choose Table Properties, and then click the Cell tab.
-
Under Size, set the cell’s width by selecting Preferred width and choosing a size. In the Measure in box, choose whether you want to measure the width in inches or a percentage.
-
Under Vertical alignment, choose an alignment option for the cell contents—Top (the default alignment), Center, or Bottom.
-
Click Options to set more cell properties, including top and bottom cell margins and text wrapping and fit options.
Top of Page
Alt text
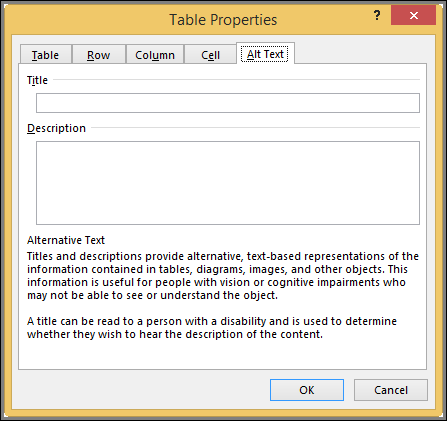
You can create alternative text (alt text) for your table to help people with screen readers understand the content of the table.
-
In the Description box, enter an explanation of the table.
-
In the Title box, enter a brief summary of the table.
Note: Unless you have a complex table, you will usually want to enter text in just the Description box. When you have complex content to describe, filling in the Title field is useful so that reading the full description is not necessary unless desired.
Top of Page
Need more help?
If the document contains tables, it must be formatted according to the requirements accepted by your college, university, company, established on the project, etc. Most requirements, including accessibility, tell that tables should contain titles, column headers, alternate text, etc. In addition, tables must be correctly positioned on the page, using the pre-defined alignment, padding, and text-wrapping guidelines.
Usually, the table contains the following basic components:
- The table number (e.g., Table 1) and the title appear above the table body (see how to create a caption for tables).
- The table includes column headings, including a stub heading (heading for the leftmost, or stub, column). Some tables also include column spanners, decked heads, and table spanners. See how to format tables in a Word document.
- The table body contains all the rows and columns of a table (including the headings row). A cell is the point of intersection between a row and a column. See how to select and format table elements.
- All types of notes (general, specific, and probability) appear below the table if there are notes. Notes describe contents of the table that cannot be understood from the table title or body alone (e.g., definitions of abbreviations, copyright attribution, etc.).

See also how to create cross-references to a table.
Align the table on the page
By default, Word aligns the table to the Left. If you want to change an alignment of the table on the page, select it and do one of the following:
- On the Home tab, in the Paragraph group, select the alignment you prefer:

- Open the Table Properties dialog box by doing one of the following:
- On the Table Layout tab, in the Table group, click the Properties button:

- Right-click the table and select Table Properties… in the popup menu:

In the Table Properties dialog box, on the Table tab, in the Alignment section, select the option you prefer:

- On the Table Layout tab, in the Table group, click the Properties button:
- Press the keyboard shortcuts:
- Ctrl+L to align a table to the Left (by default),
- Ctrl+E to Center the table,
- Ctrl+R to align a table to the Right.


Add indent from left
The Indent from left controls the distance of the table from the left margin. To add the Indent from left, do one of the following:
- On the Home tab, in the Paragraph group, click the Increase Indent button:
- Open the Properties dialog box. In the Table Properties dialog box, on the Table tab, in the Alignment section, type or choose the value you need in the Indent from left field:
Note: The Indent from left field is active only for the Left alignment.


For example, the table with a left indent 0.5 inches:

Text Wrapping for a table
Word offers to customize the text wrapping style for a table, as well as for figures. To customize a text wrapping style, do the following:
1. Select a table.
2. Open the Table Properties dialog box. In the Table Properties dialog box, on the Table tab, in the Text wrapping section:
- Select None to disable text wrapping for the table
- Select the Around option to have text wrapping around the table. Then click the Positioning… button for more customization:
In the Table Positioning dialog box:


Position a table
- In the Horizontal sections, specify:
- Position to the Left, Right, Center, Inside, or Outside,
- Relative to the Margin, Page, or Column.
For example, with Position to the Right relative to Margin:

- In the Vertical section, specify:
- Position to the Top, Bottom, Center, Inside, or Outside,
- Relative to the Margin, Page, or Column.
For example, with Position to the Top relative to Page:


Increase the space between text and table
- In the Distance from surrounding text section, enter custom values for the distance between the text and the table independently for:
- Top (0 by default),
- Bottom (0 by default),
- Left (1.13 inches by default),
- Right (1.13 inches by default).
For example, with the 0.3-inch distance on all sides:

Note: See also how to change a distance within a table.
Text wrapping options
- In the Options section:
- The Move with text option moves the table along with the text in which it is located.
Select the Move with Text option if the text is directly related to the table data. The table is vertically aligned to the related paragraph around it. If the table data applies to the whole document, keep the Move with Text option unselected.
- Allow overlap allows to layer table on top of each other.
- The Move with text option moves the table along with the text in which it is located.
Position a large table
Control where a table is split
When working with a long table, or when a table needs to be placed at the bottom of the page, splitting up a table into two separate tables is necessary. By default, if a page break occurs within a large row, Microsoft Word allows a page break to split the line between two pages (see How to prevent a table break between pages).
To insert a table break at a specific location, position the cursor on the cell on the row, or select the row that should appear on the next page, then do one of the following:
- Press Ctrl+Enter.
- On the Table Layout tab, in the Merge group, click the Split Table button:

Be careful! Word applies the chosen style to the new table. If you Undo the table splitting, the formatting may not be Undone correctly.
Add an Alternative text (Alt Text)
Most requirements recommend adding alternative text for visual objects, including tables (see how to turn off automatically creating the Alternative text).
To add an alternative text for a table, do the following:
1. Select a table.
2. Do one of the following:
- On the Table Layout tab, in the Table group, click the Properties button.
- Right-click the table and select Table Properties… in the popup menu.
3. In the Table Properties dialog box, on the Alt Text tab:

- In the Title field, type a title, if necessary.
- In the Description field, fill the description for the table.
- Click the OK button.

By default, when you create a table in Word, it is aligned with the left margin. You may want to make your tables stand out a bit by indenting them, but this cannot be done using the same formatting tools you would use to indent a paragraph.
We’ll show you a couple of ways you can easily indent a table in Word. First, you can use the table handle in the upper-left corner of the table. Click and hold the handle and then drag it to the right to move the entire table.

If you want to be more precise how far you indent the table, there is another way to do it. Right-click on the table handle in the upper-left corner of the table and select “Table Properties” from the popup menu.
On the Table Properties dialog box, make sure the Table tab is active. Enter an amount in the “Indent from left” edit box to indicate how far you want to indent the entire table. For example, we entered 0.5 inches to indent our table a half an inch.
NOTE: By default, the measurement units are in inches, but you can change that to centimeters, millimeters, points, or picas.
Our entire table is indented half an inch from the left margin.
You can also use the Table tab on the Table Properties dialog box to center or right-align the entire table.
READ NEXT
- › 8 Microsoft Word Tips for Professional Looking Documents
- › How to Indent in Microsoft Excel
- › How to Draw a Custom Table in Microsoft Word
- › Windows 11 Has a New Photo Gallery in the File Explorer
- › How to Get a Refund on the PlayStation Store
- › Discord Direct Message Won’t Go Away? Here’s the Fix
- › Save Hundreds on Elegoo’s New PHECDA Laser Engraver Through Kickstarter
- › Android’s Nearby Share Has (Unofficially) Arrived on Mac
How-To Geek is where you turn when you want experts to explain technology. Since we launched in 2006, our articles have been read billions of times. Want to know more?
 Please Note:
This article is written for users of the following Microsoft Word versions: 2007, 2010, 2013, and 2016. If you are using an earlier version (Word 2003 or earlier), this tip may not work for you. For a version of this tip written specifically for earlier versions of Word, click here: Indenting a Table.
![]()
Written by Allen Wyatt (last updated July 14, 2020)
This tip applies to Word 2007, 2010, 2013, and 2016
After you have inserted a table in your document, you cannot use the regular formatting tools to indent the table. This is because in most instances, tables do not behave the same way as paragraphs.
There are a couple of ways you can indent tables. One is to drag a table to an indented position in your document. All you need to do is use to the mouse to move the indent marker for the table. This is the marker right above the leftmost edge of your table. When you move this marker, Word moves the entire table in the direction you move the marker.
Another, more precise method of indenting your table is accomplished by following these steps:
- Position the insertion pointer somewhere within the table you want to indent.
- Make sure the Layout tab of the ribbon is displayed. (This tab is available only if the insertion point is inside a table, as you should have done in step 1.)
- Click the Properties tool within the Table group. Word displays the Table Properties dialog box.
- Make sure the Table tab is selected. (See Figure 1.)
- Using the Indent From Left control, specify how much of an indent to use for the table.
- Click on OK.
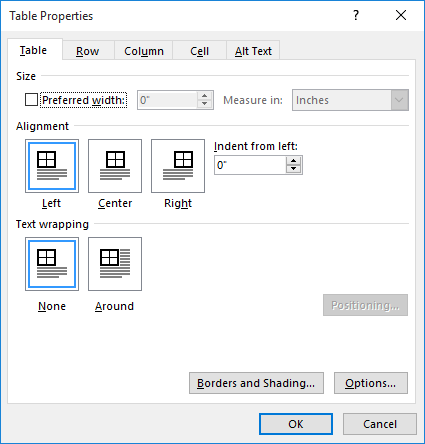
Figure 1. The Table tab of the Table Properties dialog box.
WordTips is your source for cost-effective Microsoft Word training.
(Microsoft Word is the most popular word processing software in the world.)
This tip (11434) applies to Microsoft Word 2007, 2010, 2013, and 2016. You can find a version of this tip for the older menu interface of Word here: Indenting a Table.
Author Bio
With more than 50 non-fiction books and numerous magazine articles to his credit, Allen Wyatt is an internationally recognized author. He is president of Sharon Parq Associates, a computer and publishing services company. Learn more about Allen…
MORE FROM ALLEN
Using the WEEKNUM Function
Need to know which week of the year a particular date falls within? Excel provides the WEEKNUM function so you can easily …
Discover More
Multiple Pages Per Sheet
You can save on paper with your printouts by instructing Word to print multiple pages on a single sheet. In fact, you can …
Discover More
Getting Rid of 8-Bit ASCII Characters
When working with data created outside of Excel, you may need to check that data to make sure it contains no unwanted …
Discover More
More WordTips (ribbon)
Heading Changes for Multi-page Tables
When you have a long table that extends over multiple pages, Word allows you to specify one or more rows to be repeated …
Discover More
Adding Diagonal Borders
Want to add a border diagonally, through the middle of a table cell? It’s easy if you follow the formatting steps …
Discover More
Quickly Removing Table Borders
Insert a table in your document and Word assumes that you want borders around the table and its cells. Here’s a shortcut …
Discover More
I am working on a Word document written by someone else and am trying to remove some padding from table cells.
- I right click on the table and go to ‘Table Properties’. In the ‘Row’ table, I unchecked ‘Specify height’.
- In ‘Table Options’, top/bottom/left/right is all set to 0.
I simply cannot get the padding to remove
![]()
nixda
26.5k17 gold badges107 silver badges155 bronze badges
asked Dec 9, 2013 at 19:33
![]()
0
Figured it out. My paragraph spacing was set to multiple for the document. Fixed the padding issue also.
answered Dec 10, 2013 at 18:13
![]()
M SM S
5453 gold badges6 silver badges13 bronze badges
1
I got the following steps from this page: http://www.ehow.com/how_8132114_remove-cell-padding-word.html
- Click anywhere in the table to select it. If you want to remove the padding from only one cell or a range of cells, select the cell or cells.
- Right-click your selection and choose «Table Properties» from the options. In the Table Properties dialog box, select the «Table» tab. If you are removing the cell padding from only specific cells, select the «Cell» tab instead.
- Click the «Options» button at the bottom of the window to bring up the cell margin settings. From here, you can change the left, right, top and bottom margins of the cells. To eliminate all of the cell padding so that your images or text fill the entire cell, change all the settings to zero.
- Remove the check mark next to «Allow spacing between cells» if it’s checked. This setting adds space between the cells in the table — and may be the real culprit if your table has too much space between its elements. This setting is visible only when you are changing the cell padding for the entire table.
- Click «OK» a couple of times to save your changes. If you still have unwanted space inside the cells, the problem is usually with your paragraph settings. Check the paragraph settings of a cell by clicking inside the cell, and then clicking the small arrow in the corner of the Paragraph group on the Home ribbon. Reduce the Indentation and Spacing settings to zero to eliminate the extra space.
answered Jan 8, 2015 at 8:34
![]()
AhmetAhmet
3913 silver badges5 bronze badges
Beware — Paragraph Spacing may be the answer — but word will happily tell you that the before and after spacing is 0 pt — BUT IT ISN’T.
Try changing it to auto and you may see your table shrink — if you then change it back to 0 pt it should work (I used 6 pt for ‘safety’).
Actually there’s something else going on here — changing the paragraph spacing changed it for the whole document — I don’t seem to be able to change it just for the table — when I have time (?!) I will investigate further.
answered Dec 3, 2015 at 11:21
![]()
AndySAndyS
3742 silver badges6 bronze badges
When pasting a table from the Web, you can get some padding embedded in the formatting that won’t change no matter what the cell margins or paragraph spacing are. Try selecting the table and clicking one of the built-in table styles in the Table Design tab. That replaces the style from the Web and removes the padding.
answered May 8, 2021 at 22:54
![]()
NoumenonNoumenon
7092 gold badges10 silver badges22 bronze badges
Something else that may be causing it:
Under paragraph settings, when it says «Left Indent 0cm» — It isn’t.
This is what my table looks like with «Left Indent 0 cm»:

And this is what it looks like with «Left Indent -0.2 cm»:
answered Jul 5, 2017 at 14:05
![]()
KazKaz
2631 silver badge9 bronze badges
I think what is happening is that Word sis apply Normal template settings to the table, so when I copy and paste a table I’ve been sent with no «padding, the padding gets added. What has worked at least once is to highlight a line of text outside the table (add one if necessary and delete it later) together with the table, then right-click and select paragraph. Word then allowed me to select zero as the setting after paragraphs for the whole selection.
answered Feb 20, 2020 at 14:44
![]()