

If you create documents in Word with complex layouts, tables are a useful method of arranging your content. You can use the cells in a table to structure your text, images, and even other tables. And yes, you can even nest tables in Word and we’ll show you how.
Using nested tables in Word can make a document more readable by adding more white space to line up text and images. As an example, we’ll create a nested table for part of a procedure from our article about printing a worksheet with comments in Excel.
First, we insert the main table that will contain the steps of the procedure. We write the first step and press “Enter”. We’re going to insert a nested table that describes the situations in which you would choose each option. Before inserting the nested table, we make sure the cursor is placed where we want to insert it.

You can simply insert a table at the cursor; however, you may notice that the top and bottom borders are very close to the surrounding cell. In our example, we have text above the nested table, but the bottom border of the nested table is too close to the bottom border of the containing cell. We need to expand the margins within the cell.
If you inserted a nested table this way, you can press Ctrl+Z to undo the insertion and remove the nested table. We will insert the nested table again after expanding the margins within the cell.
RELATED: How to Select All or Part of a Table in Word
To expand the margins in the cell so the borders of the nested table and the cell are not too close, make sure the cursor is in the cell of the main table where you want to insert the nested table.
NOTE: If you know that you are going to need to expand the margins the same way in other cells of the main table as well, you can select multiple cells in the table. For this example, however, we’re only going to change the margins for one cell.
Click the “Layout” tab.
In the Table section, click “Properties”.
On the Table Properties dialog box, click the “Cell” tab, if it’s not already active.
Click “Options” at the bottom of the Cell tab.
In the Cell margins section on the Cell Options dialog box, click on the “Same as the whole table” check box so there is NO check mark in the box. This activates the Top, Bottom, Left, and Right edit boxes, which contain the values for the four margins in the selected cell. By default (in Word 2016), the Top and Bottom margins are “0” and the Left and Right are “0.08”. These values might differ in earlier versions of Word. Enter new values for the margins, especially the Top and Bottom margins. We used “0.1” for all the margins in our cell. Click “OK”.
You are returned to the Table Properties dialog box. Click “OK” to close it.
Now, you can insert a table in that cell and enter your content. The nested table sits nicely in the cell in your main table.
To further enhance your table layout, you can add borders to all or parts of cells, add shading in different colors, merge and split cells, and even freeze the size of some or all of the cells in a table. You can also have multiple layers of nested tables, but be careful. Too many layers of nested tables can make for a confusing layout.
READ NEXT
- › How to Quickly Add Rows and Columns to a Table in Microsoft Word
- › How to Make Your Word Document More Accessible to Everyone
- › How to Draw a Custom Table in Microsoft Word
- › How to Convert Text to a Table in Microsoft Word
- › Discord Direct Message Won’t Go Away? Here’s the Fix
- › Windows 11 Has a New Photo Gallery in the File Explorer
- › The New Winamp Is Here, but It’s Not What You’d Expect
- › Android’s Nearby Share Has (Unofficially) Arrived on Mac
How-To Geek is where you turn when you want experts to explain technology. Since we launched in 2006, our articles have been read billions of times. Want to know more?
![]()
![]()
Did you know that Word will allow you to place one table inside another table? This can come in handy for complex documents and luckily we can do it in Word!
Follow the steps below to learn how:
- Place your first table where you want it, making sure that it is set up with the number of columns and rows you would like. And also be certain that you have merged any cells that you want to be merged.
- Place your insertion point in the cell where you want your secondary table to reside.
- Now you can insert your secondary table using any of the regular table insertion tools that you would normally use!
That is basically it. Your secondary table should now be in the cell where you wanted it. It is possible that the top and bottom borders of the secondary table seem to be very close to the top and bottom borders of the cell where it was placed. To rectify that, you can slightly modify your creation steps.
Follow the steps below to learn how:
- Place your first table, where you want it, making sure that it is set up with the number of columns and rows you would like. And also be certain that you have merged any cells that you want to be merged.
- Put the insertion point in the cell where you want to contain the secondary table.
- On your Ribbon, display the Layout tab.
- In the Table group, click Properties to display the dialog box.
- Be certain the Cell tab is displayed.
- Click Options to display the dialog box.

- Deselect Same As the Whole Table.
- Now, using the controls, specify the margins you would like used within your cell.
- Click OK twice to close both dialogs. Your insertion point should still be in the cell where you want to place your secondary table.
- Insert your secondary table using any of the normal table insertion tools that you always use.
—
A nested table is one table placed inside of another, where the larger table functions as a container for the smaller one. Nested tables are a way for you to organize objects, such as images or text, in evenly spaced rows and columns. A nested table may also allow you to arrange different sets of data in groups to show clients. You can create a table with different methods using Word’s table tab.
Method 1
-
Open a Word document. Click on the location where you will place the table.
-
Create the outer table. Go to the “Insert” tab and click “Table.” When the submenu opens, click and drag the mouse to select the numbers of rows and columns you will need. For example, to create a 3-by-3 table, click and drag the mouse to the right 3 columns and then down 3 rows.
-
Create the inner table. Click inside any cell in the larger table. Once again, use the “Insert” tab to create a table. For example, click on cell 1, go to “Insert,” “Table” and then create a 2-by-2 table. This 2-by-2 is now nested inside of the 3-by-3.
Method 2
-
Create an outer table inside the Word document using the Table menu. Then go back to the table menu, but this time select “Draw Table.” The pointer will change to a pencil.
-
Click on any cell inside of the outer table. Draw a rectangle that is 1 to 2 mm shorter than the cell it is in.
-
Add horizontal and vertical lines inside of the rectangle. For example, draw one horizontal line and one vertical line to create a 2-by-2 table. This 2-by-2 is now nested inside of the larger outer table.
 Please Note:
This article is written for users of the following Microsoft Word versions: 2000, 2002, and 2003. If you are using a later version (Word 2007 or later), this tip may not work for you. For a version of this tip written specifically for later versions of Word, click here: Tables within Tables.
![]()
Written by Allen Wyatt (last updated June 12, 2021)
This tip applies to Word 2000, 2002, and 2003
Word allows you to place one table within another table, which can be handy for some complex document layouts. (This ability was added in Word 2000; it is not available in Word 97.) To place a table within a table, follow these steps:
- Place your major table, as desired. Make sure that it has the number of rows and columns that you desire, and that you merge any cells that you want merged.
- Put the insertion point in the cell that you want to contain the secondary table.
- Insert your secondary table using any of the regular table insertion tools provided by Word.
That’s it; the secondary table should be completely within the cell in which the insertion point was located. You may notice that the top and bottom borders of the secondary table you inserted are very close to the top and bottom borders of the cell in which the table was placed. If you want more separation between the cell and table borders, modify your creation steps just slightly:
- Place your major table, as desired. Make sure that it has the number of rows and columns that you desire, and that you merge any cells that you want merged.
- Put the insertion point in the cell that you want to contain the secondary table.
- Choose Table Properties from the Table menu. Word displays the Table Properties dialog box.
- Make sure the Cell tab is displayed.
- Click the Options button. Word displays the Cell Options dialog box. (See Figure 1.)
- Clear the Same As the Whole Table check box.
- Using the controls just under the check box, specify the margins you want used within the cell.
- Click OK twice to dismiss both dialog boxes. The insertion point should still be in the cell where you want to place the secondary table.
- Insert your secondary table using any of the regular table insertion tools provided by Word.
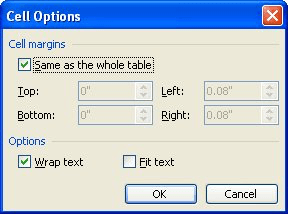
Figure 1. The Cell Options dialog box.
WordTips is your source for cost-effective Microsoft Word training.
(Microsoft Word is the most popular word processing software in the world.)
This tip (146) applies to Microsoft Word 2000, 2002, and 2003. You can find a version of this tip for the ribbon interface of Word (Word 2007 and later) here: Tables within Tables.
Author Bio
With more than 50 non-fiction books and numerous magazine articles to his credit, Allen Wyatt is an internationally recognized author. He is president of Sharon Parq Associates, a computer and publishing services company. Learn more about Allen…
MORE FROM ALLEN
Renaming a Toolbar
Word allows you to create custom toolbars that can speed how you work with various tools and macros. When you first …
Discover More
Changing the Size of a Graphic
Adding a graphic to a worksheet is easy. Getting that graphic to just the right size may take a little bit of trial and …
Discover More
Preserving Bookmarks During Replace Operations
When you do a search and replace operation in Word, it is possible that you could inadvertently wipe out a bookmark or …
Discover More
More WordTips (menu)
Creating Tables with Specific Column Widths
Create a table and Word figures out column widths by dividing the horizontal space by the number of columns you want in …
Discover More
Rounded Table Edges
Tables can be a great addition to many documents, as they allow you to arrange and present information in a clear and …
Discover More
Quickly Inserting Tables that Don’t Go From Margin to Margin
Adding a table to your document is easy. Adding one that doesn’t extend from margin to margin may seem a bit harder. …
Discover More
According to your comments, I’ve updated my solution so it’s only using PInvoke
I’ve also added some new Get/SetProperty constructors
 class Program
{
    public static object GetProperty(object obj, string memberName, object[] objParam)
    {
        return InvokeMember(obj, memberName, BindingFlags.GetProperty, objParam);
    }
    public static object SetProperty(object obj, string memberName, object[] objParam)
    {
        return InvokeMember(obj, memberName, BindingFlags.SetProperty, objParam);
    }

    public static void SetProperty(object obj, string sProperty, object oValue)
    {
        object[] oParam = new object[1];
        oParam[0] = oValue;
       obj.GetType().InvokeMember(sProperty, BindingFlags.SetProperty, null, obj, oParam);
    }

    public static object InvokeMethod(object obj, string memberName, object[] objParam)
    {
        return InvokeMember(obj, memberName, BindingFlags.InvokeMethod, objParam);
    }

    public static object InvokeMember(object obj, string memberName, BindingFlags flag, object[] objParam)
    {
        try
        {
            return obj.GetType().InvokeMember(memberName, flag, null, obj, objParam);
        }
        catch (Exception ex)
        {
            throw ex;
        }
    }
    public static  object InvokeMethod(object obj, string sProperty, object oValue)
    {
        object[] oParam = new object[1];
        oParam[0] = oValue;
        return obj.GetType().InvokeMember
        (sProperty, BindingFlags.InvokeMethod, null, obj, oParam);
    }
    public static  object GetProperty(object obj, string sProperty, object oValue)
    {
        object[] oParam = new object[1];
        oParam[0] = oValue;
        return obj.GetType().InvokeMember
            (sProperty, BindingFlags.GetProperty, null, obj, oParam);
    }
    public static object GetProperty(object obj, string sProperty)
    {
        return obj.GetType().InvokeMember
        (sProperty, BindingFlags.GetProperty, null, obj, null);
    }
    static void Main(string[] args)
    {

        Application oWord = new Application();
        try
        {
            Document oDoc;

            oWord.Visible = true;
            object oMissing = System.Reflection.Missing.Value;
            object oEndOfDoc = "\endofdoc"; /* endofdoc is a predefined bookmark */

            oDoc = oWord.Documents.Add(ref oMissing, ref oMissing,
               ref oMissing, ref oMissing);
            Range wrdRng = oDoc.Bookmarks.get_Item(ref oEndOfDoc).Range;
            object outerTables = GetProperty(wrdRng, "Tables");
            object oTable = InvokeMethod(outerTables, "Add", new object[] { wrdRng, 3, 3, oMissing, oMissing });

            var outerBorders = GetProperty(oTable, "Borders");

            SetProperty(outerBorders, "OutsideLineStyle", 1);//WdLineStyle.wdLineStyleSingle = 1
            SetProperty(outerBorders, "OutsideColor", 0); //WdColor.wdColorBlack = 0
            SetProperty(oTable, "TableDirection",1 );//WdTableDirection.wdTableDirectionLtr=1
            SetProperty(outerBorders, "InsideLineStyle", 1);//WdLineStyle.wdLineStyleSingle=1
            SetProperty(outerBorders, "InsideColor", 0);//WdColor.wdColorBlack = 0
            object oDocTables = oDoc.Tables;
            object oOuterTable = InvokeMethod(oDocTables, "Add", new object[] { wrdRng, 3, 3, oMissing, oMissing });

            object objCell = InvokeMethod(oTable, "Cell", new object[] { 2, 2 });
            object objTR = GetProperty(objCell, "Range", null);

            object Start = GetProperty(objTR, "Start", null);
           InvokeMethod(wrdRng, "SetRange", new object[] { Start, Start });
            object innerTables = GetProperty(oOuterTable, "Tables", null);


            object iTable = InvokeMethod(innerTables, "Add", new object[] { wrdRng, 2, 2, oMissing, oMissing });
            var  innerBorders = GetProperty(iTable, "Borders");

           SetProperty(innerBorders, "OutsideLineStyle", 1);
            SetProperty(innerBorders, "OutsideColor", 0);
            SetProperty(iTable, "TableDirection", 1);
            SetProperty(innerBorders, "InsideLineStyle", 1);
            SetProperty(innerBorders, "InsideColor", 0);


        }
        catch (Exception ex)
        {

            throw ex;
        }
        finally
        {
           // oWord.Quit();
        }
    }

}
which results in :
