
When you want to structure data or details in a clean and clear way in a Word document, tables are ideal. You can insert a table with the number of columns and rows you want, add borders, shading, and banded rows, and even apply an attractive style. If you’re new to using tables in Microsoft Word, this tutorial shows you how to create and customize tables in your documents.
Content
- How to Insert a Table in Word
- How to Resize a Table in Word
- How to Align a Table in Word
- How to Insert or Remove Columns or Rows
- How to Add a Border or Shading to a Table
- How to Apply a Style to a Table
- How to Delete a Table in Word
- Additional Table Properties
- Frequently Asked Questions
How to Insert a Table in Word
Microsoft makes it super easy to insert a table to your Word document. The two ways to do add one are described below.
Insert a Table With the Grid
For the simplest way to insert a table, select the number of columns and rows.
- Place your cursor where you want the table and navigate to the “Insert” tab. Select the “Table” drop-down arrow in the Tables section of the ribbon.

- Drag your cursor across and down the grid at the top of the drop-down menu. As you drag, you’ll see the number of columns and rows for your table as well as a preview of the table.

- When you see the dimensions you want, click. Your table will pop into your document.

Insert a Table and Adjust the Settings
If you’d like to take care of a few table settings upfront, use the “Insert Table” option.
- Place your cursor where you would like the table, navigate to the “Insert” tab, and select the “Table” drop-down arrow.
- Select “Insert Table” in the drop-down menu.

- At the top of the pop-up box, enter the number of columns and rows you’d like.

- Choose an auto-fit setting for the table.
- Fixed column width: choose “Auto” for automatic sizes or enter a particular measurement for the columns.
- AutoFit to contents: size your table width according to the data within it.
- AutoFit to window: size your table according to the Word window size.

- If you’d like new tables you create to adhere to these same settings, check the box at the bottom to “Remember dimensions for new tables.”

- When you finish, click “OK” to create your table in Word.

Note: read this tutorial to learn how to create a macro to create tables in Word.
How to Resize a Table in Word
Once you insert the table in Word, you may want to resize it manually. Either adjust the size of the entire table or just the columns and rows.
Resize the Table
To make the entire table larger or smaller, just drag.
- Select the table and grab the square that appears in the bottom-right corner.

- Drag the square in, out, up, or down to adjust the size of the table.

Resize a Column or Row
If you only want to adjust the size of a column or row, this is just as easy.
- Hover your cursor over a column or row border and a double-sided arrow will appear. The arrows face left and right for columns and up and down for rows.
- When you see the arrow, click and drag. Drag left or right to resize a column or up or down to resize a row.

How to Align a Table in Word
If you resize your table so that it doesn’t stretch the width of the page, you may want to align it on the left, center, or right in your document.
- Select the table and head to the “Home” tab.

- Use the Align Left, Center, or Align Right button in the paragraph section of the ribbon to position your table on the page.

How to Insert or Remove Columns or Rows
You might insert a table with a plan for its dimensions, then realize you have too many or too few columns or rows. Columns and rows can be added in a snap.
Add Columns or Rows
- To insert a single column or row, place your cursor at the top (column) or left (row) of the table. When the plus sign appears, click it.

- To insert multiple columns or rows, select the same number of existing columns or rows. For example, if you want to add two columns, select two existing columns by dragging your cursor through or above them.

- Right-click, move to “Insert” in the menu and select to inserting to the left or right for columns or above or below for rows.

Remove Columns or Rows
To remove a column or row, select it. For more than one, select multiple columns or rows by dragging through them. Right-click and choose “Delete Columns” or “Delete Rows.”

How to Add a Border or Shading to a Table
Once table has been inserted, aligned, and sized as you would like, you may want to spruce it up a bit by adding a border or shading to the table.
Select the table and go to the “Table Design” tab.

Add a Border
- Use the “Borders” drop-down menu to choose the type of border you want. For example, you can add a border around each cell, on only the outside of the table, or vertically on the inside of the table. As you hover your cursor over the options, you’ll see a preview on the table itself.

- Click to apply the border you want to use.

- If you prefer to place a border around a specific cell, column, or row, select it first, then open the “Borders” menu and choose a style.

Apply Shading
- To shade the cells in your table a particular color, use the “Shading” drop-down menu to choose a color you’d like.

- If you prefer to shade only a cell, column, or row, select it first, then use the “Shading” menu to choose a color.

How to Apply a Style to a Table
As an alternative to borders and shading, choose from one of Word’s premade table styles. These allow you to add accent colors and borders with little effort.
- Select the table and navigate to the “Table Design” tab. Use the up and down arrows in the “Table Styles” box to view the options or the More arrow on the bottom right to see them all.

- Hover your cursor over an option to see a preview of it on your table.

- Click to choose the style you want.

Tip: you can also style text in Microsoft Word.
Include or Remove Header, Total, or Banded Rows
If you apply a premade style to your table, you can adjust it per your preferences. You can include or remove the header row, total row, first or last column, or banded rows and columns.
Select your table and return to the “Table Design” tab. Check or uncheck the corresponding box(es) in the “Table Style Options” section of the ribbon.

For instance, if you choose a table style that has a dark shaded header row, you can uncheck the “Header Row” box to remove that formatting.

How to Delete a Table in Word
If you insert a table that you no longer need, you can simply remove it from the document. Keep in mind that this removes the table as well as the table’s contents.
Select the table, right-click, and choose “Delete Table.” You will not be asked to confirm this action, so make sure you want to remove the table before proceeding.

Additional Table Properties
Along with the above customization and formatting table options in Word, you can also set a specific height for your rows or a different alignment for the cell contents.
- Select the table, right-click, and choose “Table Properties” in the menu.

- When the Table Properties box displays, use the tabs to adjust for size, text wrapping, alignment, and alt text.

- Click “OK” to apply the settings to your table.

Remember, you can also select the table and review the additional formatting options in the “Table Design” tab.
Tip: you can copy your table from Word to PowerPoint.
Frequently Asked Questions
Can I use existing text to make a table in Word?
Rather than cut or copy and paste text from your document into a new table, you can convert it.
Select the text, go to the “Insert” tab, open the “Table” drop-down menu, then choose “Convert Text to Table.” Choose the number of columns and rows for your table. Note that you may still need to adjust the placement of the contents within the table.
Can I draw my own table in Microsoft Word?
Word gives you a feature to draw your own table from scratch.
Go to the “Insert” tab and select “Draw Table” in the “Table” drop-down menu. Use your cursor, which transforms into a pencil icon, to draw the outside of the table and the columns and rows inside.
How do I create a table of contents in Word?
Format the main sections of your document using the Heading 1 and Heading 2 styles in the “Home” tab. Go to the “References” tab and choose a style in the “Table of Contents” drop-down menu. For complete details on the process, check out our guide on creating a table of contents in Word.
Image credit: Pixabay. All screenshots by Sandy Writtenhouse.

Sandy Writtenhouse
With her BS in Information Technology, Sandy worked for many years in the IT industry as a Project Manager, Department Manager, and PMO Lead. She wanted to help others learn how technology can enrich business and personal lives and has shared her suggestions and how-tos across thousands of articles.
Subscribe to our newsletter!
Our latest tutorials delivered straight to your inbox
Insert and Edit a Table with Multiple Columns and Rows in Word
by Avantix Learning Team | Updated August 23, 2022
Applies to: Microsoft® Word® 2013, 2016, 2019, 2021 and 365 (Windows)
You can create a table in a Word document in 4 easy ways using the Ribbon. A table is a grid made up of columns and rows that intersect to form cells. You can insert text, numbers and images in a table. Once you have inserted a table, you can easily add and resize columns and rows and change table formatting.
It’s best to avoid using Draw Table to create a table since the table may not be created in a consistent way.
Note: Buttons and Ribbon tabs may display in a different way (with or without text) depending on your version of Word, the size of your screen and your Control Panel settings. For newer versions of Word, Ribbon tabs may appear with different names. For example, the Table Design tab may appear as Table Tools Design.
In the following example, a table with 4 columns and 5 rows has been inserted in a Word document:
Recommended article: 10 Microsoft Word Shortcuts for Moving Around in Tables
Do you want to learn more about Microsoft Word? Check out our virtual classroom or in-person classroom Word courses >
Create a table using the Table Grid
To insert a table using Insert Table and select columns and rows in the Table Grid:
- Click in the Word document where you want to insert a table.
- Click the Insert tab in the Ribbon.
- Click Table in the Tables group. A drop-down menu appears with a Table Grid.
- Hover over the grid until the number of columns and rows you want is selected.
- Click in the highlighted area of the grid to insert a table.
To insert a table, select cells in the Table Grid as follows:

Create a table using the Insert Table dialog box
To insert a table using the Insert Table dialog box:
- Click in the Word document where you want to insert a table.
- Click the Insert tab in the Ribbon.
- Click Table in the Tables group. A drop-down menu appears.
- Select Insert Table. A dialog box appears.
- Enter the number of columns and rows you want to create.
- Select the desired options below AutoFit behavior (typically Fixed column width: Auto).
- Click OK.
The Insert Table dialog box appears with options to select the number of columns and rows:

Create a table using Quick Tables
To insert a table using Quick Tables:
- Click in the Word document where you want to insert a table.
- Click the Insert tab in the Ribbon.
- Click Table in the Tables group. A drop-down menu appears.
- Select Quick Tables. A gallery appears.
- Click the table you want to insert.
Quick Tables appear in the Table drop-down menu:

Create a table by converting text to a table
If you have used tabs or other delimiters in paragraphs, you can convert the data into a table (if the delimiters are entered consistently). Wherever you have pressed Enter or Return to create a new paragraph, Word will create a new table row. You can use various delimiters to separate data but the most common are tabs, spaces or commas.
To convert delimited data to a table:
- Select the text that you want to convert.
- Click the Insert tab in the Ribbon.
- Click Table in the Tables group. A drop-down menu appears.
- Select Convert Text to Table. A dialog box appears.
- Enter the number of columns if necessary and ensure a delimiter is selected in the Separate text at area.
- Under AutoFit behavior, choose how you want your table to appear. Word chooses a width for the table columns by default. If you want a different column width, choose AutoFit to contents or AutoFit to window.
- Click OK.
In the Convert Text to Table dialog box, enter the number of columns as well as the delimiter:

Show table gridlines
Gridlines show the cell boundaries of a table on screen if table borders are not applied. Gridlines appear only on the screen and are not printed.
Gridlines are not visible when you view a document in a Web browser or in Print Preview.
To show table gridlines in a Word document:
- Click in a table.
- Click the Table Layout or Table Tools Layout tab in the Ribbon.
- In the Table group, check View Gridlines.
View Gridlines appears on the Table Tools Layout or Table Layout tab in the Ribbon:

Move around in a table
You can use the following keys to move from one cell to another in a table:
- Tab to move to the next cell to the right.
- Shift-Tab to move to the cell to left.
- Ctrl-Tab to tab within a cell.
Add a row or a column
To add a row in a table:
- Click in a cell that is located above or below where you want to add a row.
- Click the Table Layout or Table Tools Layout tab in the Ribbon.
- To add a row above the cell you clicked in, click Insert Above in the Rows and Columns group. To add a row below the cell you clicked in, in the Rows and Columns group, click Insert Below.
The commands to insert rows or columns appear on the Table Tools Layout or Table Layout tab in the Ribbon:

You can also right-click in a row and choose Insert from the drop-down menu and insert options from the sub-menu.
If you click in the last cell in a table and press Tab, Word will automatically add a row.
To add a column in a table:
- Click in a cell that is located to the right or left of where you want to add a column.
- Click the Table Layout or Table Tools Layout tab in the Ribbon.
- To add a column to the left of the cell you clicked in, click Insert Left in the Rows and Columns group. To add a column to the right of the cell you clicked in, in the Rows and Columns group, click Insert Right.
You can also right-click in a row and choose Insert from the drop-down menu and insert options from the sub-menu.
Delete a column or row
To delete a row or column:
- Select the row or column (drag over the cells or click to the left of a row or above a column when the arrow appears).
- Click the Table Layout or Table Tools Layout tab in the Ribbon.
- In the Rows & Columns group, click Delete. A drop-down menu applears.
- Click Delete Rows or Delete Columns as appropriate.
You can also right-click in a row or column and choose Delete from the drop-down menu and delete options from the sub-menu.
Change column width
To change column width:
- Select the column or columns you want to change.
- Click the Table Layout or Table Tools Layout tab in the Ribbon.
- Click Properties in the Table group. You can also right-click and choose Properties from the drop-down menu. A dialog box appears.
- Click the Column tab.
- Check Preferred Width.
- Type the new measurement for the column width. For example, typer 1.0″ or click the up and down arrows.
- Click OK.
The Table Properties dialog box appears as follows with the Column tab selected:

You can also drag the right line of a column to resize it.
Change row height
To change row height:
- Select the row or rows you want to change.
- Click the Table Layout or Table Tools Layout tab in the Ribbon.
- Click Properties in the Table group. You can also right-click and choose Properties from the drop-down menu. A dialog box appears.
- Click the Row tab.
- Check Specify Height.
- Type the new measurement for the row height. For example, type 1.0″ or click the up and down arrows.
- Specify row height as At Least or Exactly.
- Click OK.
The Table Properties dialog box appears as follows with the Row tab selected:

You can also drag the bottom line of a row to resize it.
Distribute rows and columns evenly
To distribute rows and columns evenly:
- Select the entire table by clicking the four-arrows that appear on the top left of the table.
- Click the Table Layout or Table Tools Layout tab in the Ribbon.
- Click Distribute Rows and / or Distribute Columns in the Cell Size group.
Apply a table style
To apply a table style:
- Click in the table.
- Click the Table Design or Table Tools Design tab in the Ribbon.
- Click a table style or click the More arrow to display the Table Styles gallery and click a style.
Table Styles gallery appears on the Table Tools Design or Table Design tab in the Ribbon:

To learn more about working with table styles, check out the article How to Format Microsoft Word Tables Using Table Styles (Ultimate Guide).
Subscribe to get more articles like this one
Did you find this article helpful? If you would like to receive new articles, JOIN our email list.
More resources
4 Ways to Delete a Table in Word
How to Make Columns in Word (Newspaper-style)
How to Insert Formulas and Functions in Word Tables
How to Keep a Microsoft Word Table Together on One Page
How to Delete a Page in Word (Remove Blank or Extra Pages)
Related courses
Microsoft Word: Intermediate / Advanced
Microsoft Excel: Intermediate / Advanced
Microsoft PowerPoint: Intermediate / Advanced
Microsoft Word: Long Documents Master Class
Microsoft Word: Styles, Templates and Tables of Contents
Microsoft Word: Designing Dynamic Word Documents Using Fields
VIEW MORE COURSES >
Our instructor-led courses are delivered in virtual classroom format or at our downtown Toronto location at 18 King Street East, Suite 1400, Toronto, Ontario, Canada (some in-person classroom courses may also be delivered at an alternate downtown Toronto location). Contact us at info@avantixlearning.ca if you’d like to arrange custom instructor-led virtual classroom or onsite training on a date that’s convenient for you.
Copyright 2023 Avantix® Learning
Microsoft, the Microsoft logo, Microsoft Office and related Microsoft applications and logos are registered trademarks of Microsoft Corporation in Canada, US and other countries. All other trademarks are the property of the registered owners.
Avantix Learning |18 King Street East, Suite 1400, Toronto, Ontario, Canada M5C 1C4 | Contact us at info@avantixlearning.ca
Creating tables in Microsoft Word used to be so annoying that most people just did it in Excel, then imported it into Word. It’s worth giving Word 2013’s table tools a try, though, because the process is easier, and there are some new graphical options.
Seven ways to create tables
Microsoft now provides five different methods for creating tables: the Graphic Grid, Insert Table, Draw Table, insert a new or existing Excel Spreadsheet table, and Quick Tables, plus an option for converting existing text into a table. To start, open a blank Word document from the Home/New page. Position your cursor in the document where you want the table inserted.
Graphic Grid/Select Table from Graph
Under the Insert tab, click the Table button. The Insert Table dialog box will open, showing a basic grid pattern as well as traditional menu options below it. Place your cursor on the first cell in the grid and slide it down and over until you highlight (for this example) four columns and five rows, then click once.
Notice that once the table is created, a new option called Table Tools appears on the Ribbon bar with two new tabs: Design and Layout. See the Layout and Design section below for details regarding these options.
Create a new table using the graphical grid.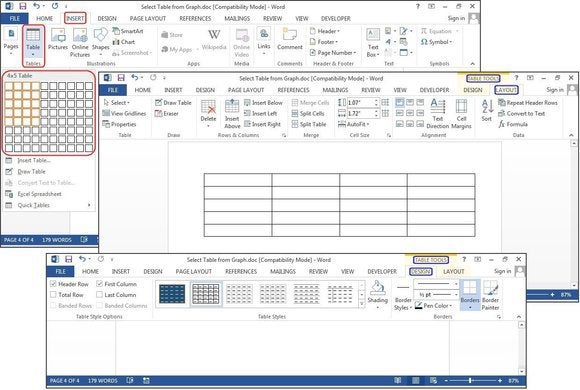
Insert Table
Click Insert > Tables > Insert Table from the dropdown menu. In the Insert Table dialog box, enter the number of columns and rows you want in this table (four columns and five rows). In the AutoFit Behavior panel, select Auto, or click the down arrow to choose a specific size. You can also choose AutoFit to Contents (produces narrow columns that expand as you add data) or AutoFit to Window (expands the table to fit the document size). Check the Remember Dimensions for New Tables box if you want the sizes you’re entering now to become your defaults for future tables.
Create a new table using Insert Table.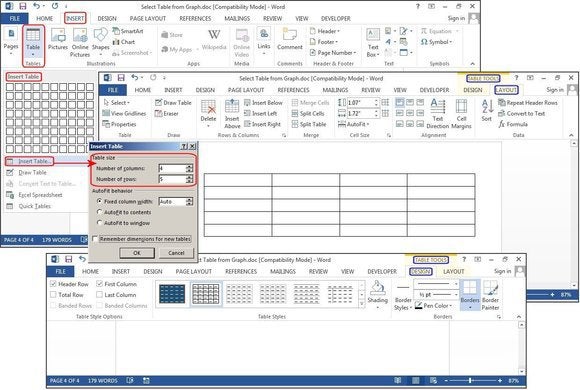
Draw Table
Click Insert> Tables > Draw Table. The cursor turns into a pencil, which you drag down and across to draw a box. Don’t worry about the exact dimensions; you can modify it any time.
Once the box is created, position the cursor inside the box and draw lines over and down for the columns and rows (one at a time). Don’t worry about crooked lines, either—Word straightens them as you draw.
To add or remove columns and/or rows later, click anywhere inside the table, then select the Design tab under Table Tools. Click the Draw Table button to add or continue drawing lines with your pencil cursor, or click the Eraser button to remove lines with the eraser cursor. To remove a line, just touch the line with the eraser cursor, and the line disappears.
Create a new table using Draw Table.
Excel Spreadsheet (create In Word)
Click Insert > Tables > Excel Spreadsheet. An Excel spreadsheet inserts at your cursor location. You can continue using Excel and its menus and commands, but after you enter your data it converts to a non-editable graphic.
If you want to add, delete, or modify the spreadsheet, right-click anywhere inside the worksheet graphic, select Worksheet Object from the dropdown menu, then click Edit. The original spreadsheet reappears for editing. Notice the top menu has changed to an Excel menu for edits.
Also from the Worksheet Object dropdown menu, you can click Open to open the spreadsheet in Excel, so you can manipulate it in that program. Or click Convert to view a Windows dialog box that lists file-conversion options.
Create a new table using Excel Spreadsheet.
Excel Spreadsheet (copy and paste existing worksheet)
In the old days, Excel spreadsheets had to be imported into Word. Now you can just copy and paste. Open Excel, highlight the spreadsheet, and copy it. Then open Word, position your cursor at the desired location, and select Paste > Keep Source Formatting.
The other options on the Paste dialog menu are Merge Formatting, which changes the text format to match the file into which you pasted the spreadsheet, and Keep Text Only, which pastes the text without the Excel grid, meaning you will likely have to realign your columns with tabs.
Copy and paste an existing table from Excel.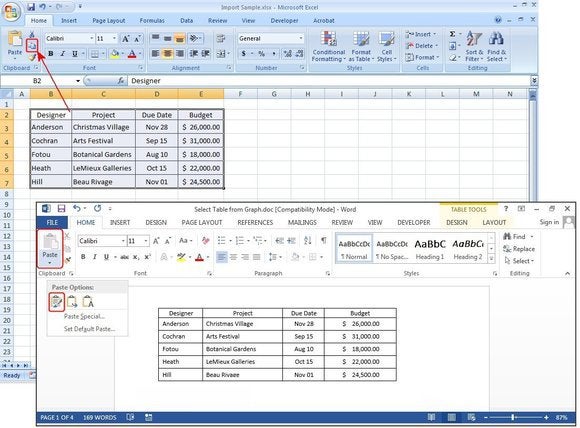
Quick Tables
Quick Tables are Word’s table templates. In addition to the nine templates provided, you can create your own designs and save them to the Quick Tables Gallery to use later. Click Insert > Tables > Quick Tables. Select a table template from the Quick Tables menu, then modify it to fit your project.
Create a new table using Quick Tables.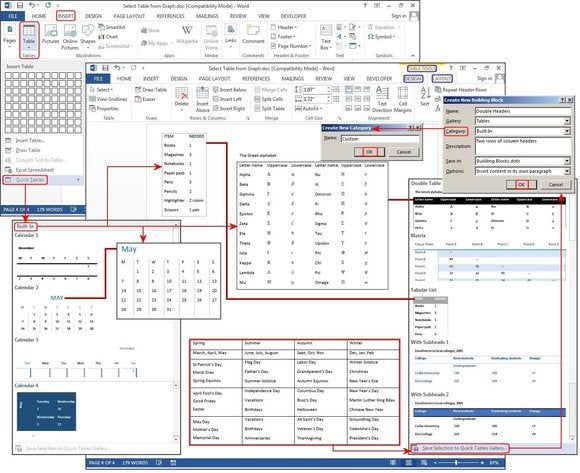
Convert Text to Table
The table tools can also make lists a lot easier to customize and even reorganize later. For our example, we’ll turn a classic contact list into a table, using a list of names—first, middle, last—plus the city, state, region, and profession of each person on the list.
For eons, people have used tabs to separate the fields, adding a tab or two to accommodate longer strings of data. But if you do this, when you convert the table to text, it misplaces all the data.
With the Convert Text to Table feature, you can separate the fields (Name, City, State, etc.) with paragraphs, tabs, commas, or other separator character, but use only one separator between each field.
Convert an existing block of text to a table.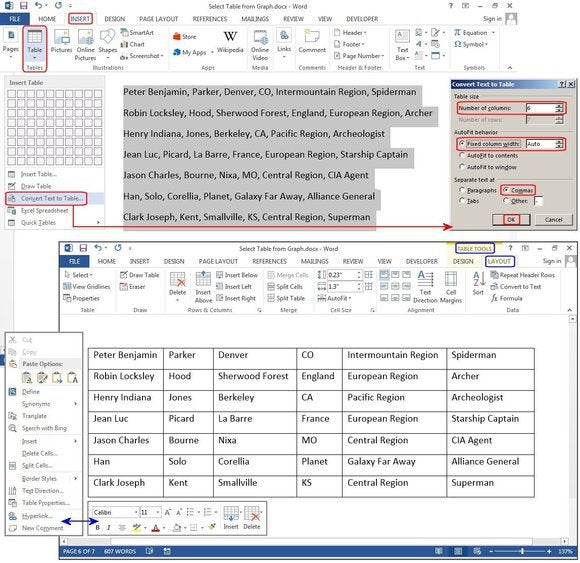
Layout and Design
There are three options to modify and/or decorate tables:
1. Use the Table Tools > Design—or—Table Tools > Layout commands on the Ribbon menu.
2. Right-click and use the Shortcut popup menus.
3. Use the keyboard shortcuts, which become visible when you press the ALT key on your keyboard.
All of these methods are fast and easy, but using a combination of all three will always be quicker. For example, use your mouse to highlight, then right-click to copy with your right hand; then arrow down to the new location and press CTRL-V to paste with your left hand.
Layout tab
The Layout tab lets you modify the structure of the table. The menu is fairly self-explanatory, and you can roll your cursor over a feature to get further clarification.
Roll your mouse over each button to view how each feature works.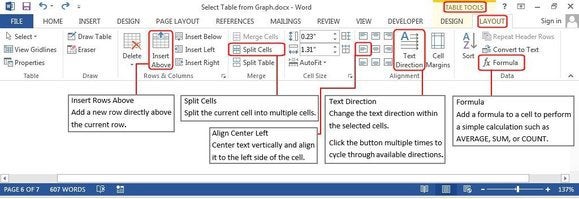
The dialog boxes below also illustrate each feature. Click Table Tools > Layout > Insert or Delete (from Rows and Columns group) to add or remove them; Merge or Split Cells or Split a Table (from the Merge group); or Text Direction (from the alignment group) to rotate the text inside the table.
Menu options to modify a table structure.
Other features include Table Properties, which provides several options for aligning the table with the text or wrapping text around your table. Select Cell Margins to change the margins inside each cell. With the table still highlighted, click Table Tools > Layout > Data > Sort to sort the table data alphabetically or numerically, just like in Excel. You can sort by column numbers or by column headers, and it provides two sort levels. For example, you can sort by Last Name, then by First Name. The table below is sorted by Last Name.
You can also convert your table back to a text block. Just choose the separator you prefer, so when the table grid disappears, the data isn’t all jumbled together.
You can even insert formulas to calculate your numeric data. I added a Salary column to the table below and entered some dollars, plus a new row at the bottom for the salary totals. To calculate the total salaries, position your cursor in the last row and the last column cell, and click the Formula button under the Data group. In the Formula dialog box type the SUM() formula [or Count() or Average()] in the Formula field box. If you are unfamiliar with the formulas Word provides, click the down arrow under the Paste Function field, and choose a formula from the list.
Type Above between the parentheses, choose a format under Number Format such as dollars, percent, or general, then click OK. Word calculates the column of numbers and places the calculation in the target cell (where your cursor resides). Review the Formula Format table in the graphic below for the correct commands that tell Word which direction to calculate (these go inside the parentheses).
Wrap text around a table, change cell margins, convert table back to text, sort the table data, and/or add formulas.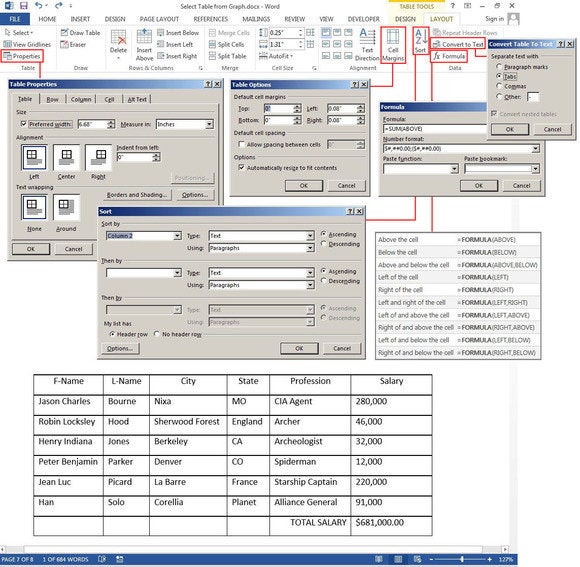
Design tab
The Design tab is for adding borders, shading, styles, and customizing the header columns and rows. Highlight your table, then select Table Tools > Design> Table Styles, Shading, Border Styles, Borders, or Border Painter (see the graphic below for ideas). There’s no learning curve, just play with the features and see what happens. If you don’t like a feature you’ve added, just click the Undo button or press CTRL-Z.
There’s also an option to add artwork borders to your pages. Select Table Tools > Design > Borders > Border Painter, and click the Page Border tab in the Borders and Shading dialog box. Click the down arrow in the field box under Art, then choose a border—mostly simple clip art—from the list.
Make your table pop with Table Styles, Shading, Border Styles, Borders, or Border Painter.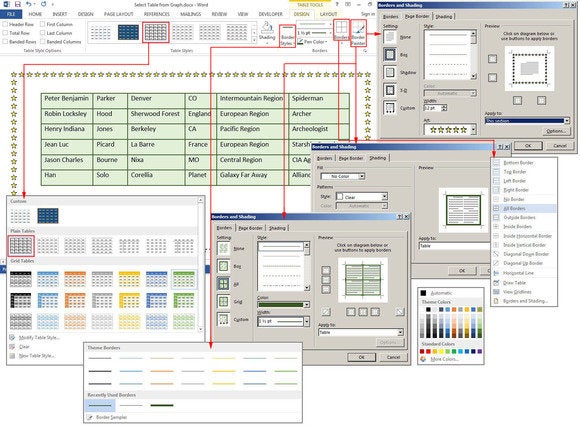
The table below uses one of the many preset styles that comes with Word. Select Table Tools > Design > Table Styles, then scroll through the gallery of styles. If you want to change the font or customize the paragraphs inside the table, use the Format Shortcut menu. Right-click anywhere inside the table, and this small menu pops up adjacent to the longer Table Options menu. If the formatting feature you need is not on the Shortcut menu (which is fairly limited), click the Home Tab and select the features you need from the Font or Paragraph group. All of the buttons and groups on the Home tab are available for formatting tables as well as documents. The options are endless.
Choose a Table Style with Banded Rows (i.e., every other row is different for easier viewing), then customize the fonts and paragraph spacing.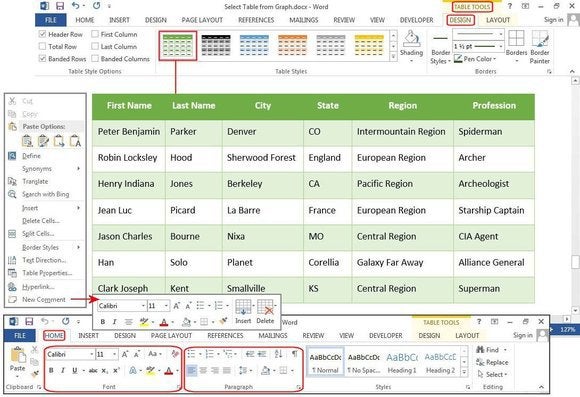
Stay tuned for more articles on getting the most out of Word 2013.
Tables in Word are useful in so many situations. In this post you’ll discover how to create tables, then manipulate and design them in the quickest and easiest way to provide that visual punch.
Clickable Table of Contents
Enhance your Word tables with these advanced features
1. What are tables in Word good for?
Tables are useful for 2 distinct reasons.
- To show an actual table of data, or
- To organise and postion text, images and other elements on the page.
Many years ago, typewriters ruled the world. And a feature of a good typewriter was the tab stop, which was a device that essentially let you control indentation.
Over the years many people have continued to use tabs to indent text, because of its convenience, but they are hard work to set up properly.
Tables provide a much easier way to organise content on a page.
1. Select the Insert tab.
2. Click the Tables icon in the Tables group.
3. Move your mouse pointer into the table grid until the required number of rows and columns are highlighted orange, then left-click.

An empty table is inserted into the document.
Two new tabs, Design and Layout are also added to the ribbon area, under the banner of Table Tools.


3. MOVING AROUND A Word TABLE
- While the table is empty, you can use the cursor keys to move around the cells. However, when the cells contain information, using the cursor keys will move through the cell content first before moving to the next cell
- You can left-click in any cell to position the cursor.
- Press Tab to move to the next cell. The cursor will move across and then down the table.
- Press Shift + Tab to move to the previous cell.

NB. Using Tab is better than using the cursors as it will move to the next/previous cell regardless of whether there is information in the cells.
NB2. If you press Tab while you are in the last cell, a new row will be added to the bottom of your table
4. SELECTING A CELL, ROW, COLUMN OR THE ENTIRE TABLE
To select a cell:
1. Position the mouse pointer inside the cell on the bottom-left corner of the cell.
The pointer will change shape to a solid black arrow that points up and right.
2. Left-click.

To select a row of a table:
1. Position the mouse pointer in the left margin in line with the row you want to select.
The mouse pointer will change to a white arrow that points up and right.
2. Left-click.

To select a column
1. Position the mouse pointer so that it rests on the top border of the table, above the column you want to select.
The mouse pointer will change to a solid black arrow pointing down.
2. Left-click.

To select the entire table:
1. Position your mouse pointer over the 4-headed arrow icon situated at the top-left of the table.
2. Left-click.

5. INSERTING AN EXTRA ROW OR COLUMN
To insert an extra row:
1. Position the cursor in a cell.
2. Select the Layout tab, under the Table Tools banner.
3. Click Insert Above or Insert Below in the Rows and Columns group

Here is a quick way to insert new rows:
1. Position the cursor to the left of the table, but in close proximity.
2. A plus symbol will appear above or below the mouse pointer indicating where the new row will be added.

3. Nudge the mouse pointer up or down to move the plus sign above or below.
4. Left-click to insert the new row,
To insert an extra column:
1. Position the cursor in a cell.
2. Select the Layout tab, under the Table Tools banner.
3. Click Insert Left or Insert Right in the Rows and Columns group

Here is a quick way to insert a new column:
1. Position the cursor above a column, but in close proximity to the table.
2. A plus symbol will appear to the left or right of the mouse pointer indicating where the new column will be added.
3. Nudge the mouse pointer left or right to move the plus sign to the left or the right of the column.
4. Left-click to insert the new column,

6. DELETING A ROW OR COLUMN
To delete the current row or column:
1. Position the cursor in any cell of the row you want to delete.
2. Select the Layout tab, under the Table Tools banner.
3. Click the Delete icon in the Rows and Columns group.

4. Choose Delete Row or Delete Column from the drop-down menu.
7. Quickly fORMATTING tables in Word
Word provides you with a number of pre-set table designs. This means that it formats the headings and the data, applies a variety of borders and colours the cells in a way that makes it look like a professionally produced table. As a beginner this simple technique will give you a good-looking table.
1. Position the cursor in any cell in the table.
2. Select the Design tab under the Table Tools banner.
The Table Styles group lists a number of table designs. To get the full list, click the More button beneath the table styles scroll bar
The default table style is Table Grid in the Plain Tables category which adds simple gridlines but no shading to your table.
Live Preview allows you to hover over a design and see it applied to your table. If you like what you see, click to select the table design.

In the Table Style Options group of the Design tab, tick the components that you have in your table. For example, if your table has column headings, tick Header Row. In doing this, the various parts of your table are formatted accordingly

Header Row
This will emphasise the header row by making the text bold or applying a different cell colour (depending on the table style selected.
Total Row
This will emphasise the bottom table row by making the text bold or applying a different cell colour (depending on the table style selected.
First Column
This will emphasise the first column (for labels etc.) by making the text bold or applying a different cell colour (depending on the table style selected.
Last Column
This will emphasise the last column (for row totals etc.) by making the text bold or applying a different cell colour (depending on the table style selected.
Banded Rows
This will make odd rows one colour and even rows a different colour. This helps readability.
Banded Columns
This will make odd columns one colour and even columns a different colour. This helps readability.
8. SETTING THE BORDERS AND SHADING
The Table Styles Gallery allows you to completely format a table with one click. Whereas you used to need some nous, anybody can now create a professional looking design.
However, you will often still need to apply your own border and shading, and manually change a table design. With a little effort can add a lot of flavour to your page and dramatically enhance the overall appearance of the document.
To set the borders for tables in Word:
1. Select the portion of the table that you wish to set the borders for. This may be the entire table, a row or rows, a column or columns or a selection of cells.
2. Select the Design tab under the Table Tools banner.
3. Select the Borders icon. A drop-down list appears. This list shows every combination of border that can be turned on or off. The icons with a shaded background are currently switched on. The rest are switched off.
4. Click any icon to switch the border on or off. The border style that is applied is the default style (½ pt solid black line ) or the last style that was used.

5. To apply customised borders, with different colours, styles and widths, click the Borders & Shading option at the bottom of the list to display the Borders and Shading dialog box.


Your selection will always have an outer border, and if you selected more than one cell, you will have some inside borders as well. The easiest way to use the dialog box is to start on the bottom-middle and work your way up and right.
1. Select the colour and width (thickness) that you would like for your border.

2. Choose a style (e.g. dotted, dashed, double, solid etc.)

3. Paint your borders. There are two ways to do this.
- The first way is to click directly on a border in the Preview itself.
- The second way is to click the appropriate icon around the edge of the Preview section that represents each border. Depending on which cells you selected in your table, some of these icons may not be available.

On the left-hand side of the dialog box, there are some pre-defined border combinations which you can use to save yourself some time. Depending on your selection of cells, the pre-defined options may differ. Here’s a run-down:

To shade the cells of tables in Word:
1. Select the portion of the table that you wish to shade. This may be the entire table, a row or rows, a column or columns or a selection of cells.
2. Select the Design tab under the Table Tools banner.
3. Click the Shading icon.
The colours that you see displayed match the current them of the document. Themes were discussed earlier in the course.
4. Click a colour in the palette.
While you can pick any colour, it is recommended to stick with the light colour shades, otherwise your tables will appear very loud and ugly, like they’re shouting in your face. Subtle is the order of the day. The exception to this is column headings or other cells that you wish to differentiate. Under these circumstances, you can use a dark colour, but use a light font with it.

If you cannot find the exact colour you need,
- Click the More Colours link underneath the palette. This displays a larger, more accurate colour palette.
- And if that’s not enough, click the Custom tab and you’ll get a really fine selection of colours (you can even enter your own RGB settings if you know them)

9. REPEATING table HEADINGS ON EVERY PAGE WHEN PRINTING
When you have large tables that occupy two or more pages, many people insert manual page breaks, then copy and paste their table header rows at the top of each page.
When rows are added or removed from tables in Word, the table headers end up half way down the page.
There is a simple tool that will eliminate this problem
1. Ensure that the table is a single table, with no manual page breaks in the middle, and one header at the top. The table header may occupy more than one row, it doesn’t affect the way this feature works.
2. Position the cursor somewhere in the top row of the table.
3. Select the Layout tab under the Table Tools banner.
4. Click the Repeat Header Rows icon ion the Data group.

Now, it doesn’t matter how many rows tables in Word contain, if the table ever spills across into another page, the header row (which normally displays the column headings) will always appear at the top of the table.
10. All the key points again
- Tables in Word serve 2 distinct purpose: to display a table of data and to organise and position items on the page
- To create table, select 2 tabs — Design and Layout under the Table Tools banner.
- There are 2 tabs — Design and Layout under the Table Tools banner.
- You can press the TAB key to move direct to the next cell and SHIFT and TAB together to move backwards through a table.
- The four elements of a table are cells, rows, columns and the whole table. Each can be selected.
- Rows can be inserted by selecting the Layout tab under Table Tools, then clicking the Insert Above or Insert Below icons. Alternatively, hover to the left of a row and click the plus symbol that appears above or below the mouse pointer.
- Columns can be inserted by selecting the Layout tab under Table Tools, then clicking the Insert
Left or Insert Right icons. Alternatively, hover above a table column and click the plus symbol that appears to the left or right of the mouse pointer. - Columns and rows and be removed from the table, by positioning the cursor in the row or column to be removed, then clicking the Delete icon on the Layout tab of Table Tools and choosing Delete
Row or Delete Column. - Tables can be formatted using the Table Style gallery or by manually setting the shading and borders manually. Both sets of tools are found on the Design ribbon of the Table Tools.
- When using the Microsoft Table Styles, you can control the behaviour of the formatting by setting the Table Style options – 6 tick boxes that define the structure of your table.
- For long tables that spill across onto subsequent pages, the top row, which normally contains the column headings can be set to repeat automatically. So there is no excuse for cutting and pasting headings midway through your table or taping pages together to make sense of the table!
I hope you found plenty of value in this post. I’d love to hear your biggest takeaway in the comments below together with any questions you may have.
Have a fantastic day.


About the author
Jason Morrell
Jason loves to simplify the hard stuff, cut the fluff and share what actually works. Things that make a difference. Things that slash hours from your daily work tasks. He runs a software training business in Queensland, Australia, lives on the Gold Coast with his wife and 4 kids and often talks about himself in the third person!
SHARE
Чтобы не тратить время на монотонные действия, связанные с оформлением таблицы, вы можете использовать уже готовый стиль — набор параметров, например таких, как толщина линий рамки, цвет заливки таблицы, которые объединены в группу с уникальным названием. Применяя к таблице какой-либо стиль, вы задаете формат сразу для всей таблицы.
По умолчанию к любой таблице, которую вы вставляете в документ, применяется стиль Сетка-таблица (Table Grid). Но вы всегда можете поменять его на любой другой готовый стиль оформления таблицы, выбрав, например, стиль:
- классическая таблица;
- простая таблица;
- изысканная таблица;
- веб-таблица;
- таблица-список.
Для этого выполните следующие шаги.
- Установите указатель мыши в области таблицы. Откройте вкладку Конструктор (Design).
- В группе Стили таблиц (Table Styles) щелкните по кнопке Дополнительные параметры (More), и перед вами раскроется полный список образцов стилей таблиц. Цвет стилей таблицы соответствует выбранной теме документа.
- Перемещая указатель мыши от одного стиля к другому, в области документа благодаря функции предпросмотра вы сможете увидеть, как будет выглядеть таблица, если вы примените к ней один из стилей. Когда подберете подходящий образец, щелкните по нему мышью.
Если вы передумаете, можете очистить стиль таблицы, выбрав в конце списка со стилями команду Очистить (Clear).
Ваша таблица может также содержать как строку заголовка, так и строку итогов. Чтобы сделать эти строки более контрастными по отношению к общему фону таблицы, обратимся к группе Параметры стилей таблиц (Table Style Options) на вкладке Конструктор (Design).
- При установке флажков Строка заголовка (Header Row) и Строка итогов (Total Row), первая и последняя строки таблицы будут выделены либо цветом, либо более жирными ограничительными линиями.
- Если требуется привлечь внимание читателя к данным, расположенным в первом или последнем столбце, установите флажки Первый столбец (First Column) и Последний столбец (Last Column).
Имейте в виду: подобное форматирование можно применять лишь к некоторым стилям.