
Word for Microsoft 365 Outlook for Microsoft 365 Word 2021 Outlook 2021 Word 2019 Outlook 2019 Word 2016 Outlook 2016 Word 2013 Outlook 2013 Word 2010 Outlook 2010 Word 2007 Outlook 2007 More…Less
To set or change table options in Word or Outlook, right-click a table and choose Table Properties.
Note: If you want to set properties for a particular row, column, or cell, click in that row, column, or cell before making changes in the Table Properties dialog box.
In this article
-
Table properties
-
Row properties
-
Column properties
-
Cell properties
-
Alt text
Table properties

Click the Table tab to apply settings to your entire table:
-
Under Size, set the table’s overall width by selecting Preferred width and choosing a size. In the Measure in box, choose whether you want to measure the width in inches or a percentage of the page.
-
Under Alignment, choose whether you want to align your table to the left, center, or right of page. If you select Left, you can select an indentation distance in the Indent from Left box.
-
Under Text wrapping, select Around if you want nearby text on your page to wrap around your table; you can make text wrapping more precise by clicking Positioning, and then choosing options in the Table Positioning dialog box. If you don’t want text wrapping, select None.
-
Click Borders and Shading to change the border style, line color, and line width of your table.
-
Click Options to set more table properties, including top and bottom cell margins, cell spacing, and automatic resizing of cell contents.
Top of Page
Row properties
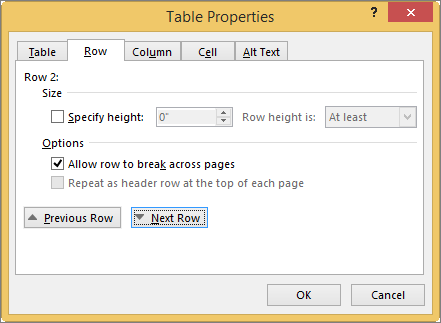
First, click in the row or select the rows you want to change, right-click, choose Table Properties, and then click the Row tab.
-
Under Size, set the row’s height by selecting Preferred height and choosing a size; you can further refine the height by selecting an option in the Row height is box.
-
Under Options, select options for breaking rows across pages or creating header rows.
-
To display the currently selected row at the top of the tab and navigate between rows without leaving the Table Properties dialog box, click Previous Row or Next Row.
Top of Page
Column properties
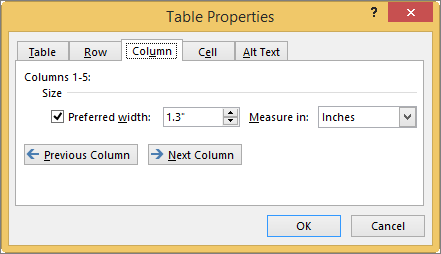
First, click in the column or select the columns you want to change, right-click, choose Table Properties, and then click the Column tab.
-
Under Size, set the column’s width by selecting Preferred width and choosing a size. In the Measure in box, choose whether you want to measure the width in inches or a percentage.
-
To display the currently selected column or columns at the top of the tab and navigate between columns without leaving the Table Properties dialog box, click Previous Column or Next Column.
Top of Page
Cell properties
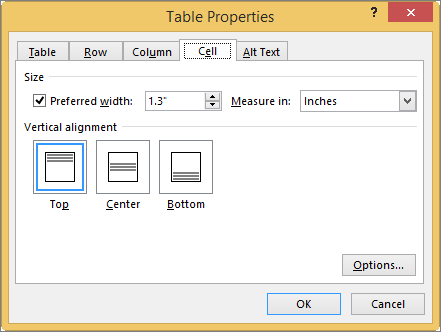
First, click in the cell that you want to change, right-click, choose Table Properties, and then click the Cell tab.
-
Under Size, set the cell’s width by selecting Preferred width and choosing a size. In the Measure in box, choose whether you want to measure the width in inches or a percentage.
-
Under Vertical alignment, choose an alignment option for the cell contents—Top (the default alignment), Center, or Bottom.
-
Click Options to set more cell properties, including top and bottom cell margins and text wrapping and fit options.
Top of Page
Alt text
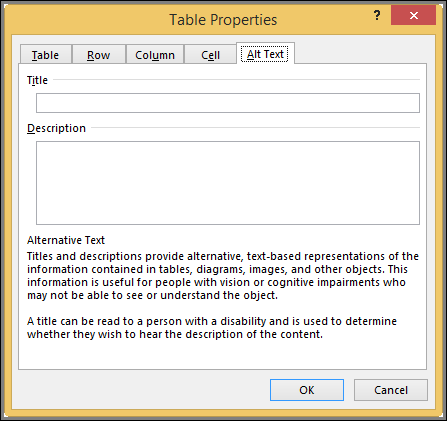
You can create alternative text (alt text) for your table to help people with screen readers understand the content of the table.
-
In the Description box, enter an explanation of the table.
-
In the Title box, enter a brief summary of the table.
Note: Unless you have a complex table, you will usually want to enter text in just the Description box. When you have complex content to describe, filling in the Title field is useful so that reading the full description is not necessary unless desired.
Top of Page
Need more help?
I want to have a spacing between horizonal borders of two adjacent table cells like in this example. I want borders below «Commerce FAculty» and «EBE Faculty» not to touch in order to use horizonal border for grouping. Is this possible?
![]()
fixer1234
26.9k61 gold badges72 silver badges116 bronze badges
asked Sep 22, 2015 at 0:24
![]()
This will probably depend on the Version of Word you are using, but on mine, I am able to select Table Properties… with a context sensitive click, then under the Table tab choose Options, and then under Options turn on Default Cell Spacing and set it to what you want.
You may have to search for something similar in yours. I am using the Mac version of Word.
answered Sep 22, 2015 at 0:57
![]()
AMRAMR
5701 gold badge4 silver badges16 bronze badges
Instructions
- Highlight the relevant cells, after making sure that they have no preexisting overlapping border beforehand (e.g. cell-based bottom border).
- Right click.
- Select ‘Table Properties’.
- Select ‘Borders and Shading’.
- Apply to ‘Paragraph’.
- Add your desired borders (in this case, bottom border).
- Click ‘OK’.
If you do this but the borders are still connected, you need to specify the necessary cell margins, for either the relevant cells or the whole table.
Example table:
This solution is based on: https://wordribbon.tips.net/T013179_Underlining_Cells_Not_Space_Between_Cells.html
answered Jul 12, 2020 at 13:42
![]()
ThredolsenThredolsen
1411 silver badge6 bronze badges
Borders always go to the edges of the cells. Two solutions:
-
If you want to use borders, include a narrow dummy column in between that you leave empty. Within the dummy columns, include the borders where you want them and exclude the ones you don’t. This might require a little extra work manipulating column widths.
-
Underscore those headings instead of using a border in that location. The underscore won’t extend beyond the words, which will leave a gap between them.
answered Sep 22, 2015 at 0:40
![]()
fixer1234fixer1234
26.9k61 gold badges72 silver badges116 bronze badges
2
Cell Margins and Cell Spacing are two important settings in any Microsoft Word Table but they aren’t used much and not well understood.
Cell margins are the spaces between your text and the edge of the cell. They can be set separately for the top, bottom, and either side of the cells.
To change the cell margins, we again click in the table and go to the Layout tab on the right. Then click Cell Margins in the Alignment group.
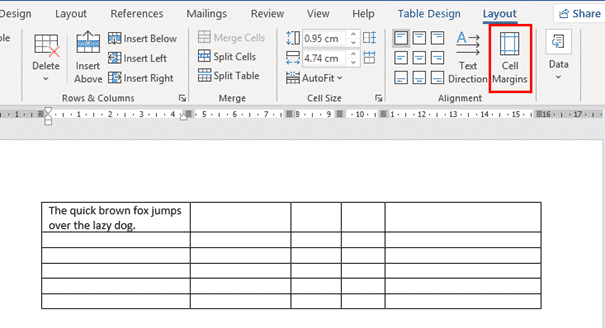
In the Table Options dialog that opens, use the spinners to incrementally change each of the four margins, or simply type in the margin that you want into each field; Top, Bottom, Left or Right.

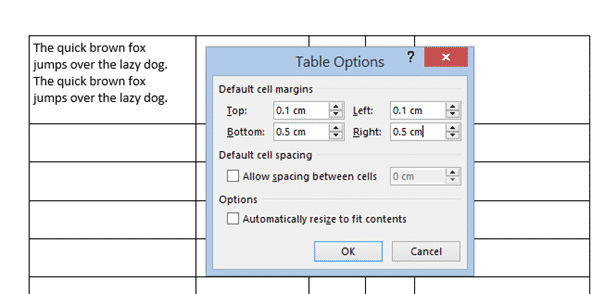
The margins we’ve selected above are quite large, just to show you clearly how his setting changes your table. Here’s the large cell margins (left) compared to zero cell margins (right).

You can, of course have different margins on different sides:
Individual, Row or Column Cell Margins
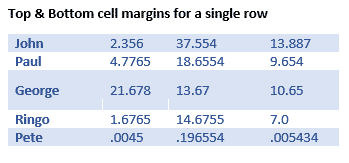
Table cell margins can be changed for a row, column or even a single cell, but it’s nowhere near the main Cell Margins ribbon button.
Select the column, row or cell you want to change then go to Table Layout | Table | Properties | Cell | Options. UNcheck the box ‘Same at the whole table’ then change the margin settings.

Here’s a single row, highlighted a little by increasing the top & bottom cell margins.
Why Adjust Table Cell Margins?
Cell margins are useful to separate lines in a table, especially when there’s no gridlines. Change the Top & Bottom cell margins to separate the lines and improve readability.

When space is tight, reducing the default left & right cell margins can help fit a table or contents into the available space.
Cell Spacing Tricks in Word Tables
Word’s Table Options have an interesting choice, Cell Spacing. While cell margins are the space between the text and the edge of the cell, cell spacing puts space around each of the cells.
Cell spacing has a surprising effect on the look of a Word Table with single line borders.
Go to Table | Alignment | Cell Margins | Default cell spacing | Allow spacing between cells.
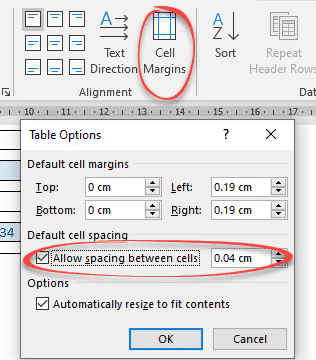
The default is OFF with no spacing.
Here’s how a Table looks using a standard single line border but increasing the cell spacing from the default, Zero.

Changes to Table Borders
As you can see, the single line table border becomes a twin gridline just by adding cell spacing to the same table.

Word table with Footnotes
Merge Cells in Word tables
Word tables for formatting magic
Indexing ‘bug’ in Word tables
On the Page Layout or Layout tab, click Columns. At the bottom of the list, choose More Columns. In the Columns dialog box, adjust the settings under Width and spacing to choose your column width and the spacing between columns.
Contents
- 1 How do I change the column width in Word without affecting other cells?
- 2 How do I reduce the space between rows in a table in Word?
- 3 How do I remove spaces after columns in Word?
- 4 How do I increase the space between two columns?
- 5 How do I format a section into two columns in Word?
- 6 How do you change the width of a column without changing the whole?
- 7 How do you change the width and height of a column in Word?
- 8 How do you change column width in pages?
- 9 How do I fix the spacing between words in Word?
- 10 How do I get rid of the white space after a table in Word?
- 11 How do you get rid of extra spaces in Word?
- 12 How do I remove spaces from a column?
- 13 How do you do a section break?
- 14 What can I use instead of a grid gap?
- 15 What is the space between two columns called?
- 16 How do you add space between columns in CSS?
- 17 How do you change the column style of the paragraph to two columns?
- 18 How do I fix columns in Word?
- 19 How do I resize individual cell size in a Word table separately from the other cells?
- 20 How do I change the width of only one cell in Word?
How do I change the column width in Word without affecting other cells?
Case 1: Adjust the Width of One Column without Affecting Others
- First, click “View” tab and then check the “Ruler” box in “Show” group.
- Next you can see the ruler on the top of the document. And there are tabs on the ruler above each column border. Click on one of these tabs to adjust a specific column.
How do I reduce the space between rows in a table in Word?
Follow these steps:
- Select the entire table. (You can choose Select Table from the Table menu.)
- Choose Cell Height and Width from the Table menu. This displays the Cell Height and Width dialog box.
- Make sure the Column tab is selected.
- Adjust the Space Between Columns setting, as desired.
- Click on OK.
How do I remove spaces after columns in Word?
Main Menu > Format > Columns. when window opens you can adjust the spacing between the columns and put a divider lines between each as well.
How do I increase the space between two columns?
- Specify a 40 pixels gap between the columns: div { column-gap: 40px; } Try it Yourself »
- Divide the text in a element into three columns: div { column-count: 3; } Try it Yourself »
- Specify the width, style, and color of the rule between columns: div { column-rule: 4px double #ff00ff; } Try it Yourself »
How do I format a section into two columns in Word?
On the Layout tab, click Columns, then click the layout you want.
- To apply columns to only part of your document, with your cursor, select the text that you want to format.
- On the Layout tab, click Columns, then click More Columns.
- Click Selected text from the Apply to box.
How do you change the width of a column without changing the whole?
To use AutoFit, click a cell in the row or column you want to change. Within the ribbon menu, click “Home.” Under “Cells,” click the “Format” button. Under “Cell Size” click “AutoFit Column Width” or “AutoFit Row Height” as desired.
How do you change the width and height of a column in Word?
Resize rows, columns, or cells
- Select the table. The contextual tabs, Table Design and Layout, appear in the ribbon.
- On the Layout tab, you can specify the custom height and width. To resize specific rows or column, click on a cell and then adjust the row/column.
How do you change column width in pages?
Click a cell in the row or column you want to resize. In the Format sidebar, click the Table tab. In Row & Column Size, click the Height and Width arrows to set the size you want. The entire row or column is resized.
How do I fix the spacing between words in Word?
Change the spacing between characters
- Select the text that you want to change.
- On the Home tab, click the Font Dialog Box Launcher, and then click the Advanced tab.
- In the Spacing box, click Expanded or Condensed, and then specify how much space you want in the By box.
How do I get rid of the white space after a table in Word?
Go to Format | Paragraph. Click the Indents And Spacing tab. In the Spacing section, change any spacing before or after the paragraph to 0. Click in the Line Spacing box, select Single and then click OK.
How to remove multiple extra spaces between words in Word
- Please press Ctrl + H to display the Find and Replace dialog.
- Press More button to show more options.
- After finish the settings, click Replace All to remove all extra spaces between words from the whole document.
How do I remove spaces from a column?
Remove all spaces between numbers
- Press Ctrl + Space to select all cells in a column.
- Press Ctrl + H to open the “Find & Replace” dialog box.
- Press Space bar in the Find What field and make sure the “Replace with” field is empty.
- Click on the “Replace all” button, and then press Ok. Voila! All spaces are removed.
How do you do a section break?
Add a section break
- Select where you want a new section to begin.
- Go to Layout > Breaks.
- Choose the type of section break you want: Next Page Section break starts the new section on the following page. Continuous Section break starts the new section on the same page.
What can I use instead of a grid gap?
‘grid-gap’ has been deprecated in favor of ‘gap’. In a similar vein ‘grid-row-gap‘ and ‘grid-column-gap’ have been deprecated in favor of ‘row-gap’ and ‘column-gap’.
What is the space between two columns called?
Column gutter: The space between columns of type.
How do you add space between columns in CSS?
The space between two rows in a
can be added by using the CSS border-spacing and border-collapse properties
How do you change the column style of the paragraph to two columns?
Select the Page Layout tab, then click the Columns command. A drop-down menu will appear. Select the number of columns you want to create. The text will format into columns.
How do I fix columns in Word?
To fit the columns to the text (or page margins if cells are empty), click [AutoFit] > select “AutoFit Contents.” To fit the table to the text, click [AutoFit] > select “AutoFit Window.” To keep Word from automatically adjusting your column size, click [AutoFit] > select “Fixed Column Width.”
How do I resize individual cell size in a Word table separately from the other cells?
If you’re using windows, you can resize individual table cells by using ctrl+alt+left or right arrow keys.
How do I change the width of only one cell in Word?
I may have it! If you right click the cell to the left of the one you want to extend, choose Column > Width and change the number in in the “Width” box. This will free up the edge of your cell and allow you to drag it to where you want it.
. The border-spacing property is used to set the spaces between cells of a table, and the border-collapse property specifies whether the border of the table is collapsed or not.
There are many formatting attributes you can apply to tables in Word to make your tables appear just right. Things like alignment, spacing, borders and shading are simple modifications you can make to format your table. The following articles discuss how to format tables to display your information how you want.
Tips, Tricks, and Answers
The following articles are available for the ‘Formatting Tables’ topic. Click the
article»s title (shown in bold) to see the associated article.
Adding Borders to Cell Contents
Word allows you to quickly add borders to cells in a table, but you may not know that you can also add borders to the text within the cells. It all depends on a single setting in the Borders and Shading dialog box, as described here.
Adding Diagonal Borders
Want to add a border diagonally, through the middle of a table cell? It’s easy if you follow the formatting steps presented in this tip.
Adjusting Column Width Using the Ribbon
If you want to resize the width of your table columns, you can do it using a mouse, but you can get more precise widths by using the ribbon controls. This tip explains how to pull up and use the proper controls so you can adjust the width of each column in the table.
Adjusting Table Row Height
When working with tables, you can adjust the height of individual rows. How you go about such adjustments depends on the version of Word you are using.
Aligning Decimal Numbers in Tables
Need to align numbers around their decimal point within a table? It’s easy to do by using the three simple steps provided in this tip.
Aligning Positive and Negative Whole Numbers in a Column
When you use a table to present numeric information, you may want to have Word align the numbers in the table. This can be a challenge in some situations, such as if your negative numbers use parentheses around them. Here’s how to align such numbers properly within the table.
Applying Borders to Tables
Want to change the borders that Word adds to your tables? You have complete control over the way your borders appear, using the tools described in this tip.
Applying Consistent Shading to a Table
Formatting tables can be very time consuming. When you get a document from another person, you can spend a lot of time formatting their tables, as well. Here are a couple of ways you can shorten the table-formatting time you need to spend.
AutoFitting Tables
Need to adjust the width of a bunch of table columns according to what is in the columns? Word provides a tool to do this, called AutoFit. Here’s how to apply it to your tables.
Centering Information in Table Cells
One of the most common ways to format information in a table is to apply some sort of alignment to the contents of table cells. If you need to center your information, you can do it both horizontally and vertically using the information in this tip.
Changing Cell Alignment
Individual cells in a table can be aligned any way you desire. As pointed out here, just select the cell and apply the formatting.
Copying Fill Color in a Table
You may spend some time getting the color in a portion of a table just right, only to be faced with the task of copying that shading to other cells in the table. There are several ways you can accomplish this task, as described in this tip.
Distributing Table Rows Evenly
If you’ve adjusted the height of your table and the rows within the table, you might want to later return all those rows to a uniform height. In Word this is referred to as «distributing» rows, and it is an easy task to do, as discussed in this tip.
Easily Copying Cell Formatting
Copying table cell formatting from one place to another can be a tedious process as Word doesn’t provide a way to do the copying. This tip looks at two techniques that can make the process easier.
Finding an Optimal Table Height
Word can adjust the height of individual rows in a table based on the information you put in each row. This may not result in the optimum table design, however. Here’s a discussion of why this happens and what you can try to do about it.
Fitting Text Into Cells
Need a way to make sure your text fits within the space available in a table cell? Word has a handy setting that will adjust your text’s format, as necessary, to make it fit.
Fitting Your Text In a Table Cell
Got some text you absolutely must fit on a single line in a table cell? Then you’ll appreciate this rather esoteric setting that allows you to force text to fit on that line.
Getting Rid of Background Color in All Tables
When working with tables (particularly those created by others), you can spend a large amount of time getting the formatting the way you want. If you need to routinely remove background shading from tables, here’s a couple of ways you can make your task easier.
Heading Changes for Multi-page Tables
When you have a long table that extends over multiple pages, Word allows you to specify one or more rows to be repeated at the top of the table on each page. Word does not provide a way for you to change the table heading on secondary pages, such as to contain the word «continued.» This tip provides a workaround you can use to get the desired result, however.
Headings On Your Printout
If you’ve got a table that spans multiple printed pages, you probably want to repeat a row or two of that table as a heading on each page. Here’s the easy way to set up those repeating rows.
Hiding Table Gridlines, by Default
The edges to table cells are shown two ways in Word: gridlines and borders. Table gridlines are only seen in Word; they do not print. Borders are visible in Word and on the printed page. Applying borders to table cells overrides the display or hiding of gridlines.
Indenting a Table
Insert a table into your document and it normally appears aligned with the left margin. Word allows you to indent the table by applying the techniques described in this tip.
Keeping Tables on One Page
Need to make sure that your smaller tables stay on a single page? Here’s a handy trick you can use to enforce this rule.
Last-Row Border Formatting
When the last row displayed on a page doesn’t show the borders you want, it can be confusing to figure out how to get them to show up. Here’s an example and a discussion on how to get the borders to appear properly.
Limiting Lines in a Table Cell
When creating tables, Word automatically sets the size of the cells. But what if you want to make sure each cell is a certain height? This tip explains how to format your table so it looks the way you want.
Preventing Overlapping Tables
You can spend considerable time getting the tables in your document to look just right. What happens, though, when you send the document to someone else and the tables are suddenly overlapping each other?
Quick Recall of Table Formats
Got a table that you use over and over again? One way you can make quick work of such repetition is to save the table in a Building Block entry. This tip shows how easy this is.
Quickly Removing Table Borders
Insert a table in your document and Word assumes that you want borders around the table and its cells. Here’s a shortcut that allows you to easily remove those borders.
Right Aligning a Table Column with an Indent
Word allows you to get a bit fancy in formatting the alignment of your tables. In this tip, you discover how to enter very precise right-alignment positioning in your table cells.
Self-Adjusting Column Widths
It is important to understand how column widths relate to the margins you may have set in your document. The reason is because when you change margin settings it can affect column width, but perhaps not as you expect.
Shading Table Rows
Need to format the rows of a table so that your data is showcased better? Here are a few ways you can get the shading you need.
Space after a Table
Those familiar with styles are used to setting vertical spacing before or after paragraphs. You can get just the look you want when it comes to spacing, except in regard to tables. Getting a certain amount of space after a table can take some trial and error, as detailed in this tip.
Spacing Before and After Tables
Tables can be a necessity in many types of documents. However, they can be a bother to get positioned properly relative to the text before and after the table. This tip shows how you can get just the positioning you need.
Spacing Table Rows Vertically
Want to get just the right amount of spacing above and below text in a table cell? A very easy way to do this is to adjust the paragraph spacing, as you do when formatting normal text.
Squaring Table Cells
Inserting a table is fast and easy in Word. You may want to make sure that the cells in the table are as square as possible. Here’s how to do this task.
Stopping Row Breaking for Many Tables
Got a lot of tables you need to format all at once? While you could make your changes manually, a much quicker way is to use a short macro, like the one featured in this tip.
Underlining Cells, Not Space Between Cells
Word provides a couple of ways you can underline information, including underlining table cells and their contents. Getting just the underlining you want can be a challenge, however, as highlighted in this tip.
Unlike PowerPoint, Microsoft Word has a utlity to create custom Word table styles. You might think this makes life a lot easier, but you would be wrong. The Word utility has quirks and bugs, and Word tables don’t work the same way as PowerPoint’s. To get a Word table style to work closer to the way it should, you may have to hack the OOXML. Here’s how to get the best possible results.
Start with a similar table style
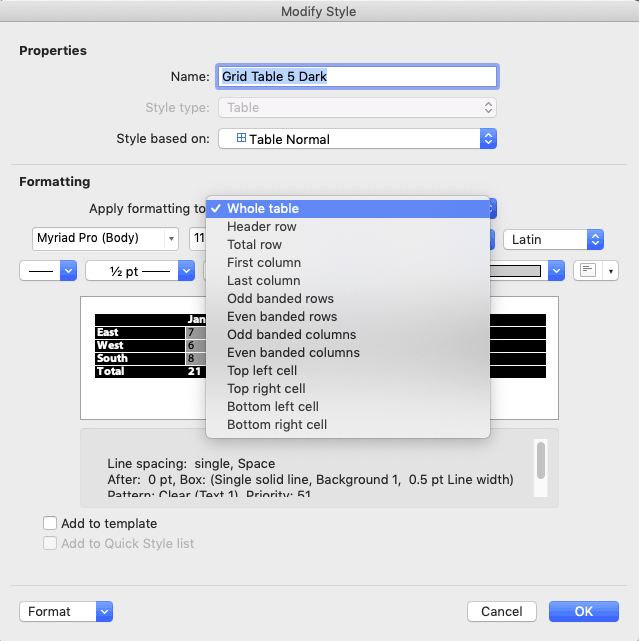
The first step in creating a custom table style is to insert a table, so the Table Design tab appears. By default, a new table will use the Table Grid style, which is very plain. If your final table style requires design options like a distinctive first column or a total Row, Table Grid is a poor place to start. It doesn’t include any of those options, and adding them back in is difficult. Switch the style to a Microsoft default that already has similar features. Next, expand the table style gallery dropdown again and select New Table Style at the bottom. This ensures that your table style will appear in a new Custom row right at the top of the styles gallery. By contrast, starting with Modify Table Style lumps your style in with all the Microsoft defaults.
Base the new style on the chosen one
When you choose Table Design>Table Styles>New Table Style, Word sets the Style based on dropdown to Table Normal, not the style you chose. If you originally chose Grid Table 5 Dark, then set Style based on to the same style name. (Current versions of Word for Mac have a display bug whereby choosing a different table style does not update the preview in the dialog. Choose the style, OK out, then choose Modify Table Style to see a corrected preview.)
Word Table Style Quirks
There are some oddities about Word table styles, and a few bugs. One oddity is that table text is based on the Normal style in relationship to Word’s Default Text settings. If Normal has been set to any color other than Automatic, applying different text colors to different table parts will have no effect. The text will remain the color set for Normal. You then have to apply new paragrpah styles to the table parts after creating the table.
Another weird result of the dependency on Normal is that Word expects to have the default line spacing for your version of Word. As I write, Word 365’s default Normal style has a Line spacing of Multiple at 1.08 with Space After of 8 points. In a table style, this gets automatically reinterpreted as Single with 0 before and after. Centered vertical spacing then works as expected. If you change the Normal line spacing to a larger or smaller value, text that is nominally vertically centered will actually sit higher or lower in the cell. If you add 12pt after, the table text will jump from being vertically centered to having 12 pt after, a huge difference. Microsoft doesn’t publish any of this information. Surprise!
This is one of the reasons why Word experts recommend that Normal style should stay as is and not be actually used in a document unless the default formatting matches the needs of the design. Better to format all text as Body Text style and give that style the custom color and line spacing.
But what if you’re given a template that already has a non-standard Normal, and the client asks for a table style? All is not lost. Table styles can still work as designed if you are using Word for Windows (sorry, Mac people). The trick here is to set the document text defaults to the same values as the revised Normal style. (Thanks to MVP Stefan Blom for this tip.) Here’s how to do this:
- With the document or template open in Word, click on the Styles pane dialog opener below the Quick Styles gallery, or press Alt + Ctrl + Shift + s at the same time. The Style pane opens.
- Click on the Manage Style button at the bottom.
- Select the Set Defaults tab.
- Set the defaults to the same values as Normal style: same font, size, color and paragraph settings. OK out.
You’ll know you got it right when you insert a table in the new style and it automatically has the correct styling for header row, first column and the other table style options. It is no longer necessary to apply text styles to the table, you can simply turn the Table Design>Table Style Options on and off to affect the related table area.
Word Table Style Bugs
Lousy User Interface Design
In the table style dialog, color dropdowns remain set at the color last chosen, even if that was for a different table part. The dropdown should update to the color currently in use for the table part that has been selected. This is just common-sense UI design.
The interface for setting border styles is pretty bad. It’s almost impossible to set one color for vertical borders and a different one for horizontal borders. All borders switch to the last selected color. But we can fix this with an OOXML hack (see below).
Defective Override Capabilities
Subsequent parts can’t always override the XML of earlier parts. As an example, set the Whole table to have internal vertical rules. Then set the first column to have no rule on the right. This should make the vertical rule separating the first column from the second column disappear, but it doesn’t. The rule has to be manually removed after the table is created.
Non-Functional OOXML Tags
The Paragraph Properties (w:pPr) element for each table part has a pStyle attribute that is supposed to set the paragraph style for that part. It does nothing. As mentioned above, the style is always derived from Normal style.
Format the Word table style options in order.
Start by formatting the Whole table section with the defaults for cell in the middle of the preview. Most of the time, this will include the font size and color, and the table background color and any rules that are to appear if banded rows are turned off. If you can’t get the formatting you need from the few controls on the dialog, click on the Format dropdown to find detailed access to Table Properties, Borders and Shading, Banding, Font and Paragraph attributes. Under Windows, you’ll also see a Text Effects choice, which is of dubious value in a table.
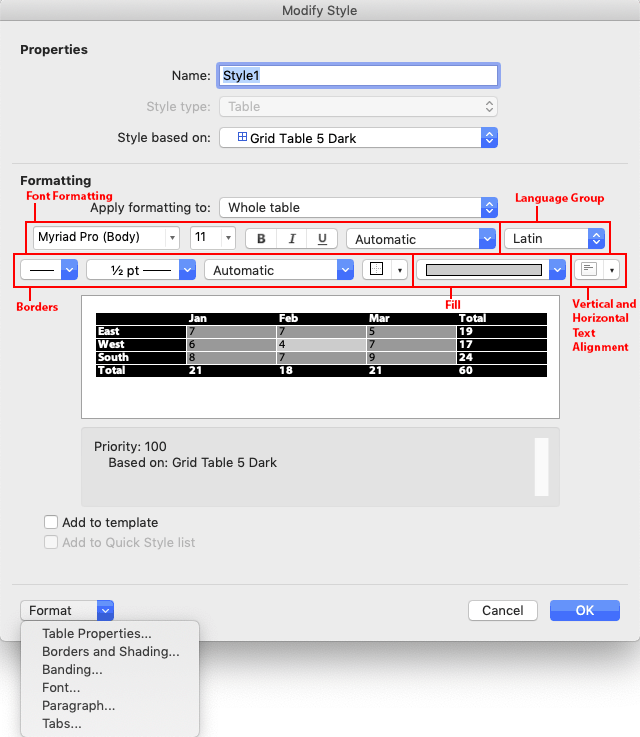
Then move on to Header Row formatting, the next item on the Apply formatting to dropdown. Format each item on that dropdown until you have set all the properties you need. After you get all formatting set, apply the custom style to the sample table you created at the beginning. Then use Modify Table Style for any tweaks required.
Word Table Style Hacks
Default style formatting is hardcoded in Word. So the styles that get stored in a Word file are only styles that have been modified or newly created in the document. All of the style exceptions and new style definitions are stored in the word/styles.xml part. Here’s the OOXML for a full table style. First, the section that formats the whole table. Pr stands for Property. tbl is Table, tc is Table Cell, p is Paragraph and r is Run (any length of text less that a paragraph).
<w:style w:type="table" w:customStyle="1" w:styleId="SampleTableStyle">
  <w:name w:val="Sample Table Style"/>
  <w:basedOn w:val="GridTable3"/>
  <w:uiPriority w:val="99"/>
  <w:rsid w:val="00264468"/>
  <w:rPr>
    <w:color w:val="282828" w:themeColor="text1"/>
    <w:sz w:val="18"/>
    <w:szCs w:val="20"/>
    <w:lang w:val="en-US"/>
  </w:rPr>
  <w:tblPr>
    <w:tblBorders>
      <w:top w:val="none" w:sz="0" w:space="0" w:color="auto"/>
      <w:left w:val="none" w:sz="0" w:space="0" w:color="auto"/>
      <w:bottom w:val="none" w:sz="0" w:space="0" w:color="auto"/>
      <w:right w:val="none" w:sz="0" w:space="0" w:color="auto"/>
      <w:insideH w:val="single" w:sz="6" w:space="0" w:color="BFBFBF"/>
      <w:insideV w:val="single" w:sz="6" w:space="0" w:color="282828"/>
    </w:tblBorders>
  </w:tblPr>
  <w:tcPr>
    <w:vAlign w:val="center"/>
  </w:tcPr>
(Above) The w:rPr section sets the default text while w:tblPr sets the borders. This table is transparent when all design options are turned off, so there is no fill. Note the entries for w:insideH and w:insideV. I had to hack this XML to get different colors for the inside horizontal and inside vertical borders.
(Below) Next is the formatting for the header row. w:rPr sets the text as bold and white, while w:tcPr sets the cell borders to nothing and the fill to Accent 2.
  <w:tblStylePr w:type="firstRow">
    <w:pPr>
      <w:jc w:val="left"/>
    </w:pPr>
    <w:rPr>
      <w:b/>
      <w:color w:val="FFFFFF" w:themeColor="background1"/>
    </w:rPr>
    <w:tblPr/>
    <w:tcPr>
      <w:tcBorders>
        <w:top w:val="nil"/>
        <w:left w:val="nil"/>
        <w:bottom w:val="nil"/>
        <w:right w:val="nil"/>
        <w:insideH w:val="nil"/>
        <w:insideV w:val="nil"/>
      </w:tcBorders>
      <w:shd w:val="clear" w:color="auto" w:fill="346577" w:themeFill="accent2"/>
    </w:tcPr>
  </w:tblStylePr>
  <w:tblStylePr w:type="lastRow">
    <w:pPr>
      <w:jc w:val="left"/>
    </w:pPr>
    <w:rPr>
      <w:b/>
    </w:rPr>
    <w:tblPr/>
    <w:tcPr>
      <w:tcBorders>
        <w:left w:val="nil"/>
        <w:bottom w:val="nil"/>
        <w:right w:val="nil"/>
        <w:insideH w:val="nil"/>
        <w:insideV w:val="nil"/>
      </w:tcBorders>
      <w:shd w:val="clear" w:color="auto" w:fill="auto"/>
    </w:tcPr>
  </w:tblStylePr>
(Above) The previous section formats the Total Row, removing the borders. There’s another hack here: the w:shd illustrates how to set the fill as No Color, with both w:color and w:fill set to auto.
(Below) Next up is the First Column formatting. w:pPr sets the text flush right, w:rPr makes it bold and w:tcPr removes the borders and keeps the fill No Color. Oddly, while w:insideH successfully overrides the internal horizontal rules set in the Whole Table section, neither w:right nor w:insideV are able to remove the internal vertical rule to the right of the column. This works as expected in a PowerPoint table style, but is broken in Word.
  <w:tblStylePr w:type="firstCol">
    <w:pPr>
      <w:jc w:val="right"/>
    </w:pPr>
    <w:rPr>
      <w:b/>
    </w:rPr>
    <w:tblPr/>
    <w:tcPr>
      <w:tcBorders>
        <w:top w:val="nil"/>
        <w:left w:val="nil"/>
        <w:bottom w:val="nil"/>
        <w:right w:val="nil"/>
        <w:insideH w:val="nil"/>
        <w:insideV w:val="nil"/>
      </w:tcBorders>
      <w:shd w:val="clear" w:color="auto" w:fill="auto"/>
    </w:tcPr>
  </w:tblStylePr>
  <w:tblStylePr w:type="lastCol">
    <w:rPr>
      <w:b/>
    </w:rPr>
    <w:tblPr/>
    <w:tcPr>
      <w:tcBorders>
        <w:top w:val="nil"/>
        <w:left w:val="nil"/>
        <w:bottom w:val="nil"/>
        <w:right w:val="nil"/>
        <w:insideH w:val="nil"/>
        <w:insideV w:val="nil"/>
      </w:tcBorders>
      <w:shd w:val="clear" w:color="auto" w:fill="auto"/>
    </w:tcPr>
  </w:tblStylePr>
(Above) The right-most table column is formatted with no borders and no fill.
(Below) If your design includes banded columns, the table style will include a section like this. There is just a definition for odd columns: even columns would be formatted with the defaults from the Whole Table section. If the First Column option is turned off, odd columns start at the left-most column. If First Column is turned on, all columns shift and the column just to the right of the first column takes on odd column formatting.
  <w:tblStylePr w:type="band1Vert">
    <w:tblPr/>
    <w:tcPr>
      <w:shd w:val="clear" w:color="auto" w:fill="D4D4D4" w:themeFill="text1" w:themeFillTint="33"/>
    </w:tcPr>
  </w:tblStylePr>
  <w:tblStylePr w:type="band1Horz">
    <w:tblPr/>
    <w:tcPr>
      <w:tcBorders>
        <w:left w:val="nil"/>
        <w:right w:val="nil"/>
        <w:insideH w:val="nil"/>
        <w:insideV w:val="single" w:sz="6" w:space="0" w:color="282828" w:themeColor="text1"/>
      </w:tcBorders>
      <w:shd w:val="clear" w:color="auto" w:fill="F2F2F2" w:themeFill="background1" w:themeFillShade="F2"/>
    </w:tcPr>
  </w:tblStylePr>
(Above) Odd Row and (Below) Even Row formatting.
  <w:tblStylePr w:type="band2Horz">
    <w:tblPr/>
    <w:tcPr>
      <w:tcBorders>
        <w:left w:val="nil"/>
        <w:right w:val="nil"/>
        <w:insideH w:val="nil"/>
        <w:insideV w:val="single" w:sz="6" w:space="0" w:color="282828" w:themeColor="text1"/>
      </w:tcBorders>
      <w:shd w:val="clear" w:color="auto" w:fill="D9D9D9" w:themeFill="background1" w:themeFillShade="D9"/>
    </w:tcPr>
  </w:tblStylePr>
(Below) Formatting for the 4 corner cells. These are only activated when both options that affect the cell are turned on. As an example, if the table has both a Header Row and a First Column, then the nwCell formatting is turned on. In the formatting for nwCell below, the text becomes flush right when both options are used.
  <w:tblStylePr w:type="neCell">
    <w:pPr>
      <w:wordWrap/>
      <w:jc w:val="left"/>
    </w:pPr>
    <w:tblPr/>
    <w:tcPr>
      <w:tcBorders>
        <w:bottom w:val="nil"/>
      </w:tcBorders>
    </w:tcPr>
  </w:tblStylePr>
  <w:tblStylePr w:type="nwCell">
    <w:pPr>
      <w:wordWrap/>
      <w:jc w:val="right"/>
    </w:pPr>
    <w:tblPr/>
    <w:tcPr>
      <w:tcBorders>
        <w:bottom w:val="nil"/>
      </w:tcBorders>
    </w:tcPr>
  </w:tblStylePr>
  <w:tblStylePr w:type="seCell">
    <w:tblPr/>
    <w:tcPr>
      <w:tcBorders>
        <w:top w:val="nil"/>
      </w:tcBorders>
      <w:shd w:val="clear" w:color="auto" w:fill="auto"/>
    </w:tcPr>
  </w:tblStylePr>
  <w:tblStylePr w:type="swCell">
    <w:tblPr/>
    <w:tcPr>
      <w:tcBorders>
        <w:top w:val="nil"/>
      </w:tcBorders>
      <w:shd w:val="clear" w:color="auto" w:fill="auto"/>
    </w:tcPr>
  </w:tblStylePr>
</w:style>
If you base your Word table styles on a table other than Table Normal, that table style will be included in styles.xml. If that table style includes formatting that you don’t want to included in your table style, then delete the section in the style it’s based on. As an example, this style was based on Grid Table 3, which includes a last column and a total row. To remove all last column and total row formatting from your style, delete the corresponding XML sections in both your custom style and in the style on which it’s based. You’ll know when you’re succesful when turning the Last Column and Total Row Design Options on and off in Word has no visual effect on a sample table.
Too complicated? Shoot me a message and we’ll create custom Word table styles for your document or template.

on
January 31, 2012, 12:39 AM PST
Add space between table cells in Word to add visual interest
Learn two easy ways to add visual interest to your Word tables by adding space between cells.
Most Word tables are relatively boring, but then, you probably don’t want a lot of table noise in most of your documents. On the other hand, you can add some interesting visual elements by simply adding space between cells. You might be surprised to learn how easy it is!
Surrounding each cell with a bit of a cushion (space) is a simple way to liven up a boring table or to add a bit of a break between elements in a busy table. It seems odd to use the space to achieve such different results, but it works in either case.
First, let’s examine a default table. By selecting the entire table, we can clearly see the default margins (.08) on the left and right. When you insert a table, Word adds those margins for you. (To insert this simple table, click the Insert menu, click Table in the Tables group, select three columns and five rows, and click!)
To add a bit of space to the top and bottom margins, do the following:
- Select the entire table (click the Move handle at the top-left corner of the table).
- Click the contextual Layout tab. In the Alignment group, click the Cell Margins option. In Word 2003, right-click the table and choose Table Properties. Then, in the Table, click Options.
- In the resulting dialog, change the top and bottom settings to .08 and click OK.
Now, let’s add some space between the cells as follows:
- Repeat steps 1 and 2 above.
- In the resulting dialog, check the Allow Spacing Between Cells option and specify .08.
- Click OK.
The results are interesting and easy to implement. All we did was add a little space. Now, let’s take another approach: let’s add space by making the cell borders disappear. Starting with another simple table like the first table shown above, do the following:
- Select the table.
- Click the contextual Design tab. Then, Click the Borders dropdown in the Table Styles group and choose Borders and Shading. In Word 2003, right-click the table and choose Table Properties. In the Table tab, click Borders and Shading.
- In the resulting dialog box, select white from the Color dropdown and choose a large point size from the Width control. Choose white if the document’s background is white; choose a color that matches the document’s background so the cell borders will disappear.
- Click the Shading tab, choose a color for the cell background, and click OK.
In this case, we didn’t increase the spacing between each cell. Instead, we increased the cell border width and then made them disappear to give the illusion of added space.
Doing very little, we just created two interesting tables. Knowing your options is the key. Experiment and if you support users, encourage them to experiment. Doing so will increase their productivity and creativity.
As much as I’d like to own that second technique, MVP, Dian Chapman shared it. She’s hosting a new Word list support group, which you might find helpful.
-
Software
Here’s how to add, remove, and customize the border lines in Microsoft Word tables.

Microsoft Word is an unavoidable productivity tool for a lot of people. But whether you’re a daily user or only need it for urgent editing, some common tasks can become confusing.
If you often work with tables, we’ll show you how to get a better hold on table border lines in Word.
Creating Tables in Microsoft Word
Depending on your choice, Microsoft Word lets you choose whether to customize your table or add it automatically. Each of these options has its own application and usefulness in various scenarios.
As expected, the automatic option offers limited initial control over your tables. But it’s useful if you want to get a table with several rows and columns working quickly.
The custom option comes in handy when you need to draft a more interactive table with personal twists.
Take Control of Your Table Border Lines
So you’ve created a Word document, then sorted and arranged your pages as needed. You’ve also inserted your tables, but now you want to get a hold on how their border lines come through. There are several ways you can do that.
First off, the property that controls table border lines is the Borders option at the top Ribbon of Word. You’ll see this option under the Table Design tab when you highlight a table, but it’s always on the Home tab as well.
On the ribbon, go to Home > Paragraph and click the arrow-down button on the Borders button. Then select your preferred border line.
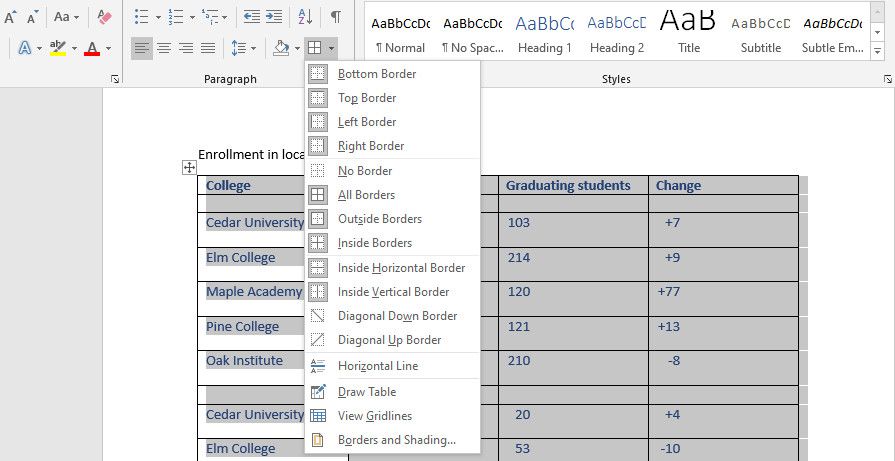
An alternative method is to right-click on the table you’ve created and click the arrow-down icon on the Borders button. Just like when using the Ribbon, use this to select a preferred border line option.
Note that if you highlight the whole table, any border line option you select applies to the entire table.
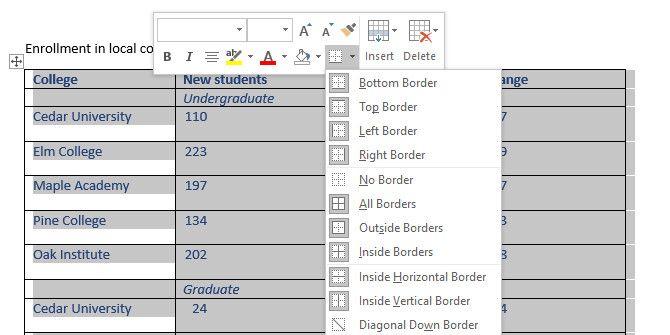
To apply the border line effect to a particular part of the table, highlight just that portion. Then repeat the process above to format the border lines to your preference.
Adding Border Colors and Styling Border Lines
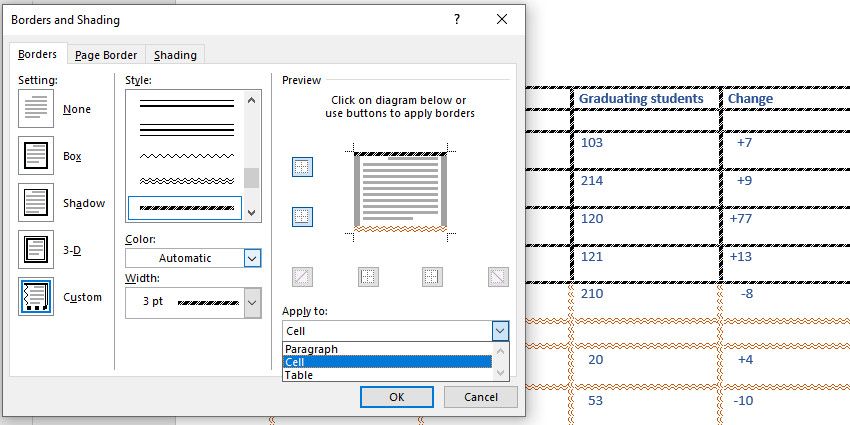
You can also control how your border lines come through by adding border colors and thinning or thickening the lines.
To do that, click the Borders button followed by Borders and Shading. Here, select Colors or Width to change those elements.
You can also change the styling of the border lines by scrolling through the Style option in the Borders and Shading window.
If you want to apply these styles to particular cells in your table, highlight them first. At the bottom-right corner of the Borders and Shading window, click the Apply to dropdown and select Cell.
To style each border line manually without highlighting cells, right-click on the table. Next, go to Border Styles and select your preferred border option.
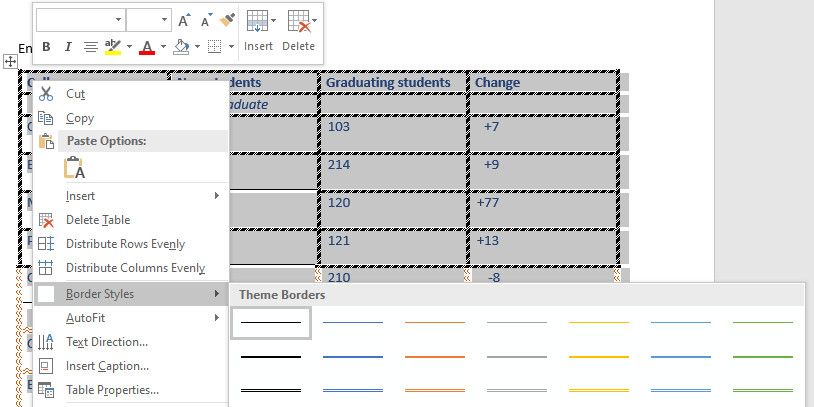
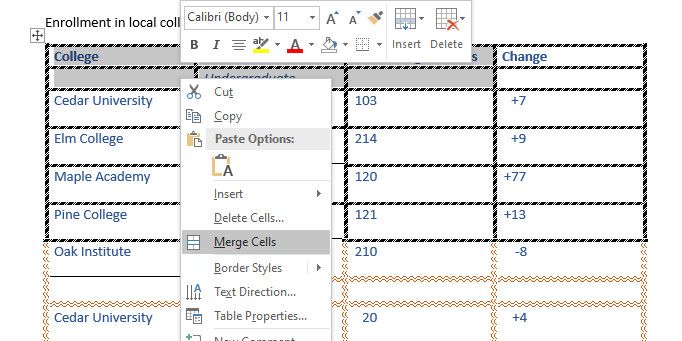
Merging and Splitting Cells
Another border control option is merging table cells. You can join two or more rows or columns by highlighting the ones you wish to join. Then, right-click on the table and click Merge Cells.
To split the merged cells into their default format, highlight the merged cells. Next, right-click on the table and click Split Cells.
Taking Control of Border Lines Is Easy
Manipulating table border lines in Microsoft Word isn’t difficult. But you’ll need a sharp eye to make your tables more professional and good-looking.
Play around with some of the available options, and you’ll find a suitable border style for your document before long.
Tables in Word are useful in so many situations. In this post you’ll discover how to create tables, then manipulate and design them in the quickest and easiest way to provide that visual punch.
Clickable Table of Contents
Enhance your Word tables with these advanced features
1. What are tables in Word good for?
Tables are useful for 2 distinct reasons.
- To show an actual table of data, or
- To organise and postion text, images and other elements on the page.
Many years ago, typewriters ruled the world. And a feature of a good typewriter was the tab stop, which was a device that essentially let you control indentation.
Over the years many people have continued to use tabs to indent text, because of its convenience, but they are hard work to set up properly.
Tables provide a much easier way to organise content on a page.
1. Select the Insert tab.
2. Click the Tables icon in the Tables group.
3. Move your mouse pointer into the table grid until the required number of rows and columns are highlighted orange, then left-click.

An empty table is inserted into the document.
Two new tabs, Design and Layout are also added to the ribbon area, under the banner of Table Tools.


3. MOVING AROUND A Word TABLE
- While the table is empty, you can use the cursor keys to move around the cells. However, when the cells contain information, using the cursor keys will move through the cell content first before moving to the next cell
- You can left-click in any cell to position the cursor.
- Press Tab to move to the next cell. The cursor will move across and then down the table.
- Press Shift + Tab to move to the previous cell.

NB. Using Tab is better than using the cursors as it will move to the next/previous cell regardless of whether there is information in the cells.
NB2. If you press Tab while you are in the last cell, a new row will be added to the bottom of your table
4. SELECTING A CELL, ROW, COLUMN OR THE ENTIRE TABLE
To select a cell:
1. Position the mouse pointer inside the cell on the bottom-left corner of the cell.
The pointer will change shape to a solid black arrow that points up and right.
2. Left-click.

To select a row of a table:
1. Position the mouse pointer in the left margin in line with the row you want to select.
The mouse pointer will change to a white arrow that points up and right.
2. Left-click.

To select a column
1. Position the mouse pointer so that it rests on the top border of the table, above the column you want to select.
The mouse pointer will change to a solid black arrow pointing down.
2. Left-click.

To select the entire table:
1. Position your mouse pointer over the 4-headed arrow icon situated at the top-left of the table.
2. Left-click.

5. INSERTING AN EXTRA ROW OR COLUMN
To insert an extra row:
1. Position the cursor in a cell.
2. Select the Layout tab, under the Table Tools banner.
3. Click Insert Above or Insert Below in the Rows and Columns group

Here is a quick way to insert new rows:
1. Position the cursor to the left of the table, but in close proximity.
2. A plus symbol will appear above or below the mouse pointer indicating where the new row will be added.

3. Nudge the mouse pointer up or down to move the plus sign above or below.
4. Left-click to insert the new row,
To insert an extra column:
1. Position the cursor in a cell.
2. Select the Layout tab, under the Table Tools banner.
3. Click Insert Left or Insert Right in the Rows and Columns group

Here is a quick way to insert a new column:
1. Position the cursor above a column, but in close proximity to the table.
2. A plus symbol will appear to the left or right of the mouse pointer indicating where the new column will be added.
3. Nudge the mouse pointer left or right to move the plus sign to the left or the right of the column.
4. Left-click to insert the new column,

6. DELETING A ROW OR COLUMN
To delete the current row or column:
1. Position the cursor in any cell of the row you want to delete.
2. Select the Layout tab, under the Table Tools banner.
3. Click the Delete icon in the Rows and Columns group.

4. Choose Delete Row or Delete Column from the drop-down menu.
7. Quickly fORMATTING tables in Word
Word provides you with a number of pre-set table designs. This means that it formats the headings and the data, applies a variety of borders and colours the cells in a way that makes it look like a professionally produced table. As a beginner this simple technique will give you a good-looking table.
1. Position the cursor in any cell in the table.
2. Select the Design tab under the Table Tools banner.
The Table Styles group lists a number of table designs. To get the full list, click the More button beneath the table styles scroll bar
The default table style is Table Grid in the Plain Tables category which adds simple gridlines but no shading to your table.
Live Preview allows you to hover over a design and see it applied to your table. If you like what you see, click to select the table design.

In the Table Style Options group of the Design tab, tick the components that you have in your table. For example, if your table has column headings, tick Header Row. In doing this, the various parts of your table are formatted accordingly

Header Row
This will emphasise the header row by making the text bold or applying a different cell colour (depending on the table style selected.
Total Row
This will emphasise the bottom table row by making the text bold or applying a different cell colour (depending on the table style selected.
First Column
This will emphasise the first column (for labels etc.) by making the text bold or applying a different cell colour (depending on the table style selected.
Last Column
This will emphasise the last column (for row totals etc.) by making the text bold or applying a different cell colour (depending on the table style selected.
Banded Rows
This will make odd rows one colour and even rows a different colour. This helps readability.
Banded Columns
This will make odd columns one colour and even columns a different colour. This helps readability.
8. SETTING THE BORDERS AND SHADING
The Table Styles Gallery allows you to completely format a table with one click. Whereas you used to need some nous, anybody can now create a professional looking design.
However, you will often still need to apply your own border and shading, and manually change a table design. With a little effort can add a lot of flavour to your page and dramatically enhance the overall appearance of the document.
To set the borders for tables in Word:
1. Select the portion of the table that you wish to set the borders for. This may be the entire table, a row or rows, a column or columns or a selection of cells.
2. Select the Design tab under the Table Tools banner.
3. Select the Borders icon. A drop-down list appears. This list shows every combination of border that can be turned on or off. The icons with a shaded background are currently switched on. The rest are switched off.
4. Click any icon to switch the border on or off. The border style that is applied is the default style (½ pt solid black line ) or the last style that was used.

5. To apply customised borders, with different colours, styles and widths, click the Borders & Shading option at the bottom of the list to display the Borders and Shading dialog box.


Your selection will always have an outer border, and if you selected more than one cell, you will have some inside borders as well. The easiest way to use the dialog box is to start on the bottom-middle and work your way up and right.
1. Select the colour and width (thickness) that you would like for your border.

2. Choose a style (e.g. dotted, dashed, double, solid etc.)

3. Paint your borders. There are two ways to do this.
- The first way is to click directly on a border in the Preview itself.
- The second way is to click the appropriate icon around the edge of the Preview section that represents each border. Depending on which cells you selected in your table, some of these icons may not be available.

On the left-hand side of the dialog box, there are some pre-defined border combinations which you can use to save yourself some time. Depending on your selection of cells, the pre-defined options may differ. Here’s a run-down:

To shade the cells of tables in Word:
1. Select the portion of the table that you wish to shade. This may be the entire table, a row or rows, a column or columns or a selection of cells.
2. Select the Design tab under the Table Tools banner.
3. Click the Shading icon.
The colours that you see displayed match the current them of the document. Themes were discussed earlier in the course.
4. Click a colour in the palette.
While you can pick any colour, it is recommended to stick with the light colour shades, otherwise your tables will appear very loud and ugly, like they’re shouting in your face. Subtle is the order of the day. The exception to this is column headings or other cells that you wish to differentiate. Under these circumstances, you can use a dark colour, but use a light font with it.

If you cannot find the exact colour you need,
- Click the More Colours link underneath the palette. This displays a larger, more accurate colour palette.
- And if that’s not enough, click the Custom tab and you’ll get a really fine selection of colours (you can even enter your own RGB settings if you know them)

9. REPEATING table HEADINGS ON EVERY PAGE WHEN PRINTING
When you have large tables that occupy two or more pages, many people insert manual page breaks, then copy and paste their table header rows at the top of each page.
When rows are added or removed from tables in Word, the table headers end up half way down the page.
There is a simple tool that will eliminate this problem
1. Ensure that the table is a single table, with no manual page breaks in the middle, and one header at the top. The table header may occupy more than one row, it doesn’t affect the way this feature works.
2. Position the cursor somewhere in the top row of the table.
3. Select the Layout tab under the Table Tools banner.
4. Click the Repeat Header Rows icon ion the Data group.

Now, it doesn’t matter how many rows tables in Word contain, if the table ever spills across into another page, the header row (which normally displays the column headings) will always appear at the top of the table.
10. All the key points again
- Tables in Word serve 2 distinct purpose: to display a table of data and to organise and position items on the page
- To create table, select 2 tabs — Design and Layout under the Table Tools banner.
- There are 2 tabs — Design and Layout under the Table Tools banner.
- You can press the TAB key to move direct to the next cell and SHIFT and TAB together to move backwards through a table.
- The four elements of a table are cells, rows, columns and the whole table. Each can be selected.
- Rows can be inserted by selecting the Layout tab under Table Tools, then clicking the Insert Above or Insert Below icons. Alternatively, hover to the left of a row and click the plus symbol that appears above or below the mouse pointer.
- Columns can be inserted by selecting the Layout tab under Table Tools, then clicking the Insert
Left or Insert Right icons. Alternatively, hover above a table column and click the plus symbol that appears to the left or right of the mouse pointer. - Columns and rows and be removed from the table, by positioning the cursor in the row or column to be removed, then clicking the Delete icon on the Layout tab of Table Tools and choosing Delete
Row or Delete Column. - Tables can be formatted using the Table Style gallery or by manually setting the shading and borders manually. Both sets of tools are found on the Design ribbon of the Table Tools.
- When using the Microsoft Table Styles, you can control the behaviour of the formatting by setting the Table Style options – 6 tick boxes that define the structure of your table.
- For long tables that spill across onto subsequent pages, the top row, which normally contains the column headings can be set to repeat automatically. So there is no excuse for cutting and pasting headings midway through your table or taping pages together to make sense of the table!
I hope you found plenty of value in this post. I’d love to hear your biggest takeaway in the comments below together with any questions you may have.
Have a fantastic day.


About the author
Jason Morrell
Jason loves to simplify the hard stuff, cut the fluff and share what actually works. Things that make a difference. Things that slash hours from your daily work tasks. He runs a software training business in Queensland, Australia, lives on the Gold Coast with his wife and 4 kids and often talks about himself in the third person!
SHARE