
Word for Microsoft 365 Outlook for Microsoft 365 Word 2021 Outlook 2021 Word 2019 Outlook 2019 Word 2016 Outlook 2016 Word 2013 Outlook 2013 Word 2010 Outlook 2010 Word 2007 Outlook 2007 More…Less
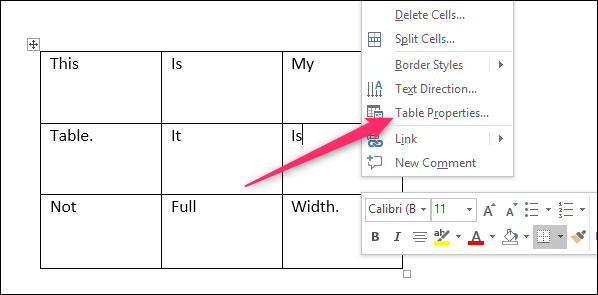
To set or change table options in Word or Outlook, right-click a table and choose Table Properties.
Note: If you want to set properties for a particular row, column, or cell, click in that row, column, or cell before making changes in the Table Properties dialog box.
In this article
-
Table properties
-
Row properties
-
Column properties
-
Cell properties
-
Alt text
Table properties

Click the Table tab to apply settings to your entire table:
-
Under Size, set the table’s overall width by selecting Preferred width and choosing a size. In the Measure in box, choose whether you want to measure the width in inches or a percentage of the page.
-
Under Alignment, choose whether you want to align your table to the left, center, or right of page. If you select Left, you can select an indentation distance in the Indent from Left box.
-
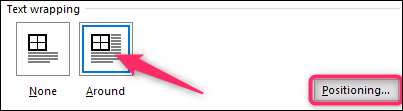
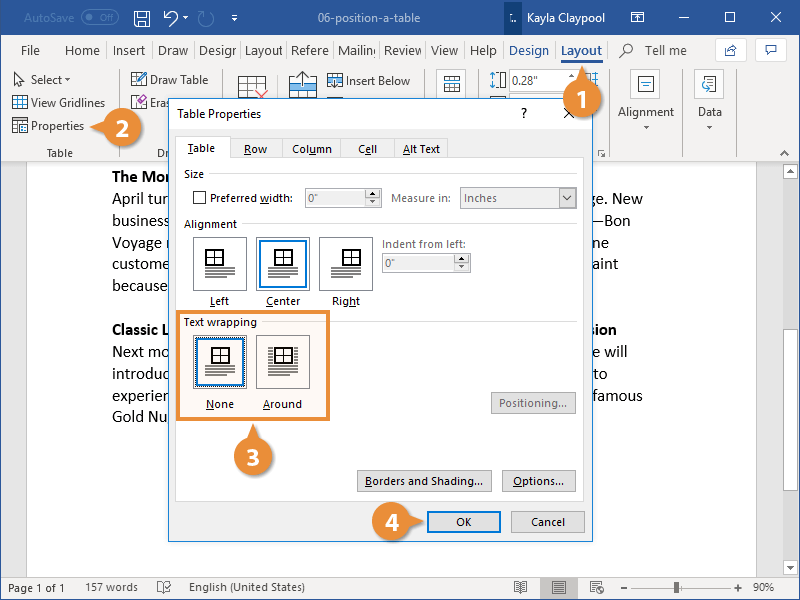
Under Text wrapping, select Around if you want nearby text on your page to wrap around your table; you can make text wrapping more precise by clicking Positioning, and then choosing options in the Table Positioning dialog box. If you don’t want text wrapping, select None.
-
Click Borders and Shading to change the border style, line color, and line width of your table.
-
Click Options to set more table properties, including top and bottom cell margins, cell spacing, and automatic resizing of cell contents.
Top of Page
Row properties
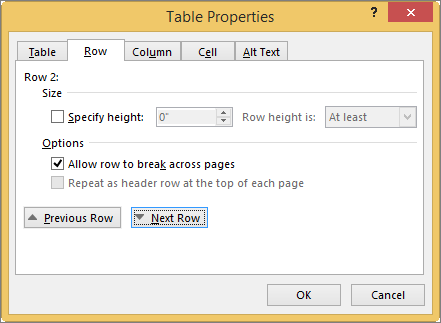
First, click in the row or select the rows you want to change, right-click, choose Table Properties, and then click the Row tab.
-
Under Size, set the row’s height by selecting Preferred height and choosing a size; you can further refine the height by selecting an option in the Row height is box.
-
Under Options, select options for breaking rows across pages or creating header rows.
-
To display the currently selected row at the top of the tab and navigate between rows without leaving the Table Properties dialog box, click Previous Row or Next Row.
Top of Page
Column properties
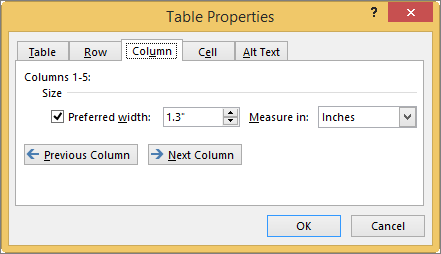
First, click in the column or select the columns you want to change, right-click, choose Table Properties, and then click the Column tab.
-
Under Size, set the column’s width by selecting Preferred width and choosing a size. In the Measure in box, choose whether you want to measure the width in inches or a percentage.
-
To display the currently selected column or columns at the top of the tab and navigate between columns without leaving the Table Properties dialog box, click Previous Column or Next Column.
Top of Page
Cell properties
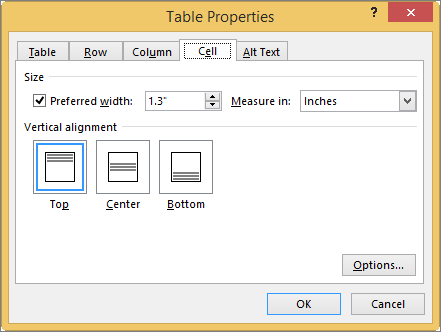
First, click in the cell that you want to change, right-click, choose Table Properties, and then click the Cell tab.
-
Under Size, set the cell’s width by selecting Preferred width and choosing a size. In the Measure in box, choose whether you want to measure the width in inches or a percentage.
-
Under Vertical alignment, choose an alignment option for the cell contents—Top (the default alignment), Center, or Bottom.
-
Click Options to set more cell properties, including top and bottom cell margins and text wrapping and fit options.
Top of Page
Alt text
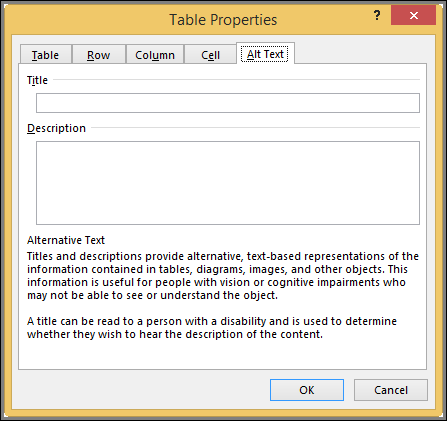
You can create alternative text (alt text) for your table to help people with screen readers understand the content of the table.
-
In the Description box, enter an explanation of the table.
-
In the Title box, enter a brief summary of the table.
Note: Unless you have a complex table, you will usually want to enter text in just the Description box. When you have complex content to describe, filling in the Title field is useful so that reading the full description is not necessary unless desired.
Top of Page
Need more help?
If the document contains tables, it must be formatted according to the requirements accepted by your college, university, company, established on the project, etc. Most requirements, including accessibility, tell that tables should contain titles, column headers, alternate text, etc. In addition, tables must be correctly positioned on the page, using the pre-defined alignment, padding, and text-wrapping guidelines.
Usually, the table contains the following basic components:
- The table number (e.g., Table 1) and the title appear above the table body (see how to create a caption for tables).
- The table includes column headings, including a stub heading (heading for the leftmost, or stub, column). Some tables also include column spanners, decked heads, and table spanners. See how to format tables in a Word document.
- The table body contains all the rows and columns of a table (including the headings row). A cell is the point of intersection between a row and a column. See how to select and format table elements.
- All types of notes (general, specific, and probability) appear below the table if there are notes. Notes describe contents of the table that cannot be understood from the table title or body alone (e.g., definitions of abbreviations, copyright attribution, etc.).

See also how to create cross-references to a table.
Align the table on the page
By default, Word aligns the table to the Left. If you want to change an alignment of the table on the page, select it and do one of the following:
- On the Home tab, in the Paragraph group, select the alignment you prefer:

- Open the Table Properties dialog box by doing one of the following:
- On the Table Layout tab, in the Table group, click the Properties button:

- Right-click the table and select Table Properties… in the popup menu:

In the Table Properties dialog box, on the Table tab, in the Alignment section, select the option you prefer:

- On the Table Layout tab, in the Table group, click the Properties button:
- Press the keyboard shortcuts:
- Ctrl+L to align a table to the Left (by default),
- Ctrl+E to Center the table,
- Ctrl+R to align a table to the Right.


Add indent from left
The Indent from left controls the distance of the table from the left margin. To add the Indent from left, do one of the following:
- On the Home tab, in the Paragraph group, click the Increase Indent button:
- Open the Properties dialog box. In the Table Properties dialog box, on the Table tab, in the Alignment section, type or choose the value you need in the Indent from left field:
Note: The Indent from left field is active only for the Left alignment.


For example, the table with a left indent 0.5 inches:

Text Wrapping for a table
Word offers to customize the text wrapping style for a table, as well as for figures. To customize a text wrapping style, do the following:
1. Select a table.
2. Open the Table Properties dialog box. In the Table Properties dialog box, on the Table tab, in the Text wrapping section:
- Select None to disable text wrapping for the table
- Select the Around option to have text wrapping around the table. Then click the Positioning… button for more customization:
In the Table Positioning dialog box:


Position a table
- In the Horizontal sections, specify:
- Position to the Left, Right, Center, Inside, or Outside,
- Relative to the Margin, Page, or Column.
For example, with Position to the Right relative to Margin:

- In the Vertical section, specify:
- Position to the Top, Bottom, Center, Inside, or Outside,
- Relative to the Margin, Page, or Column.
For example, with Position to the Top relative to Page:


Increase the space between text and table
- In the Distance from surrounding text section, enter custom values for the distance between the text and the table independently for:
- Top (0 by default),
- Bottom (0 by default),
- Left (1.13 inches by default),
- Right (1.13 inches by default).
For example, with the 0.3-inch distance on all sides:

Note: See also how to change a distance within a table.
Text wrapping options
- In the Options section:
- The Move with text option moves the table along with the text in which it is located.
Select the Move with Text option if the text is directly related to the table data. The table is vertically aligned to the related paragraph around it. If the table data applies to the whole document, keep the Move with Text option unselected.
- Allow overlap allows to layer table on top of each other.
- The Move with text option moves the table along with the text in which it is located.
Position a large table
Control where a table is split
When working with a long table, or when a table needs to be placed at the bottom of the page, splitting up a table into two separate tables is necessary. By default, if a page break occurs within a large row, Microsoft Word allows a page break to split the line between two pages (see How to prevent a table break between pages).
To insert a table break at a specific location, position the cursor on the cell on the row, or select the row that should appear on the next page, then do one of the following:
- Press Ctrl+Enter.
- On the Table Layout tab, in the Merge group, click the Split Table button:

Be careful! Word applies the chosen style to the new table. If you Undo the table splitting, the formatting may not be Undone correctly.
Add an Alternative text (Alt Text)
Most requirements recommend adding alternative text for visual objects, including tables (see how to turn off automatically creating the Alternative text).
To add an alternative text for a table, do the following:
1. Select a table.
2. Do one of the following:
- On the Table Layout tab, in the Table group, click the Properties button.
- Right-click the table and select Table Properties… in the popup menu.
3. In the Table Properties dialog box, on the Alt Text tab:

- In the Title field, type a title, if necessary.
- In the Description field, fill the description for the table.
- Click the OK button.

on
August 27, 2020, 1:44 PM PDT
How to apply both left and right alignment by using a table in Microsoft Word
Unlike a line of text, which responds to only one alignment setting, a table lets you set a different alignment for every cell.

Microsoft Word offers four alignment choices: Left, center, right, and flush. Because they’re paragraph properties, you can’t assign more than one to the same paragraph or line, at least not in the usual way. If you try, the last assigned alignment will take precedence.
In the article, How to apply both left and right alignment to text without using a table in Word, I showed you how to reconcile right and left aligned text on the same line using a tab. It’s a quick and easy solution that can be applied throughout the document once the tab is created. In this article, I’ll show you how to use a table to apply more than one alignment to a single line of text.
SEE: How to add a drop down list to an Excel cell (TechRepublic)
I’m using Microsoft 365 on a Windows 10 64-bit system, but you can use older versions. This technique isn’t appropriate for the browser edition: It won’t let you set a tab, and it won’t display pre-existing tabs correctly, within the context of this technique.
If you’re not familiar with tabs, try reading Learning how to use tabs correctly is the best way to ensure that columnar data stays where you put it. However, you won’t need to read it to work through this article.
How to insert the table into Word
Inserting a table is easy. You probably enter a line or two of content and then convert the text to a table. However, when trying to add more than one alignment to the same line of text, you’ll probably want to start by creating the table first and then entering the aligned text. This works because you can apply any alignment to any cell in a table. Then, removing the borders, the line will look line a normal line, but will really be a table.
SEE: TechRepublic Premium editorial calendar: IT policies, checklists, toolkits, and research for download (TechRepublic Premium)
I want to mention quickly that the table solution used to be applied to the header and footers section, but this is no longer necessary as the default tabs are set to center and right align automatically. However, if you’re working with a very old version, you may find this feature missing.
Now, let’s suppose you want to enter the highlighted line in Figure A, using a table. First, let’s enter the table, as follows:
- Position the cursor at the left margin of a blank line.
- Click the Insert tab, and then click Table in the Tables group and use the grid to create a table that’s two columns wide and one row deep (Figure B).
- Click to insert the table shown in Figure C.
Figure A

Figure B

Figure C

You could add more cells. For instance, you might add three cells and center the text in the second cell. Now, let’s enter the text.
How to align the text in a table in Word
Once you have a table, you can enter the text, as shown in Figure D. Right now, both cells are left-aligned, and we want the second cell to be right-aligned. To change the alignment, simply click inside that cell and click Align Right in the Paragraph group on the Home tab. Figure E shows the results. If you want centered text as well, add a cell between the two existing cells, add the text, and apply the center alignment.
Figure D

Figure E

Remove the borders from your table
Most likely, you won’t want to leave the table borders, so let’s remove them. First, select the entire table. The easiest way to do so is to click the table icon at the top-left of the table. With the entire table selected, click the contextual Table Design tab. Then, in the Borders group, click the Border dropdown and choose No Borders from the dropdown list, as shown in Figure F. The borders won’t print, but you can still see the gridlines (Figure G). To disable those, select the entire table and click the contextual Layout tab. In the Table group, uncheck View Gridlines.
Figure F

Figure G

One monkey wrench to watch for
Did you notice that the margins are just a bit off? Depending on where the text is, this might not matter. If it does, the solution is simple. Drag the left and right borders of the table out, just a bit, until the text is aligned, as shown in Figure H. Working with this table is easier if you leave the gridlines on until the document is completed.
Figure H

If you plan to use a table multiple times, you can save it as a quick table and then insert it when needed rather than re-creating it each time. For instructions, read section the Quick Tables section in the article Office Q&A: How to save time formatting Word tables.
Also See
-
How to become a software engineer: A cheat sheet
(TechRepublic) -
How to add a contact group for quick emailing to multiple recipients in Outlook
(TechRepublic) -
Zoom vs. Microsoft Teams, Google Meet, Cisco WebEx and Skype: Choosing the right video-conferencing apps for you (free PDF)
(TechRepublic) -
Hiring Kit: Application engineer
(TechRepublic Premium) -
Microsoft 365 (formerly Office 365) for business: Everything you need to know
(ZDNet) -
The 10 most important iPhone apps of all time
(Download.com) -
It takes work to keep your data private online. These apps can help
(CNET) -
Must-read coverage: Programming languages and developer career resources
(TechRepublic on Flipboard)
-
Microsoft
-
Software
Some tables in a Microsoft word document does not need full width. You can use horizontal position a table in the document and fine-tune its position by aligning it left or right on the page. In order to align any table to the left, center and right in Microsoft Word – follow these instructions.
How to Change a Table’s Horizontal Alignment
By using the guide you can quickly align your specific table to the left on the page, even to Center or right. One thing you need to know that if you are not using these alignment options, you see the table in full width. So if you have a table in your document that doesn’t need full width, you need to change the setting because by default when you create a new table, it is in full-width mode.
Though, the straightforward method to do it is clicking anywhere on the table to focus on it. Now take the mouse cursor to the bottom right side of the table it will change to resize arrow then you can drag to shrink the table to a size you want.
Now that your table is no longer full width, it is time you can apply alignment on this page. So what you are going to do it right click anywhere inside your table and choose table properties from the context menu.
From the table properties, you can see three alignment option as left, Centre and right. So if you need to align your table to the left of the page you can choose this left option: The thing goes with if you want to align your table in the center of the page or to the right side.
While you are on this page you will also same is setting preferred width using that you can fine tune the width off the table and can set the specific width in either inch or centimeter. You can use this preferred width for example if you need a table just 300 pixels wide, it is a more accurate method then just clicking and dragging using your mouse pointer.

When you’re aligning the table, you can also adjust the space from the left side of the page using the “indent from left” option. The value you put here is in inches. Take this as margin, here we set the value to one inch which is similar to padding:96px;

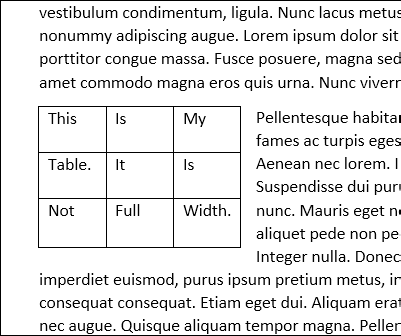
Below alignment option, you got another option which is text wrapping. If your table is more you can choose the around option this will rap wrap document text around the table. Text wrapping is similar to the float option in CSS. So if you decide to align the table in the left, the document text will appear to the right side covering the blank space. And if you chose to align the table on the right side, the document text appears on the left covering the blank area.
This is how a small table left aligned looks like with text wrapping.
So basically it is not very difficult to change the alignment horizontally of a table in Microsoft Word or Google word (Docs). Since many people use online tools such as Microsoft Word online (Unfortunately the online Microsoft Word doesn’t have the alignment option, despite it does have the alignment option, but it works only inside the table. So basically you cannot float a table to the left or the right.) and Google Docs, here is a similar approach to that as well.
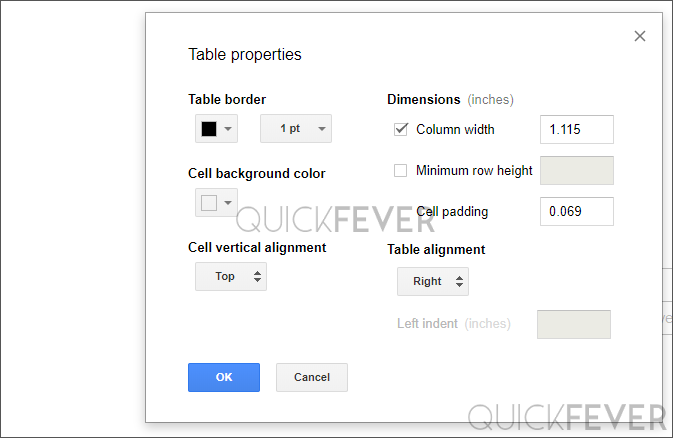
In google docs
So in case, you are using Google docs (do you know you can voice dictate in Google Docs for speeding up your writing) you can align a table horizontally to the left, right and center. The process is similar to what we have done in Microsoft Word. Since Google doc runs online on a web browser, it has some limitations.
In google docs, you can not drag to resize table instead right-click it and choose “table properties” where you can set align to the left side on the document, to the center or right.
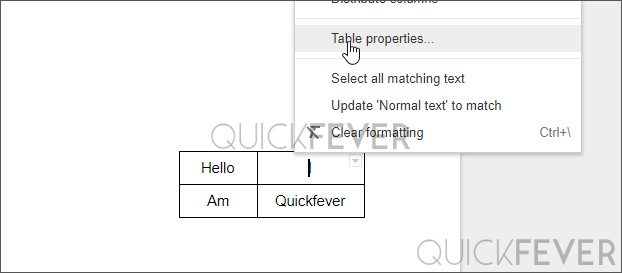
Under table alignment, you can set right to right-align your table. Also, you have some other options to tweak your table positioning horizontally. Dimensions are similar to the preferred width in Microsoft word. Here you can also apply a background color, thicker table borders, etc.
Alright, it was easy to align tables in Google Docs and Microsoft Word, you learned that knowing the options to fine-tune the looks of your table comes handy all the time.
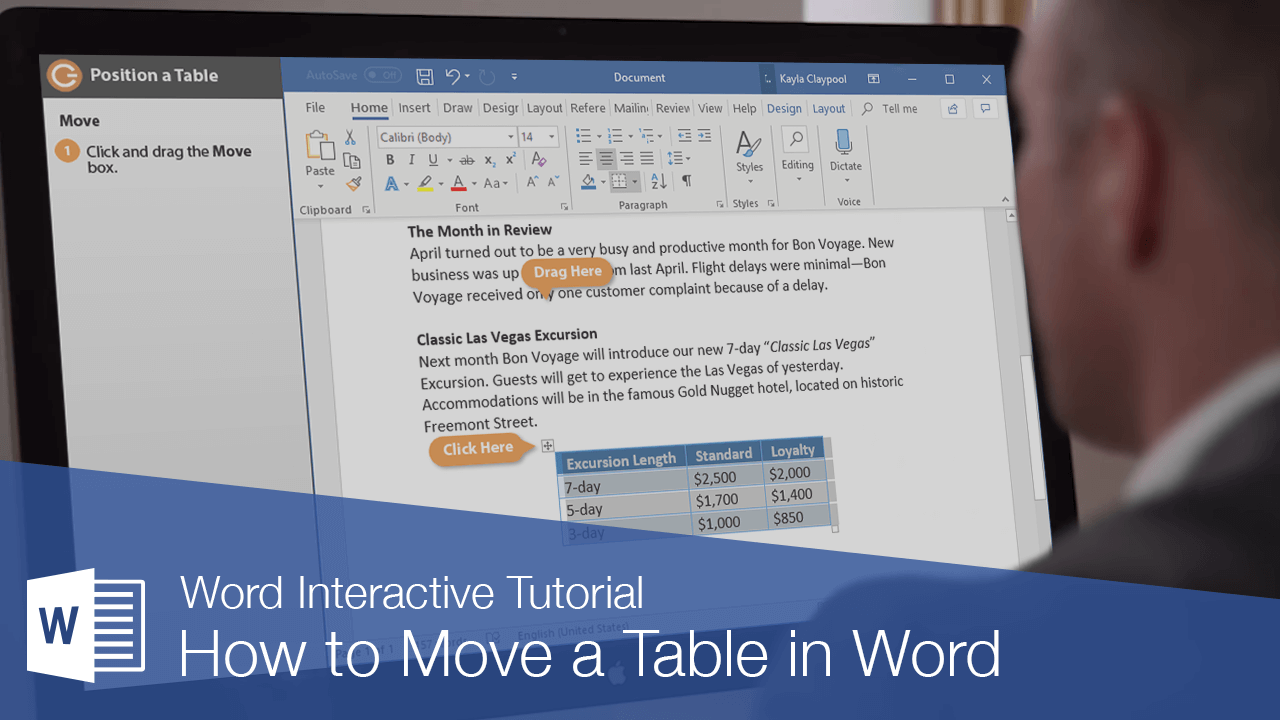
Tables aren’t simply stuck where they are when you first insert them. You can move them around manually or let Word position them automatically for you.
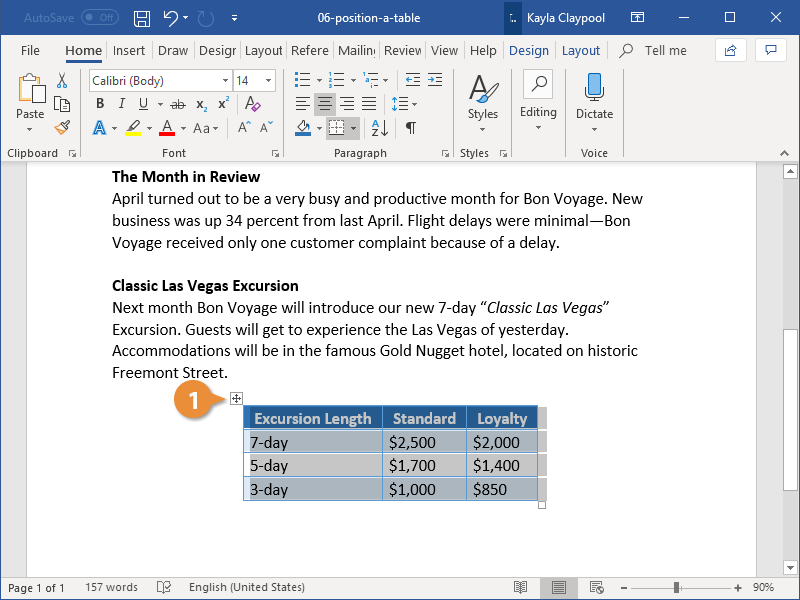
Align a Table
You can position a table the same way that you position regular text, using the alignment controls.
- Select the table by clicking the Move handle (
 ) that appears above the top left corner of the table.
 - Select an alignment option in the Paragraph group on the Home tab.

 ) that appears above the top left corner of the table.
It’s important that the whole table is selected. If only certain cells are selected, the text in those cells will be aligned instead of the table.
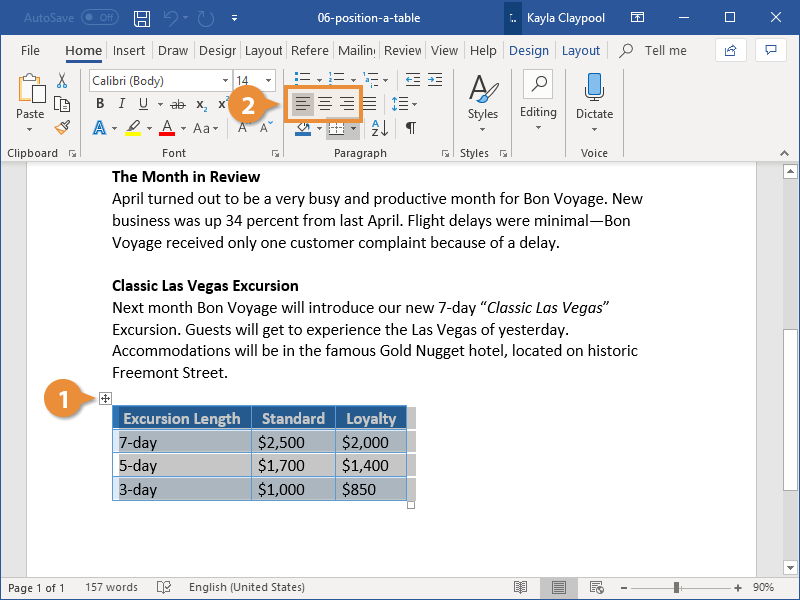
The table is aligned to the left, center, or right margin of the page, just like text would be.
Move a Table
If the basic alignment options don’t position the table where you want it to be, you can move the table around the page manually.
- Click the table’s Move handle () and drag it to where you want to move the table.
The table moves, and the text on the page moves around to make room.
Adjust Text Wrapping
Text wrapping controls how text in your document flows around a table.
- With the table selected, click the Layout tab in the Table Tools ribbon group.
- Click Properties.
- None will clear the areas to the left and the right of the table.
- Around will let the text wrap around the table on the left and right sides.
- Make your text wrapping selection.
- Click OK.
In the Text Wrapping section of the dialog box, you can choose from two text wrapping options.
The text wrapping is changed to the selected setting.
Resize a Table
You can also easily resize a table to fit within a certain space.
- Click and drag the Sizing box in the bottom-right corner of the table to make your table larger or smaller.
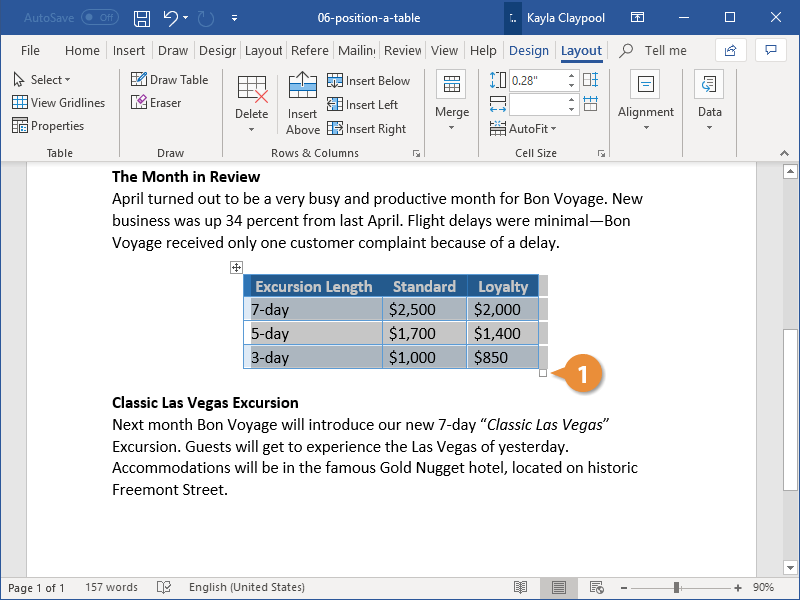
The table is resized, with the columns and rows resizing proportionally.
You can also specify a preferred table width, but not height, in the Table Properties dialog box.

FREE Quick Reference
Click to Download
Free to distribute with our compliments; we hope you will consider our paid training.
If you create a table in Word and type some contents in it, you’ll find the text is automatically aligned left just like in Excel. It’s the default setting. If you don’t like it and want to center the text in each cell of Word tables, there are methods you can try.
First, select all the content in the table.

Then switch to Home tab and click Center in Paragraph section. The text will be centered immediately as below. But it’s still at the upper place of each cell.

If you want to center the text in Word tables both horizontally and vertically, you should select all the text at first as well. Then right-click the selected text and choose Table Properties…

Switch to Cell tab and choose Center in Vertical alignment. Hit OK to implement it.

Now check the table again. You’ve centered the text completely.

Copyright Statement: Regarding all of the posts by this website, any copy or use shall get the written permission or authorization from Myofficetricks.
When inserting a table in a Word document, you can stick with the default alignment or change it in any number of ways.

Inserting a table in Microsoft Word is a simple task, but the default won’t always be exactly what you want. For instance, the default alignment is offset from the left margin. What if you want the table centered or even flush to the right margin? The good news is that realigning a table is easy. In this article, I’ll show you several ways to align a table the way you want.
I’m using Microsoft 365 on a Windows 10 64-bit system, but you can use earlier versions, and you can align tables in Word Online. You can work with your own file or download the demonstration .docx and .doc files.
SEE: Microsoft 365: A cheat sheet (free PDF) (TechRepublic)
The default table
When you insert a table or convert text into a table, Word positions it between the left and right margins (Figure A) – you can easily change this. And, there are several ways you can align a table across the horizontal plane between the left and right margins.
Figure A
The Microsoft Word table extends from the left to the right margin.
The first thing you might want to change is the width. There’s not enough text to fill the cells, and it looks odd. In addition, the readability is low. Your eyes try to take in the entire table at once instead of reading the content. Fortunately, changing the width is easy.
- Click the table to select it. Doing so will display two handles (Figure B): one in the top-left corner and one in the bottom-right corner.
- Hover the mouse over the one at the bottom-right corner and your mouse will turn into a double-arrow.
- Simply drag up and to the left to decrease the width of the table and the width of each cell. Figure C shows the results.
Figure B
Display the Word table’s handles.
Figure C
This Word table looks better, and the readability is improved a bit.
The resized table is a better fit, and you could easily stop here, if you don’t want it aligned differently.
SEE: Checklist: Securing Windows 10 systems (TechRepublic Premium)
Alignment options
When you have a table that doesn’t spread from the left to the right margin, you might want to align it. You can apply specific alignments or indent the table.
You have three alignments: left, center and right. The default table is aligned to the left margin. You can easily check that by selecting the entire table (not a cell) and viewing the alignment options in the Paragraph group on the Home tab. Figure C (above) shows the Align Left option selected. To align the table, select the table and click one of the other options: Center or Left Align. Using these three options you can quickly and easily align your table to the left, center, or right of the page.
You can also use the Table Properties option to align a table. To access these options, right-click anywhere in the table and choose Table Properties from the resulting submenu. On the Table tab, choose an option from the Alignment section, and click OK. As you can see in Figure D, there are lots of properties, but we’re concerned with only those in the Alignment section. You might want to return later and review all the other options.
Figure D
By default, the Word table is aligned to the left margin.
The final alignment option is Indent From Left. This allows you to easily indent the table from the left margin. It’s the option to use if you need to be precise in that placement. You can do the same thing by dragging the table and using the ruler to snap the table into position (Figure E). Or use the Increase Indent option in the Paragraph group to move the table a half-inch at a time.
Figure E
Drag the Word table to reposition between the left and right margins.
Aligning the content within each cell is just as easy using the Table Properties. On the Table tab, click the Options button to open the Table Options shown in Figure F. The Default Cell Margins section lets you change the size of all four margins. By default, the Automatically Resize To Fit Contents option is selected. To center or right align content in the cell, use the alignment options in the Paragraph group. However, you must select the text rather than the entire table; otherwise, clicking an option will align the table and not the content within the cells. Figure G shows the result of selecting the content (not the table) and clicking Right Align.
Figure F
Use these options to change cell margins.
Figure G
Use the alignment options to align content within the cell.
SEE: Windows 10: Lists of vocal commands for speech recognition and dictation (free PDF) (TechRepublic)
Word Online
Aligning is a bit different in Word Online, but still simple. With the table selected, right-click it and choose Paragraph Options. Use the Alignment dropdown in the General section. Using the Align options on the menu will align the text within the cells, not the table. So far, everything we’ve done has been clear cut, but you might have noticed that the text is positioned as a paragraph. The text doesn’t flow around the table.
Wrapping text
If you want text to wrap around the table, you need to change another default option. Go back to the Table Properties dialog. Below the alignment options, you’ll see the text wrapping options. The default is no wrapping. Simply click the Around option (Figure H) and click OK. As you can see, this option pulls up the text below and wraps it around the table. I clicked Backspace twice to pull the text up to align it with the top of the table. Pulling the text up this way may cause the paragraph to adopt some of the table’s properties. Simply click Normal to fix that.
Figure H
You can wrap text around the text.
Stay tuned
Aligning Word tables as a whole is a simple task, and there are a number of ways to get the alignment you want. If you repeat this task often, you might want to change the default alignment; in a future article, I’ll show you how to do so.
Denial of responsibility! GajetHub.com is an automated media aggregator focused on technology. All the stuff is freely available on the Internet. We just placed it on a single platform for educational purposes only. Each piece of material has a link to the main source. All trademarks are the property of their respective owners, and all materials are the property of their respective writers. If you are the owner of the content and do not want us to post it on our website, please contact us using our contact page . Within 24 hours, the material will be removed.