
Excel for Microsoft 365 Word for Microsoft 365 Outlook for Microsoft 365 PowerPoint for Microsoft 365 Excel 2021 Word 2021 Outlook 2021 PowerPoint 2021 Excel 2019 Word 2019 Outlook 2019 PowerPoint 2019 Excel 2016 Word 2016 Outlook 2016 PowerPoint 2016 Excel 2013 Word 2013 Outlook 2013 PowerPoint 2013 Excel 2010 Word 2010 Outlook 2010 PowerPoint 2010 Excel 2007 Word 2007 Outlook 2007 PowerPoint 2007 More…Less
You can easily insert a check mark (also known as a «tick mark») in Word, Outlook, Excel, or PowerPoint.
These marks are static symbols. If you’re looking for an interactive check box that you can click to check or uncheck, see: Add a check box or option button (Excel) or Make a checklist in Word.
-
In your file, place the cursor where you want to insert the symbol.
-
Open the Symbol dialog box:
-
Word or Outlook: Insert, select
 Symbols then More Symbols
 -
Excel: Insert, select
Symbols -
PowerPoint: Insert, select
Symbols > Symbol
The Symbols button
is on the far right end of the Insert toolbar tab. -
-
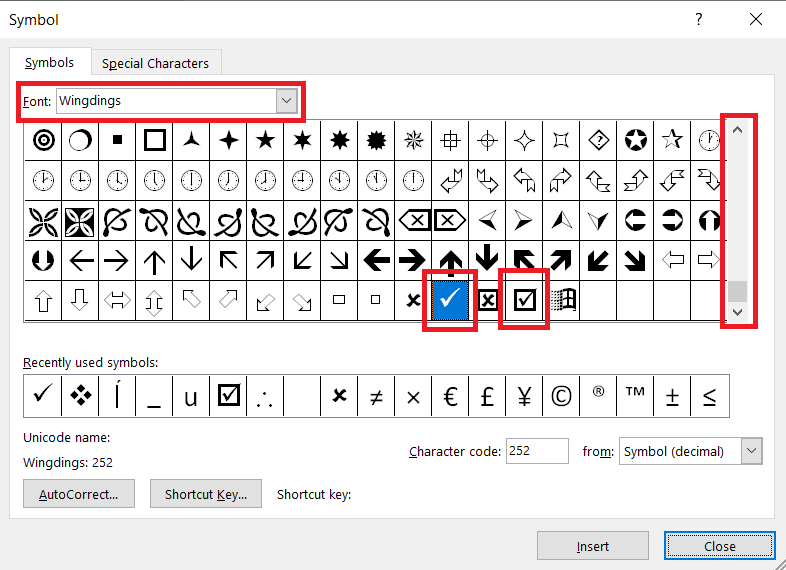
In the Font box, select Wingdings.
-
In the Character code box at the bottom, enter: 252
In the grid of symbols, the check mark
is selected. Another check-mark option is available two squares away from it (character code 254). -
Select the check mark you want. Click Insert. Then click Close to dismiss the dialog box.
-
Once the check mark has been inserted, you may change its size or color. Select the check mark, right-click it, and make your desired changes by using the floating toolbar:
 Symbols then
  is selected. Another check-mark option
  is available two squares away from it (character code 254).
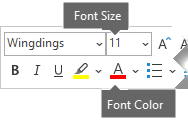
More check marks to choose from
Another font, Segoe UI Symbol, has three checkmark options. You can opt for this font in step 3 of the procedure above, and you can substitute one of the following character codes in step 4.
|
Symbol |
Character code |
|---|---|

|
2705 |

|
2713 |

|
2714 |
Need more help?
Want more options?
Explore subscription benefits, browse training courses, learn how to secure your device, and more.
Communities help you ask and answer questions, give feedback, and hear from experts with rich knowledge.
HTTA is reader supported. When you buy through links on our site, we may earn an affiliate commission at no extra cost to you. Learn more.
A check mark ✓ (or checkbox ☑) is a symbol used to indicate the concept of “yes” in the English language.


In this tutorial, you will learn how to type the checkmark symbol in Microsoft Word using the keyboard or mouse.
NOTE: Different application has different methods for typing the checkmark symbol. I will teach you how to type the checkmark symbol in Word in this post. Later, I’ll write on how it can be typed on other Office Applications in a separate blog post.
Without any further ado, let’s get started.
In Word, there are several ways available for you to type the checkmark symbol.
In this section, I’ll go through each one of these methods one after the other.
Let’s begin with the easiest options.
Type check mark symbol in Word using Alt Code
The alt code to type the checkbox symbol in Word is 10003. Use 10004 for a heavy checkmark.
To use this alt code type the check mark symbol in Word, obey the following instructions:
- Place the cursor where you want to type the checkmark.
- Press and hold the Alt key on your keyboard.
- While pressing down the Alt key, type the checkmark alt code which is 10003 or 10004 for a heavy checkmark. For this to work, you must use the numeric keypad on the right side of your keyboard.
- After typing the checkmark symbol alt code, release the Alt key.
As soon as you release the alt key, the symbol will be inserted at the cursor’s current location in your document.
This is how you may use the check mark symbol alt code in Microsoft Word.
Using Keyboard Shortcut to type Checkmark in Word
The Keyboard shortcut for check mark symbol in Microsoft Word is 2713, Alt+X.
Note: this checkmark symbol shortcut works only in Microsoft Word.
Below is a step by step guide on how to use this shortcut to type the check mark symbol into your Word document:
- First of all, place the insertion pointer at where you wish to type the checkmark.
- Next, type the checkmark alt code which is 2713.
- After typing the alt code, highlight it and press Alt+X on your keyboard.

As soon as you press the Alt+X shortcut, the checkmark alt code (2713) will convert into the check mark symbol.
This is how you may type the check-mark sign in Word using the alt code keyboard shortcut.
Using the Symbol’s dialog
Aside from typing the check mark symbol with the keyboard shortcut, there is also a mouse-based approach to get this symbol into your Word document.
Just obey the following instructions:
- Place the cursor where you want to insert the checkmark.
- Go to the Insert tab.

- In the Symbols group, select Symbol>More Symbols.

- The Symbol dialog box will appear. On this dialog box, click on the Font: drop-down and select Wingdings 2 from the list. More advanced symbols will appear. Locate the Checkmark symbol from these symbols and double-click on it to insert it into your document. Alternatively, just click to select it and then hit the Insert button.

NOTE: If you need to insert this symbol often in your document, you don’t have to go through all these steps each time you need it. Instead, copy it to your clipboard and hit Ctrl+V to paste it whenever the need arises.
This is how you may get the check mark symbol in Word using the insert symbol dialog box.
Adding Clickable and non-clickable check marks in Word
This approach is right for you if you have a list of options that users are supposed to choose from.
The clickable checkbox is interactive. It allows the user to place a check mark by clicking on the checkbox symbol.
On the other hand, the non-interactive check mark is just a visual check mark symbol that you cannot click to check or uncheck the symbol.
Interactive checkbox
Non-interactive checkbox
I will show you how to add clickable and non-clickable checkmarks to your list of options in Microsoft Word.
Without any further ado, let’s get started.
Ho to insert Non-Clickable checkmark in Word
Obey the following instructions to add this symbol to a list of options in Microsoft Word.
- Begin by typing all the options in a list. Begin each option on a new line.

- Highlight all the options you’ve just typed. Then click on the Home tab, in the Paragraph group, click on the bullet list drop-down.

- From the Bullet List drop-down menu, select the symbol you want to use as bullet. In this case we will select the check mark symbol. If this is your first time of using this symbol as bullet, you may not find it from this drop-down. If that’s like you, please jump to the next step.

- If you can’t find the check mark symbol on this drop-down, click on the Define New Bullet… button at the bottom.

- The Define New Bullet dialog box will appear. In the Bullet Character category, click on the Symbol… button to launch the Symbol dialog.

- From the Symbol dialog, click on the Font: drop-down and select Wingdings or Wingdings 2 from the list. More advanced symbols will appear. Locate the Checkmark symbol from this library of symbols, click to select it and then hit the Insert button.
- After specify the bullet symbol, click on the OK button on the Define New Bullet dialog.

The checkmark symbol you select will be used as bullets. You can use other symbols as well. For example, if you want to add a checkbox without the check mark symbol inside it, select the checkbox symbol from the symbol’s dialog box.

Someone may also want some of the checkboxes checked and others unchecked. If that’s like you, you should consider adding a clickable checkbox symbol instead. This way, you can manually click to check and uncheck the options.
In the next section, I’ll explain how to add clickable check boxes in Word.
Inserting Clickable Checkmark Symbols in Word
The clickable checkmark symbols allow users of your document to select and deselect the checkboxes as illustrated below:
Adding this type of checkmark symbol requires you to use the developer tab on the ribbon. This tab is not visible by default.
Thus, first of all, look and see whether there’s a tab named Developer on the ribbon.

If you seem not to find the Developer tab on the ribbon, you’ll therefore need to take steps to add it to the ribbon. Just obey the following instructions.
Adding the Developer tab
To add the developer tab in Word:
- Right-click anywhere on the Ribbon and select Customize Ribbon from the shortcut menu.

- The Word Options dialog box will appear with the Customize Ribbon category displayed. On the right side of this dialog box, click to select the Developer checkbox, then click on the OK button. If this is checked, the Developer tab will now become visible.

Now that you have the developer tab visible on your ribbon, follow the remaining steps below to add clickable checkboxes and checkmarks into your Word document:
- Click to place the cursor where you want to add the checkmark.

- Click on the Developer Tab.
- In the Controls category, click the Checkbox button.

The checkbox button will be added exactly where you placed your insertion pointer.

- Follow the same steps to add the checkbox to the rest of the items. Or, copy and paste the checkbox at the beginning of each line.

By default, clicking on this checkbox will mark an “X” symbol instead of the tick mark we want to see. The X sign is not what we want. We want to see a tick mark inside the tick box when clicked. You can change it to include any symbol you want (like this: ☑). Continue the steps below to learn how to change the checked symbol.
- Click to select the symbol.
- Go to the Developer tab, in the Controls category, click on Properties.

- In the Content Control Properties dialog, click on the Change button next to the Checked symbol option.

- The Symbol dialog box appears. Select Webdings 2 from the Font dropdown to display some of the Microsoft Word Advanced Symbols.
- Locate the tickbox symbol and click on it.

- Also, click the OK button for the Content Control Properties dialog.
Now you should have a tick on your checkbox whenever you click on it.
This how you may create a clickable check box or tick box into Microsoft Word documents.
Inserting Checkmark in Word Using the Wingdings font
This option is my least favorite approach to type certain symbols like the check mark symbol in Word. You need to know the symbol’s character code before hand, and you must also change the font before you can get the symbol. But if you can’t find the symbol you want to insert in the Symbol’s dialog, this approach is a helpful solution to consider even though it’s too much work.
Obey the following instructions if you want to type the check mark symbol in Word using the Wingdings front approach.
- Place your curser where you want to type the check mark symbol.
- Press Alt+0252 to type the plain check mark symbol or Alt+0254 to type the boxed checkmark symbol.
Holding down the alt key, use the numeric keypad and type the character code 0252 for the plain check mark symbol. Use 0254 for the boxed check mark symbol. You may have to press the Num Lock key to be able to use the numeric keypad.
After pressing the character code with the alt code pressed down, release the alt code. A new character ( ü ) will be inserted into your document.
- Don’t panic, that isn’t all the steps. Highlight this new character and apply the Windings font.

As soon as you apply the Wingdings font, you’ll get the check mark symbol into your document.

These are all the available ways to easily type the check mark symbol in Word.
If you have any question concerning this post, please drop it in the comments section below.
Related Post:
- How to type square root symbol on keyboard

First, you need to customize Word’s ribbon and enable the “Developer” tab to show the option to add check boxes. Then, select “Developer” and click the “Check Box Content Control” button to insert a check box into your document. You can also transform Word’s bullets into checkboxes.
When you create surveys or forms with Microsoft Word, check boxes make the options easier to read and answer. We’re covering two good options for doing just that. The first is ideal for documents that you want people to fill out digitally within the Word document itself. The second option is easier if you’re planning to print documents like to-do lists.
Option 1: Use Word’s Developer Tools to Add the Check Box Option for Forms
In order to create fillable forms that include checkboxes, you first need to enable the “Developer” tab on the Ribbon. With a Word document open, click the “File” drop-down menu and then choose the “Options” command. In the “Word Options” window, switch to the “Customize Ribbon” tab. On the right-hand “Customize the Ribbon” list, select “Main Tabs” on the dropdown menu.

On the list of available main tabs, select the “Developer” check box, and then click the “OK” button
Notice that the “Developer” tab is added to your Ribbon. Just position your cursor in the document where you want a check box, switch to the “Developer” tab, and then click the “Check Box Content Control” button.
You should see a check box appear wherever you placed your cursor. Here, we’ve gone ahead and placed a check box next to each answer and, as you can see, those check boxes are interactive. Click a box to mark it with an “X” (as we’ve done for answers 2, 3, and 4) or select the whole form box (as we’ve done for answer 4) to move the check box around, format it, and so on.
RELATED: How to Create a Fillable Form With Microsoft Word
Option 2: Change Bullets to Check Boxes for Printed Documents
If you’re creating a document to print out—like a to-do list or printed survey—and just want check boxes on it, you don’t have to mess around with adding Ribbon tabs and using forms. Instead, you can create a simple bullet list and then change the bullets from the default symbol to check boxes.
In your Word document, on the “Home” tab, click the small arrow to the right of the “Bullet List” button. On the dropdown menu, select the “Define new bullet” command.
In the “Define New Bullet” window, click the “Symbol” button.
In the “Symbol” window, click the “Font” dropdown and choose the “Wingdings 2” option.
You can scroll through the symbols to find the empty square symbol that looks like a check box, or you just type the number “163” into the “Character Code” box to automatically select it. Of course, if you see a symbol you like better—like the open circle (symbol 153)—feel free to choose that instead.
When you’ve selected your symbol, click the “OK” button to close the “Symbol” window, and then click the “OK” button to close the “Define New Bullet” window, too.
Back in your Word document, you can now type your bullet list. The check boxes appear instead of the regular bullet symbol.
And the next time you need the check box symbol, you don’t have to navigate through that whole set of windows. Just click that small arrow to the right of the “Bullet List” button again, and you’ll see the checkbox listed under the “Recently Used Bullets” section.
Again, this method is really only useful for documents you want to print out. The check box symbols are not interactive, so you can’t check them off inside a Word document.
If you’re also creating spreadsheets and presentations, you may want to learn how to insert checkboxes in Excel and add checkboxes to PowerPoint too.
RELATED: How to Add a Check Mark or Tick Mark in Word
READ NEXT
- › How to Add a Check Mark or Tick Mark in Word
- › How to Create a Basic Survey in Microsoft Word
- › How to Create a Fillable Form With Microsoft Word
- › How to Count Checkboxes in Microsoft Excel
- › How to Add a Drop-Down List to a Word Document
- › The Best Steam Deck Docks of 2023
- › Microsoft Outlook Is Adding a Splash of Personalization
- › How to Install Unsupported Versions of macOS on Your Mac
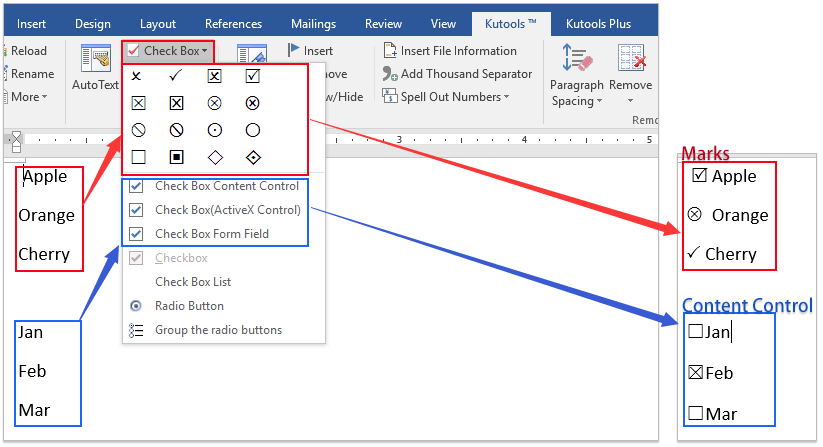
There are two kinds of checkbox in Microsoft Word, checkbox symbol and interactive checkbox. Checkbox symbol usually be applied to printable document and interactive checkbox can be checked electronically within Word document. This tutorial will show you how to insert checkbox symbol into Word document.
- Insert checkbox symbol with Symbol feature
- Insert multiple checkbox symbols in bulk with Bullets feature
- One click to insert checkbox symbol into Word document with Kutools for Word
Insert checkbox symbol in Word
Please process following steps to insert checkbox symbol in Word.
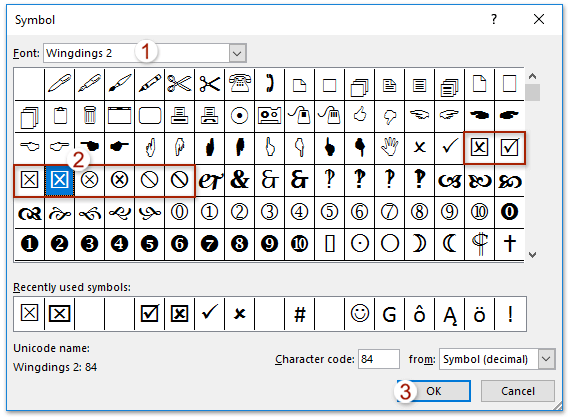
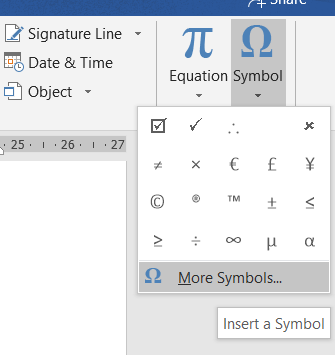
1. Put the cursor at the place you will insert the checkbox symbol, and click Insert > Symbol > More Symbols. See screenshot:

2. In the opening Symbol dialog box, please (1) choose Wingdings 2 from Font draw down list; (2) select one of specified checkbox symbols you will add; (3) click the Insert button. See screenshot:

Now the specified checkbox symbol is inserted at the cursor place.
3. For inserting the specified checkbox symbol at another place, please put the cursor at the place you will insert the symbol, and click the Insert button in the Symbol dialog box.
4. Close the Symbol dialog box.
One click to insert checkbox symbol or checkbox (content control) in Word
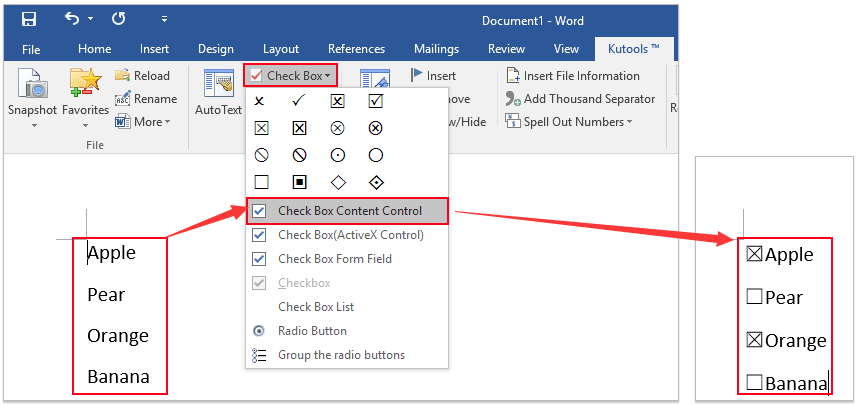
In general, you can insert a checkbox symbol with finding it from symbol library, or insert a checkable checkbox control with enabling Developer tab and adding such a content control. Both seem not easy! Do not worry! Kutools for Word provides a Check Box feature, not only supports a various kinds of checkbox symbols, but also can help you insert checkable checkbox control with only one click easily!
Insert multiple checkbox symbols in bulk with Bullets feature
This method will guide you to define the specified checkbox symbol as your custom bullets, and then you can easily insert multiple checkbox symbols in bulk by applying the custom bullets. Please do as follows:
1. Select the content you will add the checkbox symbols for, and click Home > Bullets > Define New Bullet. See screenshot:

2. In the opening Define New Bullet dialog box, please click the Symbol button. See screenshot:

3. Now the Symbol dialog box comes out. Please (1) select Windings 2 from the Font drop down list; (2) select one of checkbox symbols from below table; and (3) click the OK button. See screenshot:
4. Click the OK button in the Define New Bullet dialog box.
And now the specified checkbox symbol is added at the font of each row in bulk at once.
Note: If you need to batch add the specified checkbox symbols in future, you can select the rows, and then click the specified checkbox symbol from the Bullets drop down list directly. See screenshot:

One click to insert checkbox symbol into Word document with Kutools for Word
If you have Kutools for Word installed, you can apply its Check Box feature to easily insert checkbox symbols with only one click in Word.
Kutools for Word is a handy add-in to ease your work and enhance your ability of processing word document. Free Trial for 60 days! Get It Now!
Put the cursor at the place you will insert a checkbox symbol, and click Kutools > Check Box, and then specify one of checkbox symbols from the drop down list. See screenshot:
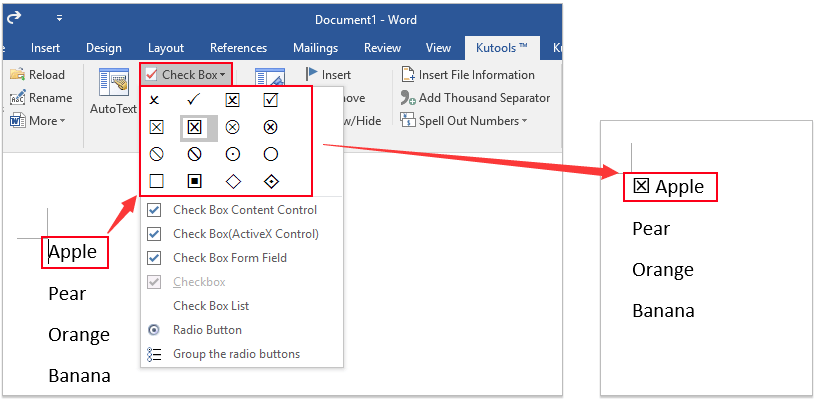
For inserting checkbox symbols at many places, please repeat above processing as you need.
Note: Besides inserting a various kinds of checkbox symbols, Kutools for Word’s Check box feature also supports to insert checkbox content controls, checkbox (active X control), and a checkbox list with only one click in Word.
Tabbed browsing & editing multiple Word documents as Firefox, Chrome, Internet Explore 10!
You may be familiar to view multiple webpages in Firefox/Chrome/IE, and switch between them by clicking corresponding tabs easily. Here, Office Tab supports similar processing, which allow you to browse multiple Word documents in one Word window, and easily switch between them by clicking their tabs. Click for full features free trial!
Recommended Word Productivity Tools


Kutools For Word — More Than 100 Advanced Features For Word, Save Your 50% Time
- Complicated and repeated operations can be done one-time processing in seconds.
- Insert multiple images across folders into Word document at once.
- Merge and combine multiple Word files across folders into one with your desired order.
- Split the current document into separate documents according to heading, section break or other criteria.
- Convert files between Doc and Docx, Docx and PDF, collection of tools for common conversions and selection, and so on…
Comments (15)
No ratings yet. Be the first to rate!
Tick symbol (🗸) also known as a check mark is a symbol for “Yes”. Sometimes tick in a box (☑) is preferred over tick symbol to denote yes or completion. In this blog we have covered, four different ways to insert tick and tick in box symbol in Microsoft Word.
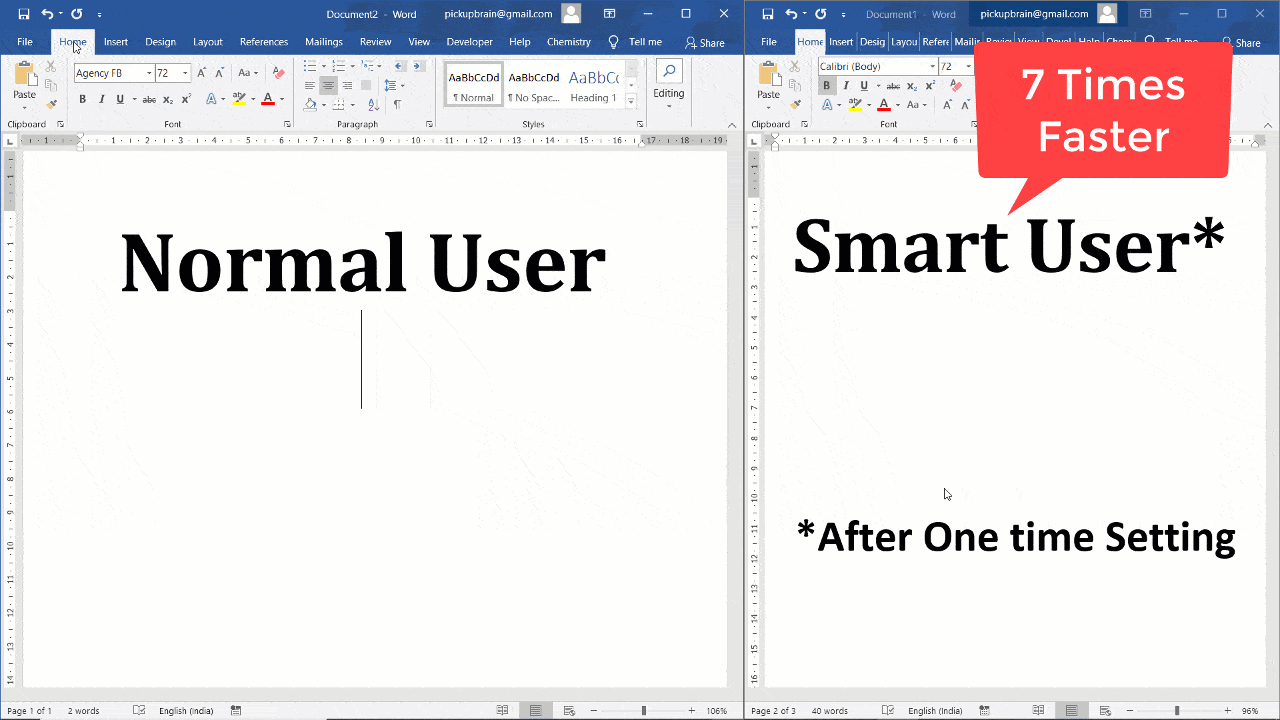
Place your cursor where you want to insert the symbol and use any of the following 4 methods. Method 4 is easiest and up to 7 times faster.
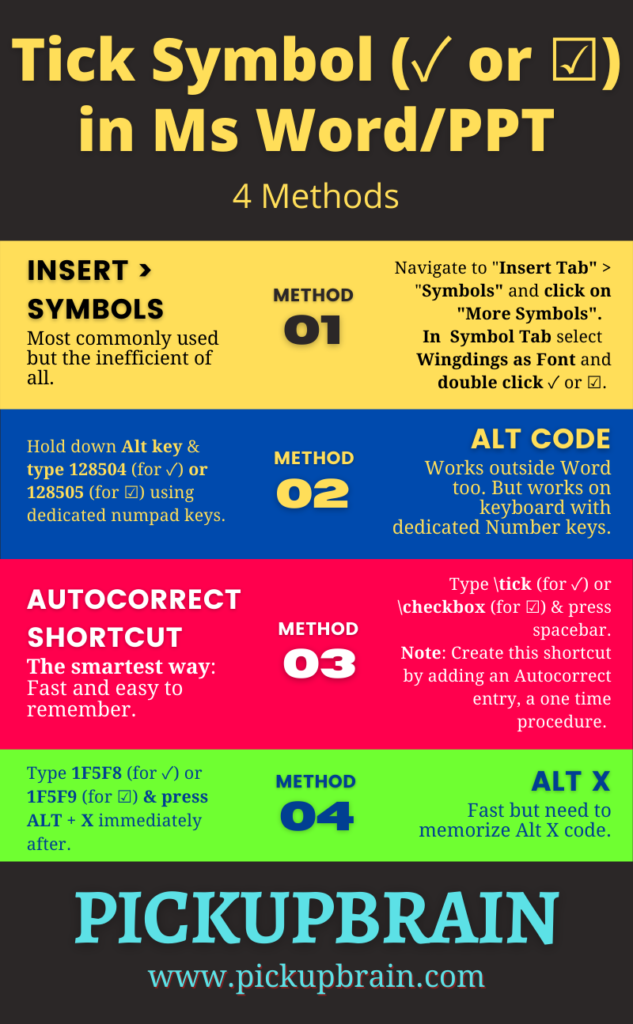
Method 1 – Insert > Symbols
- Navigating Insert Tab > Symbols and select More Symbols
2. Select Symbol Tab > Wingdings Font, and double click on desired symbol i.e. 🗸 or ☑.
3. Select Close
Method 2 – Alt Code (Requires dedicated Number pad keys)
Ms Word Alt code for Tick (or Check) Mark and Tick in Box are:
| Tick Symbol or Check Mark (🗸) | Tick in Box (☑) |
|---|---|
| 128504 | 128505 |
To insert symbol, type corresponding Alt Code using Number pad (not using numerics key using above letters) while holding down Alt key.
Method 3 – Autocorrect (Fastest method for Tick Symbol Word)
- Create Autocorrect entry
- Locate Tick Symbol or Tick in Box symbol (as shown in Method 1) by navigating to Insert > Symbols > More Symbols and select symbol.
- Click Autocorrect Button to open new AutoCorrect Dialogue box.
- Type desired shortcut text (say tick or checkbox) in Replace.
- Click Add.
- Close Autocorrect and Symbol Window.
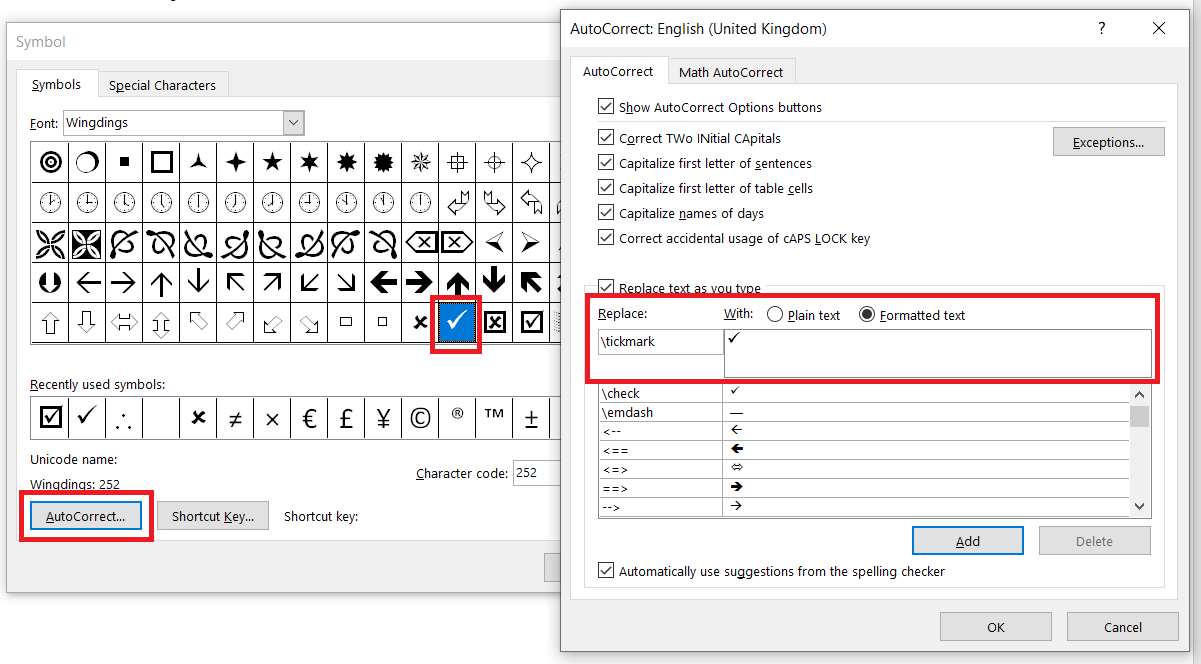
2. Type autocorrect text created in above step and press space (for e.g. tick) to convert into corresponding symbol.
Method 4 – Alt X
Alt X code for Tick (or Check) Mark & Tick in Box are
| Tick Symbol or Check Mark (🗸) | Tick in Box (☑) |
|---|---|
| 1F5F8 | 1F5F9 |
To insert thick (or check) mark, type 1F5F8 and press Alt + X immediately following it. Similarly, for inserting tick in box, type 1F5F8 and press Alt + X.
Summary
There are four different methods to insert tick symbol in Ms Word. Of all, Alt X and Alt Code method requires remembering 4-5 digit code. While, the Insert Symbol and Autocorrect method are straightforward and relatively easy to remember. Of all these, the smartest way to insert tick symbol or tick in box is Autocorrect method as it is fastest and easy to remember.