Track changes in Word
Note: If a document has been shared with you for review, you may not be able to turn off Track Changes. If you want to edit the document without tracking changes, you’ll need to either save a copy or ask the person who sent it to you to share it again with review mode turned off.
Turn Track Changes on and off
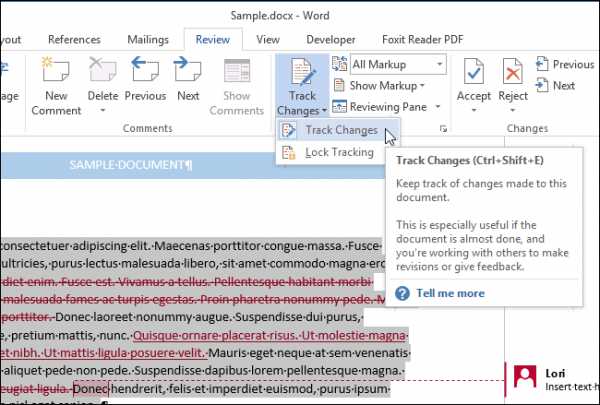
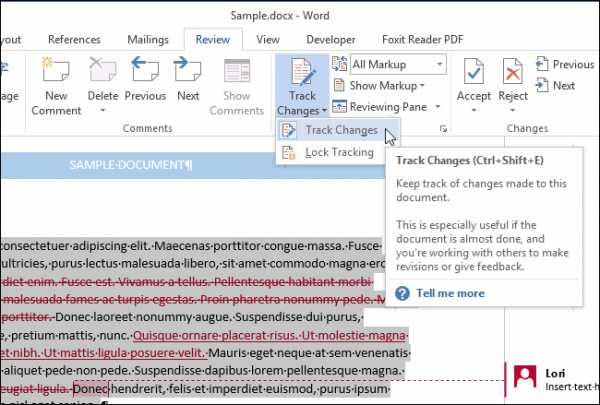
On the Review tab, select Track Changes.
-
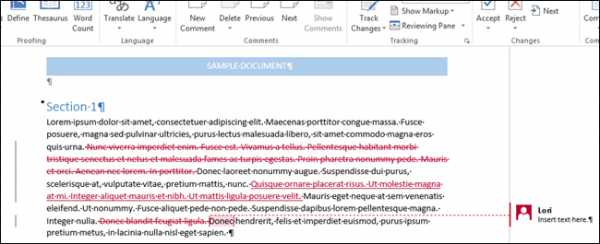
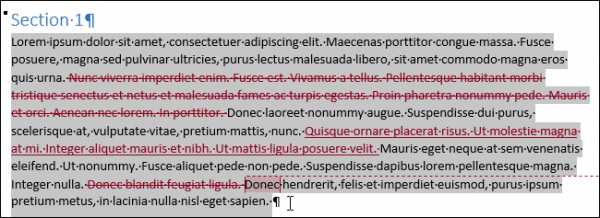
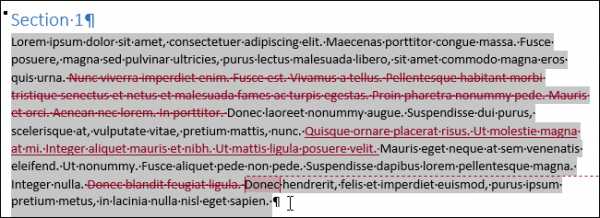
When Track Changes is on, the section is highlighted. Deletions are marked with a strikethrough, and additions are marked with an underline. Different authors’ changes are indicated with different colors.
-
When Track Changes is off, the section is not highlighted. Word stops marking changes, but the colored underlines and strikethroughs are still in the document.
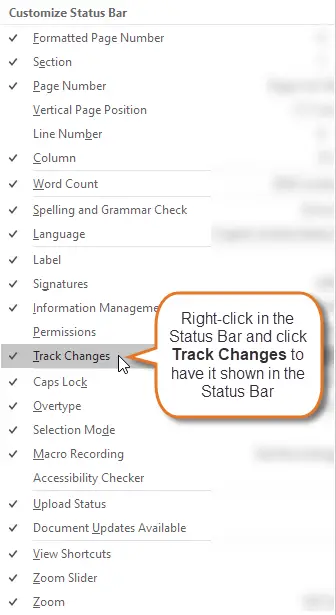
Tip: You also can add a Track Changes indicator to the status bar. Right-click the status bar and select Track Changes.
View tracked changes
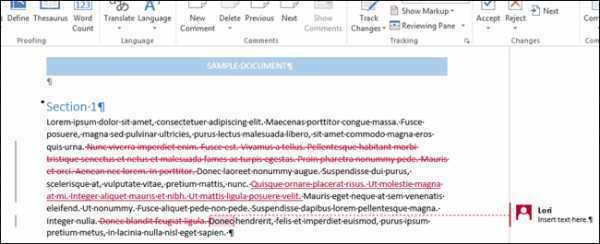
Note: When a document is in Editing or Reviewing mode, you can select a tracked change to view a collaborator’s full, suggested change in a card that displays. Hover over the Accept or Reject button to see a preview of what that action would do to your final document.
Choose whose changes to track
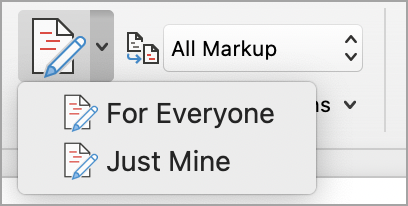
You can choose to track only your own changes or everyone’s changes.
-
To track only your own changes — On the Review tab, select Track Changes > Just Mine.
-
To track everyone’s changes — On the Review tab, select Track Changes > For Everyone.
Tip: to use a password to keep others from turning off Track Changes — On the Review tab, select Track Changes > Lock Tracking.
Choose how you would like to see the changes in the document
You can choose the type of markup you want to see.
-
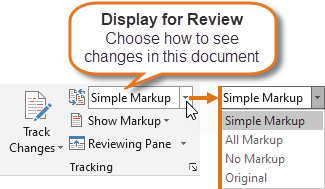
On the Review tab, select Tracking.
-
Select All Markup for the drop-down list to display.
-
Select one of the following options.
-
Simple Markup displays tracked changes with a red line in the margin.
-
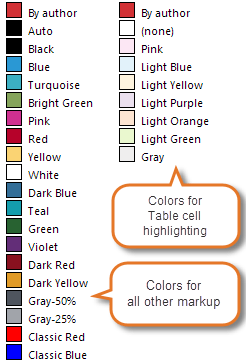
All Markup displays tracked changes with different colors of text and lines for each reviewer
-
No Markup hides the markup to show the document with changes incorporated
-
Original displays the original document without tracked changes and comments showing. However, any tracked changes or comments in the document that have not been accepted, rejected, or deleted remain in the document.
Choose the way track changes display
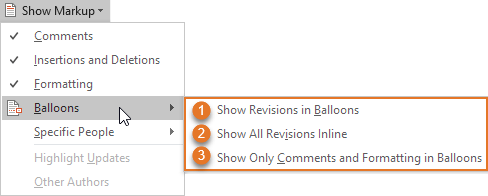
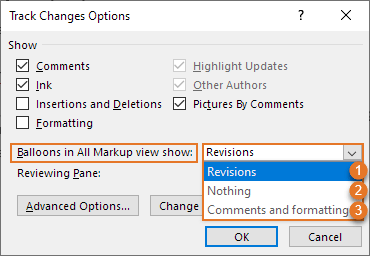
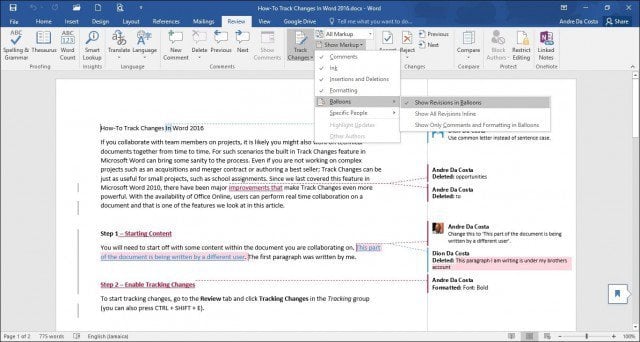
You can choose the types of revisions that display and the way they display. If you choose to show revisions as balloons, they display in the margins of the document. If you choose to display them directly within the document in line. In line revisions display all deletions with strikethroughs instead of inside balloons.
-
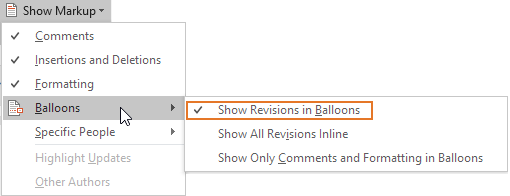
On the Review tab, select Track > Show Markup.
-
Select Balloons and then select the type of display you want.
-
Show Revisions in Balloons
-
Show All Revisions Inline
-
Show Only Formatting in Balloons
Note: If you want to see tracked changes in balloons, you must be in Print Layout view or Web Layout view.
Display changes by type of edit
-
On the Review tab, select Track Changes > Show Markup.
-
Select the type of edit.
-
Insertions and Deletions
-
Formatting
The check mark next to the item indicates that it’s selected.
Note: Even if you hide a type of markup by clearing it on the Show Markup menu, the markup automatically displays each time the document is opened by you or a reviewer.
Display changes by reviewer(s)
-
In Review > Tracking, select Show Markup.
-
Select Specific People.
-
Select to clear all check boxes except the ones next to the names of the reviewers whose changes you want to show.
Note: To select or clear all check boxes for all reviewers in the list, select All Reviewers.
Navigate tracked changes in Changes menu section
You can navigate from one tracked change to another.
-
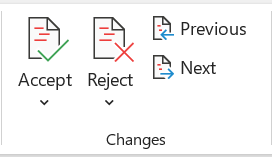
In Review > Changes, select Next to view the next tracked change.
-
In Review > Changes, select Previous to view the previous tracked change.
Accept or Reject tracked changes
There are multiple ways to address tracked changes. The most proficient method is to identify the commentor and respond to the tracked change is through the card display when you click the marked change. The card displays the commentor name and the option to accept or reject the suggestion.

Accept or reject tracked changes in sequence using the main menu
You can resolve teach tracked change from the beginning of the document to the end of the document in sequence.
-
Select Review > Changes > Next.
-
Select Accept or Reject. The next sequential tracked change is highlighted for your review and action.
Note: You can also accept or reject individual tracked changes using the main menus’ drop-down menus. This method is often used as a methodical approach to reviewing tracked changes.
Accept changes using the main menu
-
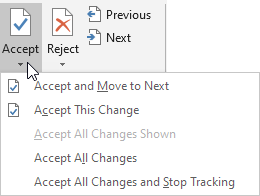
In Review > Changes, select Accept.
-
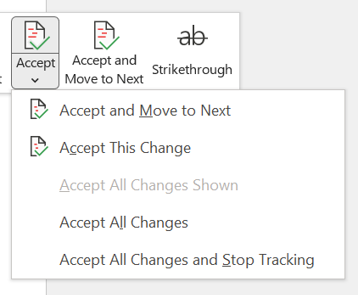
Select one of the options.
-
Accept and Move to Next
-
Accept This Change
-
Accept All Changes
-
Accept All Changes and Stop Tracking
Reject changes using the main menu
-
In Review > Changes, select > Reject.
-
Select one of the options.
-
Reject and Move to Next
-
Reject This Change
-
Reject All Changes
-
Reject All Changes and Stop Tracking
Accept or reject changes within a document with a right click
Working within a document, you can right-click on a tracked change to accept or reject the change. Using the right-click method displays a banner menu option and a drop-down menu option.
Accept changes in-line with the right-click banner option
-
Right-click a tracked change in the document to review a single suggestion.
-
On the banner, select one of the following.
-
Accept > Accept and Move to Next
-
Accept > Accept This Change
-
Accept > Accept All Changes
-
Accept > Accept All Changes and Stop Tracking
-
Accept and Move to Next
Accept changes in-line with the right-click drop-down menu option
-
Right-click a tracked change in the document to review a single suggestion.
-
In the drop-down menu, select one of the following.
-
Accept Insertion (or Accept Deletion)
-
Reject Insertion (or Reject Deletion)

Accept or reject all tracked changes at once on the main menu
Accept all tracked changes
-
In Review > Changes, select Accept.
-
Select one of the options.
-
Accept All Changes Shown
-
Accept All Changes
-
Accept All Changes and Stop Tracking
Reject all tracked changes
-
In Review > Changes, select Reject.
-
Select one of the options.
-
Reject All Changes Shown
-
Reject All Changes
-
Reject All Changes and Stop Tracking
Note: When Review>Tracking>Show Markup>Specific People>All Reviewers is selected, the Accept All Changes Shown and Reject All Changes Shown options do not display.
Hide tracked changes and comments when printing
Hiding changes doesn’t remove them from the document. You must use the Accept and Reject commands in the Changes group to remove markup from your document.
-
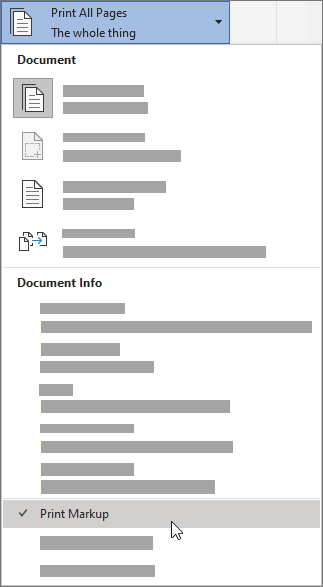
Go to File > Print > Settings > Print All Pages.
-
Under Document Info, select Print Markup to clear the check mark.
View all your changes in a summary list on the Reviewing Pane
-
In Review > Tracking, select Reviewing Pane.
-
Choose if you want to see the Reviewing Pane next to or below your document.
-
Select Reviewing Pane Vertical to see a list of all changes next to your document.
-
Select Reviewing Pane Horizontal to see a list of all changes below your document.
You can use the Reviewing Pane as a handy tool for to check that all tracked changes have been removed from your document so that they show up to others who might view your document. The summary section at the top of the Reviewing Pane displays the exact number of visible tracked changes and comments that remain in your document.
The Reviewing Pane also allows you to review long comments that don’t fit within a comment bubble.
Note: The Reviewing Pane, unlike the document or the comment balloons, is not the best tool for making changes to your document. Instead of deleting text or comments or making other changes in the Reviewing Pane, make all editorial changes in the document. The changes will then be visible in the Reviewing Pane.
Important: Comments are no longer part of the Track Changes function.
Turn on Track Changes
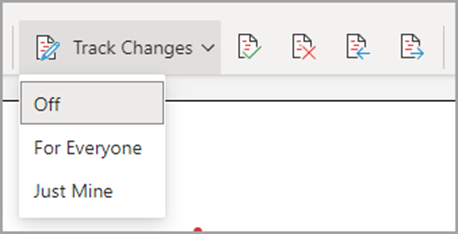
You can set Word for the Web to track changes for all users who are collaborating on the document or to track only your changes.
-
On the Review tab, select Track Changes.
-
In the Track Changes drop-down list, select one of the following:
-
To track only the changes that you make to the document, select Just Mine.
-
To track changes to the document made by all users, select For Everyone.
-
Turn off Track Changes
-
On the Review tab, select Track Changes.
-
In the Track Changes drop-down list, select Off.
Select the Markup view
-
On the Review tab, select Markup view.
-
Select one of the markup options.
-
Markup in margin (Simple Markup) — See suggestions in the margin
-
Markup on page (All Markup) — See suggestions on the page
Review, accept, or reject changes
Accept or reject tracked changes in sequence
You can review each tracked change in sequence and decide whether to accept or reject the change.
-
Click or tap at the beginning of the document.
-
On the Review tab, select Track Changes.
-
Select Accept or Reject. As you accept or reject changes, Word will move to the next change.
Tip: To move through changes in the document without accepting or rejecting them, select Next or Previous.
-
Repeat until you’ve reviewed all of the changes in your document.
Accept or reject a single change
Rather than move through changes in sequence, you can accept or reject a single change. When you accept or reject the change, Word will not move to the next change in the document.
-
Click the change.
-
Select the option to accept or reject it.
When tracked changes are turned on, Word marks any changes made by any authors of the document. This is useful when you’re collaborating with other authors because you can see which authors made a particular change.
Turn Track Changes on
-
On the Review tab, select Track Changes.
-
Select to track only your own changes or everyone’s change.
-
To track only your own changes — On the Review tab, select Track Changes > Just Mine.
-
To track everyone’s changes — On the Review tab, select Track Changes > For Everyone.
Note: To turn Track Changes off, select Track Changes again.
Accept or reject all tracked changes at once on the main menu
Accept all tracked changes
-
Select Reviewing > Accept.
-
Select one of the options.
-
Accept All Changes Shown
-
Accept All Changes
-
Accept All Changes and Stop Tracking
Reject all tracked changes
-
Select Reviewing > Reject.
-
Select one of the options.
-
Reject All Changes Shown
-
Reject All Changes
-
Reject All Changes and Stop Tracking
Word shows changes in the document by displaying a line in the margin. If you switch to All Markup view, you’ll see changes inline and in balloons.

Anytime someone adds a comment, it’ll show up in a balloon.

Review changes inline
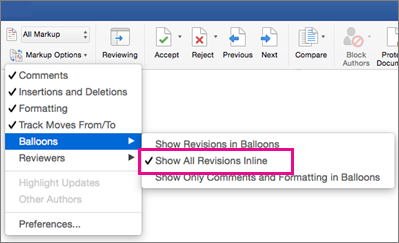
To see changes inline instead of in balloons, do the following:
-
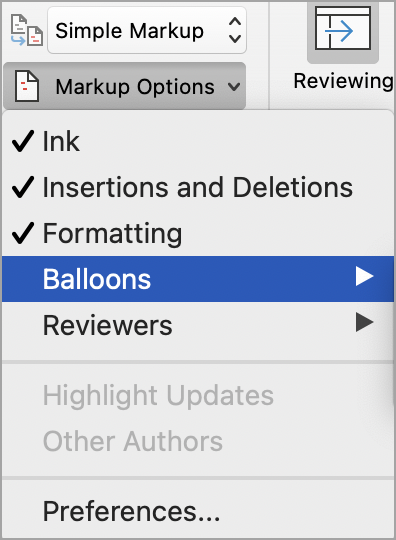
On the Review Tab, select Markup Options
-
Point to Balloons and select Show All Revisions Inline.
Keep Track Changes on
To prevent others from turning off Track Changes, lock Track Changes on with a password.
Important: Be sure to remember the password so you can turn Track Changes off when you’re ready to accept or reject the changes.
Lock Track Changes with a password
-
On the Review tab, select Protect > Protect Document.
-
In the Password box, enter a password.
-
Re-enter your password and select OK.
While tracked changes are locked, you can’t turn off change tracking, and you can’t accept or reject changes.
Unlock Track Changes
-
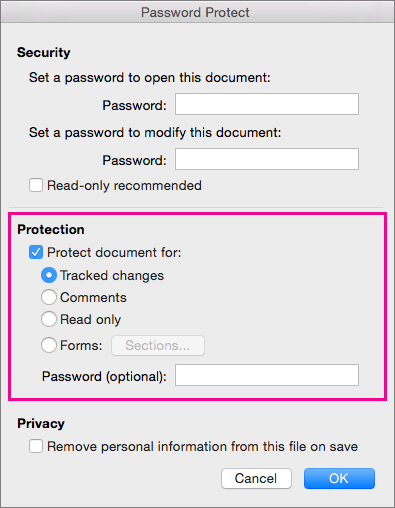
On the Review tab, select Protect > Protect Document.
-
Under Protection, uncheck Protect document for.
-
Enter your password and select OK.
For more info, see
remove the tracked changes and comments.
Turn Track Changes on or off (Word for iPad)
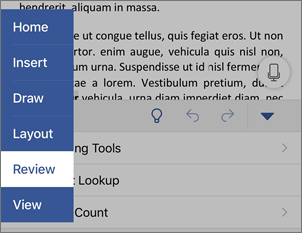
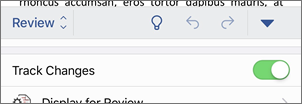
-
Tap the Review tab.
-
Tap the control next to Track Changes to turn Track Changes on or off.
Show or hide markup (Word for iPad)
-
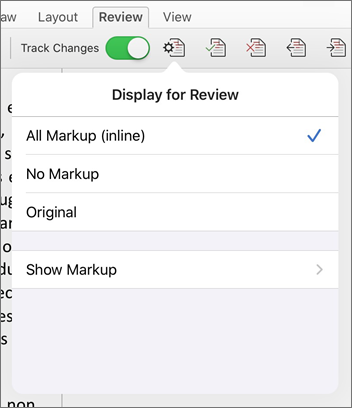
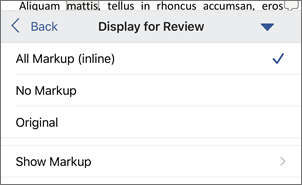
On the Review tab, tap the Display for Review icon.
-
In the Display for Review list, tap the option you want:
-
All Markup (inline) shows the final document with tracked changes visible inline
-
No markup shows the final document without tracked changed
-
Original shows the original document with no tracked changes
-
Show tracked changes by type (Word for iPad)
-
On the Review tab, tap the Display for Review icon.
-
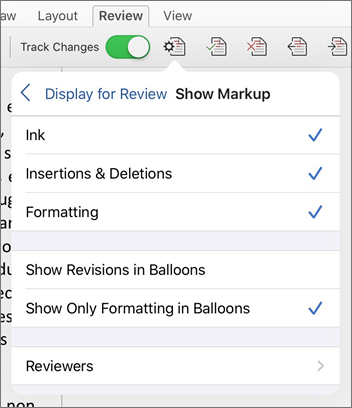
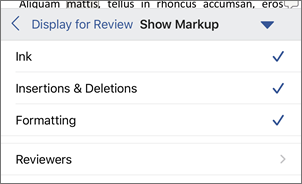
In the Display for Review list, tap Show Markup.
-
In the Show Markup list, tap the option you want:
-
Ink shows or hides any marks made by digital inking in the document.
-
Insertions & Deletions shows or hides inserted or deleted text.
-
Formatting shows or hides formatting changes.
-
Show Revisions in Balloons shows changes in balloons in the right margin.
-
Show Only Formatting in Balloons shows only formatting changes in balloons and keeps the other changes as inline tracking.
-
Show tracked changes by reviewer (Word for iPad)
If there are multiple reviewers for the document, Word will show all changes by default. However, you can choose to show only changes made by specific viewers.
-
On the Review tab, tap the Display for Review icon.
-
In the Display for Review list, tap Show Markup.
-
In the Show Markup list, tap Reviewers.
-
In the Other Authors list, tap the names of the reviewers whose changes you want to see or tap All Reviewers.
Accept changes (Word for iPad)
-
Tap twice on a change in the document to select it.
-
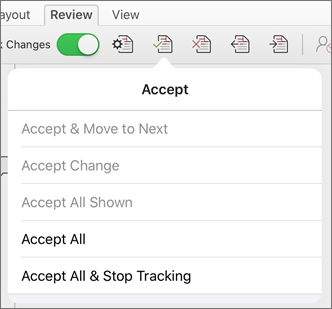
On the Review tab, tap the Accept icon.
-
Do one of the following:
-
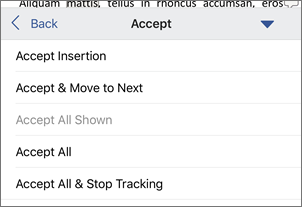
Tap Accept & Move to Next to accept the change and move to the next change in the document.
-
Tap Accept Deletion, Accept Insertion, or Accept Change to accept the selected change, identified contextually by type, and not move to the next change in the document.
-
Tap Accept All Shown to accept all changes that are visible, but not changes that are hidden. For example, if you’re viewing only changes made by a specific reviewer, tapping Accept All Shown accepts only the changes made by that reviewer.
-
Tap Accept All to accept all changes in the document.
-
Tap Accept All & Stop Tracking to accept all changes in the document and turn off Track Changes.
-
-
To move to another change without accepting or rejecting it, tap the Previous or Next icon.
Reject changes (Word for iPad)
-
Tap twice on a change in the document to select it.
-
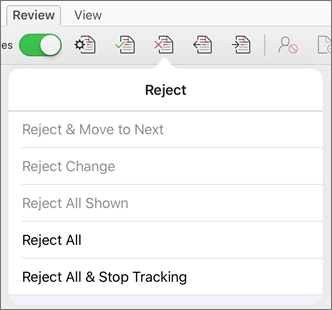
On the Review tab, tap the Reject icon.
-
Do one of the following:
-
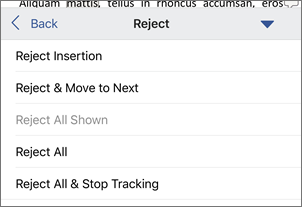
Tap Reject & Move to Next to reject the change and move to the next change in the document.
-
Tap Reject Deletion, Reject Insertion, or Reject Change to reject the selected change, identified contextually by type, and not move to the next change in the document.
-
Tap Reject All Shown to reject all changes that are visible, but not changes that are hidden. For example, if you’re viewing only changes made by a specific reviewer, tapping Reject All Shown rejects only the changes made by that reviewer.
-
Tap Reject All to reject all changes in the document.
-
Tap Rejects All & Stop Tracking to reject all changes in the document and turn off Track Changes.
-
-
To move to another change without accepting or rejecting it, tap the Previous or Next icon.
Delete comments (Word for iPad)
-
Tap twice on a comment in the document to select it.
-
Tap the Review tab.
-
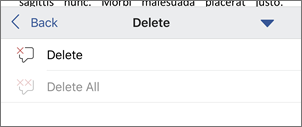
Tap the Delete icon to delete the comment or press and hold the Delete icon until the Delete list appears, and then do one of the following:
-
Tap Delete to delete only the selected comment.
-
Tap Delete All to delete all comments in the document.
-
-
To move to another comment without deleting it, tap the Previous or Next icon.
Turn Track Changes on or off (Word for iPhone)
-
Tap the pen icon at the top to open the ribbon.
-
Tap the Review tab.
-
Tap the control next to Track Changes to turn Track Changes on or off.
Show or hide markup (Word for iPhone)
-
On the Review tab, tap Display for Review.
-
Tap the option you want:
-
All Markup (inline) shows the final document with tracked changes visible inline
-
No markup shows the final document without tracked changed
-
Original shows the original document with no tracked changes
-
Show tracked changes by type (Word for iPhone)
-
On the Review tab, tap Display for Review.
-
Tap Show Markup.
-
In the Show Markup list, tap the option you want:
-
Ink shows or hides any marks made by digital inking in the document.
-
Insertions & Deletions shows or hides inserted or deleted text.
-
Formatting shows or hides formatting changes.
-
Show tracked changes by reviewer (Word for iPhone)
If there are multiple reviewers for the document, Word will show all changes by default. However, you can choose to show only changes made by specific viewers.
-
On the Review tab, tap Display for Review.
-
Tap Show Markup.
-
Tap Reviewers.
-
In the Other Authors list, tap the names of the reviewers whose changes you want to see or tap All Reviewers.
Accept changes (Word for iPhone)
-
Tap twice on a change in the document to select it.
-
On the Review tab, tap Accept.
-
Do one of the following:
-
Tap Accept & Move to Next to accept the change and move to the next change in the document.
-
Tap Accept Deletion, Accept Insertion, or Accept Change to accept the selected change, identified contextually by type, and not move to the next change in the document.
-
Tap Accept All Shown to accept all changes that are visible, but not changes that are hidden. For example, if you’re viewing only changes made by a specific reviewer, tapping Accept All Shown accepts only the changes made by that reviewer.
-
Tap Accept All to accept all changes in the document.
-
Tap Accept All & Stop Tracking to accept all changes in the document and turn off Track Changes.
-
Reject changes (Word for iPhone)
-
Tap twice on a change in the document to select it.
-
On the Review tab, tap Reject.
-
Do one of the following:
-
Tap Reject & Move to Next to reject the change and move to the next change in the document.
-
Tap Reject Deletion, Reject Insertion, or Reject Change to reject the selected change, identified contextually by type, and not move to the next change in the document.
-
Tap Reject All Shown to reject all changes that are visible, but not changes that are hidden. For example, if you’re viewing only changes made by a specific reviewer, tapping Reject All Shown rejects only the changes made by that reviewer.
-
Tap Reject All to reject all changes in the document.
-
Tap Reject All & Stop Tracking to reject all changes in the document and turn off Track Changes.
-
Delete comments (Word for iPhone)
-
Tap twice on a comment in the document to select it.
-
One the Review tab, tap Delete, and then do one of the following:
-
Tap Delete to delete only the selected comment.
-
Tap Delete All to delete all comments in the document.
-
-
To move to another comment without deleting it, tap the Previous or Next icon
Need more help?
Want more options?
Explore subscription benefits, browse training courses, learn how to secure your device, and more.
Communities help you ask and answer questions, give feedback, and hear from experts with rich knowledge.
Find solutions to common problems or get help from a support agent.
На основании Вашего запроса эти примеры могут содержать грубую лексику.
На основании Вашего запроса эти примеры могут содержать разговорную лексику.
резюме изменений
краткое изложение изменений
Краткий обзор изменений
сводная информация об изменениях
сводка изменений
Table 2 showed the components of the additional requirement, while table 3 contained a summary of changes under expenditure sections.
В таблице 2 отражены компоненты дополнительных потребностей, а в таблице 3 содержится резюме изменений по статьям расходов.
Status of the death penalty at the end of 2000: summary of changes since the beginning of 1994
Статус высшей меры наказания в конце 2000 года: резюме изменений с начала 1994 года
Annex 2: Updating and overhauling the FAO methodology for assessing food insecurity — a summary of changes and their impacts.
Приложение 2:Обновление и глубокая переработка методологии ФАО для оценки отсутствия продовольственной безопасности: краткое изложение изменений и их последствий
Summary of changes to offices/sections/units under realignment of support component
Краткое изложение изменений в организационной структуре служб, секций и групп в связи с реорганизацией компонента поддержки
WEB Please also view the summary of changes.
Summary of the latest ISIC, CPC versions (ISIC 3.1, CPC 1.1), summary of changes, impact and implications of changes, relationship to other classifications, such as HS, SITC, BOP, COICOP;
резюме последних версий МСОК, КОП (МСОК 3.1, КОП 1.1), резюме изменений, влияние и последствия изменений, связь с другими классификациями, например с СС, МСТК, РПБ, КИПЦ;
A. Summary of changes made in this chapter
component: Summary of changes.
The breakdown of tariff components and summary of changes are presented below.
Разбивка тарифа по компонентам и обзор изменений представлены ниже.
This report provides a summary of changes to specified inventory objects for a specified computer and time period.
В этом отчете дана сводка изменений в указанных объектах инвентаризации для указанного компьютера за определенный промежуток времени.
Below is a brief summary of changes from 2.0.
Ниже приведен краткий обзор изменений по сравнению с SMF 2.0.
The Committee recommends that the section be precise and specific and include a summary of changes compared with the previous budget.
Комитет рекомендует составлять этот раздел точным и конкретным по содержанию и представлять в нем сводную информацию об изменениях по сравнению с предыдущим бюджетом.
Appendix B provides a summary of changes since RFC 2222.
You will be presented with a summary of changes made to the disks and asked to confirm that the filesystems should be created as requested.
Вам покажут отчёт об изменениях, которые будут произведены на диске и попросят подтвердить, что все представленные файловые системы должны быть созданы.
Here is a summary of changes in employment by sector
Second, it presents a summary of changes that need to be implemented at both the data-collection level and the statistical estimation stage.
Во-вторых, в нем кратко излагаются изменения, которые необходимо осуществить как на уровне сбора данных, так и на этапе статистических оценок.
MailChimp, with a concise summary of changes of its privacy policy.
Full programme narratives can be found on the Internet (), and a summary of changes is provided in the present document.
Every consumer shall be informed about any changes with the information on the main page of the Website containing the summary of changes and the date of their becoming effective.
Обо всех изменениях каждый Пользователь будет проинформирован с помощью информации на главной странице Сайта, содержащей список изменений и дату их вступления в силу.
Результатов: 37. Точных совпадений: 37. Затраченное время: 105 мс
Documents
Корпоративные решения
Спряжение
Синонимы
Корректор
Справка и о нас
Индекс слова: 1-300, 301-600, 601-900
Индекс выражения: 1-400, 401-800, 801-1200
Индекс фразы: 1-400, 401-800, 801-1200
Как сделать track changes в word?
- Откройте документ, который нужно отредактировать.
Для этого дважды щелкните по документу Microsoft Word или откройте программу Microsoft Word, а затем выберите документ на странице «Последние документы».
- Прежде чем вносить изменения в документ, сделайте его копию и редактируйте ее, а не исходный документ (на случай, если что-то пойдет не так).
-
Перейдите на вкладку Рецензирование. Она находится на синей ленте в верхней части документа. Откроется панель инструментов, которые помогут отредактировать документ.
-
Нажмите Исправления. Эта опция находится посередине верхней панели инструментов. Так вы включите функцию «Исправления» в Microsoft Word.
-
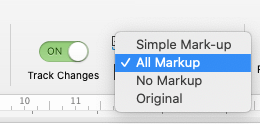
Откройте выпадающий список рядом с Исправления.
В списке находятся следующие опции:
- Исправления: добавленный или удаленный текст будет обозначен красными линиями на полях; другие изменения не отображаются.
- Все исправления: все изменения, внесенные в документ, будут обозначены красным шрифтом и комментариями на полях.
- Без исправлений: обозначения исправлений будут скрыты, а документ отобразится в финальном виде (после внесения всех изменений).
- Оригинал: отобразится исходный документ без изменений.
-
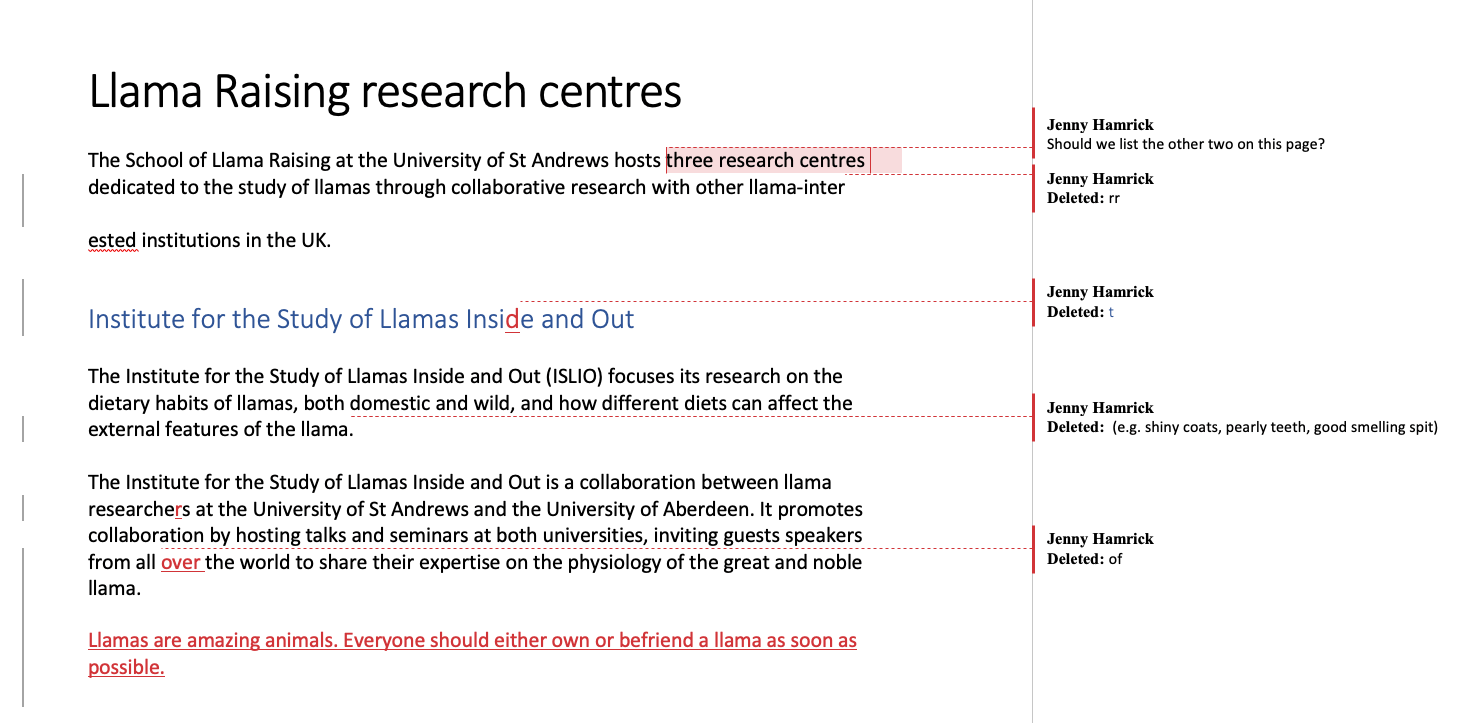
Нажмите Все изменения. Будут обозначены все изменения (красным шрифтом), которые были внесены в исходный текст (черный шрифт).
- Удалите текст.
Если удалить один символ или целый абзац, они исчезнут из документа. На полях справа появится красное поле с примечанием « Удалено: ».
- Если вы измените формат всего документа (например, поменяете шрифт), это также будет обозначено на полях справа.
- Введите новый текст.
Любой текст, который вы добавите в документ, будет отображаться красным шрифтом.
- Если вы перейдете на новую строку (для этого нажмите ↵ Enter или ⏎ Return), на полях слева появится серая вертикальная черта, обозначающая новую строку.
- Нажмите Создать примечание, чтобы добавить примечание к выделенному тексту.
Значок этой опции выглядит как текстовое облачко со знаком «плюс» и находится в верхней части окна. На полях справа откроется поле, в которое можно ввести примечание.
- Щелкните по любой точке документа вне поля для примечания, чтобы сохранить примечание.
- Примите или отклоните исправления.
Для этого нажмите «Принять» или «Отклонить», чтобы согласиться или не согласиться с обозначенными исправлениями; также можно нажать «▼» под опцией «Принять» или «Отклонить», а затем нажать «Все исправления», чтобы согласиться или не согласиться со всеми изменениями, внесенными в документ. При этом будут удалены все обозначения исправлений, такие как красный шрифт и поля с примечаниями.
- Также документ можно сохранить с обозначениями исправлений; в этом случае пропустите этот шаг.
-
Сохраните документ. Для этого зажмите Ctrl (или ⌘ Command в Mac OS X), а затем нажмите S. Документ будет сохранен с внесенными изменениями.
- В некоторых почтовых клиентах удаленный текст отображается черным шрифтом с перечеркивающей красной линией.
- Если перед редактированием документа вы не сделаете его копию, это может привести к потере содержимого исходного документа.
Информация о статье
Эту страницу просматривали 13 979 раза.
Была ли эта статья полезной?
Текстовый редактор Microsoft Word — это не только отличный инструмент для набора и форматирования текста, но и удобнейшее средство его дальнейшего исправления и правки. Об этой истинно «редакторской» функции знают немногие, поэтому мы решили раскрыть вам этот секрет.
Проще всего править текст на бумаге — возразят мне многие читатели. Действительно, взяв красную ручку всегда можно зачеркнуть несуразную фразу, а сверху написать что-то получше. Можно оставить злорадные комментарии, показав автору текста его неправоту. А самое главное: при такой правке исходный текст не меняется, и автору самому решать, принимать исправления или нет. Но такие исправления не отправишь по электронной почте, и существуют они в единственном виде.
Воспользовавшись инструментами рецензирования текстового редактора Word, вы сможете точно так же вставлять комментарии практически красной ручкой на полях и исправлять то, что написал автор, зачеркивая исходный текст. Но при этом документ со всеми исправлениями и пометками будет существовать в электронном виде, а значит, будет доступен для пересылки по электронной почте. А автор документа, изучив исправления, буквально одним нажатием кнопки может их принять, а не исправлять каждую пометку вручную, или же, наоборот, отклонить, оставшись при своем мнении.
Инструменты для вставки пометок и исправлений размещены на панели инструментов «Рецензирование». Отобразить ее можно, выбрав «Вид (View) -> Панели инструментов (Toolbars) -> Рецензирование (Reviewing)».
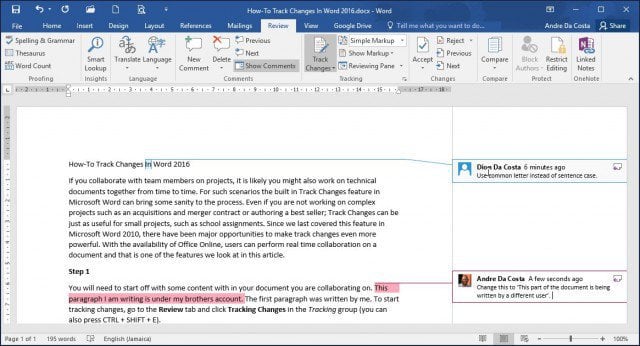
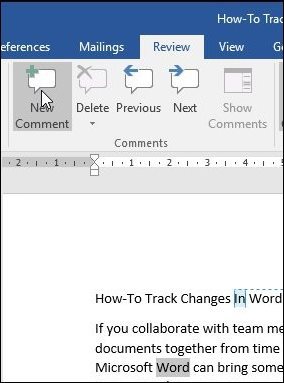
Если вдруг, читая текст, у вас возникло желание прокомментировать особо понравившийся или наоборот, неудачный момент, вы можете воспользоваться инструментом «Примечание». Для этого выделите нужный фрагмент текста и нажмите кнопку «Добавить примечание» (Insert Comment) на панели инструментов. В поле справа от основного текста появится окно для ввода примечания. После того, как вы набрали текст, нажмите мышкой в стороне от окна для ввода примечания.
Поле для ввода примечания отобразиться справа от текста документа.
После сохранения и повторного открытия текста, на экране фрагмент, у которого есть примечание, будет выделен другим цветом. А если навести на него мышку, можно увидеть текст примечания, его автора и время его добавления. Перемещаться между добавленными примечаниями удобно с помощью специальных кнопок, размещенных на панели инструментов «Рецензирование».
Просмотр текста примечания
Следующим инструментом, доступным для редактирования, является режим исправления.
При включении этого режима записываются все изменения, вносимые в документ. Причем, как изменения, касающиеся его содержимого (будет записано удаление и добавление текста), так и изменения формата документа (изменение шрифтов, параметров страниц и т. д.). Перейти в режим записи исправлений очень просто — достаточно дважды щелкнуть мышкой по кнопке с надписью «ИСПР», которая размещена в строке состояния текстового редактора. Второй способ: нажать на кнопку «Исправления» (Track Changes) на панели инструментов «Рецензирование».
В зависимости от настроек Word, исправления будут либо отображаться другим цветом, либо не отображаться вовсе, но обязательно рядом с каждым исправлением будет размещено примечание, в котором и будет указано, какие именно изменения были внесены в документ.
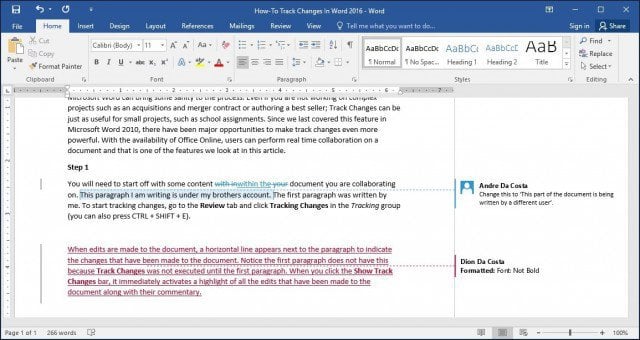
Все исправления и примечания наглядно отображаются на правом поле документа
Для просмотра всех исправлений следует отобразить на экране окно просмотра изменений. Для этого необходимо нажать кнопку «Окно просмотра» на панели инструментов «Рецензирование». В нижней части экрана отобразятся все внесенные в документ исправления и примечания. Используя это окно можно по очереди выделять в тексте документа добавленные примечания и исправления. Для этого надо дважды щелкнуть мышкой на линии, отделяющей одно примечание от другого.
Следующим шагом после просмотра внесенных изменений будет принятие решения относительно их сохранения. Для этого предназначены списки «Принять выделенное исправление» и «Отклонить выделенное исправление». Нажав соответствующую кнопку можно раскрыть список и выбрать нужный пункт, с помощью которого можно принять или отклонить это конкретное исправление. А выбрав пункт «Отклонить все изменения» или «Применить все изменения» можно принять решение относительно правки всего документа.
Инструмент «Исправления» в Word нужен для отслеживания изменений, сделанных в документе. Он особенно полезен при совместной работе над документом с другими пользователями. Иногда необходимо скопировать текст в другой документ, сохранив историю исправлений. Эта задача кажется простой, но на деле она сложнее, чем просто скопировать и вставить текст.
Сперва выделите текст с изменениями.
Первый секрет копирования исправлений вместе с текстом: нужно обязательно отключить опцию Track Changes (Исправления). Для этого откройте вкладку Review (Рецензирование). Если в разделе Tracking (Запись исправлений) кнопка Track Changes (Исправления) подсвечена синим, это значит, что опция включена. Нажмите нижнюю часть этой кнопки и выберите из выпадающего меню пункт Track Changes (Исправления). Теперь, когда опция отключена, у кнопки нет подсветки.
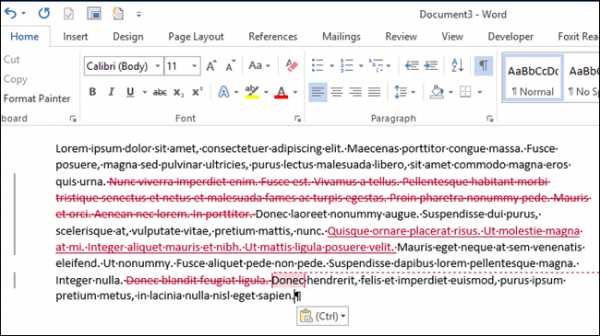
Примечание: Если не отключить функцию Track Changes (Исправления), Word решит, что Вы хотите скопировать текст в таком виде, как если бы все изменения были приняты, и исправления применятся.
Нажмите Ctrl+C, чтобы скопировать текст. Создайте новый документ, в него мы вставим скопированный текст.
Примечание: Текст можно вставить в любой существующий документ Word.
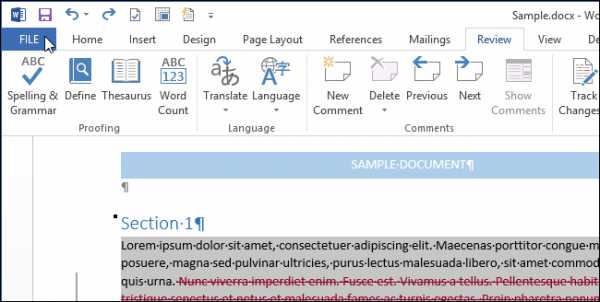
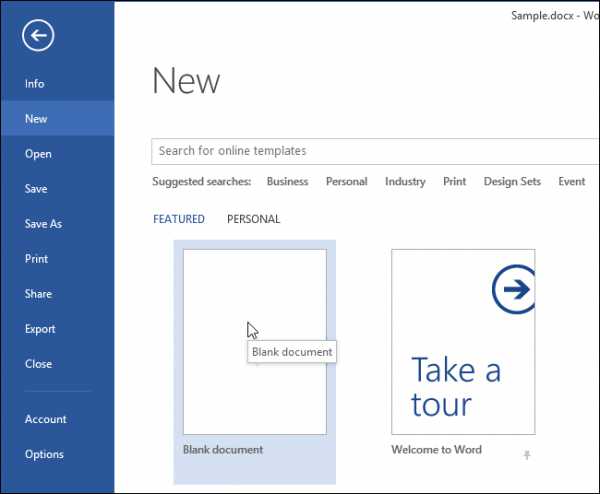
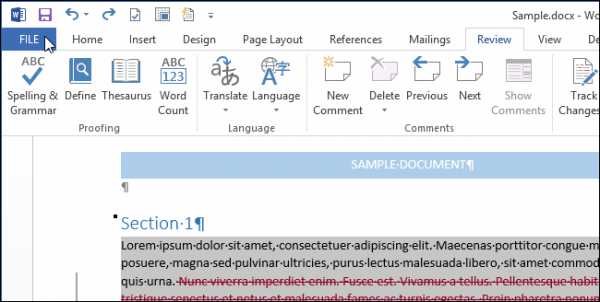
Откройте вкладку File (Файл).
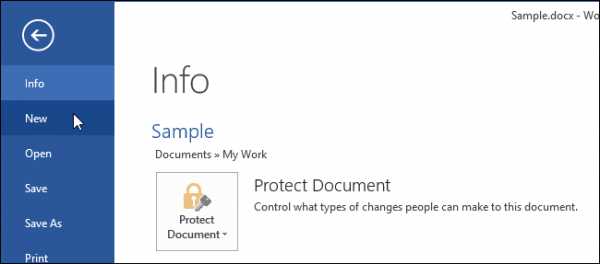
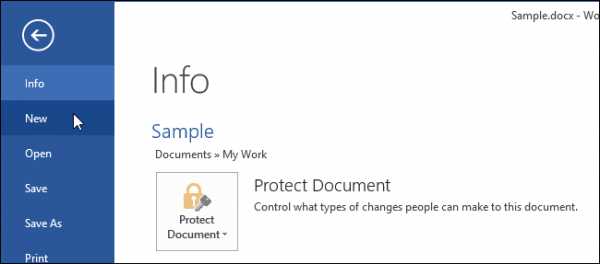
В левой части окна нажмите New (Создать).
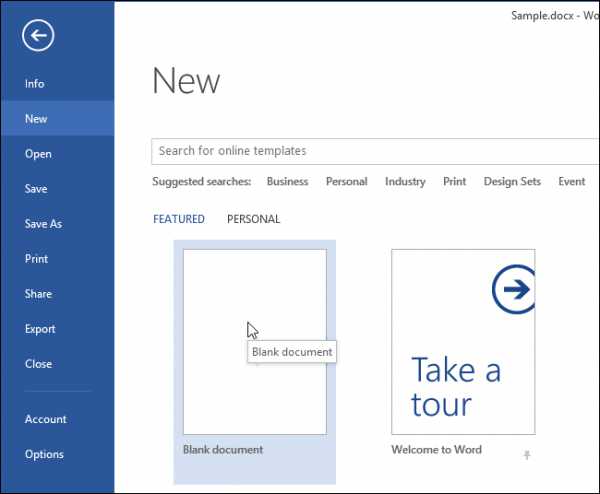
В разделе New (Создать) кликните по Blank document (Новый документ).
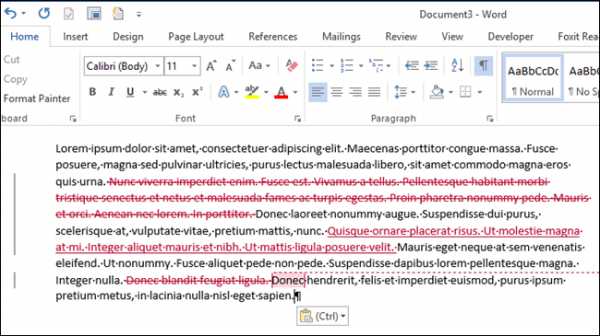
Второй секрет успешного сохранения исправлений в скопированном тексте: отключите опцию Track Changes (Исправления) в том документе, куда собираетесь вставить скопированный текст. Затем нажмите Ctrl+V, и скопированный текст вставится вместе с исправлениями.
Для копирования текста можно воспользоваться инструментом «Копилка», что особенно удобно, если Вы копируете несколько несмежных блоков текста и/или изображения.
Урок подготовлен для Вас командой сайта office-guru.ru Источник: /> Перевела: Ольга Гелих
Правила перепечаткиЕще больше уроков по Microsoft Word
Оцените качество статьи. Нам важно ваше мнение:
Track changes in Word
Word for Office 365 Word 2019 Word 2016 Word 2013 Word 2010 Word 2007 More… Less
Turning on Track Changes gives you and your coworkers a way to make changes that are easy to spot. The changes are like suggestions that you can review, and then remove them or make them permanent.
Turn Track Changes on and off by going to Review > Track Changes.
-
When it’s turned on, deletions are marked with a strikethrough, and additions are marked with an underline. Different authors’ changes are indicated with different colors.
-
When it’s turned off, Word stops marking changes, but the colored underlines and strikethrough are still in the document.
To review the changes in your document, go to Review > Tracking > Display for Review.
-
To review the changes, indicated by a red line in the margin, choose Simple Markup.
-
For a detailed view of the changes, choose All Markup.
-
For a preview of how the document will look if you make all the suggested changes permanent, choose No Markup.
-
To view the original document as if all the suggested changes were removed, choose Original.
-
On the Review tab, in the Tracking group, choose Track Changes.
The Track Changes is highlighted, as shown in the following image.
Note: If the Track Changes feature is unavailable, you might have to turn off document protection. On the Review tab, in the Protect group, click Restrict Editing, and then click Stop Protection at the bottom of the Protect Document task pane. (You might need to know the document password.)
You also can add a track changes indicator to the status bar.
-
Right-click the status bar and choose Track Changes.
Note: You now can use the Track Changes indicator on the status bar to turn on or turn off Track Changes.
When you turn off Track Changes, you can revise the document without marking what has changed. Turning off the feature, however, doesn’t remove any changes that have already been tracked.
-
On the Review tab, in the Tracking group, choose Track Changes button.
The Track Changes button no longer is highlighted as shown in the following image.
Important: To remove tracked changes, use the Accept and Reject commands on the Review tab in the Changes group.
What would you like to do?
Display all changes inline
The default in Word is to display deletions and comments in balloons in the margins of the document. However, you can change the display to show comments inline and all deletions with strikethroughs instead of inside balloons.
-
On the Review tab, in the Tracking group, click Show Markup.
-
Point to Balloons, and then click Show All Revisions Inline to show deletions with strikethroughs and comments inline.
Display comments in ScreenTips instead of balloons
The default in Word is to display deletions and comments in balloons in the margins of the document. However, you can change the display to show comments inline. Inline comments can be viewed when you rest your pointer on the comment indicator.
-
On the Review tab, in the Tracking group, click Show Markup.
-
Point to Balloons, and then click Show All Revisions Inline to show deletions with strikethroughs and comments inline.
-
Rest the pointer on a comment in the document. The comment appears in a ScreenTip.
Display changes by type of edit or by reviewer
-
On the Review tab, in the Tracking group, click Show Markup.
-
Do one of the following:
-
Click to select the type of change that you want to display. For example, click Comments or Insertions and Deletions. The check mark next to the item indicates that the item is selected.
-
Important: Even if you hide a type of markup by clearing it on the Show Markup menu, the markup automatically appears each time the document is opened by you or a reviewer.
Point to Reviewers, and then click to clear all check boxes except the ones next to the names of the reviewers whose changes and comments you want to show.
Note: To select or clear all check boxes for all reviewers in the list, click All Reviewers.
Display changes and comments for specific reviewers
An editor or reviewer usually wants to view a document as it will appear after their changes are incorporated. This procedure gives an editor or reviewer the opportunity to see how the document will look with the changes.
-
On the Review tab, in the Tracking group, click the arrow in the Display for Review box, and then choose the option that you want.
-
Final Showing Markup This view displays the final document with all tracked changes and comments showing. This is the default view for all documents opened in Word.
-
Final This view displays the document with all changes incorporated into the text and without tracked changes showing. However, any tracked changes or comments that have not been accepted, rejected, or deleted remain in the document.
-
Original Showing Markup This view displays the original text with tracked changes and comments.
-
Original This view displays the original document without tracked changes and comments showing. However, any tracked changes or comments in the document that have not been accepted, rejected, or deleted remain in the document.
-
Note: If you want to see comments and tracked changes in balloons, you must be in Print Layout view or Web Layout view.
Hide tracked changes and comments when printing
Hiding changes does not remove changes from the document. You must use the Accept and Reject commands in the Changes group to remove markup from your document.
-
Click the File tab.
-
Click Print.
-
Under Settings, click the arrow next to Print All Pages.
-
Click Print Markup to clear the check mark.
What would you like to do?
Review a summary of tracked changes
The Reviewing Pane is a handy tool for making sure that all tracked changes have been removed from your document and won’t show up to others who might view your document. The summary section at the top of the Reviewing Pane displays the exact number of visible tracked changes and comments that remain in your document.
The Reviewing Pane also allows you to read long comments that don’t fit within a comment bubble.
Note: The Reviewing Pane, unlike the document or the comment bubbles, is not the best tool for making changes to your document. Instead of deleting text or comments or making other changes in the Reviewing Pane, make all editorial changes in the document. The changes will then be visible in the Reviewing Pane.
-
On the Review tab, in the Tracking group, choose one of the following:
-
To view the summary at the side of your screen, choose Reviewing Pane.
-
To view the summary across the bottom of your screen, in the Reviewing Pane list, choose Reviewing Pane Horizontal.
-
-
Choose Show Detailed Summary to view the number of each type of change.
Review each tracked change and comment in sequence
-
On the Review tab, in the Changes group, click Next or Previous.
-
Do one of the following:
-
In the Changes group, choose Accept.
-
In the Changes group, choose Reject.
-
In the Comments group, choose Delete.
-
-
Accept or reject changes and delete comments until there are no more tracked changes or comments in your document, and then confirm all tracked changes are accepted or rejected and that all comments are deleted.
-
On the Review tab, in the Tracking group, choose Reviewing Pane.
Note: The summary section at the top of the Reviewing Pane displays the exact number of tracked changes and comments that remain in your document.
Review changes by type of edit or by a specific reviewer
-
On the Review tab, in the Tracking group, do one of the following:
-
In the Show Markup list, clear all check boxes except for those next to the types of changes that you want to review.
-
In the Show Markup list, choose Reviewers, and then clear all check boxes except those next to the names of the reviewers whose changes you want to see.
-
In the Show Markup list, choose All Reviewers to select or clear the check boxes for all reviewers in the list
-
-
On the Review tab, in the Changes group, choose Next or Previous.
-
Do one of the following:
-
In the Changes group, choose Accept.
-
In the Changes group, choose Reject.
-
Accept all changes at the same time
-
On the Review tab, in the Changes group, choose Next or Previous.
-
In the Accept list, choose Accept All Changes in Document.
Reject all changes at the same time
-
On the Review tab, in the Changes group, choose Next or Previous.
-
In the Reject list, choose Reject All Changes in Document.
Delete comments
-
Click the comment.
-
On the Review tab, in the Comments group, click Delete.
To delete all comments at once, click the arrow below Delete, and then click Delete All Comments in Document.
What would you like to do?
You can easily make and view tracked changes and comments while you work in a document. By default, Microsoft Office Word 2007 uses balloons to display deletions, comments, formatting changes, and content that has moved. If you want to see all your changes inline, you can change settings so that tracked changes and comments display the way you want.
Balloons (1) show formatting changes, comments, and deletions.
Note: To prevent you from inadvertently distributing documents that contain tracked changes and comments, Word displays tracked changes and comments by default. Final Showing Markup is the default option in the Display for Review box.
-
Open the document that you want to revise.
-
On the Review tab, in the Tracking group, click the Track Changes button. The Track changes button becomes highlighted, as shown in the following figure.
-
Optional. Add a track changes indicator to the status bar. Right-click the status bar, and click Track Changes. Click the Track Changes indicator on the status bar to turn on or turn off track changes.
-
Make the changes that you want by inserting, deleting, moving, or formatting text or graphics. You can also add comments.
Note: If you use change tracking and then save your document as a Web page (.htm or .html), tracked changes will appear on your Web page.
To turn Track changes off:
-
On the Review tab, in the Tracking group, click the Track Changes button.
The Track Changes button is no longer highlighted, as shown in the following image.
If you customized the status bar to include a track changes indicator, clicking Track Changes in the Tracking group will also turn off the indicator in the status bar.
Note: Turning off change tracking does not eliminate the tracked changes in your document. To ensure that there are no more tracked changes in your document, be sure that all changes are showing, and then use the Accept or Reject commands for each change in the document.
Be aware that there are various ways to hide tracked changes or comments, but all the changes that were made while the Track Changes feature was turned on and all the comments that were inserted remain part of the document until they are accepted or rejected (or, in the case of comments, deleted).
Hiding tracked changes—for example, under Show Markup, clearing the check mark for Insertions and Deletions—doesn’t delete existing tracked changes or comments from the document. Instead, hiding tracked changes enables you to view the document without having to wade through crossed-out text, underlining, and balloons.
There are several ways to hide tracked changes and comments, which may lead you to think that they are not in the document. For example:
-
Display for Review box On the Review tab, in the Tracking group, the Display for Review box shows you what viewing mode you are in. It also provides additional options for viewing your document. If you click Final or Original, tracked changes and comments are hidden. To display them, select Final Showing Markup or Original Showing Markup.
-
Show Markup On the Review tab, in the Tracking group, you can use the Show Markup list to hide comments and tracked changes. Items that are marked with a check mark under Show Markup are displayed; items without a check mark are hidden. To display an item, such as Insertions and Deletions, click it on the Show Markup menu.
The default in Word is to display deletions and comments in balloons in the margins of the document. However, you can change the display to show comments inline and all deletions as crossed out instead of inside balloons.
-
On the Review tab, in the Tracking group, click Balloons.
-
Click Show All Revisions Inline to show deletions as crossed out and comments inline.
There are several options available for changing how tracked changes (markup) is displayed.
-
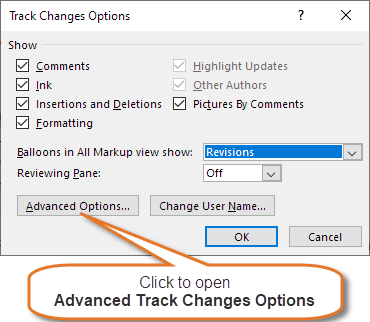
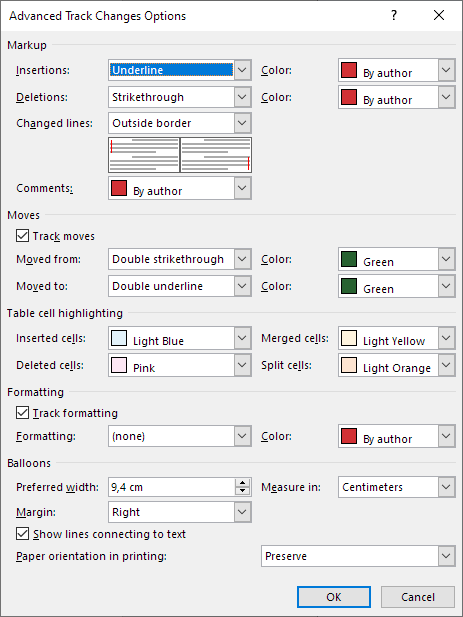
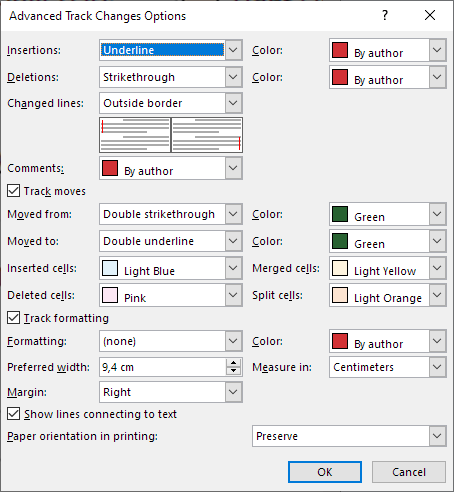
You can change the color and other formatting that Word uses to mark changed text and graphics by clicking the arrow next to Track Changes and then clicking Change Tracking Options.
Note: While you can’t assign specific colors for changes made by different reviewers, each reviewer’s changes appear as a different color in the document so that you can track multiple reviewers.
-
You can view all changes, including deletions, inline instead of inside balloons that appear in the margins of your document. To show changes inline, in the Tracking group, click Balloons, and then click Show all revisions inline.
When you click Show all revisions inline, all the revisions and comments in the document appear inline.
-
To highlight the margin area where all balloons appear, under Show Markup, click Markup Area Highlight.
-
On the Review tab, in the Tracking group, click the arrow next to Show Markup.
-
Do one of the following:
-
Select the type of change that you want to display.
Note: Even if you hide a type of markup by clearing it on the Show Markup menu, the markup automatically appears each time the document is opened by you or a reviewer.
-
Point to Reviewers, and then click to clear all check boxes except the ones next to the names of the reviewers whose changes and comments you want to show.
Note: To select or clear all check boxes for all reviewers in the list, click All Reviewers.
-
You can use the Display for Review list, in the Tracking group, to view a document at various stages of the edit process. Each of the four options in the list provides a different view of the document. Final Showing Markup is the default when you open any document.
-
Final Showing Markup This view displays the final document with all tracked changes and comments showing. This is the default view for all documents opened in Word.
-
Final This view displays the document with all changes incorporated into the text and without tracked changes showing. However, any tracked changes or comments that have not been accepted, rejected, or deleted remain in the document.
-
Original Showing Markup This view displays the original text with tracked changes and comments.
-
Original This view displays the original document without tracked changes and comments showing. However, any tracked changes or comments in the document that have not been accepted, rejected, or deleted remain in the document.
The default in Word is to display deletions and comments in balloons in the margins of the document. However, you can change the display to show comments inline. Inline comments can be viewed when you rest your pointer on the comment indicator.
-
On the Review tab, in the Tracking group, click Balloons.
-
Click Show All Revisions Inline to show deletions as crossed out and comments inline.
-
Rest the pointer on a comment in the document. The comment appears in a ScreenTip.
To learn more about comments, see Insert and delete comments.
-
On the Review tab, in the Changes group, click Next or Previous.
-
Do one of the following:
-
In the Changes group, choose Accept.
-
In the Changes group, choose Reject.
-
In the Comments group, choose Delete.
-
-
Accept or reject changes and delete comments until there are no more tracked changes or comments in your document, and then confirm all tracked changes are accepted or rejected and that all comments are deleted.
-
On the Review tab, in the Tracking group, choose Reviewing Pane.
Note: The summary section at the top of the Reviewing Pane displays the exact number of tracked changes and comments that remain in your document.
-
On the Review tab, in the Changes group, choose Next or Previous.
-
Do one of the following:
In the Accept list, choose Accept All Changes in Document.
In the Reject list, choose Reject All Changes in Document.
Office Word 2007 provides a feature called Document Inspector that allows you to check any document for tracked changes, comments, hidden text, and other personal information. To check a document:
-
Open the document you want to inspect for tracked changes and comments.
-
Click the Microsoft Office Button , point to Prepare, and then click Inspect Document.
-
In the Document Inspector dialog box, click Inspect.
-
Review the inspection results. If Document Inspector finds comments and tracked changes, you are prompted to click Remove All next to Comments, Revisions, Versions, and Annotations.
-
Click Reinspect or Close.
Before you print the document, switch to Print Layout view and display the tracked changes and comments the way that you want them to appear in the printed document. You have several options.
-
Print showing all markup On the Review tab, in the Tracking group, click Show Markup.
Note: Clicking Show Markup displays or hides all markup in the document for selected reviewers. When you display all markup, all types of markup are selected on the Show Markup menu.
-
Print showing changes and comments by type or reviewer On the Review tab, in the Tracking group, click Show Markup, and then select the type of change that you want to display.
-
Print changes and comments for an editor or other reviewer On the Review tab, in the Tracking group, in the Display for Review box, click Final Showing Markup.
When the markup appears the way that you want it to, you are ready to print the document.
-
Click the Microsoft Office Button , and then click Print.
-
In the Print dialog box, in the Print what box, click Document showing markup, and then click OK.
Notes:
-
By default, Microsoft Word chooses the zoom level and page orientation to best display the tracked changes in your printed document.
-
If balloons are turned on, the document will shrink to fit the balloons on the printed page. To make your printed page readable, you can turn off balloons by clicking Balloons in the Tracking group and then clicking Show all revisions inline. You can also set the page layout to landscape to print the balloons and the text in a more readable format. On the Page Layout tab, under Page Setup, click Orientation, and then click Landscape.
-
Change the layout for printing tracked changes
-
On the Review tab, in the Tracking group, click the arrow next to Track Changes, and then click Change Tracking Options.
-
Under Balloons, in the Paper orientation in printing list, click one of the following:
-
Auto When you select this option, Word decides the orientation that will provide the best layout for your document.
-
Preserve When you select this option, Word prints the document with the orientation that is specified in the Page Setup dialog box.
-
Force Landscape When you select this option, the orientation is landscape and the most room is allowed for balloons.
-
Print a list of changes made to a document
-
Click the Microsoft Office Button , and then click Print.
-
In the Print what box, click List of markup.
Hiding changes does not remove changes from the document. You must use the Accept and Reject commands in the Changes group to remove markup from your document.
-
Click the Microsoft Office Button , and then click Print.
-
In the Print what box, click Document (instead of Document showing markup).
Insert or delete a comment
Expand your Office skills Explore training
Track changes in Word
Word for Office 365 Word 2019 Word 2016 Word 2013 Word 2010 Word 2007 More… Less
Turning on Track Changes gives you and your coworkers a way to make changes that are easy to spot. The changes are like suggestions that you can review, and then remove them or make them permanent.
Turn Track Changes on and off by going to Review > Track Changes.
-
When it’s turned on, deletions are marked with a strikethrough, and additions are marked with an underline. Different authors’ changes are indicated with different colors.
-
When it’s turned off, Word stops marking changes, but the colored underlines and strikethrough are still in the document.
To review the changes in your document, go to Review > Tracking > Display for Review.
-
To review the changes, indicated by a red line in the margin, choose Simple Markup.
-
For a detailed view of the changes, choose All Markup.
-
For a preview of how the document will look if you make all the suggested changes permanent, choose No Markup.
-
To view the original document as if all the suggested changes were removed, choose Original.
-
On the Review tab, in the Tracking group, choose Track Changes.
The Track Changes is highlighted, as shown in the following image.
Note: If the Track Changes feature is unavailable, you might have to turn off document protection. On the Review tab, in the Protect group, click Restrict Editing, and then click Stop Protection at the bottom of the Protect Document task pane. (You might need to know the document password.)
You also can add a track changes indicator to the status bar.
-
Right-click the status bar and choose Track Changes.
Note: You now can use the Track Changes indicator on the status bar to turn on or turn off Track Changes.
When you turn off Track Changes, you can revise the document without marking what has changed. Turning off the feature, however, doesn’t remove any changes that have already been tracked.
-
On the Review tab, in the Tracking group, choose Track Changes button.
The Track Changes button no longer is highlighted as shown in the following image.
Important: To remove tracked changes, use the Accept and Reject commands on the Review tab in the Changes group.
What would you like to do?
Display all changes inline
The default in Word is to display deletions and comments in balloons in the margins of the document. However, you can change the display to show comments inline and all deletions with strikethroughs instead of inside balloons.
-
On the Review tab, in the Tracking group, click Show Markup.
-
Point to Balloons, and then click Show All Revisions Inline to show deletions with strikethroughs and comments inline.
Display comments in ScreenTips instead of balloons
The default in Word is to display deletions and comments in balloons in the margins of the document. However, you can change the display to show comments inline. Inline comments can be viewed when you rest your pointer on the comment indicator.
-
On the Review tab, in the Tracking group, click Show Markup.
-
Point to Balloons, and then click Show All Revisions Inline to show deletions with strikethroughs and comments inline.
-
Rest the pointer on a comment in the document. The comment appears in a ScreenTip.
Display changes by type of edit or by reviewer
-
On the Review tab, in the Tracking group, click Show Markup.
-
Do one of the following:
-
Click to select the type of change that you want to display. For example, click Comments or Insertions and Deletions. The check mark next to the item indicates that the item is selected.
-
Important: Even if you hide a type of markup by clearing it on the Show Markup menu, the markup automatically appears each time the document is opened by you or a reviewer.
Point to Reviewers, and then click to clear all check boxes except the ones next to the names of the reviewers whose changes and comments you want to show.
Note: To select or clear all check boxes for all reviewers in the list, click All Reviewers.
Display changes and comments for specific reviewers
An editor or reviewer usually wants to view a document as it will appear after their changes are incorporated. This procedure gives an editor or reviewer the opportunity to see how the document will look with the changes.
-
On the Review tab, in the Tracking group, click the arrow in the Display for Review box, and then choose the option that you want.
-
Final Showing Markup This view displays the final document with all tracked changes and comments showing. This is the default view for all documents opened in Word.
-
Final This view displays the document with all changes incorporated into the text and without tracked changes showing. However, any tracked changes or comments that have not been accepted, rejected, or deleted remain in the document.
-
Original Showing Markup This view displays the original text with tracked changes and comments.
-
Original This view displays the original document without tracked changes and comments showing. However, any tracked changes or comments in the document that have not been accepted, rejected, or deleted remain in the document.
-
Note: If you want to see comments and tracked changes in balloons, you must be in Print Layout view or Web Layout view.
Hide tracked changes and comments when printing
Hiding changes does not remove changes from the document. You must use the Accept and Reject commands in the Changes group to remove markup from your document.
-
Click the File tab.
-
Click Print.
-
Under Settings, click the arrow next to Print All Pages.
-
Click Print Markup to clear the check mark.
What would you like to do?
Review a summary of tracked changes
The Reviewing Pane is a handy tool for making sure that all tracked changes have been removed from your document and won’t show up to others who might view your document. The summary section at the top of the Reviewing Pane displays the exact number of visible tracked changes and comments that remain in your document.
The Reviewing Pane also allows you to read long comments that don’t fit within a comment bubble.
Note: The Reviewing Pane, unlike the document or the comment bubbles, is not the best tool for making changes to your document. Instead of deleting text or comments or making other changes in the Reviewing Pane, make all editorial changes in the document. The changes will then be visible in the Reviewing Pane.
-
On the Review tab, in the Tracking group, choose one of the following:
-
To view the summary at the side of your screen, choose Reviewing Pane.
-
To view the summary across the bottom of your screen, in the Reviewing Pane list, choose Reviewing Pane Horizontal.
-
-
Choose Show Detailed Summary to view the number of each type of change.
Review each tracked change and comment in sequence
-
On the Review tab, in the Changes group, click Next or Previous.
-
Do one of the following:
-
In the Changes group, choose Accept.
-
In the Changes group, choose Reject.
-
In the Comments group, choose Delete.
-
-
Accept or reject changes and delete comments until there are no more tracked changes or comments in your document, and then confirm all tracked changes are accepted or rejected and that all comments are deleted.
-
On the Review tab, in the Tracking group, choose Reviewing Pane.
Note: The summary section at the top of the Reviewing Pane displays the exact number of tracked changes and comments that remain in your document.
Review changes by type of edit or by a specific reviewer
-
On the Review tab, in the Tracking group, do one of the following:
-
In the Show Markup list, clear all check boxes except for those next to the types of changes that you want to review.
-
In the Show Markup list, choose Reviewers, and then clear all check boxes except those next to the names of the reviewers whose changes you want to see.
-
In the Show Markup list, choose All Reviewers to select or clear the check boxes for all reviewers in the list
-
-
On the Review tab, in the Changes group, choose Next or Previous.
-
Do one of the following:
-
In the Changes group, choose Accept.
-
In the Changes group, choose Reject.
-
Accept all changes at the same time
-
On the Review tab, in the Changes group, choose Next or Previous.
-
In the Accept list, choose Accept All Changes in Document.
Reject all changes at the same time
-
On the Review tab, in the Changes group, choose Next or Previous.
-
In the Reject list, choose Reject All Changes in Document.
Delete comments
-
Click the comment.
-
On the Review tab, in the Comments group, click Delete.
To delete all comments at once, click the arrow below Delete, and then click Delete All Comments in Document.
What would you like to do?
You can easily make and view tracked changes and comments while you work in a document. By default, Microsoft Office Word 2007 uses balloons to display deletions, comments, formatting changes, and content that has moved. If you want to see all your changes inline, you can change settings so that tracked changes and comments display the way you want.
Balloons (1) show formatting changes, comments, and deletions.
Note: To prevent you from inadvertently distributing documents that contain tracked changes and comments, Word displays tracked changes and comments by default. Final Showing Markup is the default option in the Display for Review box.
-
Open the document that you want to revise.
-
On the Review tab, in the Tracking group, click the Track Changes button. The Track changes button becomes highlighted, as shown in the following figure.
-
Optional. Add a track changes indicator to the status bar. Right-click the status bar, and click Track Changes. Click the Track Changes indicator on the status bar to turn on or turn off track changes.
-
Make the changes that you want by inserting, deleting, moving, or formatting text or graphics. You can also add comments.
Note: If you use change tracking and then save your document as a Web page (.htm or .html), tracked changes will appear on your Web page.
To turn Track changes off:
-
On the Review tab, in the Tracking group, click the Track Changes button.
The Track Changes button is no longer highlighted, as shown in the following image.
If you customized the status bar to include a track changes indicator, clicking Track Changes in the Tracking group will also turn off the indicator in the status bar.
Note: Turning off change tracking does not eliminate the tracked changes in your document. To ensure that there are no more tracked changes in your document, be sure that all changes are showing, and then use the Accept or Reject commands for each change in the document.
Be aware that there are various ways to hide tracked changes or comments, but all the changes that were made while the Track Changes feature was turned on and all the comments that were inserted remain part of the document until they are accepted or rejected (or, in the case of comments, deleted).
Hiding tracked changes—for example, under Show Markup, clearing the check mark for Insertions and Deletions—doesn’t delete existing tracked changes or comments from the document. Instead, hiding tracked changes enables you to view the document without having to wade through crossed-out text, underlining, and balloons.
There are several ways to hide tracked changes and comments, which may lead you to think that they are not in the document. For example:
-
Display for Review box On the Review tab, in the Tracking group, the Display for Review box shows you what viewing mode you are in. It also provides additional options for viewing your document. If you click Final or Original, tracked changes and comments are hidden. To display them, select Final Showing Markup or Original Showing Markup.
-
Show Markup On the Review tab, in the Tracking group, you can use the Show Markup list to hide comments and tracked changes. Items that are marked with a check mark under Show Markup are displayed; items without a check mark are hidden. To display an item, such as Insertions and Deletions, click it on the Show Markup menu.
The default in Word is to display deletions and comments in balloons in the margins of the document. However, you can change the display to show comments inline and all deletions as crossed out instead of inside balloons.
-
On the Review tab, in the Tracking group, click Balloons.
-
Click Show All Revisions Inline to show deletions as crossed out and comments inline.
There are several options available for changing how tracked changes (markup) is displayed.
-
You can change the color and other formatting that Word uses to mark changed text and graphics by clicking the arrow next to Track Changes and then clicking Change Tracking Options.
Note: While you can’t assign specific colors for changes made by different reviewers, each reviewer’s changes appear as a different color in the document so that you can track multiple reviewers.
-
You can view all changes, including deletions, inline instead of inside balloons that appear in the margins of your document. To show changes inline, in the Tracking group, click Balloons, and then click Show all revisions inline.
When you click Show all revisions inline, all the revisions and comments in the document appear inline.
-
To highlight the margin area where all balloons appear, under Show Markup, click Markup Area Highlight.
-
On the Review tab, in the Tracking group, click the arrow next to Show Markup.
-
Do one of the following:
-
Select the type of change that you want to display.
Note: Even if you hide a type of markup by clearing it on the Show Markup menu, the markup automatically appears each time the document is opened by you or a reviewer.
-
Point to Reviewers, and then click to clear all check boxes except the ones next to the names of the reviewers whose changes and comments you want to show.
Note: To select or clear all check boxes for all reviewers in the list, click All Reviewers.
-
You can use the Display for Review list, in the Tracking group, to view a document at various stages of the edit process. Each of the four options in the list provides a different view of the document. Final Showing Markup is the default when you open any document.
-
Final Showing Markup This view displays the final document with all tracked changes and comments showing. This is the default view for all documents opened in Word.
-
Final This view displays the document with all changes incorporated into the text and without tracked changes showing. However, any tracked changes or comments that have not been accepted, rejected, or deleted remain in the document.
-
Original Showing Markup This view displays the original text with tracked changes and comments.
-
Original This view displays the original document without tracked changes and comments showing. However, any tracked changes or comments in the document that have not been accepted, rejected, or deleted remain in the document.
The default in Word is to display deletions and comments in balloons in the margins of the document. However, you can change the display to show comments inline. Inline comments can be viewed when you rest your pointer on the comment indicator.
-
On the Review tab, in the Tracking group, click Balloons.
-
Click Show All Revisions Inline to show deletions as crossed out and comments inline.
-
Rest the pointer on a comment in the document. The comment appears in a ScreenTip.
To learn more about comments, see Insert and delete comments.
-
On the Review tab, in the Changes group, click Next or Previous.
-
Do one of the following:
-
In the Changes group, choose Accept.
-
In the Changes group, choose Reject.
-
In the Comments group, choose Delete.
-
-
Accept or reject changes and delete comments until there are no more tracked changes or comments in your document, and then confirm all tracked changes are accepted or rejected and that all comments are deleted.
-
On the Review tab, in the Tracking group, choose Reviewing Pane.
Note: The summary section at the top of the Reviewing Pane displays the exact number of tracked changes and comments that remain in your document.
-
On the Review tab, in the Changes group, choose Next or Previous.
-
Do one of the following:
In the Accept list, choose Accept All Changes in Document.
In the Reject list, choose Reject All Changes in Document.
Office Word 2007 provides a feature called Document Inspector that allows you to check any document for tracked changes, comments, hidden text, and other personal information. To check a document:
-
Open the document you want to inspect for tracked changes and comments.
-
Click the Microsoft Office Button , point to Prepare, and then click Inspect Document.
-
In the Document Inspector dialog box, click Inspect.
-
Review the inspection results. If Document Inspector finds comments and tracked changes, you are prompted to click Remove All next to Comments, Revisions, Versions, and Annotations.
-
Click Reinspect or Close.
Before you print the document, switch to Print Layout view and display the tracked changes and comments the way that you want them to appear in the printed document. You have several options.
-
Print showing all markup On the Review tab, in the Tracking group, click Show Markup.
Note: Clicking Show Markup displays or hides all markup in the document for selected reviewers. When you display all markup, all types of markup are selected on the Show Markup menu.
-
Print showing changes and comments by type or reviewer On the Review tab, in the Tracking group, click Show Markup, and then select the type of change that you want to display.
-
Print changes and comments for an editor or other reviewer On the Review tab, in the Tracking group, in the Display for Review box, click Final Showing Markup.
When the markup appears the way that you want it to, you are ready to print the document.
-
Click the Microsoft Office Button , and then click Print.
-
In the Print dialog box, in the Print what box, click Document showing markup, and then click OK.
Notes:
-
By default, Microsoft Word chooses the zoom level and page orientation to best display the tracked changes in your printed document.
-
If balloons are turned on, the document will shrink to fit the balloons on the printed page. To make your printed page readable, you can turn off balloons by clicking Balloons in the Tracking group and then clicking Show all revisions inline. You can also set the page layout to landscape to print the balloons and the text in a more readable format. On the Page Layout tab, under Page Setup, click Orientation, and then click Landscape.
-
Change the layout for printing tracked changes
-
On the Review tab, in the Tracking group, click the arrow next to Track Changes, and then click Change Tracking Options.
-
Under Balloons, in the Paper orientation in printing list, click one of the following:
-
Auto When you select this option, Word decides the orientation that will provide the best layout for your document.
-
Preserve When you select this option, Word prints the document with the orientation that is specified in the Page Setup dialog box.
-
Force Landscape When you select this option, the orientation is landscape and the most room is allowed for balloons.
-
Print a list of changes made to a document
-
Click the Microsoft Office Button , and then click Print.
-
In the Print what box, click List of markup.
Hiding changes does not remove changes from the document. You must use the Accept and Reject commands in the Changes group to remove markup from your document.
-
Click the Microsoft Office Button , and then click Print.
-
In the Print what box, click Document (instead of Document showing markup).
Insert or delete a comment
Как в Word 2013 копировать и вставлять текст с исправлениями — Microsoft Excel для начинающих
Инструмент «Исправления» в Word нужен для отслеживания изменений, сделанных в документе. Он особенно полезен при совместной работе над документом с другими пользователями. Иногда необходимо скопировать текст в другой документ, сохранив историю исправлений. Эта задача кажется простой, но на деле она сложнее, чем просто скопировать и вставить текст.
Сперва выделите текст с изменениями.
Первый секрет копирования исправлений вместе с текстом: нужно обязательно отключить опцию Track Changes (Исправления). Для этого откройте вкладку Review (Рецензирование). Если в разделе Tracking (Запись исправлений) кнопка Track Changes (Исправления) подсвечена синим, это значит, что опция включена. Нажмите нижнюю часть этой кнопки и выберите из выпадающего меню пункт Track Changes (Исправления). Теперь, когда опция отключена, у кнопки нет подсветки.
Примечание: Если не отключить функцию Track Changes (Исправления), Word решит, что Вы хотите скопировать текст в таком виде, как если бы все изменения были приняты, и исправления применятся.
Нажмите Ctrl+C, чтобы скопировать текст. Создайте новый документ, в него мы вставим скопированный текст.
Примечание: Текст можно вставить в любой существующий документ Word.
Откройте вкладку File (Файл).
В левой части окна нажмите New (Создать).
В разделе New (Создать) кликните по Blank document (Новый документ).
Второй секрет успешного сохранения исправлений в скопированном тексте: отключите опцию Track Changes (Исправления) в том документе, куда собираетесь вставить скопированный текст. Затем нажмите Ctrl+V, и скопированный текст вставится вместе с исправлениями.
Для копирования текста можно воспользоваться инструментом «Копилка», что особенно удобно, если Вы копируете несколько несмежных блоков текста и/или изображения.
Оцените качество статьи. Нам важно ваше мнение:
Смотрите также
1 Answer
Yes. There is a way to do it, but it appears VBA coding is needed to be able to generate a document with all the changes listed. Here is an MVP site with some ready to use Macros. VBA for Word — Macro
Alternately, if you want to print the changes, here is a link for that.
Print List of Changes
answered Nov 22, 2011 at 18:16
CharlieRBCharlieRB
22.5k5 gold badges55 silver badges104 bronze badges
2
-
Thanks, the «Print List of Changes» tip helped in the short term.
Nov 23, 2011 at 15:26
-
Many thanks for the links. Saves me from doing SaveAsText followed with `%bash diff rev1.txt rev2.txt —suppress-common-lines >diffs.txt
Jan 10, 2014 at 13:28
This tutorial shows how to use Track Changes in Microsoft Word. Track Changes helps us edit documents by tracking insertions, deletions, replacements, and format changes. Word calls these edits markups.
This tutorial also includes an overview of Word’s new Modern comment tool.
We will cover twelve topics:
- How to Turn Track Changes On and Off
- How to Show and Hide Track Changes
- How to Delete Text with Track Changes
- How to Insert Text with Track Changes
- How to Replace Text with Track Changes
- How to Change Formatting with Track Changes
- How to Accept or Reject Track Changes
- How to Insert Comments
- How to Reply to Comments
- How to Resolve Comments
- How to Delete Comments
- How to Open and Close the Reviewing Pane
Watch all the steps shown here in real time!
Explore more than 200 writing-related software tutorials on my YouTube channel.
Let’s dive in…
How to Turn Track Changes On and Off
- Select the Review tab in the ribbon.
- Select the Track Changes button in the Tracking group. The button will appear darker than the rest of the ribbon when Track Changes is turned on.
- Select the Track Changes button (see figure 2) again to turn off tracking.
How to Show and Hide Track Changes
You can control how comments and edits appear by using the Display for Review and Show Markup menus in the Tracking group in the ribbon.
- Select the Display for Review drop-down menu to choose how edits and comments are displayed. The options are (A) Simple Markup, (B) All Markup, (C) No Markup, and (D) Original.
(A) Simple Markup displays the edited version of the document without visible in-line edits. However, edits are indicated by a vertical line in the left margin.
For example, if you delete a sentence, that sentence won’t appear on screen. Instead, a vertical line will appear in the left margin showing that a change was made in that location.
If you want to see the edit, select the vertical line to switch to All Markup.
Comments will be visible on the right side of the screen when in Simple Markup.
(B) All Markup displays all edits and comments.
A vertical line, like the one shown in Simple Markup (see figure 4), will appear on the left side of the screen indicating that a change was made in that location.
Select that line to switch to Simple Markup.
(C) No Markup displays the edited version of the document without any visible edits or comments.
(D) Original displays the original version of the document without any edits or comments.
- Select the Show Markup drop-down menu to choose what features Track Changes displays. (Note that this menu is called Markup Options in Word for Mac.)
I recommend showing markups for Insertions and Deletions and Formatting as well as choosing Show Only Formatting in Balloons so that your insertions and deletions will appear in the text and formatting changes will appear next to the text.
Be default, comments will appear in balloons on the right side of the text.
Important note: The remaining sections show Track Changes in the All Markup view.
How to Delete Text with Track Changes
- Select the text you want to delete.
- Select the Delete key on your keyboard. The deleted text will appear with a strikethrough in the All Markup view.
How to Insert Text with Track Changes
- Place your cursor where you want to insert new text.
- Type the new text. The insertion will appear with an underline in the All Markup view.
How to Replace Text with Track Changes
- Select the text you want to replace.
- Type the replacement text. The original text will appear with a strikethrough, and the replacement text will appear with an underline in the All Markup view.
How to Change Formatting with Track Changes
Formatting includes the font style, font size, font color, italics, bold font, underlining, superscripting and subscripting, indentations, alignment, and margins.
- Select the text you want to reformat.
- Change the format. Track Changes will automatically display the change with your other markup if you have selected formatting in the Show Markup section of the Tracking group.
How to Accept or Reject Track Changes
Edits created with Track Changes must be accepted before they become part of your document. You can accept or reject edits individually or all at once.
Accept or Reject Edits Individually
- Click on or select the insertion, deletion, or replacement text.
- Select the Accept or Reject button in the Changes group.
Pro Tip: Use the Previous and Next buttons to navigate through all the edits in the document.
Accept or Reject All Edits
Unless you are very confident in your reviewers’ expertise, I strongly caution against accepting or rejecting all edits without first checking the accuracy of each one.
- Select the Accept or Reject menu arrow in the Changes group.
- Select your preferred option: Accept/Reject All Changes or Accept/Reject All Changes and Stop Tracking.
This section covers the basics of using comments in Word. For a more in-depth look, please see my previous tutorial “How to Use Comments in Microsoft Word (Modern Comments).”
You can use the Comment tool with Track Changes turned on or turned off.
- Place your cursor near the text you want to comment on or select the text.
- Select the Review tab in the ribbon (see figure 1).
- Select the New Comment button in the Comments group.
- Type your comment into the comment text box on the right side of the screen.
If you are part of an organization, you may be able to @ mention other users in your comments.
- Select the Post button or type the keyboard shortcut Ctrl + Enter (PC) or Command + Return (Mac) to post the comment.
- If you need to edit your comment, select the Edit button (PC users see figure 15; Mac users see figure 16).
- Type your reply into the Reply text box in the other person’s comment.
- Select the Post button or type the keyboard shortcut Ctrl + Enter (PC) or Command + Return (Mac) to post the reply.
You can mark a comment as “Resolved” to tell other people (or remind yourself) that an issue has been taken care of. However, you can also reopen a resolved comment, thereby turning it back to a regular comment.
- Select the three-dot menu in the comment.
- Select Resolve thread from the drop-down menu.
The comment will no longer be visible in the contextual view on the right side of the screen.
How to Reopen Resolved Comments
- Select the Review tab (see figure 1).
- Select the Show Comments menu arrow.
- Select List from the drop-down menu.
- Select the Reopen button in the comment.
Here are two ways to delete comments.
Method 1: Select the three-dot menu in the comment and then select Delete thread from the drop-down menu.
Method 2: Place your cursor in the comment or the text connected to the comment and then select the Delete menu arrow in the Review tab.
From there, choose Delete to delete the current comment, or Delete All Comments Shown, Delete All Comments in Document, or Delete All Resolved Comments (PC only).
How to Open and Close the Reviewing Pane
The Reviewing Pane (labeled Revisions) shows all the comments and edits selected in the Show Markup drop-down menu in the Tracking group in the ribbon, along with the total number of those comments and markups in the document.
The Reviewing Pane isn’t necessary for using Track Changes, but it can be helpful when you need to find a specific edit or want to see how many edits or comments are in the document.
- Select the Review tab (see figure 1).
- Select the Reviewing Pane button in the Tracking group.
The Reviewing Pane will appear, normally on the left side of your screen.
- Reselect the Reviewing Pane button to close the Reviewing Pane.
Related Resources
How to Copy and Paste Text with Comments and Track Changes in Word
How to Remove User Names from Existing Track Changes in Microsoft Word
How to Change Your User Name for Track Changes in Microsoft Word
How to Stop Microsoft Word from Calling You “Author” in Track Changes
How to Change the Color of Track Changes in Microsoft Word
Updated January 16, 2023
Summary of changes proposed to the current practice for financing peacekeeping operations.
операций по поддержанию мира.
contingencies, professional fees and management costs, forward pricing escalation and swing space.
стоимости профессиональных услуг и расходах на управление, прогнозируемом повышении цен и подменных помещениях.
The Committee recommends that a summary of changes in relation to posts(new posts,
posts abolished, reclassifications and transfers) be provided in future, inclusive
of
regional units.
Комитет рекомендует впредь давать резюме изменений в отношении должностей( новые должности,
упраздненные должности, реклассификация и переводы), в том числе по региональным подразделениям.
См.« PCI DSS: обзор изменений PCI DSS версии 3. 2 в сравнении с версией 3. 1».
the latest ISIC, CPC versions(ISIC 3.1,
relationship to other classifications, such as HS, SITC, BOP, COICOP;
последних версий МСОК, КОП( МСОК 3. 1,
связь с другими классификациями, например с СС, МСТК, РПБ, КИПЦ;
This report provides a summary of changes to specified inventory objects for a specified computer and time period.
В этом отчете дана сводка изменений в указанных объектах инвентаризации для указанного компьютера за определенный промежуток времени.
Status
of
the death penalty at the end
of
2000: summary of changes since the beginning
of
1994.
Статус высшей меры наказания в конце 2000 года: резюме изменений с начала 1994 года.
The Committee recommends that the section be precise and specific and
Комитет рекомендует составлять этот раздел точным и конкретным по содержанию и
Background information on how this version
of
the draft agreement differs from the previous
draft is available in the explanatory memorandum Summary of Changes to Base Agreement.
Историческая информация об отличиях данной версии проекта от
предыдущих вариантов доступна в пояснительном меморандуме- Основные изменения в базовом соглашении.
Full programme narratives can be found on the Internet(www. unodc.
Полное
описание
программ в настоящее время приводится на сайте Интернет(
With respect to budget presentation and results-based budgeting, the Advisory Committee welcomed the inclusion in mission budget proposals
of
new sections on efficiency gains and planning assumptions, but recommended that the chapter on planning assumptions should be precise and specific and
Что касается представления бюджетов и бюджетирования, ориентированного на конкретные результаты, то Консультативный комитет с удовлетворением отмечает включение в предложения по бюджетам миссий новых разделов, посвященных мерам по повышению эффективности и предположениям, положенным в основу процесса планирования, но вместе с тем рекомендует, чтобы раздел о предположениях, положенных в основу процесса планирования,
Results: 30,
Time: 0.0252
English
—
Russian
Russian
—
English
Track Changes is a tool in Microsoft Word which allows you to show any markups, changes or comments made to a document.
In this post, I’ll teach you how to use Track Changes to edit Word documents, and how to accept or reject those changes as a reviewer.
Why use Track Changes?
It is particularly useful when you are sharing documents with other colleagues, because it allows you to see exactly what changes were made, and by whom. In addition, it gives more power to the owner of the document who can accept or reject any changes made to the document.
Digital communications often shares Word documents containing website content with colleagues across the University, and asks them to use Track Changes to make edits or queries. This allows us to clearly see what edits have been made and greatly speeds up the amount of time we spend editing web pages.
How to use Track Changes
If you do not know how to use Track Changes, Microsoft has a very useful online guide to using Track Changes.
You can also follow these steps if you are using the desktop Microsoft Word app:
Turn on Track Changes
- Open Microsoft Word.
- Choose the Review tab at the top of the document.
- Either click the Track Changes button (PC) or toggle the Track Changes switch (Mac).
- Make sure that you change ‘Simple Markup’ to ‘All Markup’ from the drop down bar next to Track Changes.
Edit
Once Track Changes is turned on, you can start editing the document. Any changes you make to the text will be marked by a grey bar on the left side of the changed text.
When you add text, the added text will be in a different colour to the normal text – making it easy to spot for reviewers.
When you delete text, the deleted text will be noted in a comment in the right margin of the document.
When you reformat text, the type of reformat will be noted in a comment in the right margin of the document.
You can also comment on pieces of text by selecting New Comment from the Review tab. The comment will appear in the right margin of the document.
Review
If you are reviewing a document, you can either accept or reject changes made by another person. To do this, simply click on the changed text (or the note in the margin) and then select either Accept or Reject from the Review tab.
You can also choose to accept or reject all changes at once from the drop down menus beside each option.
Turn off Track Changes
To turn off Track Changes, simply click on the Track Changes button or toggle again.
Learn what Track Changes is, how to track changes in Word, how to remove tracked changes in Word, and much more.
Track Changes in Word is a powerful feature that makes it possible to mark changes that are made to a document. The feature includes several tools you can use to control which types of changes to track, how to display the tracked changes, and finally how to accept or remove the tracked changes.
Word has included Track Changes functionality for decades. Microsoft has changed the Track Changes features in Word 2013 and later versions compared to earlier versions.
This article covers the Track Changes feature as it works in Word 2013, Word 2016, Word 2019, Word 2021, and Word for Microsoft 365.
If you are using an older version of Word, see Shauna Kelly’s article about Track changes, covering Word 2010 and earlier versions.
Word refers to both tracked changes and comments that are added using Word’s comment feature as revisions. Some of tools discussed in this article are also used in relation to comments. I have covered the Word comment feature in detail in the article How comments in Word work. Please refer to that article for help on comments in Word.
Below, you will find a Table of Contents showing all headings in the article. Click a heading to go to the section in question. When you scroll down, a Go to Info About list will appear to the left, showing the main headings. These headings also work as hyperlinks that let you quickly go to the relevant content.
What is Track Changes in Word?
Track Changes in Word lets you keep track of the changes that are made to a document. This is useful in the editing process of a document and when you ask others for feedback.
Track Changes can be used to keep track of changes no matter whether only you or several people work on a document. Tracked changes can be displayed in a number of different ways in Word. You can also entirely hide the changes. All the different display options are explained later in this article.
Figure 1. Example of text with tracked changes. In this example, inserted text is in red and underlined whereas deleted text is in blue and strikethrough.
You don’t need to accept all changes. You can select to either accept or reject the individual changes. You can also accept or reject all changes in one operation.
Track Changes need to be turned on for Word to mark the changes. If you email a document to somebody else for feedback, the other person can turn on Track Changes before editing the document. When the document is returned to you, you can see which changes have been made.
Don’t worry if Track Changes has not been turned on during editing. Word has a compare feature that lets you compare two versions of a document and show the differences as tracked changes. This means that you can quickly generate a copy showing all the differences between two versions of a document. For more details, see How to find the differences between two versions of a document below.
Where is track changes in Word?
The track changes tools are found on the Review tab in the Ribbon:
Figure 2. The Track Changes tools in Word are found on the Review tab in the Ribbon. The tools are marked by a colored frame here.
Terminology used in Word in relation to Track Changes
In the different commands related to Track Changes in Word, you will find a number of terms in use. It can be a bit confusing since some of the terms mean the same. Terms with the same meaning seem to be used more or less randomly. See the list below:
|
Terms |
What the terms mean |
|
Tracked changes Changes Markup Revisions |
The changes that have been marked by the Track Changes feature Note that the terms markup and revisions in most cases also cover comments inserted using Word’s comment feature |
|
Author Reviewer |
A person who has edited/made changes to a document |
|
Balloons |
Tracked changes or comments shown in the margin of a document |
|
Accept |
Incorporates a tracked change in the document, as if it belonged to the original document. |
|
Reject |
Removes (or deletes) a tracked change from the document, as if it had not been made |
|
Display Show |
The way Word visually presents the tracked changes on the screen |
In other language versions of Word than English, the confusion may be even worse since the translations may not be consistent. For example, I have found examples in Danish versions of Word where even more terms have been introduced due to inconsistent or incorrect translation.
Is Track Changes the same as redlining in Word?
You may see the terms redline, redlining, blackline, or blacklining used instead of Track Changes. I have found a number of definitions of these terms and the definitions do not say precisely the same.
Redline or redlining seems to be used in the same meaning as Track Changes. The terms indicate that red ink is used to mark changes in a document.
Blackline, blacklining, or legal blacklining seems to be used primarily if changes are marked in a separate document, showing the differences between two versions of a document, i.e. without making any changes in the source documents. You can create such document using Word’s Compare or Combine features. See How to find the differences between two versions of a document and How to create a new document that combines tracked changes from different authors while keeping existing tracked changes below.
Basic concepts – what you should know before you start using Track Changes
The are some basic concepts you should be aware of before you start using Track Changes. If you have never used Track Changes before, it can be a little confusing – but once you learn how it works, it is very powerful.
There are four steps to tracking changes
Tell Word to track changes.
If you want to track the changes you make to a document, you must first turn on Track Changes.
As long as Track Changes is turned on, information about the changes you make is registered in the document. If you turn off Track Changes, Word will stop registering new changes you make. You can turn on or of Track Changes whenever you want.
Even if Track Changes is turned off at the moment, a Word document can contain tracked changes from earlier.
Tell Word to display tracked changes.
Even if a document contains tracked changes, you may not see it. The display of tracked changes can be turned on so the changes are visible or turned off so the changes are hidden.
Even if you hide the tracked changes, they are still in the document until they are accepted or rejected.
Tell Word how to display tracked changes.
Word has a number of options you can use to control how the tracked changes are displayed.
The display options let you determine both which types of changes you see and in which way you see them.
Tell Word to accept or reject the changes.
Tracked changes in a document will remain in the document until they are accepted or rejected. That is the only way to remove them.
How to enable track changes in Word
As explained above, you must turn on Track Changes to tell Word to track all the changes you make in your document.
How to turn on Track Changes in Word
You can use different methods to turn on Track Changes to start tracking your changes.
All methods work as toggles that alternately turns Track Changes on and off. This means that you can use the same methods to turn off Track Changes.
IMPORTANT
Turning Track Changes on or off doesn’t affect whether you can see the tracked changes. See How to display tracked changes in Word below.
METHOD 1 – Use keyboard shortcut
Press Ctrl+Shift+E to turn on Track Changes.
The shortcut works as a toggle. If already turned on, the shortcut turns off Track Changes. Note that this shortcut works in all versions of Word.
This is the fastest method.
METHOD 2 – Click Track Changes icon on the Review tab
To turn on Track Changes, select the Review tab and click the Track Changes icon.
The icon works as a toggle. If you click the icon again, you turn off Track Changes.
If you click the text below the icon, a menu appears from where you can select Track Changes to turn it on.
You can see on the color of the Track Changes icon whether it is turned on or off. The icon is highlighted when Track Changes is on.
Figure 3A. Track changes is disabled: Track Changes is off.
Figure 3B. Track changes is enabled: Track Changes is on (the icon is highlighted).
METHOD 3 – Use the Quick Access Toolbar (QAT)
TIP
You can add Track Changes to the Quick Access Toolbar (QAT) for easy access. The QAT is always visible. This also makes if easy to see whether Track Changes is on or off.
To add the icon to the toolbar, right-click the Track Changes icon on the Review tab and select Add to Quick Access Toolbar.
Figure 4. Track Changes has been added to the Quick Access Toolbar (QAT) for easy access. Here marked by a colored frame. The icon is highlighted when Track Changes is on.
METHOD 4 – Use the Status Bar
On the Status Bar (in the bottom of the Word window), click the text Track Changes.
The text in the Status Bar works as a toggle. If you click it again, you turn off Track Changes.
Figure 5. Turn on Track Changes via the Status Bar. The text “Off” or “On” tells whether Track Changes is currently off or on.
If you can’t see Track Changes, right-click in the Status Bar and select Track Changes from the Customize Status Bar menu that appears.
Figure 6. If Track Changes is not shown in the Status Bar, right-click in the Status Bar and select Track Changes from the Customize Status Bar.
How to stop tracking changes in Word
As explained above, you enable track changes by turning on Track Changes. To stop tracking changes so that Word no longer marks new edits you make, you must turn off Track Changes. Read on below.
How to turn off track changes in Word
You can turn off Track Changes using the same methods as you can use for turning it on. See How to turn on Track Changes in Word above.
IMPORTANT
Turning Track Changes on or off doesn’t affect whether you can see the tracked changes. See How to display tracked changes in Word below.
What is Track Changes Cards and how to get rid of them
Track Changes Cards are pop-up windows that may appear in Word for Microsoft 365 when you click in a change. I have written a separate article about those cards and how you can disable them using my free Word add-in DocTools StopSpellingPopUp. See the article How to disable Track Changes Cards in Word for details.
How to find out whether Track Changes is on or off
Note that tracked changes may not be visible in your document even if Track Changes is on. Tracked changes are only visible if you have set Word to display the changes. See How to display tracked changes in Word below.
IMPORTANT
Turning Track Changes on or off doesn’t affect whether you can see the tracked changes. See How to display tracked changes in Word below.
METHOD 1 – Look at the Status Bar
Look at the Status Bar at the bottom of the screen. Changes are currently being tracked if you see Track Changes: On in the Status Bar.
See METHOD 4 – Use the Status Bar above if you can’t see the text Tracked Changes: On or Tracked Changes: Off in the Status Bar.
METHOD 2 – Look at the Review tab in the Ribbon
If the Track Changes icon in the Review tab in the Ribbon is highlighted, Track Changes is on. See Figure 3 above.
METHOD 3 – Look at the Quick Access Toolbar (QAT)
This method is only relevant if you have added the Track Changes icon to the QAT. See METHOD 3 – Use the Quick Access Toolbar (QAT) above. If the Track Changes icon in the QAT is highlighted, Track Changes is on.
Displaying or hiding tracked changes
How to display tracked changes in Word
Word has a number of options that influence how tracked changes are displayed. All the options can be accessed from the Tracking group on the Review tab in the Ribbon. Below, you can learn how the individual options work.
The different options influence each other. It can be rather difficult to get an overview of all the relations. The result is determined by the combination of your settings in:
- the Display for Review menu (see Figure 7 below)
- the Show Markup menu (you can see the menu in Figure 14 below.)
- the Advanced Track Changes Options dialog box (see Figure 22 below)
Figure 7. The Display for Review menu includes four display options that determine how tracked changes are shown. See the descriptions of the options below.
|
Display option |
How are tracked changes displayed |
|
Simple Markup |
Red vertical lines in the margin show where changes are found. See Example 1 – Simple Markup display below. In the Advanced Track Changes Options dialog box > Markup section > Changed lines, you can determine how and where the red, vertical lines are shown. TIP: You can click a red line in the margin to switch to All Markup display. |
|
All Markup |
Shows all changes with different colors and lines. The red lines from Simple Markup display turns into gray lines. The exact display depends on your settings in the Show Markup menu and in the Advanced Track Changes Options dialog box.
For an illustration of the Advanced Track Changes Options dialog box, see Figure 22 below. See Example 2 – All Markup display + Show Revisions in Balloons and Example 3 – All Markup display + Show All Revisions Inline below.. TIP: You can click a gray line in the margin to switch to Simple Markup display. |
|
No Markup |
Shows the document as if you had accepted all the tracked changes. This means that the document will look as if all the changes had been there always. Note that the tracked changes are still there – they are just hidden. |
|
Original |
Shows the document as if you had rejected all the tracked changes. This means that the document will look as it did before any of the changes were added. Note that the tracked changes are still there – they are just hidden. |
Summary of the facts from above:
- To see tracked changes, you must select either Simple Markup or All Markup from Display for Review menu.
- In addition, you must make sure that a check mark is shown in the Show Markup menu for the types of tracked changes you want to see: Comments (not handled in this article), Insertions and Deletions, and/or Formatting.
- In the Advanced Track Changes Options dialog box, set up how you want to see the tracked changes.
Example 1 – Simple Markup display
Figure 8. Example of Simple Markup. Note the red lines in the right margin. The lines show where edits are made. You can have the lines shown in the left margin instead, if you want. You can click a red line in the margin to switch to All Markup display.
In Simple Markup display, any comments will appear as small comment icons in the margin.
Example 2 – All Markup display + Show Revisions in Balloons
Figure 9. Example of All Markup in combination with Show Markup > Balloons > Show All Revisions Inline. Note the gray lines in the right margin. The lines appear in the same places as the red lines in Figure 8 above. You can click a gray line in the margin to switch to Simple Markup display.
Example 3 – All Markup display + Show All Revisions Inline
Figure 10. Example of All Markup in combination with Show Markup > Balloons > Show All Revisions Inline. Note the gray lines in the right margin. The lines appear in the same places as the red lines in Figure 8 above. You can click a gray line in the margin to switch to Simple Markup display.
IMPORTANT
Even if you have selected All Markup, you may not see all changes. You can define which types of changes you want to see.
How to hide tracked changes in Word without removing the changes
When working with tracked changes in a document, you may sometimes want to see the document without displaying the changes. You can hide tracked changes while keeping the tracked changes in the document.
If Track Changes is turned on, Word will continue to track the changes but just not show them as long as you are hiding tracked changes.
METHOD 1 – Select Review tab > Display for Review > No Markup
If you select Review tab > Display for Review > No Markup, Word will display your document as if you had accepted all the tracked changes in the document.
It hides the tracked changes but does not remove them. If another user opens the document, that user can easily display the changes.
METHOD 2 – Select Review tab > Display for Review > Original
If you select Review tab > Display for Review > Original, Word will display your document as if you had rejected all the tracked changes in the document.
It hides the tracked changes but does not remove them. If another user opens the document, that user can easily display the changes.
How to remove tracked changes in Word
As explained above, tracked changes remain in the document until they are accepted or rejected. Below, you will learn how to remove tracked changes individually or remove all tracked changes entirely from a Word document.
How to accept or reject a single tracked change
METHOD 1 – Use the right-click menu
To accept a tracked change, right-click in the change and select Accept Insertion or Accept Deletion or Accept Format Change.
To reject a tracked change, right-click in the change and select Reject Insertion or Reject Deletion or Reject Format Change.
The menu that appears when you right-click depends on the context. There are situations where the Accept or Reject commands are not available in the right-click menu. For example, that is most often the case if you right-click in text marked as a spelling error. In that case, use one of the other methods.
METHOD 2 – Click the Accept or Reject icon in the Review tab in the Ribbon
Click within the change, then click Accept or Reject in the Review tab in the Ribbon.
If you have selected text that includes more than one tracked change, all changes in the selection will be accepted or rejected.
METHOD 3 – Use the Accept or Reject menu in the Review tab in the Ribbon
To accept a change and automatically move to the next change, select Review tab > Accept > Accept and Move to Next. See Figure 11 below.
To accept a change without moving to the next, select Review tab > Accept > Accept This change. See Figure 11 below. Use this method if you want to be able to see the result before Word moves on to the next change.
To reject a change and automatically move to the next change, select Review tab > Reject > Reject and Move to Next.
To reject a change without moving to the next, select Review tab > Reject > Reject Change. Use this method if you want to be able to see the result before Word moves on to the next change.
Figure 11. The menu that is displayed if you click the arrow below Accept in the Review tab. A corresponding menu is found when you click Reject.
How to accept or reject all tracked changes in a Word document at once
To accept all tracked changes in the document in one operation, select Review tab > Accept > Accept All Changes. If you want to turn off Track Changes at the same time, select Review tab > Accept > Accept All Changes and Stop Tracking. See Figure 11 above.
To reject (delete) all tracked changes in the document in one operation, select Review tab > Reject > Reject All Changes. If you want to turn off Track Changes at the same time, select Review tab > Reject > Reject All Changes and Stop Tracking.
Formatting changes – how of get rid of them and stop marking formatting changes
In many cases, you may only be interested in keeping track of content changes in the form of insertions and deletions. Changes to formatting, such as style changes or applying bold font, may be irrelevant.
Read on below to learn how to accept existing formatting changes and stop marking new formatting changes you make.
How to accept formatting changes and keep all other tracked changes
- Select Review tab > Tracking group > Show Markup and make sure to set check marks as follows:
Comments: Not checked
Insertions and Deletions: Not checked
Formatting: CheckedOnly Formatting must have a check mark.
- Select Review tab > Show Markup > Specific People and make sure All Reviewers is selected.
- Select Review tab > Changes group > Accept menu > Accept All Changes Shown.
Since only formatting changes were shown, only formatting changes will be accepted. - Select Review tab > Tracking group > Show Markup and turn on Comments and/or Insertions and Deletions again to show those types of changes when Track Changes is on.
See below if you want to stop tracking new formatting changes you make.
How to stop tracking formatting changes
When Track Changes is on, the types of changes that are tracked depend on your current settings in the Advanced Track Changes Options dialog box.
To stop tracking formatting changes:
- Open the Advanced Track Changes Options dialog box. See How to open the Advanced Track Changes Options dialog box below.
- Make sure to turn off the Track formatting check box.
- Click OK.
Note that the setting of the Track Formatting check box is document-specific. Turning on or off that setting does not influence other documents.
Turning off Track Formatting will not remove existing formatting changes that have been marked. You must accept those changes to get rid of them. See How to accept formatting changes and keep all other tracked changes above.
How to copy text with tracked changes
When copying and pasting text with tracked changed, the method to use depends on the result you want. See below.
In the following, I have used these terms:
- Source document: the document you copy from
- Target document: the document into which you paste
How to copy text to another document WITHOUT copying the track changes
- In the source document, turn ON
Track Changes (ensure that the Status Bar shows Track Changes: On). - In the target document, turn OFF
Track Changes (ensure that the Status Bar shows Track Changes: Off). - Now copy and paste.
How to copy text to another document WITH the tracked changes
- In the source document, turn OFF Track Changes (ensure that the Status Bar shows Track Changes: Off).
- In the target document, turn OFF Track Changes (ensure that the Status Bar shows Track Changes: Off).
- Now copy and paste.
Tracked changes and printing
How to print a document with tracked changes
If your document includes tracked changes, you can print it so the printout shows the tracked changes.
- Select File > Print.
- Under Settings, click the first button (shows Print All Pages or another text depending on your latest print settings).
- Select Print Markup in the menu that appears. See Figure 12 below.
- Make other selections as appropriate. Then click Print.
Figure 12. Select Print Markup to have the document printed with tracked changes. You can see the result in the preview that is shown in the window.
Note that my Word Add-in DocTools ExtractChanges Pro lets you extract tracked changes from Word documents incl. full context. If the primary goal of printing is to get an overview of the tracked changes in their context, the extracts you can make using this add-in gives a better overview of the tracked changes than the result you get by printing a document with Print Markup turned on, as described above. You can print such extract document if you want.
How to print a document without tracked changes
Even if your document includes tracked changes, you can print it so that the tracked changes are hidden in the printout. The document will print as if the changes had been accepted.
- Select File > Print.
- Under Settings, click the first button (shows Print All Pages or another text depending on your latest print settings).
- Make sure that Print Markup in the menu that appears does not have a check mark. See Figure 12 above.
- Make other selections as appropriate. Then click Print.
How to print a list of the tracked changes in a Word document
If your document includes tracked changes, you can print a list of tracked changes using Word’s built-in functionality:
- Select File > Print.
- Under Settings, click the first button (shows Print All Pages or another text depending on your latest print settings).
- Select List of Markup in the menu that appears. You can see List of Markup in Figure 12 above.
- Make other selections as appropriate. Then click Print.
The printout will include all the tracked changes, incl. formatting changes. You will see page number, date, and time for each change plus the change itself.
TIP: The free Word add-in DocTools ExtractData lets you automatically export all insertions and deletions in a document to a new document. The exported data is set up in a table. For each insertion and deletion, you will find the page number, line number, type of change, the revised text, author name and revision date.
The advanced Word add-in DocTools ExtractChanges Pro lets you export insertions, deletions and comments in full context, including headings and subheadings. In addition, the add-in includes several other features.
Printouts made from extract documents you create with ExtractData or ExtractChanges Pro do not include formatting changes. However, the extract documents include more details about each insertion and deletion and provides a better overview than the built-in feature.
Multiple authors and Track Changes
How to see who made the changes in a document in case of more than one author
Word use two terms for the people who make track changes to a document: author and reviewer.
METHOD 1 – Hover the mouse over the tracked change to see author name and more
If you have selected Display for Review > All Markup, Word displays a small screen tip, showing the change, the author name, and the date and time the change was made.
Figure 13. Example of screen tip shown when hovering the mouse over a tracked change.
If no screen tip is shown:
- Check that Review tab > Display for Review > All Markup is selected.
- Check that screen tips are set to be shown. To show screen tips on hover, turn on File > Options > Display > Show document tooltips on hover.
METHOD 2 – Show revisions in balloons
Works in Print Layout view and Web Layout view only.
Make sure that Review tab > Display for Review > All Markup is selected. Select Show Markup > Balloons > Show Revisions in Balloons. Then you will se information about each change in the balloon area.
If too many changes are found to show all information, you must click a change to see the details about that change.
Figure 14. The Show Markup menu with the Balloons menu displayed. The Highlight Updates and Other Authors commands are usually disabled unless for shared documents.
METHOD 3 – Show the Reviewing Pane
Works in all views except Read Mode. Also works even if tracked changes are hidden.
No matter how tracked changes are displayed, you can show the Reviewing Pane to see information about each tracked change. You can turn the Reviewing Pane on and off via Review tab > Reviewing Pane. Select Reviewing Pane Vertical or Reviewing Pane Horizontal as desired.
Colors and Track Changes
How to display tracked changes with the same colors no matter who made the changes
To use the same colors for each author’s changes:
- Open the Advanced Track Changes Options dialog box (see How to open the Advanced Track Changes Options dialog box below).
- In all color boxes, make sure to select a named color instead of By Author. For example, to see all insertions as Red, click the Color field next to Insertions and select Red.
- Click OK.
How to display each author’s changes in a different color
To display each author’s changes in a different color:
- Open the Advanced Track Changes Options dialog box (see How to open the Advanced Track Changes Options dialog box below).
- In all color boxes, select By Author.
- Click OK.
The Advanced Track Changes Options dialog box offers the colors shown below.
Figure 15. The lists of colors you can select from in the color fields in the Advanced Track Changes Options dialog box.
The By Author color icon is sometimes two-colored, red and blue.
When using the By Author setting, one could think that Word would use the colors found in the lists above. However, that is not the case.
I created a macro to change the user name 100 times and for each user name insert the text User# with tracked changes in a document. I found the following:
- If By Author is selected, Word seems to use the 20 different colors illustrated below for markup types that offer the left-most list of colors illustrated above.
- However, if you have already previously added tracked changes using other settings in any document in that Word session (i.e. since you started Word), the allocation of colors seems to be random.
- The 20 different colors used are not the same as the colors found in the left-most color list above.
Figure 16. Word seems to use 20 different colors if By Author is selected. This illustration is part of the result of adding text using 100 different user names. User no. 21, 22, etc. are allocated the same colors as User no. 01, 02, etc. However, if other color settings have been used in the same Word session, the allocation of colors seems to be random.
Read on below for more details about colors and tracked changes.
How to define which color to use for each author – you can’t
If you have selected to apply color By Author as explained above, you may think you can determine which colors to use. The answer to this is: You can’t. Word allocates the colors.
As explained and illustrated above in How to display each author’s changes in a different color above, Word seems to use a total of 20 colors for different authors. If more than 20 authors are involved, the colors are reused for other authors. However, as explained above, the color allocation sometimes seems random.
Do tracked changes made by a specific author always appear with the same color?
As explained in How to display each author’s changes in a different color above, Word allocates colors to tracked changes if you have selected to color By Author.
You can’t be sure that two different users see the same colors in the same document. Also, you can’t be sure that you see the same colors each time you open the same document yourself.
How to make sure that other users see tracked changes in the same way as you do
It is the individual users’ settings of track changes options that determine how they see track changes.
You can’t control their settings unless by using e.g. a macro (programming) to force the options to be set in a specific way. It would also be possible for an IT department in a company to force specific track changes settings via Group Policy.
Track Changes and author names
Word use two terms for the people who make track changes to a document: author and reviewer.
Where does the author name shown in tracked changes come from?
The name shown in tracked changes you make is determined by the current user name set up on your computer. You can change the user name and initials. This will influence new tracked changes you add. Read on to lean how.
How to change the name shown in new tracked changes you make
As explained above, the name shown in tracked changes you make is determined by the current user name set up on your computer. You can change the user name and initials from two places – they both lead to the same dialog box:
- Select File > Options > General. Enter values in the User Name and Initials fields. Click OK.
- Open the Track Changes Options dialog box (see Figure 21 below) Click the Change User Name button. Enter values in the User Name and Initials fields. Click OK.
IMPORTANT
The changed name will apply to new tracked changes you make. Existing tracked changes will remain unchanged.
The change of user name applies to all Office applications (Word, Excel, PowerPoint, etc.)
How to change the user name in existing tracked changes
Once you have made tracked changes, there is no built-in method in Word to change the author name to another name.
However, Word lets you remove personal information from a document. This will set the name of all comments and tracked changes to “Author”. For details, see my article about how comments in Word works.
The DocTools ExtractChanges Pro add-in (from version 6.0) includes a command, Change Author & Date, that lets you change the name in existing tracked changes and comments. In addition, the command lets you remove or change the date of the tracked changes and comments. You can select whether the name and/or date changes are to be applied to all tracked changes and comments or only tracked changes and comments added by a specific author. The changes are made in copy of the document so that the original document remains unchanged.
TIP: If you want to remove the name from tracked changes and comments, you can type e.g. a non-breaking space (Ctrl+Shift+Spacebar), a hyphen or an En dash as both the author name and initials in the Change Author & Date dialog box in DocTools ExtractChanges Pro.
How to remove the name from existing tracked changes
As explained above, Word has no built-in method to change the author name of existing tracked changes except from using the tools to remove personal information.
My add-in DocTools ExtractChanges Pro has a tool that lets you remove or change the name of existing tracked changes and comments. See the information above.
How to display only the tracked changes made by specific authors
Remember that tracked changes are also called revisions – authors are also called reviewers.
To display only tracked changes made by specific authors:
- Select Review tab > Show Markup > Reviewers > select or deselect the reviewers (authors) as desired. Only tracked changes added by reviewers with a check mark will be shown.
Compare or combine Word documents
Word lets you compare two documents to find the differences between the documents no matter whether the individual documents include tracked changes. Word also lets you combine – or merge – documents and, at the same time, preserve all tracked changes and comments from the individual documents. Read on the learn how.
How to find the differences between two versions of a document
You can use Word’s Compare feature to find the differences between two versions of a document and mark the differences as tracked changes. This is also referred to a legal blackline.
You can use the feature no matter whether the documents already contain tracked changes.
The result of the compare is the same as if you had made all the changes. Your current user name will be shown as the author name on all changes.
compare two documents to find the differences between the documents
If one or both of versions you select to compare already includes tracked changes, Word will treat those changes as if they had been accepted.
If you want to preserve the changes made by individual authors so you can see who made the changes, you can instead use Word’s Combine command. See How to create a new document that combines tracked changes from different authors while keeping existing tracked changes below.
To compare two documents:
- Select Review tab > Compare > Compare to open the Compare Documents dialog box. If you can’t see all options in the dialog box, click the More >> button. See Figure 17 below.
- In the Compare Documents dialog box, select the original document and the revised document either from the two lists or by using the browse buttons besides the lists.
- Below Comparison settings, turn on check boxes as desired to specify which types of changes you want to be marked in addition to insertions and deletions, if any.
- Below Show changes, select whether to show changes at character level or word level. See the examples in Figure 18 below.
- Below Show changes in, select in which document to show the changes. The default is New document which I recommend in most situations. Then Word creates a new document with the changes, without making any changes in the existing documents.
- Click OK to execute the compare.
Figure 17. The Compare Documents dialog box with all options shown.
The illustration below shows the difference between selecting Character level and Word level in step 4 above.
- Character level will show changes in individual words by marking as few inserted or deleted characters as possible.
- Word level will show changes in individual words by marking the original word as deleted and the revised word as inserted.
Figure 18. Example of the difference between selecting Character level and Word level in step 4 above.
TIP: The DocTools ExtractChanges Pro add-in lets you – in one operation – compare two versions of a document and extract all changes and comments from the compared version. The DocTools ExtractChanges Pro add-in also lets you do that with multiple documents at a time. You can batch compare one document with several other versions of the same document and extract the changes and comments. Or you can batch compare documents by pairs and extract the changes and comments.
How to merge track changes from two or more documents into one document
If two or more authors have added tracked changes and comments to two or more separate copies of a document, you may want to combine those tracked changes and comments in one document and still preserve the information about who made which change and when.
Word’s Combine feature can be used for that – follow the steps below. However, it only lets you combine two documents at a time. If you want to combine more than two documents, you need to repeat the procedure steps as described in Step 8 below.
To combine two versions of a document and retain existing tracked changes:
- Select Review tab > Compare > Combine to open the Combine Documents dialog box. If you can’t see all options in the dialog box, click the More >> button. See Figure 19 below.
- In the Compare Documents dialog box, select the original document and the revised document either from the two lists or by using the browse buttons besides the lists.
- When you have selected documents, the name defined as your user name will automatically be inserted in the Label unmarked changes with fields. Change the name, if you want. The name will be used to mark any differences between the two document what are not already marked as tracked changes.
- Below Comparison settings, turn on check boxes as desired to specify which types of changes you want to be marked in addition to insertions and deletions, if any.
- Below Show changes, select whether to show changes at character level or word level. See the examples in Figure 18 above.
- Below Show changes in, select in which document to show the changes. The default is New document which I recommend in most situations. Then Word creates a new document with the changes, without making any changes in the existing documents.
- Click OK to execute the combination of tracked changes.
- If you want to combine more documents, repeat Steps 1-7 above. As the original document, you must each time select the combined result from the last Combine operation and as the revised document you must select another edited document. Repeat until you have combined all the edited documents in one document that includes all tracked changes and comments from all the documents.
Figure 19. The Combine Documents dialog box. It is almost identical to the Compare Documents dialog box.
About the Advanced Track Changes Options dialog box
To manage the detailed setting for the display of tracked changes, you must use the Advanced Track Changes Options dialog box.
NOTE
Track Moves and Track formatting are document-specific settings that are saved in the document. All other options in the Advanced Track Changes Options dialog box apply to all Word documents.
A new Word document you create will inherit the settings of Track Moves and Track Formatting from the template.
How to open the Advanced Track Changes Options dialog box
To open the Advanced Track Changes Options dialog box:
- Select the Review tab in the Ribbon.
- Click the dialog box launcher in the Tracking group. See Figure 20 below.
This opens the Track Changes Options dialog box. - Click the Advanced Options button to open the Advanced Track Changes Options dialog box. See Figure 22 below.
Figure 20. On the Review tab, click the dialog box launcher in the Tracking group to open the Track Changes Options dialog box.
Figure 21. The Track Changes Options dialog box that opens when you click the dialog box launcher in the Tracking group on the Review tab.
Figure 22. The Advanced Track Changes Options dialog box, here shown with the default settings. All options except Comments and Show lines connecting to text are related to the display of tracked changes. See the descriptions below for details about the options.
Overview of all options in the Advanced Track Changes Options dialog box
These general rules apply to Advanced Track Changes Options:
- You can set a specific type of markup out of function by selecting (none) from the related field.
- The settings only come into play when tracked changes are shown.
- Only the Track Moves and Track Formatting options are document-specific. All the other options apply to all Word documents.
For information about the color options (all fields with a color box), see the explanation and illustration in How to display each author’s changes in a different color above.
TIP
For an easy way to revert the settings in the Advanced Track Changes Options dialog box, you can use the ready-to-use macro found on my Word Macros & Tips website.
The table below shows information about all the options in the Advanced Track Changes Options dialog box. Where two options belong together, they are listed side by side with a +sign between.
|
Option |
Default setting |
What it does |
|
GROUP: Markup |
||
|
Insertions + Color |
Underline + By author |
Defines the formatting and color applied to insertions. If you select (none), no formatting is applied. |
|
Deletions + Color |
Strikethrough + By author |
Defines the formatting and color applied to deletions. If you select (none), no formatting is applied. |
|
Changed lines |
Outside border |
Shows vertical bars in the margin where lines with changes are found in the document. The icon below the option shows the result of the currently selected setting. The vertical bars are red in Simple Markup view and gray in All Markup view. You can switch between the displays by clicking a red/gray bar. If Page Setup > Different odd and even is turned on, Outside border shows the lines in the left side of even pages and right side of odd pages. Otherwise, it shows the lines in the left side. If you select (none), no vertical bars are shown. |
|
Comments |
By author |
Defines the color applied to the text that was commented on (the comment scope) and to other comment marks. |
|
GROUP: Moves |
||
|
Track moves |
Turned on |
When turned on, content you cut and paste will be marked. Document-specific option. |
|
Moved from |
Double strikethrough |
Defines how cut text is formatted when you paste it elsewhere. If you select (none), no formatting is applied. |
|
Moved to |
Double underline |
Defines how pasted text that was cut from elsewhere in the document is formatted. If you select (none), no formatting is applied. |
|
GROUP: Table cell highlighting |
||
|
Inserted cells |
Light blue |
Defines the color of new tables cells you insert. If you select (none), no formatting is applied. |
|
Deleted cells |
Pink |
Defines the color of deleted tables cells. If you select (none), no formatting is applied. |
|
Merged cells |
Light yellow |
Defines the color of cells that have been merged from multiple cells. If you select (none), no formatting is applied. |
|
Split cells |
Light orange |
Defines the color of table cells that have been split. If you select (none), no formatting is applied. |
|
GROUP: Formatting |
||
|
Track formatting |
Turned on |
When turned on, changes to formatting will be marked. Document-specific option. Examples of formatting changes: Apply bold, underline, color, change font, change font size. |
|
Formatting + Color |
(none) + By author |
Defines the formatting and color applied to formatting changes. It seems counter-intuitive to mark formatting changes with further formatting – this may conflict. It seems most relevant to keep the default, (none). |
|
GROUP: Balloons |
||
|
Preferred width |
Inches: 3.7″ |
Default depends on the default unit of measurement. Defines the width of the balloons area. Seems to be measured from the vertical bars showing changed lines and to the edge of the paper, provided the vertical bars are in the same side of the page as the balloons area. |
|
Margin |
Right |
Defines whether balloons are shown in the left or right side of the page. |
|
Show lines connecting to text |
Turned on |
Defines whether comments are connected to the texts that was commented on (the comment scope). |
|
Paper orientation in printing |
Preserve |
Defines the paper orientation in print when printing with tracked changes. Auto adjusts orientation based on content. Preserve keeps the actual orientation of pages. Force landscape prints all pages as landscape when printing with tracked changes. |
Special tips about tracking changes
Tips on special situations where Track Changes may be helpful
Normally, it is relevant to track changes in the reviewing process of a document or when asking others for feedback on a document. For example, tracked changes are used a lot in relation to contract work.
It may also be useful to turn on Track Changes in other situations. For example, you may turn on Track Changes before you make a big change to your document. If you don’t like the result, you can quickly reject the changes.
How to get access to the Accept or Reject Changes dialog box from older versions of Word
Long ago, in Word 2000 and earlier versions, Word had a dialog box that worked well as the control center for accepting or rejecting changes. See the illustration below:
Figure 23. It is still possible to access the old Accept or Reject Changes dialog box. You can assign a keyboard shortcut to the command and/or you can add it to the Quick Access Toolbar (QAT).
The dialog box still works but you can’t access it by default. However, you can easily assign a shortcut to the command or add it to the Quick Access Toolbar (QAT). Follow the instructions below:
- To assign a keyboard shortcut to the Accept or Reject Changes command, follow the general instructions in the Microsoft article Customize keyboard shortcuts. In step 4 in the procedure, select All Commands, in step 5, select ToolsReviewRevisions.
- To add the Accept or Reject Changes to the Quick Access Toolbar (QAT), follow the general instructions in the Microsoft article Customize the Quick Access Toolbar. See the section “Add a command to the Quick Access Toolbar that isn’t on the ribbon”. Select All Commands in the left-most list. The command to find in the list is:
Accept/Reject Changes (ReviewAcceptOrRejectChangeDialog)
About the View options in the Accept or Reject Changes dialog box:
- Changes with highlighting corresponds to selecting Display for review > All Markup.
- Changes without highlighting corresponds to showing Display for review > No Markup.
- Original corresponds to showing Display for review > Original.
- If Display for review > Simple Markup is selected when you open the dialog box, click View option no. 2 or 3 and then click back to option no. 1 to have All Markup displayed.
Balloon settings are found in two places – how are they related?
Some the Track Changes commands and options can be rather confusing. Some are found in more that one place and identical options are not always named identically. This is the case for the Balloons options.
You can set Balloons options in two different places:
- In Review tab > Show Markup > Balloons menu
- In the Track Changes Options dialog box
To open the dialog box, click the dialog box launcher in Review tab > Tracking group. See Figure 20 above.
See the illustrations below:
Figure 24. The options marked no. 1, 2, and 3 in the Show Markup > Balloons menu are the same as the options marked no. 1, 2, and 3 in the Track Changes Options dialog box in Figure 25 below.
Figure 25. The options marked no. 1, 2, and 3 in the Balloons in All Markup view show list in the Track Changes Options dialog box are the same as the options marked no. 1, 2, and 3 in the Show Markup > Balloons menu in Figure 24 above.
If you select one of the options marked no. 1, 2, and 3 in Figure 24, the corresponding option marked no. 1, 2, or 3 in Figure 25 will automatically be selected and vice versa.
Security issues in relation to Track Changes
Make sure that you don’t email or publish Word documents that include tracked changes (or comments) that are not meant to be seen by others.
You can reduce the risk of revealing tracked changes unintentionally if you take the precautions described below.
How to avoid sending Word documents to others with tracked changes that should not be shared
There are many examples out there about Word documents that have been distributed to others or published with tracked changes that were indeed not meant to be seen be others.
IMPORTANT
Be careful not to distribute Word documents containing tracked changes unless the receiver needs to see the changes.
It is the Track Changes settings on the individual Word user’s computer that determine how that user sees tracked changes. Your own settings only apply to what you see on your computer.
Remember that tracked changes remain in the document until they are accepted or rejected. Even if you hide tracked changes, they are still in the document. This means that they can easily be turned on by another user who opens your document.
To make sure that you are automatically warned before printing, saving, or sending a Word document to somebody else:
- Select File > Options > Trust Center.
- Click the Trust Center Settings button to open the Trust Center dialog box.
- Click Privacy Options.
- Turn on the options:
Warn before printing, saving, or sending a file that contains tracked changes or comments
Make hidden markup visible when opening or saving - Click OK to close the dialog boxes.
See Figure 26A below. When these options are on, you are warned so you can take your precautions before you continue.
If you save often (which I recommend), you may not want to turn on the option Warn before printing, saving, or sending a file that contains tracked changes or comments since a message will open, warning you each time you save a document that includes tracked changes or comment (see Figure 26B below). You may find that too annoying.
Figure 26A. Trust Center settings that can help you avoid problems with tracked changes that are distributed to others unintentionally. See also Figure 26B below.
Figure 26B. The warning that appears when saving if Warn before printing, saving, or sending a file that contains tracked changes or comments is turned on. The text in the message varies depending on the types of revisions found in the document.
How to lock tracking so Track Changes can’t be turned off
Word lets you lock Track Changes so it can’t be turned off. This way, you can make sure that the document will be shown with tracked changes and that users can’t accept or reject existing changes. User’s can only add new changes.
To lock tracking, select Review tab > click the arrow below the Track Changes icon > select Lock Tracking > enter a password > Click OK.
The Lock Tracking icon is highlighted when tracking is locked.
To unlock tracking, select the Lock Tracking command again > enter the password > click OK.
Other operations and commands, in addition to Track Changes, Accept, and Reject, may be unavailable or disabled in a document when tracking is locked.
How to find out whether there are tracked changes in your document
METHOD 1 – Try to click Previous or Next on the Review tab
To easily find out whether there are any tracked changes (or comments – another type of revision) in your document, select the Review tab and click Previous or Next in the Changes group. The message below is shown if no comments or tracked changes are found in the document.
Figure 27. This message is shown if you click Previous or Next and if no comments or tracked changes are found in the document.
If revisions are found, Word will instead move to the previous or next revision.
METHOD 2 – Use Document Inspector
Note that this method may remove more data from your document than you like and it is not always totally clear what Word does.
If you use the tools on the Review tab with care and are aware of the importance of accepting or rejecting changes before you distribute documents to people who shouldn’t see the changes, you should be safe.
Personally, I never use Document Inspector to remove information.
- Select File > Info > Inspect Document > Check for Issues > Inspect Document.
- In the Document Inspector dialog box, make sure the option Comments, Revisions, and Versions is selected.
- Click Inspect.
- If comments and/or tracked changes are found, a dialog box lets you click Remove All. If you do so, Word will accept all tracked changes and remove all comments.
Note that Word doesn’t tell but “Remove All” means “Accept” in relation to tracked changes.
- Click Close.
For more details, see the Microsoft article Remove hidden data and personal information by inspecting documents, presentations, or workbooks.
How to make sure that Word always displays tracked changes when you open a document
To make sure that Word always displays tracked changes when you open a document, turn on the Trust Center setting Make hidden markup visible when opening or saving. For details, see How to avoid sending Word documents to others with tracked changes that should not be shared above.
IMPORTANT
The fact that traced changes are shown doesn’t mean that Word tracks changes when you start editing the document. To do that, you must make sure to turn on Track Changes.
How to make sure that Word warns you before emailing a document that contains tracked changes
To make sure that Word shows a warning if you attempt to email a document with tracked changes, turn on the Trust Center setting Warn before printing, saving, or sending a file that contains tracked changes or comments. For details, see How to avoid sending Word documents to others with tracked changes that should not be shared above.
I want to send my document outside the company – I want to leave tracked changes in the document, but I don’t want anyone to see who made the tracked changes or when they were made – how can I do that?
To neutralize tracked changes both as regards author names and time information, you can use the Document Inspector.
NOTE
This method may have undesired side-effects. See the CAUTIONS below.
- Select File > Info > Inspect Document > Check for Issues > Inspect Document.
- In the Document Inspector dialog box, make sure the following option is selected:
Document Properties and Personal Information
(You can leave other options checked as well – the first step will not make any changes to the document but only inspect it). - Click Inspect.
- A new dialog opens. A Remove All button is shown next to Document Properties and Personal Information. If you click the Remove All button, the name “Author” will be assigned to all tracked changes in the active document instead of the current author name(s). In addition, date and time will be removed from tracked changes.
- Click Close.
CAUTION 1
The Remove All button for Document Properties and Personal Information turns ON the Trust Center option Remove personal information from file properties on save for the document.
This means that the removal of name and properties will continue to take place also each time you save the document. That is most likely not what you want. To prevent this setting from being saved in the document, select File > Info again and click the text Allow this information to be saved in your file (shown below Inspect Document) to turn off the setting – the text you clicked disappears and the setting has now been turned off (not very intuitive, in my opinion…).
You can also turn off the setting via Trust Center: Select File > Options > Trust Center > Trust Center Settings > Privacy Options and remove the check mark from Remove personal information from file properties on save.
CAUTION 2
The Remove All button also removes all custom document properties and clears all data from built-in properties. If you have DocProperty fields in the document, they will show errors unless you have locked or unlinked the fields first.
For more details about the Document Inspector, see the Microsoft article Remove hidden data and personal information by inspecting documents, presentations, or workbooks.
What other kinds of hidden information might be saved in my Word document?
Your Word documents might contain various kinds of hidden information that could compromise your security or reveal information that you don’t want to share. The term metadata (that is, data about the data) is used to refer to this kind of information.
For details about how to reduce or remove different types of metadata from your documents, see the Microsoft article Remove hidden data and personal information by inspecting documents, presentations, or workbooks.
Troubleshooting in relation to Track Changes
PROBLEM 1 – I have turned on Track Changes but I don’t see any changes
- CHECK 1 – Make sure that you have selected either Simple Markup or All Markup in the Display for Review menu on the Review tab in the Ribbon.
If you still can’t see any changes:
- CHECK 2 – Make sure at least one of the following options in the Show Markup menu is checked: Insertions and Deletions, Formatting.
If you still can’t see any changes:
- CHECK 3 – Open the Advanced Track Changes Options dialog box and check the settings. If a setting is set to (none), that setting is put out of action.
If you still can’t see any changes:
- CHECK 4 – The reason may be that the document contains no tracked changes. To easily find out, click Previous or Next in the Changes group on the Review tab. The message below is shown if you click Previous or Next and if no comments or tracked changes are found in the document.
Figure 28. This message is shown when you click Previous or Next if there are no comments or tracked changes in the document.
PROBLEM 2 – I have turned on balloons but no balloons are shown
Make sure that you have selected All Markup in the Display for Review menu on the Review tab in the Ribbon. Balloons are only shown in All Markup view.
Also, Balloons can only be shown in Print Layout view and Web Layout view.
TIP
You can switch from Simple Markup to All Markup display by clicking a red vertical line in the margin.
PROBLEM 3 – No screen tips are shown when I hover the mouse over a tracked change
- Check that Review tab > Display for Review > All Markup is selected.
- Check that screen tips are set to be shown. To show screen tips on hover, turn on File > Options > Display > Show document tooltips on hover.
PROBLEM 4 – Why are Accept All Changes Shown and Reject All Changes Shown disabled?
In the Accept and Reject menus, the commands Accept All Changes Shown and Reject All Changes Shown are disabled if comments and all types of tracked changes by all people are already selected to be shown. The commands are only enabled if not all comments and tracked changes are selected to be shown.
If, for example, you turn off display of Formatting changes, the commands will be enabled. The commands will also be enabled if Review tab > Show Markup > Specific People isn’t set to All Reviewers.
PROBLEM 5 – I want to define which color to use for each author – how can I do that?
You can’t define which color is used for which author. Word allocates the colors. See How to define which color to use for each author – you can’t above.
PROBLEM 6 – Other users don’t see the same colors used for the individual authors as I do – how can we be sure to see the same colors?
You can’t define which color is used for which author. Word allocates the colors. See How to define which color to use for each author – you can’t above.
PROBLEM 7 – When I use Track Changes, many fields appear as both deleted and inserted – how do I fix that?
A Word document can include many types of fields. Fields include instruction to Word about which content to show. Examples of fields are tables of contents (TOC), numbers in captions, DocProperty fields that show values of custom document properties.
If tracked changes are shown, and if the All Markup display option is selected, you may see many fields twice, both as deleted and inserted. This happens for fields whose results are affected by tracked changes. This influences the layout and it may look confusing. However, Word will fix the fields as soon as you accept or reject the changes and update fields (Ctrl+A to select all, F9 to update fields).
PROBLEM 8 – When I use Track Changes, the automatic numbering of headings and lists look wrong – how do I fix that?
If you view tracked changes inline and if you have added or deleted numbered items, Word will show changes to all numbers that are affected by the changes. This may influence the layout and it may look confusing. However, Word will fix the numbering as soon as you accept or reject the changes. See the example below.
Figure 29. Example of automatic numbering with tracked changes.
PROBLEM 9 – When I open a document, Word automatically shows tracked changes – why?
Word automatically opens with tracked changes displayed if the Trust Center setting Make hidden markup visible when opening or saving is turned on. See How to avoid sending Word documents to others with tracked changes that should not be shared above.
You may turn off the setting. However, having it turned on helps you avoid security issues.
PROBLEM 10 – How can I determine how other users see tracked changes when I share my documents?
It is the Track Changes settings on the individual Word user’s computer that determine how that user sees tracked changes. Your own settings only apply to what you see on your computer.
For more details, see How to make sure that other users see tracked changes in the same way as you do above.
PROBLEM 11 – The Track Changes, Accept, and Reject commands are disabled – how can I fix that?
The problem is most likely that track changes has been locked with a password. Only users who know the password can unlock tracking. See How to lock tracking so Track Changes can’t be turned off above.
PROBLEM 12 – How to get rid of track changes in Word?
To get rid of track changes in Word, you need to remove the changes by accepting or rejecting them. See How to remove tracked changes in Word above.
PROBLEM 13 – I can’t change the user name – how to fix that?
If you can’t change the user name as described in How to change the name shown in new tracked changes you make above, the problem is most likely that your IT department has locked the user name via Group Policy. You may contact the relevant people to find out whether you will be allowed to change the name.
PROBLEM 14 – The author names of tracked changes and comments keep changing to “Author” – why does this happen and how to fix it?
If you use Word’s Inspect Document feature to remove Document Properties and Personal Information from a document, Word remembers this in that specific document by automatically turning ON the Trust Center option Remove personal information from file properties on save for that document.
As long as the Remove personal information from file properties on save option is turned ON, Word will continue to run the removal procedure each time you save the document. As a result, the author name (and date) of every tracked change and comment in the document will change to «Author» each time you save.
To prevent Word from changing the author name to «Author», you must turn OFF the Remove personal information from file properties on save option. Note that any tracked change and comment that has already been changed to show «Author» will not be changed back to show the original author name, but Word will stop changing the author name of new tracked changes and comments. To turn off the option, use one of the following two methods:
METHOD 1: Stop changing to «Author» via File > Inspect Document
Select File > Info > click the text Allow this information to be saved in your file (shown below Inspect Document) to turn off the setting – the text you clicked disappears and the setting has now been turned off (as also mentioned in “CAUTION 1” above, this is not very intuitive). See the illustration below.
Figure 30. How to turn off Remove personal information from file properties on save via Inspect Document. To close the Backstage view, press the Esc key or click the circled arrow in the top-left corner of the window.
METHOD 2: Stop changing to «Author» via Trust Center > Privacy Options
Select File > Options > Trust Center > Trust Center Settings > Privacy Options and remove the check mark from Remove personal information from file properties on save. See the illustration below.
Figure 31. How to turn off Remove personal information from file properties on save via Trust Center.
PROBLEM 15 – How to merge Word documents with comments and track changes?
If different authors have added tracked changed and comments in separate copies of a Word document, you may want to merge all those documents into one document. You can do that using Word’s Combine feature as explained in this step-by-step-procedure.
PROBLEM 16 – The Advanced Track Changes Options dialog box is smaller than normal and is missing the group headings – how to fix that?
I experienced some time ago that the Advanced Track Changes Options dialog box looked too small. I found out that it was missing the headings that are normally used to group the options.
The dialog box has a lot of options. For any user who is not familiar with all the options, the missing group headings would make it really difficult or impossible to find out what the individual options refer to.
The problem with the missing headings in the dialog box seemed to appear randomly. Sometimes the headings were there, sometimes not.
I reported the problem to Microsoft. The answer from Microsoft, after some troubleshooting, was that this specific dialog box has a minimum vertical resolution requirement. This means that the headings will not be shown if the screen resolution is below a certain level.
Even if my screen resolution was more than sufficient to allow the headings to be shown, they sometimes were not shown. I found out that zooming up in Word was what made the headings in the dialog box disappear even if zooming has nothing to do with the size of the dialog box or the screen resolution. Zooming above a certain percentage (131 % on one monitor, 151 % on another monitor) made the headings in the dialog box disappear. Microsoft is not going to fix this problem.
If you run into the problem with disappearing headings in the Advanced Track Changes Options dialog box, the solution is the following:
- Close the Advanced Track Changes Options dialog box.
- Zoom down in Word.
- Open the Advanced Track Changes Options dialog box again.
- If the headings still don’t appear, repeat the steps above.
The illustration below shows how the dialog box looks when the group headings are missing:
Figure 32. The Advanced Track Changes Options dialog box is missing headings due to too high zoom in Word. The headings Markup, Moves, Table cell highlighting, Formatting, and Balloons are missing here. You can compare it to Figure 22 above.
Acknowledgment
Thanks to Shauna Kelly who wrote an article about Track changes, covering Word 2010 and earlier versions. Shauna’s article has been visited by thousands of Word users. It is still visited many times a day. However, since that article was written and last revised when Word 2010 was the newest version of Word, it does not cover all the changes that have been made to the features since then.
This article is written in recognition of Shauna Kelly’s work. It covers all the areas that Shauna covered in her article, however updated to match newer versions of Word. This article also covers all the new and changed Track Changes features added after Word 2010.
Related information
My Word Add-ins DocTools ExtractData and DocTools ExtractChanges Pro both let you extract tracked changes from Word documents. See a comparison of the two add-ins.
For detailed information about how comments in Word work, see my article How comments in Word work.
For a ready-to-use macro to revert the settings in the Advanced Track Changes Options dialog box to default plus several VBA code snippets for handling track changes, see this article on my Word Macros & Tips website.
This article has explained how Track Changes in Word works. I hope this article helps you in your future work with tracked changes in Word.
Microsoft Word allows the users to review the documents and provide their review comments inside the document. You can also enable tracking the changes in the document. So it will be useful later at the time of reviewing or finalizing the document.
Below are the steps to track changes in the Word document, Create/Delete the comments and Accept/Reject the changes made in the document.
This article applies to:
- Microsoft Word 2010
Step (1). Open your Word document into the Microsoft Word application.
Step (2). Click on the Review tab on Ribbon control. It will display review-related icons on Ribbon control.
Step (3). Check whether the Track Changes feature is already enabled or not. If it is not enabled, click on the Track Changes icon to enable Track Changes. Remember that before reviewing the document you must enable track changes. So this enables you to track all the changes you make to the document including insertions, deletions, and even formatting changes. This will be useful at the time of finalizing the changes in the document to accept or reject the changes you make to the document.
Step (4). Review the document and make any corrections to the document. The changes will be tracked and Word will create tracking entries in the document. So these tracking entries are useful to accept or reject while re-reviewing or finalizing the document.
Step (5). Insert the review comments by selecting the text or paragraph for which you want to provide your review comments and click on the New Comment icon. It will insert a comment and allow you to provide the text for your comment.
Step (6). Select the comment and update the text you want to provide into it or you can also delete the comment by clicking on the Delete comment icon.
- You can also delete multiple comments at a time. Click on the arrow mark below the Delete icon. It will display a pull-down menu. Select Delete All Comments Shown to delete all displayed comments or click on Delete All Comments in Document to delete all the comments in the document.
Step (7). Usually, documents are on multiple pages and while reviewing the documents it is a bit difficult to navigate between the items which you want to review. You may not be required to review all the documents but may be required to review portions of the document or may be required to review particular reviewers’ changes in the document.
Step (8). Click on the Show Markup button which is under the Tracking group. It will display a pull-down menu. From Show Markup pull-down menu:
- Select the items you want to review. Once you selected, those markups only showed in the document. For eg: You need to review only the comments made by reviewers, just select Comments and un-select the rest of the items. So in the document, it displays only the markups related to the comments.
- Select Reviewers menu item. It will display a sub-menu with a list of reviewers. Select the reviewers whose changes you want to track and un-select the rest of the reviewers. So in the document, it will show the markups related to the selected reviewers only.
Step (9). While reviewing the document, you may need to Accept or Reject the changes made in the document.
- Click on Accept button which is under the Changes group to accept the selected change.
Microsoft Word – Review – Accept changes - You can also accept multiple changes at a time:
- Click on the arrow symbol under Accept button. It will display a pull-down menu.
- From the pull-down menu, click on Accept All Changes in Document to accept all the changes in the document or click on Accept All Changes Shown to accept only the changes currently shown in the document.
- By clicking on the Reject button you can reject the selected change.
Microsoft Word – Review – Reject changes - You can also reject multiple changes at a time:
- Click on the arrow symbol under the Reject button. It will display a pull-down menu.
- From the pull-down menu, click on Reject All Changes in Document to reject all the changes in the document or click on Reject All Changes Shown to reject only the changes currently shown in the document.
- Navigate between the changes by clicking on the Previous or Next buttons.
Step (10). You can also see the summary of review changes by clicking on Reviewing Pane button which is under the Tracking group in Review ribbon control. This window is useful while reviewing the changes because it will display all the changes in one place in the respective section.
- Once you click on Reviewing Pane button it displays a Reviewing Pane either horizontal or vertical depending on your selection in Reviewing Pane pull-down menu. This menu will display when you click on the arrow button next to Reviewing Pane button from the Tracking group.
Microsoft Word – Reviewing Pane pull-down menu - Even you can Accept/Reject the changes from Reviewing Pane. Select the review item and right-click on it. It will display a pop-up menu. You can select Accept Deletion or Reject Deletion to accept or reject the selected change.
Microsoft Word – Reviewing Pane pop-up menu - On top of the Reviewing Pane, it displays a summary of revisions, types of changes along the count.
Once you are going to finalize the review of the document, you must review all the changes and you should not leave any of the changes left it either accepted or rejected before going to release the document.
If you collaborate with team members on projects, the Track Changes feature in Word 2016 is essential, and now more powerful. Here’s how it works.
If you collaborate with team members on projects or mark up contracts with redlines, tracking changes in Microsoft Word can be a lifesaver! Track Changes is a built-in feature in Microsoft Word which truly brings sanity to the process. Even if you are not working on complex projects such as acquisitions, mergers, contracts, or authoring a best seller – Track Changes can be just as useful for small group projects, such as school assignments.
Since we last covered this feature in Microsoft Word 2010, significant improvements make Track Changes even more powerful. With the availability of Office Online, users can perform real-time collaboration on a document, which is one of the exciting new features we look at in this article.
Enable and Use Track Changes in Word 2016
Step 1: Starting Content
You will need to start with some content within the document you are collaborating on. A different user is writing this part of the document. I wrote the first paragraph.
Step 2: Enable Track Changes
To start tracking changes, go to the Review tab and click Track Changes in the Tracking group (you can also press CTRL + SHIFT + E.)
When Track Changes is enabled, you will see a balloon for each author on the screen’s right-hand side.
Step 3: Editing
Track Changes in Word uses color coordination to avoid confusion. The first author is blue, and the second is red. When additional authors make edits, they will also be assigned a unique color.
When edits are made to the document, a vertical line appears next to the paragraph to indicate the changes that have been made to the document. Notice the first paragraph does not have this because Track Changes was not enabled until further into the document. When you click the Show Track Changes bar, it immediately activates a highlight of all the edits made to the document and their commentary. If you keep it enabled and make edits, you will see the changes in real-time as you type and delete.
Step 4: Comments, Balloons & Additional Editing Tools
If you want to add a comment on a word or paragraph, highlight it, select the Review tab and click New Comment in the Comments group. Your comments will then appear on the right side of the document when the document is finalized; you can turn them off.
One of the things you’ll notice when you apply special formattings such as Bold, Italic, or Underline, a comment is automatically added to the track changes called Formatted.
You can also customize how you want balloons to appear on the document. For instance, if you want to see all the revisions added to the document by each author, click the Review tab > Show Markup menu > Balloons > Show revisions in balloons.
Revisions
The Reviewing Pane (Review > Reviewing pane) lets you review all edits by each author, which you can view vertically or horizontally on the screen. You can click a word or paragraph in the Revisions pane, and it will automatically navigate to that part of the document.
Step 5: Accept or Reject Changes made to document
If you agree with the changes that have been made to the document, you can Accept or Reject them. Click the Show Track Changes bar to highlight changes made by the other author, then go to the Review tab, click the Accept button to confirm.
You’ll now notice the changes are applied immediately.
Step 6: Compare Or Combine Documents
Another handy feature authors can take advantage of is the ability to version track a document. For instance, if two authors fork the same documents into two copies and continue working on them separately, they can later compare the two versions and combine them. As long as they are similar in structure, you can combine them to create a final document.
To compare and combine changes, select the Review tab, click Compare, select the original document in the field box, select the revised version, and then click OK.
Microsoft Word will then present a three-pane view of the document showing the main screen as the final document with combined content and the original and alternate copies in a mini window pane. When you scroll through, you can compare the changes. This is preferably done on a screen with enough screen resolution.
When you are ready to combine the documents into a final copy, go back to the Review tab, click Compare, then click Combine, select the original document in the field box, select the revised version, and then click OK.
You will then see the combined document along with the changes made by other authors in another color.
Integration with Office Online
One of the killer features of Google Apps has been its real-time collaboration tools. Microsoft has finally caught up thanks to its Office Online suite, which features a web-based version of Word. A new feature in Word 2016 is sharing and viewing who is working on your document. To do that, click the Share button and save the document to your OneDrive folder.
The Share pane will then reveal additional options, with the ability to invite persons to edit the document with different restrictions. You will also notice the Block Authors and Restrict options are now enabled within the Protect group. If you use Microsoft 365 (formerly O365) in an enterprise setting, you can invite authors to collaborate.
For this article, I will use the Get a sharing link to email to additional authors I would like to collaborate with on the document.
When you or the other author load Word Online and make changes, other persons collaborating on the document will be notified in real-time.
Here you can see saved edits made by the other author are color-coded in a blue highlight.
When an author is no longer editing the document, you will be notified within Word 2016.
As you can see, Track Changes is even more powerful with its real-time collaboration features. Whether you are working on projects big or small, Word 2016 can make it easy to keep everyone on the same page. Color coordination, sharing, real-time editing, and cloud integration with OneDrive add up to a compelling experience.


