
Word for Microsoft 365 Word for Microsoft 365 for Mac Word 2021 Word 2021 for Mac Word 2019 Word 2019 for Mac Word 2016 Word 2016 for Mac Word 2013 Word 2010 Word 2007 More…Less
After you have created a table of contents in Word, you can customize the way it appears. Customizing your table of contents applies your preferences to your existing table. Like what you see, select OK. If you’re not happy with the look, just select Cancel and all changes are forgotten. Your table of contents will still be there.
To customize your existing table of contents:
-
Go to References > Table of Contents.
-
Select Custom table of contents.
-
Use the settings to show, hide, and align page numbers, add or change the tab leader, set formats, and specify how many levels of headings to show. For more info, see Custom table of contents .
-
Go to References > Table of Contents > Custom Table of Contents.
-
Select Modify. If Modify is grayed out, change Formats to From template.

-
In the Styles list, click the level that you want to change and then click Modify.
-
In the Modify Style pane make your changes.
-
Select OK to save changes. Repeat steps 3 and 4 for all the levels that you want to display in your table of contents.
To customize your existing table of contents:
-
Go to References > Table of Contents.
-
Select Custom table of contents.
-
Use the settings to show, hide, and align page numbers, add or change the tab leader, set formats, and specify how many levels of headings to show.
-
Go to References > Table of Contents > Custom Table of Contents.
-
Select Modify. If Modify is grayed out, change Formats to From template.
-
In the Styles list, click the level that you want to change and then click Modify.
-
In the Modify Style pane, make your changes.
-
Select OK to save changes. Repeat steps 3 and 4 for all the levels that you want to display in your table of contents.
To customize your existing table of contents, or create a new table:
-
Go to References>Table of Contents>Insert Table of Contents.
-
If you’ve already got a table of contents, customizations will be applied. If not, this will insert a new customized table.
-
Use the settings to show, hide, and align page numbers, add or change the tab leader, set formats, and specify how many levels of headings to show. For more info, see Custom table of contents .
-
Go to References > Table of Contents > Insert Table of Contents.
-
Select Modify. If Modify is grayed out, change Formats to From template.
-
In the Styles list, click the level that you want to change and then click Modify.
-
In the Modify Style pane make your changes.
-
Select OK to save changes. Repeat steps 3 and 4 for all the levels that you want to display in your table of contents.
Do you have a question about Word that we didn’t answer here?
Post a question on the Word Answers forum.
Need more help?
Want more options?
Explore subscription benefits, browse training courses, learn how to secure your device, and more.
Communities help you ask and answer questions, give feedback, and hear from experts with rich knowledge.
Table of Contents entries use nine levels of the pre-defined TOC styles (TOC 1, TOC 2, etc.) for formatting. All TOC styles extend the Body style of the document theme, but each TOC style has a specific indent and spacing settings. By default, Word uses the styles defined in the template attached to the document (by default, the template is normal.dotx):

You can modify the font, paragraph, tabs, border, and other formatting of these TOC styles the same way modify any other style. Using the customizations of the Table of Contents styles, you can:
- Change the line spacing to the double space:

- Format long Headings to avoid overlapping page numbers:

- Align the second line of the long title:
- Customize tab leaders for different headings in the Table of Contents:

Sure, you can format the text of these lists like regular text in the document. However, all changes you make to the Table of Contents without changing the Table of Contents style may be lost after updating fields in the document.
To customize an existing Table of Contents style, you need to select that style and open the Modify Style dialog box. Word offers several different ways how to open that dialog box:
- Using the Table of Contents dialog box.
- Using the Styles pane.
- Using the Reveal Formatting pane.
Open the Modify Style dialog box using the Table of Contents dialog box
To modify TOC styles in the Table of Contents dialog box while creating a new Table of Contents (or editing an existing one), do the following:
1. Open the Table of Contents dialog box (see how to create a Table of Contents).
2. In the Table of Contents dialog box, on the Table of Contents tab, click the Modify… button:

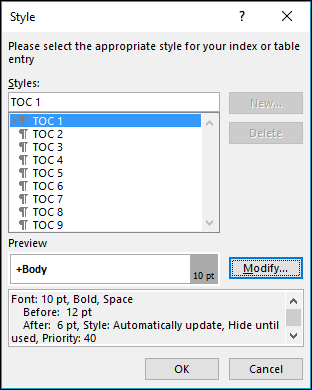
3. In the Style dialog box:
- In the Styles list, select the style you want to modify:

- In the Preview field, see how the selected style looks,
- Under the Preview field, see the main options of the selected style,
- If you need to change the selected style, click the Modify… button.

Open the Modify Style dialog box using the Styles pane
You can create or modify any style in a Word document using the Style pane. To open it, on the Home tab, in the Styles group, click the dialog box launcher (or press Ctrl+Shift+Alt+S):

On the Styles pane:
- Select the style you want to modify,
- Right-click and choose Modify… in the popup menu:

Open the Modify Style dialog box using the Reveal Formatting pane
The Reveal Formatting pane allows you to quickly review the font, paragraph, and section formatting used in the document content. See more about reviewing the text formatting quickly using the Reveal Formatting task pane.
1. Open Reveal Formatting pane by pressing Shift+F1:

- To view the formatting for the word, click on it
- To view the formatting for more than one word of the text, select the text fragment.
2. On the Reveal Formatting pane, in the Paragraph section, click on the PARAGRAPH STYLE link to open the Style dialog box.
3. In the Style dialog box:
- Select the style you want to modify,
- In the Preview field, Word shows how the selected style looks,
- Under the Preview field, Word shows the main options for the selected style,
- To make any changes, click the Modify… button:

Note: In some cases, more than one Style may be applied to the selected block of text; Word opens Hyperlink style if it can’t recognize which style it should open. You can scroll the list to choose the TOC style you need.
Modify the Table of Contents style
In the Modify Style dialog box, make the changes you need:

- In the Formatting section, make formatting changes as desired (for example, change the font, font size, color, and paragraph spacing),
- Click the Format tab:

Examples for the TOC style changes
Example 1: Change the line spacing to the double space
To change the line spacing, in the Modify Style dialog box:

- Select the Double space button,
- Make any other changes you need and click OK:
Note: You need to repeat this customization for all the TOC styles you use.
Example 2: Format long Headings using a right indentation
You can need to format the Table of Contents with long headings to avoid overlapping page numbers:

To format a long Heading that spans more than one line in the Table of Contents so that it doesn’t overlap the page numbers, do the following:
1. In the Modify Style dialog box, click the Format… button, then select Paragraph…
2. In the Paragraph dialog box, in the Indentation section, in the Right field, type or select the value you need. E.g., 0.2″:

3. Apply the changes for the style:

Note: If you have several long Headings with different TOC styles, you need to repeat this customization for all of them.
Example 3: Align the second line of the long title using a hanging indent
You can need to format the Table of Contents with the long headings for second and following lines:
To format a long Heading that spans more than one line in the Table of Contents so that it doesn’t overlap the page numbers, do the following:
1. In the Modify Style dialog box, click the Format… button, then select Paragraph…
2. In the Paragraph dialog box, in the Indentation section:
- In the Special dropdown list, select Hanging,
- In the By field, type or select the value you need. E.g., 0.8″:

3. Apply the changes for the style:

Note: If you have several long Headings with different TOC styles, you need to repeat this customization for all of them.
Example 4: Customize tab leaders for different headings in the Table of Contents
To customize the tab leaders for some TOC style, do the following:
1. In the Modify Style dialog box, click the Format… button, then select Tab…
2. In the Tab dialog box:
- In the Tab stop position field, type the value you want to position page numbers (usually, page width minus a minimal value such as 0.01″),
- In the Alignment section, select the Right option,
- In the Leader section, select the tab leader you prefer:

- Click the Set button to apply the Tab stop position.

3. Apply the changes to the style:

![]()
Download Article
![]()
Download Article
- Adding a Table of Contents
- Updating the Table of Contents
- Stylizing the Table of Contents
- Video
|
|
|
This wikiHow teaches you how to customize and update the table of contents in your Word document. When you create a table of contents in Word, page numbers are added automatically based on the headings you’ve added to each section. Word makes it easy to customize the way the page numbers and section titles appear on the table. If you make changes to your document that affects your section headers or page numbers, you’ll need to choose the Update Table option so the table of contents remains correct.
-
1
Format the headings of each section of your document. Word’s table of contents builder automatically generates a table of contents based on the headings in your document.[1]
This means each section that you want represented in your table of contents must have a properly-formatted heading.- If a section should appear as a primary section in the table of contents, select its heading, click the Home tab, and then select Heading 1 on the «Styles» panel.
- To add a sub-section to the primary section in the table of contents, give that section a Heading 2 header: Select its heading and choose Heading 2 from the Styles section.
- You can can also use Heading 3, Heading 4, etc., to add even more pages to your table of contents.
- Make sure any page you want to include in the table of contents has a heading.
-
2
Click the location where you want to insert the table of contents. Typically this will be at the beginning of your document.
Advertisement
-
3
Click the References tab. It’s at the top of Word.
-
4
Click Table of Contents on the toolbar. It’s at the upper-left corner of Word. A list of Table of Contents styles will expand.
-
5
Select an automatic style template. Several style options appear for your table of contents—choose one of the suggested styles to get started. Once selected, this will add a table of contents that lists the page numbers for each of your formatted sections.


Advertisement
-
1
Click the References tab. It’s at the top of Word.[2]
- Use this method if you’ve made a change (changing a heading, adding/removing pages) to your document and need to update the table of contents to reflect that change.
- The only way to change the name of a section on the table of contents is to change the name of the corresponding header in the document.
-
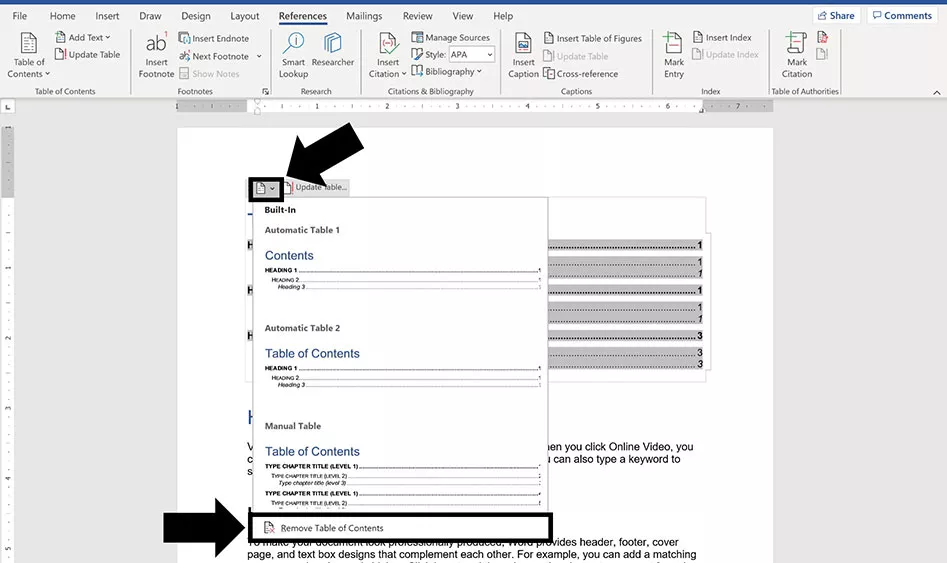
2
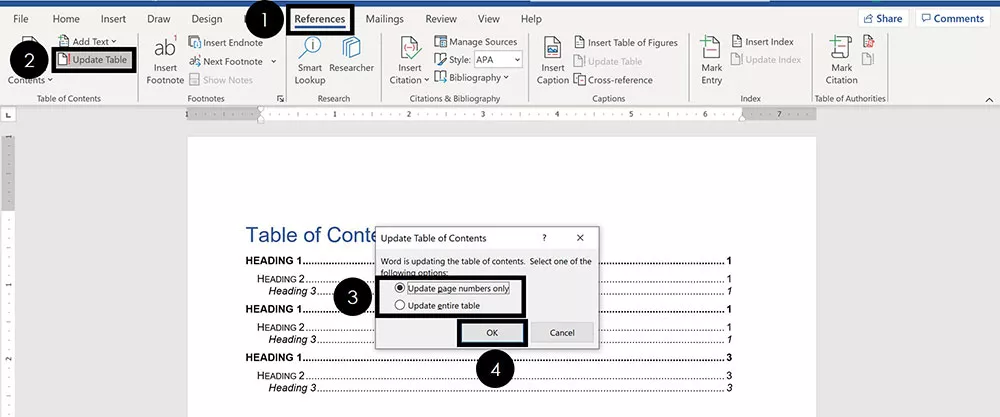
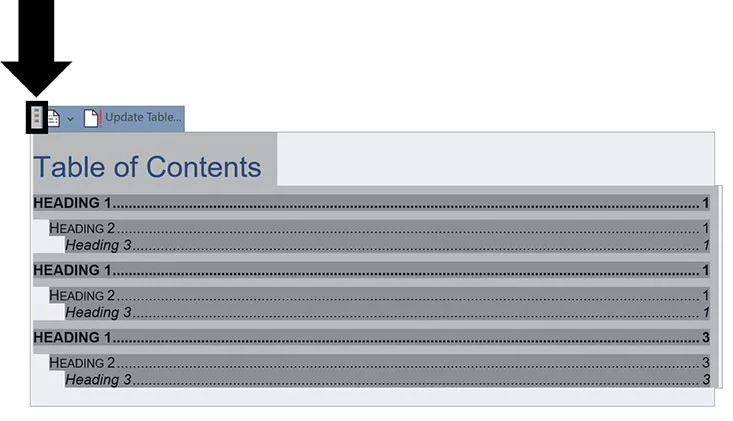
Click Update Table on the «Table of Contents» panel. It’s in the upper-left corner. Two options will appear.
-
3
Select an update option.
- Select Update page numbers only if you want to refresh the page numbers without applying any changes you’ve made to the headings.
- Select Update entire table to apply all heading and page number changes.
-
4
Click OK. The table of contents is now up-to-date.


Advertisement
-
1
Click the References tab. It’s at the top of Word.
-
2
Click Table of Contents on the toolbar. It’s at the upper-left corner of Word. A list of Table of Contents styles will expand.
-
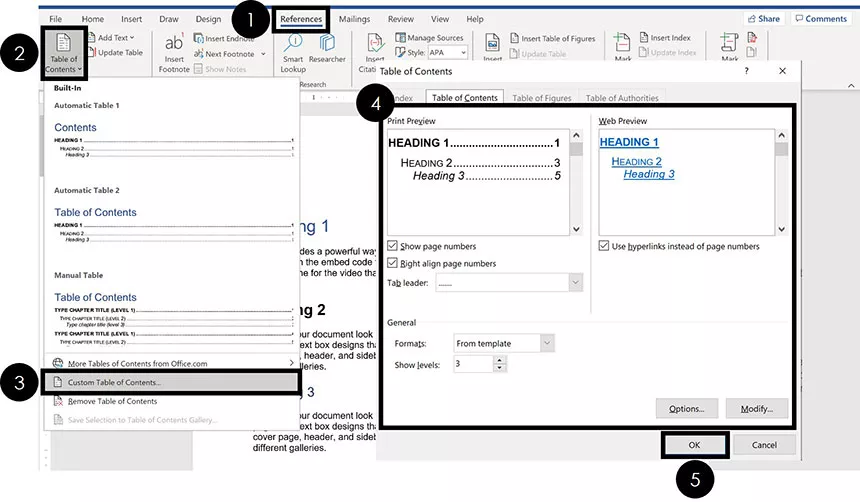
3
Click Custom table of contents on the menu. This opens the Table of Contents dialog box.
-
4
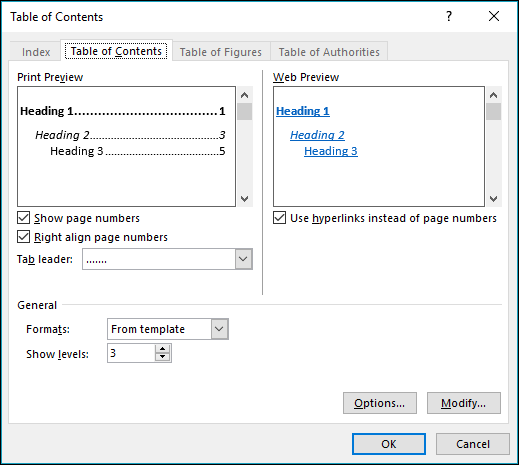
Adjust your general preferences. The «Print Preview» box at the upper-left corner shows you how the printed table of contents will appear, while the «Web preview» box displays how it will look on the web.[3]
- Use the checkbox next to «Show page numbers» to show or hide page numbers. If you just want to hide page numbers on the web version of the table of contents, check the box next to «Use hyperlinks instead of page numbers.»
- Use the checkbox next to «Right align pages numbers» top adjust the alignment.
- To change the style of the line or pattern that separates the heading title and the page number, make your selection from the «Tab leader» menu.
- To choose another theme, select something from the «Format» menu.
- To adjust how many heading levels are displayed in the table, select an option from the «Show levels» menu (the default is 3).
-
5
Click the Modify button. It’s in the lower-right corner of the window. This is where you can change the properties of the text on the table of contents page.
- If you don’t see this button, click the «Formats» menu and select From template. It should appear then.
-
6
Select a style and click Modify. The styles you can change appear in the «Styles» box on the left side of the window. When you click a style (e.g., TOC 1), you’ll see the font size, spacing, and other details—clicking Modify allows you to change these details.
-
7
Make your changes and click OK. You can choose different fonts, alignments, colors, and numerous other details for each selected style. Alternatively, you can keep the defaults, which come from the table of contents template you selected.
-
8
Click OK. The style changes you’ve made will apply to your table of contents immediately.


Advertisement
Ask a Question
200 characters left
Include your email address to get a message when this question is answered.
Submit
Advertisement
Video
Thanks for submitting a tip for review!
About This Article
Article SummaryX
1. Click the References tab.
2. Click Update Table.
3. Select an update option.
4. Click OK.
Did this summary help you?
Thanks to all authors for creating a page that has been read 60,117 times.
Is this article up to date?

on
October 21, 2019, 1:08 PM PDT
How to format a table of contents in a Word document
Word’s table of contents, by default, has no formatting. You can add formatting directly, but you’ll have to reapply it every time you update the table. Instead, learn how to modify the table’s underlying styles.
We may be compensated by vendors who appear on this page through methods such as affiliate links or sponsored partnerships. This may influence how and where their products appear on our site, but vendors cannot pay to influence the content of our reviews. For more info, visit our Terms of Use page.

If you’re working on a document that requires a table of contents, Microsoft Word has an easy-to-implement feature based on built-in heading styles. Word uses Heading 1, Heading 2, and so on to build a table of contents; however, the resulting table of contents by default is almost devoid of formatting–it’s downright bland. I’ll show you how to modify the table of contents styles–specifically, we’ll add a bit of color, but you could apply a number of formats.
I’m using Office 365 on a Windows 10 64-bit system, but you can use earlier versions of Word. You can work with your own document or download the demonstration .docx and .doc files. The browser edition will display an existing table of contents and even let you update it, but you can’t add a table of contents or modify a style.
LEARN MORE: Office 365 Consumer pricing and features
Word’s default table of contents
You might expect heading styles used in your Word document to persist in a table of contents, but that’s not how it works; while this behavior might seem odd at first, it’s by design. As a general rule, a table of contents is fairly bland. The table of contents will not have the same formatting as the heading styles.
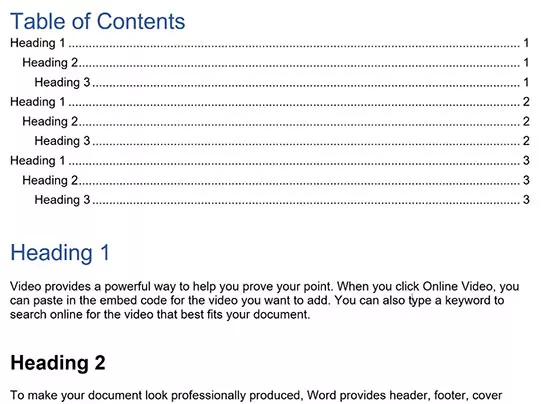
Figure A shows a simple table of contents with three heading levels: Heading 1, Heading 2, and Heading 3. All three styles are blue—a font format. I added a direct color format, red, to one Heading 2 instance to be comprehensive. (If you’re using a theme, blue might not be the predominant color.)
Figure A
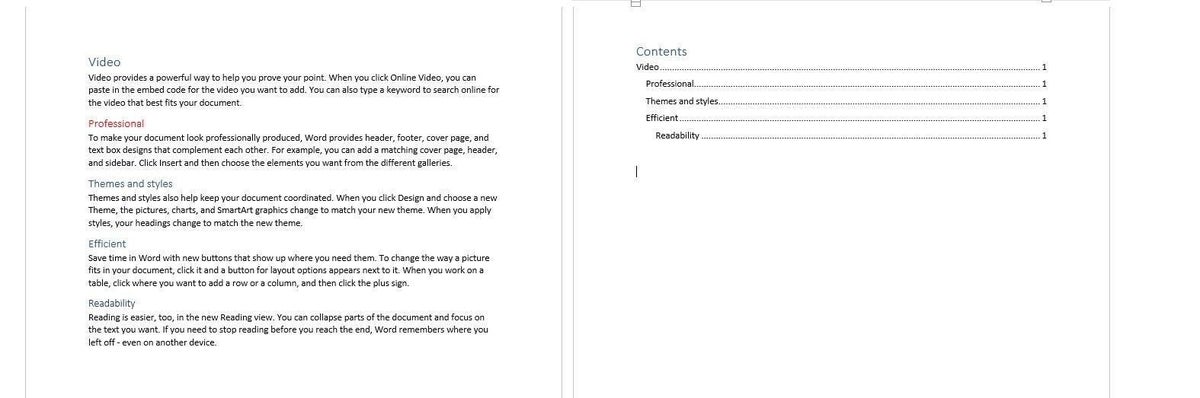
Word doesn’t use the heading styles (whether built-in or custom) applied to the document’s headings to format a table of contents. You could add direct formatting to the table of contents, but every time you update it, you’ll have to reapply the format. Fortunately, there’s an easier solution: Modify the built-in table of contents styles.
Word’s table of contents styles
Word uses a dedicated set of styles to format a table of contents. If you want to permanently format the table of contents, you’ll have to modify the corresponding styles.
To access the table of contents styles, click the Home tab, and then click the dialog launcher for the Style group to open the Styles. If you’re working in a document that already has a table of contents, you’ll find the table of content styles in use. For instance, the demonstration document uses three levels in the table of contents, so those corresponding styles are available in the pane (Figure B).
Figure B

If the table of contents styles aren’t in the pane, do the following to add them:
- Click the Options button at the bottom of the Style Pane.
- In the resulting dialog, choose All Styles from the Select Styles To Show dropdown.
- Select Alphabetical from the Select How List Is Sorted dialog (Figure C).
- Click OK. In truth, you added all of the styles to the pane, not just the table of contents styles.
Figure C

How to modify a table of contents style in Word
Once you have the table of contents styles in the Styles pane, you can easily modify them. To demonstrate, let’s add color to level 2, which corresponds to Heading 2 and TOC 2. Follow these steps:
- Thumb down in the styles pane until you find TOC 2.
- Click TOC 2’s dropdown and choose Modify from the resulting submenu.
- In the resulting dialog, choose blue from the color dropdown (Figure D) and click OK.
Figure D

As you can see in Figure E, all level 2 items are now blue. Note that the red heading in the document doesn’t change. We didn’t modify Heading 2–we modified TOC 2. This is why there are two sets of styles—one for the headings in your document and one for each level in the table of contents. Also note that there’s a style for the table’s heading: TOC Heading. Although we added a simple color format, you can use this same technique to completely stylize a table of contents, if warranted.
Figure E

Send me your Microsoft Office question
I answer readers’ questions when I can, but there’s no guarantee. Don’t send files unless requested; initial requests for help that arrive with attached files will be deleted unread. You can send screenshots of your data to help clarify your question. When contacting me, be as specific as possible. For example, “Please troubleshoot my workbook and fix what’s wrong” probably won’t get a response, but “Can you tell me why this formula isn’t returning the expected results?” might. Please mention the app and version that you’re using. I’m not reimbursed by TechRepublic for my time or expertise when helping readers, nor do I ask for a fee from readers I help. You can contact me at susansalesharkins@gmail.com.
Also See
-
50 time-saving tips to speed your work in Microsoft Office (free PDF)
(TechRepublic) -
Cost comparison calculator: G Suite vs. Office 365
(TechRepublic Premium) -
Microsoft Office has changed, how you use it should too
(ZDNet) -
How to add a drop-down list to an Excel cell
(TechRepublic) -
Best cloud services for small businesses
(CNET) -
Best to-do list apps for managing tasks on any platform
(Download.com) -
More must-read Microsoft-related coverage
(TechRepublic on Flipboard)
-
Microsoft
-
Software
You’ve built a Table of Contents in Microsoft Word using the Styles feature to mark the TOC entries or by marking them manually. And just when you’re about to pat yourself on the back for having an automatic Table of Contents in your document, you notice something’s a little … off. Maybe the font’s not quite right. Perhaps the font’s okay but the spacing’s not. Or the indentation. It could be you want/don’t want the dot leaders running up to the page numbers.
Suffice it to say you just want to alter the format of it. But how?
More…
First, let’s take a look at a sample generated Table of Contents:

Right away, I see several problems:
- Fonts are not consistent. There’s a mix of Times New Roman (the font for the rest of the brief) and Arial.
- I’d probably prefer a bit more white space between the second-level entries.
- I don’t like the way the right indentation on the second-level entries is behaving — too close to the page numbers.
Table of Contents: fix = replace
To fix the Table of Contents, I basically replace it. Yes, there are other ways to modify TOC entries (if you’re already comfortable with Styles), but I prefer this method because it doesn’t involve me searching all over the document for each Style and modifying it separately. To-may-to, to-mah-to.
First, we select the entire Table of Contents with the mouse and hit Delete.
Next, we can re-define the Table of Contents the way we want. To do that, we go to the References tab and find the Table of Contents menu on the far left:

Word 2007-2010

Word 2013-2016
That brings us to the Table of Contents dialog box. We’ll click Modify at the bottom:

… which will take us to the Style dialog box:

The secret to controlling TOC formatting: Styles
This dialog box lists all of the Styles associated with Table of Contents entries. Since the Styles control the formatting of the entries in the Table of Contents, we need to modify the Styles to correct the formatting. The first entry that has incorrect formatting is TOC 2 (the second-level entries). Click on that (click #1 above) to see the current settings in the Preview window, then click on Modify (click #2).

Here’s where we can fix everything that’s wrong with the second-level TOC entries: we can change the font from Arial to Times New Roman with the drop-down in the center, and we can fix the paragraph issues (the right indentation and the amount of vertical space before and after) by clicking on the Format button at the bottom and choosing Paragraph from the menu.
That will take us to the familiar Format Paragraph dialog box:

We can repeat the same steps for any other TOC entries that need adjusting, but you get the idea, right?
To check our progress, we go back to the Table of Contents dialog box:
Use Print Preview as a guide
Before …

… and after.
Notice how the Print Preview window (circled in red) has changed from the first time we saw it. Also notice that, if we want more/fewer TOC levels, or we want to alter or delete the dot leader, those options are available under General (in the lower third of the dialog box).
Now that we have finished modifying the TOC Styles, we can click OK to insert the new Table of Contents.
So, for my friend Judy, who has asked me repeatedly to do a tutorial on how to modify the format of a Table of Contents … there it is!
This content is part of a course
What you’ve learned here is just a small part of my Brief Builder’s Workshop course, where you can learn all sorts of skills for building better briefs, such as creating a Table of Authorities and configuring a Table of Contents (two ways). Click here for more information.
When you’re creating or editing a long document, you’ll
probably have to create a table of contents. That might sound like a chore, but
fortunately, you can do it in just a few clicks. Then, if you change the document, Word can update the table of content instantly.
Best of all, Word includes hyperlinks to the various sections in your table of contents, so it isn’t just a visual aid for
printed documents, but it’s also perfect to make easy-to-browse online documents and PDFs with.
Creating the table of contents in Word itself is simple, but the tricky part is getting it to work the way you want. In this tutorial, I’ll show you everything you need to make a simple, auto-generated table of contents, and then get it to look the way you want in every version of Microsoft Word.
How to Make a Table of Contents in Microsoft Word (Screencast)
You can follow along using your own document, or if you prefer, download the zip file included for this tutorial. It contains a document called The Age of Einstein.docx, which is a public domain physics textbook (credit to the author, Professor Frank W.K. Firk).
Watch the video screencast above or follow the written tutorial instructions below for more detail on how to make a table of contents in Word.
Creating Your Table of Contents in Word
There are a few ways of creating a table of contents in Word, but only two that you’ll
ever use
- Create them automatically from built-in styles
- Create them from your custom styles
These methods work mostly the same in Windows and Mac versions of Microsoft Word.
Using MS Word built-in styles is the fastest and most common
technique, and using custom styles takes only a little more work. Sometimes,
you’ll want to use both techniques in the same document. Once you have a table of contents (TOC) in
a document, you can format it with its own styles. You don’t want to format the
TOC like regular text, because the formatting can easily get wiped out.
How the Textbook is Organized
Before doing anything to the document, let’s see how it’s
organized. Page 1 is the title, page 2 is blank and will hold the table of contents, page 3
is the preface, and after that comes the text. As you scroll down, notice that headings
and subheadings are formatted.
.jpg)
.jpg)
.jpg)
The best way to see the structure of the document is with
the Navigation Pane. (In some versions of Word for Mac, it may be called the Document Map Pane.)
In Windows, go to the View
tab, then click the check box to enable the Navigation Pane.
.jpg)
.jpg)
.jpg)
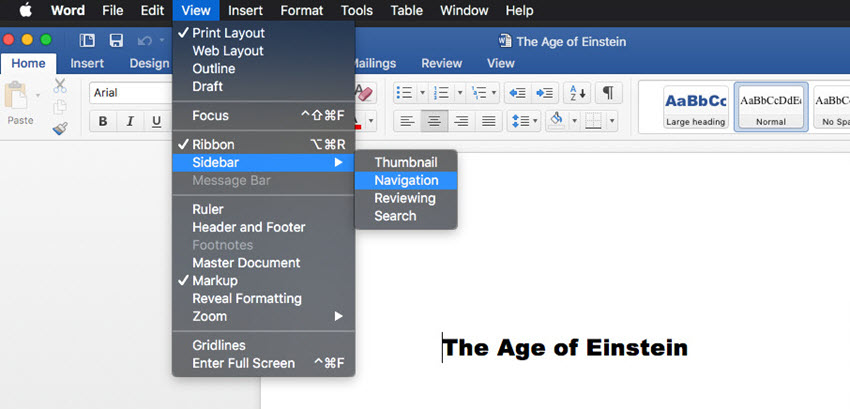
On the Mac, click the Sidebar option to show the drop-down menu. Click the arrow next to the option and click Navigation. (On older versions of the Mac software, the option is called Document Map Pane.)


On your Mac or PC, go back to the Home
tab if you’re not already there. Keep your eye on the Styles box on the ribbon,
and click the items in the pane to navigate through the book.
Notice that the
items with whole numbers – like 2.
Understanding the Physical Universe – are formatted as Heading 1, and items
with decimals – like 2.1 Reality and Pure
Thought – are formatted as Heading 2. There are also a few decimal items –
like 4.5 Space Travel – that are
formatted as Heading 3.
Tip: when
creating a document, the shortcuts for applying the Heading 1, 2 and 3 styles
are Ctrl-Alt-1, Ctrl-Alt-2, and Ctrl-Alt-3
(and Command-Opt-1, Command-Opt -2, and Command-Opt-3 on the Mac).
Generating a Table of Contents Using Built-In Header Styles in Word
Word can now turn those Heading styles into table of contents
entries. Click at the top of page 2. (Tip: in Windows, press Ctrl-G,
type 2, then press Enter. On the Mac, press Command-Opt-G, type 2, then press Return.)
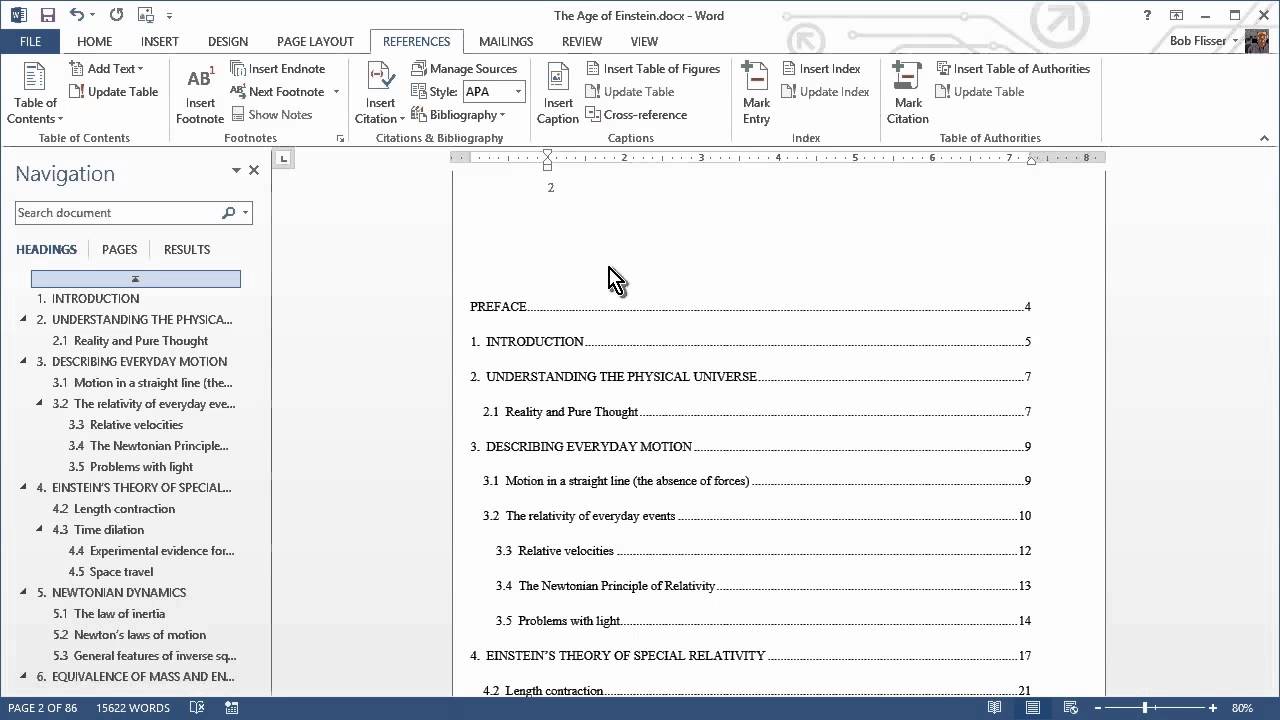
In Windows, go to the References
tab on the ribbon, click the Table of
Contents button on the left, then choose one of the two built-in tables
from the list. Note that the thumbnails show that Headings 1, 2 and 3 will be
included.
It’s almost the same on the Mac. Go to the Insert menu, choose Index and Tables, then pick one of the
formats on the left and click OK.
This dialog box also shows that Headings 1-3 will be included.
.jpg)
.jpg)
.jpg)
As soon as you choose one, the table of contents gets inserted starting on
page 2, and Word automatically inserts a couple of more pages, so it all fits. In Windows, you can Ctrl-click one of the items, and it will hyperlink to the item in the document.
.jpg)
.jpg)
.jpg)
This works great, but there’s one problem. Before the
Introduction, there is a Preface that
should be included in the table of contents. And just before Appendix A1 is the heading for
the Appendix, and that should also be
included. But they weren’t, because they’re both formatted with a custom style
called Large heading, and custom
styles don’t get included in the default table of contents. The second method of creating table of contents in Word will fix that.
Creating a Table of Contents From Custom Styles in Word
Word can include any styles in a table of contents. We just
have to tell it which ones to choose. And we can update the table, rather than having
to delete it and start over.
In Windows, go back to the References tab, click the Table
of Contents button, then near the bottom of the menu, choose Custom Table of Contents. Click the Options button near the bottom of the dialog box to display the Table of Contents Options dialog box.
On the Mac, go to back to the Insert menu and choose Index
and Tables. In the Table of Contents section, click the Options button.
On the Mac or PC the Table of Contents Options dialog box shows that the Heading 1 style will have TOC level 1,
the Heading 2 style will have TOC level 2, and the Heading 3 style will have
TOC level 3.
.jpg)
.jpg)
.jpg)
Scroll down to the bottom of the list (on the Mac, you’ll use the down slider). Then, in the box for Large heading, type a 1 to make it level 1. Table of Content levels can
come from more than one style.
.jpg)
.jpg)
.jpg)
Click OK in the
Table of Contents Options dialog, then OK again in the Table of Contents dialog box. When Word displays a message asking if you want to replace the
table, choose Yes. The Preface and Appendix are now both included in the table
of contents.
.jpg)
.jpg)
.jpg)
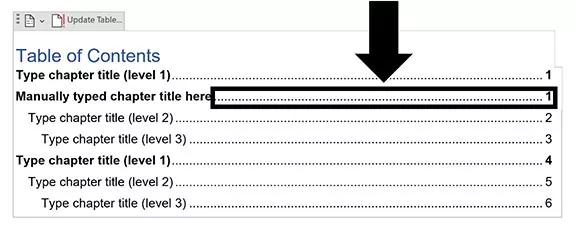
Manually Updating the Table of Contents in Word
There are other times when you’ll want to update the table
manually. This is handy when you change the text of one of the headings and
want the change reflected in the table of contents.
Scroll down to the page with the preface. At the top of the page replace
PREFACE with FORWARD. Make sure it still uses the Large heading style.
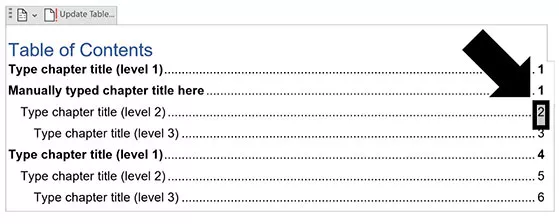
Go back to the top of the table of contents and click in it. Note that it
has a gray background; that means it’s a field, and fields can usually be
updated.
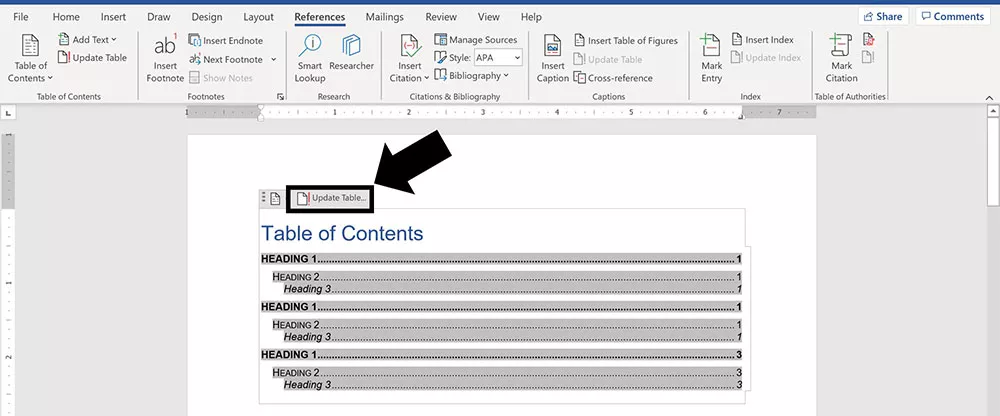
Click the Update Table
button either on the TOC itself (that button doesn’t always appear) or on the References tab, and the first entry changes to FORWARD. (On the Mac, right-click the table and choose Update Field from the pop-up menu. Choose the Update entire table option and click OK.)
.jpg)
.jpg)
.jpg)
Now that the table of contents displays the correct text, we
can apply nicer formatting though.
How to Modify Table of Contents Styles in Word
Each heading level of the table of contents has its own
style that’s automatically applied. All we have to do is change the formatting
of the styles to change the table’s appearance, here’s how:
- In Windows, in the References tab of the ribbon, click again on the Table of Contents button and choose Custom Table of Contents, near the
bottom. In the Table of Contents dialog box, click Modify. - On the Mac, click Insert > Index
and Tables. On the left side, choose From Template, then
click Modify. Everything else works
the same way as in Windows. - In the Table of Contents dialog box, click Modify, and another dialog box appears,
showing style names and formatting for the TOC heading levels. Select TOC
1. - Click the Modify
button just below it, and the Style dialog box appears. (On the Mac, it’s called the Properties dialog box.)
.jpg)
.jpg)
.jpg)
Format the style with Arial or Helvetica, 12 points, bold.
Then click OK.
.jpg)
.jpg)
.jpg)
- Repeat for the TOC 2 style, and set it to Arial
or Helvetica, 12 points, normal. - Repeat for the TOC 3 style, and set it to Arial
or Helvetica, 11 points, normal.
The table of contents should now look like this:
.jpg)
.jpg)
.jpg)
Conclusion
When you have a long document, you don’t have to fear
creating a table of contents. Whether you’re using Windows or a Mac, you can
insert one in just a few clicks, then use the same dialog box to change the
formatting.
As you learned in this table of contents tutorial, remember not to apply formatting directly to the table, because it
can get wiped out if you replace it. If you make any changes to the Word document itself, remember to click the top of the TOC and update it. Leave a comment below if you have any trouble making or tweaking your table of contents.
To learn more about working with Microsoft Word, study the following tutorials:
Editorial Note: This post was
originally published in 2014. It has been comprehensively revised to make it
current, accurate, and up to date by our staff—with special assistance from Laura Spencer.
Did you find this post useful?

Bob Flisser has authored many videos and books about Microsoft and Adobe products, and has been a computer trainer since the 1980s. He is also a web and multimedia developer. Bob is a graduate of The George Washington University with a degree in financial economics.
Insert, Format and Update a Table of Contents or TOC in Microsoft Word (The Easy Way)
by Avantix Learning Team | Updated April 14, 2022
Applies to: Microsoft® Word® 2013, 2016, 2019, 2021 or 365 (Windows)
You can create a table of contents quickly in Word using built-in heading styles. Although you can insert a table of contents (TOC) using different strategies in Word documents, it’s easiest to use Heading 1, Heading 2 and so on to format headings and then generate your table of contents. You can then change the formatting and update the TOC when your document changes.
Because a table of contents is a Word field, you should not type over it as any typing will be removed when you update the TOC.
There are 4 steps for creating a table of contents in Word using heading styles:
- Prepare the document by applying built-in heading styles such as Heading 1, Heading 2 and so on
- Create or insert the table of contents
- Format the table of contents
- Update the table of contents
Both custom and automatic table of contents can be updated when changes are made to the document. An automatic table of contents is inserted in a content control and some users may have difficulty working with, or understanding, content controls (which act as containers for specific content). The Manual Table that appears in the Insert Table of Contents drop-down menu is an option that requires the user to type entries and is not an efficient way to create a table of contents in Word (and should rarely be used).
Recommended article: 14 Timesaving Microsoft Word Shortcuts to Quickly Select Text
Do you want to learn more about Microsoft Word? Check out our virtual classroom or in-person classroom Word courses >
Step 1: Prepare the document by applying built-in heading styles
In order to easily insert a table of contents in Word, you’ll need to apply heading styles to titles and subheadings in your document first.
To apply a built-in heading style to a title or subheading:
- Click in the title or subheading to which you wish to apply a built-in heading style. Each title or subheading is a paragraph and should be followed by a hard return (you pressed Enter or Return).
- Click the Home tab in the Ribbon and in the Styles group, click a heading style (such as Heading 1). You can click the down arrow on the bottom right of the Styles Gallery to display more styles.
Below is the Styles Gallery in the Home tab in the Ribbon in Word:

It’s common to have one or two levels of headings (Heading 1 and Heading 2), but you can apply multiple heading levels. By default, Word will typically display the next heading level if a previous level has been used in the document.
You can also click in a title or subheading and press Ctrl + Alt + 1 to apply Heading 1, Ctrl + Alt + 2 to apply Heading 2 and so on.
Step 2: Create or insert the table of contents
Once you have applied built-in heading styles, you can easily create a custom table of contents or TOC.
To create or insert a table of contents:
- Click in the document where you want to insert or create a table of contents (typically at the beginning of the document).
- Type «Contents» or «Table of Contents» and press Enter. Format the text, but do not use built-in heading styles.
- Click below the title where you want to insert the table of contents.
- Click the References tab in the Ribbon and click Table of Contents in the Table of Contents group. A drop-down menu appears.
- Select Custom Table of Contents. A custom table of contents will not appear in a content control. A dialog box appears.
- Enter the number of levels to display in the table of contents beside Show levels (such as 2).
- Select or check Use hyperlinks instead of page numbers if you want to create active hyperlinks or links if you save the document as a PDF (Portable Document Format) file. This will enable users to click the table of contents in the PDF to jump to specific locations in the file.
- Ensure Show page numbers is selected if you want page numbers to appear in the table of contents. If you select Show page numbers, the page numbers are typically right aligned by default. If necessary, select a tab leader from the Tab leader drop-down menu to change the character that leads up to the page numbers in the table of contents.
- Select an option from the Formats drop-down menu if necessary. It’s best to select From template if you want to modify the formatting of the table of contents.
- Click OK. A table of contents appears in the document. This is a Word field so if you click in it, it will normally appear in grey. Do not type manual entries in the table of contents.
The Table of Contents dialog box appears as follows:

Step 3: Format the table of contents
You can format a table of contents in many ways using the Table of Contents dialog box:
- Click in the table of contents.
- Click the References tab in the Ribbon and click Table of Contents in the Table of Contents group. A drop-down menu appears.
- Select Custom Table of Contents. A dialog box appears.
- Click Modify. Note: you will not be able to select Modify if you have selected any option other than From Template from the Formats drop-down menu. A dialog box appears with TOC styles.
- Click a TOC style. For example, click TOC 1 if you want to format the first level items in the table of contents.
- Click Modify. The Modify Style dialog box appears.
- Select the desired options (such as font size, bold, etc.). You can also select Format and choose other options from the drop-down menu. It’s a good idea to turn off Automatically update so if a user selects and formats paragraphs manually in a table of contents, the table of contents does not update with the changes. It’s also usually best to select Only in this document so that the formatting changes apply only to the current document, not future documents based on the template (typically the Normal template).
- Click OK.
- Repeat for other TOC levels.
- Continue clicking OK until you return to the document. A dialog box appears asking if you want to replace the table of contents.
- Click OK.
You can modify an automatic table of contents in the same way. Click in the automatic table of contents and follow steps 2-9.
Below is the Style dialog box that appears when you click Modify:

If you selected 2 heading levels to include in your table of contents, you may want to modify TOC 1 and TOC 2.
When you click a TOC style and then click Modify, the following Modify Style dialog box appears:

You can select options under Formatting or click Format on the bottom left and select other options such as Font or Paragraph.
The following table of contents example includes 2 heading levels (TOC 1 and TOC 2):

Step 4: Update the table of contents
After you edit your document, you can update the table of contents at any time.
To update a table of contents:
- Click in the table of contents.
- Right-click and select Update Field from the drop-down menu or press F9. You can also click the References tab and then click Update Table in the Table of Contents group. A dialog box appears.
- Click Update page numbers only or Update entire table (recommended).
- Click OK.

Navigate to table of contents entries
If you want to quickly jump to a table of contents entry, Ctrl-click it in the table of contents.
Remove a table of contents
You can remove a table of contents if it’s no longer required.
To remove a table of contents:
- Click in the table of contents.
- Click the References tab in the Ribbon and click Table of Contents in the Table of Contents group. A drop-down menu appears.
- Select Remove Table of Contents.
You can also select the entire table of contents by dragging over it and then pressing Delete.
Table of contents can be generated easily from built-in heading styles so it’s best to use the built-in styles when formatting your Word documents rather than creating new styles for headings.
This article was first published on February 8, 2020 and has been updated for clarity and content.
Subscribe to get more articles like this one
Did you find this article helpful? If you would like to receive new articles, JOIN our email list.
More resources
How to Create, Edit, Use and Save Templates in Microsoft Word
10 Microsoft Word Navigation Shortcuts for Moving Around Faster
How to Insert an Em or En Dash in Word (4 Ways with Shortcuts)
How to Keep Text Together in Microsoft Word (Words, Lines or Paragraphs)
How to Convert a PDF to Word in Microsoft Office (No Third Party Programs Needed)
Related courses
Microsoft Word: Intermediate / Advanced
Microsoft Excel: Intermediate / Advanced
Microsoft PowerPoint: Intermediate / Advanced
Microsoft Word: Long Documents Master Class
Microsoft Word: Styles, Templates and Tables of Contents
Microsoft Word: Designing Dynamic Word Documents Using Fields
VIEW MORE COURSES >
Our instructor-led courses are delivered in virtual classroom format or at our downtown Toronto location at 18 King Street East, Suite 1400, Toronto, Ontario, Canada (some in-person classroom courses may also be delivered at an alternate downtown Toronto location). Contact us at info@avantixlearning.ca if you’d like to arrange custom instructor-led virtual classroom or onsite training on a date that’s convenient for you.
Copyright 2023 Avantix® Learning
Microsoft, the Microsoft logo, Microsoft Office and related Microsoft applications and logos are registered trademarks of Microsoft Corporation in Canada, US and other countries. All other trademarks are the property of the registered owners.
Avantix Learning |18 King Street East, Suite 1400, Toronto, Ontario, Canada M5C 1C4 | Contact us at info@avantixlearning.ca

It’s tricky to make a good-looking and functional table of contents in Microsoft Word.
You might often encounter documents that have messy tables of contents along with navigation panes with links to missing headings, non harmonized styles, and badly structured sections.
This wouldn’t be a big problem for smaller documents, but with hundreds of pages in a file it ruins the user experience and makes it painful to navigate from one section to another. Not to mention that non-harmonized styles throughout the file can mess with the overall hierarchy of titles.
So how can you build a customizable and structured table of contents with pretty personalized titles and numbering? You’ll learn how in this guide.
How to Build a Table of Contents in Microsoft Word
How to Define Numbering Styles in Word
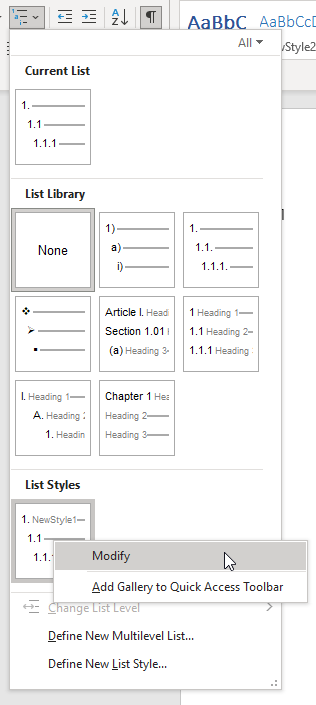
What we’re going to do first is define a new list style to create a personalized numbering for our titles. Go to the Home tab > Paragraph section and click the multilevel list button. Choose Define New List Style.
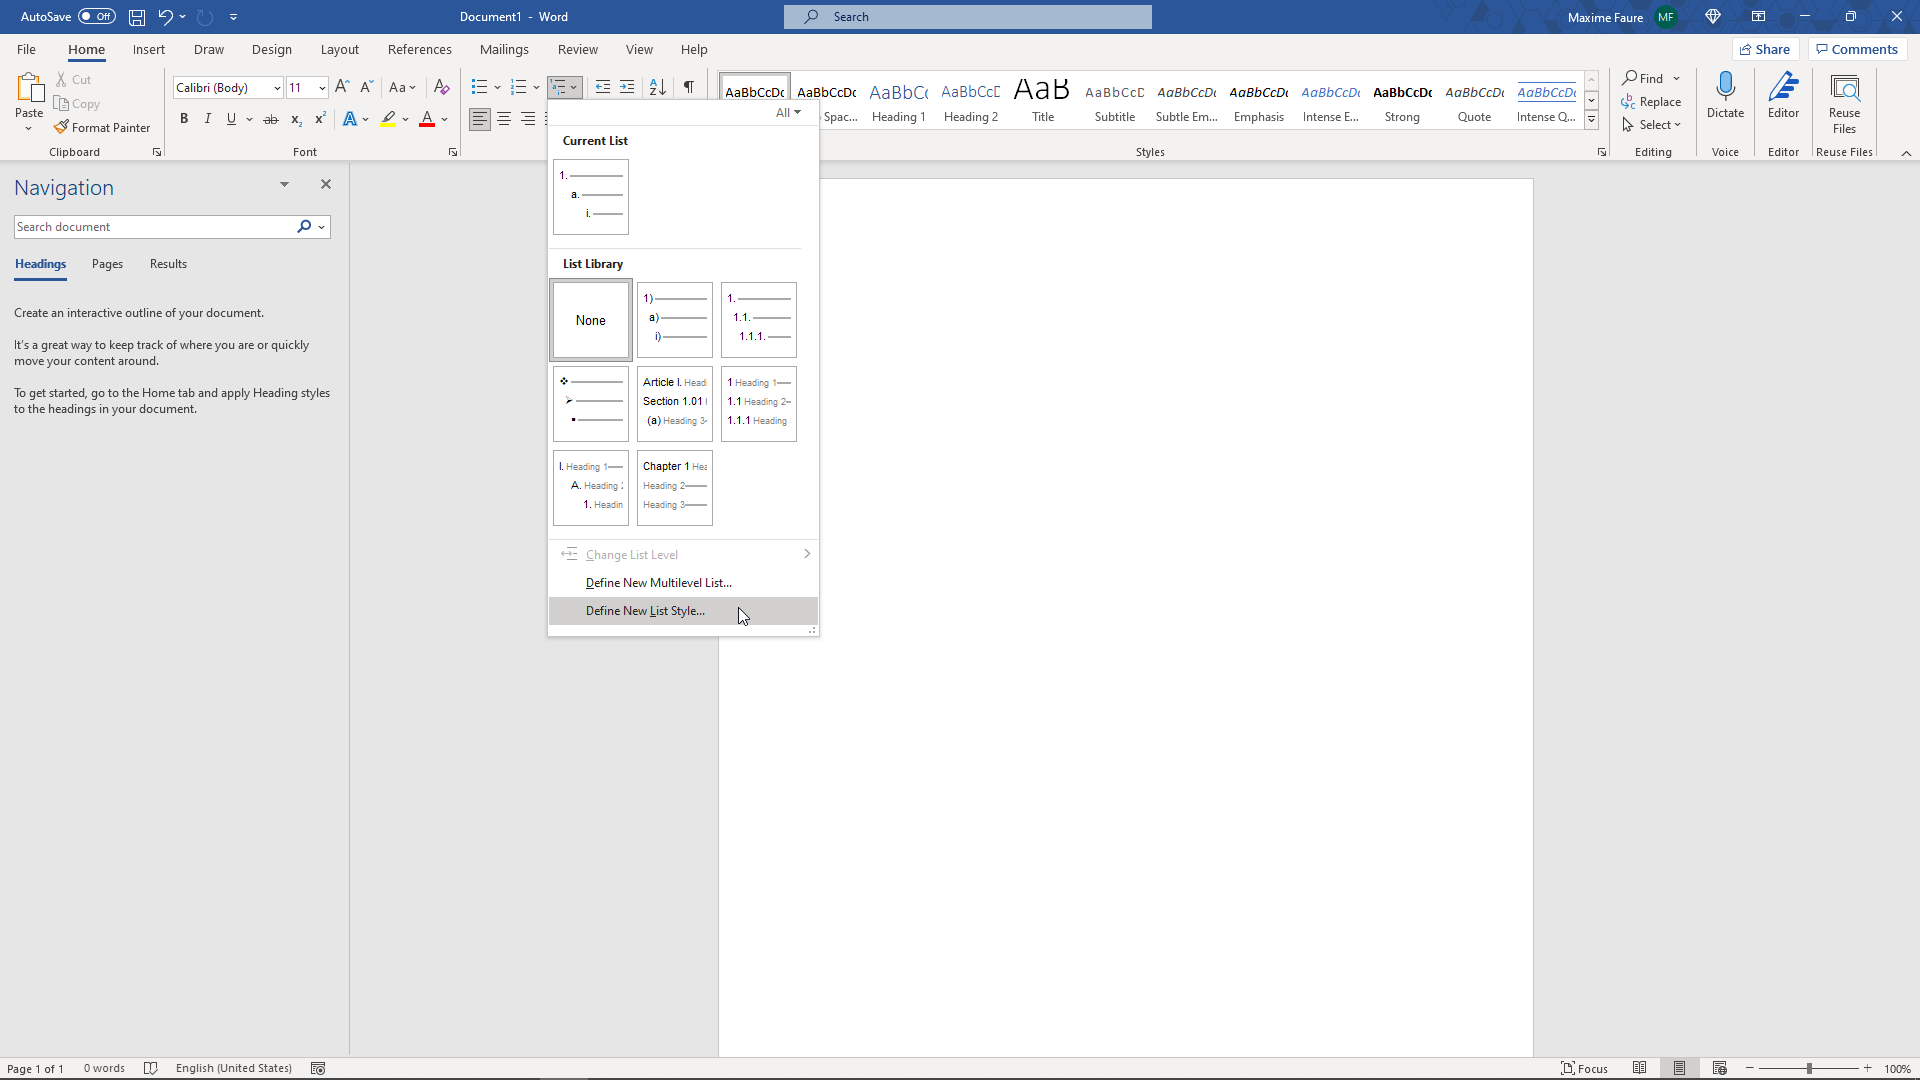
This will open the Define New List Style window which we will use to customize the numbering style and format of our titles.

Name your style however you want (here MyNewListStyle), then click the Format button > Numbering… This will open the Modify Multilevel list window.
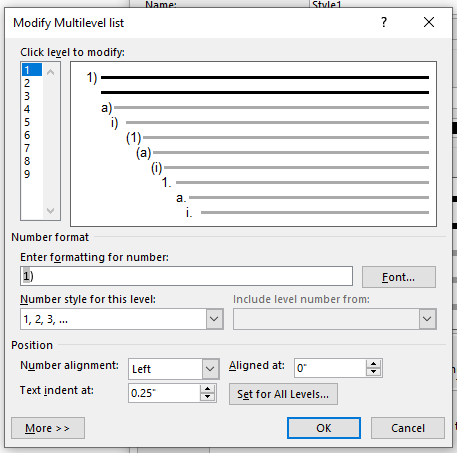
We will only define the numbering («1)»,»a)») and no format or style will be applied at this level. We’ll define and apply font styles and formats later on.
Let’s take the following numbering for our titles «1.»,»1.1″,»1.1.1″,»2.»,»2.1″,»2.2″ and so on.
First replace the parenthesis character with a dot character in the Enter formatting for number field. This will change the level 1 numbering format to «1.».
Then we’ll define the second level of numbering by clicking the number 2 in the Click level to modify list.

Change the Number style for this level by clicking the associated dropdown menu then select 1,2,3, … You should get this result:

Erase the parenthesis character in the Enter formatting for number field and place a dot before the «1». You should have «.1».
Now how do I get the numbering style 1.1 at level 2? Pretty simple! Place your mouse before the «.1» in the Enter formatting for number field. Then open the Include level number from dropdown menu and select Level 1.

This will insert the numbering for level 1 before your numbering for level 2. You should get this result:

Inserting numbers manually in this field will give you static numbers which won’t be linked to any dynamic numbering in your document. These numbers won’t be highlighted in grey in the Enter formatting for number field.
Let’s repeat the same steps for level 3. Select level 3 in the Click level to modify list. Select the right Number style for this level in the dropdown menu. Remove unwanted characters and add a dot before the «1».
Then place your mouse before the «.1» in the Enter formatting for number field and open the Include level number from dropdown menu and select level 2. Add a dot before the level 2 «1» in the Enter formatting for number field. Then open Include level number from and select level 1. You should get this result:

You can modify the space character following the number by clicking More >> then Follow number with and select what you want. Here I am going to use Tab character for all my levels.
Click the OK button and you’re all set for the numbering part! You won’t have to do these steps again as the styles you define can be available from one Word document to another. We’ll talk more about that later.
Your list style should be available by clicking the Multilevel list button in the Paragraph section of the Home tab.

We will now define our title styles.
How to Define Title Styles in Word
In the Home tab and under the Style section, click the down arrow next to the different styles available.
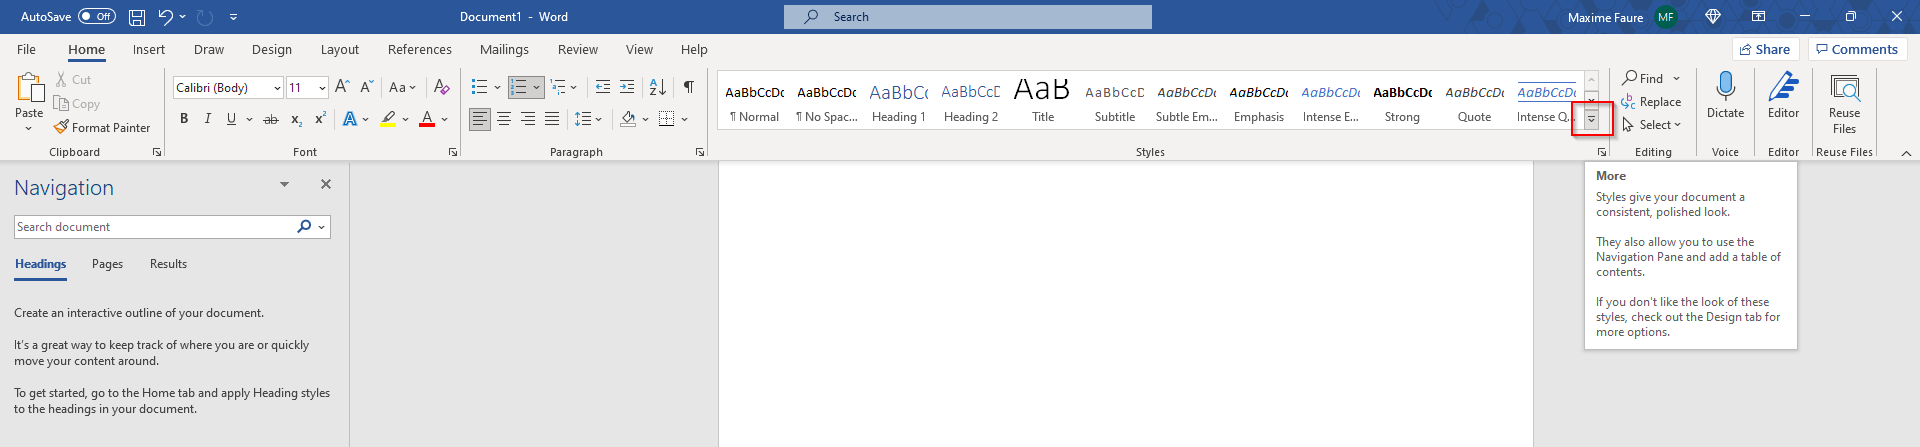
Then click Create a Style.

Give your new style a name. It’s good practice to include the level number where you’re going to apply this title so it’s easier to follow your title hierarchy. I am going to name mine NewStyle1 for level 1. Then click Modify.
If you’ve clicked OK too fast don’t worry – you can find your style and modify at anytime in the style section. You can edit it by right clicking on it and clicking Modify…


We are going to apply formatting to our title style.

Start by opening the Style based on dropdown menu and select Heading 1 for level 1. This is an important step for Word to understand the title hierarchy level. You’ll apply this step to each level (Heading 2 for your level 2 style, Heading 3 for your level 3 style…).
Then open the Style for following paragraph and select Normal. This will prevent any formatting from applying automatically to the following lines of text you type.
Open the Format menu and open the Numbering… menu. Make sure that None is selected then click OK. This will prevent any conflict between the numbering we defined earlier.

You can then select any font formatting that you want. This is what I picked:

Let’s create a style for level 2 and 3 by following the same steps. Be sure to have the numbering set to None each time. This is what I have for level 2:

And level 3:

We are now going to link our title styles with our numbering style.
Go to the Home tab, Paragraph section, Mutlilevel list. Then right click on the Numbering list style we created in the first part and click Modify.
Open the Numbering window by clicking Format. Select the level 1 and in the Link level to style dropdown menu select the level 1 style you created for your level 1 title. You should get this:

Repeat these steps for level 2 and 3.

Then click OK.
How to Apply Your New Title Styles
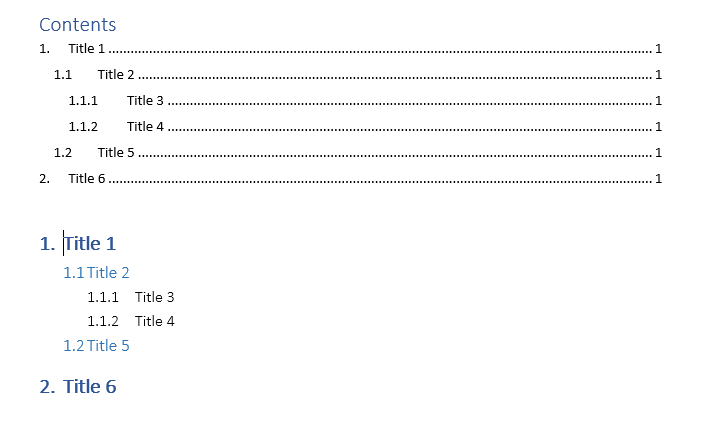
Now let’s try to apply our new title styles. Type in Title 1 in your document without any formatting applied.
If you already have a format applied you can remove it by clicking in the paragraph and applying the Normal style in the Styles section. This is useful to remove any unwanted formatting or styles you may find.
Now click in the Title 1 text and click on your newly created style for level 1. This will apply your level 1 style to the whole paragraph.
If you go to the View tab you can check the Navigation pane and see that «1. Title 1» just appeared as a selectable heading on the left Navigation panel, allowing you to go to it quickly.

Let’s try our other titles styles as well. Type in the text without formatting, place your mouse in the relevant paragraph, and then click on your newly created styles to apply them. You should get something like this:

As you can see on the left panel, all my titles are appearing in a structured way with harmonized numbering. You can collapse are expand these to navigate faster. There is also a search engine available on top of this panel.
You can now insert a structured table of contents by going to the References tab > Table of Contents > Automatic table 1. You should now have something like this:
You can customize this table of contents to only display titles down to a certain level by clicking Table of Contents > Custom table of Contents > decrease the Show levels number > OK.

How to Preserve Your Styles in Word
At the moment, these title styles are only available in this Word file. We are going to make them available every time we open Word as well as make them transferable to other people.
Open the Developer tab in Word. If you can’t see it displayed click File > Options > Customize Ribbon > Check Developer in the right panel > OK.
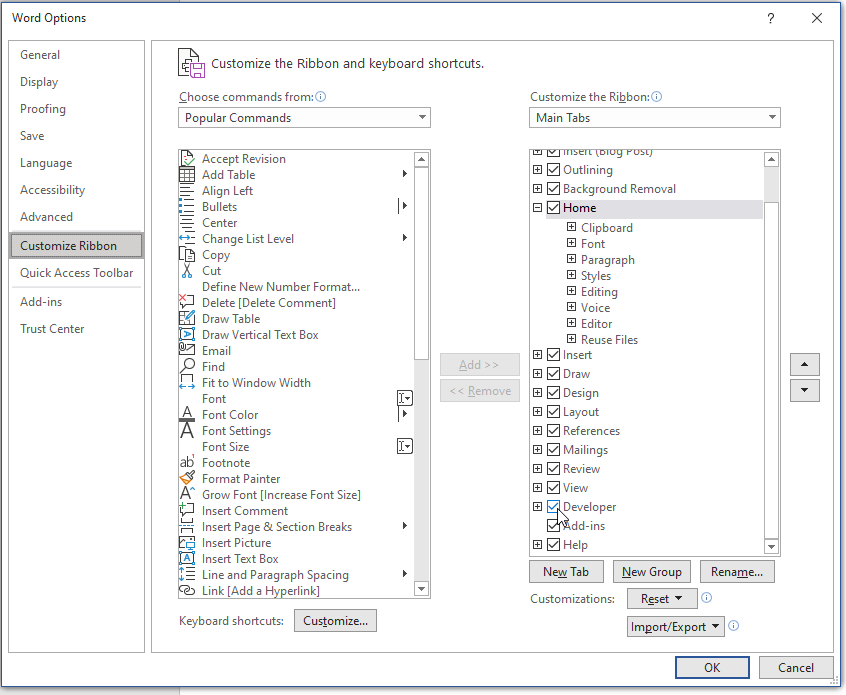
Once you’re in the Developer tab go to Document Template > Organizer.

In the left panel (in Document1 for me) you can see the styles available in this file. In the right panel are the styles available in the Normal.dotm which allows you to store styles that will be available every time you open Word.
Let’s select all our newly created styles then click Copy->. You should get something like this:

Now if you open another file your styles will be directly available in the styles section. This can be useful if you want to transfer styles among your group and harmonize the structure and format of your files.
That’s it!
Voilà! You are now able to build a structured Word document with customizable titles styles and a reliable navigation panel.
Learn to code for free. freeCodeCamp’s open source curriculum has helped more than 40,000 people get jobs as developers. Get started
In this article, you’ll learn how to make a Table of Contents in Word, as well as how to update and manage it inside your document.
There are 3 types of Table of Contents you can create in Microsoft Word (all with a number of different options and features):
- Automatic Table (based on your saved formatting)
- Custom Table of Contents that is 100% customizable
- Manual Table that requires you to do all of the heavy lifting
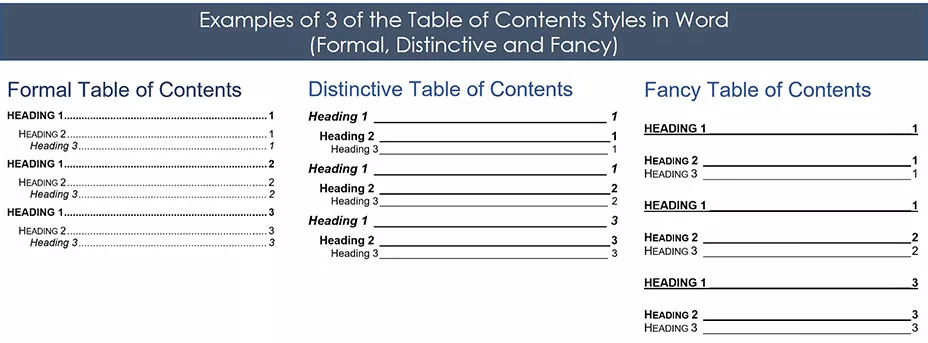
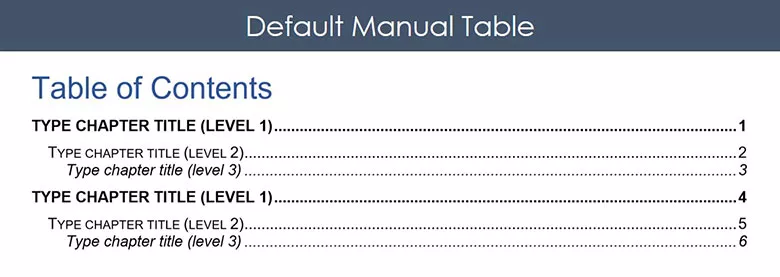
Below are examples of 3 of the many styles of Table of Contents you can quickly create in Word.
The most important thing to know about creating an automatic Table of Contents in Word is that you first need to format your document using the Heading Styles.
That’s because it’s the Heading Styles formatting (as you can see pictured below) that feeds your Table of Contents. This step is explained in detail below.
If you don’t want to use the Heading Styles, you can use a Manual Table to create your Table of Contents, as discussed below.
Note: Throughout this article, the words Table of Contents and TOC are used interchangeably.
On the top, of all examples below were created using the Microsoft Office 365 subscription, which you can learn about on Microsoft’s website here.
How to create a table of contents in Word
The first critical step to creating an automatic updating TOC in Word is properly formatting the sections of your document using the:
- Heading 1 style
- Heading 2 style
- Heading 3 style
If you have already formatted your document this way, you can skip to the next section.
Note: You are not limited to the default Heading Styles formatting. Below I’ll show you how you can not only change your Styles formatting, but also how you can create your own.
1. Applying Heading Style Formatting
To properly format your Word document using the Heading Styles, simply:
- Select the section Headings of your document
- Navigate to the Home tab
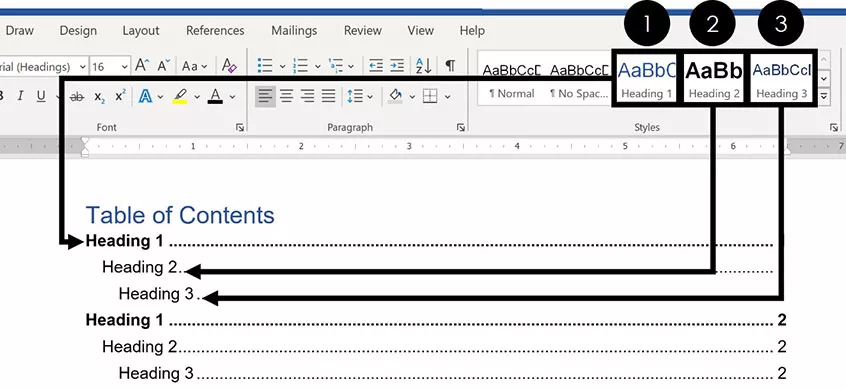
- Select the Heading 1, Heading 2 or Heading 3 style, as appropriate
By default, only the Heading 1 through Heading 3 Styles will automatically populate into your Table of Contents.
You can still use the Heading 4 through Heading 9 styles in a Table of Contents, but you’ll have to do so with a Custom Table of Contents, as discussed below.
Note: Instead of using the Styles gallery to mark up your Word document, you can also use the Add Text drop down directly on the References tab, saving you a few clicks.
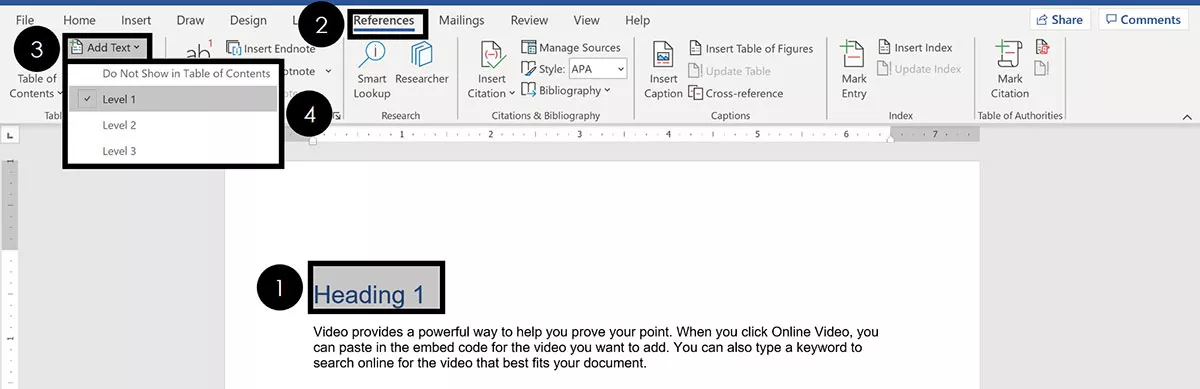
To mark up text using the Add Text drop down, simply:
- Select your section heading text
- Navigate to the References tab
- Open the Add Text dropdown menu
- Select your Heading style
This is the exact same thing as using the Heading Style 1, Heading Style 2 and Heading Style 3 options in the Styles gallery on the Home tab.
The option that says Do Not Show in Table of Contents is the same as marking your text as Normal.
2. Heading Style Shortcuts
If you have a large Word document, you can speed up the formatting process by using Heading Style shortcuts.
Shortcuts like these are the fastest way to double your productivity.

To set up a basic Table of Contents in Word, the 3 Heading Styles shortcuts you’ll need to remember are:
- Heading Style 1 shortcut: Alt + Shift + 1
- Heading Style 2 shortcut: Alt + Shift + 2
- Heading Style 3 shortcut: Alt + Shift + 3
You can apply the Normal style to any text in your document that you don’t want to show in your TOC.

Normal Style Shortcut: Ctrl + Shift + N
When making an automatic Table of Contents in Word, only content that is properly formatted using these Heading Styles will appear in your TOC.
Furthermore, this formatting is critical if you later want to convert Word to PowerPoint.
3. Changing Your Heading Style Formatting
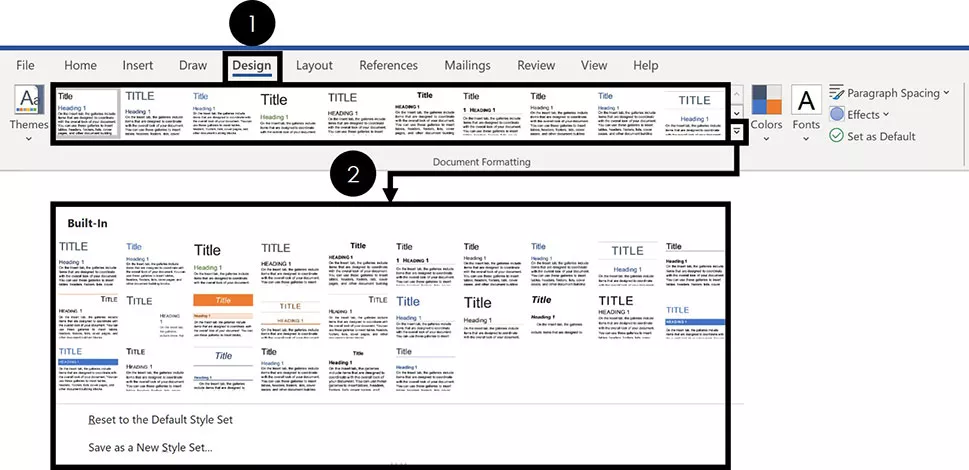
If you don’t like the way the default Heading Styles look, you can change them. To do that, simply:
- Navigate to the Design tab
- Choose a different Document Formatting
If you click the downward facing arrow, you will see more options, as pictured above.
Note: The Document Formatting styles change all of the formatting styles within your Word document. Therefore, you’ll want to review your entire Word document to make sure you are okay with whatever new Document Formatting you select.
4. Creating Your Own Heading Style Formatting
If you don’t like the Document Formatting options for your Heading Styles, you can create your own. To do that, simply:
- Format your Heading Style however you want it to look
- Navigate to the Home tab
- Right-Click the Heading Style you want to change
- Select Update Heading to Match Selection
Doing so will change the Heading Style to match the formatting you’d applied to that text. In addition, it will automatically update all the existing Headings of that level in your Word document.
How to Insert a Table of Contents
Once you’ve properly formatted your document using the different Heading Styles, creating your Table of Contents is pretty straightforward.
1. Insert a Table of Contents
Once your Word document is properly formatted with the Heading Styles, to make your Table of Contents, simply:
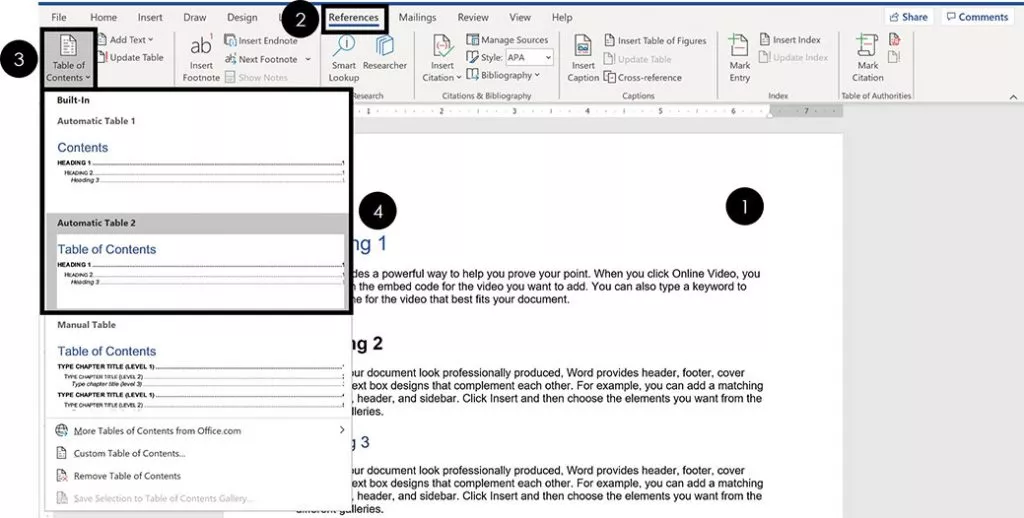
- Click into your document where you want your TOC
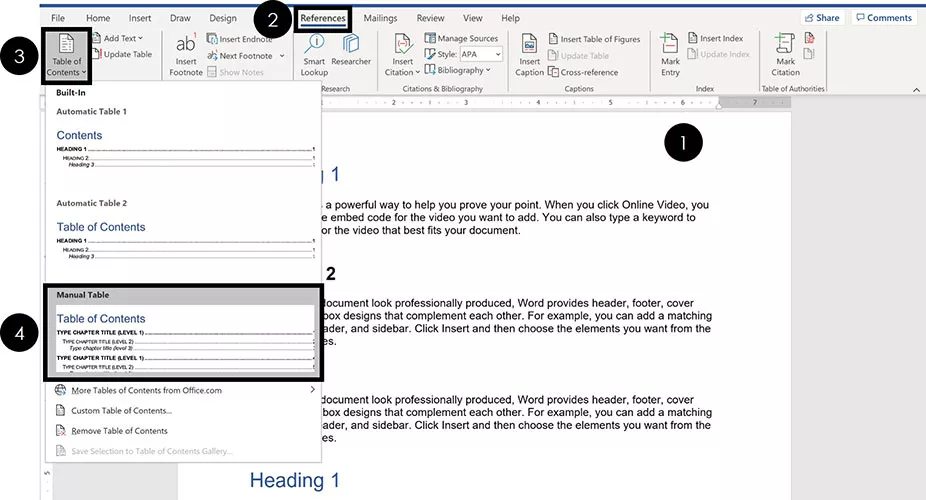
- Navigate to the References tab
- Open the Table of Contents dropdown menu
- Choose Automatic Table 1 or Automatic Table 2
Choosing either option inserts a TOC based on your Heading 1, Heading 2 and Heading 3 Styles.
Your TOC might look different than the one pictured above depending on whether you previously inserted and saved your TOC style.
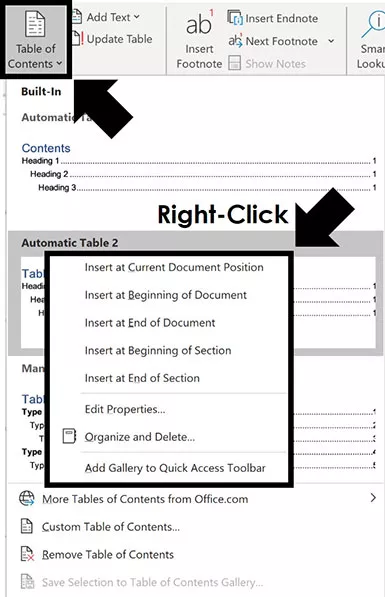
Note: If you right-click the Table of Contents in the dropdown menu, you get options for where to place it in your document..
Some of these options require you to use the different page break options in Word to properly place within your document.
- Insert at Current Document position
- Insert at Beginning of Document
- Insert at End of Document
- Insert at Beginning of Section
- Insert at End of Section
Setting up these different sections is the trick to getting more than one Table of Contents in your Word document.
That’s the difference between the Automatic Table 1 and Automatic Table 2 styles?
Not much. The main difference is the title – table of contents vs. contents – which you can just click into and change. If you need more formatting options beyond the Automatic Table styles, you can create your own Custom Table of Contents.
Note: If you do not properly format your Word document using the Styles gallery, inserting a TOC will result in the following warning: No table of contents entries found

If this happens to you, simply work your way through your document and apply the proper Heading 1, Heading 2 and Heading 3 styles.
If you want more than just 3 levels in your Table of Contents, you’ll need to insert a Custom Table.
2. Format Your Table of Contents
To format your Table of Contents in Word, simply:
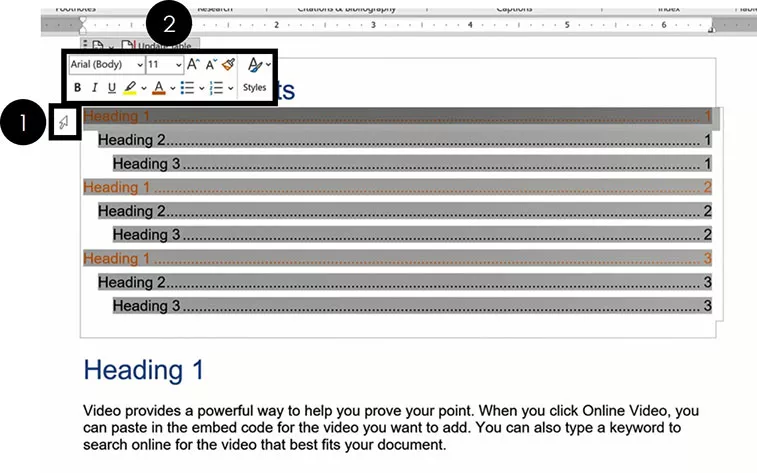
- Hover your mouse to the left of your TOC (your arrow will look like a diagonal arrow)
- Select the Heading Style you want to change
- Format it however you wish
Sometimes this takes a few attempts to select your Heading Styles so they all properly update. If it doesn’t work the first time, just try it again.
Note: Formatting the Heading Styles of your TOC only affects the formatting styles inside your TOC. None of your document level formatting is affected.
To affect the formatting of the Headings in the rest of your document, you’ll need to update the Heading Styles in the Style area of the Home tab.
3. How to Save Your Table of Contents formatting
After formatting the different levels of your TOC, you are given the option to save that formatting when you exit out of Microsoft Word.
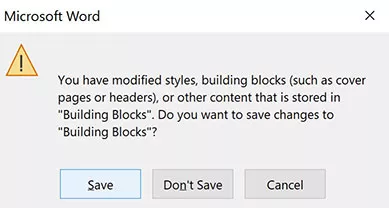
If you select Save, your manual formatting adjustments are saved to Word. That means that the next time you make a Table of Contents, all of your manual adjustments will show up by default.
Once you reformat the different elements of your new Table of Contents, you will be given the option to save them again when you exit Word.
4. Updating a Table of Contents
Table of Contents in Microsoft Word DO NOT automatically update themselves.
As you add and remove content to your document, you need to manually click the Update button to have your TOC update itself.
Your TOC is just a snapshot in time of when you either inserted it or last updated it. So, don’t forget to update it when you are done making changes to your document.
To update a Table of Contents in Word, simply:
- Navigate to the References tab
- Click Update Table
- Choose Update page numbers only or Update entire table
- Click OK
If you are using one of the Automatic Table layouts, can also select the Update Table button at the top of your table, as pictured below.
The two update options are:
- Page numbers only updates the page numbers of your TOC. It does not update the structure of your TOC based on any sections you’ve added or removed. It also does not update any of the text in your Headings, or the Heading Styles.
- Entire table updates everything in your TOC including page numbers, sections added and sections removed.
If you have made many changes to your Word document, or are unsure of what you’ve changed, I recommend updating the entire table. That ensures that everything within your document is accurately reflected in your TOC.
5. Table of Contents Navigational Shortcuts
The cool thing about making an automatic Table of Contents in Word, is that you can use it to quickly jump around your document.
That’s because each of the lines of your TOC is a hyperlink to that section within your document. All you need to do is hold down the Ctrl key and click the section of your TOC

An alternative way you can quickly navigate the sections of your Table of Contents is with the Navigation Pane. In it, you can see all the different sections of your document.
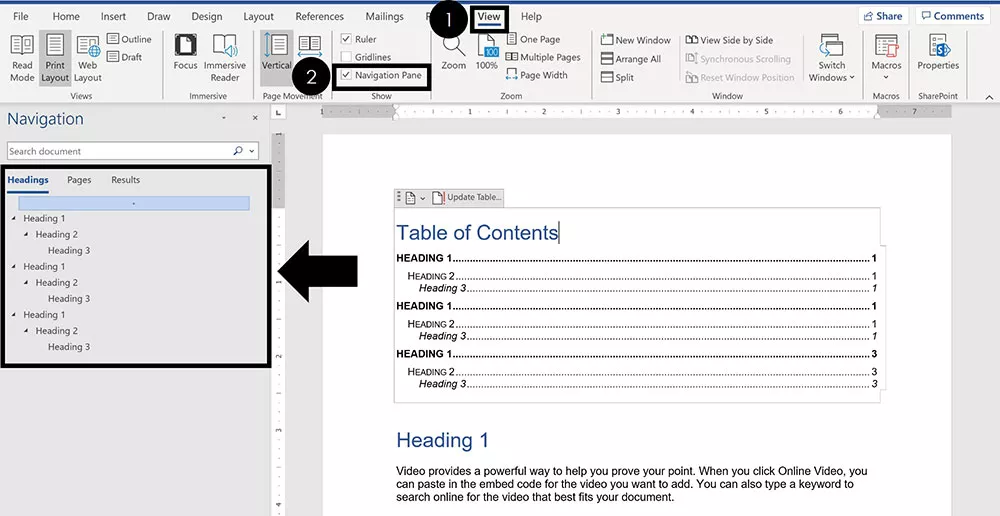
To open the Navigation Pane to see your Headings in Word, simply:
- Navigate to the View tab
- Click on Navigation Pane
Within the Navigation Pane, you can see, expand, collapse and navigate all the sections within your document.
This is another benefit of using the Heading Styles to properly format your Word document.
Removing a Table of Contents
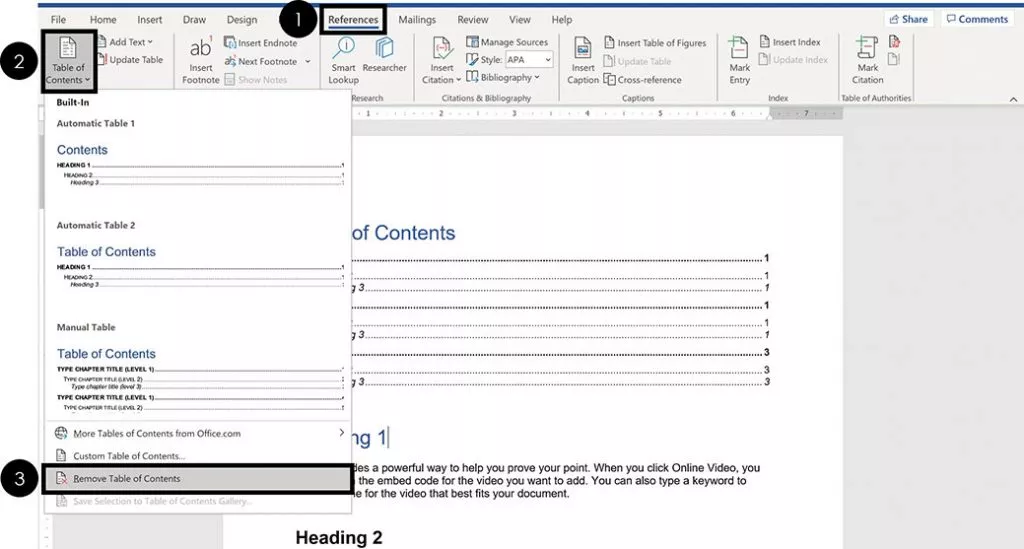
To remove a Table of Contents from a Word document, simply:
- Navigate to the References tab
- Open the Table of Contents dropown menu
- Select Remove Table of Contents
If you are using one of the Automatic Table styles, you can also use the dropdown menu at the top of your table, as pictured below.
Note: If you are using one of the Automatic Table styles, sometimes the table will not fully remove itself. This is particularly true for TOCs inserted at the beginning or ends of sections.
If this happens to you, simply click the three dots in the upper left-hand corner to select your TOC.
With it selected, either hit Ctrl + X to cut the TOC out of your document, or keep hitting the Delete key (not the backspace key) until it is removed.
Sometimes it takes three or four times before the entire TOC container is fully removed.
Creating a Custom Table of Contents
If you need more formatting options than the automatic table styles provide, you can create your own Custom Table of Contents.
To create a Custom Table of Contents in Word, simply:
- Navigate to the References tab
- Open the Table of Contents dropdown menu
- Choose Custom Table of Contents
- Customize the elements of your TOC (see details below)
- Click OK
Don’t worry about getting your custom TOC right the first time through. There are a lot of options to choose from and you can always go back and make different selections
Note: A Custom Table of Contents is still based on the Heading Styles you use to format your Word document. That means that if you do not properly format your document, your TOC will be blank.
On top of that, as you add and remove content to your document, you will need to use the Update Table command to update your custom TOC.
If you do not want an automatic updating TOC, insert a Manual Table.
1. Show Page Numbers Options
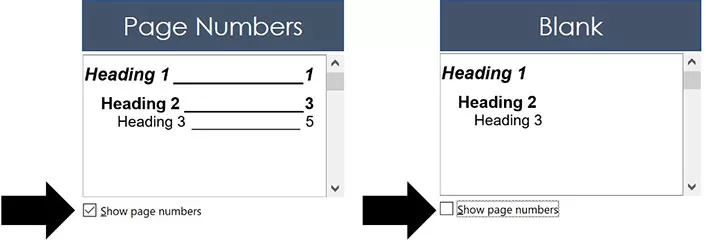
Selecting or de-selecting the Show page numbers box adds or removes the page numbers from your TOC, as you can see in the picture above.
My recommendation is to always select Show page numbers, as that makes it easier to understand and navigate your document. That’s usually the point of creating a TOC in the first place
2. Right Align Page Numbers Options

Right align page numbers determines whether your page numbers are aligned on the right side of your document, or if they are just stacked up after your section Headings.
My recommendation is to always use the Right align option. This not only makes your TOC easier to read, it also also opens up all of the Tab leader options (discussed next).
3. Tab Leader Options
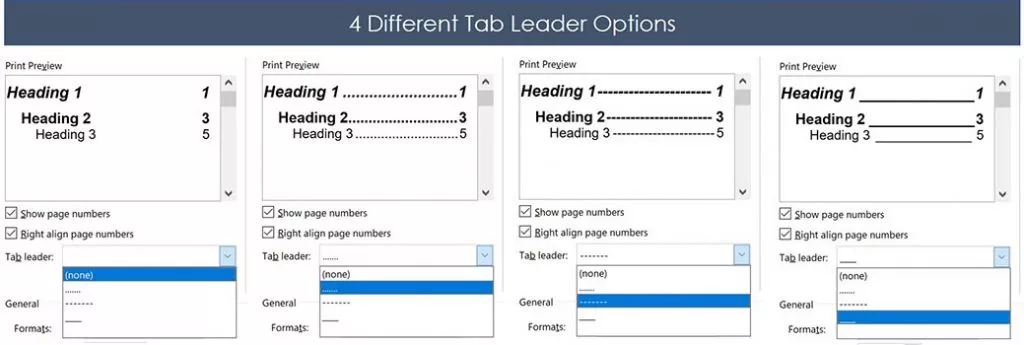
There are four different Tab leader options you can use to format your TOC, as pictured above.
The Tab leader dropdown menu is only available when you are using the Right align page numbers option. If you don’t like these styles of Tab leaders, you can use a Manual Table and create your own.
My recommendation is to always use a Tab leader as it makes it easier to find the section page numbers within your Word document.
4. Format Template Options
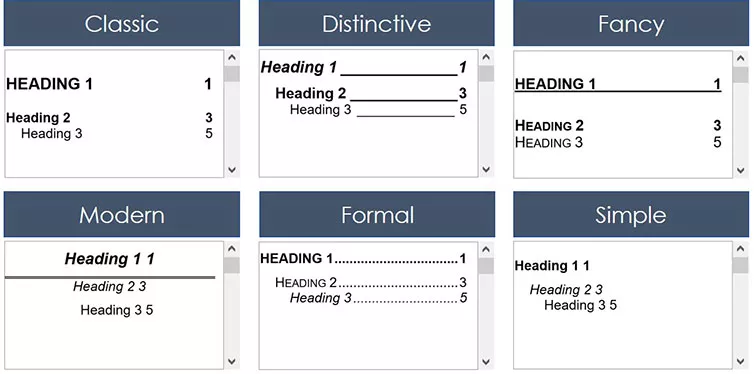
There are a variety of different Format templates you can use to change the look and feel of your TOC. For each one, you can make a number of adjustments and customizations. Here are the default formatting options for each one, as pictured above:
- Classic
- Distinctive
- Fancy
- Modern
- Formal
- Simple
You also have the From Template option which opens up the more manual formatting options for you if you know what you are doing (see the Options and Modify commands below).
All of these formats can be tweaked using the other formatting options in the Custom TOC dialog box. So feel free to try different combinations to find the custom TOC formatting that works best for you.
5. Show Levels Options
The Show levels setting determines how many of the Heading Style levels are included in your Table of Contents.
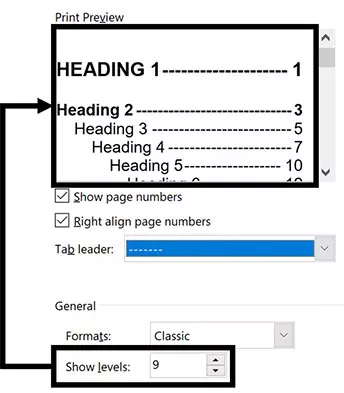
Just remember that to feed more content into your TOC, you first need to use the Heading Styles formatting throughout your document.
This is another example of when properly formatting your Word document can be a real lifesaver.
6. Options & Modify
If you use the From Template option to format your TOC, you can apply advanced formatting using the Options and Modify commands.

These are for advanced users and go above and beyond the scope of this tutorial (and what you’ll probably need to do). So, I’m not going into detail about these options here. But feel free to explore them if you need additional formatting options for your Table of Contents.
Creating a Manual Table of Contents
If you don’t want to use the Automatic TOC styles, you can instead use the Manual Table option.
Warning: Just so we are crystal clear before you go this route. Inserting a Manual Table means that you will be responsible for manually updating anything and everything within the table.
A Manual Table will not track or update itself based on any content you add or remove to your Word document. Therefore, if you make a lot of changes in your document, updating your TOC could take you a long time.
If you ever get tired of updating a table like this, you can insert an Automatic Updating TOC.
To insert a Manual Table for your TOC in Word, simply:
- Click into your document where you want your TOC
- Navigate to the References tab
- Open the Table of Contents dropdown menu
- Select Manual Table
Selecting Manual Table, you get a default Table of Contents that in no way reflects the content of your document.
Whether you have 1 page or 100 pages in your document, the Manual Table will come pre-loaded with two level 1, level 2 and level 3 placeholders
That means that anything you want done to your TOC, you’ll need to do yourself. There is no way to automatically update a Manual Table.
Below you’ll find some formatting tips for how to best update and edit your Manual Table.
Alternative: Another way to create your own manual TOC is to insert a two column table and use the left column as your section Headings, and the right column as your page numbers.
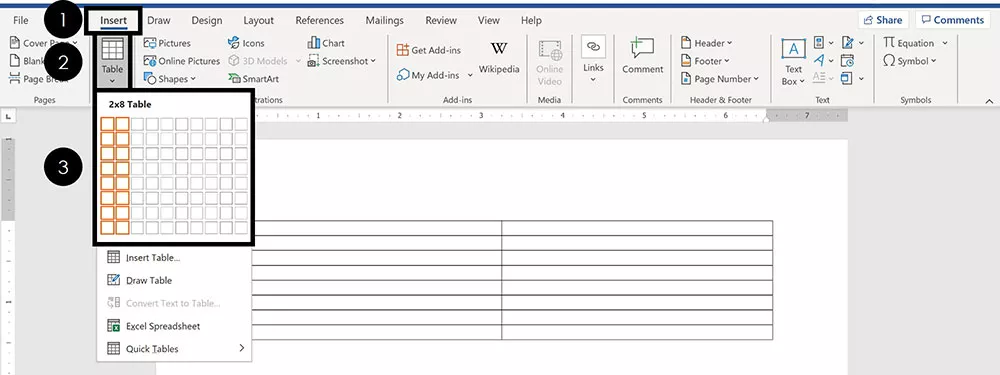
To insert a table in Word to use as your own custom TOC, simply:
- Navigate to the Insert tab
- Open the Table dropdown menu
- Select how many Rows and Columns you want in your table
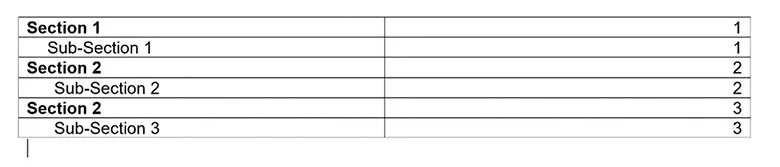
You can then manually add section Headings to your table and remove the outline border if you like. In the below picture, I’ve left the table border in so you can see that it’s a table.
To create a tab space within a table cell as shown in the picture above, simply hit Ctrl + Tab.
1. Add a New Section Row
To add a new section to a Manual table, first add a new blank row. The fastest way to do that is to put your cursor at the end of your page number and hit Enter.
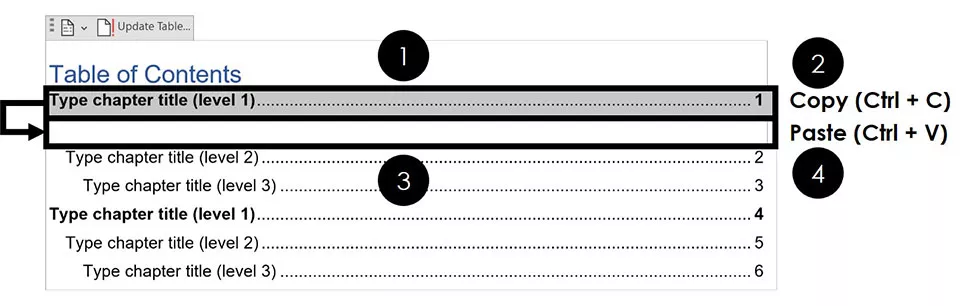
To add a new row of formatting to your Manual Table, simply:
- Select a section row that you want to copy
- Hit Ctrl + C to copy the row
- Click into your blank row
- Hit Ctrl + V to paste your row
Once you’ve pasted in your new row, you can then type in whatever text you want for it.
Thankfully, the Tab leader dots automatically adjust as you type in your section Headings. You don’t have to add them in yourself.
2. Edit Your Page Numbers
To edit the page numbers of your Manual Table, you’ll need to:
- Click and drag to select the page number
- Type and/or format your page number
Remember: When you use a Manual Table, you are responsible for manually adding and formatting everything within it (which can be really annoying).
The table will not automatically update in any way, based on the content you add or remove in your Word document.
Conclusion
So that’s how to make a Table of Contents in Word, along with all the formatting, navigation and updating options.
The most important thing to remember about your TOC is to use the Heading Styles when formatting your Word document. Doing so will make inserting and editing a TOC super easy and stress-free.
If you enjoyed this tutorial and want to learn more about our training courses and other resources, visit us here.