Highlight selected text
-
Select the text that you want to highlight.
-
Go to Home and, select the arrow next to Text Highlight Color.
-
Select the color that you want.
Note: Use a light highlight color if you plan to print the document by using a monochrome palette or dot-matrix printer.
Highlight multiple parts of a document
This method is best for highlighting multiple parts of a document because the Highlight tool stays on until you decide to turn it off.
-
Go to Home and select the arrow next to Text Highlight Color.
-
Select the color that you want.
The Text Highlight Color button displays the selected color, and the mouse pointer becomes a
when you point to the area of your document that contains text.
Note: Use a light highlight color if you plan to print the document by using a monochrome palette or dot-matrix printer.
-
Select the text or graphic that you want to highlight.
-
To stop highlighting, select the arrow next to Text Highlight Color
and select Stop Highlighting, or press Esc.
The mouse pointer becomes a
when you point to your document.
Remove highlighting from part or all of a document
-
Select the text that you want to remove highlighting from, or press Ctrl+A to select all of the text.
-
Go to Home and select the arrow next to Text Highlight Color.
-
Select No Color.
Quickly find highlighted text
-
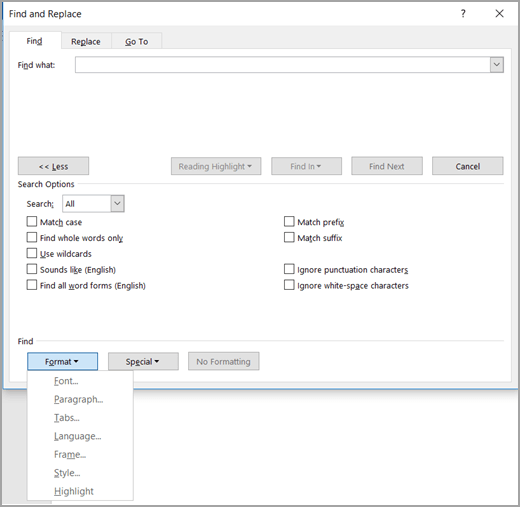
If you are using Word 2016 or Word 2013, select Find > Advanced Find.
If you are using Word 2010, select Find.
The Find and Replace box appears.
-
Select Format > Highlight.
If you don’t see the Format button, select More.
-
Select Find Next.
Highlight selected text
-
Select the text that you want to highlight.
-
Go to Home and select the arrow next to Text Highlight Color.
-
Select the color that you want.
Note: Use a light highlight color if you plan to print the document by using a monochrome palette or printer.
Highlight multiple parts of a document
This method is best for highlighting multiple parts of a document because the Highlight tool stays on until you decide to turn it off.
-
Go to Home and select the arrow next to Text Highlight Color.
-
Select the color that you want.
The Text Highlight Color button displays the selected color, and the mouse pointer becomes a
when you point to the area of your document that contains text.
Note: Use a light-toned highlight color if you plan to print the document by using a monochrome palette or printer.
-
Select the text or graphic that you want to highlight.
-
To stop highlighting, select the arrow next to Text Highlight Color
and select Stop Highlighting, or press Esc.
The mouse pointer becomes a
when you point to your document.
Remove highlighting from part or all of a document
-
Select the text that you want to remove highlighting from, or press Ctrl+A to select all of the text in the document.
-
Go to Home and select the arrow next to Text Highlight Color.
-
Select No Color.
Quickly find highlighted text
-
Select Find > Advanced Find.
The Find and Replace box appears.
-
Select Format > Highlight.
If you don’t see the Format button, select More.
-
Select Find Next.
- Using the Text Highlight Color button
- Using the Context Menu
- Using the Find and Replace dialogue box
Method 1: Using the Text Highlight Color button
Step 1: Open your Word document.
Step 2: Select the text.
Now that your document is ready, select the text that you want the highlight color changed.
You can quickly select a text by double clicking on it.
Step 3. Access the Text Highlight Color drop-down button.
While the text is selected, click the drop-down button next to the Text Highlight Color button in the Home tab.
This will display the highlight colors available. Click the color that you prefer.
Method 2: Using the Context Menu
Step 1: Open up a Word document.
Step 2: Select the text.
Once your document is ready, go ahead and select the text that you want the highlight color changed.
Step 3: Access the Context Menu.
Right-click on the text and click the Text Highlight Color drop-down button.
Select the color that you prefer from the drop-down menu.
Method 3: Using the Find and Replace Dialogue Box
This is most suitable if you have multiple highlighted text across your document. Note that if you have different highlight colors in your document, this method can replace all of that with the same color.
You can also replace batches of highlighted recurring words with a different uniform color. To do this, you can skip to the “Changing Highlight Color of Recurring Text in Word” section.
With that introduction, let’s get to it.
Step 1: Open your Word document.
Step 2: Launch the Find and Replace dialogue box.
Go to the Home tab and click the Replace button.
This will launch the Find and Replace dialogue box in the middle of your window.
Step 3: Change the highlight color.
On the dialogue box, click inside the Find What field then click the More>> button to display more options.
After that, click the Format drop-down menu at the bottom left of the dialogue box and select Highlight.
You’ve done it successfully if you see the word ‘Highlight’ under the Find what field.
Now, click inside the Replace with field and repeat the same step.
Finally, click the Text Highlight Color drop-down menu while your cursor is still in the Replace with field. Then, select the color you prefer.
Click the Replace All button to replace all highlight colors at once. Click the Replace button to change highlight color one by one. Otherwise, click the Cancel button.
Remove Text Highlight Color in Word
If you want to remove a few text highlight color in your document, simply repeat either the first and second method.
However, you’ll have to select the No Color option instead.
To remove all text highlight color in a document, simply hit the CTRL + A keys in your document.
This will select all contents of your document. Now, click the Text Highlight Color drop-down menu and select the No Color option.
Changing the Highlight Color of Recurring Text in Word
To do so, you’ll simply have to repeat the steps in method 3 with one single revision.
On the Find and Replace dialogue box, type the recurring text in the Find what field.
Then, click inside the Replace with field and click the Text Highlight Color drop-down menu to change the color.
For this example, we’ll replace the highlight color of the text “amet”.
When that’s done, click the Replace All button to apply the changes. Or, click the Cancel button if you changed your mind.
If you want to learn how to use the Find and Replace functions better, check out the “How to Find and Replace Text in MS Word” article.
Conclusion
We hope you’ve found this article helpful!
How highlight in Word works
Learn how to highlight in Word, how to remove highlight / unhighlight in Word, find and replace highlight, etc.
In Word, you can highlight text on the screen much like you can highlight text on paper using a highlighter. In this article, you will find general information about how highlight in Word works. The basic information about highlight applies to both the built-in highlight functionality and the functionality of the DocTools HighlightManager add-in.
There is no difference between highlight added using the DocTools HighlightManager add-in and using the built-in highlight functionality in Word. The difference is that DocTools HighlightManager add-in makes the work much faster and more flexible.
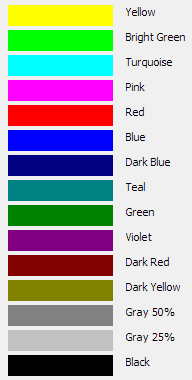
15 available highlight colors
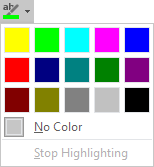
Word offers 15 highlight colors. For years, Word users have asked for more colors or the option to customize highlight colors, but so far with no luck.
Figure 1. Word highlight colors and their names.
Many of the 15 highlight colors available are too dark to use in most cases – for example, you can’t read black text on any of the darkest highlight colors.
Personally, I use yellow, bright green, turquoise and, in a few cases, red. The colors are rather glaring but I find they are the only ones that work.
Even if the Gray 25% is light enough to read the text, I don’t use it since it is impossible to distinguish it from selected text and from fields with field shading turned on.
In addition to the 15 highlight colors, there is a No Color which removes highlight.
Back to Table of Contents
How to show or hide highlight on screen and in print
- Highlight is neither font formatting nor paragraph formatting
- Highlight in Word documents is placed in its own layer that you can either show or hide
Even if it may look so, highlight in Word is not applied as font formatting or paragraph formatting like e.g. color shading. If you check the formatting of highlighted text, you will not see the highlight listed anywhere.
The display of highlight is managed via an option in Word:
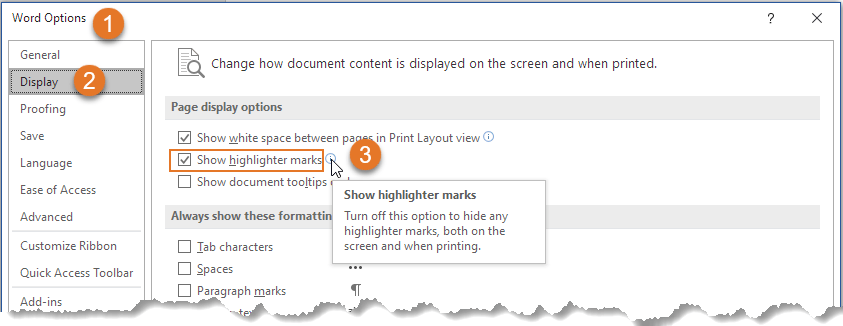
- To show highlight both on the screen and in print, turn ON File > Options > Display > Show highlighter marks. See Figure 2 below.
- To hide highlight both on the screen and in print, turn OFF File > Options > Display > Show highlighter marks. See Figure 2 below.
Note that the Show highlighter marks setting is a global Word setting. It applies to all documents.
When you turn off Show highlighter marks, any highlight in documents will only be hidden, not removed. As soon as you turn on the setting, the highlight will appear again, if any. The highlight will also be visible if the document is opened on another computer with the setting turned on.
Figure 2. To show highlight on the screen and in print, turn on Show highlighter marks.
When you select a highlight color using the built-in functionality of Word, that color will be set as the default highlight color, i.e. the same color will be applied the next time you click the Text Highlight Color icon in the Home tab of the Ribbon or in the Mini Toolbar.
As opposed to the built-in functionality, the selection of a specific highlight color using the Apply Highlight command in the DocTools HighlightManager add-in will not affect your next highlight operation. The add-in lets you apply any highlight color with a click.
How to print without highlight
As explained above, you can turn highlight on and off, without removing the highlight from the document.
To print without highlight but keep the highlight in the document:
- Turn off display of highlight as explained above (see Figure 2).
- Print.
- Turn highlight on again, if you want.
In the DocTools HighlightManager add-in, you will find a command for quickly turning on and off the display of highlight instead of digging deep into the Word Options dialog box.
Highlight and track changes
Changing highlight in a document is not registered by track changes. Even if track changes is on, Word will not regard a highlight change as a revision.
The difference between highlight color and shading color
You should be aware of the difference between highlight and shading.
As mentioned above, the number of highlight colors is limited. On the other hand, you can apply any color of your choice via the Shading tools in Word. This may make users want to use shading instead of highlight in order to get access to more colors. However, the two types of coloring work in totally different ways.
As explained above, highlight in Word is neither font formatting nor paragraph formatting. The highlight lives in its own layer in Word and can be turned on or off for all content. The same is not possible with shading.
If you apply a shading color to content using a color from one of the Shading tools in Word or via the Borders and Shading dialog box, that color is applied as formatting of text, paragraphs, table cells or entire tables.
This means that the shading is applied as a characteristic or an attribute of the text, paragraph, table cell or table itself.
You can’t turn on and off shading for an entire document as you can with highlight. You can easily select all and set the shading to No Color. However, once you have removed the shading, you can’t easily apply it again if spread across the entire document. This means that it may not necessarily be a good idea to use shading as a substitute for highlight.
Highlight is often used as a temporary marking of content, e.g. during the editing process. Shading may more often be used as permanent formatting that is meant to remain in the finished document.
Figure 3. A color selected from a Shading palette is either font, paragraph, or table formatting.
A shading color you apply via a Shading palette or via the Borders and Shading dialog box is applied as one of the following types of formatting depending on the conditions and what you select:
- Font formatting applied to text
- Paragraph formatting applied to entire paragraph(s)
- Table cell formatting applied to entire table cell(s)
- Table formatting applied to entire table(s)
Back to Table of Contents
How to highlight in Word using the built-in functionality
You can apply highlight in different ways using the built-in functionality in Word. See METHODs 1-4 below. When you apply highlight to selected text in Word using the built-in methods described below, Word doesn’t retain the selection but collapses the selection so the insertion point is placed after the selection afterwards. Since you may often want to apply e.g. formatting to the same selection immediately after applying highlight, this is not always practical.
The DocTools HighlightManager add-in lets you decide whether or not to keep the selection after highlighting text. It can help you save time.
METHOD 1 – How to highlight selected text via the Ribbon
- Select the text to be highlighted.
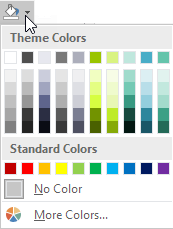
- Select Home tab > click the arrow in Text Highlight Color icon and click the desired highlight color. The currently selected color works as the default highlight color and is shown in the icon. If you want to apply that color, you can just click the icon. (To remove highlight, select No Color).
Figure 4. The Text Highlight Color options in the Home tab in the Ribbon.
Back to Table of Contents
What is the default highlight color in Word?
The default highlight color in Word is the highlight color currently shown in the Text Highlight Color icon.
When you click one of the 15 colors or No Color, that color becomes the default highlight color.
The default highlight color will automatically be used by Word for the next highlight unless you select another color.
The DocTools HighlightManager add-in lets you use any highlight color without changing the default highlight color.
METHOD 2 – How to highlight selected text via the Mini Toolbar
If you have the Mini Toolbar enabled, you can also apply highlight via that toolbar:
- Select the text to be highlighted.
- In the Mini Toolbar that appears when you have selected text, click the arrow in the Text Highlight Color icon and click the desired highlight color. The currently selected color works as the default highlight color and is shown in the icon. If you want to apply that color, you can just click the icon. (To remove highlight, select No Color).
The highlight tools in the Mini Toolbar are identical to the ones on the Home tab in the Ribbon.
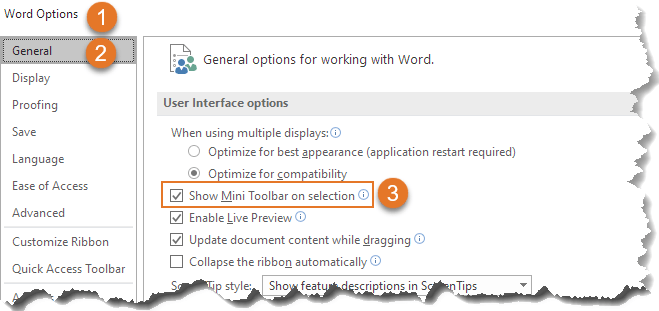
The Mini Toolbar only appears when you have selected text and if, at the same time, the option File > Options > General > Show Mini Toolbar on selection is turned on. See Figure 5 below.
Figure 5 The Mini Toolbar is only shown if the Show Mini Toolbar on selection option is turned on.
Figure 6. The Text Highlight Color options in the Mini Toolbar are the same as in the Home tab of the Ribbon.
METHOD 3 – How to highlight using a shortcut
Word has a default shortcut assigned to highlight:
- Alt+Ctrl+H
You can both apply highlight and remove highlight using the Alt-Ctrl-H shortcut. Note that this shortcut only works with the currently selected default highlight color so you still have to first make sure the desired color has been selected, either via the Home tab or the Mini Toolbar.
As opposed to how the Alt-Ctrl+H shortcut works, the DocTools HighlightManager add-in lets you assign shortcuts to each individual highlight color – customizable shortcuts have been assigned to the most useful highlight colors beforehand so they are ready for use at once. This means that the add-in makes it possible to apply any highlight color simply by pressing a keyboard shortcut without first switching color.
How the Alt+Ctrl+H shortcut works
You must select text before pressing the Alt+Ctrl+H shortcut. What happens when you press the shortcut depends on the situation. See the examples below:
Figure 7. No highlight applied to the selection beforehand.
EXAMPLE 1
If the selected text is not highlighted beforehand, Alt+Ctrl+H applies the highlight color that is currently selected as the default highlight color in Home tab > Text Highlight Color.
NOTE: If the currently selected default color is No Color, no highlight will be applied even if you press the shortcut.
Figure 8. Entire selection highlighted beforehand.
EXAMPLE 2
If the entire selected text is already highlighted (same color or mixed colors), Alt+Ctrl+H removes the highlight. This means that it works as a toggle: It adds or removes highlight depending of the selection.
Figure 9. The selected text is partly highlighted beforehand.
EXAMPLE 3
If the selected text is partly highlighted, i.e. some of the text is highlighted and other is not, Alt+Ctrl+H applies the highlight color that is currently selected as the default highlight color in Home tab > Text Highlight Color.
NOTE: If the currently selected default color is No Color, Alt+Ctrl+H removes highlight from the selection.
Back to Table of Contents
METHOD 4 – How to highlight without first selecting text
If you click the Text Highlight Color icon on the Home tab or in the Mini Toolbar without first selecting text, the cursor changes to the icon shown below (enlarged here). You can then highlight text by dragging across the text that is to be highlighted.
NOTE: If you drag across text that is already highlighted, the highlight will be removed.
Figure 10. Highlighter icon
To exit the highlighter mode, do one of the following:
Press the Escape key OR
Click the Text Highlight Color icon on the Home tab or in the Mini Toolbar OR
Select Stop Highlighting from the Text Highlight Color tools on the Home tab or in the Mini Toolbar.
Note that the DocTools HighlightManager add-in lets you apply any highlight color to a paragraph without first selecting the entire paragraph – you only need to press a shortcut.
How to unhighlight in Word
Unhighlight is the same as removing highlight. See below.
How to stop highlighting in Word
If you click inside text that is highlighted and start typing, the new text you type will inherit the highlighting from the existing text. If you want to stop highlighting text when you type the new text, you can for example do as follows – all carried out via the keyboard:
- Type the first new character, then press and hold the Shift key and press the Left Arrow key to select the typed character.
- Press Alt+Ctrl+H to unhighlight the selected character you just typed.
- Press the Right Arrow key once to move after the typed character (or you can just delete the character when finished typing in step 3).
- Then continue to type the new text.
Getting rid of highlight may be referred to as either removing highlight or unhighlight. You may also think of it as how to remove highlighted text in word even if you want to keep the text and only make the highlighting go away.
To get rid of highlight in Word – or unhighlight – you can follow the steps described for applying highlight using METHOD 1, METHOD 2, METHOD 3 or METHOD 4 above but with the difference, that you select No Color instead of one of the 15 colors.
The DocTools HighlightManager add-in provides tools that let you quickly remove highlight either from the selection or from all paragraph(s) that are fully or partly included in the selection. This means that you don’t need to spend time on first selecting the entire paragraphs to remove highlight.
How to remove highlight from a paragraph number or bullet
If you are working with Word documents with automatic numbering, you may have struggled with how to unhighlight a number in Word. The same may be true for bullets in bulleted paragraphs.
Paragraph marks and trailing spaces (spaces at the end of a paragraph) never show highlight. However, they may be highlighted – but you can’t see it.
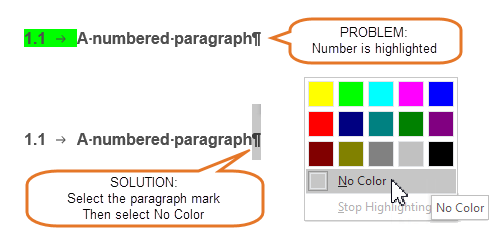
If only the number or bullet of a paragraph is highlighted, it is because the paragraph mark of that paragraph is highlighted.
To remove highlight from a number or from a bullet, select the paragraph mark and remove the highlight. You can also select the entire paragraph or the last part of the paragraph as long as you make sure the paragraph mark is included in the selection. Then the highlight will disappear from the number/bullet. See the illustration below.
TIP: Turn on formatting marks (Ctrl+Shift+8) so you can see the paragraph marks and other non-printing characters. Paragraph marks look like this: 
Figure 11. To remove highlight from a number or bullet, select the paragraph mark and unhighlight it.
The DocTools HighlightManager add-in provides a tool that lets you quickly remove highlight from numbered or bulleted paragraphs. You only need to click a button to remove highlight from any bullet or number in the selection or in the entire document.
Back to Table of Contents
How to remove light yellow highlight that does not disappear when selecting No Color
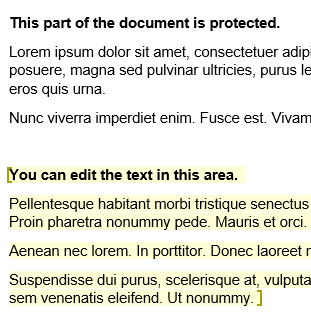
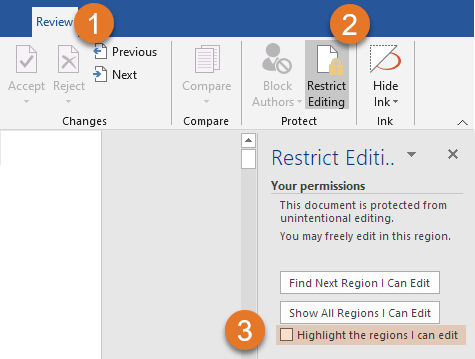
You may experience that you open a document in which some areas are highlighted with a light or pale yellow color (see figure 12 below). The color differs from the bright yellow color in the highlight color palette. If you try to remove the light, yellow highlight by selecting No Color from the highlight palette, nothing happens.
Such pale, yellow highlight is most likely a result of the document being protected. The yellow color is used to show which areas of the document you can edit. You can turn off the highlight but it will be turned on again if you close and reopen the document. As opposed to normal highlight colors, the light, yellow color does not print. It is shown on the screen only.
Figure 12. Example of light, yellow highlight that shows which areas you can edit in a protected document.
To remove the light yellow highlight:
- In the Ribbon, select Review tab > Restrict Editing.
- In the Restrict Editing pane that opens, turn off Highlight the regions I can edit. See figure 13 below.
You can also open the Restrict Editing pane from the Developer tab > Restrict Editing.
Figure 13. To remove the light, yellow highlight, turn off Highlight the regions I can edit.
Back to Table of Contents
How to replace highlight colors in a document
You can use Find in Word to search for highlight. You can also use Find and Replace to e.g. search for highlight and remove it or to apply highlight to a search string – or to replace one highlight color with another. See the examples below about how you can use Find and Find and Replace in relation to highlight.
How to find highlight
As you will learn below, the built-in functionality of Word does not let you search for a specific highlight color. As opposed to that, the DocTools HighlightManager add-in lets you find any specific highlight color.
Word does not let you search for specific highlight colors.
If two or more paragraphs in succession are highlighted, Word will not find them as one instance of highlight. Word interprets each paragraph as one instance of highlighting. This means that Word finds highlight in one paragraph at a time.
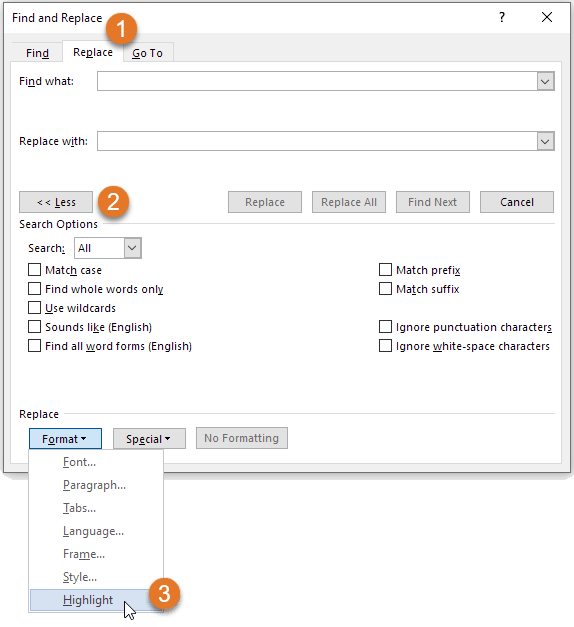
To find highlight in Word using the Find and Replace dialog box:
- Press Ctrl+H to open the Find and Replace dialog box. If you only want to find highlight, you can use the Find tab in the dialog box. If you want to replace highlight, make sure the Replace tab is selected.
- To find highlight, make sure the insertion point is in the Find what field.
- To expand the dialog box so all options are shown, click the More button.
- Select Format (bottom of dialog box) > Highlight. The word «Highlight» will now be shown below the Find what field. See Figure 15 below.
- If you want to find highlight no matter the text, leave the Find what field empty, otherwise enter the relevant text.
- Add other search criteria as needed and use the buttons in the dialog box to find and/or replace.
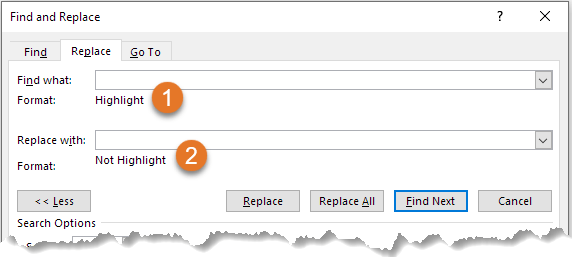
TIP: You can find both Highlight and Not highlight
If you select Highlight from the Format menu in the Find and Replace dialog box twice, the text below the Find what or Replace with field changes from Highlight to Not highlight. See Figure 15 below.
This means that you can search for and replace with both highlight and no highlight.
If you select Format > Highlight a third time, Not highlight is cleared.
To clear all Format criteria from the Find what or Replace with field, click in the relevant field, then click the No Formatting button. Alternatively, press Ctrl+Spacebar to clear the formatting.
Figure 14. The Find and Replace dialog box lets you search for or replace with Highlight.
Figure 15. Example: You can search for Highlight and replace with Not Highlight.
How to replace one highlight color with another
You may sometimes want to change highlight color in Word.
You can use the Find and Replace command to replace one highlight color with another. To do this:
- Select the new highlight color you want as the default highlight color (via the Text Highlight Color in the Home tab or the Mini Toolbar).
- Press Ctrl+H to open the Find and Replace dialog box.
- In both Find what and Replace with, add Highlight (see How to find highlight above for help. Leave the text fields empty unless you want to search for specific text and/or replace with other text.
- If you want to replace any highlight, no matter the color, with the new color, click Replace All. If you only want to replace a specific color, use the Find Next button and click Replace only if relevant – repeat Find Next.
As opposed to the built-in functionality in Word, the DocTools HighlightManager add-in lets you find any specific highlight color and replace it with any other highlight color, leaving all other colors unchanged.
The DocTools HighlightManager add-in also has a Find command that finds the next highlight in the document without you needing to set up the search in the Find or Find and Replace dialog box.
Back to Table of Contents
How to copy only the highlighted text to another document
The built-in functionality of Word does not have a special feature for copying only highlighted text.
You could save a copy of the document and use Find and Replace to delete all text that is not highlighted. To do that:
- Press Ctrl+H to open the Find and Replace dialog box.
- Click in the Find what field and select Format > Highlight twice until the text Not highlight is shown below the field. Leave the field empty.
- In the Replace with field, type ^p in the field.
The ^p replaces the found non-highlighted text with a paragraph mark. This will split the remaining highlighted text in paragraphs. Otherwise, the result could be that many highlighted instances end in one paragraph. - Click Replace All.
The result may not always be useful since all the highlighted text remains with context.
The DocTools HighlightManager add-in includes a command for extracting highlight to a new document. Using that command, you can quickly create a document that includes the highlight, incl. metadata about each found instance.
Troubleshooting highlight
PROBLEM 1 – Highlight it is not visible on the screen
If you apply a highlight color to selected text and no color appears, the problem is likely to be one of the following:
- You have selected No Color instead of a color.
- The selection if of a type that can’t be highlighted.
- The Show highlighter marks setting is turned OFF. See how to turn on highlight marks.
PROBLEM 2 – Why can’t I remove highlighting in Word?
If you try to remove highlight using the methods described above and if that doesn’t remove the color, the reason may be that the color is not applied using highlight.
See PROBLEM 4 below for further details about how to get rid of other types of colors than highlight.
PROBLEM 3 – How to remove yellow highlight in Word?
A yellow background color on text in Word may not always be highlight. If you try to remove highlight using the methods described above and if that doesn’t remove the yellow color, the reason may be that the color is not applied using highlight.
See PROBLEM 4 below for further details about how to get rid of other types of colors than highlight.
PROBLEM 4 – The color doesn’t disappear when I attempt to remove highlight
What to do if you can’t remove highlighting in word? The reason may be that what looks like highlighting isn’t highlighting at all but another type of coloring.
If you select text that seems to be highlighted and try to remove the highlight and if this does not make the color go away, the reason may be that it is not highlight but one of the following:
- The color is a warm yellow highlight color added by the Find feature
- The color is color shading
- The color is light yellow and is showing which areas you can edit in a protected document
- The color is light gray field shading making it possible to distinguish fields from normal text
- The color is light gray Form Field shading making it possible to see where to fill in fields
See below for help on how to remove the five types of color.
How to remove yellow highlight added by the Find feature
If you use the Find feature in the Navigation Pane, Word highlights all occurrences that match your search criteria. You can, for example, remove the highlight by pressing the Escape key once.
How to remove color shading
- Selected the text from which you want to remove the color shading.
- Select Home tab > Paragraph group > Shading menu > No Color.
Note that shading can be applied to part of a paragraph, entire paragraphs, table cells, or entire tables. However, selecting No Color from the Paragraph group can remove shading from any of the types.
How to remove the light yellow color from a protected document
See how you remove light yellow highlight from a protected document above.
How to remove gray field shading
In documents with fields, I recommend having field shading set to always be displayed. The shading is visible on the screen only and does not print (more information about field shading). However, you can turn off field shading or set it to be displayed only on field(s) that are selected:
- Select File > Options > Advanced.
- In the Show document content group, select Field shading > Never or When selected.
- Click OK.
Figure 16. Example of a field with fields shading.
I strongly recommend having field shading shown always. If you can’t distinguish fields from other content, you risk making manual changes inside fields. The result will be that such changes are gone when you update fields.
How to remove gray Form Field shading
Word documents that are created as forms that are to be filled in by users may be created using a special type of fields: Form Fields. In newer versions of Word, forms that use Form Fields are referred to as Legacy Forms since Word now also lets you create forms using content controls.
If you see gray shading that can’t be removed using any of the methods above, Form Fields may be in use. You can quickly find out by pressing Alt+F9 to show field codes. If the areas with the gray shading now appear as { FORMTEXT }, { FORMCHECKBOX }, or { FORMDROPDOWN }, Form Fields are in use.
Figure 17. Example of Form Field without and with Form Field shading and example of Form Field showing field code.
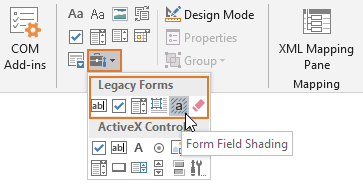
It is practical to have Form Field shading turned on since it makes it easy to see where to fill in data. However, you can turn the Form Field shading off:
- On the Developer tab > Controls group, click Legacy Tools.
- Click the Form Field Shading icon to turn off the shading of Form Fields.
If you can’t see the Developer tab, see How to show the Developer tab in Word.
Figure 18. Form Field shading can be turned on and off via Developer tab > Controls group > Legacy Tools.
Back to Table of Contents
PROBLEM 5 – No highlight is applied when I press Alt+Ctrl+H
As explained above, Alt+Ctrl+H is the default shortcut assigned to highlight. If you press Alt+Ctrl+H and nothing happens, the problem is likely to be one of the following:
- You have not selected any text or the selection if of a type that can’t be highlighted.
- The currently selected highlight color in Home tab > Text Highlight Color is No Color,
Back to Table of Contents
PROBLEM 6 – How to customize highlight color in Word?
The quick answer is: You can’t create custom highlight colors in Word. The colors are restricted to the 15 colors shown in Figure 4 above.
You might use color shading instead of highlight. When it comes to color shading, you can define any color you want. However, highlighting and color shading are very different as explained above.
Back to Table of Contents
How to apply or remove highlight via macros (VBA)
Below, you will find small examples of macro code related to highlight. If you record a macro in Word to find out what code to use for highlighting, the result is macro code that also changes the default highlight color to the color you apply. As you will see in the code samples below, you can apply or remove highlight via VBA without changing the default color.
EXAMPLE 1: Apply yellow highlight to the selection without changing the default highlight color that is shown in the Text Highlight Color icon:
Selection.Range.HighlightColorIndex = wdYellow
EXAMPLE 2: Remove highlight from the selection without changing the default highlight color that is shown in the Text Highlight Color icon:
Selection.Range.HighlightColorIndex = wdNoHighlight
EXAMPLE 3: Select bright green as the default highlight color that will be shown in the Text Highlight Color icon:
Options.DefaultHighlightColorIndex = wdBrightGreen
Back to Table of Contents
Generate complete documents in seconds from re-usable text or graphics
Manage comments in Word fast and easy – review comments, extract comments to Word or Excel, etc.
Simplify and speed up the management of cross-references even in your most complex documents
Manage and repeat data in Word fast and easy with custom document properties and DocProperty fields
Extract insertions, deletions and comments from any Word document, incl. context and headings
Apply any highlight color or remove highlight in Word with a single click – customizable shortcuts
Browse pages, sections, headings, tables, graphics, etc. and find text in Word with a single click
Check safety-critical procedure documents for human factor issues in minutes – improve quality and help prevent errors
Create screen tips in Word fast and easy – with up to 2040 characters
Highlight can be useful in many Word documents, not least during the editing process. This article has explained how highlight in Word works. You have learnt how to highlight, how to remove highlight / unhighlight, how to solve different problems with highlight, etc. I hope this article helps you work more efficiently with highlight in Word.
Here’s a work-around to the problem of defining custom highlight colors which I discovered quite some time ago ..
If you paste in highlighted text copied from an application from outside of Word (i.e., highlighted text from an AOL email let’s say), you can then:
- Use the insertion bar to select and highlight an area of the text you just pasted in
- Press the FORMAT PAINTER tool to copy the formatting of the area you’ve selected. The pointer changes to a PAINTBRUSH icon (with an insertion bar attached)
- Move the PAINTBRUSH to the existing Word text that you want to highlight using the new color
- Press and hold the mouse button (usually the left button) while selecting the specific text
- Release the mouse button to apply the new highlighting and formatting
The applied highlighting will also include any other existing formatting; so you MAY have to change the font or adjust some other feature (i.e., turn on/off bold, italics, underline, etc.) But this is easily accomplished. The point is that you can now have ANY color highlighting that you prefer – this hack absolutely DOES work!
Here’s, one last thing – when you save the document (by clicking the OFFICE BUTTON in the upper left corner), I would advise that you first select WORD OPTIONS, then SAVE and check the box next to «Embed fonts in the file» under «Preserve fidelity when sharing this document» (I always uncheck the other two boxes). This is to ensure that before you export or print the document, you may be sure that all the fonts and features have been saved within it.
And for the record, this technique is NOT shading.
The highlighting comes from actual HIGHLIGHTED TEXT copied from a document or application from OUTSIDE of Word. So it has nothing whatsoever to do with Word’s shading feature. I’ve even copied highlighted text from non-dedicated word processing applications, and then pasted the text into Word – where it is then available to apply the copied highlighting to text within the existing Word document.
If you think about it – the fact that Word 2007 permits you to define any THEME color you want clearly shows that one should be able to define ANY desired custom HIGHLIGHTING color as well – besides just the 15 basic colors (and excluding the «no color»). And this work-around proves that this is so. The problem is that the Word application itself does not permit you to accomplish this directly.
In this course, we will talk about how to change font color in MS Word. Meanwhile, this is the continuation of the previous tutorial on how to change font style, size and font case in Microsoft Word which still part of formatting text in your documents.
Further, we’ll learn how to mark text so that it looks like it was done with a highlighter pen. We will also learn how to give different effects to different parts of text.
Table of contents
- Font Color in MS Word
- What is font color in MS Word?
- What is the default font color in MS Word
- What is the use of font color in MS Word?
- How to Change Font Color in MS Word
- Text Highlight Color in MS Word
- How to Highlight Text with Colors
- What are effects applied to text?
- How to Apply Text Effects in MS Word Document
- Summary
What is font color in MS Word?
Font color is sometimes used to say more than what the text says. For example, you might use color to draw attention to an important point in a course syllabus. Or, you could put a multiple-choice question on a word document and color the right answer green and the wrong answers red.
What is the default font color in MS Word
The default font color in MS Word isn’t black; it’s Automatic Black on light colors and White on dark ones. I wouldn’t suggest changing the color that is used by default for all new documents, but if you really want to: To open the Styles pane, press Alt+Ctrl+Shift+S.
What is the use of font color in MS Word?
The use of font color in MS Word is you can add colored text like red, orange, green, blue, indigo, and many others. At the same time, you can choose the background color.
Also, you can change the color of links from blue to something else if you need to work with a certain background color.
How to Change Font Color in MS Word
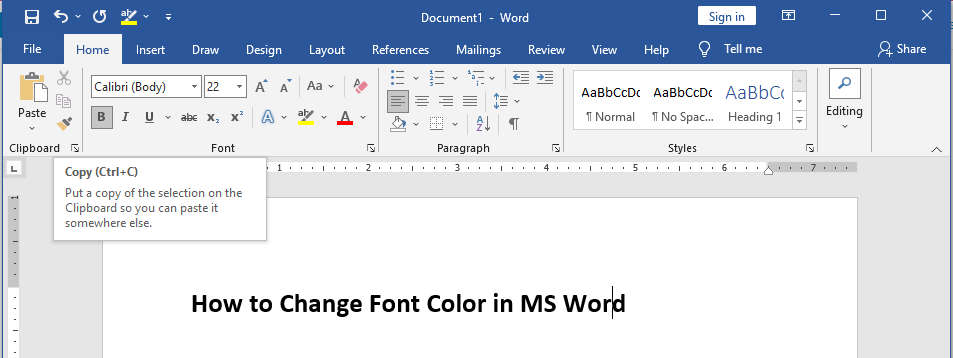
Here are the steps on how to change font color in MS Word.
- Step 1: Open or make a new document in which you want to change the text color.
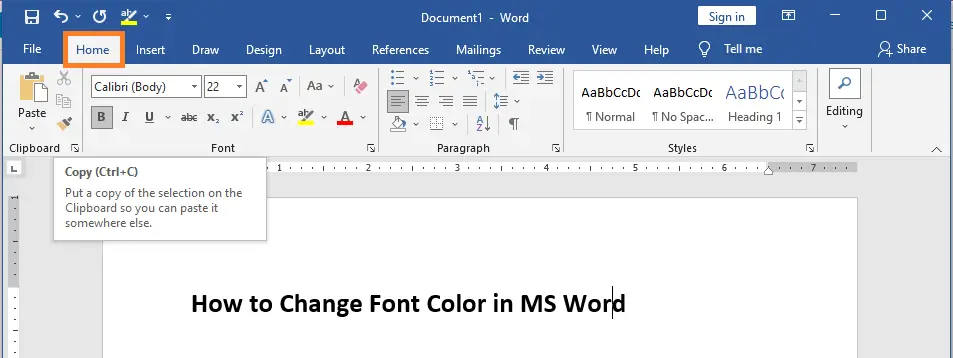
- Step 2: Now, click on the Home tab as shown below.
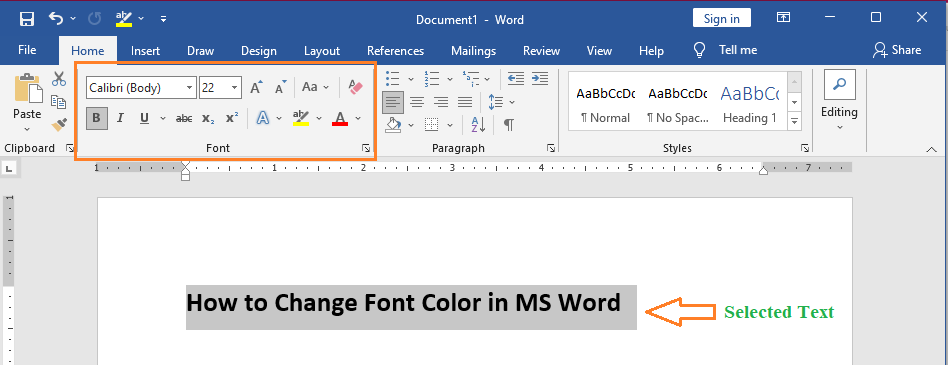
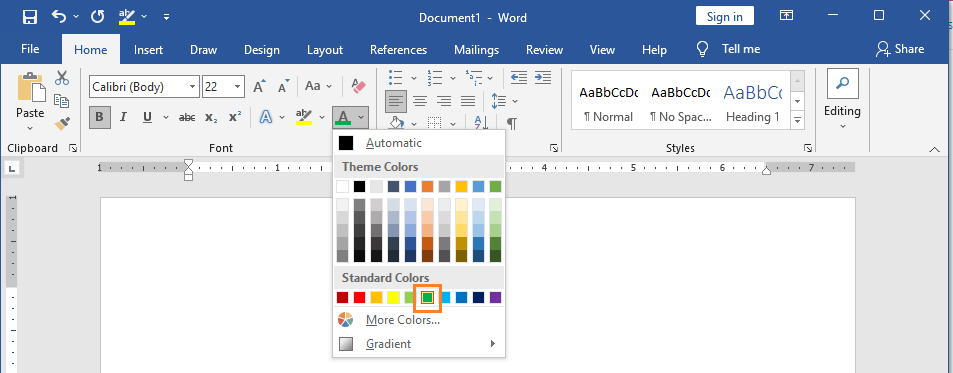
- Step 3: Now select text or paragraph whose color you want to change. Then, to the Font group under the Home tab marked in the image below.
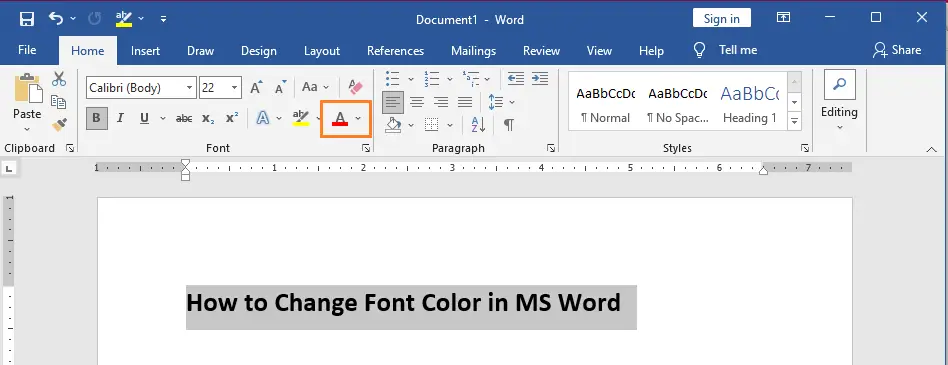
- Step 5: Select the font color option (marked in the image below.)
- Step 6: Pick the color you want from the list in the menu.
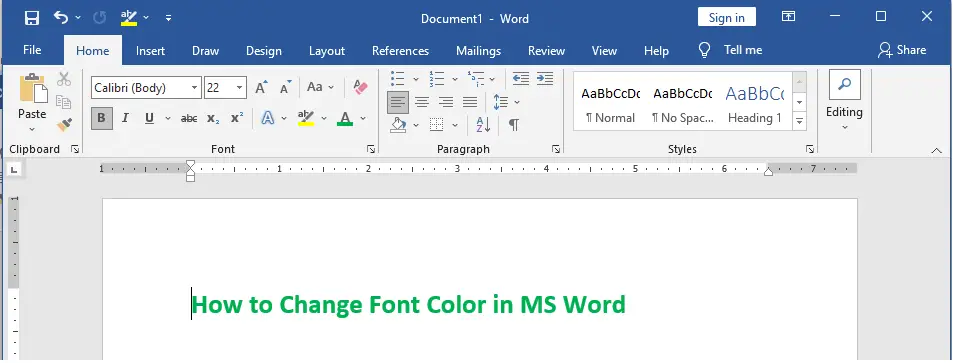
- Step 7: Here, the text changed from being black to being green.
Text Highlight Color in MS Word
The text highlight color is the shade of a color over your text and the color of a word that also includes the white spaces between the letters. Text highlight color can change depending on what program is being used.
How to Highlight Text with Colors
Here’s how you can use any color to highlight a piece of text and make it look like it was marked with a highlighter pen. Most of the time, we use yellow to highlight text. By following this two simple steps, you can easily highlight a section of text with a color.
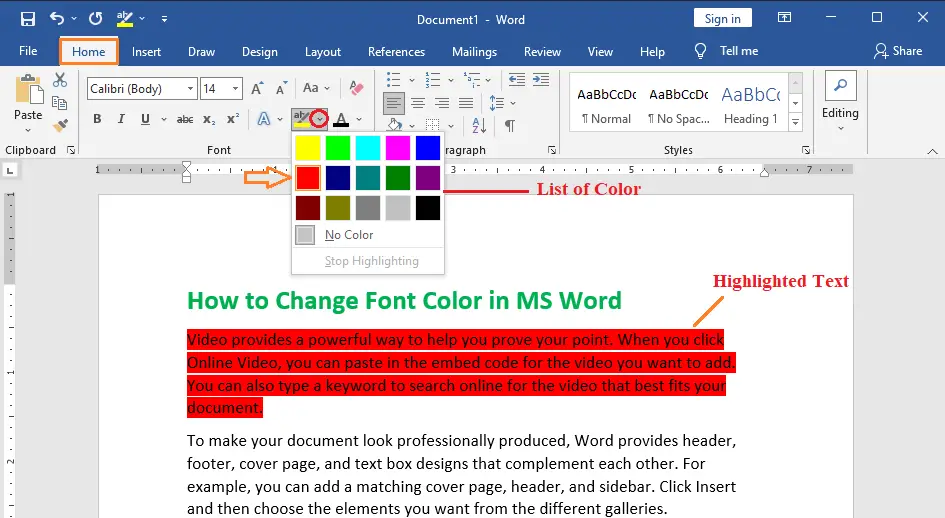
- Step 1: Choose the part of the text that needs to be colored. You can use any of the ways to select text to pick out the part of text you want.
- Step 2: Click the triangle next to the Text Highlight Color button to see a list of colors. Try moving your mouse pointer over different colors to see how the color of the text changes on its own. You can choose any of the colors by just clicking on it.
If you click on the left side of the Text Highlight Color button, the selected color is automatically applied to the text. Clicking on the small triangle shows a list of colors.
What are effects applied to text?
What are effects applied to text?
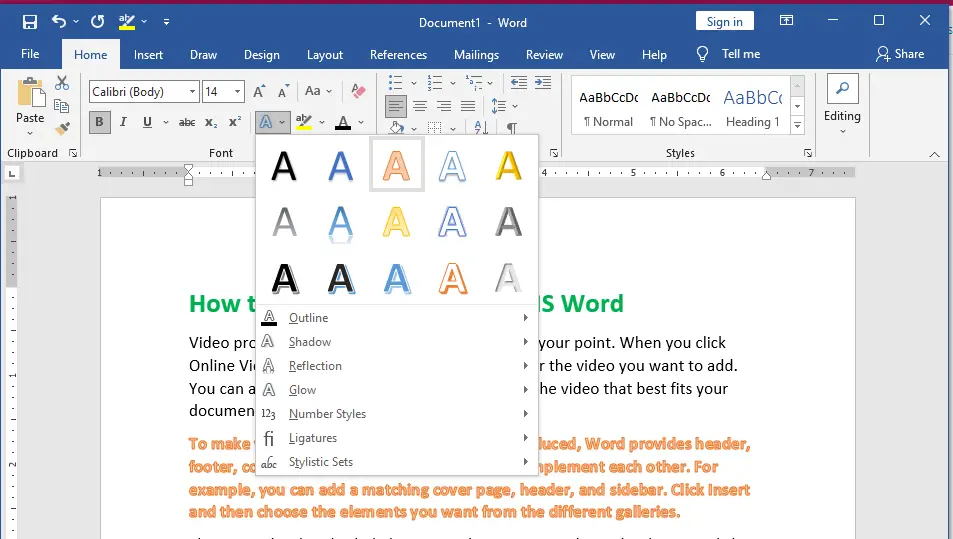
The effects that you can apply to a text are to create shadows, bevels, reflections, and a variety of other effects. In addition, Text Effects are located within the Font group of the ribbon. For which there are several pre-made styles available for selection in the Text Effects menu’s leading selections. Furthermore, the Text Effects menu also includes Outline, Shadow, Reflection, and Glow choices.
How to Apply Text Effects in MS Word Document
Microsoft Word has a list of text effects that will show you how to apply text effects in an MS Word document to improve the appearance of your document, particularly the cover page and headings. By following two simple steps, it’s easy to apply different effects to text.
- Step 1: Find the text you want to make bold and click on it. You can use any of the ways to select text to pick out the part of text you want.
- Step 2: Click the Text Effect button to see a list of effects, such as shadow, outline, glow, reflection, etc. If you move your mouse pointer over different effects, the text effect will change on its own. You can choose any of the available text effects by clicking on it.
Summary
In summary, we’ve talked about how to change font color and highlight text in Microsoft Word, as well as how to apply effects in a document and what those terms mean. In addition, we know the list of color options available in Microsoft Word. We also gain insight into how changing font color and highlighting make the document creative and good.
We hope this tutorial helps you as you format your documents in MS Word.
PREVIOUS
NEXT
Updated: 03/06/2020 by
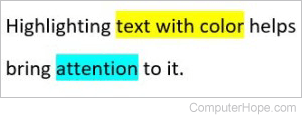
In a Microsoft Word document or a PowerPoint slide, highlighting text with color helps bring attention to that text. If you want to make sure readers pay attention to important content, highlight the text in yellow or another light color, to ensure they see it and can read it.
Select a link below for steps on how to highlight text in Word or PowerPoint.
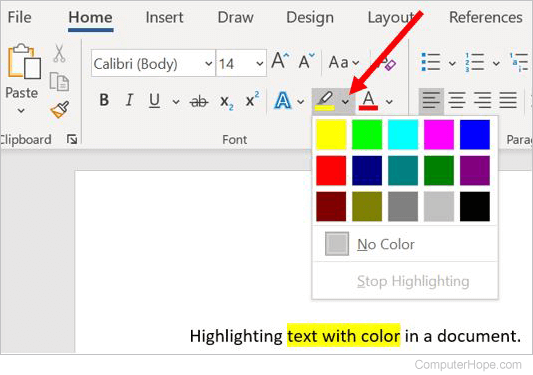
Highlight text in Microsoft Word
To highlight text with color in a Word document, follow the steps below.
- Open the Microsoft Word document where you want to highlight text with color.
- Find the text to highlight. Using your mouse, select the text by pressing and holding the left mouse button, then drag the mouse to the left or right to select the text.
- In the Ribbon, on the Home tab, click the downward-pointing arrow next for the Text Highlight Color option.
- In the highlight color drop-down menu, select the preferred color for highlighting the text. The text is now highlighted with color.
Tip
If you want to change the highlighting color, repeat the steps above and select the new color in step 4.
Tip
If you want to remove the highlighting color, repeat the steps above and select the No Color option.
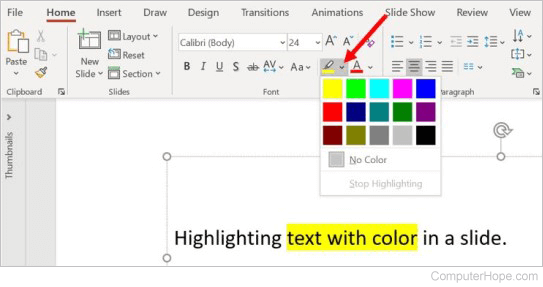
Highlight text in Microsoft PowerPoint
To highlight text with color in a PowerPoint slide, follow the steps below.
- Open the Microsoft PowerPoint slide deck where you want to highlight text with color.
- Find the text to highlight. Using your mouse, select the text by pressing and holding the left mouse button, then drag the mouse to the left or right to select the text.
- In the Ribbon, on the Home tab, click the downward-pointing arrow next for the Text Highlight Color option.
- In the highlight color drop-down menu, select the preferred color for highlighting the text. The text is now highlighted with color.
Tip
If you want to change the highlighting color, repeat the steps above and select the new color in step 4.
Tip
If you want to remove the highlighting color, repeat the steps above and select the No Color option.
Changing the font color and highlighting the background of the text are basic skills that every Microsoft Word user should master. Artistic effects are rarely used in everyday life, but applying effects is simple as changing the font color.
To change the color of the selected text, do one of the following:
- On the Home tab, in the Font group, click the Font Color button:

If you want to use a different color instead of the proposed, click the arrow down on the right side of the button to open a dropdown list and choose the color you prefer:

- If you see the Mini toolbar after selecting a fragment, you can click the Font Color button in it:
- Right-click the selected fragment and then click the Font Color button in the Mini toolbar.
To make the selected text pop by highlighting a bright color, do one of the following:
- On the Home tab, in the Font group, click the Text Highlight Color button:
If you want to use a different color instead of the proposed, click the arrow down on the right side of the button to open a dropdown list and choose the color you prefer:
- If you see the Mini toolbar after selecting a fragment, you can click the Text Highlight Color button in it:
- Right-click the selected fragment and then click the Text Highlight Color button in the Mini toolbar.
To apply artistic effects to the selected text, do the following:
- On the Home tab, in the Font group, click the Text Effects and Typography button:
In the gallery, click the preformatted effect combination that you want to apply:
On the menu, click Outline, Shadow, Reflection, Glow, Number Styles, Ligatures, or Stylistic Sets. Then make selections on the submenus to apply and modify those effects.
Please, disable AdBlock and reload the page to continue
Today, 30% of our visitors use Ad-Block to block ads.We understand your pain with ads, but without ads, we won’t be able to provide you with free content soon. If you need our content for work or study, please support our efforts and disable AdBlock for our site. As you will see, we have a lot of helpful information to share.
Have you ever wanted to change all of the highlighting in a document to a different colour? Normally you would need to individually select each highlighted text and re-do the colour, however you can do it with the Find and Replace command.
To Replace the Highlight;
- First choose the new Text Highlight Colour that you want to change to
(Home ribbon / Font group / Text Highlight Colour) - Open the Find and Replace dialog (Ctrl H) and click the More button.
- Click in the Find What box
- Click the Format button (If you can’t see it, click on the More button)
- Select Highlight
- Click inside the Replace With box
- Click the Format button
- Select Highlight again
- Click the Replace All button and Word will replace all your highlighting.
To Remove the Highlight;
Do one of the following;
Using Find & Replace;
- Follow the steps above, but after point 6 click the select No Formatting button.
Not using Find & Replace;
- Use Select All on the document (Ctrl A)
- Click the arrow next to the Text Highlight Colour
- Select No Colour.
Modification Highlighted Text Color In Windows 10
How can an individual alter the emphasize history shade for chosen message in Microsoft Workplace (variation Office 365 (16.0 ), if it matters)? This choice shade appears additionally to put on matched words from the “Locate as well as change” dialog.
Motif shielding that adds background color to the selected message, as well as paragraphs, can likewise look similar to highlighting. Because of this, MS Word users could require to eliminate style shielding rather than highlights. This is how users can get rid of shaded messages in Word. Firstly, under the “Home” tab and also in the “Typeface” team, click on the drop-down switch on the “Text Emphasize Color” command.
- Word for Microsoft 365 Word 2019 Word 2016 Word 2013 Word 2010 Word 2007 Even more.
- Is it feasible to tailor the text highlight shades in Word, Highlighted text looks fine on the screen, yet when I publish, the highlighted color is much to dark.
- Subscribe If you select A lot more Colors, you can define any type of color that you want.
- It’s various from highlighting text, which has an extremely restricted selection of colors, and that isn’t a theme color, select one under Criterion Color styles or click More Color styles.
- Apply shading to words or paragraphs – Word, Add background shades to words and paragraphs in your papers.
Is there a method to lower the density of the Select the Shading tab as well as pick the wanted shade? If the design is a paragraph style, you will be able to use the shielding only for Paragraphs, but in a character design, Put on will be set to Text.
Apply shading to words or paragraphs – Word, Include background colors to words and paragraphs in your records. Word for Microsoft 365 Word 2019 Word 2016 Word 2013 Word 2010 Word 2007 More. It’s different from highlighting text, which has a very restricted choice of shades, and that isn’t a theme color, choose one under Criterion Colors or click Even more Color styles. From the colors displayed, pick the one you want to use.
Is it possible to customize the message highlight colors in Word, Highlighted text looks fine on the screen, yet when I publish, the highlighted color is much too dark. Subscribe If you choose More Color styles, you can specify any type of shade that you desire. From the shades presented, pick the one you wish to use. Just How To Put Color Shaded Area In Word 2010, No, the emphasized shades are fixed. You can make use of Shielding from the Paragraph group on the Home tab of the ribbon instead. If you choose Much more From the colors shown, pick the one you want to use.
You can change the highlight color in word
- Go to File > Options.
- Select the Display tab, which is located at the bottom of the window.
- Click Highlighting Color and choose a new color from the drop-down menu that appears.
- Click OK at the bottom of this window to save your changes, or Cancel if you decide not to change anything else in Word just yet.
Conclusion
We hope this guide helps you change the highlight color in word. If you have any questions or suggestions for us, please let us know in the comments below!
About the author
Hi There! I’m Lee. Welcome to A Pretty Fix, a home DIY blog about making your home colorful, decorating, and helping colors ideas and fun. Here you’ll find ideas, tips, and inspiration to live life more colorfully and beautifully. Hope you stick around!


 when you point to the area of your document that contains text.
 and select Stop Highlighting, or press Esc.
 when you point to your document.