
Содержание
- сайт уроков по программам word, excel, access и power point.
- Рубрики
- Добавление эффекта к рисунку
- Удаление эффекта из рисунка
- Удаление эффекта из рисунка
- Дополнительные сведения
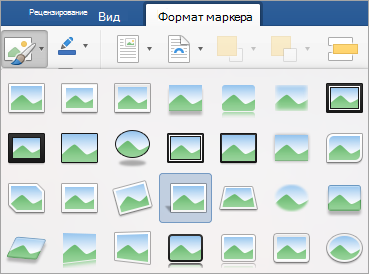
Чтобы гармоничнее интегрировать изображения в документ, в программе Microsoft Word предусмотрены специальные стили отображения рисунков, которые можно применить к любому изображению. Стили отличаются друг от друга формой, толщиной, цветом рамки, наличием или отсутствием отражения и многими другими параметрами.
Разработчики программы Microsoft Word подготовили для пользователей набор экспресс-стилей для того, чтобы они могли использовать уже готовые стилевые решения. Чтобы применить к изображению какой-либо стиль, достаточно выполнить ряд простых действий:
- нужно щелкнуть мышью по изображению, чтобы появилась дополнительная группа Работа с рисунками (Picture Tools);
- перейти на вкладку Формат (Format) и в группе элементов управления Стили рисунка (Picture Styles) выбрать нужный стиль.
Чтобы посмотреть, как будет выглядеть тот или иной стиль изображения, достаточно навести на него мышь.
После этого стиль изображения изменится (рис. 7.10). Однако вариантов экспресс-стилей предлагается пользователю не так уж много. Давайте научимся самостоятельно применять к изображениям различные эффекты и изменять границы рисунков.

Рис. 7.10. Пример применения стилей к изображениям
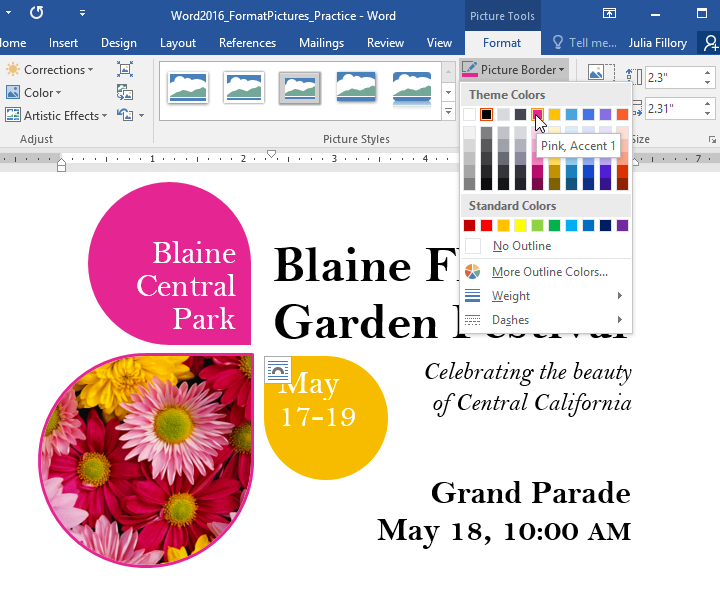
Чтобы изменить цвет и форму границы рисунка, достаточно нажать кнопку Границы рисунка (Picture Border) группы элементов управления Стили рисунка (Picture Styles) вкладки Формат (Format). После этого откроется контекстное меню, в котором можно выбрать цвет, толщину и внешний вид границы рисунка. Для применения того или иного вида границы достаточно просто щелкнуть мышью по нужному атрибуту.
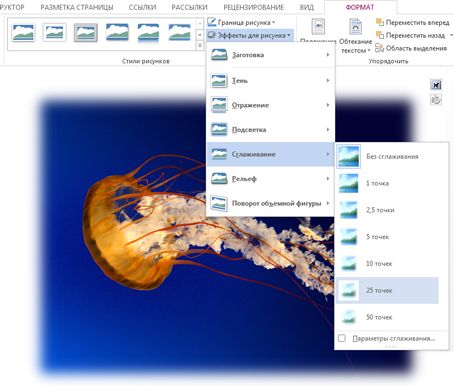
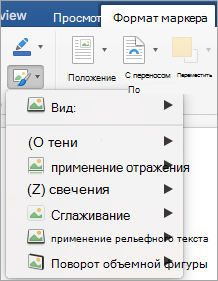
Для применения к изображению различных эффектов нужно воспользоваться кнопкой Эффекты для рисунка (Picture Effects) группы элементов управления Стили рисунка (Picture Styles) вкладки Формат (Format). После нажатия кнопки Эффекты для рисунка (Picture Effects) откроется контекстное меню, содержащее различные эффекты.
Всего существует семь различных групп эффектов.
- Заготовка (Preset). Представляет собой уже готовые шаблоны эффектов тени и формы.
- Тень (Shadow). Различные варианты длины, направления и интенсивности теней.
- Отражение (Reflection). Добавляет к изображению различные эффекты отражения.
- Свечение (Glow). Добавляет к изображению различные по интенсивности и цвету свечения контура.
- Сглаживание (Soft Edges). Сглаживает пикселы изображения.
- Рельеф (Bevel). Добавляет изображению псевдотрехмерность за счет рельефности.
- Поворот объемной фигуры (3-D Rotation). Изменяет форму изображения на псевдообъемную фигуру.
Для предварительного просмотра какого-либо эффекта достаточно просто навести на него указатель мыши. Для применения какого-либо эффекта к изображению необходимо щелкнуть по эффекту в контекстном меню мышью. Различные эффекты могут быть применены к одному изображению одновременно.
сайт уроков по программам word, excel, access и power point.
Рубрики
В программе Microsoft Word на вкладке “Работа с рисунками / Формат” есть стили рисунков.
К примеру, стиль “прямоугольник с размытыми краями”, который удобно применять к картинкам в инструкциях, чтобы текст был читаемым, без отвлечения на соседние элементы.
Проблема стиля в том, что элементы расположенные с краю достаточно близко, тоже размываются, поэтому хотелось бы сделать размытие меньше.
Поэтому для редактирования стиля, примененного к картинке, нажимаем на кнопку (стрелочку) “Формат фигуры”.
Переходим на закладку “Свечение и сглаживание” и уменьшаем размер сглаживания до 3пт.
Изменяя настройки на закладках, можно изменяя стандартные стили, создать свой стиль.
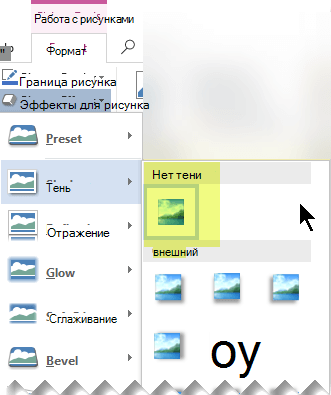
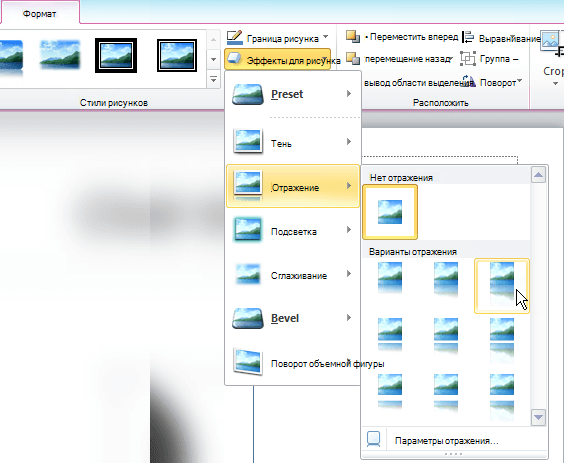
Чтобы сделать рисунок более привлекательным, можно добавить такие эффекты, как тени, свечения, отражения, сглаживания, рельеф и поворот объемной фигуры.

Добавление эффекта к рисунку
Выберите рисунок, для которого вы хотите добавить или изменить эффект.
Примечание: Чтобы добавить один и тот же эффект в несколько рисунков, щелкните первый рисунок и затем, нажав и удерживая клавишу CTRL, щелкните другие рисунки. Если вы используете Word, скопируйте рисунки на полотно, если это еще не сделано. Откройте вкладку Вставка, щелкните значок Фигуры и выберите пункт Новое полотно. (После добавления или изменения эффекта необходимо вернуть рисунки обратно в исходное место в документе.)
На панели Работа с рисунками на вкладке Формат в группе Стили рисунков щелкните Эффекты для рисунка.
Наведите указатель мыши на один из параметров Эффекты для рисунка, чтобы отобразить меню различных способов применения каждого эффекта. При наведении указателя мыши на один из эффектов в меню, он отображается как рисунок для предварительного просмотра в документе.
Чтобы настроить добавляемый эффект, нажмите кнопку Параметры в нижней части меню каждого эффекта. Например, в меню Тень щелкните Параметры тени для выполнения пользовательских настроек для эффекта тени.
Если вкладка Работа с рисунками или Формат не отображается, дважды щелкните рисунок, чтобы убедиться, что он выбран. Если рядом с именем файла в верхней части окна программы отображаются слова [Режим совместимости], сохраните документ в формате DOCX или XLSX (вместо прежнего формата файла DOC или XLS) и попробуйте еще раз.
Удаление эффекта из рисунка
Для каждой категории эффекта рисунка в верхней части его меню отсутствует параметр . Выберите этот параметр, чтобы отключить ненужный эффект.
Например, чтобы удалить тень, наведите указатель мыши на пункт эффекты рисунка > тень > Нет тени.
Выберите рисунок, для которого вы хотите удалить эффект.
В разделе Работа с рисункамина вкладке Формат в группе Стили рисунков нажмите кнопку эффекты для рисунка.
Выберите категорию эффектов для рисунков , которую вы хотите удалить. В появившемся меню первый вариант не <>имя эффекта (например, без тени или отражения). Выберите этот параметр, чтобы удалить этот тип эффекта из рисунка.
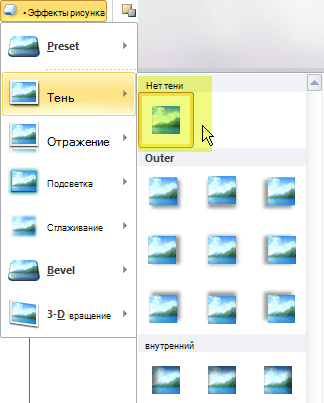
Чтобы сделать рисунок более привлекательным, можно добавить такие эффекты, как тени, свечения, отражения, сглаживания, рельеф и поворот объемной фигуры.
Щелкните рисунок, для которого вы хотите добавить или изменить эффект.
Примечание: Чтобы добавить один и тот же эффект в несколько рисунков, щелкните первый рисунок и затем, нажав и удерживая клавишу CTRL, щелкните другие рисунки. При использовании Word нужно скопировать рисунки на полотно, если их там еще нет. Откройте вкладку Вставка, щелкните значок Фигуры и выберите пункт Новое полотно. (После добавления или изменения эффекта необходимо вернуть рисунки обратно в исходное место в документе.)
На панели Работа с рисунками на вкладке Формат в группе Стили рисунков щелкните Эффекты для рисунка.
Если вкладка Работа с рисунками или Формат не отображается, дважды щелкните рисунок, чтобы убедиться, что он выбран. Если рядом с именем файла в верхней части окна программы отображаются слова [Режим совместимости], сохраните документ в формате DOCX или XLSX (вместо прежнего формата файла DOC или XLS) и попробуйте еще раз.
Выполните одно или несколько из указанных ниже действий.
Чтобы добавить или изменить встроенную комбинацию эффектов, наведите указатель на пункт Заготовка и затем щелкните нужный эффект.
Для настройки встроенного эффекта щелкните Параметры объема и измените необходимые параметры.
Чтобы добавить или изменить тень, наведите указатель на пункт Тень и затем щелкните нужную тень.
Для настройки тени щелкните Варианты тени и измените необходимые параметры.
Чтобы добавить или изменить отражение, наведите указатель на пункт Отражение и затем щелкните нужный вариант отражения.
Для настройки отражения щелкните Параметры отражения и измените необходимые параметры.
Чтобы добавить или изменить свечение, наведите указатель на пункт Свечение и затем щелкните нужный вариант свечения.
Для настройки цветов свечения выберите команду Другие цвета свечения, а затем выберите необходимый цвет. Для изменения цвета, который не входит в цвета темы, выберите команду Дополнительные цвета, а затем выберите необходимый цвет на вкладке Стандартная или создайте собственный цвет на вкладке Спектр. Пользовательские цвета и цвета на вкладке Стандартная не обновляются при последующем изменении тема документа.
Для настройки вариантов свечения щелкните Параметры свечения и измените необходимые параметры.
Для добавления или изменения сглаживания щелкните Сглаживание, а затем выберите нужную степень сглаживания.
Для настройки сглаживания щелкните Параметры сглаживания и измените необходимые параметры.
Чтобы добавить или изменить рельеф, наведите указатель на пункт Рельеф и затем щелкните нужный рельеф.
Для настройки рельефа щелкните Параметры объема и измените необходимые параметры.
Чтобы добавить или изменить поворот объемной фигуры, наведите указатель на пункт Поворот объемной фигуры и затем щелкните нужный вариант поворота.
Для настройки поворота выберите команду Параметры поворота объемной фигуры и измените необходимые параметры.
Чтобы получить дополнительные сведения о параметрах, описанных в этих областях, нажмите кнопку справка  в верхней части диалогового окна ” Формат рисунка “.
Удаление эффекта из рисунка
Для каждой категории эффекта рисунка в верхней части его меню отсутствует параметр . Выберите этот параметр, чтобы отключить ненужный эффект.
Например, чтобы удалить тень, наведите указатель мыши на пункт эффекты рисунка > тень > Нет тени.
Выберите рисунок, для которого вы хотите удалить эффект.
В разделе Работа с рисункамина вкладке Формат в группе Стили рисунков нажмите кнопку эффекты для рисунка.
Выберите категорию эффектов для рисунков , которую вы хотите удалить. В появившемся меню первый вариант не <>имя эффекта (например, без тени или отражения). Выберите этот параметр, чтобы удалить этот тип эффекта из рисунка.
Выполните любое из описанных ниже действий.
Быстрое применение стиля
Щелкните рисунок и откройте вкладку Формат рисунка.
Щелкните Экспресс-стилии выберите нужный стиль.
Добавление и изменение тени, отражения, свечения, краев, рельефа или объемного поворота
Щелкните рисунок и откройте вкладку Формат рисунка.
Нажмите кнопку эффекты для рисунка, наведите указатель на тип эффекта и выберите нужный эффект.
Чтобы настроить эффект, нажмите кнопку Параметры в нижней части меню “эффекты”.
Дополнительные сведения
Выполните любое из описанных ниже действий.
Применение и изменение стиля
Щелкните рисунок и откройте вкладку Формат рисунка.
В разделе Стили рисунков выберите нужный стиль.

Чтобы посмотреть другие стили, наведите указатель мыши на нужный стиль и щелкните  .
.
Добавление и изменение тени, отражения, свечения, багетной рамки или объемного вращения
Щелкните рисунок и откройте вкладку Формат рисунка.
В разделе Стили рисунков нажмите кнопку Эффекты, наведите указатель на тип эффекта и выберите нужный вариант.
Для тонкой настройки эффекта в разделе Стили рисунков нажмите кнопку Эффекты, наведите указатель на тип эффекта и выберите пункт Параметры [название эффекта].
Чтобы гармоничнее интегрировать изображения в документ, в программе Microsoft Word предусмотрены специальные стили отображения рисунков, которые можно применить к любому изображению. Стили отличаются друг от друга формой, толщиной, цветом рамки, наличием или отсутствием отражения и многими другими параметрами.
Разработчики программы Microsoft Word подготовили для пользователей набор экспресс-стилей для того, чтобы они могли использовать уже готовые стилевые решения. Чтобы применить к изображению какой-либо стиль, достаточно выполнить ряд простых действий:
- нужно щелкнуть мышью по изображению, чтобы появилась дополнительная группа Работа с рисунками (Picture Tools);
- перейти на вкладку Формат (Format) и в группе элементов управления Стили рисунка (Picture Styles) выбрать нужный стиль.
Чтобы посмотреть, как будет выглядеть тот или иной стиль изображения, достаточно навести на него мышь.
После этого стиль изображения изменится (рис. 7.10). Однако вариантов экспресс-стилей предлагается пользователю не так уж много. Давайте научимся самостоятельно применять к изображениям различные эффекты и изменять границы рисунков.

Рис. 7.10. Пример применения стилей к изображениям
Чтобы изменить цвет и форму границы рисунка, достаточно нажать кнопку Границы рисунка (Picture Border) группы элементов управления Стили рисунка (Picture Styles) вкладки Формат (Format). После этого откроется контекстное меню, в котором можно выбрать цвет, толщину и внешний вид границы рисунка. Для применения того или иного вида границы достаточно просто щелкнуть мышью по нужному атрибуту.
Для применения к изображению различных эффектов нужно воспользоваться кнопкой Эффекты для рисунка (Picture Effects) группы элементов управления Стили рисунка (Picture Styles) вкладки Формат (Format). После нажатия кнопки Эффекты для рисунка (Picture Effects) откроется контекстное меню, содержащее различные эффекты.
Всего существует семь различных групп эффектов.
- Заготовка (Preset). Представляет собой уже готовые шаблоны эффектов тени и формы.
- Тень (Shadow). Различные варианты длины, направления и интенсивности теней.
- Отражение (Reflection). Добавляет к изображению различные эффекты отражения.
- Свечение (Glow). Добавляет к изображению различные по интенсивности и цвету свечения контура.
- Сглаживание (Soft Edges). Сглаживает пикселы изображения.
- Рельеф (Bevel). Добавляет изображению псевдотрехмерность за счет рельефности.
- Поворот объемной фигуры (3-D Rotation). Изменяет форму изображения на псевдообъемную фигуру.
Для предварительного просмотра какого-либо эффекта достаточно просто навести на него указатель мыши. Для применения какого-либо эффекта к изображению необходимо щелкнуть по эффекту в контекстном меню мышью. Различные эффекты могут быть применены к одному изображению одновременно.
Word for Microsoft 365 Word 2021 Word 2019 Word 2016 Word 2013 Word 2010 More…Less
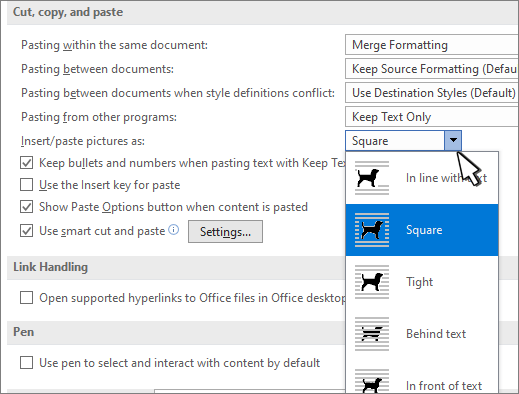
By default, Word sets text wrapping to In line with text when you insert or paste a new picture into a document. In line with text may not be what you prefer, so here’s how to change the default.
-
Go to File > Options >Advanced.
-
In the Cut, copy, and paste section, change the setting under Insert/paste pictures as: to the text wrapping style you want.

-
Select OK.
Need more help?
Want more options?
Explore subscription benefits, browse training courses, learn how to secure your device, and more.
Communities help you ask and answer questions, give feedback, and hear from experts with rich knowledge.
Lesson 19: Formatting Pictures
/en/word/pictures-and-text-wrapping/content/
Introduction
There are many ways to format pictures in Word. For instance, you can change the size or shape of an image to better suit your document. You can also enhance its appearance using Word’s image adjustment tools.
Optional: Download our practice document.
Watch the video below to learn more about formatting pictures.
To crop an image:
When you crop an image, part of the picture is removed. Cropping can be useful if you’re working with an image that’s too big and you want to focus on only part of it.
- Select the image you want to crop. The Format tab will appear.
- From the Format tab, click the Crop command.
- Cropping handles will appear on the sides and corners of the image. Click and drag any handle to crop the image. Because the cropping handles are near the resizing handles, be careful not to drag a resizing handle by mistake.
- To confirm, click the Crop command again. The image will be cropped.
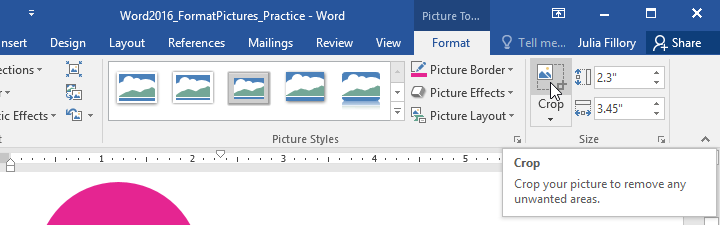
The corner handles are useful for simultaneously cropping the image horizontally and vertically.
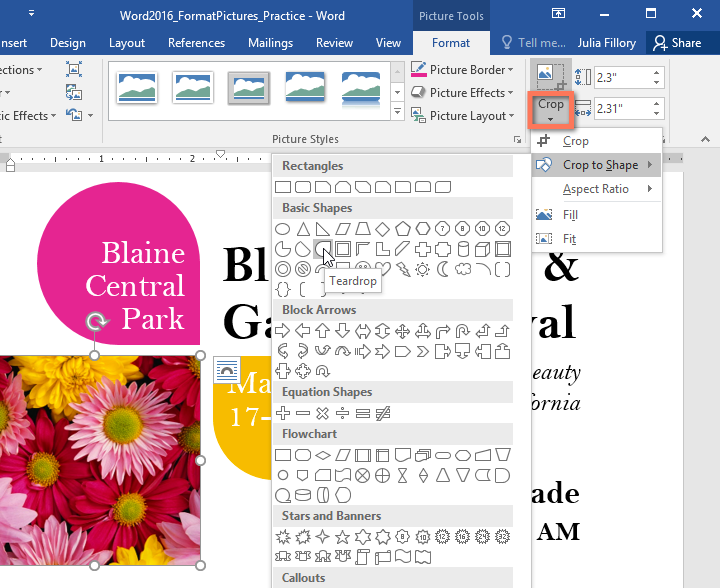
To crop an image to a shape:
- Select the image you want to crop, then click the Format tab.
- Click the Crop drop-down arrow. Hover over Crop to Shape, then select the desired shape from the drop-down menu.
- The image will be cropped to the chosen shape.
To add a border to a picture:
- Select the picture you want to add a border to, then click the Format tab.
- Click the Picture Border command. A drop-down menu will appear.
- From here, you can select a color, weight (thickness), and whether the line is dashed.
- The border will appear around the image.
Making image adjustments
With Word’s image adjustment tools, you can easily change properties like color, contrast, saturation, and tone. Word also offers built-in picture styles, which can be used to add a frame, drop shadow, and other predefined effects.
When you’re ready to adjust an image, simply select it. Then use the options below, which can be found on the Format tab.
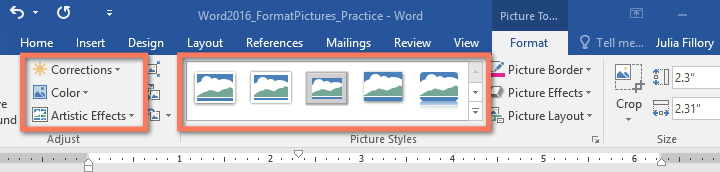
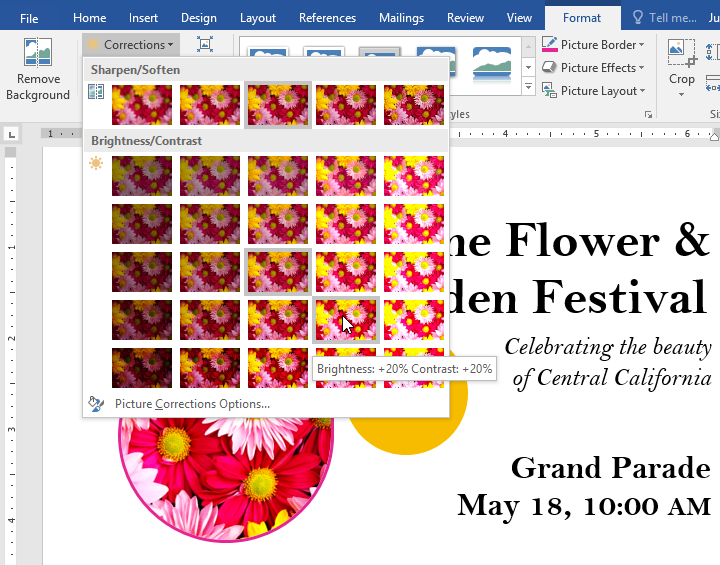
Corrections
From here, you can sharpen or soften the image to adjust how clear or blurry it appears. You can also adjust brightness and contrast, which affect the image’s lightness and general intensity.
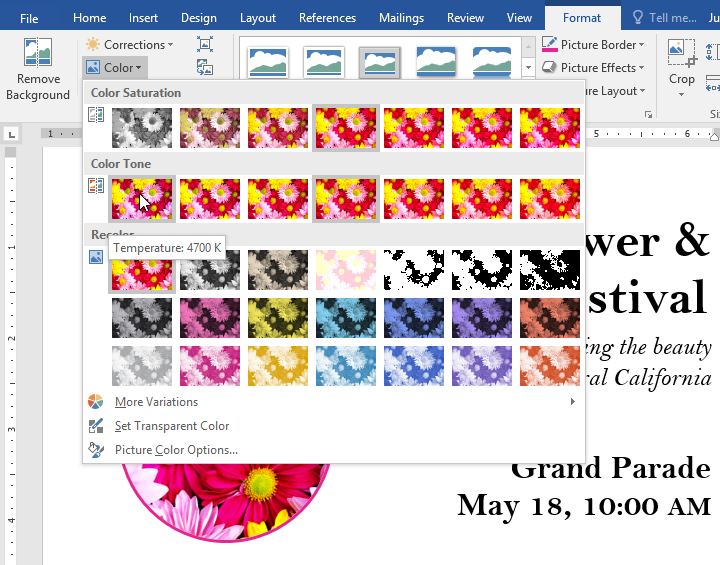
Color
Using this command, you can adjust the image’s saturation (how vibrant the colors appear), tone (the color temperature of the image, from cool to warm), and coloring (the overall tint of the image).
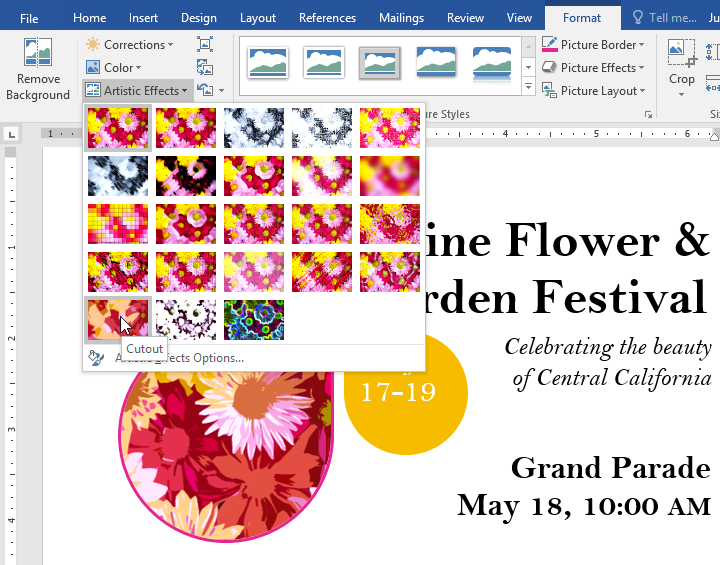
Artistic Effects
Here, you can apply special effects to your image, such as pastel, watercolor, or glowing edges. Because the results are so bold, you may want to use these effects sparingly (especially in professional documents).
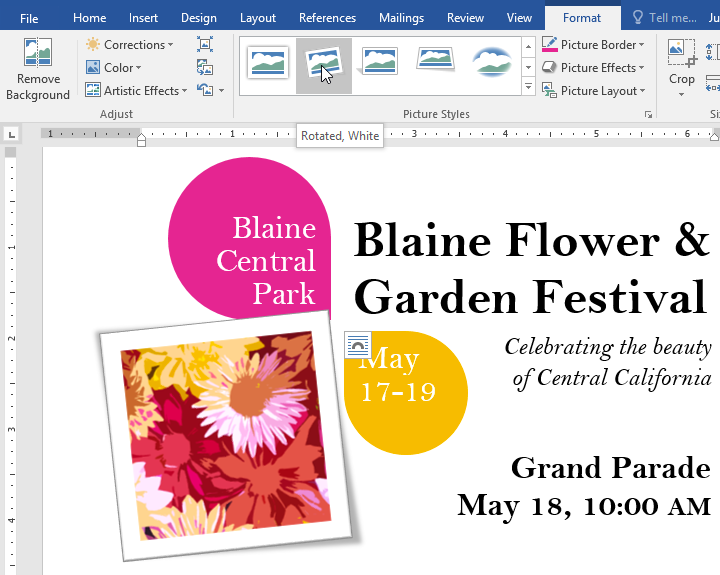
Picture Styles group
This group contains different predefined styles that make image formatting even easier. Picture styles are designed to frame your image without changing its basic settings or effects.
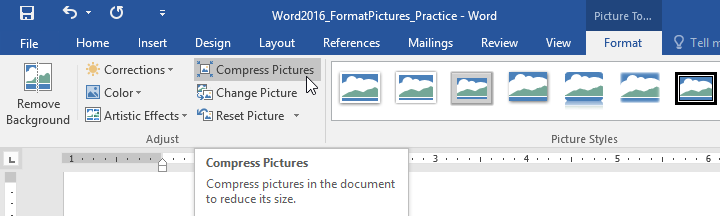
Compressing pictures
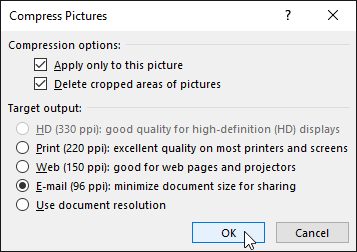
If you plan to email a document that contains pictures, you’ll need to monitor its file size. Large, high-resolution images can cause your document to become very large, which may make it difficult to attach to an email. Additionally, cropped areas of pictures are saved within the document by default, which can add to the file size.
Thankfully, you can reduce your document’s file size by compressing your pictures. This will lower their resolution and delete cropped areas.
Compressing a picture may noticeably affect its quality (for instance, the image may become blurry or pixelated). Because of this, we recommend saving an extra copy of your document before compressing pictures. Also, be prepared to use the Undo command if you’re dissatisfied with the results.
To compress a picture:
- Select the picture you want to compress, then navigate to the Format tab.
- Click the Compress Pictures command.
- A dialog box will appear. Check the box next to Delete cropped areas of pictures. You can also choose whether to apply the settings to this picture only or to all pictures in the document.
- Choose a Target output. If you are emailing your document, you may want to select Email, which produces the smallest file size.
- Click OK.
Challenge!
- Open our practice document.
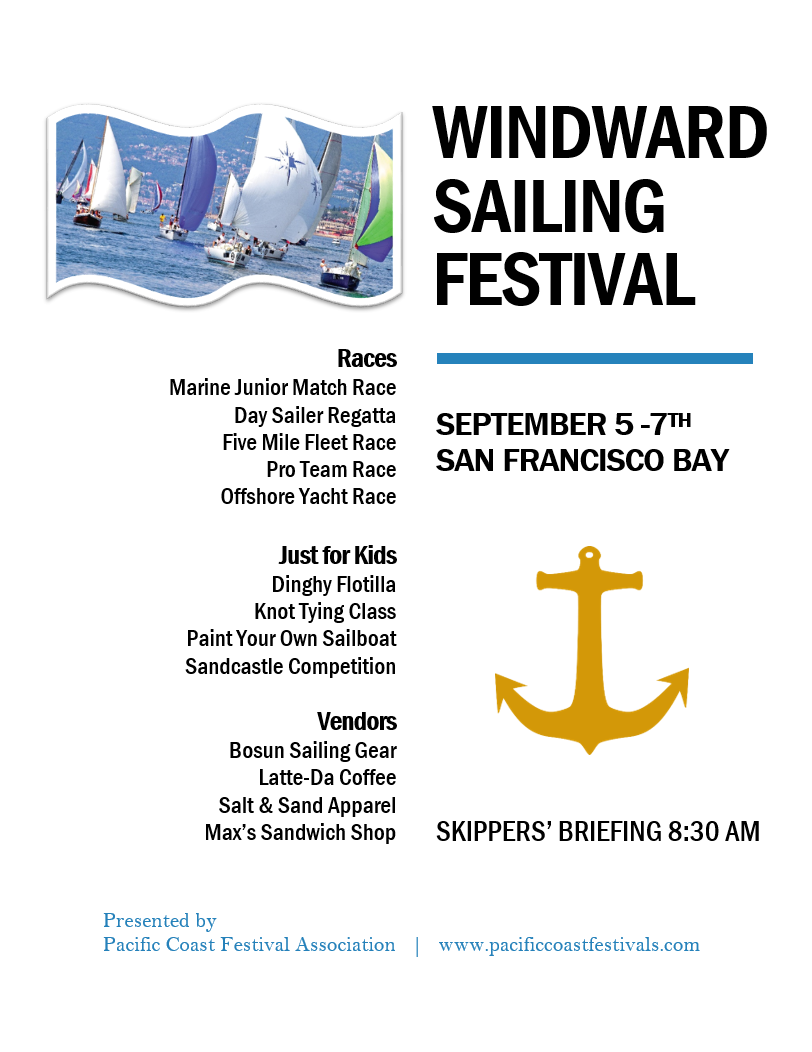
- Scroll to page 2 and select the picture of the sailboats.
- In the Format tab, change the style to Simple Frame, White.
- With the picture still selected, use Crop to Shape and crop to the Double Wave shape in the Stars and Banners category. Hint: The shape names will appear when you hover over them.
- Select the picture of the anchor.
- In the Format tab, use the Color drop-down menu to re-color the anchor to Gold, Accent color 2 Light.
- When you’re finished, your page should look like this:

/en/word/shapes/content/
Formatting pictures in 3 clicks of your Quick Access Toolbar…
I understand this is an old post… but it is still applicable due to Office 365’s shortcomings.
This solution is designed to apply your predefined custom picture format on a new image pasted from the clipboard. (But if you’re a savvy Office user, which you are because you are reading this, you can tweak this apporach to your preference.)
Once this approach is set up, it only involves 3 clicks on the Quick Access Toolbar to format your pictures. All the clicks take place in a very small area of your screen — much more efficient than navigating through the tabs and options in the ribbons.
INITIAL SETUP PART 1: Defining your Picture Format
- Insert a picture into your document or email. Format it as to your liking. Select the picture.
- From the Insert tab, click Quick Parts, and click Save Selection to Quick Part Gallery
INITIAL SETUP PART 2: Config your Toolbar
-
From the Insert tab, click Quick Parts, and right-click your Quick Part
-
Click Add Gallery to Quick Access Toolbar
-
Making sure your picture is selected, click on the Format tab
-
Click on Change Picture, then right-click on From Clipboard
-
Click Add Gallery to Quick Access Toolbar
Now that you are setup, you can format your new pictures in 2 clicks…. In this case, have your picture on your clipboard, ready to be pasted into your document or email.
- Click the QAT button you added from step 2… your Quick Part gallery will appear; Click on your Quick Part. This adds your predefined formatted picture into your document. Select the picture (I admit I didn’t count this as one of the clicks!)
- Click the QAT button you added in step 7. Voila! Your new image now resides in your document with your custom formatting.
I prefer to include images in Microsoft Word documents. They often help illustrate technical examples. The problem for me was I could never quite get the pictures and text to work nicely. Either the surrounding text was too close to the online picture or there was too much spacing. In this tutorial, I’ll show you how to wrap text around an image in Word without using a table. (Includes video tutorial.)
For this word wrap tutorial, I’m taking advantage of Creative Commons images and the RAND function. However, you can use your own text, images, or even an irregular shape.
Create the Practice Doc Without Image
In this tutorial, I’m using Microsoft 365. And if you’re interested in older MS Word versions, I’ve created a PDF document with the steps. Let’s create a practice document.
- Open a blank Microsoft Word document.
- At the top of the page, type
=rand(2,5). - Press Enter.

- This Word function creates 2 paragraphs of 5 sentences of random text.

How to Insert the Picture in Word
You can use any image, but I’m going to use an online image because they come with attached captions. Unfortunately, captions can present issues.
- Place your cursor at the end of paragraph 1.
- From the ribbon, click Insert.
- From the Illustrations group, click Pictures.
- From the menu, select Online Pictures…

- From the Online Pictures pane click Cats. Or, you can choose another category.
- Click the first cat picture. A checkmark will appear in the top right corner.
- Click the Insert tab. It will show with (1) to indicate image count.
Your image will appear between the two sample paragraphs.

Resize the Image & Caption
Most likely, your image is not the size you want, so we’ll resize it. What is not immediately apparent is that the caption has its own sizing controls. Thus, we’re dealing with 2 objects – the picture object and the caption object. If we don’t click the right set, we may end up resizing one object. You can test this by clicking around.
- Click the image. You want to have one set of sizing handles and one rotation control. The red arrow below points to the rotation handle.

- From the top menu, click Picture Format.
- In the Size group, click the downward-pointing arrow in the lower right corner.

- This opens the Layout dialog with 3 Tabs: Position, Text Wrapping and Size. Click the Size tab.

- In the Height section, change the Absolute size to 2.5″.
- Press Tab. The width value will change.
- Keep the Lock aspect ratio box checked.
- Press OK.
You should now have a small image and a caption with the Layout Options control to the right. The image also maintained its aspect ratio.

Adjust Word Wrap with Layouts
At this stage, we’d like to have the text wrap to the right of the image. To do that, we need to change our wrapping option.
- Click the Layout Options control, which is on the right-hand side outside of the sizing box.
- Click the Square option. It’s the first item under With Text Wrapping.

- Click the X to close the Layout Options panel.
We now have wrapped text to the right of the kitten image. However, this wrapping style looks too crowded for me.

Add Space With Picture Styles
For my taste, there isn’t enough room between the image and text. And you can’t highlight the paragraph and indent. This is where picture styles play a role. Fortunately, Microsoft has a number of layout styles that can enhance the image and white space.
- Click your image. The sizing box should show around it and the caption.
- Click Picture Format from the top menu.
- The Picture Styles group appears.
- Click the More button (small arrow) to the right scrollbar to expand.

- Hover over the style icon to determine which one works best for you.
If you played around with the different picture formats, you’d have noticed that the effects differed quite a bit. And while some styles didn’t really increase the space between the image and text, the image effect and coloring made it seem like it did.
There are other places where you can wrap text in Word, such as making custom address labels with an image. While address labels don’t have as many options, the layout concept is similar. And you could probably shrink down this adorable kitten picture to use.
- Wrap Text Video Tutorial
Hand-picked Tutorials
- How to Create Letterhead in Word
- How to Compress a Word Document
- How to Add a Watermark in Word
- How to Reduce Image File Size
- How to Check Word Readability

Word allows you to do much more than simply insert or place graphics. For our fourth lesson in this series, we will focus on the graphic design functions in Word such as pictures, SmartArt, screenshots, and other items that can be found on the “Insert” tab.
These functions really breathe life into your drab black and white text documents. With a simple picture or chart, you can turn your term paper from meh to yeah! Luckily, there’s a whole range of ways you can add images to better illustrate (no pun intended) your point.
We’ll wrap the lesson by changing gears a bit and discussing how to use more than one language in Word 2013.
Images and Multimedia
You don’t have to think of Word as simply a word processing program. It has requisite tools for doing some pretty nifty page layout. While it’s not a feature-complete or robust as a professional page layout program such as Adobe InDesign. You can still get very professional looking results if you know what’s in your toolbox and how to use it.

Pictures and Online Pictures
Both “Pictures” and “Online Pictures” accomplish the same goal. The only difference is that “Pictures” means you can insert pictures locally, while “Online Pictures” allows you to insert images from an internet-based source such as clip art from Office.com, Bing, or OneDrive (formerly SkyDrive).
You can also insert pictures from your Facebook profile or Flickr although you could always just save the pictures you want to insert to your computer and then insert them from there if you don’t want to connect Office to these profiles.
Picture Tools
As always, when you want to edit a picture or any element place in a Word document, you can click on it and the appropriate tab will appear on the Ribbon.
With pictures, that tab is “Picture Tools.” Here we see you can make all kinds of corrections to the picture on-the-fly. For example, you can correct brightness and contrast, the color, add a border.
Where you position and how you wrap text will also play a large role in formatting your documents.
Here we see those controls. In our documents, we don’t worry so much about word wrapping or positioning because Word isn’t the final step toward publishing online. However, if you’re going to produce something WYSIWYG (What You See is What You Get), such as for a PDF or print publication, then these things will definitely matter.
Also, there are a couple ways you make changes to your pictures inline, such as resizing, rotating, and moving them. In the following image, you see these controls, many of which you will likely be familiar with.
When you click on an image in your document, you get a box on each corner, which will let you resize a picture. At the top, in the middle, is a circular arrow, grab this to freely rotate your picture. To move the image, hover the mouse over the image until the pointer is the four arrows, you can then click and drag the image anywhere you like.
Finally, if you click on the little “Layout Options” button, you can change your text wrapping without going to the Ribbon.
Clicking on “See more…” at the bottom of the “Layout Options” opens the full-blown “Layout” dialog.
Note, the size tab both on the Ribbon the “Layout” dialog allows you to specifically resize, rotate, and scale your pictures, rather than relying wholly on winging it:
We’d like to spend the whole day talking about formatting images in Word, but as you can see, there’s a ton of options at your disposal. Let’s move on now to other objects you can insert into your documents, starting with “Shapes.”
Shapes
Microsoft Word 2013 comes with an array of built-in shapes, which you can use to create callouts, boxes, stars, and other shapes.
When you choose a shape, you simply draw it on a blank space on the page. It doesn’t matter if you get it perfect or just the way you want it because you can adjust it to your heart’s content once it is placed in your document.
Note in the screenshot, the previously mentioned little “handles” you can use to resize and rotate your shapes.
At the bottom of the “Shapes” menu, there’s an option to create a “new drawing canvas.” This will open, what is essentially a text box for shapes. With this drawing canvas, you can create drawings using these shapes allowing you to create things like diagrams and flowcharts.
SmartArt and WordArt
SmartArt and WordArt tend to have some overlap, particularly if you create something using WordArt and then customize any of the text within it. Of course, you can use one or the other and never the twain shall meet, but we’re going to talk about them in the same section because one often leads to the other.
Think of SmartArt as premade drawing canvases that you can insert into your document and then customize as you like. Simply pick an arrangement, such as a list, process, or cycle.
As you can see, we created a graphic based on a “Continuous Block Process.” When we click on the text boxes, we can edit what is inside. There are also the usual grab handles needed to resize the image, and the “Layout Options” allowing you to wrap text to your preference.
If you use SmartArt, note that the Ribbon changes to reflect this. The “SmartArt Tools” features two tabs: “Design” and “Format.” Let’s cover each one and its features.
The right half of the “Format” tab allows you to pick from a number of “SmartArt Styles” and you can also “Change Colors.”
If you look at our previous example, you can see we applied an embossed, shiny effect and changed the colors of our text boxes and arrow.
On the left half of the “Design” tab, you can “Create Graphic” so you can add shapes, bullets, text, and move things around.
The “Layouts” section lets you change how your graphic looks on the fly. Simply hover over any of the built-in options to see how it would look utilizing a different layout. Changes to the layout are not applied unless you first click on a style.
The right side of the “Format” tab is used for affecting changes to text. These include “WordArt Styles” and other effects suchs as fill and outline. Beyond that, you can arrange multiple layers by sending them forward and backward.
The “Layout” dialog pops out if you select the little arrow in the bottom-right corner of the “size” section or you can choose more options from any of the drop-down menus including “Position”, “Align”, and “Rotate.”
On the left side of the “Format” tab you can select any of your shapes and change them to another, and also make them larger or smaller.
If you click on “Shape Styles” you will be able to choose from a selection of pre-defined shapes and colors.
Shift right just slightly and you will find controls to alter the fill. Choose from various “Theme Colors” or select your own. You an also use pictures, gradients, and textures for even more fill options.
If you want to refine the outline around your shape(s), you can choose any color, weight, or dashes.
Finally, “Shape Effects” has quite a few options for enhancing your shapes, many of which will give them a cool 3D effect that you can adjust by clicking 3D Options at the bottom of the of the menu.
Format Text Effects
Let’s take a closer look at this because it contains a pretty sizable amount of features. We’ll cover the basics so that you’re more aware of them. The pane titled, “Format Text Effects,” slides out from the right edge.
As with any other panes in Word 2013, it can be detached, which you can then stick out of the way to save screen area, or keep it nearby so it is handy. Regardless, this dialog box will allow you to quickly work with text, so you don’t have to repeatedly keep going to the ribbon to change things. Note also that the dialog is split into functions, “Text Fill and Outline” and “Text Effects.” “Text Fill and Outline” is simple enough to figure out, and is used to enhance how text appears.
Say, for instance, we want to write How-To Geek School and enhance it so that it is size 48 pt., blue with a black 1 pt. outline. We simply select the text we want, increase to the size to 48, then in the “Format Text Effects” dialog, we can change the color (we can also do this in the “Font” section of the “Home” tab. Then under “Text Outline” we choose “Solid line” and choose block and 1 pt. for the outline width.
That looks pretty good, but we really want it to pop, let’s add some more text effects, such as a shadow, a reflection, and we’ll add a bit of a 3d bezel to round the lettering out.
The result is a bit more striking and while it’s not likely to make it into any final designs, it does give you an idea of what you can do with WordArt.
Chart
Who doesn’t like charts? Charts are a great way to visually display data sets and Word 2013 comes jam packed with a large assortment of Charts to choose from, including columns, pie, bar charts and much, much more. Check out the screenshot for an idea of just how many options there are:
When you choose a style, you’ll get a spreadsheet, which will allow you to enter the data points on your x and y axes. As you enter data, the chart will change.
Manipulating and formatting charts is easy. Whenever you click on a chart in your document, you’ll get the “Chart Tools,” which, as you might have guessed, is the Ribbon tab devoted solely to charts.
Using the “Design” tab, if you don’t like the colors or style of your chart, you can instantly apply changes to it without having to generate a new one.
If you decide you don’t think the layout works for this particular type of data, change it using “Quick Layout” or add another element such as another axis, chart title, gridlines, and more.
On the right side of the “Design” tab you will find essential tools for altering your data and you can also go back and completely change the type of chart you’re using.
So, if you think a pie chart would work better, you can change to that. Note however, some data points, such as “breakfast,” “lunch,” and “dinner” aren’t represented on this chart.
The “Chart Tools” also give you a “Format” tab so you can dress things up a bit by adding shapes and then being able to change the style, fill, and outline.
Turning to the right side of the “Format” tab, you are given options for adding and changing WordArt, arranging elements, and adjusting the size of your chart (which you can also do with the grab handles).
It’s easy also to affect changes inline too. When you click on a chart in your document, formatting controls appear along the upper-right corner. From top-to-bottom, you get “Layout options” so you can set your text wrapping. You can change chart elements with the plus (+) symbol, so if you want to change chart titles, add gridlines, and stuff like that.
The paintbrush icon is for setting a style and color them, and finally, the sieve icon is for “Chart Filters,” so you can edit data points and names on your chart.
Screenshot
The “Screenshot” feature will allow you to take a screen clip, which is automatically pasted in you document.
When you use the screenshot function, it will let you choose between any currently open windows, or you can select “Screen Clipping,” which will minimize Word allowing you to take a selection or full shot of your desktop. So for example, if you want to simply insert a shot of your desktop and its icons, you would first need to minimize everything you have open.
There’s a myriad of ways you can take and add screenshots, so we’re not going to dwell on it. Just note this feature, if you’re unfamiliar with adding screenshots, and you want an easy way to do it in Word.
Online Video
You can insert “Online Video” such as Bing, YouTube, or video embed code into your document.
When you embed a video, it will appear as if it is a regular picture, complete with grab handles and text wrap controls.
Further, you can adjust how the emedded video thumbnail appears (as a picture) using the “Picture Tools” so you can make adjustments to the color, add a border, correct the contrast and brightness, and more.
So you see, we simply applied a “picture style” and add a purple border. This is only a fraction of the stuff you can do, so if you to add some really nice looking effects and create a nice looking document that really pops, you should take your time to familiarize yourself with everything.
On the other hand, if you don’t like your changes and you want to go back to the default, simply click “Reset Picture” and it will revert to normal.
Other Text Features
Here are few more text features that you might want to be aware of though you will probably rarely use them.
Text Box
Text boxes are like their own little islands in Word. What we mean is, when you add a “Text Box” to your documents, it is immune to changes you make to the rest of the document. It is like a document within a document.
This is useful if you want to present something “as is” in your work, be able to make overarching changes to the document’s formatting, but have something you’ve pasted remain unchanged.
For the most part, text boxes are something of a bane to an editor’s existence because they don’t play nice with styles (Lesson 5). You may find them extremely convenient and that’s perfectly fine, but if you want something that conforms to your document’s style and formatting, but still place it in a box or have a border around it, then we recommend simply adding a border, which we covered in Lesson 2 – Shading and Borders.
Drop Cap
Drop caps are simply that one letter at the beginning of a chapter or book that is larger than the rest:
You can either make your drop cap “Dropped” (the text below it shifts underneath it) or “In Margin.” Check out the “Drop Cap” options for more power over how your drop caps behave.
Using More than One Language
If you want to produce content in a language other than the one that comes with Word by default, you will likely need to purchase it. Open the Word “Options” and click on “Language.”
Pick the language you want to add from the dropdown list and then click the “Add” button. When you add a language, you will need to enable it, which means that you will have to turn it on in the “Control Panel.”
From here, you can write in the language, but Word won’t display in it, in other words, menus and help systems will still appear in the default language. To get the full multilingual experience, you may need to purchase a language pack from Microsoft.
To see what languages are available for purchase, and how much, click on “Not installed” and you will be whisked to the Microsoft Office website.
If you want to add proofing tools, such as spellcheck, grammar check, and/or screen tooltips, then you may be able to simply download them for free.
While it’s doubtful you’ll be using Word in full multilingual mode, it’s nice to know how you can affect those changes. Moreover, most languages are freely available to use system-wide so actually creating a document in another language is well within your reach, for free.
Coming up Next…
So that concludes this section. We know it’s been a lot to absorb but you’ll see that after a while, this stuff is a cinch!
Once you get the hang of one skill, the rest is pretty similar and comes easier. By now you should have more than enough knowledge to create awesome documents with lists, tables, pictures, video, and anything you need to create a true multimedia publication!
Don’t forget though, if you’ve missed anything in this series you can always go back and read our introduction in Lesson 1, all that stuff on paragraphs and lists in Lesson 2, and all-important tables and other formatting options in Lesson 3.
In our final lesson, Lesson 5, we will cover styles, templates, and themes. It doesn’t sound like much, but they can be a fantastic way to not only save tons of time and create consistently formatted documents, but quickly apply themes that will instantly affect the entire appearance of your documents, as well as create templates that you can later use over and over again!
READ NEXT
- › Save Hundreds on Elegoo’s New PHECDA Laser Engraver Through Kickstarter
- › Why Your Phone Charging Cable Needs a USB Condom
- › Five Types of Phone Damage That Aren’t Covered by Your Free Warranty
- › Spotify Is Shutting Down Its Free Online Game
- › This 64 GB Flash Drive From Samsung Is Just $8 Right Now
- › Android’s Nearby Share Has (Unofficially) Arrived on Mac
This tutorial shows how to insert images in Microsoft Word. We will also look at how to resize images, align images with the text, and add a border.
Quick Links:
- How to Insert an Image
- How to Resize an Image
- How to Align an Image with the Text
- How to Add a Border to an Image
Do you want to insert shapes instead of images? Please see “How to Insert and Modify Shapes in Microsoft Word (PC & Mac).”
This tutorial is also available as a YouTube video showing all the steps in real time.
Watch more than 200 other writing-related software tutorials on my YouTube channel.
The images below are from Word for Microsoft 365. These steps also apply to Word 2021, Word 2019, Word 2016, and Word 2013. However, the stock image options will be limited in those older versions of the software.
- Place your cursor where you want to insert the image. (This is an approximate placement. You can change the alignment with the text after inserting the images, as shown in the section below.)
- Select the Insert tab in the ribbon.

- Select the Pictures button in the Illustrations group.

- Select the location of the image from the Insert Picture From menu:
-
- This Device lets you choose an image stored on your computer or network server.
- Stock Images lets you choose stock images, icons, cutout people, stickers, and illustrations. The full stock image library is only available to users signed into Word for Microsoft 365.
- Online Pictures lets you search for images through Bing, Microsoft’s search engine. This option also provides a link to OneDrive.

For this tutorial, we will insert an image stored on the device.
- (For “This Device” option only) Locate the image in the Insert Picture dialog box.

- Select the Insert button.

Your image should now appear in your Word document.
How to Resize an Image in Microsoft Word
- Select the image. A border with resizing handles will appear when the image is selected.
- Select one of the resizing handles and then drag the image to a new size.
Pro Tip: Choose a corner handle to maintain the image’s current shape.

Optional Steps: How to Rotate an Image in Microsoft Word
- Select the image.
- Select the rotation handle at the top of the border.
- Rotate the image to the left or right.

How to Align an Image with the Text in Microsoft Word
- Select the image.
- Select the Layout Options button.

- Select an option from the layout menu:
-
- In Line with Text
- Square
- Tight
- Through
- Top and Bottom
- Behind Text
- In Front of Text
The visual effectiveness of each option will depend on the size of your image and the density of your text. So, you may need to experiment with several options to find the one most suited to your content.

Pro Tip: If you select an option other than In Line with Text, you can select and “grab” the image, and then move it almost anywhere in the document.
How to Add a Border to an Image in Microsoft Word
- Select the image.
- Select the Picture Format tab in the ribbon. (This tab only appears when an image is selected.)

From here, you can add a built-in border or edge effect or manually create a border.
How to Add a Built-In Border or Edge Effect to an Image
- Select the bottom menu arrow in the Picture Styles group.
![]()
- Select a frame or other edge effect from the Picture Styles menu.

Your new border or edge effect should appear immediately.

How to Add a Manual Border to an Image
- Select Picture Border in the Picture Styles group.

- Select a color from the drop-down menu.

- Reselect Picture Border, select Weight, and then choose a line thickness.

- Reselect Picture Border, select Dashes, and then choose a line style.

Your new manual border should appear immediately.

Documents with a lot of images can negatively affect Word’s performance. If you notice Word reacting slowing, please see “How to Make Microsoft Word Faster by Hiding Images.”
Related Resources
How to Write Figure Captions for Graphs, Charts, Photos, Drawings, and Maps
How to Insert Figure Captions and Table Titles in Microsoft Word
How to Change the Style of Table Titles and Figure Captions in Microsoft Word
How to Update Table and Figure Numbers in Microsoft Word
How to Save Tables and Figures as Images in Microsoft Word (PC & Mac)
Updated February 20, 2023
Change Text Wrapping Style For A Picture
8:00 PM
Text Wrapping Style is the way the text is being wrapped when there is a picture or any auto shape on the document.
1) On the Format menu, click the command for the type of object you selected — for example, AutoShape, Drawing Canvas, or Picture,

2) click the Layout tab and click Advanced.

3) Click On Text Wrapping Tab and choose the type of wrapping you want on it.
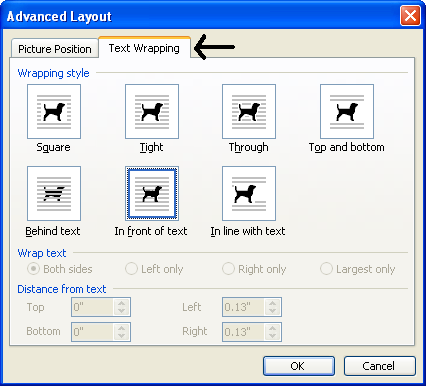
If the picture or object is on a drawing canvas, select the canvas. If the picture or object is not on a drawing canvas, select the picture or object. This is possible even in Microsoft Office Word 2007 and 2010 versions.
Search This Blog
