
- Remove From My Forums
-
Question
-
Hi,
How can i find the beginning of line(Paragraph) in word by «Find and Replace»?
For example in Editplus «^» is used to find the beginning of line.
^ Expression to the right of ^ matches only when it is at the beginning of line. For example «^A» matches an «A» that is only at the beginning of line. Like above i want to find the beginning of line in the MS-word.
Thanking you
Thirusanguraja V
Answers
-
Using Find/Replace, there is no way of finding the beginning of a ‘line’, unless that line is also the beginning of a paragraph or follows a manual line break. That’s because the beginning of any other line is affected by the layout parameters returned by
the attached printer’s driver — and that varies from one printer make/model to the next.That said, a Find, where Find = ^pA, will find the ‘A’ that starts a paragraph, but also finds the preceding paragraph break — you can’t Find only the ‘A’. The same applies to Find = ^lA, for an ‘A’ following a manual line break. Note, too, that Find
= ^pA won’t find an ‘A’ that starts a document or a new Section, or follows a manual page break. For all of the above, except for the ‘A’ that starts a document, you could use a single wildcard
Find, where Find = [^11-^13]A
Cheers
Paul Edstein
[MS MVP — Word]-
Marked as answer by
Thursday, March 28, 2013 9:59 AM
-
Marked as answer by
Indent the first line of a paragraph

To indent the first line of a paragraph, put your cursor at the beginning of the paragraph and press the tab key. When you press Enter to start the next paragraph, its first line will be indented.
Tip: If you want to change indentation for paragraphs that have already been written, use the tab-key method on the first paragraph, as described above. Then put your cursor at the beginning of the next paragraph. Press Backspace and then Enter. Repeat the process for subsequent paragraphs.
First-line indent by default
If you always want first-line indentation, modify the Normal style:
-
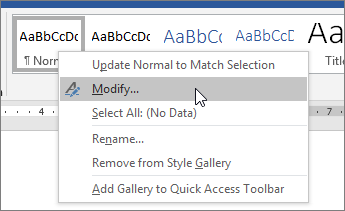
Put the cursor anywhere in the paragraph.
-
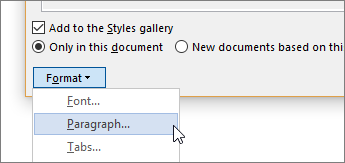
On the Home tab, right-click the Normal style, and choose Modify.

-
Select Format, and then choose Paragraph.
-
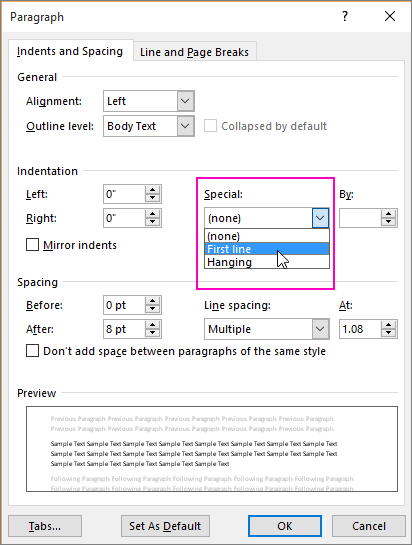
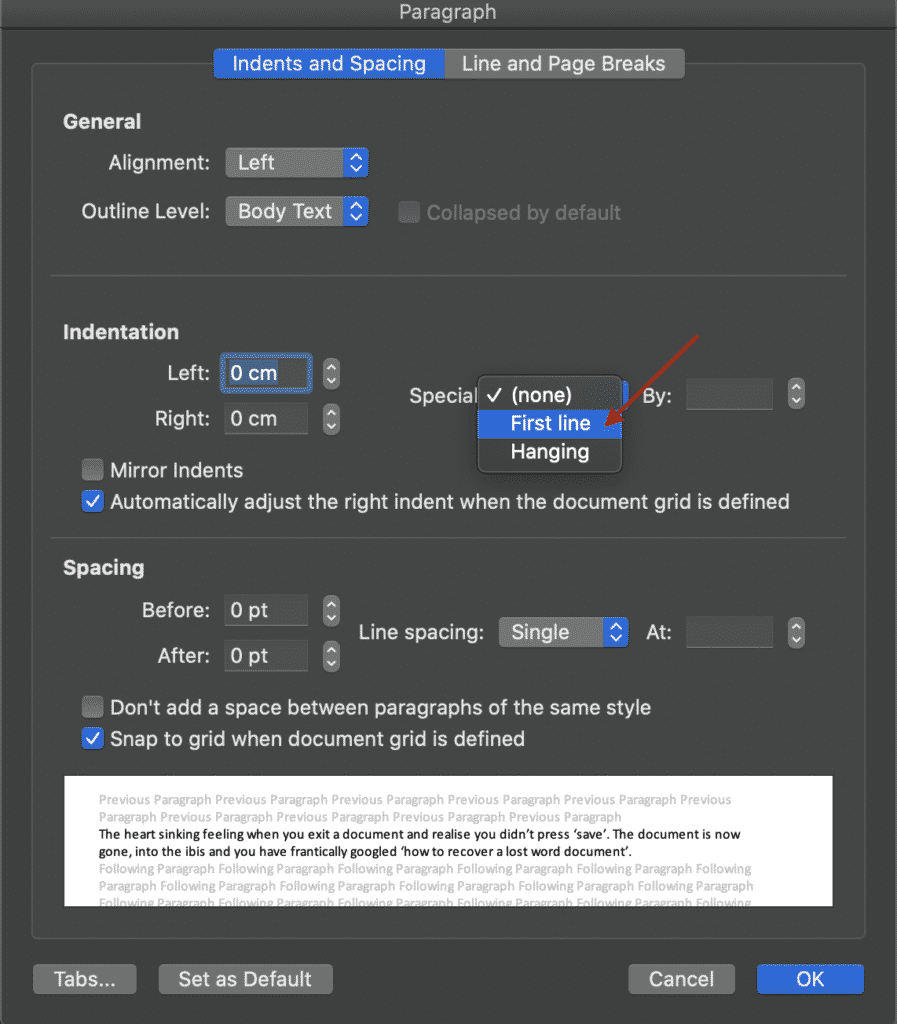
On the Indents and Spacing tab, under Indentation, select First line.
-
Select OK.
-
Select OK again.
Note: If you always want first-line indentation whenever you start a new document, choose the New documents based on this template option before you select OK.

Need more help?
Want more options?
Explore subscription benefits, browse training courses, learn how to secure your device, and more.
Communities help you ask and answer questions, give feedback, and hear from experts with rich knowledge.
An indentation or indent is an empty space at the beginning of a line of
written or printed text. There are several types of indents that can be used in the Word
document:
- The First Line Indent indicates the first line of the paragraph.
Instead of using the first-line indents, a
space between paragraphs
or even an empty line is often used. In modern word-processing, it is not
recommended to use the first-line indents and the
spaces between paragraphs in the same document.Notes:
- The first-line indent in the first paragraph of any text
is optional, since it is obvious where the paragraph begins.
However, the
Drop caps
may apply for such paragraphs. - Do not use spaces or tabs to indent the first line — when you
change the style of different paragraphs, it will be difficult
to reconcile them.

- The first-line indent in the first paragraph of any text
- Professionally printed material in English typically does not indent the first
paragraph, but indents those that follow. So, a negative indent or
hanging indent is used, as an indent that indents all text except the
first line:
The hanging indents used in Bibliographies, References pages, and
sometimes in scripts, dictionary entries, and footnotes. - Another common modern English style is the lack of indentation, and the addition
of vertical white space to create «block paragraphs»:
The block paragraphs commonly used for block quotations.


Customize the paragraph format
1. Click the paragraph you want to format or select
multiple paragraphs.
2. Do one of the following:
- On the Home tab, in the Paragraph group, click the dialog box
launcher:
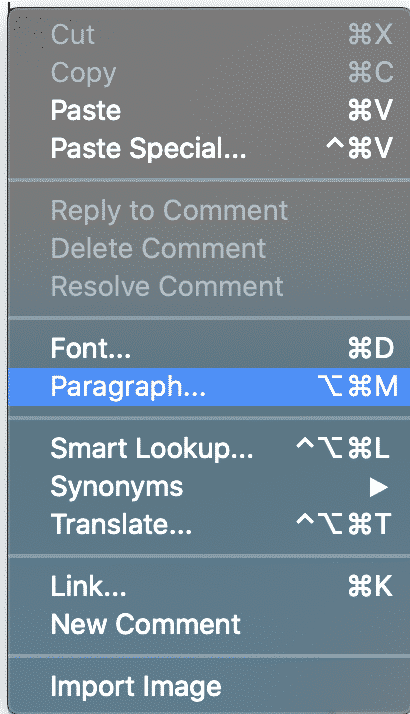
- Choose Paragraph… from the shortcut menu (right-click or press
Shift+F10), to display the Paragraph dialog box:


3. In the Paragraph dialog box, choose or
type the appropriate values for Left, Right or Special
(First line or Hanging) indents:

Use the ruler
To do so, click in the paragraph you want to format or select multiple paragraphs, and
then drag the First Line Indent marker left or right to the desired location.
Use shortcuts
You can press Ctrl+T to create a hanging indent that aligns body text with the
first tab marker. (By default, tabs are set every 0.5 inch.)
You can press Ctrl+Shift+T to «unhang» an indent, regardless of how the hanging
indent was created.
Press Ctrl+Shift+M to decrease a paragraph’s indent by one tab stop. By default,
tab stops are set every 0.5 inch.
Press Ctrl+M to increase a paragraph’s indent by one tab stop. By default, tab
stops are set every 0.5 inch.
You can instantly add a full line space before a paragraph by selecting the paragraph(s)
you want to format and pressing Ctrl+0 (zero). If you select multiple paragraphs,
pressing Ctrl+0 adds a blank line space before each paragraph in the selection.
See also this tip in French:
Comment créer un retrait négatif de première ligne.

This is a quick reference round-up how to and how not to covering how to stat a new line, how to start a new paragraph, how to start a new page and how to indent a paragraph in Word for Windows.
I have covered all of these in detail in various longer articles which I’ll link to as we go along.
Why all the fuss? Why can’t I do it my way?
If you are formatting a document to be used by someone else, edited and changed or, especially, printed, it’s vital that you use the standard ways to lay out your document to prevent it getting into a mess or someone else having to reformat it (which could be expensive if you’re paying them). In addition, certain methods, especially using Enter to start a new line, can make your document messy as soon as you enter extra text before that line break (see the relevant article for details and examples).
How to start a new line in Word
Don’t use the space bar to move the cursor along until it finally gets to the next line
Do use a soft line return or a hard paragraph return:
- Pressing the shift key and enter key at the same time at the end of your line will move the cursor to the next line without any paragraph breaks, spaces between the lines, etc. (this is very useful if you’re creating two-line captions)
- Pressing the enter key at the end of your line will move the cursor to the start of the new line (this will give you a space between the two lines if you have your paragraphs set up like that
How to start a new paragraph in Word
Don’t use the space bar to move the cursor to a new line, then create a new line of spaces
Do use a hard paragraph return: hit the Enter key on your keyboard
How to put a space between paragraphs in Word
Don’t use the Enter key to add a line of white space
Do use the Line Space icon in your Home tab or the Paragraph menu to add a space after each paragraph
How to indent a paragraph in Word
Really don’t use the space key to line up the paragraphs
Don’t use the Tab key to indent the paragraph
Do either highlight the whole text and set the rulers at the top of the page OR set the Normal style to have an indent at the start of a paragraph
How to start a new page in Word
Don’t use the Enter key to move the cursor down to the next page
Do use the Enter and Control keys at the same time to force a page break
This article has summarised how to start a new line, paragraph and page and indent a paragraph correctly in Word.
Related articles in this blog
Line space icon
Paragraph menu
Indenting paragraphs
Page breaks
Word VBA, Move Cursor to Start of Line
Using the code snippet below you can move the cursor to the start of the Line:
Selection.HomeKey Unit:=wdLine
Assume the cursor is somewhere in the middle of a line:

Result after using the code above:

See also:
- Word VBA, Move Cursor to Start of Document
- Word VBA, Move Cursor to End of Document
- Word VBA, Move Cursor to End of Line
- VBA Word, Select Text
- Word VBA Using Bookmarks to Move the Cursor
If you need assistance with your code, or you are looking for a VBA programmer to hire feel free to contact me. Also please visit my website www.software-solutions-online.com
Using keyboard shortcuts makes us to work very easy and fast..
In Microsoft Office word, there is an inbuilt macro to get the list of keyboard shorts.
Here is the procedure to run this macro.
For MS Word 2003 and earlier:-
Step 1:
Choose «Macro» from the Tools menu, then choose «Macros».
Step 2:
Select «Word commands» from the list in the Macros in box.
Step 3:
From the list in the Macro name box, choose «ListCommands»
Step 4:
Click «Run».
In the List Commands dialog box, click «Current» menu and keyboard settings.
The macro will generate a document in table form that you can print.

For MS Word 2007 and higher versions:
Step 1:
Go to developers tab, if developers tab not visible,
Click the Office button (File in Word 2010) => Click word options in the bottom corner => Click show developer tab in the ribbon.
Step2 :
Click Macros in Develper Tab, Type the Macro name «listcommands», now the run button will get enabled, click the run button.
In the List Commands dialog box, click «Current» menu and keyboard settings.
The macro will generate a document in table form that you can print.
Shortcuts:
|
Command Name |
Modifiers |
Key |
|---|---|---|
|
All Caps |
Ctrl+Shift+ |
A |
|
Annotation |
Alt+Ctrl+ |
M |
|
App Maximize |
Alt+ |
F10 |
|
App Restore |
Alt+ |
F5 |
|
Apply Heading1 |
Alt+Ctrl+ |
1 |
|
Apply Heading2 |
Alt+Ctrl+ |
2 |
|
Apply Heading3 |
Alt+Ctrl+ |
3 |
|
Apply List Bullet |
Ctrl+Shift+ |
L |
|
Auto Format |
Alt+Ctrl+ |
K |
|
Auto Text |
F3 |
|
|
Auto Text |
Alt+Ctrl+Shift+ |
V |
|
Bold |
Ctrl+ |
B |
|
Bold |
Ctrl+Shift+ |
B |
|
Bookmark |
Ctrl+Shift+ |
F5 |
|
Browse Next |
Ctrl+ |
Page Down |
|
Browse Prev |
Ctrl+ |
Page Up |
|
Browse Sel |
Alt+Ctrl+ |
Home |
|
Cancel |
Esc |
|
|
Center Para |
Ctrl+ |
E |
|
Change Case |
Shift+ |
F3 |
|
Char Left |
Left |
|
|
Char Left Extend |
Shift+ |
Left |
|
Char Right |
Right |
|
|
Char Right Extend |
Shift+ |
Right |
|
Clear |
Del |
|
|
Close or Exit |
Alt+ |
F4 |
|
Close Pane |
Alt+Shift+ |
C |
|
Column Break |
Ctrl+Shift+ |
Return |
|
Column Select |
Ctrl+Shift+ |
F8 |
|
Copy |
Ctrl+ |
C |
|
Copy |
Ctrl+ |
Insert |
|
Copy Format |
Ctrl+Shift+ |
C |
|
Copy Text |
Shift+ |
F2 |
|
Create Auto Text |
Alt+ |
F3 |
|
Customize Add Menu Shortcut |
Alt+Ctrl+ |
= |
|
Customize Keyboard Shortcut |
Alt+Ctrl+ |
Num + |
|
Customize Remove Menu Shortcut |
Alt+Ctrl+ |
— |
|
Cut |
Ctrl+ |
X |
|
Cut |
Shift+ |
Del |
|
Date Field |
Alt+Shift+ |
D |
|
Delete Back Word |
Ctrl+ |
Backspace |
|
Delete Word |
Ctrl+ |
Del |
|
Distribute Para |
Ctrl+Shift+ |
J |
|
Do Field Click |
Alt+Shift+ |
F9 |
|
Doc Close |
Ctrl+ |
W |
|
Doc Close |
Ctrl+ |
F4 |
|
Doc Maximize |
Ctrl+ |
F10 |
|
Doc Move |
Ctrl+ |
F7 |
|
Doc Restore |
Ctrl+ |
F5 |
|
Doc Size |
Ctrl+ |
F8 |
|
Doc Split |
Alt+Ctrl+ |
S |
|
Double Underline |
Ctrl+Shift+ |
D |
|
End of Column |
Alt+ |
Page Down |
|
End of Column |
Alt+Shift+ |
Page Down |
|
End of Doc Extend |
Ctrl+Shift+ |
End |
|
End of Document |
Ctrl+ |
End |
|
End of Line |
End |
|
|
End of Line Extend |
Shift+ |
End |
|
End of Row |
Alt+ |
End |
|
End of Row |
Alt+Shift+ |
End |
|
End of Window |
Alt+Ctrl+ |
Page Down |
|
End of Window Extend |
Alt+Ctrl+Shift+ |
Page Down |
|
Endnote Now |
Alt+Ctrl+ |
D |
|
Equation Toggle |
Alt+ |
= |
|
Extend Selection |
F8 |
|
|
Field Chars |
Ctrl+ |
F9 |
|
Field Codes |
Alt+ |
F9 |
|
Find |
Ctrl+ |
F |
|
Font |
Ctrl+ |
D |
|
Font |
Ctrl+Shift+ |
F |
|
Font Size Select |
Ctrl+Shift+ |
P |
|
Footnote Now |
Alt+Ctrl+ |
F |
|
Formatting Pane |
Alt+Ctrl+Shift+ |
S |
|
Formatting Properties |
Shift+ |
F1 |
|
Go Back |
Shift+ |
F5 |
|
Go Back |
Alt+Ctrl+ |
Z |
|
Go To |
Ctrl+ |
G |
|
Go To |
F5 |
|
|
Grow Font |
Ctrl+Shift+ |
. |
|
Grow Font One Point |
Ctrl+ |
] |
|
Hanging Indent |
Ctrl+ |
T |
|
Header Footer Link |
Alt+Shift+ |
R |
|
Help |
F1 |
|
|
HHC |
Alt+Ctrl+ |
F7 |
|
Hidden |
Ctrl+Shift+ |
H |
|
Highlight |
Alt+Ctrl+ |
H |
|
Hyperlink |
Ctrl+ |
K |
|
Indent |
Ctrl+ |
M |
|
Italic |
Ctrl+ |
I |
|
Italic |
Ctrl+Shift+ |
I |
|
Justify Para |
Ctrl+ |
J |
|
Left Para |
Ctrl+ |
L |
|
Line Down |
Down |
|
|
Line Down Extend |
Shift+ |
Down |
|
Line Up |
Up |
|
|
Line Up Extend |
Shift+ |
Up |
|
List Num Field |
Alt+Ctrl+ |
L |
|
Lock Fields |
Ctrl+ |
3 |
|
Lock Fields |
Ctrl+ |
F11 |
|
Macro |
Alt+ |
F8 |
|
Mail Merge Check |
Alt+Shift+ |
K |
|
Mail Merge Edit Data Source |
Alt+Shift+ |
E |
|
Mail Merge to Doc |
Alt+Shift+ |
N |
|
Mail Merge to Printer |
Alt+Shift+ |
M |
|
Mark Citation |
Alt+Shift+ |
I |
|
Mark Index Entry |
Alt+Shift+ |
X |
|
Mark Table of Contents Entry |
Alt+Shift+ |
O |
|
Merge Field |
Alt+Shift+ |
F |
|
Microsoft System Info |
Alt+Ctrl+ |
F1 |
|
Move Text |
F2 |
|
|
New Default |
Ctrl+ |
N |
|
Next Field |
F11 |
|
|
Next Field |
Alt+ |
F1 |
|
Next Misspelling |
Alt+ |
F7 |
|
Next Object |
Alt+ |
Down |
|
Next Pane |
F6 |
|
|
Next Window |
Ctrl+ |
F6 |
|
Next Window |
Alt+ |
F6 |
|
Normal |
Alt+Ctrl+ |
N |
|
Normal Style |
Ctrl+Shift+ |
N |
|
Normal Style |
Alt+Shift+ |
Clear (Num 5) |
|
Open |
Ctrl+ |
O |
|
Open |
Ctrl+ |
F12 |
|
Open |
Alt+Ctrl+ |
F2 |
|
Open or Close Up Para |
Ctrl+ |
0 |
|
Outline |
Alt+Ctrl+ |
O |
|
Outline Collapse |
Alt+Shift+ |
— |
|
Outline Collapse |
Alt+Shift+ |
Num — |
|
Outline Demote |
Alt+Shift+ |
Right |
|
Outline Expand |
Alt+Shift+ |
= |
|
Outline Expand |
Alt+Shift+ |
Num + |
|
Outline Move Down |
Alt+Shift+ |
Down |
|
Outline Move Up |
Alt+Shift+ |
Up |
|
Outline Promote |
Alt+Shift+ |
Left |
|
Outline Show First Line |
Alt+Shift+ |
L |
|
Page |
Alt+Ctrl+ |
P |
|
Page Break |
Ctrl+ |
Return |
|
Page Down |
Page Down |
|
|
Page Down Extend |
Shift+ |
Page Down |
|
Page Field |
Alt+Shift+ |
P |
|
Page Up |
Page Up |
|
|
Page Up Extend |
Shift+ |
Page Up |
|
Para Down |
Ctrl+ |
Down |
|
Para Down Extend |
Ctrl+Shift+ |
Down |
|
Para Up |
Ctrl+ |
Up |
|
Para Up Extend |
Ctrl+Shift+ |
Up |
|
Paste |
Ctrl+ |
V |
|
Paste |
Shift+ |
Insert |
|
Paste Format |
Ctrl+Shift+ |
V |
|
Paste Special |
Alt+Ctrl+ |
V |
|
Prev Field |
Shift+ |
F11 |
|
Prev Field |
Alt+Shift+ |
F1 |
|
Prev Object |
Alt+ |
Up |
|
Prev Pane |
Shift+ |
F6 |
|
Prev Window |
Ctrl+Shift+ |
F6 |
|
Prev Window |
Alt+Shift+ |
F6 |
|
|
Ctrl+ |
P |
|
|
Ctrl+Shift+ |
F12 |
|
Print Preview |
Ctrl+ |
F2 |
|
Print Preview |
Alt+Ctrl+ |
I |
|
Proofing |
F7 |
|
|
Redo |
Alt+Shift+ |
Backspace |
|
Redo or Repeat |
Ctrl+ |
Y |
|
Redo or Repeat |
F4 |
|
|
Redo or Repeat |
Alt+ |
Return |
|
Repeat Find |
Shift+ |
F4 |
|
Repeat Find |
Alt+Ctrl+ |
Y |
|
Replace |
Ctrl+ |
H |
|
Research Lookup |
Ctrl+Shift+ |
O |
|
Reset Char |
Ctrl+ |
Space |
|
Reset Char |
Ctrl+Shift+ |
Z |
|
Reset Para |
Ctrl+ |
Q |
|
Revision Marks Toggle |
Ctrl+Shift+ |
E |
|
Right Para |
Ctrl+ |
R |
|
Save |
Ctrl+ |
S |
|
Save |
Shift+ |
F12 |
|
Save |
Alt+Shift+ |
F2 |
|
Save As |
F12 |
|
|
Select All |
Ctrl+ |
A |
|
Select All |
Ctrl+ |
Clear (Num 5) |
|
Select All |
Ctrl+ |
Num 5 |
|
Select Table |
Alt+ |
Clear (Num 5) |
|
Show All |
Ctrl+Shift+ |
8 |
|
Show All Headings |
Alt+Shift+ |
A |
|
Show All Headings |
Alt+Shift+ |
A |
|
Show Heading1 |
Alt+Shift+ |
1 |
|
Show Heading2 |
Alt+Shift+ |
2 |
|
Show Heading3 |
Alt+Shift+ |
3 |
|
Show Heading4 |
Alt+Shift+ |
4 |
|
Show Heading5 |
Alt+Shift+ |
5 |
|
Show Heading6 |
Alt+Shift+ |
6 |
|
Show Heading7 |
Alt+Shift+ |
7 |
|
Show Heading8 |
Alt+Shift+ |
8 |
|
Show Heading9 |
Alt+Shift+ |
9 |
|
Shrink Font |
Ctrl+Shift+ |
, |
|
Shrink Font One Point |
Ctrl+ |
[ |
|
Shrink Selection |
Shift+ |
F8 |
|
Small Caps |
Ctrl+Shift+ |
K |
|
Space Para1 |
Ctrl+ |
1 |
|
Space Para15 |
Ctrl+ |
5 |
|
Space Para2 |
Ctrl+ |
2 |
|
Spike |
Ctrl+Shift+ |
F3 |
|
Spike |
Ctrl+ |
F3 |
|
Start of Column |
Alt+ |
Page Up |
|
Start of Column |
Alt+Shift+ |
Page Up |
|
Start of Doc Extend |
Ctrl+Shift+ |
Home |
|
Start of Document |
Ctrl+ |
Home |
|
Start of Line |
Home |
|
|
Start of Line Extend |
Shift+ |
Home |
|
Start of Row |
Alt+ |
Home |
|
Start of Row |
Alt+Shift+ |
Home |
|
Start of Window |
Alt+Ctrl+ |
Page Up |
|
Start of Window Extend |
Alt+Ctrl+Shift+ |
Page Up |
|
Style Apply Pane |
Ctrl+Shift+ |
S |
|
Style Separator |
Alt+Ctrl+ |
Return |
|
Subscript |
Ctrl+ |
= |
|
Superscript |
Ctrl+Shift+ |
= |
|
Symbol Font |
Ctrl+Shift+ |
Q |
|
Thesaurus RR |
Shift+ |
F7 |
|
Time Field |
Alt+Shift+ |
T |
|
Toggle Character Code |
Alt+ |
X |
|
Toggle Field Display |
Shift+ |
F9 |
|
Toggle Master Subdocs |
Ctrl+ |
|
|
Toggle Ribbon |
Ctrl+ |
F1 |
|
Toggle XMLTag View |
Ctrl+Shift+ |
X |
|
Translate Pane |
Alt+Shift+ |
F7 |
|
Un Hang |
Ctrl+Shift+ |
T |
|
Un Indent |
Ctrl+Shift+ |
M |
|
Underline |
Ctrl+ |
U |
|
Underline |
Ctrl+Shift+ |
U |
|
Undo |
Ctrl+ |
Z |
|
Undo |
Alt+ |
Backspace |
|
Unlink Fields |
Ctrl+ |
6 |
|
Unlink Fields |
Ctrl+Shift+ |
F9 |
|
Unlock Fields |
Ctrl+ |
4 |
|
Unlock Fields |
Ctrl+Shift+ |
F11 |
|
Update Auto Format |
Alt+Ctrl+ |
U |
|
Update Fields |
F9 |
|
|
Update Fields |
Alt+Shift+ |
U |
|
Update Source |
Ctrl+Shift+ |
F7 |
|
VBCode |
Alt+ |
F11 |
|
Web Go Back |
Alt+ |
Left |
|
Web Go Forward |
Alt+ |
Right |
|
Word Count List |
Ctrl+Shift+ |
G |
|
Word Count Recount |
Ctrl+Shift+ |
R |
|
Word Left |
Ctrl+ |
Left |
|
Word Left Extend |
Ctrl+Shift+ |
Left |
|
Word Right |
Ctrl+ |
Right |
|
Word Right Extend |
Ctrl+Shift+ |
Right |
|
Word Underline |
Ctrl+Shift+ |
W |
![]()
Download Article
![]()
Download Article
Are you sick of pressing the Tab key for each new paragraph in your document? Word allows you to automatically indent your new paragraphs with just a few simple menu changes. Follow this guide to learn how for Word 2007, 2010, and 2013.
-
1
Open the Paragraph dialog box. On the lower right corner inside “Paragraph” group, click the small arrow. You can open this through the “Paragraph” group in the “Home” tab or the “Page Layout” tab.
- You may do this process before you start typing your document or, if you have already typed a document, just highlight the paragraphs you want indented.
-
2
Find the “Indentations” section. This can be found in the “Indents and Spacing” tab.
Advertisement
-
3
Click the drop down menu under “Special”. Select “First Line” to automatically indent the first line of each new paragraph.
-
4
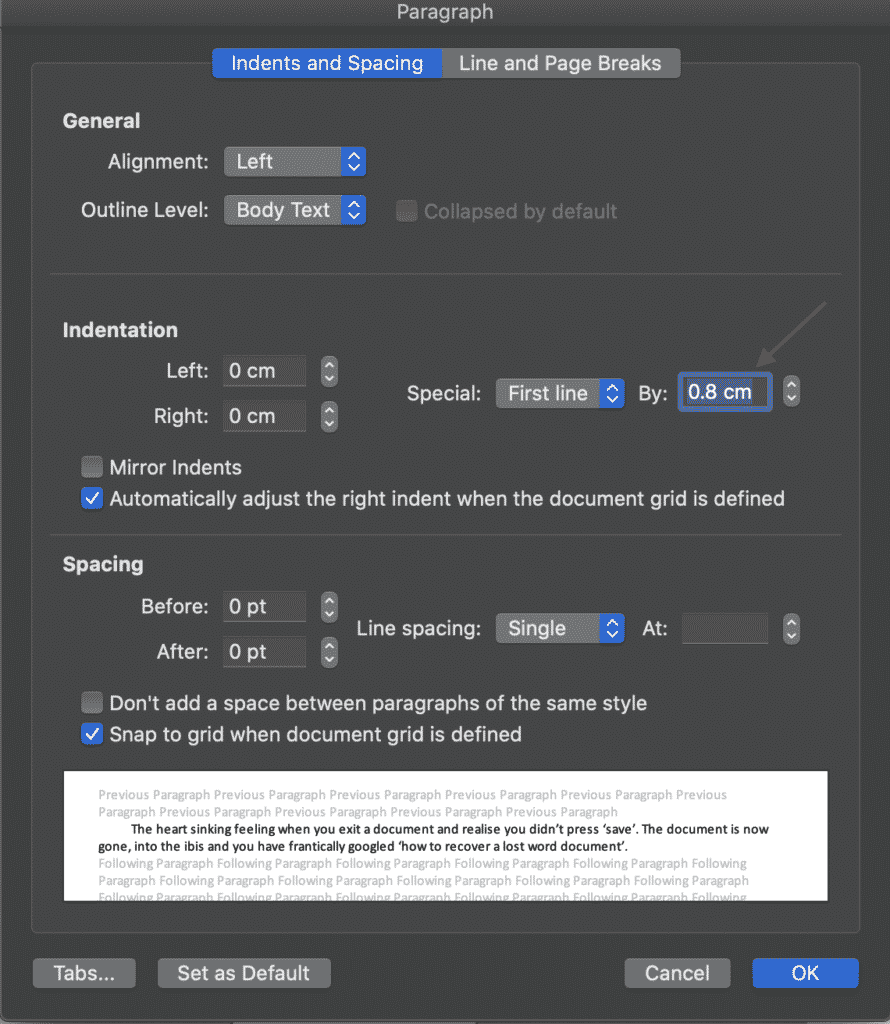
Enter the indent size. This is the amount that each line will be indented. The most commonly used size is 0.5” or 1/2 of an inch. You can see a preview of the changes in the Preview section at the bottom of the dialog box.
-
5
Click OK to save your changes and apply them to the document. Click the “Set as default” button if you want to set the changes to automatically take effect for new documents.


Advertisement
-
1
Click on the «Page Layout» tab, at the top of the Ribbon in Microsoft Word. In the image on the right, it is encircled in red.
-
2
Go to the section that is headed «Indents» and «Spacing». Click on the little arrow in the bottom right-hand corner. In the image on the right it is encircled in red. This arrow opens up the Paragraph Dialog Box.
-
3
Look for the heading «Indentations» in the Paragraph Dialog Box. In this section, there is a drop-down box with the heading «Special:». Click on the drop-down box and select the «First line» option.
-
4
Choose the amount you want the lines indented by. You can change this in the «By:» box. Half an inch (0.5”) is the standard indent size.
-
5
Click on «OK», and continue typing. Now, Word will automatically indent the first line every time you press Enter.


Advertisement
Ask a Question
200 characters left
Include your email address to get a message when this question is answered.
Submit
Advertisement
-
If you want to prevent a line from being indented when this setting is on, hold the Shift key down while pressing Enter.
Thanks for submitting a tip for review!
Advertisement
About This Article
Thanks to all authors for creating a page that has been read 347,430 times.
Is this article up to date?
wikiHow Tech Help:
Tech troubles got you down? We’ve got the tips you need
Subscribe
You’re all set!
What is a first-line indent?
The first-line indent is as it sounds; the first line of a paragraph is slightly indented in comparison to the remainder of the text in the paragraph.
Adding the first-line indent makes it easy for your reader to identify where a new paragraph or topic starts. They are not ‘required’ but are commonly used in Microsoft Word Documents to provide readers with a user-friendly layout.
There are two ways to insert the first-line indent, manually, by pressing ‘Tab’. Using the Tab button to insert an indent will move your text to the right by 1/2 and inch.
If you are looking to customise or change the size of your first-line indent, continue reading the steps below.
Adding or Changing the first-line indent in Word
- Open Word
- Place your cursor where you would like the insert or edit the first-line indent
- Right Click
- Click Paragraph
- Select First Line under ‘Special’
- Customise the indentation you would like on the first line
- Press OK
You have now successfully inserted and customised the first line indent in your Microsoft Word Document.
Need a simple solution to your collaboration problems?
Collaborating together in a Microsoft Word document is something most of us will do during our working careers. Some more than others, some may even collaborate daily, which is why collaborating with ease is so important.
When it’s your turn to review and edit a shared Word Document you usually received an email in your inbox ‘for your review’, you open the email, click the attachment and a Word Document pops up.
You start reading the text, making some edits, add a few comments and then press save.
Where do you save the document? Does this live deep in your company shared drive somewhere, under Client>2020>reports>Q3Report>Draft>Final? Your guess is as good as anyone else’s, so you save it here hoping that’s the right spot and move on.

Without realising it you have accidentally saved your find in the wrong spot, making it near impossible to source later. You also forgot to turn on tracked changes when you made your edits (don’t worry, you’re not alone, most of us do this monthly). With no tracked changes, there is no way of knowing what edits you made, to then re-do them or highlight them for your manager. So you are forced to start all over again.
It’s painful and time-consuming and happens to the majority of people collaborating in Word.
Luckily, there are some new purpose built tools on the market that were built with seamless collaboration in mind. Tools such as Simul Docs.
Simul Docs was built to ensure you never forget to turn on tracked changes again, in fact, Simul will track your changes automatically. Open a document, start making changes and Simul will begin tracking them. It sounds simple, and it is, but it is something that makes a huge difference when collaborating in Word.

Not sure where to save your document?
Simul has you covered.
Simul will keep track of every, single version your team creates. If the document is opened and a change made, Simul will automatically save this as a new version. Because, if there are new edits or changes you probably don’t want to miss them.
Automatically saving new versions is one thing, but Simul thought they would take it one step further, just to make sure you never have to stress about where your files are again. Simul manages version control on your behalf. When a new version is created, Simul will save it and give it a new version number such as 0.0.2 or 0.0.3, depending on how many versions of the document currently exist.

As your team continues collaborating, Simul will continue saving and managing your version control. Keeping track of every change and every file, while storing them neatly in a Versions List for you to review at any time.
If you want to pull a document out of Simul and save it or forward it on in an email, no worries, you can do that directly from Simul as well.
Simul allows you to access your documents from anywhere, anytime. without the need for shared drive or server access. If you have an internet connection (or not, because Simul is happy for you to work offline too), you can access all of your files.

Is there honestly anything Simul Docs can’t do?
We haven’t found it yet.
I have a document that has some paragraphs formatted with a seemingly unchangeable first-line indent. In paragraph format, the left indent is zero, and first line indent is «none». When turning on «show paragraph marks», a tab character appears in the indent area. However it is impossible to delete the tab. It acts like it is the newline, and merges the text with the previous line if backspace used at the start of the line.
Setting the format to Normal does nothing. Clear Formatting does nothing.
This problem occurs on the line after a Heading 1 style. The properties of Heading 1 have «Normal» for style for following paragraph.
Inserting text elsewhere in the document does not exhibit this problem.
What is the cause of this «phantom tab» and how do I eliminate it?
![]()
Hennes
64.5k7 gold badges111 silver badges165 bronze badges
asked Feb 25, 2011 at 21:41
![]()
1
Do you have any tracked changes? I have found this behavior occurs sometimes where a tracked format change removes a tab character associated with line numbering. It does not show the tab in red with strikethrough, but it really has been deleted due to the format change. Once the format change is accepted, the phantom tab disappears.
answered Aug 20, 2013 at 21:09
![]()
I am working in Word 2013.
Highlight the paragraph with the problem.
Open Paragraph Settings.
Click on TAB button.
Clear any negative Tab Stop Position tabs.
Unfortunately, you have to do this each time this setting is set in your document. In other words, if some paragraphs have a negative tab set and some don’t, the you have to go paragraph by paragraph to clear it. If several paragraphs in a row have a negative tab set, then they can be cleared together.
answered Mar 18, 2016 at 17:41
![]()
I had a similar thing (Word 2013) with a document I got from someone else. My suspicion is that it had to do with margins. The document had ‘narrow margins’ (menu > Page Layout > Margins > narrow) but I think it had a line copied into it from another document with ‘normal margins’ and thus copied that formatting.
I could see there were different text sections in the document (that 1 odd line was a separate section). I made that visible via File > Options > Advanced > Show document content -> ticked the option ‘Show text boundaries’.
The main thing was I could fix it by setting the Page layout to ‘normal margins’, so everything got aligned. After that just re-setting it back to ‘narrow’ would not work — I first had to save the document. After re-opening it I could set it to ‘narrow margins’ and the whole text was properly aligned. So it looks like copy/paste can bring along some funny settings from the source document. It is often safer to paste as unformatted text and copy the formatting from the surrounding text.
It’s a bit of a late answer, but I hope it helps you and perhaps others, as I have seen more mysterious indent questions / posts on the net.
Jacob
answered May 26, 2016 at 3:41
![]()
JacobJacob
111 bronze badge
Can you copy the format unit and past it into a «find» box? If so, you could then «replace» the phantom tab with nothing or a space? Might be worth a try.
answered Feb 25, 2011 at 21:44
![]()
outsideblastsoutsideblasts
6,4551 gold badge17 silver badges19 bronze badges
4
First try turning on show formatting marks in Microsoft Word. If you cannot see any character in that paragraph then almost certainly the problem is happening because you have first line indent set under paragraph settings.
Right click on the paragraph -> Paragraph Properties -> Indent -> Reset numbers there to 0.
answered Jul 6, 2012 at 3:58
![]()
AdamAdam
7,3032 gold badges25 silver badges41 bronze badges
You can try to just move the sentence downwards until you get to a point where you dont have to typ anything. Like on a blank page or something. It worked for me.
answered Apr 6, 2015 at 11:09
![]()
I had a similar problem on the first line of my word document. The thing was that I had a text box on my headers and it was pushing my first line text to the side, as if there as a «invisible tab» there. I have moved the text box and it was solved. Hope it can help someone!
answered Sep 14, 2017 at 18:56
![]()